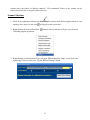
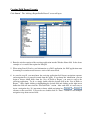
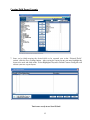
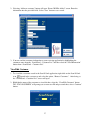
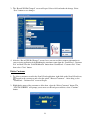
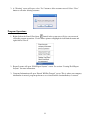
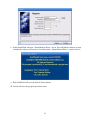
1
Shadow Custom Software
Scan-N-Send
USERS Guide
Revision Date: 4/1/2008
Table of Content
About Scan-N-Send
Page 3
Software Application Installation
Page 4 - 7
Scanner Driver Installation
Page 7 - 11
Scanner Calibration
Page 12 - 13
Creating Card Export Layouts
Page 13 - 15
Using Scan-N-Send
Page 16 - 19
Program Operations
Page 19 - 21
2
About Scan-N-Send:
Scan-N-Send is a windows application which will offer its users many benefits. It is application
independent and can therefore be used with virtually any Windows or DOS program. Once installed
and running, Scan-N-Send simply runs in the background making it transparent to the operator.
Manual entry of personal data is no longer needed, simply Scan-N-Send.
Originally designed for hotel and motel registration, Scan-N-Send has evolved and is widely used
across multiple markets as an effective and efficient data capture tool. Scan-N-Send can quickly
decode demographic data stored on any state issued Driver's License or Government ID.
Depending on end user requirements and the type of scanning hardware, Scan-N-Send can quickly
extract data from a magnetic stripe, bar code (PDF-417) or even the entire face of the license, front
or back. Scanning the face of the license requires one of two OCR scanners.
3
Software Application Installation:
Important: Please do not connect the card scanner to computer at this time. Follow the following
installation procedures first.
1. Insert the Scan-N-Send CD.
2. When prompted, click the Next > button on the next three screens.
Screen #2
Screen #1
Screen #3
4
Software Application Installation:
3. Select the type of device being installed (i.e. ScanShell-800, SnapShell, MagShell-900), then
click the Next > button on the next two screens.
Screen #2
Screen #1
4. Click on the Finish > button on the next screen.
Screen #3
5
Software Application Installation:
5. Click the Next > button on the next two screens.
Screen #1
Screen #2
6. Select the Property Management Software you will be using with ScanNSend and click the
Next > button.
Screen #3
6
7. Click the Next > button on the next screen and the Finish > button on the last screen.
Screen #4
Screen #5
This Completes the Scan-N-Send Application Installation. Please remove the CD from the PC.
Scanner Driver Installation:
Plug the scanner USB cable into one of the available computers USB port. If possible, use a USB
port located in the back of the computer. After connecting the scanner USB cable to the computer,
connect the other end of the USB cable to the scanner. Once you’ve connected the USB cable to the
scanner, the computer will find the scanner and start to load the diver.
ScanShell 800
1. Select “No, Not this time”, then click the Next > button on the next screen.
7
2. Select “Install the software automatically”, then click the Next > button on the next screen.
3. Click the Continue Anyway button on the next screen.
4. Click the Finish button on the next screen.
8
This Completes the ScanShell 800 Scanner Driver Installation.
IMPORTANT: It is very important that you calibrate your ScanShell 800 scanner before
using it for the first time. Please follow the Scanner Calibration instructions.
SnapShell
1. Select “No, Not this time”, then click the Next > button on the next screen.
2. Select “Install the software automatically”, then click the Next > button on the next screen.
9
3. Click the Continue Anyway button on the next screen.
4. Click the Finish button on the next screen.
5. Click the Yes button on the next screen. The PC will shut down and restart.
This Completes the SnapShell Scanner Driver Installation.
Always make sure that the scanner is plugged into the same USB Port. If the scanner is unplugged
from the USB Port it was originally installed on and plugged into another USB Port, reinstalling the
scanner driver will be required.
After successfully installing the software and driver make sure to place scanner in a safe and
convenient working location on your desk or counter. You may also affix the scanner to the desk or
10
counter with your choice of adhesive material. We recommend Velcro so the scanner can be
removed and stored in a safe place when not in use.
Scanner Selection:
1. Click on the application desktop icon ScanNSend to start the Scan-N-Send application if it is not
running. Once started, a new icon
will appear in the system tray.
2. Right click on the Scan-N-Send icon,
selectable program operations.
, located in the system tray will give you a menu of
3. Right clicking on Setup Scanner Type will open “IDScan Interface Setup” screen. Select the
scanner type you have and select “Update IDScan Settings” button.
11
Scanner Calibration:
1. Click on the application desktop icon ScanNSend to start the Scan-N-Send application if it is not
running.
2. Select the icon
from the “Scan-N-Send Scan Engine” window.
3. Select the tab “Image” from the “Scanner Configuration” window. Then select “Calibrate”
button from “Scanner Configuration” window.
12
4. Find the calibration card included with your scanner and insert it into the scanner with the dark
boxes facing down, then click “Calibrate” button to proceed with the calibration. Once the
calibration is completed, select “Done” button and close “Scanner Configuration” window , you
are now ready to use the scanner.
Creating Field Export Layouts:
Scan-N-Send works with virtually any application that runs on a Microsoft Windows platform. To
utilize Scan-N-Send follow these steps to create a card layout for exporting.
1. Load the application that will receive information from Scan-N-Send. Write down the receiving
applications window caption. It is important that you write it exactly as it appears in the caption
bar. If you are using Notepad as the receiving application, the windows caption for Notepad will
look like this; Untitled – Notepad.
2. Analyze and understand the receiving application field layout. It is also important to know the
navigation sequence of the layout as well as, which key is used to navigate through the layout.
Most windows applications use the “Tab” key while most DOS applications use the “Enter”
key.
, located in the system tray and select the option,
3. Next right click on the Scan-N-Send icon,
“Export Layouts”. After doing so, the “Field Export Layouts” screen will open.
13
Creating Field Export Layouts:
Click “Insert”. The “Adding a Export Profile Record” screen will open.
4. Enter the window caption of the receiving application into the Window Name field. In the above
example we’ve entered the caption for Notepad.
5. When using Scan-N-Send to send information to a DOS application, the DOS application must
be running in a window mode however, not in a full screen mode.
6. As noted in step #2, you must know the receiving application field layout, navigation sequence
and navigation key to proceed forward from this point. If you know this information, you can
begin to choose which fields from the “List of Fields to Export” you want to send to the
receiving application. To do so, simply double click the desired field in the “List of Fields to
Export”. After double clicking or highlighting the desired field and clicking on the right arrow
button the field will move into the “Selected Fields” section. After each field, it is necessary to
insert a navigation key. It’s important to know which navigation key,
or
,
advances to the next field. You can also use double click on “Times” column to send multiple
navigation steps between two fields.
14
Creating Field Export Layouts:
7. Once you’ve finish moving the desired fields to be exported over to the “Selected Fields”
section, click the Save Settings button. After saving the export layout you must highlight the
layout to be used and click on the “Select Highlighted Layout as Default” button. Doing this will
activate your new export layout.
You’re now ready to use Scan-N-Send.
15
Using Scan-N-Send:
1. Make sure the receiving application is started and ready to receive data from Scan-N-Send. Also
make sure that the cursor is positioned in the first data field of the receiving application.
2. Insert the driver’s license or ID into the scanner. Do not force the card into the ScanShell 800
scanner, once the card is inserted, the scanner will detect the card and will automatically begin to
pull it into the scanner.
3. Once the scanning process is completed, a scan preview window will open. At this time any of
the fields can be edited. Selecting Send and Save, the “Selected Fields” from the export layout
will be sent to the receiving application. The data from these fields will be displayed in the
receiving application window in their respective fields within a few seconds. You can select
Discard All if you need to rescan the item.
Manual Entry
1. To manually enter data when a license or ID is not available to scan, right click on the Scan-NSend icon,
, located in the system tray and select the option, “Browse Customers”. After
doing so, the “ScanNSend – Customer List” screen will open.
16
2. Selecting “Add new customer” button will open “Record Will Be Added” screen. Enter the
information into the provided fields. Select “Save” button to save record.
3. You can send the customers information to your receiving application by highlighting the
customers name from the “ScanNSend – Customer List” and then select the “Send Information”
button from “ScanNSend – Customer List”.
View/Edit Customer
1. To view/edit a customer record in the Scan N Send application, right click on the Scan-N-Send
icon, , located in the system tray and select the option, “Browse Customers”. After doing so,
the “ScanNSend – Customer List” screen will open.
2. Highlight the name of the customer to view/edit then, select the “View/Edit Customer” button.
The “LOG ON SCREEN” will prompt you to enter user ID and password then, select “Continue”
button.
17
3. The “Record Will Be Changed” screen will open. Select a field and make the change. Select
“Save” button to save changes.
4. After the “Record Will Be Changed” screen closes you can send the customers information to
your receiving application by highlighting the customers name from the “ScanNSend – Customer
List” and then select the “Send Information” button from “ScanNSend – Customer List”. If not
then select “Close” button.
Delete Customer
1. To delete a customer record in the Scan N Send application, right click on the Scan-N-Send icon,
, located in the system tray and select the option, “Browse Customers”. After doing so, the
“ScanNSend – Customer List” screen will open.
2. Highlight the name of the customer to delete then, select the “Delete Customer” button. The
“LOG ON SCREEN” will prompt you to enter user ID and password then, select “Continue”
button.
18
3. A “Warning” screen will open, select “Yes” button to delete customer record. Select “Close”
button to exit after deleting customer.
Program Operations:
1. Right click on the Scan-N-Send icon, , located in the system tray will give you a menu of
selectable program operations. Use the mouse pointer to highlight an item from the menu and
right click to select it.
2. Export Layouts will open “Field Export Layouts” screen. See section “Creating Field Export
Layouts” for more information.
3. Company Information will open “Record Will Be Changed” screen. This is where your company
information is entered, program preferences are selected and file location/hotkeys is entered.
19
4. Browse Customers will open “ScanNSend – Customer List” screen. See section Using Scan-NSend.
5. Setup Scanner Type will open “IDScan Interface Setup” screen. Select the scanner type you have
and select “Update IDScan Settings” button. Always recalibrate scanner after doing this.
6. Restart Scan Engine will restart scanner interface.
7. Register ScanNSend will open “Register” screen. Enter registration information in the available
locations then select “Register” button to complete registration. Selecting the “Continue” button
will close the window and not save any changes.
20
8. About ScanNSend will open “About Shadow Writer” screen. You will find the software version
and who the software is licensed to. Left click on the “About Shadow Writer” screen to close it.
9. Exit ScanNSend will close the Scan-N-Send software.
10. Cancel will close the program operations menu.
21