1
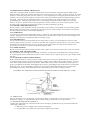
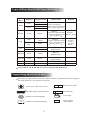
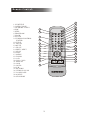
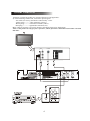
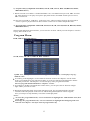
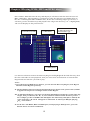
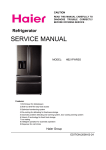
USER MANUAL
DVD20EBL
Compact DVD Player with
Progressive Scan
Kodak
WARNING: TO REDUCE THE RISK OF FIRE OR ELECTRIC SHOCK, DO NOT EXPOSE THIS
APPLIANCE TO RAIN OR MOISTURE.
CAUTION
RISK OF ELECTRIC SHOCK
DO NOT OPEN
CAUTION: TO REDUCE THE RISK OF ELECTRIC
SHOCK, DO NOT REMOVE COVER (OR BACK).
NO USER SERVICEABLE PARTS INSIDE. REFER
SERVICING TO QUALIFIED SERVICE PERSONNEL
THIS SYMBOL INDICATES THAT
DANGEROUS VOLTAGE CONSTITUTINGA
RISK OF ELECTRIC SHOCK IS PRESENT
WITHIN THIS UNIT.
THIS SYMBOL INDICATES THAT THERE ARE
IMPORTANT OPERATING AND
MAINTENANCE INSTRUCTIONS IN THE
MAINTENANCE INSTRUCTIONS IN THE
LITERATURE ACCOMPANYING THE
APPLIANCE.
The important note is located on the rear of the cabinet.
IMPORTANT SAFEGUARDS
1. READ INSTRUCTIONS
All the safety and operating instructions should be read before the unit is operated.
2. RETAIN INSTRUCTIONS
The safety and operating instructions should be retained for future reference.
3. HEED WARNINGS
All warnings on the unit and in the operating instructions should be adhered to.
4.FOLLOW INSTRUCTIONS
All operating and use instructions should be followed.
5. CLEANING
Unplug this unit from the wall outlet before cleaning. Do not use liquid cleaners or
aerosol cleaners.
6. ATTACHMENTS
The manufacturer of this unit does not make any recommendations for attachments,
as they may cause hazards.
7. WATER AND MOISTURE
Do not use this unit near water. For example, near a bathtub, washbowl, kitchen sink,
laundry tub, in a wet basement, or near a swimming pool.
8. ACCESSORIES
Do not place this unit on an unstable cart, stand, tripod, bracket, or table. The unit may fall,
causing serious injury, and serious damage to the unit.
S3126A
(Symbol provided by RETAC)
8A. An appliance and cart combination should be moved with care. Quick stops, excessive force,
and uneven surfaces may cause the appliance and cart combination to overturn.
9. VENTILATION
Slots and openings in the cabinet back or bottom are provided for ventilation, and to ensure reliable
operation of the unit, and to protect it from overheating. These openings must not be blocked or
covered, The openings should never be blocked by placing the unit on a bed, sofa, rug, or other
similar surface. This unit should never be placed near or over a radiator or heat source. This unit
should not be placed in a built-in installation such as a bookcase or rack unless proper ventilation is
provided or the manufacturer ' s instructions have been adhered to.
10. POWER SOURCE
This unit should be operated only from the type of power source indicated on the rating plate lf you
are not sure of the type of power supply to your home, consult your appliance dealer or local power
company. For units intended to operate from battery power, or other sources, refer to the respective
pages in this Owner ' s Manual for their operating instructions.
11.GROUNDING OR POLARIZATION
This unit is equipped with a polarized altemating-current line plug (plug having one blade wider
than the other). This plug will fit into the power outlet only one way. This is a safety feature. If you are
unable to insert the plug fully into the outlet, try reversing the plug. If the plug should still fail to fit,
contact your electrician to replace your obsolete outlet, Instead of the polarized alternating-current
line plug, your unit may be equipped with a 3-wire grounding-type plug (a plug having a third
grounding) pin). This plug will only fit into a grounding-type power outlet. This too, is a safety
feature. If you are unable to insert the plug into the outlet, contact your electrician to replace your
obsolete outlet. Do not defeat the safety purpose of the grounding-type plug.
12. POWER-CORD PROTECTION
Power-supply cords should be routed so that they are not likely to be walked on or pinched by items
placed upon or against them, paying particular attention to cords at plugs, convenience receptacles,
and the point where they exit from the appliance.
13. LIGHTNING
To protect your unit from a lightning storm, or when it is left unattended and unused for long periods
of time, unplug it from the wall outlet and disconnect the antenna or cable system. This will prevent
damage to the unit due to lightning and power ling surges.
14. POWER LINES
An outside antenna system should not be located in the vicinity of overhead power lines or other
electric light or power circuits, or where it can fall onto or against such power lies or circuits. When
installing an outside antenna system, extreme care should be taken to keep from touching such
power lines or circuits, as contact with them might be fatal.
15. OVERLOADING
Do not overload wall outlets and extension cords, as this can result in a risk of fire or electric shock.
16. OBJECT AND LIQUID ENTRY
Do not push objects through any openings in this unit, as they may touch dangerous voltage points
or short out parts that could result in fire or electric shock. Never spill or spray any type of liquid into
the unit.
17.OUTDOOR ANTENNA GROUNDING
If an outside antenna or cable system is connected to the unit, be sure the antenna or cable system
is grounded to provide some protection against voltage surges and built-up static charges, Section
8 10 of the National Electrical Code (NEC), ANSI/NFPA 70, provides information with respect to
proper grounding of the mast and supporting structure, grounding of the lead-in wire to an antenna
discharge unit, size of grounding conductors, location of antenna discharge unit, connection to
grounding electrodes, and requirements for the grounding electrode. See figure below.
EXAMPLE OF ANNTENNA GROUNDING AS PER NATIONAL ELECTRICAL CODE
18. SERVICING
Do not attempt to service this unit yourself as opening or removing covers may expose you to
dangerous voltage or other hazards. Refer all servicing to qualified service personnel.
19. DAMAGE REQUIRING SERVICE
Unplug this unit from the wall outlet and refer servicing to qualified service personnel under the
following conditions:
a. When the power-supply cord or plug is damaged.
b. If liquid has been spilled, or objects have fallen into the unit.
c. If the unit has been exposed to rain or water.
d. If the unit does not operate normally by following the operating instructions. Adjust only
those controls that are covered by the operating instructions, as an improper adjustment
of other controls may result in damage and will often require extensive work by a qualified
technician to restore the unit to its normal operation.
e. If the unit has been dropped or the cabinet has been damaged.
f. When the unit exhibits a distinct change in performance, this indicates a need for service.
20. REPLACEMENT PARTS
When replacement parts are required, be sure the service technician uses replacement parts
specified by the manufacturer or those that have the same characteristics as the original part.
Unauthorized substitutions may result in fire, electric shock or other hazards.
21. SAFETY CHECK
Upon completion of any service or repairs to this unit, ask the service technician to perform safety
checks to determine that the unit is in proper operating condition.
22. HEAT
The product should be situated away from heat sources such as radiators, heat registers, stoves, or
other products (including amplifiers)that produce heat.
SLOT23. DISC
Keep your fingers well clear of the disc slot as it is closing. It may cause serious personal injury.
24. CONNECTING
When you connect the product to other equipment, turn off the power and unplug all of the
equipment from the wall outlet. Failure to do so may cause an electric shock and serious personal
injury, Read the owner' s manual of the other equipment carefully and follow the instructions when
making any connections.
25.SOUND VOLUME
Reduce the volume to the minimum level before you turn on the product. Otherwise, sudden high
volume sound may cause hearing or speaker damage.
26. SOUND DISTORTION
Do not allow the product output distorted sound for a longtime. If may cause speaker overheating
and fire.
27.HEADPHONES
When you use the headphones, deep the volume at a moderate level. lf you use the headphones
continuously with high volume sound, it may cause hearing damage.
28.LASER BEAM
Do not look into the opening of the disc slot or ventilation opening of the product to see the source
of the laser beam. It may cause sight damage.
29. DISC
Do not use a cracked, deformed, or repaired disc. These discs are easily broken and may cause
serious personal injury and product malfunction.
30. NOTE TO CABLE TV SYSTEM INSTALLER
This reminder is provided to call the Cable TV system installer' s attention to Article 820-40 of the
NEC that provides guidelines for proper grounding and, in particular, specifies that the cable ground
shall be connected to the grounding system of the building, as close to the point of cable entry as
practical.
31. APPARATUS SHALL NOT BE EXPOSED TO DRIPPING OR SPLASHING AND NO
OBJECTS FILLED WITH LIQUIDS, SUCH AS VASES, SHALL BE PLACED ON THE
APPARATUS.
This device complies with Part 15 of the FCC Rules. Operation is subject of the following two
conditions: (1)this device may not cause harmful interference, and (2) this device must accept
any interference received, including interference that may cause undesired operation.
Table of Contents
Table of Discs Your DVD player Will play
Supporting function of disc
Remote Control
Systems Connection
Chapter 1 Basic Operation
1. Turn On the TV and your DVD player
2. Place a disc
3. Play
4 . Program Play
Chapter 2 Additional Operation
1. Selecting Tracks (compatible with DVD, SVCD, VCD, CD, CD+G, DTS-CD,
HD-CD, WMA, MP3/JPEG discs)
2. Skipping Tracks (compatible with DVD, SVCD, VCD, CD, CD+G, DTS-CD,
HD-CD, WMA, MP3/JPEG discs)
3. Multispeed Fast Motion Playback (compatible with DVD, SVCD, VCD, CD,
DTS-CD, MP3 discs)
4. Multispeed Slow motion playback (compatible with DVD, SVCD, VCD, CD,
CD+G, DTS-CD, HD-CD discs)
5. Freeze Frame and Frame Advance (compatible with DVD, SVCD, VCD, CD,
CD+G, DTS-CD, HD-CD, WMA, MP3 discs)
6. Using the Repeat Feature (compatible with DVD, SVCD, VCD, CD, CD+G,
.
2
2
3
4
5
5
5
5
6
7
7
7
7
8
8
DTS-CD, HD-CD, WMA, MP3 discs)
7. Using the Display Feature (compatible with DVD, SVCD, VCD, CD, CD+G,
8
DTS-CD, WMA, MP3 discs)
8.Using the Search Feature (compatible with DVD, SVCD, VCD, CD, DTS-CD,
8
HD-CD discs)
9
9. Changing the Soundtrack (compatible with SVCD, VCD, CD, CD+G, HD-CD,
WMA, MP3/JPEG discs)
10. Changing the Audio Language (compatible with DVD, SVCD discs)
11. Subtitles (compatible with DVD, SVCD discs)
12. Changing the Camera Angle (compatible with DVD discs)
9
10
10
10
13. Mute the Audio Output (compatible with DVD, SVCD, VCD, CD, CD+G,
DTS-CD, HD-CD, WMA, MP3 discs)
14. Zoom In the Video Image (compatible with DVD, SVCD, VCD,
10
JPEG discs)
15. Repeat a Specific Segment on the Disc that You Define (compatible with
DVD, SVCD, VCD, CD, CD+G, DTS-CD, HD-CD, WMA, MP3 discs)
16. Volume control (compatible with DVD, SVCD, VCD, CD, CD+G, DTS-CD,
HD-CD, WMA, MP3 discs)
11
Chapter 3 Playing WMA, MP3 and JPEG discs
Chapter 4 The Setup Menu System
Disc maintenance
Specifications
1
11
11
12
15
24
24
Types of Discs Your DVD Player Will Play
Types of
Discs
Diameter
12cm
DVD
8cm
SVCD
Data Format
Playback Time
Remark
1 layer: 120min
DVD Format Disc:
2 layers: 240min Compressed Digital
Audio Compressed Digital
1 layer: 80min
Video
2 layers: 180min
Moving picture
MPEG2
Include:
Compressed Digital Audio
Compressed Digital Video SVCD CVD
Moving picture
12cm
45min
12cm
74min
8cm
20min
MPEG1
Compressed Digital Audio
Compressed Digital Video
Moving picture
CD
12cm
8cm
74min
20min
CD-DA:
Digital Audio
HD-CD
12cm
74min
HD-CD:
Digital Audio
DTS-CD
12cm
74min
MP3/JPEG
12cm
12cm
600min
VCD
WMA
Include:
VCD2.0
VCD1.1
VCD1.0
DVCD
DTS-CD:
Digital Audio
Compressed Digital Audio
Compressed Digital Audio
Note: DVD-R, CD-R, CD-RW discs can be played in this DVD player.
Supporting function of disc
DVD disc can support many functions, different makers, and different function support.
Prevalent marks of a few functions as follows:
1
16:9
NTSC zone code & TV system
LB
Picture scale mode
N T S C
DOLBY digital surround sound
Numbers of sound language
2
Numbers of subtitle language
2
R
RESTRICTED
Parental lock
4
View angle
CC
Close caption
(Only NTSC)
Remote Control:
1. SUBTITLE
2. OPEN/CLOSE
3. NUMERIC KEYS
4. PBC
5.STEP
6. PROGRAM
7. SLOW
8. SETUP
9. CURSOR CONTROL
/ENTER
10.TITLE
11. PAUSE
12.MUTE
13. FR, FF
14. PREV, NEXT
15. STOP
16.PLAY
17. MENU
18. ZOOM
19. A-B
20. VOL+,VOL21. REPEAT
22. OSD
23. GOTO
24. L/R
25. RETURN
26. VIDEO/P-SCAN
27. LANGUAGE
28. ANGLE
29. STAND-BY
29
28
27
1
2
20
26
20
25
3
4
20
24
20
23
20
22
20
21
5
6
7
8
9
20
19
20
18
20
17
20
10
11
12
16
15
14
13
3
systems connection
1) Before connecting, make sure to turn off power of all apparatus.
2) After finishing connection, turn on the power again.
AV cable (accessory) should be connected by color .
Yellow plug-------- video terminal (yellow)
White plug--------- left audio terminal (white)
Red plug----------- right audio terminal (red)
Must connect properly, especially the plug should be inserted to the bottom.
Notice: this picture is only for your reference, all the functions should be based on the real unit
machine.
CLASS I
LASER PRODUCT
DVD20EBL
20W
AUDIO/VIDEO
APPARATUS
25RY
E253271
M21-B2
CENTER
SUB
WOOFER
COAXIAL
FRONT
R
DIGITAL AUDIO INPUT
4
L
5.1 CHANNEL INPUT
Chapter 1 Basic Operation
1.Turn On the TV and Your DVD Player
Press the Power or STANDBY button on the player or the remote controller, and Read appears
on the TV screen. If there hasn't a disc in the DVD player.
2.Place A Disc
Press the Open / Close button on the remote controller or the front of the DVD player, and
Open appears on the screen. Then Place a disc gently into the tray with the disc's label
facing up (double-sided discs have content on both sides, so you can place either side up),
and press the Open / Close button again to close the disc tray, Close appears and the player
starts to read. Then the disc starts playing automatically. (Note: Of some certain type discs,
after reading out the type, the Play or Enter button should be pressed to start playing.)
3. Play
The contents of each disc menu vary according to how the disc was authored and what
features are included. The disc menu will be turned on for you to select, when Menu button
pressed. Also play and pause can be switched with the Pause button on the remote. Moreover,
such as menu play, title play, sequence play etc., These different play modes are offered.
a) Menu Play (compatible with DVD, SVCD, VCD2.0 discs)
I. Press Menu Button
TV screen displays the DVD Root Menu when a DVD disc is loaded.
II. When a DVD disc is loaded, you can press Arrow buttons to highlight the menu item you
want to choose.
III. Press Enter or Play button, you can begin play with the highlighted.
IV. Return when playing: When a DVD disc is playing, press Menu (PBC) button, and you
can return to Root Menu.
V. Stop
1) When you press Stop button for the first time, the player turns into quasi stop state.
To begin the title over, press Stop twice.
2) In quasi stop state, the player remembers where you stopped, when you start playing the
disc again, the DVD player picked up where you left off.
3) In stop state, when you press Play, the player enters sequence playback mode.
For the disc protection, before you press Open / Close button to eject the disc tray when
playing, please press Stop button at first. After taking out the disc, press Open / Close
again to close the tray.
If you're not going to use the DVD player for a long time, be sure to remove the electronic plug.
b) Title Play (compatible with DVD discs only)
I. During DVD playback, press Title button to display the DVD title content.
II. Press the Arrow buttons to highlight the title you want to choose, and press Enter; Also
you can press numeric buttons to choose.
III. The DVD player begins with the chapter 1 of the chosen title.
5
b) Sequence Play (compatible with DVD, SVCD, VCD, CD+G, DTS-CD, HD-CD, WMA,
MP3/JPEG discs)
I. When a SVCD or VCD disc is loaded and PBC is on, once PBC button pressed, PBC switches
off. Then the player can play in sequence playback mode; when PBC button pressed twice,
PBC switches on.
III. Except for SVCD or VCD discs, in the stop state, when press Play button, the player then
enters sequence playback mode. This feature is effective to all the compatible discs.
d) Program Play (compatible with DVD, SVCD, VCD, CD, CD+G, DTS-CD, HD-CD, WMA,
MP3/JPEG discs)
The Program Playback option allows you to enter the order in which you want chapters or tracks
to play, maxi-mum to 20.
Program Menu:
DVD, WMA, MP3/JPEG discs:
SVCD, VCD, CD, CD+G, HD-CD, DTS-CD discs:
If PBC is on, this operation will turn PBC off while the chapters / tracks plays in programmed order.
According to the highlight, use the Numeric buttons to enter the chapters / tracks in the
order you want them to play. Then press Play or use Arrow buttons to highlight the PLAY
item and press Enter. The chapters / tracks will play in the programmed order.
You can program maximum 20 titles / chapters / tracks.
According to the Direction Indicator on the menu, you can press Arrow buttons to highlight where you want to enter.
During Program Playback, if Program button pressed, the programmed order and the
contents will be displayed on the screen, and the Program Playback will be stopped;
Also you can press Stop and Play to resume normal playback.
Notes:
To clear the programmed order, use Arrow buttons to highlight the CLEAR ALL item, then
press Enter.
To modify the programmed order, use Arrow buttons to highlight the modifying item and
enter the new chapter / track you want to program directly.
6
Chapter 2 Additional Operation
1. Selecting Tracks (compatible with DVD, SVCD, VCD, CD, CD+G, DTS-CD, HD-CD,
WMA, MP3 /JPEG discs)
a) When playing a DVD disc, press Numeric buttons on the menu or title page to select tracks;
During DVD playback, you can input desired title number directly.
b) As a SVCD or VCD disc, during sequence playback, press Numeric buttons to select tracks.
(During Program Playback and PBC is on, you can only press Prev / Next button to select)
c) As for CD, CD+G, HD-CD, DTS-CD discs, press Numeric buttons directly to select tracks.
d) when playing WMA, MP3 / JPEG discs, press numeric buttons to select different tracks on
current track list.
Notes: To select tracks from 1 to 10, press corresponding Numeric buttons (1-9, 10)
To select tracks above 10, press 10+ button. For example, to select the track 15, press
10+ and 5 button. If the selected track is not available, the input would be invalid.
2. Skipping Tracks (compatible with DVD, SVCD, VCD, CD, CD+G, DTS-CD, HD-CD,
MP3/JPEG discs)
a) To skip forward to the beginning of the next title / chapter / track on a disc, press Next on
the remote or the front of the player.
b) To skip backward to the beginning of the preceding title / chapter / track on a disc, press
Prev on the remote or the front of the player.
When playing the last chapter / track on a SVCD or VCD disc with PBC off, pressing Next
button will stop the playback; When playing the first chapter / track., pressing Prev button
will stop the playback; When stop, pressing Next / Prev button will be invalid.
If a DVD disc is loaded, it varies according to how the disc was configed.
3. Multispeed Fast Motion Playback (compatible with DVD, SVCD, VCD, CD, DTS-CD,
MP3 discs)
You can search in forward or reverse mode during playback.
a) Press the F.F button on the remote during playback to search through a disc. Press the
button again on the remote to search at the next speed. Fast Forward Playback has four
speeds: 2, 4, 8, 16, 32. With each consecutive press of the button, the search
speed increases. If you press the button six times, Fast Forward Playback cycles back
to normal playback. During DVD playback, when Fast Forward Playback gets to the
beginning of the next title / chapter, it resumes normal playback; During SVCD or VCD
playback with PBC on, when Fast Forward Playback gets to the beginning of the next
track, it resumes normal playback.
Press Play button to resume normal playback.
b) Press the F.R button on the remote during playback to search through a disc. Press the button
again on the remote to search at the next speed. Fast Reverse Playback has four speeds: 2,
4, 8, 16,
32 . With each consecutive press of the button, the search speed increases. If
you press the button six times, Fast Reverse Playback cycles back to normal playback.
During DVD playback, when Fast Reverse Playback gets to the beginning of the playing title
/ chapter, it resumes normal playback; During SVCD or VCD playback with PBC on, when
Fast Reverse Playback gets to the beginning of the playing track, it resumes normal playback.
Press Play button to resume normal playback.
7
4. Multispeed Slow Motion Playback (compatible with DVD, SVCD, VCD, CD, CD+G,
DTS-CD, HD-CD discs)
Press Slow button when pictures moving, you can enter Slow Motion Playback mode.
Press the Slow button on the remote during playback. Press the button again on the remote to
play at the next speed. Slow Motion Playback has five speeds: 1/32, 1/16, 1/8, 1/4, 1/2. With
each consecutive press of the button, the play speed decreases. If you press the button six
times, Slow Motion Playback cycles back to normal playback.Press Play button to resume
normal playback
5. Freeze Frame and Frame Advance (compatible with DVD, SVCD, VCD, CD, CD+G,
DTS-CD, HD-CD, WMA, MP3 discs).
a) During CD, CD+G, HD-CD, DTS-CD, WMA or MP3 / JPEG playback, press Pause once to
freeze playback; Press the Pause button again or Play button to resume normal playback.
b) During DVD, SVCD or VCD playback, press Pause once to freeze playback; Press of the
Pause button again to advance the picture one frame at a time or press Play to resume normal
playback.
6. Using the Repeat Feature (compatible with DVD, SVCD, VCD, CD, CD+G, DTS-CD,
HD-CD, WMA, MP3 discs)
While a disc is playing, press Repeat button once, and the repeat banner appears to show current
repeat mode. User can also press arrow button to choose the mode and press ENTER to confirm.
A) In SVCD, VCD, CD, CD+G, HD-CD, DTS-CD sequence playback mode, press Repeat button
again to turn on repeat mode. Press the button again on the remote to turn to the next repeat
mode. There are four repeat options: Repeat Off, Repeat Disc and Repeat Track..
With each consecutive press of the button, the repeat mode switches. If you press the
button four times, repeat mode cycles back to Off.
b) In DVD playback, press Repeat button again to turn on repeat mode. There are three repeat
options: Repeat Off, Repeat Chapter, and Repeat Title . With each consecutive press of the button,
the repeat mode switches. If you press the button four times, repeat mode cycles back to Off.
c) In WMA, MP3 playback, press Repeat button again to turn on repeat mode. There are
four repeat options: Off, All, Dir and File. With each consecutive press of the button, the
repeat mode switches. If you press the button five times, repeat mode cycles back to Off.
7. Using the Display Feature (compatible with DVD, SVCD, VCD, CD, CD+G, DTS-CD,
WMA, MP3 discs)
a) Loading and playing DVDs (two pages)
Press OSD button once to show the first page:
Disc Type,Title * / * (the playing title / total titles),Chapter * / * (the playing chapter / total
chapters),Elapsed Time of the Disc, Repeat Mode.
Press the button again to show the second page:
Language * / * (the serial number of playing language / the amount of optional languages)
or Off,Language Type, Audio Type,Subtitle * / * (the serial number of playing subtitle / the
amount of optional subtitles) or Off,Angle * / * (the serial number of playing angle / the amount of optional angles) or Off, Play Mode.
Press the button for the third time, the display menu fades out.
b) Loading and playing SVCD discs (two pages)
8
b) Loading and playing SVCD, VCD discs (two pages)
Press OSD button once to show the first page:
Disc Type,Track * / * (the playing track / total tracks), Elapsed Time of the Playing Track,
Repeat Mode, PBC, Play Mode, Mute.
Press the button again, the display menu fades out.
d) Loading and playing CD, CD+G, DTS-CD, HD-CD, WMA, MP3 discs
Press OSD button once to show the first page:
Disc Type,Track * / * (the playing track / total tracks), Elapsed Time of the Playing Track,
Repeat Mode, Play Mode.
Press the button again, the display menu fades out.
8. Using the Search Feature (compatible with DVD, SVCD, VCD, CD, DTS-CD,
HD-CD discs)
You can use Search feature to select a title / chapter / track number or go to a specific point in
a title. Firstly, press Search (Goto) button on the remote controller to bring up the search menu
and enter the edit state; Secondly, press Arrow buttons to highlight the title / chapter / track
number or the time option; Thirdly, use Numeric buttons to enter the title / chapter / track you
want to play or the elapsed time you want to go to in that title; At last, press Enter button to
start playback. For example, entering 01:23:56 will start playback one hour, twenty-three
minutes and fifty-six seconds into the title. If the input number is illegal, the error information
INVALID KEY will be displayed on the screen.
Notes
I. This feature does not work in Program Play mode.
II. If PBC is on, it will turn off automatically when Search Playback starts.
III. When playing WMA, MP3 / JPEG discs, Search Feature does not work.
9. Changing the Soundtrack (compatible with SVCD, VCD, CD, CD+G, HD-CD discs)
Press the L / R button to display current soundtrack.
a) Press the button can switch soundtracks.
b) Press the button again on the remote to turn to next soundtrack.
I. When playing a SVCD or VCD disc, there are three soundtracks: Stereo, Left, Right.
With each consecutive press of the button, the soundtrack switches. If you press the button
four times, soundtrack cycles back to Stereo.
II. When playing a CD, CD+G, DTS-CD, HD-CD or MP3 disc, there are three: Stereo,
Left, Right.
Notes:
Switch to L/L Auto A/D Detect or R/R Auto A/D Detect to have various antistrophes (you
can have an antistrophe with the singing on the disc), according to the contents on the
disc).
When playing a dual-language VCD movie disc, press the L / R button to select the
desired language.
9
10. Changing the Audio Language (compatible with DVD, SVCD discs)
During disc playback, press Language on the remote once, and the audio language info banner
appears. When a DVD or SVCD is recorded whit multiple soundtracks, you can use the Language feature to temporarily change the audio language (the language of the soundtrack) With
each consecutive press of the Language button, the audio language switches and the
corresponding serial number appears on the screen. For example, Language Icon:
[1 English DTS 6CH] or [Off] (the availability of the languages are disc-dependent).
Notes: AUDIO Language option are practicality-dependent.
11. Subtitles (compatible with DVD, SVCD discs)
Press the Subtitle button on the remote once, and the subtitle info banner appears. When a
DVDor SVCD is recorded with subtitles, you can use the Subtitle feature to view the subtitles onscreen. By default, subtitles are off. The info banner will display Subtitle Off. To
display subtitles, press the Subtitle button again. The default language with its corresponding serial number will be displayed in the info banner and subtitles will be displayed in that
language. With each consecutive press of the Subtitle button, the
subtitle switches. For example, Language Icon:
[1 English DTS 6CH] or [Off] (the availability of the subtitles are disc-dependent). To turn
subtitles off, press the Subtitle button until Subtitle Off is displayed.
Notes: SUBTITLE Language option are practicality-dependent.
12. Changing the Camera Angle (compatible with DVD discs)
During disc playback, press Angle on the remote once, and the angel icon appears.Some
DVDs contain multipleangles of a particular scene or sequence, so you can use the Angle
feature to view.Press the Angle button again to go to the next camera angle. If multiple
camera angles are available, the Angle icon displays the current angle numberand the
number of angles available. For example: Angle Icon: [* / *] or [Off] ; 1 / 4 indicates that
angle one is beingdisplayed, and there are four different angles available. (This feature is
disc-dependent. If no additional camera angles are available, the Invalid Key will be
displayed.)
13 . Mute the Audio Output (compatible with DVD, SVCD, VCD, CD, CD+G, DTS-CD,
HD-CD, WMA, MP3 discs)
Pressing the Mute button allows you to reduce sound to an inaudible level, and MUTE will be
displayed on screen. Press the button again or press the Vol +/- button to return to the normal
condition.
Notes:
When mute, the microphone also has no audio output.
If the player playback disc without sound, please try to press Mute button to resume.
10
14. Zoom In the Video Image (compatible with DVD, SVCD, VCD, JPEG discs)
a) The Zoom Function allows you to enlarge or zoom out the video image and to pan though the
image. Press Zoom repeatedly to activate the function and choose the required zoom factor:
Zoom 2, Zoom 3, Zoom 4, Zoom 1/2, Zoom 1/3, Zoom 1/4.
Notes:
This feature does not work when the Disc Menu appears.
b) Use the Arrow buttons to pan across the screen when the zoom factor is 2, 3 or 4.
15. Repeat a Specific Segment on the Disc that You Define (compatible with DVD, SVCD,
VCD, CD, CD+G, DTS-CD, HD-CD, WMA, MP3 discs)
a) During the normal or fast motion playback, press the A-B button once, and REPEAT Awill appears on the screen. This indicates the start of the loop to be repeated.
b) During the normal of fast motion playback, press A-B again, and REPEAT A-B will
appears on the screen. It indicates the end of the loop.
Looping will run from set point A to set point B until you turn off Repeat.
C) Press A-B again to cancel A-B loop mode.
When playing a SVCD, VCD, or CD disc, you can repeat a specific segment only in one
track. When the next track begins, A-B Repeat turns off automatically.
When playing a DVD disc, you can repeat a specific segment only in one title / chapter.
16. Volume control (compatible with DVD, SVCD, VCD, CD, CD+G, DTS-CD, HD-CD,
WMA, MP3 discs)
You can press the Volume button on the front of TV set or the amplifier to control the
sound level.
Pressing the Vol+ button on the remote allow you to amplify the sound level; Pressing
Vol- will reduce the sound level.
Notes:
During DVD PCM output playback, this feature does not work.
11
Chapter 3 Playing WMA, MP3 and JPEG discs
Place a MP3 / JPEG disc into the tray, and the player will auto search the directories saved
MP3 / JPEG files. After searching, it will auto go to the first directory saved MP3 files (to
the disc containing both MP3 and JPEG files; To the disc containing single type of files, it
will auto go to the first directory) and play the first song in the directory ( 01: is highlighted).
The screen displays as the picture below:
Current directory name
The playing file
is a MP3 music.
Current MP3/JPEG file name.
If a JPEG file playing, the
name should be *.jpg.
The playing file
is a JPEG picture.
Use the Arrow buttons to enter the Directory Region and highlight the desired directory, then
the first track under it starts playback; Also you can use the Arrow buttons to enter the File
Region and select the file you want to play.
Notes:
I. Press the Left and Right arrow buttons, you can activate Directory Region, File Region
and File Switch Region separately.
II. The highlight in Directory Region and File Region is shown as the picture above; While
it appears a transparent rectangle in File Switch Region.
III. In File Switch Region, you can press the Left and Right arrow buttons to switch the highlight, then press Enter; the M , P , and G button is illustrated in the above picture.
For example, if a disc with MP3 and JPEG files but without any NES files is loaded, the
color of the letter M and P will appear to white and G black. If a MP3 file playing,
M turns darker.
IV. To the disc with WMA, MP3 and JPEG files, when playing a JPEG picture, press the
Return button to return to JPEG list.
12
V. You can press the Numeric buttons to select the file you want to play. For example, if you
th
th
desire the 15 track in current list, press the 10+ button once, then press 5 , the 15 starts
playback.
Notes: When playing a disc with MP3 files, video cannot be output while only digital audio
can.
When playing JPEG pictures, the screen will display the following picture. Press the Left and
Right arrow buttons to highlight the icon of the desired page, then press ENTER button .
When you select ALBUM, the screen displays small pictures. Up to 6 small pictures are
displayed per screen. To view the next 6 pictures, press the Next button to go forward
and the Prev button to go to the previous page. You can also select and play a picture
in full screen by press that number on the remote.
When you select ROTATE icon, press ENTER button to change the display angle. With each
consecutive press of the button, the angle is changed.
13
Chapter 4 The Setup Menu System
1. General Steps of Setup Menu
a) Press the Setup button, the main setup menu appears.
When the main menu displayed, the DVD system will auto pause.
b) Press the Left and Right arrow buttons to highlight the icon of the desired page, then press
the Down or Right arrow button to activate that page; For example, if you want to setup the
video page, press Right to highlight the video icon, the video page will be displayed on the
screen.
c ) Press the Down arrow button to highlight the desired option. Press Enter or press Right to
select, the choices of that option appear on the right; For example, press the Down arrow
button to highlight the BRIGHTNESS option, then press Enter to select, the brightness
choices appear on the right.
d) Press the Arrow buttons to highlight the Exit Setup option, then press Enter or Setup again
to exit Setup Menu.
14
2. Setup Items Introduction
a) LANGUAGE SETUP
The language setup options are illustrated below:
MENU LANGUAGE
Highlight the MENU option, and press the Arrow buttons to choose the MENU
language you prefer. Press Enter to confirm, and it will display MENU in that language.
Notes: Menu languages are practicality-dependent.
DISC LANGUAGE
Highlight the DISC option, and press the Arrow buttons to choose the disc language you prefer. Press Enter to confirm. If the disc you are playing has that language available,
it will output audio in that language.
Notes: Disc languages are practicality-dependent.
AUDIO LANGUAGE
Highlight the AUDIO LANG option, and press the Arrow buttons to choose the audio language you prefer. Press Enter to confirm. If the disc you are playing has that language available,
it will output audio in that language.
Notes: Audio languages are practicality-dependent.
15
SUBTITLE LANGUAGE
Highlight the SUBTITLE LANG option, and press the Arrow buttons to choose the subtitle
language you prefer. Press Enter to confirm. If the disc you are playing has that language
available, it will displays subtitles in that language
Notes: Subtitle languages are practicality-dependent.
VERSION
Highlight the VERSION option, press Enter or Play button to display the version.
SCREEN SAVER
If the screen saver is on, when your DVD player is in Stop, Open, or No Disc state, or there
is a frame frozen for more than 60sec, the screen saver will be displayed. This feature can
protect the screen from damage.
ON: Choose this setting to active the screen saver.
OFF: Choose this setting to cancel the screen saver.
16
RESET
User can reset the setting to restore one and former setting will be changed.
B) DISPLAY SETUP
The display setup options are illustrated below:
ASPECT RATIO
16 : 9 (Wide Screen): Choose this setting if your DVD player is connected to a wide screen
TV. If you choose this setting and you don't have a wide screen TV, the images on the screen
may appear distorted due to vertical compression.
4 : 3 LB (Letter Box): Choosing this setting if your DVD player is connected to a normal
ratio TV. connector You'll see the movies in their original aspect ratio (height-to-width ratio).
You'll see the entire frame of the movie, but it will take up a smaller portion of the screen
vertically.
The movie might appear with black bars at the top and bottom of the screen.
4 : 3 PS (Pan & Scan): Choosing this setting if your DVD player is connected to a normal
ratio TV. You can fill the movie to the entire screen of your TV. This might mean that parts
of the picture (the left and right edges) won't be seen.
Notes:
The image display ratio is related to the recorded disc format. Some disc can not display
images in the aspect ratio you choose.
If you play a disc recorded in 4:3 format on a wide screen TV, black bars will appear on
the left and right side of the screen.
You must adjust the screen setting depending on the type of the television you have.
PAUSE MODE
Highlight the PAUSE MODE option, and press the Arrow buttons to choose the mode
you prefer. Press Enter to confirm. There are three mode: Auto, Frame and Field.
17
MESSAGE
You can set Message on or off.
BLACK LEVEL
You can set Black Level on or off.
TV SYSTEM
According to the Color System of the TV, you can choose the TV System.
NTSC: Choose this settings if your DVD player is connected to a NTSC TV.
Notes: DEFAULT modes are practicality-dependent.
18
VIDEO OUT
S-VIDEO: Choose this setting if your DVD player is connected to the TV with S-VIDEO cable.
YPbPr: Choose this setting if your DVD player is connected to a progressive scan TV with
Y, Pb, Pr video cables.
YUV: Choose this setting if your DVD player is connected to the TV with Y Cb Cr video cable.
Notes: Output setup are dependert on actual function.
C) AUDIO SETUP
The audio setup options are illustrated below:
DRC
19
LPCM OUTPUT
Set LPCM output to 48k or 96k.
SPDIF DOLBY
SPDIF DTS
20
CHANNEL OUTPUT
LT/RT: Choose this setting, it will be sound like in a movie theatre if the original movie
the disc was recorded from was encoded in the Pro Logic Dolby Digital format.
STEREO: Choose this setting, when 5.1-channel sound playing, two channels of signals
will be output from the left and right soundtrack; when 2-channel sound playing, stereo
signal will be output.
SPDIF PCM CHANNEL
21
D) SPEAKER SETUP
The speaker setup options are illustrated below:
3D/EQ
E) PARENTAL SETUP
The parental setup options are illustrated below:
P ASSWORD
The password option is initialized locked, and you cannot set the ratings limit or change the
password. In order for the Ratings feature work, the password mode must be turned on. If you
want to set the ratings limit, you will need to enter the default password, which is 0000, then
press Enter to confirm. To change the password, you will be prompted for the old password,
then be prompted for a new. Enter a 4-digit number (this is your password).
If you choose the YES , the following picture will be showed on the screen .
22
RATING LEVEL
The Rating feature is a rating limit system, like movie rating. It works with DVD that have been
assigned rating. This helps you control the types of DVDs that your family watches.
NOTES:
If you password option is locked. you cannot set the rating limit ; the rating limit does not work
when the password option unlocked
CHANGE
Press ENTER button ,enter a 4-digital number(this is your password), so your old password
is been changed to the new one .
23
Disc maintenance
Disc protection:
Take the disc both by the hole in the center and the brim;
No paper shall be adhered to surface of disc neither fingerprint allowed;
Disc must be kept clean;
Disc must be cleaned with soft cotton regularly by directing from disc center outside.
Specifications:
Type of video disc:DVD/SVCD/VCD/CD+G(digital AV discs)
MP3/CD-DA(common music laser disc)
CDIFMV(VOD)
Kodak Picture CD
Video/picture
MPEG2
Audio
MPEG2
Signal output:
Video:1.0Vp-p
Audio: stereo 2vp-p
Function operation: Play/pause, stop, open/close, forward/backward, screen
display, select time, part repeat, last/next, menu, setup,
enter, channels, angle, return, volume control,
mute, subtitle display, mode.
Output interface:
S- video output, VIDEO output(CVBS),
coaxial output, Y Cb Cr output, Y Pb Pr output .
Voltage:
120V ~ 60Hz
Consuming power:
20W
Frequency response: CD *4Hz--20KHz(EIAT) DVD:4Hz--22KHz(48K)(sampling)
4Hz--44KHz(96K)(sampling)
S/N:
>90 db
THD:
0.003%
Accessories:
AV cable, infrared ray remote controller, common AAA battery,
user manual. (Accessories AV cable battery are dependent
on the actual incasement
(No advanced notification shall be occurred regarding changes of design, specifications & tech
parameters due to constant product improvement)
Notice:
1. Manufactured under license from Dolby Laboratories. Dolby and the double-D symbol are trademarks of
Dolby Laboratories.
2. This Product incorporates copyright protection technology that is protected by method claims
of certain U.S. Patents and other intellectual property rights owned by Macrovision Corporation
and other rights owners. Use of this copyright protection technology must be authorized by
Macrovision Corporation, and is intended for home and other limited viewing uses only unless
otherwise authorized by Macrovision Corporation. Reverse engineering or disassembly is
prohibited.
24
75-7901131-01