1
Once your PHILIPSMAGNAVOX purchase isregistered, you're eligibleto receive all the privileges of owninga
PHILIPSMAGNA VOX product. So complete and return the Warranty Registration Card enclosedwith your purchase
at once.And take advantage of these important benef_.
Congratulations on your purchase, and
PHILIPS
welcometo the '_rami_"
Dear
PHILIPS
MAGNAVOX
product
owner:.
Thankyou for your confidencein PHlUPSMAGNAVOY_ You'veselectedone ofthe best-built,best-backed
products
availabletoday. And we'lldo everythingin our powerto keep you happywith your purchasefor manyyearsto come.
As a member of the PHIUPSMAGNAVOX 'h_amily,
" you're entitledto protectionbyone of the mostcomprehensive
warranties and
outstandingservicenetworks in the industry.
What's more,your purchaseguaranteesyou'llreceive allthe informationandspecialoffersfor whichyou qualify,plus easyaccessto
accessories
from our convenienthomeshoppingnetwork.
And most importantlyyou cancount on our uncompromisingcommitmentto yourtotal saUsfacUon.
All of this isour way of sayingwelcome-andthanks for invesdngin a PHILIPSMAGNAVOX product.
Sincerely,
P.S. Remember, to get the most from your
PHILIPS MAGNAVOX
product, you must
return your Wm'r_ty
Registration Card
within I 0 days. So please mail it to us right
now_.
Robert Minkhorst
President and Chief Executive Off'Rcer
Enter below the Serial No. which is looted
For Customer
Use
on the rear of the cabinet. Retain this information for future reference.
Model No.
Know these
Serial No.
//_
This "bolt of lighmin_' indicate_uninsulamdmaterial within your unit may causean dectrical shock.
For the safe_ of everyone in your household,pleasedo not remove product covering.
$afetysymbols
Z_The
"exclamation point" callsan_Jon
to features for which you should read the enclosedEser'ature
closelyto prevent operldng and maintenanceproblern_
WARNING: TO PREVENT RRE OR SHOCK HAZARD, DO NOT EXPOSE THIS EQUIPHENT TO RAIN
OR MOISTURE.
CAUTION: To prevent electric shock,match wide bladeof plugto wide slot,and fully insert.
ATTENTION: Pour 6viter les chocs _leo0riques, introduire la !ame la plus _
€orrespondante de la prise et pousserjusqu'aufond.
de la fiche dartsla borne
SAFETY PRECAUTIONS
CAUTION:
This Digital Video Disc Player employs a Laser System.
To ensure proper use of this product,please read this owner's manual carefully and retain for future referenoe.
Shouldthe unit require maintenance, contact an authodzed service location - see service procedure.
Use of controls, adjustments or the performance of procedures other than those specifiedmay resultherein
hazardous radiation exposure.
To prevent direct exposure to laser beam, do not try to open the enclosure.
Visible laser radiation when open and interlocks defeated.
DO NOT STARE INTO BEAM.
/
FCC NOTICE: This equipment has been tested and found to complywith the limitsfor a Class B digitaldevice, pursuantto part
15 of the FCC Rule. These timits are designedto provide reasonable protectionagainst harmfulinterferencein a
residential installation.
This equipmentgenerates, uses, and can radiate radio frequency energy and, if not installedand used in
accordance with the instructions,may cause harmful interference to radio communications.
However, there is no guarantee that interferencewill not occur in a particularinstallation.
tf this equipmentdoes cause harmful interferenceto radio or television reception,which can be determined by
turningthe equipment off and on, the user is encouraged to try to correctthe interferenceby one or more of the
following measures:
-
WARNING:
Reorient or relocate the receivingantenna.
IncreBsethe separation between the equipmentand receiver.
Connect the equipmentinto an outleton a circuit different from that to whichthe receiver is connected.
Consult the dealer or an experienced radio/TV technicianfor help.
Changes or rnodificationsmade to this equipment, not expresslyapproved by PhilipsConsumerEisctronics
Company, or parties authorized by PhilipsConsumer Electronics Company, couldvoid the user's authorityto
operate the equipment.
INDUSTRY CANADA REQUIREMENT
This Class B digital apparatus meets all requirements of the Canadian Interference-CausingEquipment
Regulations.
Cet appareil num_rique de la classe B respecte toutes les exigences du R_glementsur le matdriel brouilleur du
Canada.
Location of the required label
PRODUCT IS CERTLFIED BY THE MANUFACTURER
COMPLY WITH IDHHS RULES 21 CFR SUBCHAPTER
APPLICABLE AT THE DATE OF MANUFACTURE.
I
TO
J
MANUFACTURED
I
DISTRIBUTED BY:
PNIMPS CONSUMER ELECTRONICS CO.
P. O. BOX 14810 KNOXVILLE,
TN 37914
-1810
211
IMPORTANT SAFETY INSTRUCTIONS
CAUTION: PLEASE READ AND OBSERVE ALL WARNINGS AND INSTRUCTIONS GIVEN IN THIS OWNER'S MANUAL AND
THOSE MARKED ON THE UNIT. RETAIN THIS BOOKLET FOR FUTURE REFERENCE.
This set has been designedand manufactured to assure personalsafety.Improperuse can resultin electricshock or firs hazard.
The safeguards iocorporatedin this unitwillprotectyou if you observethe followingproceduresfor installation,usa and servicing.
This unitis fullytransistorizedand does not containany parts that can be repairedby the user.
DO NOT REMOVE THE CABINET COVER, OR YOU MAY BE EXPOSED TO DANGEROUS VOLTAGE. REFER SERVICING TO
QUALIFIED SERVICE PERSONNEL ONLY.
1,
2,
3,
4,
Read owner's manual
After unpacking this product, read
the owner's manual carefully, and
follow all the operating and other
instructions.
Power Sources
This product should be operated
only from the type of power source
indicated on the marking label, if
you are not sure of the type of
power supply to your home, consult your product dealer or local
power company. For products intended to operate from battery
power, or other sources, refer to
the operating instructions.
7,
8,
Groundingor Polarization
This productmay be equippedwith
a polarized alternating current line
plug(a plug havingone bladewider
than the other). This plugwillfit into
the poweroutletonlyone way. This
isa safety feature, ifyou are unable
to insert the plug fully into the outlet, try reversingthe plug. If the plug should stillfail to fit,
contact your electricianto replace your obsoleteoutlet. Do
not defeat the safety purposeof the polarized plug.
Ventilation
Slots and openings in the cabinet
are provided for ventilation and to
ensure reliable operation of the
productand to protect itfrom overheating, and these openings must
not be blocked or covered. The
openings shouldnever be blocked
by placing the producton a bed, sofa, rug or other similar
surface. This product should not be placed in a built-in
installation such as a bookcase or rack unless proper
ventilation is provided or the manufacturer's instructions
have been adhered to.
5. Heat
The product should be situated
radiators, heat registers, stoves,
away
from
heat sources
as
• or
other
products
(includingsuch
amplifiers) that produce heat.
113
6.
%
p D
___
_'_/.__
_..,._
9.
Water and Moisture
Do not use this productnear water
- for example,near a bathtub, wash
bowl, kitchensink,or laundrytub; in
a wet basement; or near a swimmingpool and the like.
J
Cleaning
Unplug this product from the wall
outlet before cleaning. Do not use
liquidcleaners or aerosol cleaners.
Use a damp clothfor cleaning.
Power-Cord Protection
Power-supply cords should be
routed so that they are not likelyto =--_'_.,
be walked on or pinched by items _
f_/'/'/_/_!_
placed uponor against them, pay- _
L._:_;_
ing particular attention to cords at .r.,,'-__
plugs, convenience receptacles,
_'_
_F=:1_--'--'_- _. _
and the point where they exit from
_'_\
the product.
Overloading
Do not overload wall outlets; extension cords, or integral convenience
receptacles as this can result in a
risk of fire or electric shock.
I 0. Lightning
For added protectionfor this product dudng storm, or when it is left
unattended and unused for long
periods of time, unplug it from the
wall outlet. This will prevent damage to the productdue to lightning
and power-line surges.
11.Object and Liquid Entry
Never pushobjectsof any kind into
this productthrough openings as
they may touch dangerousvoltage
pointsor short-outparts that could
result in a fire or electric shock.
Never spill liquidof any kindon the
product.
12. Attachments
Do not use attachments not recommended
manufacturer as they may cause hazards.
by the product
13.Accessories
Do not place this product on an
unstable cart, stand, tripod,
bracket, or table. The product
may fall, causing seflous injury
to a child or adult, and serious
damage to the product. Use only
with a cart, stand,tripod, bracket,
or table recommended by the
'-"
manufacturer, or sold with the product. Any mounting of
the productshouldfollow the manufacturer's instructions,
and should use a mounting accessory recommended by
the manufacturer.
A product and cart combination should be moved with
care. Quick stops, excessive force, and uneven surfaces
may cause the product and cart combinationto overturn.
15.Burden
injury and serious damage to the
product.
may fall, causingserious personal
Do not
Iookintothe
openingofthe
__
disc
tray
or into the
ventilation
openingsto see the soumeof the ,4_'__
laser beam, it may cause eye
damage.
_ ._______
21. Dis(=
Do nctuasa cracked,deformed, _
or repaired disc. These dmcs ,_,p_:,,
are easilybroken and may _";(.,_/f_
cause sedous personal injury \_J((
and productmalfunction.
_"
_L_
_)i" _;>_
":_))
22. Damage RequiringService
Unplugthisproductfromthe walloutletand refer servicingto
qualifiedservice personnelunderthe following conditions:
a) Whenthe power-supplycord or plug is damaged.
b) If liquidhas been spilled, or objects have fallen Intothe
product.
c) If the producthas been exposedto rain or water.
d) If the productdoes not operatenormallyby followingthe
operatinginstructions.Adjustonlythose controlsthat are
covered by the operating instructionsas an improper
adjustmentof othercontrols may resultin damageandwill
often requireextensivework by a qualifiedtechnicianto
restorethe productto its normaloperation.
e) If the producthas been droppedor damagedin any way.
f ) Wbentheproductexhibitsadistinctchangeinperformance
- this indicatesa need for service.
14. Disc Tray
Keep yourfingersclear of the disc
tray as it is closing. It may cause
sedous personal injury.
product
Do notplace
or step
a heavy
on it.objectonthe
The object
20. Laser Beam
,_t.__
_
16.Connecting
When you connect the productto
other equipment, turn off the
powerand unplugall of the equipment from the wall outlet. Failure
to do so may cause an electric
shock and serious personal injury. Read the owner's manual
for the other equipment carefully
and follow the instructionswhen
making any connections.
23. Servicing
Do not attempt to service this
product yourselfas openingor removingcovers may expose you to
dangerous voltage or other hazards. Referall servicingto qualified
service personnel.
24. Replacement Parts
When replacement parts are required,be sure the service
technician has used replacement parts specified by the
manufacturer or have the same characteristicsas the originalpart. Unauthorizedsubstitutions
may resultinfire°electric
shock, or other hazards.
17. Sound Volume
Reduce the volume to the minimumlevel before you turn on the
product. Otherwise, sudden high
volume may cause hearing or
speaker damage.
25. Safety Check
Upon completion of any serviceor
repairsto this product,ask the service technician to perform safety
checksto determinethat the product isin properoperatingcondition.
18.Sound Distortion
Do not allowthe productto output
distortedsound for a long time. It
may cause speaker overheating
and fire.
\
_ i
19. Headphones
keep the
When
youvolume
use theatheadphones,
a moderate _''_//,r"
level. If you use the headphones _)
continuously at a with high volume, it may cause hearing damage.
pr'=
411
Precautions
• When chippingthe DVD videoplayer,the originalshipping
cartonand packing materials comein handy.For maximum
protection,repackthe unitas itwas odginallypackedat the
factory.
• Do not use volatileliquids,such as insectspray,near the
DVD videoplayer.Do not leaverubberor plasticproductsin
contact with the DVD videoplayer fur a longtime.They will
leavemarkson the cabinet
• The top and rear panels ofthe DVD video playermay
becomewarm aftera long pedodof use.This isnot a
malfunction.
• When the DVD video player is notin use, be sureto remove
the discand turnoffthe power.
• If youdo not usathe DVD videoplayerfur a longtime,the
unitmay notfunctionproperlyin the future. Usethe DVD
videoplayeroccasionally.
Moisture condensation damages the DVD video
player. Please read the following carefully.
Moisturecondensationoccurs,fur example,whenyou pour a
coil drink intoa glasson a warmday.Drops of waterform on
the outsideof the glass.In the same way,moisturemay
condenseon the opticalpick-uplensinsidethis unit,one of the
mostcrucialinternalparts of the DVD videoplayer.
• Moisture condensation occurs during the following
cases.
• When you place this DVD video player near a TV, radio,or
VCR, the playbackpicturemay become poorand the sound
may be distorted.In this case,place the DVD videoplayer
swayfrom the TV, radio,or VCR.
Use a soft, dry cloth for cleaning.
• For stubborn dirt, soak the cloth in a weak detergent solution,
wring the cloth wall, and wipe the unit. Usa a dry cloth to
wipe it dry.
Do not use any type of solvent, such as thinner and benzine,
as they may damage the surface of the DVD video player.
• If you use a chemical saturated cloth to clean the unit, follow
that product's instructions.
• When you bringthe DVD videoplayerdirectlyfroma cold
place to a warmplace.
• When you usa the DVD videoplayerin a roomwhere you just
tumed on the heater,or a placewhere the coldwindfromthe
air conditioner directlyhitsthe unit.
• In summer,whenyou use the DVD video playerin a hot and
humidplacejust afteryou movethe unitfrom an air
conditioned room.
• When you usethe DVD video playerin a humidplace.
o
0
0
0
0
0
o
0
o
0
• Do not use the DVD video player when moisture
condensation may occur.
The DVD video player is a high technology, precision device, ff
the optical pick-up lens and disc drive parts are dirty or worn
down, the picture quality beoomes poor. To obtain a dear
picture, we recommend regular inspection and maintenance
(cleaning or parts replacement) every 1,000 hours of use
depending on the operating environment. For details, contact
your nearest dealer.
15
If you usethe DVD videoplayerin sucha situation,it may
damage discs and internal parts. Removethe disc,connect
the powercord of the DVD video playerto the wall outlet,turn
on the DVD videoplayer,and leaveit fur twoor three hours.
Aftertwo or three hours,the DVD videoplayerwill have
warmed up and evaporatedany moisture.Keep the DVD
video playerconnected to the wall outletand moisture
condensation willseldomoccur.
Intmduotlon_
Table of Contents
Introduction
• SAFETY PRECAUTIONS
........................ 2
•
Front Panel/DVD display/Rear Panel
• IMPORTANT SAFETY INSTRUCTIONS ... 3, 4
• Precautions ............................................... 5
• Table of Contents .....................................
Identification of Controls ...................... 7-10
RemoteControl
Preparingthe RemoteControl
Operatingwiththe RemoteControl
6
Connections
• Connecting to aTV .................................
11
•
Connecting to Optional Equipment... 13, 14
EnjoyingDelby Digital(AC-3) Sound
EnjoyingDofbyPro LogicSunoundSound
EnjoyingTwo-ChannelDigitalStereo Sound
•
Playing Repeatedly ................................
• Connecting to an Audio System ............. 12
Playback
•
Playing a Disc ...................................
BasmPlayback
15-18
Playingat Twioeor Eight'limesthe NormalSpeed
PlayingFrame by Frame
• Playing in a Favorite Order ..................... 22
Playing in Slow Motion
Resuming Playback from the Same
• Locating a Specific TrUe, Chapter,
or Track ..............................................
21
Repeatinga'Rtie, Chapter,or Track
Repeatinga SpecificSegment
SettingTitles, Chapters, or Tracks in a Favodte Order
•
PlayingTdles in RandomOrder
19, 20
Locatinga "IdleUsingthe "Idle Menu
Locatinga"Idle
Locatinga SpecificChapteror Track
Playing in Random Order ....................... 23
Playing Chapters or Tracks in Random Order
•
Using the On-Screen Display and
DVD display .............................................
24
Checking the Operational Status
Locating a Spec'_c Chapter or Track Directly
Checkingthe RemainingTime andSettingStatus
_!
Function
Setup
• Selecting a Display Language ................ 25
._Selenting a Language for On-Screen Displays
and the SET UP MENU
• Displaying Subtitles .......................... 31, 32
Setting the Default Subtitle Language
• Setting the Playback Picture Size ........... 26
Selectinga SubtitleLanguage
DisplayingSubtffies
• Selecting the Camera Angle ............. 33, 34
Se_ting the Default Playback Picture Size
• Selecting a Disc Menu Language ..... 27, 28
Setting
the DefaultDiscMenuLanguage
Changingthe CameraAngle
Displaying the Angle Icon on theTV Screen
• Setting the Parental Lock ................. 35, 36
Selecting a Disc Menu Language
Table of Languagesend Their Abbreviations
Settingthe ParentalLock
• Selecting a Language ...................... 29, 30
Settingthe Default Language
Selecting a Playback Audio Setting
,i)
Others
• Notes on Discs ........................................ 37
NotesonUnauthorized
Discs
• Before Calling Service Personnel ........... 38
• Specifications ..........................................
• Index .......................................................
40
• LIMITED WARRANTY ............... Back cover
39
61
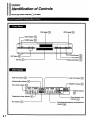
Identification
of Controls
See the page number iruside the D
for details.
DVD display
STOP button
Powerindicator[_
POWER button [_
_L
L_
S_lP_oo
_
DLsc_ay
J
J
]
'---_-_'---"_PA
SE button_
PLAY buttonI:_
OPEN/CLOSE button
Angle iconir_di_.ator
[_>
AudioCD indicator_)
Operatingstatusindicator
Tdie numberindicatorD
F
I-I • I-! I-!. I-! I-II
0-0
Chapter/tracknumberindicator
DVD indicator
P,_D0_
OM indicator
I-J-O O I
l
[
Repeat playbackmode
Totalplayingtime/rema;_n_°:e/e'_psed time
indicators[_
17
MEMORY indicator[_
t
_:./Ac_oiGrrA,
Auolo
ou'rj._I_ I_
A_.OQAUDIO
our€._.t_
E_ [_} D
f
i
! k--_
m_
'/
f
Power cord --
------,uo,o_,.,c=,D I_ I_ D
8
Identification
of Controls (continued)
The instructions in this manual describe the conbols on the remote control,
See the page number inside the _
for details.
I
OPEN/CLOSE
button [_
_
SET UP button [_
)1 L_
DISPLAY button
I
ENT'_R
button
"--"
2L2L2_
1
REV(reverse)button[_'_"_
PLAYbutt°n lk_
SKIP button_
_
ySUm_
I h
I _
li
ITI ITI
REV
iii
_
_-J
_------"TITLEbutton[_
"lm.E
_ -_-.-.--
r_iL
_
_
_
SKIP STOP SKIp ,SLOW
_
I
•
ii
POWER button _
[_
SUBTITLE ON OFF but'ton
I_AST PLAY button [_
_T(_e)_vtton[_
Pt.AY P'WOP_tL_'_("
_"
-
_
Kl
-_rm.
--._.
L
iI
_
_
_
_
_'_m
)
_
_
SETUP
I
_
i
'J
_
FWD 'fast forward'button
_"
"
REPEAT button
* MENU button
Use the MENU button to display
the menu screen included on
DVD video discs. To operate a
menu screen, follow the
instructions in =Locating a T'dle
Using the'idle Menu" (page 19).
19
I
Insertthe batteriesintothe remotecontrolso youcan useit to
operatethe DVD Videoplayer.
i
This section shows yOUhow to use the remote control.
Point the remote control at the
remote sensor and press the buttons.
Open the cover.
W'_hin about seven meters (23 feet)
Insert two AA batteries.
r-%
Distance:Aboutsevenmetersfromthe
remotesensor
Angle:
About30" in each directionof the
frontofthe remote sensor
* Do notexposethe remotesensor of the
DVD videoplayerto a stronglightsource,
suchas directsunlightor illumination.
If you do so,you may not be able to
operatethe ENDvideo playerwiththe
remotecontrol
Make sure to matchthe + and - on the
batteries
to the marks inside the battery
compartment.
!
Close the cover.
Improper use of b_tteries may cau_ battery k_akage and corrosion.
To operate the remote control correctly, follow the instructions below.
• DO not insert the batteries into the remote control in the wrong
direction (follow the +/- signs).
• DO not charge, heat, open, or short-circuit the batteries. Do cot throw
the batteries into a fire.
• DO not leave dead or exhausted batteries in the remote control,
•
•
•
•
•
Point the remote contre_ at tba remote sensor of the DVD video p/ayar.
DO not drop the remote control
DO not leave the remote control near an extremely hot or humid place.
Do not spill water into or put anything wet on the remote control.
DO not open the remote control.
• DO not use different types of batteries together, or mix old and new
batteries.
- If you do cot use the ramote control for a long pedod of rime, remove
the batteries to avo'KIpossible damage from battery corrosion.
• If the remote control does cot fucolJon correctly or if the opera_ng
range becomes reduced, replace all batteries with new ones.
• If battery Jeakage occurs, wipe the batter_,' liquid from the battery
compartment, then insert new batteries.
10 1
connec.o=
Connecting
to a TV
Connect the DVD video player to your TV.
Set the AUDIO SELECTOR
to "PCM(ANALOG ON)."
Towall outlet
R;M(/_/U-OG_
-?
AUDIOS_OR
Powerplug
To ANALOG AUDIO OUT _
_
OR
To S VIDEO OUT
(red)
To
VIDEO
OUT
If the "W has an S video _nput,connectthe DVD
video playerwiththe suppliedS-videocable. Use
thiscustomS video cable,andconnect the end with
the filterto the DVD videoplayer'sS VIDEO OUT
jackas illustrated,
S video cable (supp,ed)
I_ To S videoinputjack
If yourTV has an RF (AntennaIn) jack only,use
an RF modulator(not supplied) to connectthe
DVD video playerto yourTV.
TV or monitorwith
audio/videoinputjacks
* Set yourTV to acceptAuxiliary
(Une) input.See yourTV
owners manualfor details.
• Be sure to refer to your TV owner's manual as well.
• When you connect the DVD video player to yeur TV, be sure to turn off the power and unplug both units from the wall outlet before making any
connec_ons.
• If your television has one audio input, use a Y cable adapter (not supplied) to connect to your TV,
* C_nnast the DVD vi_
player direct_yto y_ur TV If y_u _nnant the DVD video player to a VCR_ the playbeck pict_Jmwi_ be _rted
DVD video discs are copy protected.
because
Connecting
to an Audio System
You can listen to the sound of audio CDs and DVD video discs in stmao.
i
I
I
I
ii ¸
i
•
Set the AUDIO SELECTOR
to "PCM (ANALOG ON)."
i
To walloutist
PO.!(/Ue_.OG
ON_
AUDIO SELECTOR
Power plug
OUT
ToVIDEO
O_ TOS VIDEOOUT
TO ANALOG AUDIO OUT (red) _._
If the'iV has an S video input, connect the DVD
video player with the supplied S-video cable.
Use this custom S video cable, and connect the
end with the filter to the DVD video player's S
VIDEO OUT jack as illustrated.
S video cable (supplied)
To audio input jacks
of the amplilier
(red)
t To Svideo inputjack
(wh_e)
_'
0
To video inputjack (yeliow)
Videocable
Audio system
* Set your amplifier to receive
Amdliory input. See your audio
system's owner's manual for
betai/s.
TV or monitor with a
video input jack
• Set your TV to accept Auxiliary
(Une) input. See your -rv
owner's manual for details.
• Refer to the owner's manual of the connected equipment ('l'V, audio system) as well.
• When you connect the DVD video player to other equipment, be sure to turn off the power and unplug all of the equipment from the wall outist
before making any counecifor_.
• If you place the DVD video player near a toner or radio, the radio broadcast sound might be distorted. In this case, place the DVD video player
away from the tuner and radio,
• The output sound of the DVD video player has a wide dynamio range. Be sure to adjust the reeeNer's'_01urce to a moderate listening ioveL
Othew&se, the speakers may be damaged by a sudden high volume sound.
• Turn off the amplifier before you connect or disconnect the DVD video player's power cord. If you leave the amplifier power on, the speakers
maybedamaged.
12 •
Co.nec. )
Connecting to Optional Equipment
You can enjoy the high quality dynamic sound of Dolby Digital (AC-3), Dolby Pro Logic, andTwo-Channel Digital Stereo.
I
r
I
I
•
Do_byDigb_ (AC-3)
Dolby Digital is the surround sound technology used in mov_ theaters, and is now available in the home.You can enjoy motion picture and live
concert DVD viden discs with this reaUs_c sound by co_eslJng the DVD video player to a six-chanred amP_fier equ_oped with a DolW D_
(AC.3) desoder or Dolby Dig_al (AC.3) precessor. If you have a Dolby Pro Logic Surround danoder, you will obtain the full benefit of Pro Logic
from the same DVD movies that provide full 5.1-channel Dolby Digital soundtracks, as well as from ti_es with the Dolby Sunound mark.
Whan you set the AUDIO SELECTOR
Set the AUDIO SELECTORto
=AC-3(ANALOG OFF):
vidan pley_ does nct send out sound
from the ANALOG AUDIO OUT jacks.
To PCM/AC-3
DIGITAL
AUDIO OUT
AUDIO SELECTOR
ToVIDEO OUT
rSohm
coaxial ca_a
Connection
Ampli_
example
Video csble
To digitalaudio
input
eqsippad with e
r
Standard equipment
necessary to enjoy Dolby
••
u
YOUwill need:
• The DVD vicleo player
o in
(equipped w_than AC-3
ROnt speaker _
I ,1
_.
,
_
Front speaker
• DVD video diSCSrecorded
in Dolby Digital (AC-3)
Six-channel
amplifier
equipped with
e Dofby
._",_
Digital Digitar(AC-3)
(AC-3) deooder, or
Dolby
--
_
"_"
n ^
er r_" _j
__vJ_
_
Sub woofer
"_
processor and power
amplifier
Five speakers and one
sub weofer
Rear spseker
"_'"
(left surround) [_
J To enjoy Dolby Digital
1_"
[_
Rser speaker
(rightsurround)
•
J (AC-3) sound
J YOUneed to select the
J recording system. See
page 30 and select =AC-3:
{
[
ManLl_Ctumd under license from Dolby Laboratories Licensing Corporation, "Dolby;'AC-3,"
=pro
Corpombon.
Logic; and the double-D symbol are trademarks of Dolby Laboratories Licensing
1
J
• Connect the spe_<em a¢cot_g to the instnJctionsin the owner's manual for the speaker system.
• Refer to the owner's manual of the connected equipmeht as well.
• When you connect _e DVD video pleyerto other equipment, be sure to tom off the power and unplugall of _ equipment from the wall outlet before
making any co,sections.
• The output sound of the DVD video player has a wide dynamic range. Be sure to adjust the receiver'svolume to a moderate listening level. OthenNise,the
speakers may be damaged by a sudden high volume sound.
.%Turn off the _'nplifier before you connect or disconnectthe DVD video PleYer'sPower cord. ff YOulea_ethe amp"tierpower on, tl'msbeakem may be damaged"
113
Do notsetthe AUDIO SELECTOR to'AC.3 (ANALOGOFF)"tmlessyouare connecting(tothe PCM/AC-3 DIGITALAUDIOOUT jack)an AV decoder
I Warning
1
b'_athas _e Do]byDigital(AC-3) decodingfunction.Highvolumesoundmaydamageyourhearingaswellas I_ speakers.
ii
Dolby Pro Logic Surround
You can enjoy Dolby Pro Logic Surround sound by connecting an
_mer andspeakw_mwn (r_ end_e from_
speaker,
andoneortworut speakm).
a cenmr
_nel
,
i
Digital Stm'eo
You can enjoy Two.Channel Digital Stereo sound by connecting
an amplifier equipped with a digital audio input and speaker
symm (r_htandk_tfrontspeakers).
iWlth anamplmerequippedwith DolbyDigital(AC-3),
connect
theequipment
thesamewayas described
In"F.njoying
DolbyDigital(AC-3)Sound"
ontheprevious
page.Refertothat
amplifier's
owner's
rnanualar_lsettheamplifier
soyoucanenjoy
DolbyProLogicSurround
sound
mWithanamplifiernot equippedwith DolbyDigital(AC-3),
connect
theequipment
as follows.
SettheAUDIOSELECTOR
to "PCU(ANALOGON)."
AUIXOSla.ECTOR
SettheAUDIOSELECTOR
to_
(ANALOGON):
AUtO SB.ECTOR
To PCM/AC-3
DIGITAL
AUDIO OUT
75 ohm coaxial cable
ToVIDEOOUT
tidao caUe
m
ToVIDEO OUT
TOANALOG AUDIO OUT U
example
/
lidao cable
Connection
Connection
To digital
audio input
Ampii_erequipped
witha digitalaudio
Audi°_T_oauclio in
example
put
Center speaker
_
Rear speaker _
I input of TV
Connectoneor two
rear speakers.
rear
speakers
"t_
_nd
f_-nwalbe
tP_
monaural
s_enif
you
connecttyrorear
speakem
• Connect the speakers accon:r,n,g
to 5'-minstructionsin the _mer's manual lot the speakm system.
• Refer to the owner's manual of the connected equipment as well.
• When you connect the DVD _idao player to other equipment, be sure to turn off _ _
_
u_ug all of _ _
_
_ _
_et be_ _
a_
connections.
• The _utput sound of the DVD video player has a wide dynamic range. Be sure to adjust the rsce_a
_u_
to a _
li=en_ _l.
_,
_
speakers may be damaged by a sudden high volume sound.
• Turn off the amplifier beforeyou connect or disconnectthe DV_ video player's power cord. If you leave the amplifier power on, the speakers may be damaged.
14 •
P_yback
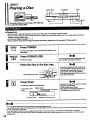
Playing a Disc
Powerindicator
STOP
This section shows you how to play a DVD video disc
or audio CD (compact disc).
• Preparations
• When you want to play DVD video discs, turn on the TV and put the TV in Auxiliary (Une) input mode.
• When you want to enjoy the SOundof DVD video discs or audio CDS from the audio system, turn on the audio system and set the
amplifier to receive Auxiliary input.
• For connection details, see pages 11 - 14.
• Set the playback picture size according to the picture tube shape or aspect ratio of the connected "rv. (See page 26.)
The DVD video piayer turns on and the power indicator on the
player lights.
l!
O OSE
Press POWER.
Press OPEN/CLOSE.
The disc tray opens.
i
Place the disc in the disc tray•
Youcan opsn the drsctroy byprs_dngthisbutton
evenif the DVD video player is turned off.
• Them am two ditiomntdisc sizes. Place the disc
in _le corrsctguideio the disc _'ay.If the disc is
outof the guide,it may damagethe dLscand
causethe DVDvideo playerto malfunction.
• Do notplaceanythinge0(ceptDVD video discsor
audioCDs in the disctray.
Wt_ the playbacksidedown
Press PLAY•
The disc tray doses and playback starts.
Currentchapteror _ad_
number
'
Playback
= indicator
J ,-- DVDindicatorappearsduringDVD
, I /v_od_cpWos_
Currentlffienumber
• If youinsert an audioCD, the audio CD indicator
appeare in the DVD display.
The titisnumberdoas notappsar.
• Afterplaying all of the chaptersin the title,the
DVD videoplayerautomaticaity stops.
Elapsedtimeofthetitleor track
• Do notmove the DVD video player dudngplayback. Doingso maydamagethe disc.
• Use the OPEN/CLOSE buttonon the remotecontrolor DVD videoplayerto open and closethe disctray.DOnotpushthe disc1my.Doing so may cause
the DVD videoplayerto rcaffunction.
• DOnotpush downthe disc tray or putany objeotsotherthan discsk_the disctray.Doingeo may causethe DVD videoplayer to maffurK_l_,on.
• Keepyourfingersclear of the disctrayas it is dosing.Be especiallycareful whenchildren'sfingersere near the closingdisc tray. There is a dsk of
personaliniu_.
115
I
• To obtain a higher quality picture
Occas'mnally,
some picturenoisemay appearon the'rV _reon
whileplayingaDVD videodiscbecausethe high resolutionpictures
on fl'mssdiscsincludea lot of infon'nation.
While the amountof
noisedependson the'IV, you shouldreducethe sharpness
adjustmenton yourTV from the pos'dlonyou usuallyset for normal
broadcasts.
i
=__
=i=
_.L
!
sToP
!_
The _
_ symbols on the heading bar show the playable discs for
the function described under that heading,
:You can use this function with DVD video discs.
:You can use this function with audio CDs.
i
To go to the next chapter
SKIP
4
mUSE_EP
_l
or track
To stop playback
STOP
Press SKIP )4H.
To go to the previous chapter or track
SKIP
Press SKIP 1<1.4.
Press STOP.
The DVD videoplayer returnsto chapter1
or track1.
To remove the disc
OPB_.OSE
_'_
Press OPE_CLOSE.
The DVD videoplayer startsplayback from
the beginningofthe currentchapteror
track.
When youpressthe SKIP M< button
twice, the DVD video playerstarts
playbackfrom the beginningof the
p_us
chapteror track.
Removethediscalterthedisctray
openscompletely.
To pause playback (still playback)
• Be sure to press the OPEN/CLOSE
button to close the disc tray after you
remove the disc.
PAUSF_.iS'_ Press PAUSE/STEP durin 9
playback.
Appears when pk_oack is paused
I
I
TO resume normal playback, press the
PLAY button.
• The sound is muted during still playback.
16,=
Playback )
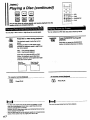
Playing a Disc (continued)
_ _ _ ::_ _
REV
You can play dlsQs at various speeds, and resume playback from the
iocauo,whereyoustoppedplayback.
Youcan play a disc at twiceor eight_rnes the normaJspeed.
You can advancea DVD videodisc pictureframe byframe.
Press REV or FWD during playback.
Pre_ PAUSE/STEP during l_ill
playbad_
The playback
speedistwicethenormal
Eachtime youpress the PAUSE/STEP
button,the pictureadvancesone frame.
Pressingthe REV or FWD buttonagain
changesthe playbackspeed to eighttimes
the normalspeed.
REV: Fast reverseplayback
FWD: Fast forward playback
Eachtime you pressthe REV or FWD
button,the playback speed altemates
between twicethe normalspeed and eight
times the normalspeed.
Twk:ethe
normalspeed
Eightt_es the
normalspeed
To resume normal playback
PLAY
[_
....
Press PLAY.
• The DVD video player does not play sound and _
of a DVD
vicleo disc dudng playback that is twice or eight times the normal
playback speed (forward or reverse).
H¢_=ver, the DVD video player plays sound during fast forward or fast
reverse playback of audio CDs.
• Twice or eight times the normal playback speeds are only approximate
speeds. These speeds may vary slightly from disc to disc.
117
To resume normal playback
PLAY
Press PLAY.
The sound Jsmuteddudngtrameby frarnop_aybad,:.
1
_._ _::2C:::]:::__-I! i
_
_
4
-2 3
it
_
_
Pt.AY
_
_
SLOW
1
/
Youcan play a DVD videodiscin slowmotion.
:
You can stopplaybackand resumeplaybacklaterfrom the
same locationon the disc.
, .SLOWd..n.pl,bac
The playback speed becomes half the
Press STOP during playback at the
location you would like to retum to
later.
!
normalspeed.
• The DVD videoplayermemorizes the
Fv_]
k_cat_n
whereyoustopped
playbac_
• The OVDvideoplayerstoresthatlocation
in itsmemory, even ifyou turnoffthe
player.
Eachtime you pressthe SLOW butt_, the
playbackspeed changesas follows.
I
i
•
Leave the disc in the DVD video
player.
Openingthe disctraycancelsthis function.
1/81_
!
I
!
'"°1
I
"
......
|
I
1181
i
LAST
PLAY Press LAST PLAY.
The DVD videoplayer resumesplayback
slightly before the location where you
stoppedplaybec_
'°1
I
To resume normal playback
PLAY
Press PLAY.
The sound is muted during slow motion playback.
• The Last Play function is canceled if the DVD video player is
disconnected from the wall ouaet, or if power is interrupted.
• Some DVD video discs start playback automatically when you insert
them, and you do not have to press the PLAY button to start playback.
If you use the Last Play function with these DVD video discs, turning off
the DVD video player with the POWER button cancels the Last Ray
function.
- The Last Play functlon is cancaled when you press the SET UP button
to display the SET UP MENU on the "iV screen.
• The Last Play function is cancaled when you stop playback in a title
that includes multiple camera angles and press the ANGLE button
Loage
33).
• You cannot use the Last Play function while operating the disc menu.
18 •
Playback )
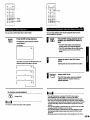
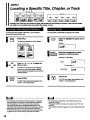
Locating a Specific Title, Chapter, or Track
DVDvidesdtsc
_2
Chapter I
T_,
Chapter 2
Audio CD
_]
Normally, DVD video discs are divided into titles, and the titles ere sub-divided into chapters. Audio CDs are dMded
into tracks.You can quickly locate any specific tltio, chapter, or track.
If a DVD video disc contains a title menu, you can locate a
specific title using that title menu.
You canlocate a specifictitle byentednga tiite number.
ii
Press "IITLE.
PrimT to highlightthe space next to
TITLE.
The title menu appeam on the TV screen.
Example of a title menu
TITLE: ml
CHAPTER:
I_[::_mmr'_"
1:::_:_O[3
1
buttons for the title you wanL
Pie.the
corresponding number
Example: To select title 2
I
t3D
Press A I "_" I "q l D" toselectthe
title you want.
To select title 12
If the titles in the title menu are assigneda
number,you can directly locatea specific
title by pressingits assignednumberwith the
number buttons.
Press PLAY.
The DVD video playerstartsplaybackfrom
chapter I ofthe selectedtitle.
• The instructions above describe the basic procedure. Tbe procedure
varies depending on the contents of the DVD video d'rsc,if different
instructions appear on the TV screen, follow those instruct!ons,
• If you display the title menu dudng ptayback and press the TITLE
button again without selecting any title, the END video player resumes
pla_ck
from the point where you first pressed the TITLE button.
• If a DVD video disc does not contain a t;ife rnenu, the title menu does
no! appear on the TV screen when you prees tbe TITLE button.
19
The DVD videoplayerstartsplaybackfrom
chapter1 ofthe selected _le.
• You cannot locate a specific title on DVD video discs that do not
contain title numbers.
• pressing the CLEAR button erases the numbers next to TITLE and
CHAPTER.
• You can select a preferred language for on-screen displays (see page
25).
TITLE
_AI
vl
_ ENTER
-ql
D,-
_T
li====
Numberbuttons
i:
i_
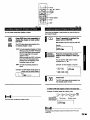
Youcan locate consecutivechaptersor tracks.
Press SKIP _
or )4H repeatedly to
display the chapter or track number
you wahl
SKIP
!l
If you knowthe chapteror tracknumberyou wantto play,you
can locate it directly.
m
If/
I
The DVD videoI_tyer startsplayback from
the selectedchapteror track.
: To locateprecedingchaptersor tracks
Whenyou pressthe SKIP _ button,
the DVD videoplayer startsplayback
fromthe beginningof the current
chapteror track.
When you pressthe SKIP _ button
twice,the DVD videoplayerstarts
playbackfromthe beginningofthe
precedingchapteror track.
:Tolocatesucceedingchapters or
tracks
Example: "TheDVDdisplaywouk:lappear_,s
followswhenyou selectchapter3.
J_
PressT repeatedly to highlight the
space next to CHAPTER.
Skipthis stepif you are usingan audio CD.
Example
!
C_QD_
buttons
the chapter or track
you
CI3QDrn
Press theofcorresponding
number
_:3C_Dr'nQD want.
You can usethe (_] batten to select
numbersfrom 10 - 99.
Example:To selectchapter or track25
: r --r --C3B
LI" U L I" L:
Press PLAY.
The END videoplayerstartsplaybackfrom
the selectedchapteror track.
To select a title and chapter number at the same time
Example:To seisct chapter25 in title2, press
PLAy
Some tibes may not display the chapter number.
Do
_ Fess_f_
spacenexttoTITLE_
alreadyhighigh_l.
T'_enumber Chapternumber
TtTLE:
2
CHAPTER:_
I
Pressingthe CLEAR buttonerasesthe numbemnexttoTITLE and
CHAPTER.
20 m
Playing Repeatedly
PLAY
I
A-B RPT
You can play a spacmctitle, chap_r, txack,or segment repe_Nly.
(l"iUerepeat, chapter/trackrepeat,A-B repeat)
You canplay the same title, chapter,or trackrepeatedly.(TrUe,
chapter/trackrepeat)
Begin playback of the title, chapter,
or track you want to repeat (see
pages 19 and 20).
I_
L__._I
REPEAT
You can play a specificsegment repeatedly.(A-B repeat)
!.__J
_:
the
beginning
of the
segment
(point
During
playback,
press
A-B RPT
at
A) you want to play repeatedly.
Flashes
Press REPEAT during playback.
I
Each time you pressthe REPEATbutton,the
repeat mode changesas follows.
__
i-
_-t.l-r
, -;
"
I°t
I
I
Chapter/track repeat
(Repeats the same DVD videodiscchapter
or audio CD track)
--'4_.
!
l'l.
FI
l.l,IJ
J]_
Press A-B RPT again at the end of the
segment (point B).
t-/.
n
U-I.I
l
Appears
Title repeat
(Repeats the same DVD videodisctitle or
entire audio CD)
I .......
"
i
|
I
Ap_.am
Appears
I
i J'_'_.
I
L!.
ILI.
; J
The DVD videoplayerautomaticallyreturns
to pointA and startsrepeat playbackof the
selsctodsegment(A-B).
Repeat off (No Indicator)
(Resumes normalplayback)
To resume normal playback
CLEAR
["-7
To resume normal playback
Press CLEAR.
The (_CHP/TRK
disappear.
CLEAR
and (._TrrLE
indicators
TherepeatmodeappearsontheTV screenduringinitkdplayback
ofthe
title,chapter,ortrack.
21
Press CLEAR.
The C A-B indicator disappears.
• You can spedfy a segment only within the current title.
• You cannot set the A-B repeat function lot a segment that includes
multiple camera angles.
Playback
)
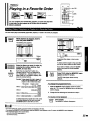
Playing in a Favorite Order
1111_ : 21=: 25
:
i _
C3 i
:
•
Q
•
•
q*
You can combine your favorite titleo, chapters, or backs and play them
in any order.You can program up to 30 items into the memory.
i,
(Memory
playback)
,I
The END video playerautomaticallyplaystitles,chapters,or tracksin the orderyou program.
i
MEMORY While playback is Mopped, insert a
II _
disc and press MEMORY.
1
2
3
4
The following
menuappears,
mMEMORVm_r.'÷
m
m_'r.- -!-,
T02C25
T02C12
T01C-T04C02
s 'r=-c=7 T--C=B
_
10
tl
12
T--C-"f--C-T--C-T--C--
,_,_"r--c-14 T--C-_S X--C--
T--C--
u_xn"r_m_x
NEXT
_
T: Ti_ number
C:Chapter
number
SET
Rashes
Programmed_e, chapter,or tracknumber
appears.
To selectanotherchapterin the sametitle,
you do not need to selectthe title number.
Enter the items you went, in order, by
pressing the number buttons, then
ENTER, for each item.
If you make a mistake, press the CLEAR
button, then press the correct number
buttons.
Each time you press the T button, the indication next to T and C is highlighted in
turn. Highlight the - indication next to T (to
select a title) or C (to select a chapter), then
press the number buttons.
Press PLAY while the MEMORY menu
appears on theTV screen.
The DVD videoplayerstartsmemory
playback.
Example: To play chapter 25 in title 2. chapter 12
in title 2, all the chaptem in tiife 1, eJnd
chapter 2 in title 4, follow these steps,
Title number
Chapternumber
ENTER
._o_ 2
IZ3-OD-t-'_
Et,r_R
To change the programmed items
1 While the MEMORY menu appeam on theTV screen,
press A/'_to movethe highlightedbar tothe itemyou
wantto change.
2
Change the item following the instructions at step 2.
ENTER
To resume normal playback
To selecttracksfrom an audio CD in order, press
the number Ixlttons for the track,then press
the ENTER buttonfor each item youwant.
CLEAR
(_
Press CLEAR.
The MEMORY indicatordisappears.
• You cannot select title, chapter, and track numbers not included on the disc.
• if you press the MEMORY or RETURN button while the MEMORY menu appears on the TV screen, the MEMORY menu disappears.
• The p_ogmmmed items vail be cleared when:
- you turn off the DVD video player, or
you remove the disc.
22m
ptayback
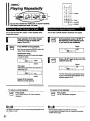
Playing in Random Order
_
_-__--J_
CLEAR
TITLE: 1:3
L _JILTrru_:s
_1
T
0
0
•
•
Numberbuttons
PLAY
0
_
__
You can play titles, chapters within a title, or tracks in random order.
(Random playbadc)
The DVD video playerautomaticallyselectsthe tidesin a DVD
videodiscand playsthem randomly.
*
j
The DVD vidso player automatk_ly sslects chaptemwithioa trde,
or tracks on an audio CD, and plays them randomly.
Press T while playback Is stopped,
then press RANDOM.
RANDOM
SKIP
RANDOM
_
Press the appropriate number
buttons for the title which contains
the chapters you want to play back in
random order.
[TVscreen]
TITLE
Skipthis stepwhen you wantto enjoythe
randomplaybackfunctionwithan audioCD.
Example: To play back the chapters in title 2
in random order, press
If you press the RANDOM button during
playback, the DVD video player automatically
current
title. playback after finishing the
starts random
!
RANDOM
Press RANDOM while playback is
stopped.
['rv screen]
Press PLAY.
If you pressthe RANDOM buttondudng
playback,the END videoplayerautomatically
startsrandomplaybackafterfinishing the
currentchapteror track.
The DVD videoplayerstartsrandom
playback.
The RANDOM indicator will appear in the
DVD display.
Press PLAY.
Pre,.%s
the PLAY buttonwithinaboutfive
secondsafteryou pressthe RANDOM
button.
The DVD video player starts random
playback.
Press the PLAY button within about five
seconds after you press the RANDOM
button.
To resume normal playback
CLEAR
Press CLEAR.
The RANDOM indicatorin the DVD display
disappears.
You cannotusa the randomplaybackfunction andthe memoryplayback
function at the same time.
23
To resume normal playback
CLEAR
Press CLEAR.
The RANDOM indicatorin the DVD display
disappears.
• You cannot use the random playback function and the memory
playback func_on at the same time.
• If you press the SKIP _
button during random play_
the END
video player goes to another chapter or track and starts playback,
Playback )
OPEWCLOSE
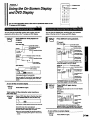
Using the On-Screen Display
and DVD Display
-'-
DISPLAY
You can view information about a dise and ita operationM status on the
TV screen and DVD display.
Youcan view the currenttitle number,back number,and total
playingtime ofthe discon the TV screen and DVD display.
Youcanview the elapsedtime, remainingtime, and operation
statusof the disc on the"IV screen and DVD display.
m
Press DISPLAY while playback is
stopped.
[TVscr_.]
U
i
DISPLAY
Press DISPLAY during playback.
[TVm]
DVD video dian
DVD video disc
Current _tis number
__
j
TITLE:
_--
CHAPTER
Rrst track number of the disc
number
Currentti_ number
Remak_g Ume
-in the currerdtitle
pLAY
-0: 50:45-0:10:24
0:10:15
3
CHAPTER:
E_
Example
Currentd_er
Remainingtimein
--the currantchapter
REPF.AT
Bapsed time ot
-the currenttitle
Playbac_mode
The REMAIN indicatorand remainingtime in the
currenttitleappearin the DVD display.
[DVD display]
Audlo CD
1"
Currenttracknumber
Current l_e number
F-_w#e[.__.___]
_
"_-
: 3
DVD indicat°r
J
DISC
PLAY
I_ "OpemlJ°naIstatus
-0:02: 00 "_
"RemaiNngtime in
.0:43:00
, Ulecurrentbad_
TRAC_
Remainingtimeof
-_-_
First chapter number in the current title
Elapsed Umeof
"the cuwentback
When an audio CD is in the DVD video player, _e
TOTALJndicator and total playing time of the disc
appear.
Ptayt_ack
mode
The REMAIN indicator and remaining time in the
current track appear in b_ END display.
To turn off the on-screen display
Press DISPLAY again during
playback.
I_SPLAY
Press DISPLAYagain.
When you play an audio CD, the on-screen (_splay
turns off.
['rv screen]
sxamp_
Total number of titles indication when inserting a
DVD video disc
0PE_CL0_
PLAY
T I TLE"
-0" 50" 45
C_R
3 2 -0_10_24
ELAPSED 0: 10:_5
AUDIO 1 ENG AC-3 2CH
Place a DVD video disc in the disc tray, then
press OPEN/CLOSE
to close the disc tray.
ANGLE 1
_ng
angle
/
Total number of titles appears for about three seconds
Some DVOvideo discsstartplayback
autornntlcallywhenyouir",oertthem.In this case,
the total numberof titlesdoes notappear.
When youinsertan audioCD, the totalnumberof
zcksandtotal playing time appearfor aboutthree
_onds.
Currentaucho
setting
The abbreviadon of the language (e.g. ENG)
appears instead of the language name. See page
28 for a ILstof languages and their abbreviations.
To turn off the on-screen
display
DISPLAY
Press DISPLAY again.
24=.
FunctionSetupj _
; 1,5
_
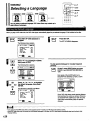
Selecting a Display Language
=_
2, 4
_ I
3,4
r
You can select • preferred language for on.screen displays and the
SET UP MENU.
_,"t!1l!lllli_iB1
•
_-.]
_
[I]llt._
[_
lh'l!l _
LIP,;hVil_i!llllJ
Preparations
• Turnon the TV and select the appropriatevideo input mode (/_xUlary Input).
• Turnthe DVD videoplayeron.
m
i
SETUP• stopped.
pressSETUPwhi_p_y_
The followingmenu appeam.
•
SET
UP
MENU
ECREEN
OISPLAY$
"rv SHAPE
ANGLE
ICON
AUDIO
EUBTITLE
DISC
MENU
SlLl_'_ll_
ENG
16:9
OFF
ENG
ENG
ENG
is
II
U
_.J
!ENTER
Press Air
until your prefmmd
language Is highlighted, then press
ENTER.
The following menuappears.
When you select "ENGLISH. _
EET
UP
MENU
9ELECT:,_
SCREEN
DISPLAYS
TV SHAPE
ANGLE
ICON
AUOIO
EUGTITLE
OISG
MENU
EXIT_
[NG
16:9
OFF
ENG
ENG
ENG
EXITI_}
{ii
Press ,i I ,!- until =SCREEN
DISPLAYS" is highlighted.
Ill
SET
UP
MENU
SCREEN
DISPLAYS
TV
SHAPE
ANGLE
_CON
AUDIO
SUBTITLE
DISC
MENU
m
When you select "FRENCH?
m MENU
R_GLAGE
AFFICHAGE-_CRAN
FORMAT
TV
IC_NE
ANGLE
AUDIO
SOUS-TITRES
MENU OISOUE
S_CT:_
ENG
16:9
OFF
ENG
ENG
ENG
SiLi:C_=IIFRE
16:9
OFF
ENG
ENG
ENG
EORTIE_
F.XIT_
When you select "SPANISH;
I
Press ENTER.
The following menu appeam.
PREPARAR
MEN0
DESPLEGADOS
FORMATO
DE TV
ICGNO
ANGULAR
AUDIO
EUBTITULO
MEN0
DEL DISCO
SELECT:elSPA
t6:9
OFF
ENG
ENG
ENG
IiALIR|
mSCREEN
DISPLAYS
ENGLISH
FRENCH
SPANISH
EXIT_
W
SEL!E_[,''II"
The abbreviation of the language appeam
instead of the language name. See page 28
for a list of languages and their
abbreviations.
Press SET UP.
The SET UP MENU disappears.
H
If you press the RETURN button while a menu appears on the TV screen, you will return to the previous screen,
25
FunctionSetup,)
Setting the PlaybackPicture Size
!i 2,3,4
'i
_
'
R_RN
2,3,4'
=
!J
Set Ute default playback picture slse according to the picture tube shape or aspect
ratio of your TV. For example, normal or standard'iV screens are a 4:3 aspect ratio.
• Preparations
• Turn on theTV and selectthe appropriatevideoinputmode (Auxiliary input).
• Turnthe DVD videoplayeron.
|
The followingmenu appears.
SET uP
MENU
°.,o...=.o
_
SB.ECT:'I':
SCREEN
DISPLAYS
"iV SHAPE
ANGLE
ICON
AUDIO
SUBTITLE
DISC
MENU
ENG
16:9
OFF
END
ENG
ENG
ENTER
PSI PAN-SCAN:
Displayspicturescroppedto fillyourTV
screen.Eitheror bothsidesof the pictureare
cutoff.
EXlT_
Press ,_. / v to highlight"TV SHAPE,"
then press ENTER.
LB I LETI'ERBOX:
Displaystheatrical imageswith masking bars
above and belowthe picture.
The followingmenu appears.
4.
ENTER
m TV SHAPE _'1"
TV
SHAPE
4:3
m
NORMAL
m
EXITi
i
The SET UP MENU appears again.
"PS_ or "LB"appearson the SET UP MENU.
ratio
presstheENTER.
Pressof-qyour
I _" TV,
to then
highlight
aspect
_
If you select =4:31 NORMAL:"
4.
The
DISPLAYMODE
Proceedto
step4. settingmenu appears.
ENTER
DISPLAY
[]
!
S__._UP
L-_J
Press SET UP.
The SET UP MENU disappears.
MODE
PS
PAN-SCAN
EX_T_
If you select "16:9/WIDE:"
The SET UP MENU appears.Proceedto
step 5.
• The displayable picture size is preset on the DVD video disc.
Therefore, the playback p',_ture of some END video discs m_'J not
¢ooform to the piofure Size you select above.
• When you playback DVD video disss recorded in the 4:3 plcture size
only, the pla_
piofum always appears in the 4:3 picture size
regardless of the TV shape setting.
• If you press the RETURN button while a menu appears on the TV
screen, you will return to the previous screen.
26 m
FunctionSetup,)
SETUP
--TITLE
-- MENU
Selecting a Disc Menu Language
-- RETURN
-- ENTER
-I-I'-
_mellu
You can select a preferred language for the disc menu from the languages
Included on the DVD video disc.
When you play a DVD videodisc,the DVD videoplayer
automaticallydisplaysthe discmenu in the pre-selscted
languageif if is includedon the disc.
SET UP
When a DVD videodiscis inserted,youcan displaythe disc
menu and selecta disc menulanguagefrom those includedon
the disc.
PressTITLE
disc menu.
stopped.
Press SET UP while playback is
The SET UP MENU app(_m on the TV
:MENU
screen.
_
Press ,_lV
4,
ENTER
to highlight"DiSC
MENU, then press ENTER.
The followingmenu appears,
III
DISC
MENU
ENGLISH
FRENCH
SPANISH
CHINESE
GERMAN
or MENU to display the
z
i
SETUP
SELECT,',_
ITALIAN
JAPANESE
DUTCH
KOREAN
MALAYSIAN
Press SET UR
' The disc menu languageincludedon the
DVD video discappearson theTV screen.
DISC IVlI_U:B_G
EXITI
You can select the default disc menu
language from the 10 languages displayed
on the DISC MENU.
l[
v
r-_lr_.l
_
4.
the
default
disc menu
then
Press
,_/'_'1-<
I ='- language,
to highlight
press ENTER.
Youwill returnto the SET UP MENU.
SET
ENTER
UP
MENU_,,_
SCREEN
DISPLAYS
"iV SHAPE
ANGLE
ICON
AUDIO
SUBTITLE
DiSC
MENU
ENG
16:9
OFF
eNG
ENG
FeE
II
[]
SETUP
Press SET UP again to select the disc
menu language.
Eachtimeyou pressthe SET UP button,the
disc menulanguage,from those includedon
the DVD videodisc,changes.
The abbreviationofthe languageappears
insteadof the languagename.See the next
pagefor a listof languagesand their
abbreviations.
Press ENTER.
i
SET UP
Press
SET
The
SET
UP UR
MENU disappears.
• If youpresstheRETURNbuttonwhilea menuappears
ontheTV
screen,youwillreturntothe previous
screen.
• Some DVD video discs may not contain a disc menu.
• Some DVD _deo discs may not include your pre-eelected disc menu
language. In this event, the DVD video player automatically displays
the disc menu in the disc's initial language setting.
27
The disc menu appears in the selected
language.
If the DVD video disc contains only one disc menu language, the disc
menu language does not appear on the TV screen when you press the
SET UP button at step 2.
Abbreviation Language
of the
language
CHI
DUT
ENG
FRE
GER
ITA
JPN
KOR
MAY
SPA
AA
AB
AF
AM
AR
AS
AY
AZ
BA
BE
BG
BH
BI
BN
BO
BR
CA
CO
CS
CY
DA
DZ
EL
No alternate
language
Chinese
Dutch
English
French
German
Italian
Japanese
Korean
Malay
Spanish
Afar
Abkhazian
Afrikaans
Amharic
Arabic
Assarnese
kymara
Aze ! ni
Bashkir
Beloruseian
Bulgarian
Bihad
Bislama
Bengali,Bangla
Tibetan
Breton
Catalan
Corsican
Czech
Welsh
Danish
Bhutani
Greek
Abbreviation Language
ofthe
Language
EO
ET
EU
FA
FI
FJ
FO
FY
GA
GD
GL
GN
GU
HA
HI
HR
HU
HY
IA
IE
IK
IN
iS
IW
JI
JW
KA
KK
KL
KM
KN
KS
KU
KY
LA
Esperanto
Estonian
Basque
Persian
Finnish
Fiji
Faroess
Frisisn
Irish
ScottishGasiic
Galician
Guarani
Gujarati
Hausa
Hindl
Croatian
Hungarian
Armenian
Interlingua
Interlingue
Inupiak
Indonesian
Icelandic
Hebrew
Yiddish
Javanese
Georgian
Kazakh
Greeniandic
Cambodian
Kannada
Kashmiri
Kurdish
Kirghiz
Latin
Abbreviation Language
of the
Language
LN
LO
LT
LV
MG
MI
MK
ML
MN
MO
MR
MT
MY
NA
NE
NO
OC
OM
OR
PA
PL
PS
PT
QU
RM
RN
RO
RU
RW
SA
SD
SG
SH
SI
SK
/dl_on
Lingaia
Laotian
Lithuanian
LaNisn,
Maiagasy
Maod
Macedonian
Malayalam
Mongolian
Moldavian
Marathi
Maltese
Burmese
Nauru
Nepali
Norwegian
Occitan
(Afan)Oromo
Oriya
Penjabi
Polish
Pashto,Pushto
Portuguese
Quechua
R_aeto-R0mance
Kirundi
Rumanisn
Russian
Kinyarwanda
Sanskrit
Sindhi
Sango
Serbo-Crcatisn
Singhalese
Slovak
_the
Language
SL
SM
SN
SO
SQ
SR
SS
ST
SU
SV
SW
TA
TE
TG
TH
Ti
TK
TL
TN
TO
TR
TS
"Fr
Tw
UK
UR
UZ
Vl
VO
WO
XH
YO
ZU
Language
Slovanian
Samoan
Shone
Somali
Albanian
Serbian
Siswati
Sesetho
Sundanese
Swedish
Swahili
Tamil
Telugu
Tajik
Thai
Tigrinya
Turkmen
Tagalog
Setswana
Tongan
Turkish
Tsonga
Tatar
Twi
Ukrainian
Urdu
Uzbek
Vietnamese
Volap0k
Wolof
Xhosa
Yoruba
Zulu
28==
FunctionSetup_
Selecting a Language
i _ _
_
_i
_DIO
2,3
You can select a preferred language. DVD video discs may contain up to
eight different languages.
When you play a DVD video disc,the DVD videoplayerautomaticallyplaysthe pre-selectedlanguageif it is induded on the disc.
Press SET UR
U
SETUP
stopped.
Press SET UP whne playbeck is
i
SETUP
The SET UP MENU disappears.
The followingmenuappears.
m
SET
UP
MENU
._.___j]_._-"_
SCREEN
DISPLAYS
"iV SHAPE
ANGLE
ICON
AUDIO
SUBTITLE
DISC
MENU
EXITi
END
16:9
OFF
ENG
ENG
ENG
m
Press _ I v to highlight "AUDIO,"
then press ENTER.
The follo_ng
4,
menu appears.
IK AUDIO
SEL/_r:,.JJ-
AUDIO
||l
ENTER
To play special dialogue for visually impaired
parsons
ENGLISH
FRENCH
SPANISH
CHINESE
GERMAN
DESCRIPTIVE
EXIT_
ITALIAN
JAPANESE
DUTCH
KOREAN
MALAYSIAN
SERVICE
OFF
At step 3, prese AUDIO before you press
ENTER to set DESCRIPTIVE SERVICE to
"ON."
Eachpress ofthe AUDIO buttonturns
DESCRIPTIVE SERVICE to "ON"or "OFF?
M AUGIO
Press _ / ,qr / "< / =,- to highlight
i
r_l rz'l r.._l the default language, then press
ENTER,
4.
ENTER
You will return to the SET UP MENU.
S_u_T:_
I,
ENGLISH
FRENCH
SPANISH
CHINESE
GERMAN
DESCRIPTIVE
ITALIAN
JAPANESE
DUTCH
KOREAN
MALAYSIAN
SERVICE
ON
F.X_T_
m
SET
UP
MENU
SF.LECt:=_•
SCREEN
DISPLAYS
TV
SHAPE
ANGLE
ICON
AUDIO
SUBTITLE
DISC
MENU
EXIT_
im)
ENG
16:9
OFF
FRE
ENG
ENG
Some DVD video discs contain special dialogue
that describes the actions on-screen. When you
set DESCRIPTIVE SERVICE to "ON; the DVD
video player automatically plays this special
dialogue.
• If you press the RETURN button while a menu appeam on the TV screen, you will return to the previous screen.
• Some DVD video discs may not include your pre-selected language. In this case, the DVD video player automatically plays back the disc's initial
language setting.
129
= 1,2
,
F
Youcan easily selecta playbackaudiosetting(language,recordingsystem,and audio channel)from thoseincludedon the DVD video
disc duringplayback.
!
AUDIO
Press AUDIO during playback.
CLEAR
-Currentaudio
settingappears
channel foraboutthree
second=
Recording
system
Language
Position
number
AUDIO
_
Fad
2CH--
I1'
The abbreviationof the languageappears
insteadof the languagename.See page 28
for a listof languagesand their
abbreviations.
|
To turn off the audio setting indication
AUDIO
Press CLEAR.
About recording systems
This DVD videoplayerusesthe DolbyDigital(AC-3) and
PCM recordingsystemsand cannotplay DVD videodiscs
recorded in any otherrecording system.
Selectthe audiosetting"PCM"or "AC-3"depending on the
kind of audiosystemyou connectedto the 0VD video player
(pages 13 and 14).
AC-3 5.1 Channelis displayedas =AC-36CH:
Press AUDIO or A while the audio
setting appears on theTV screen.
Each time you press the AUDIO or .a.
button, the audio settings included on the
DVD video disc change.
Example
AUDtO 1 ENG PCM 2OH
IAUD|O2
FRE AC-3
6CH
I
IAUOI03
SPA PCM
L:_I'I
J
I
_" : Cycles backward
• Youcanchangethelanguageonlyon DVDvideodiscscontaining
rnorethanonelanguage.
• Theincluded
languages differ depending ontheDVDvideodiscs.
30 i
Function _up)
: 1,4
Displaying Subtitles
2, 3
You can display subfltMs on theTV screen and select a _
subtitle
language. DVD video discs may include up to 32 different subtltM languages.
When you playa DVD video disc,the DVD videoplayer automaticallydisplayethe pre-selantedsubtitlelanguageif if is includedon the
disc.
Press SET UP.
SET UP
stopped.
Press SET UP while playback is
1"hefollowingmenu appears.
m
SET
UP
MENU
SEu_'r."_
CAREEN
DISpLAyS
'IV SHAPE
ANGLE
ICON
AUDIO
SUBTITLE
DISC
MENU
The SET UP MENU disappeam.
!
ENG
11:9
OFF
INa
ENG
ENG
F.XITi
Press ,=L / v to highlight
"SUBTITLE," then press ENTER.
The fo,owingmenu appears.
4.
ml SUBTITLE
_._..._'l_
I|I,-ENGLISH
ITALIAN
FRENCH
JAPANESE
SPANISH
DUTCH
CHLNESE
KOREAN
GERMAN
MALAYSIAN
NO SUBTITLES
ENTER
6XTENDED
FEATURES
To display special subtitles for headng impaired
parsons
SUB'I'(TLE At Step 3, press SUBTITLE before you press
ENTER to set EXTENDED FEATURES to
"ON."
OFF
eXJT_
Each press ofthe SUBTITLE buttonturns
EXTENDED FEATURESto "ON" or"OFR'/
m SUBTITLE
v
r_-'lr._.l
the
default
subtitle language,
then
ress
AIvI41P,'tohlghlight
_
press ENTER.
if you do not wantto displaysubtitles,select
"NO SUBTITLES."
4.
ENTER
SlaJ_'_,,_
ENGLISH
FRENCH
SPANISH
CHINESE
GERMAN
NO SUBTITLES
EXTENDED
ITALIAN
JAPANEEE
DUTCH
KOREAN
MALAYSIAN
FEATURES
ON
You will return to the SET UP MENU.
fll
SET
UP
MENU
f_:_
SCREEN
DISPLAYS
TV SHAPE
ANGLE
ICON
AUDIO
SUeTITLE
DISC
MENU
=xiTm
ENG
16:9
OFF
ENG
FRE
ENG
Some DVD video discs contain special subtitles,
an enhancement of closed captioning. When you
set EXTENDED FEATURES to "ON," the DVD
video player automatically displays these special
subtitles.
D
• If y_J press the RETURN button while a menu &ppears on the TV screen, you wi/] mtum to the previous semen.
• SOme DVD video discs may not include your pre-selected language. In this case, the DVD video player automatically displays subtitles consistent wi_
the disc's initlaJlanguage setting.
131
I
--
Youcan easilyselectthe subtitlelanguagefromthose included
on the DVD videodiscduringplayback.
Press SUBTITLE during playback.
SUBTITLE
SUBTITLEON OFF
Youcan displaysubtitleson theTV screen.
SUBIm.E
ONOFF
Press SUBTITLE ON OFF,
1 ENG ON---_..---l-Current_
I
I
L_
uage
SUBTITLE 1 B4G ON_-Appemsfo¢
about thres
seconds
forabo_ _rse
The abbreviationof the languageappears
insteadof the languagename.(See page 28.)
"NO SUBTITLES"appears ifno subtitlesare
available.
Good moming!
Subtitles
Press SUBTITLE or _, while the
subtitle seffing appears on theTV
screen.
Eachtime you pressthe SUBTITLE or
,_ button,the subtitlelanguages included
on the DVD videodiscchange.
To turn off the subtitles
SU_ll.E
ONOFF
I SUB'rlTLE 1 ENGGN
I'--
J-_
Press SUBTITLE ON OFF.
The subtitlesdisappear.
1
SUBTITLE 2 FRE ON
|
[ suBTi-TLE3 SPAON
I
I
SUBTVrLEt ENGOFF---
Appearefor
aboutthree
seconds
[
"_" : Cycles backward
To tum off the subtitle setting indication
CLEAR
Press CLEAR.
• YOUcan change the subtifle language only on DVD video discs
containing more than one subtitle language.
• The included subtitle languages differ depending on the DVD video
disc,
• During some scenes, the subtitles may not appear immediately after
you change the subtitle language by pressing the ._. / _r buttons.
- Even if you select"NO SUBTITLES • as the default setlJng, you can
turn ofi the subtitles and selact a language by pressing the SUBTITLE
button.
• You can display sub.as Only it the DVD video disc includes subtitles.
• Some DVD video discs are set to display subtffies automatically, and
you cannot turn them off even if you set the subtitle function to off.
• Dudng soma scenes, the subtiflas may not appear immediately after
you press the SUBTITLE ON OFF button.
• Even if you setect"NO SUBTITLES" as the default seffing, you can
turn the subtitles on or off by pressing the SUBTITLE ON OFF button
after you change the subtitle language by pressing the SUBTITLE
button.
32I
Selecting the Camera Angle
1,2
_p
You can watch scenes from up to nine differmlrtcamera angles (mutiiFle angle).
_
CLEAR
L_
Ifthe scenewas recordedfrom multipleangles,you can easilychangethe camera angleof the sceneyouare watching.
Press ANGLE while playing a scene
recorded from multiple angles.
Pressthe ANGLE buttonwhilethe angle icon
in the DVD displayisflashing.
/_eLE II
- Current
angle
number
appears
To check if the scene is recorded from multiple
angles or not
On ssme DVD video disss,onlysome scenesof thetitle may
be recordedfrom multiple angles.Youcan checkwhich
scenesare recordedfrom multipleanglesby the statusof
the angleiconin the DVD display.
When Flaying a title that contains at least one scene
recorded from multiple angles, the DVD displayappears
as follows.
Appear_
I
I ..... °
Press ANGLE or ,_, while the angle
number appears on the TV screen.
Eachtime you pressthe ANGLE or
button,the camera anglechanges.
I
When playing a scene recorded from multiple angles,
the DVD displayappearsas follows.
Flashes
:"
.-i
:
L='_J _J
1
To turn off the angle number indication
CLEAR
Press CLEAR.
_r : Cycles backward
You can change the camera angle directly by
pressing the number buttons for the angle
number.
• You can change the camera angle onlyon sconesrecordedfrommultipleangles.
• You can change _e camera angle duringstillplayback.Thecameraangle changesto _e new settingwhenyouresumenormalplayback.
• If the currenttitlehas scenes recordedfrommultipleangles,youcan changethe camera anglewhileplayback is stopped.
1 33
- il
1A
i
You can display the angle icon on the'IV screen to determine if a scene is recorded from multiple angle_
Press SET UP,
i
ET UP
I[Z
Press a.
SET UP while playback is
mpp
The SET UP MENU disappeam.
The following menu appears.
SET
UP
The angleiconautomaticallyappearson the
"r'vscreenwhileplayinga scene recorded
from multipleangles.
MENUN_IJ_'T.*_-
SCREEN
DISPLAYS
"iV SHAPE
ANGLE
ICON
AUDIO
SUBTITLE
DISC
MENU
ENG
16:9
OFF
ENG
ENG
ENG
_1!
EX_I"D
- Appeamin
white
Press A / ,qr to highlight =ANGLE
ICON,' then press ENTER,
The followingmenu appears.
M
ENTER.
ANGLE
ICON
ANGLE
ICON
SEUEr_r*.,/_
The angle icontums red while displayingthe
anglesettingon theTV screen.
ON
_ITUED
Press -.q I _ to highllght"ON;'
press ENTER.
then
To turn off the angle icon
At step 3, press --,I I =,- to highlight "OFF,"
then press ENTER.
You will return to the SET UP MENU.
•
SET
UP
MENU
SCREEN
DISPLAYS
"rv SHAPE
ANGLE
ICON
AUDIO
SUBTLTLE
DISC
MENU
EXIT_)
SELI_"_',,_
END
16:9
ON
ENG
ENG
ENG
4,
ANGLE
ICON
ANGLE
ICON
ENTER
._./_1
E_
ON
EXIT_
I
m
If you press the RETURN button while a menu appears on the TV screen, you w,I return to the previous screen.
34 m
ii 1,7
Setting the Parental Lock
4,s,6
1®
_-----_
_
3, 4, 5, 6
,..-, h
CLEAR
2,3
You can use the parental lock function only with DVD video discs
equipped with the parental lock function.
DVD video discs equipped wi_ the parental lock function are rated according to their content. The contents allowed by a parental lock
level and the way a DVD video disc can be controlled are different from disc to disc. For example, you can cut out violent scenes
unsuitable for children and replace them with more suitable scenes, or lock out playback of the disc altogether.
stopped,
whose
The SET UP MENU appears on the TV screen.
standards
wen) used to rate the
DVD video disc, then press ENTER.
_
following menu appears.
Press 9 twice.
The following menu appears.
m
PARENTAL
PRESET
LOCK
SECURITY
Iil
ENteR
r;1
la PARENTAL
LOCK
lily
LEVELS/
IEWARLE
._.=_'_
m
LEVEL'/
LEVELS
LEntiLS
CODE
LEVEL4
LEVELS
LEVEL2
LEVELIi
I1
EXITi
PRESS [0]-IS]
EXIT_
Press the number buttons to create a
four-digit security code, then press
ENTER.
&
Example
Press A / v to highlight the parental
lock level, then press ENTER.
€
ENTER
ENTER
You cannot play DVD video discs rated higher
than the level you selected unless you cancel
the parental lock function.
For example, when you select level 7, the discs
rated higherthan level 7 are locked out and
cannot be played.
Example:When you select USA
..
4,
m
PARENTAL
LOCK
S£L_
PARENTAL
B)/VIEWABLE
PARENTAL
LOCK
._"_
i
=_•
LOCK
ON
LEVEL7
LEVELS
LEVELS
LEVEL4
LEVEL8
LEVEL2
.When you
select"CAN,"
"CAN"/"appears
instead.
LEVELIm
UEAS
EXIY_
If you make a mistake before pressingthe
ENTER button, press the CLEAR buttonand
enter your four-digit security code again.
The parental lock level is equivalent to the
followingUSA movie ratings.
Press 4 / _ to highlight "ON," then
press ENTER.
LEVEL7:NC-17
LEVEL6: R
LEVEL4: PG 13
The following menu appears.
4ENTER
PARENTAL
LOCK_CT:'_
COUNTRY
LEVEL3:
LEVEL1:
The parental lock levels for "CAN" (Canada) are
includedfor future use. Check the appropriate
parental lock level when you buy a DVD video
disc equipped with the parental lock function in
the future.
CAN
LEVEL8
EXIT_
• 35
PG
G
Press SET UP.
The SETUP MENUdisappears.
To change the parental lock level
To cancel the parental lock function
Youcan changethe parentallocklevelby followingthe steps
in "Settingthe ParentalLock."
At step 3, pressthe number buttons to enteryourfour-digit
securitycode,then continueto step4.
1 Followsteps I and 2 in"Settingthe ParentalLock."
2
Pressthe number buttons to enteryour four-digit
securitycode,then pressthe ENTER button.
ifyou make a mistake,press the CLEAR buttonand enter
the correctfour-digitsecuritycode.
Ifyou make a mistake,pressthe CLEAR buttonand
enter the correctfour-digit securitycode.
ffyou enter the securitycode incorrectly,
"WRONGNUMBER'
flasheson theTV screen. Enterthe correctcode.
If
you enterthe securitycode incorrectly,
NUMBER"flasheson the TV screen. Enter thecorrect
code.
Press -.,,=/ =,.-to highlight"OFF_,
then pressthe ENTER
button.
TO change your four-digit security code
M
Youcan changeyour four-digitsecuritycode.
PARENTAL
LOCK
PARENTAL
LOCK
1 Followsteps I and 2 in "Settingthe ParentalLock."
ON
USA7
2 Pressthe STOP buttonfourtimeswhilethe securitycode
menuappearson the "IV screen.
STOp
STOP
STOP
SEL_'q_-I-
F.XITQ
STOP
The SET UP MENU appearsagain.
The four-digitsscufity code iscleared.
3 Pressthe number buttons to createa newfour-digit
securitycode,then pressthe ENTER button.
4
Press the SET UP button.
The SET UP MENU disappears, and the parental lock
function is cancelled.
4 Compietosteps 4 - 7 in "Settingthe ParentalLock."
• DVD "video discs may or may not respond to the parental lock settings. Make sure this function works with your DVD video discs.
• If you press the RETURN button while a menu appears on the "IV screen, you will return to the previous screen.
36 m
Notes on Discs
This section shows you how to handle, clean, and store discs.
• Do nottouchthe playbackside ofthe disc.
This DVD videoplayercan playthe followingdiscs.
Disc mark
Contents
Disc
size
Maximum
playback time
Appr_€. four hours
(_r_e sideddisc)
Audio
--'Playback
side
• Do not attach paper or tape to discs.
12 cm
+
video
disc:
e_ght
hours
doublesideddisc)
Video
(moving
pictures)
Ap_
Appror.
80 minutes
(singlesideddisc)
8cnl
/q_=. 160rnioutes
(doublesided disc)
,ud,o
COs
• Fingerprinta and dust on the disc cause picture and sound
deterioration. Wipe the disc from the canter outward with a soft
cloth. Always keep the disc clean.
DIGITAL AUDIO
Audio
12cm
74 minutes
8 cm
20 minutes
(CD
single)
You cannot play discs other than those listed above.
This DVD videoplayerusesthe NTSC colorsystem,and cannot
play DVD videodiscsrecordedin anyothercolorsystem(PAL,
SECAM, etc.).
• If you cannot wipe off the dust with a soft cloth, wipe the disc
lightly with a slightly moistened soft cloth then dry the disc with
a dry cloth.
• Do not use any type of solvent such as thinner, benzine,
commercially available cleaners or antistatic spray for vinyl
LPs.These may damage the disc.
• Do not store discsin a place subjectto directsunlightor heat.
• Do not store discsin places subjectto moistureand dust,such
as in a bathroomor near a humidifier.
• Store discsvertically in a case. Stackingor placingobjectson
discsmay cause warping.
This owner's manual explains the basic operations of this DVD
video player.
Some DVD video discs have functions that may not be
explained in this owner's manual. Therefore, some instructions
may differ from this owner's manual, and there may be extra
instructions. In this case, follow the instructions displayed on the
"rv screen or DVD video disc package.
The icon" •" may appear on the TV screen during operation.
This icon means the function explained in this owner's manual is
not available on the DVD video disc.
137
THIS DVD VIDEO PLAYER IS MANUFACTURED
FOR PLAYBACK OF REGION 1 (USA, CANADA)
ENCODED DVD SOFTWARE.
USE OF SOFTWARE NOT INTENDED FOR
REGION 1 PLAYBACK MAY RESULT IN
UNDESIRABLE PLAYER PERFORMANCE.
1L.U
Youmay not be ableto playsoma DVD videodiscson this
playerif theywere purchasedoutsideyour geographicarea or
made for businesspurposes.
When you tryto playan unauthorizeddisc,=DISCPLAYBACK
UNAUTHORIZED CONSULTOWNERS MANUAL FOR
FURTHER INFORMATION"appearson the TV screen.
It is forbidden by law to copy, broadcast, show, broadcast on
cable, play in public, and rent copyrighted material without
permission.
DVD video discs are copy protected, and any recordings made
from these discs will be distorted.
This productincorporatescopyright protectiontechnologythat is
protectedbymethodclaimsof certainU.S.pateritsand other
intellectualpropertyrightsowned by MacrovisionCorporation
and otherrightsowners.Use of this copyrightprotection
technologymustbe authorizedby MacrovisionCorporation,and
is intendedfor home and otherlimitedviewingusesonlyunless
otherwiseauthorizedby MacrovisionCorporation.Reverse
engineeringor disassemblyis prohibited.
Before Calling Service Personnel
Check the following guide for the possible cause of a problem before requesting service.
Symptom
Cause
Correction
Page
No power
The power plug is disconnected.
Connect the power plug into the wall outlet
securely.
11, 12
The poweris on,but the DVD
videoplayerdoes notwork.
No disc is inserted.
Insert a disc, (Chask that the DVD or audio
CD indicator in the DVD display is lit.)
15
No picture
• The TV is not set to receive a DVD signal.
• Set your TV to accept Auxiliary input,
15
• The video cable is not connected
• Connect the vidso cabio to the jacks
securely.
11, 12,
13, 14
securely.
• The TV power is turoed off.
No sound
[ • The equipment connected with the audio
cable is not set to receh_ethe DVD signal.
• Turn on theTV,
15
• Select the correct input mode of the audio
receiver so you can listen to the sound
15
fromthe DVD videoplayer.
"_neplaybackpicturehas
occasionaldistortion.
• The audio cablesare notconnected
securely.
• Connect the audio cable to the jacks
securely.
• The powerof the equipmentconnected
with the audiocable isturned off.
• "rum on the equipment connected with the
audio cable.
15
• The AUDIO SELECTOR is set to the
wrongposition.
• Set the AUDIO SELECTOR to the correct
position, then turn on the DVD video player
again by pressing the POWER button.
11, 12,
13, 14
The disc is dirty.
• Eject the disc and clean it.
11, 12,
13, 14
37
• Sometimes a small amount of picture
distortion may appear. This is not a
mulfunction.
The OVD video player does not I • No disc is inserted.
start playback.
• An unplayable disc is inserted.
I " Insert a disc. (Check that the DVD or audio
CD indicator in the DVD display is lit.)
15
• Insert a playable disc. (Check the disc type
and color system,)
37
• The disc is placed upside down.
Place the disc with the playbeok side down.
15
• The disc is not placed within the guide.
Place the disc in the disc tray correctly
inside the guide.
15
• The disc is dirty.
• Clean the disc.
• A menu is on the TV screen.
• Press the SET UP button to remove the
menu screen.
• The parental lock function is set.
• Cancel the parental lock function or change
the parsofal lock level
Buttonsdo notwork.
Power supply fluctuations or other
abnormalities may interrupt correct
operation.
Turn the power on or off with the POWER
button. Or disconnect the power plug and
insert it into the wall outlet again.
The remotecontroldoes not
work properly.
• The remote control is not pointed at the
remote sensor of the DVD video player.
• Point the remote control at the remote
sensor of the DVD video player.
10
• The remote control is too far from the
• Operate the remote control within about
seven meters.
10
DVD video player. ,
• There is an obese
between the remote
control and the DVD video player.
• The battefles in the remote control are
exhausted.
37
35,36
• Remove the obstacle.
• Replace the batteries with new ones.
10
38m
Specifications
[DVD Video Player]
Powersupply
120 V AC, 60 Hz
Poweroonsump1_n
20W
Weight
3.4 kg
External dimensions
.
430 x 81 x 308 mm 0N/H/D)
sta rd NTSC
Laser
Semiconductor laser, wavelength 650 nm
Frequency range (digital audio)
4 Hz to 20 kHz
Signal-to-noice ratio (digital audio)
More than 96 dB (EIAJ)
Audio dynamic range (digital audio)
More than 93 dB (EIAJ)
Harmonic distortion (digital audio)
Less than 0.006 %
Wow and flutter
Below measurable level (less than -_-0.001% ON.PEAK)) (EIAJ)
Operating condi_ons
Temperature: 5 °C to 35 °C, Operation status: Horizontal position
[outputs]
Video output
1.0 V (p-p), 75 Q, negative sync., pin jack x 1
S video output
(Y) 1.0 V (p-p), 75 Q, negative sync., Mini DIN 4-pin x 1
(C) 0.286 V (p-p), 75 Q
Audio output (digital audio)
0.5 V (p-p), 75 Q, pin jack x 1
Audio output (analog audio)
2.0 V (rms), 330 Q, pin jack (L, R) x 1
[Supplied
Accessories]
S video cable ...... :::;:............................................................
1
Audio/video cable .................................................................
1
Remote control ....................................................................
1
Batteries (AA) ......................................................................
2
• Designs and specificationsare subjectto changewithoutnotice.
• 39
Index
mmA
A_=:essories
........................................
iN
Notes on discs
.................................... 37
lib
Battery................................................ 10
no
On-screandisplay..............................24
nc
lip
Camera angle..................................... 33
Chapterrepeat ................................... 21
Connections................................. 11-14
Connectingto an amplifier...... 12-14
Connectingto an audiosystem..... 12
Connectingtea TV ....................... 11
Connectingto speakers .......... 13, 14
lid
Disc menu .......................................... 27
Dolby Digital(AC-3) ........................... 13
Dolby Pro LogicSurroundSound....... 14
DVD display.......................................... 7
F_R-_R
,,o,°o°.o..°....**,.,o._o,.,,,,°,.°..,.,,.,o
26
Parentallock.......................................35
Playablediscs .................................... 37
Playback(basic)................................. 15
Eighttimesthe normalspeed ....... 17
Frame byframe .............................17
Memoryplayback.......................... 22
Randomplayback......................... 23
Repeat playback...........................21
Slow motion playback................... 18
Stillplayback................................. 16
Twicethe normalspeed ................ 17
Precautions.......................................... 5
ms
Saletyprecautions ........................... 1-2
Searching
Chapter/tracksearch.....................20
Titlesearch ...................................19
Selectinga displaylangsage .............25
Selectinga language.........................29
Selectinga subtitlelanguage............. 31
Settingthe playback picturesize........ 26
Specifications
.....................................39
Suppliedaccessories.........................39
lit
T_e repeat .........................................21
Troubleshooting
.................................. 38
Two-ChannelDigitalStereo Sound.... 14
liR
IL
Letterbox............................................ 26
liM
Memoryplayback............................... 22
Moisturecondensation......................... 5
Multipleangle..................................... 33
Randomplayback..............................23
Remainingtime indicator.................... 24
Remotecontrol ................................... 10
Repeat playback................................21
A-B repeat
Chapter repeat
Tmtie
repeat
Trackrepeat
,=
................18
I
40 m
Philips
Consumer
Electronics
Company
Factory Service Center Locations
See Reverse Side for More Details.
Beaumo_Au_n
San Antonio
NOTE:if youresidein oneofourPhilipsFactowServiceBranchareas(seedirectory
on back),youcancontactthenearestServiceBranch
to
obtainefficientandexpedient
repairfor yourproduct.If yourproductis In-Warranty,
youshouldhaveproof-of-purchase
to ensure
NoCharge
Service.
ForOut-of-Warranty
service,callthelocation
nearestyou.
NQTA:Sivousr_sidezdartsunedesr_gions
desservies
parunesuccureaie
deserviceapr_sventedufabdcantPhilips(voirlistecl-dessous),
vous
pourrezcontacter
labranchedeserviceapr_,sveofelaplusprt_s
dechazvouspourobtenirunserv'lce
apr_sventerapideet efficace.Si leproduct
estsousgarantie,
il suffiradepr6senter
unepreuved'achatpourb_n(_ficier
d'unservicesansfrais. Pourlesproduitsnoncouverts
parlagarantie,
contacte2
lecentre/eplusprosde chezvous.
NOTA:SiUd.resideenunadenuestras
zonasparasucursales
Philipsdeservicioaldef_bdca(verdirestoriom,_s
abajo),Ud.puedecomunicarse
conlasucursal
deserviciom_scercana
paraobtenerunareparaci6n
oportuna
y eficazdesuproducto.Sisuproducto
es_ todavlabajogaranUa,
Ud.debepresentar
comprohante
de compraparanoocasioear
ningunos
cargosporservicio.Paraservicio
despu_s
delvencimiento
dela
oar_ntia,Ila'meal lugarm_scercano
delosabajoindicados.
EL4482-3 Rev. Q
_
_BWISE/SASCLOGE
ASYOUR
_|
SIMPLY
LOOK
OVER
1HEURYBB.OWFORTHE_
OFAFACTORY
SlERVISE
_
NEAR
YOU.YotlRPROOIJCT
WILLBECBVE
EFRClENT
AN9E)OREglEI_
CARRY,-IN,
MAIL'IN,ORIN-HOME
SBWICE,
AN9YOUWILLREGEWE
REAI_OFMBi9,
KNOWING
YOURFflOOUCT
ISBUNGGIVEN
_ EXPERT
ATrENllON
OFPHlUPS' FACTORY
SUW_E. Am), JFTHe_ON_ mien UST_ FORYotm AREA
ISLONG
DISTARCE,
CALL
1-800-242-9225 FONFACIGElr
SlmlClL
COMMERT
OBTENIR
NOTRE
S_KVICE
APRJ_VI_ RAFtcEETEFF_ACE
SOITpARCOURMBI,JLOOal_ OUEZlSE_
_ ON_
ntC_N
OEPRODCIT$
k PJlPANER
ATRAVI_ UEPAYS:CONTACTIER
LEGIENIRIE
CESBWICE
_ _l_
_ _
_
_
UNRAYONDE511A
75MPJES
(llOKMJk121KM)OUCEInl_IE
DESERVI_LOCAL
_ _
_
C_MOCO11_ UNSERVlaOOFORYUNO
YERClEaTE
FORCORREO,
BI4CA$A0 ENPINNA PARA
SOPRO_
A_
DEUN_0
_
TO00ELpALS
PAPALARECE!_ONOEPflODUCTOS
NECIESITAOOS
DER_ARACIONES:
COMUNICARSE
CONELCIENTIRO
DIESEIWICIO
9EFABIMCA
_
DEUHRADIO
D£JillAlZ0 KN(M A75 HILLAS)DB.CBIIRO0ESHWICIOLOCAL
Atlanta- Athene-Macon- Chattanooga,
TNNorthGeorgiaArea
200 North CobbParkway
Suite120
Marietta,GA30062
(770) 795-0O95
Dallas- R. WorthArea
13375 StemmonsFreeway
Suite200
Dallas,Texas75234
(972) 243-4775
Miami - SoutheastRoridaArea
2099 W. AtlanticBlvd.
PompanoBeach,FL33069
(954) 978-0467
mU_.
L'_
DE_.
_
_
DEM _
_ _ _
CE
_
_ _ _ _
_
PAPAESTOS
I.UGARES
9ERYRO
SanFrancisco- OaklandSanJoseArea
3370 MontgomeryDove
SantaClara,CA95054
(408) 492-9013
New YorkMetFoArea
116 CharlotteAvenue
Seattle-TacomaArea
1055 AndoverParkEast
Hicksvitle,NY 11801
Charlotte- WinstonSalem (516) 933-1780 NassauCounty Tukwila,WA98188
GreensboroArea
(206) 575-6288
Orlando- Jnsksonville- Oeala520-G ClantonRoad
Gainnsville& EastCoast
R. Myers Satellite Location
Tampa- St.PntersburgCharlotte,NC28217
SarasotaArea
11601 Cleveland
Ave.,Suite15 2452 SandLakeRoad
(704) 529-6330
Odando,FL
32809
Ft. Myers,FL 33907
CenterPointBusinessPark,
Chicago-Naperville-Rocldord- (941) 278-4242
(407) 857-8998
BuildingB-l, Suite100
Kennsha- Belnlt- Madison1911 U.S. Hwy.301 North
Houston- Galveston- Beaumont Philadelphia- SnslhNJ Area
Gary- Merrillvllle Area
Tampa,FL33619
-Austin - San AntonioArea
352 0unks FerryRoad
1360 W. HamiltonParkway
(813) 621-8181
1110 North PostOakRoad
Bensalem,PA 19020
itasca, IL 60143
Suite1O0
Washington,DC- Baltimore(215) 638-7500
(7O8)775-O99O
NorthernVAArea
Houston,TX77055
Pittsburgh,PA- Stoubenvllle, 6671-3 SantaBarbaraRoad
Cleveland- Akron(713)682-3990
OH- Wheellng/Morgantown,
WV Eikridgeo
YoungstownArea
MD 21227
Knoxville- GreenevilleArea
24090 DetroitAvenue
(410)
796-0105
Tri Cities- EastTennesseeArea 2891 BanksvilleRoad
Wasttake,OH44145
6700 D. Papermill Road
Pittsburgh,PA15216
(216) 899-2040
PapermillPlaza
(412) 563-8020
Columbus- DaytonKnoxville,TN 37919
CincinnatiArea
(423) 584-6614
6333 BuschBlvd.
LosAngeles- SanDiegoArea
Columbus,Ohio43229
2910 E. LaPalma,SuiteE
(614) 781-2605
Anaheim,CA92806
(714) 238-7250
DetroitArea
25173 Dequindre
MadisonHeights,M148071
(810) 544-2110
HOWYOUCANOBTAIN
EFFICIENT
ANDEX%_IFJ4T
CARRY-IN,MAIL-IN,ORIN-HOMESERVICE
IN CANADA
FORYOURPRODUCT
THROI_iHAPHILIPSCONSUMER
SERVICE
COMMENT
OBTIERIR
NOTRESERVICE
APR_SVEN_ RAPIDEETEFFICACE
SOfTpARCOURRIER,
A OOMICILE,
00 EN_EPRI_ENTARY
J_UH CE_4TRE
BESERYICE
PHIUPS
C6MOOBTEeERtin SERVICIO
0P01TRINO
Y EFICIENT1E
PODC0RREOo
ENCASA0 ENI=ERSONA
ENELCANADA
PAPASUPRODOCFO
ATRAVE_DEUNCERYRO
PHtIJPSDES_VICIO ALCOHSUMIDQR
TORONTO
601MilnerAvenue
Scarborough,
Ontario
M1B1M8
(416)754-6064(Tel.)
(416)292-5161(Tel.)
(416)754-6290(Fax)
MONTRILM.
4977 Le_j Street
St.Eaurent,
Quebec
H4R2N9
(514)956-0120(Tel.)
1514)9,_-o626(Fax)
VANCOUVER
1741Boundary
Road
Vancouver,
B.C.
VSM3Y7
(604)294-3441(Tel.)
(604)294-3574(Fax)
III *_ I I1:1 PlVAVl_,l ;,I ;Jr__W
_.l Ik*
DVD VIDEO
PLAYER
90 Days Free Labor
One Year Exchange Warranty
This product
WHO
must be carried
IS COVERED?
You must.haveproof of purchaseto receive warranty service.A sales
receipt or otis" documentshowingthes you purchasedthe product is
consideredproof of purchase.
WHAT
IS COVERED?
Warranty coveragebeginsthe day you buy your product. For 90 days
thereafter,all partswill be repaired or replaced, and labor is free. From
90 daysto oneyearfromthe day of pum.bese,
all parts will be repaired or
replaced, hot you payfor all labor charges. After oneyearfrom the day
0fpurchase,you pay for the replacement or repair of all parts, andfor
all labor char_es.
All parts, including repaired
and replaced parts" are covered only for
the originalwarranty period. When the warranty on the product
expires,the warranty on all replaced and repaired parts also expires.
WHAT
IS EXCLUDED?
Your warranty does not cover:.
labor charges for installationor setupof the product, adjust_nentof
customer controls on the product, and installationor repair of
antenna systemsoutsideof the product.
product repair and/or part replacement becauseof misuse, accidens"unauthorizedrepair or other causenot within the control of
PhilipaConsumer ElectronicsCompany.
• reception problems causedby signalconditionsor cable or antenna
systemsoutsidethe unit.
a product that requires modification or adaptationto enableit to
operate in any country other than the country for which it was
designed,manufactured,approved end/or aud_rized, or repair of
productsdamagedby these modifications.
incidentalor consequentialdamagesresulting from the product.
(Some states do not allow the exclusionof incidentalor consequential damages,so the above exclusion may not applyto you. This
includes,bu_is not limited to, prerecorded material, whether copyrighted or nor.cop)'.r_nted.)
• a product that is usedfor commerc'_d or institutionalpurposes
(includingbut not limited to rental purposes).
WHERE
IS SERVICE
AVAILABLE?
Warranty service is available in all countrieswhere the product is o_T_cially distributedby PhilipsConsumer ElectronicsCompany.In countries where Phifips Consumer Bectrouics Companydoes not d_ribote
the product, the kx:al
Philipa serviceor_nization will attempt to provide service(althoughthere may be a delayif the appropriate spare
parts andtechnicalmenuai(s)are not readily available).
MAKE
SURE
YOU
on Parts
in for repair.
keep the ori_nai box and packing materialin caseyou need to return
your product.
BEFORE REQUESTING
SERVICE...
Pleasecheckyourowner'smanualbeforerequestingservic_
Adjustmenta
of the controlsdiscussed
there maysaveyoua service
call.
TO GET WARRANTY
SERVICE
PUERTO RICO OR U.S. VIRGIN
IN U.S.A.,
ISLANDS...
Take the product to a PhifipaPactotyservice center (see endosed list)
or authorized servicecenter for repair. When the product hasbeen
repaired, you must pick up the unit at the centor. Centers may keep
defectiveparts.
(In U,S_., Puerto Rico and US. Virgin Islands,all impEedwarrenties,
including implied warranties of merchantabirro/andfitnessfor a particular purpose, are limited in duration to the duration of this express
warranty. Becausesome states do not allow limitationson how long an
impliedwarranty may I_, this limitationmay not apply to you.)
TO GET WARRANTY
SERVICE
IN CANADA...
Take the product to a P'nilipaconsumerservice center (listedbelow),
serf-servicingdealer or authorized servicedepot.
Philips Elect.tonicsLtd.
601 Milner Avenue, Scarborough,Ontario, MIB IM8
(416) 292-5161
4977 Levy Street, St. Lauren_,QuL=bec,H4R 2N9
(514) 956-017.0
1741 BoundaryRoad,Vancouver, B.C., VSM 3Y7
(6O4)Z_-3441
(in Canada, this warranty is given in lieu of all other warranties. No
other warranties are expressed or implied, including any implied warranties of merchantability
or fimess for a particular purpose.
Philips is
not liable under any circumstances for any direct, indirect, special, incidental or consequential damages, howsoever incurred, even if notified
of the possibility of such damages.)
REMEMBER...
Please record the model and serial numbers found on the product
below. Also, pleasefill out and mail your warcant7 re_tion
card
promptly. It will be easier for usto notify you if necessary.
MODEL #
SERIAL#
KEEP...
Pleasekeep your salesreceipt or other document showingproof of
purchase.Attach it to thisowner's manual and keep both nearby.Also
_is wor_n_
g_es
yo_s_
_=_r_h_.Youmayh_eother
e,_sw_ch
wry_m _m_nte
Philips Service Company,
P.O. Box 555, Jefferson City, Tennessee 37760,
EL6191E001 I MAC60Sa
I 10-96
=_
(423) 475-8869
I_Pt14EO01
Printed in