1
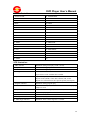
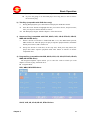
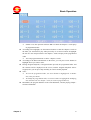
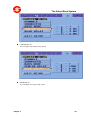
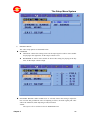
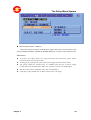
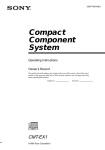
Table of Contents
Table of Contents
Table of Contents…………………………...………………………...1
DVD Player User’s Manual………………….…………………..…...3
1. Types of Discs Your DVD Player Will Play……………………..…………..…………..3
2. Remote Controller……………………………………….…..………………..………….4
3. VFD Illustration……………………….…..………………………………...…………….4
Chapter 1 Basic Operation…………………….….…….…………..5
I. Turn on your DVD player………………………………..………..………………………5
2. Place a disc into the tray…………………………………………………………………5
3. Playing discs………………………………………………………………………………5
a) Menu Play (compatible with DVD, SVCD, VCD2.0 discs)………………………5
b) Title Play (compatible with DVD discs only)………………………………………6
c) Sequence Play (compatible with DVD, SVCD, VCD, CD-G, DTS-CD, HD-CD,
WMA, MP3/JPEG discs)……………………………………………………………6
d) Program Play (compatible with DVD, SVCD, VCD, CD, CD-G, DTS-CD,
HD-CD, WMA, MP3/JPEG discs)…………………………………………………6
Chapter 2 Additional Operation
1. Selecting Tracks (compatible with DVD, SVCD, VCD, CD, CD-G, DTS-CD,
HD-CD, WMA, MP3/JPEG discs)…………………………………………………………8
2. Skipping Tracks (compatible with DVD, SVCD, VCD, CD, CD-G, DTS-CD,
HD-CD, WMA, MP3/JPEG discs)…………………………………………………………8
3. Multispeed Fast Motion Playback (compatible with DVD, SVCD, VCD, CD,
DTS-CD, WMA, MP3/JPEG discs)……………………………………………..…………8
4. Multispeed Slow Motion Playback (compatible with DVD, SVCD, VCD, CD,
CD-G, DTS-CD, HD-CD, WMA, MP3/JPEG discs)………………………………………9
5. Freeze Frame and Frame Advance (compatible with DVD, SVCD, VCD, CD,
CD-G, DTS-CD, HD-CD, WMA, MP3/JPEG discs)………………………………………9
6. Using the Repeat Feature (compatible with DVD, SVCD, VCD, CD, CD-G,
DTS-CD, HD-CD, WMA, MP3/JPEG discs)………………………………………………9
7. Using the Display Feature (compatible with DVD, SVCD, VCD, CD, CD-G,
DTS-CD, WMA, MP3/JPEG discs)…………………………………….…………………10
8. Using the Search Feature (compatible with DVD, SVCD, VCD, CD, DTS-CD,
HD-CD discs)………………………………………………………….………………10
9. Using the Browse / Scan / Index feature (compatible with SVCD, VCD discs;
the scan feature is also compatible with CD, CD-G, DTS-CD, HD-CD discs)….11
10. Changing the Soundtrack (compatible with SVCD, VCD, CD, CD-G, HD-CD,
1
Table of Contents
WMA, MP3/JPEG discs)…………………………………………………………………..12
11. Changing the Audio Language (compatible with DVD, SVCD discs)…………12
12. Subtitles (compatible with DVD, SVCD discs)………………………………….12
13. Changing the Camera Angle (compatible with DVD discs)……………………...13
14. Changing the TV System (compatible with DVD, SVCD, VCD, CD, CD-G,
DTS-CD, HD-CD, WMA, MP3/JPEG discs)……………………………………………..13
15. Mute the Audio Output (compatible with DVD, SVCD, VCD, CD, CD-G, DTS-CD,
HD-CD, WMA, MP3/JPEG discs)……………………………………………………...…13
16. Zoom In the Video Image (compatible with DVD, SVCD, VCD, JPEG discs)...14
17. Repeat a Specific Segment on the Disc that You Define (compatible with DVD,
SVCD, VCD, CD, CD-G, DTS-CD, HD-CD, WMA, MP3 discs)……………………….14
18. 3D Surround Mode (compatible with SVCD, VCD, CD, CD-G, HD-CD, MP3
discs)…………………………………………………………………………………...……14
19. Volume control (compatible with DVD, SVCD, VCD, CD, CD-G, DTS-CD,
HD-CD, WMA, MP3/JPEG discs)…………………………………………...……………18
Chapter 3 Playing WMA, MP3 and JPEG discs…………………19
Chapter 4 The Setup Menu System………………………………21
1. General Steps of Setup Menu………………………………………………………..21
2. Setup Items Introduction ……………………………………………………………..22
a) System Setup……………………………………………………………………22
b) Language Setup…………………………………………………………………27
c) Audio Setup…………………………………………………………..………….29
d) Video Setup………………………………………………………………………32
e) Speaker Setup…………………………………………………………………...34
f) Digital Setup……………………………………………………………………..37
2
DVD Player User’s Manual
DVD Player User’s Manual
Types of Discs Your DVD Player Will Play
Types of
Discs
Diameter
12cm
DVD
8cm
SVCD
Playback Time
Data Format
1 layer: 12min
DVD Format Disc:
Compressed Digital Audio
Compressed Digital Video
(Moving picture)
2 layers: 240min
1 layer: 80min
2 layers: 180min
Include: SVCD、
CVD
MPEG1
Compressed Digital Audio
Compressed Digital Video
(Moving picture)
Include: VCD2.0、
VCD1.1、
VCD1.0、DVCD
45min
12cm
74min
8cm
20min
12cm
74min
8cm
20min
HD-CD
12cm
74min
HD-CD:
Digital Audio
DTS-CD
12cm
74min
DTS-CD:
Digital Audio
MP3/JPEG
12cm
600min
Compressed Digital Audio
WMA
12cm
CD
MPEG2
Compressed Digital Audio
Compressed Digital Video
(Moving picture)
12cm
VCD
Remark
CD-DA:
Digital Audio
Compressed Digital Audio
Note: DVD-R, CD-R, CD-RW discs can be played in this DVD player.
3
DVD Player User’s Manual
Remote Controller:
1.OPEN\CLOSE
21. PAUSE\STEP
2.POWER
22. UP
3.VOL+
23. DOWN
4.VOL -
24. LEFT
5. DISPLAY
25. RIGHT
6. NUMERIC BUTTON
26. ENTER
7. GOTO
27. PLAY
8. P-SGAN\VGA
28. SLOW
9. TITLE
29. F.R
10. MENU
30. F.F
11. RETURN
31. REPEAT
12. STOP
32. PREVIEW
13. L\R
33. A-B
14. PROGRAM
34. 3D
15. P\N
35. SUB-TITLE
16. ZOOM
36. ANGLE
17. SETUP
37. LANGUAGE
18. PREV
38. MUTE
19. NEXT
39.
VFD Illustration:
1. PBC indicator
Illuminate during menu play (VCD / SVCD).
2. Play indicator
Illuminate during playback.
3. Pause indicator
Illuminate during still picture.
4. Disc type indicator
Illuminate DVD / SVCD / VCD / CD when a DVD /
Super-VCD / VCD / CD-DA disc is loaded.
5. Repeat indicator
Repeat of chapter (DVD) / track (CD, VCD).
Repeat of title (DVD) / entire disc contents (CD, VCD).
Repeat of a section between two specific points (A-B repeat).
6. Program indicator
Illuminate during program play.
7. Time indicator
Illuminate the elapsed time or remain time of the playing
chapter or track.
8. Chapter / Track indicator
Indicate the current chapter (DVD) / track (VCD) number.
9. Title indicator
Indicate the playing title number (DVD)
10. DTS indicator
Indicate the DTS audio on a disc
11. Dolby indicator
Indicate the Dolby audio on a disc
12. Multi-angle indicator
Illuminate when a multi-angle disc is loaded.
4
Basic Operation
Chapter 1 Basic Operation
1. Turn On the TV and Your DVD Player
Press the Power button on the player or the remote controller, and “Read” appears on the
TV screen. If there hasn’t a disc in the DVD player, “No disc” will be displayed on both the
screen and the VFD.
2. Place A Disc
Press the Open / Close button on the remote controller or the front of the DVD player, and
“Open” appears on the screen. Then Place a disc gently into the tray with the disc’s label
facing up (double-sided discs have content on both sides, so you can place either side up),
and press the Open / Close button again to close the disc tray, “Close” appears and the player
starts to read. Then the disc starts playing automatically. (Note: Of some certain type discs,
after reading out the type, the Play or Enter button should be pressed to start playing.)
3. Play
The contents of each disc menu vary according to how the disc was authored and what
features are included. The disc menu will be turned on for you to select, when Menu button
pressed. Also play and pause can be switched with the Pause button on the remote. Moreover,
such as menu play, title play, sequence play etc., these different play modes are offered.
a) Menu Play (compatible with DVD, SVCD, VCD2.0 discs)
I. Press Menu Button
TV screen displays the DVD Root Menu when a DVD disc is loaded.
When a SVCD or VCD 2.0 disc is loaded, SVCD or VCD 2.0 menu will be
displayed on the screen (when PBC is off) (At this moment, press PBC button
once to display current PBC state).
PBC is initialized on when a SVCD or VCD2.0 disc is loaded.
II. When a DVD disc is loaded, you can press Arrow buttons to highlight the menu
item you want to choose; As SVCD or VCD2.0, you can press Numeric buttons to
select a track to play.
III. Press Enter or Play button, you can begin play with the highlighted.
IV. Return when playing: When a DVD disc is playing, press Menu (PBC) button, and
you can return to Root Menu; As SVCD, VCD2.0, and PBC is on, press Menu (PBC)
button, you can return to the menu.
V. Stop
1) When you press Stop button for the first time, the player turns into quasi stop
state. At the same time the OSD appears “Quasi Stop”. To begin the title over,
press Stop twice.
2) In quasi stop state, the player remembers where you stopped, when you start
playing the disc again, the DVD player picked up where you left off.
3) In stop state, when you press Play, the player enters sequence playback mode.
For the disc protection, before you press Open / Close button to eject the disc
tray when playing, please press Stop button at first. After taking out the disc,
chapter 2
5
Basic Operation
press Open / Close again to close the tray.
If you’re not going to use the DVD player for a long time, be sure to remove
the electronic plug.
b) Title Play (compatible with DVD discs only)
I. During DVD playback, press Title button to display the DVD title content.
II. Press the Arrow buttons to highlight the title you want to choose, and press Enter;
Also you can press numeric buttons to choose.
III. The DVD player begins with the chapter 1 of the chosen title.
c) Sequence Play (compatible with DVD, SVCD, VCD, CD-G, DTS-CD, HD-CD,
WMA, MP3/JPEG discs)
I. When a SVCD or VCD disc is loaded and PBC is on, once PBC button pressed,
PBC switches off. Then the player can play in sequence playback mode; when PBC
button pressed twice, PBC switches on.
II. Except for SVCD or VCD discs, in the stop state, when press Play button, the
player then enters sequence playback mode. This feature is effective to all the
compatible discs.
d) Program Play (compatible with DVD, SVCD, VCD, CD, CD-G, DTS-CD, HD-CD,
WMA, MP3/JPEG discs)
The Program Playback option allows you to enter the order in which you want
chapters or tracks to play, maximum to 16.
Program Menu:
DVD, WMA, MP3/JPEG discs:
SVCD, VCD, CD, CD-G, HD-CD, DTS-CD discs:
chapter 2
6
Basic Operation
chapter 2
If PBC is on, this operation will turn PBC off while the chapters / tracks plays
in programmed order.
According to the highlight, use the Numeric buttons to enter the chapters / tracks in
the order you want them to play. Then press Play or use Arrow buttons to highlight
the “PLAY” item and press Enter. The chapters / tracks will play in the programmed
order.
You can program maximum 16 titles / chapters / tracks.
According to the Direction Indicator on the menu, you can press Arrow buttons to
highlight where you want to enter.
During Program Playback, if Program button pressed, the programmed order and
the contents will be displayed on the screen, and the Program Playback will be
stopped; Also you can press Stop and Play to resume normal playback.
Notes:
To clear the programmed order, use Arrow buttons to highlight the “CLEAR”
item, then press Enter.
To modify the programmed order, use Arrow buttons to highlight the modifying
item and enter the new chapter / track you want to program directly.
Meanwhile, the program indicator in the VFD illuminate, and the playing chapter /
track also illuminate.
7
Additional Operation
Chapter 2 Additional Operation
1. Selecting Tracks (compatible with DVD, SVCD, VCD, CD, CD-G, DTS-CD, HD-CD,
WMA, MP3/JPEG discs)
a) When playing a DVD disc, press Numeric buttons on the menu or title page to select
tracks; During DVD playback, you can input desired title number directly.
b) As a SVCD or VCD disc, during sequence playback, press Numeric buttons to select
tracks. (During Program Playback and PBC is on, you can only press Prev / Next button
to select)
c) As for CD, CD-G, HD-CD, DTS-CD discs, press Numeric buttons directly to select
tracks.
d) When playing WMA, MP3 / JPEG discs, press Numeric buttons to select different tracks
on current track list.
Notes: To select tracks from 1 to 10, press corresponding Numeric buttons (1-9, 10)
To select tracks above 10, press 10+ button. For example, to select the track 15,
press 10+ and 5 button.
If the selected track is not available, the input would be invalid.
2. Skipping Tracks (compatible with DVD, SVCD, VCD, CD, CD-G, DTS-CD, HD-CD,
WMA, MP3/JPEG discs)
a) To skip forward to the beginning of the next title / chapter / track on a disc, press Next
on the remote or the front of the player
b) To skip backward to the beginning of the preceding title / chapter / track on a disc, press
Prev on the remote or the front of the player.
When playing the last chapter / track on a SVCD or VCD disc with PBC off,
pressing Next button will stop the playback; When playing the first chapter / track.,
pressing Prev button will stop the playback; When stop, pressing Next / Prev button
will be invalid
If a DVD disc is loaded, it varies according to how the disc was configed.
3. Multispeed Fast Motion Playback (compatible with DVD, SVCD, VCD, CD,
DTS-CD, WMA, MP3/JPEG discs)
You can search in forward or reverse mode during playback.
a) Press the F.F button on the remote during playback to search through a disc. Press the
button again on the remote to search at the next speed. Fast Forward Playback has four
speeds: × 2, × 4, × 8, × 20. With each consecutive press of the button, the
search speed increases. If you press the button five times, Fast Forward Playback cycles
back to normal playback.
During DVD playback, when Fast Forward Playback gets to the beginning of the next
title / chapter, it resumes normal playback; During SVCD or VCD playback with PBC
on, when Fast Forward Playback gets to the beginning of the next track, it resumes
normal playback.
Press Play button to resume normal playback.
chapter 2
8
Additional Operation
During CD, HD-CD, MP3, or WMA playback ,with the speed F.F × 2, the player
has audio output.
b) Press the F.R button on the remote during playback to search through a disc. Press the
button again on the remote to search at the next speed. Fast Reverse Playback has four
speeds: × 2, × 4, × 8, × 20. With each consecutive press of the button, the
search speed increases. If you press the button five times, Fast Reverse Playback cycles
back to normal playback.
During DVD playback, when Fast Reverse Playback gets to the beginning of the playing
title / chapter, it resumes normal playback; During SVCD or VCD playback with PBC
on, when Fast Reverse Playback gets to the beginning of the playing track, it resumes
normal playback.
Press Play button to resume normal playback.
During CD, HD-CD, MP3, or WMA playback ,with the speed F.R × 2, the player
has audio output.
4. Multispeed Slow Motion Playback (compatible with DVD, SVCD, VCD, CD,
CD-G, DTS-CD, HD-CD, WMA, MP3/JPEG discs)
Press Slow button when pictures moving, you can enter Slow Motion Playback mode.
Press the Slow button on the remote during playback. Press the button again on the remote
to play at the next speed. Slow Motion Playback has six speeds: 1/2, 1/3, 1/4, 1/5, 1/6, 1/7.
With each consecutive press of the button, the play speed decreases. If you press the button
seven times, Slow Motion Playback cycles back to normal playback.
Press Play button to resume normal playback.
5. Freeze Frame and Frame Advance (compatible with DVD, SVCD, VCD, CD,
CD-G, DTS-CD, HD-CD, WMA, MP3/JPEG discs)
a) During CD, CD-G, HD-CD, DTS-CD, WMA or MP3 / JPEG playback, press Pause once
to freeze playback; Press the Pause button again or Play button to resume normal
playback.
b) During DVD, SVCD or VCD playback, press Pause once to freeze playback; Press of
the Pause button again to advance the picture one frame at a time; Press Play to resume
normal playback.
6. Using the Repeat Feature (compatible with DVD, SVCD, VCD, CD, CD-G, DTS-CD,
HD-CD, WMA, MP3/JPEG discs)
While a disc is playing, press Repeat button once, and the repeat banner appears to show
current repeat mode.
a) In SVCD, VCD, CD, CD-G, HD-CD, DTS-CD, WMA, or MP3 / JPEG sequence
playback mode, press Repeat button again to turn on repeat mode.
Press the button again on the remote to turn to the next repeat mode. There are three repeat
options: Off, Track Repeat, and Disc Repeat. With each consecutive press of the button, the
repeat mode switches. If you press the button four times, repeat mode cycles back to Off.
b) In DVD playback, press Repeat button again to turn on repeat mode.
chapter 2
9
Additional Operation
c)
There are three repeat options: Off, Chapter Repeat, and Title Repeat. With each
consecutive press of the button, the repeat mode switches. If you press the button four
times, repeat mode cycles back to Off.
In WMA, MP3 / JPEG playback, press Repeat button again to turn on repeat mode.
There are four repeat options: Off, Track Repeat, Directory Repeat, and Disc Repeat.
With each consecutive press of the button, the repeat mode switches. If you press the
button five times, repeat mode cycles back to Off.
7. Using the Display Feature (compatible with DVD, SVCD, VCD, CD, CD-G,
DTS-CD, WMA, MP3/JPEG discs)
a) Loading and playing DVDs (two pages)
Press Display button once to show the first page:
“Disc Type, Title * / * (the playing title / total titles),
Chapter * / * (the
playing chapter / total chapters), Elapsed Time of the Disc”.
Press the button again to show the second page:
“Language * / * (the serial number of playing language / the amount of optional
languages) or Off, Language Type,
Audio Type, Subtitle * / * (the serial
number of playing subtitle / the amount of optional subtitles) or Off, Angle * / *
(the serial number of playing angle / the amount of optional angles) or Off”.
Press the button for the third time, the display menu fades out.
b) Loading and playing SVCD discs (two pages)
Press Display button once to show the first page:
“Disc Type, Track * / * (the playing track / total tracks), Mute,
PBC,
Repeat Mode, Elapsed Time of the Playing Track”.
Press the button again to show the second page:
“Language * / * (the serial number of playing language / the amount of optional
languages) or Off, Language Type,
Audio Type, Subtitle * / * (the serial
number of playing subtitle / the amount of optional subtitles) or Off”.
Press the button for the third time, the display menu fades out.
c) Loading and playing VCDs
Press Display button once to show the first page:
“Disc Type, Track * / * (the playing track / total tracks), Mute,
PBC,
Repeat Mode, Elapsed Time of the Playing Track”.
Press the button again, the display menu fades out.
d) Loading and playing CD, CD-G, DTS-CD, HD-CD, WMA, MP3 / JPEG discs
Press Display button once to show the first page:
“Disc Type, Track * / * (the playing track / total tracks), Mute, Repeat Mode,
Elapsed Time of the Playing Track”.
Press the button again, the display menu fades out.
8. Using the Search Feature (compatible with DVD, SVCD, VCD, CD, DTS-CD,
HD-CD discs)
You can use Search feature to select a title / chapter / track number or go to a specific point
chapter 2
10
Additional Operation
in a title. Firstly, press Search (Goto) button on the remote controller to bring up the search
menu and enter the edit state; Secondly, press Arrow buttons to highlight the title / chapter /
track number or the time option; Thirdly, use Numeric buttons to enter the title / chapter /
track you want to play or the elapsed time you want to go to in that title; At last, press Enter
button to start playback. For example, entering 01:23:56 will start playback one hour,
twenty-three minutes and fifty-six seconds into the title. If the input number is illegal, the
error information “INVALID KEY ” will be displayed on the screen.
Notes
I. This feature does not work in Program Play mode.
II. If PBC is on, it will turn off automatically when Search Playback starts.
III. When playing WMA, MP3 / JPEG discs, Search Feature does not work.
9. Using the Browse / Scan / Index feature (compatible with SVCD, VCD discs;
the scan feature is also compatible with CD, CD-G, DTS-CD, HD-CD discs)
a) Press Preview button during Stop state
I. When a SVCD or VCD disc is loaded, the screen displays small pictures or
“thumbnails” of the available tracks. According to the tracks’ sequence on the disc,
up to nine thumbnails are displayed per screen, and each thumbnail plays 3
seconds.
If PBC is on, it will turn off automatically when Browse Playback starts.
To view the next nine thumbnails, press the Next button to go forward and the
Prev button to go to the previous page.
To exit the digest and resume normal playback from current track, press the
Play button.
Each thumbnail has a number in the corner. You can select and play a track by
press that number on the remote.
II. When a CD, CD-G, DTS-CD, or HD-CD disc is loaded, according to the tracks’
sequence on the disc, each track plays 15sec.
You can select a track to start Scan Playback by press Numeric buttons on the
remote.
To exit the Scan Playback and resumes normal playback from the scanning
track, press the Play button.
During normal playback, press Preview button to start Scan Playback from
current track (if the track has played for more than 15sec, it will start from the
next track).
b) Press the Preview button again, that is to press the button during Browse Playback, the
screen displays big pictures instead of thumbnails. According to the tracks’ sequence on
the disc, each picture plays 15sec.
You can select a track to start Index Playback by press Numeric buttons on the
remote.
To exit the digest and resume normal playback from current track, press the
Play button.
c) During normal playback, press the Preview button to show thumbnails of the currently
chapter 2
11
Additional Operation
selected track.
If PBC is on, it will turn off automatically when Browse Playback starts.
To view the next nine thumbnails, press the Next button to go forward and the
Prev button to go to the previous page.
To exit the digest and resume normal playback from the current picture, press
the Play button.
Each thumbnail has a number in the corner. You can select and play a picture
by press that number on the remote.
10. Changing the Soundtrack (compatible with SVCD, VCD, CD, CD-G, HD-CD,
WMA, MP3/JPEG discs)
Press the L / R button to display current soundtrack.
a) Press the button can switch soundtracks.
b) Press the button again on the remote to turn to next soundtrack.
I. When playing a SVCD or VCD disc, there are five soundtracks: Stereo (L/R), L/L,
R/R, L/L Auto A/D Detect, and R/R Auto A/D Detect. With each consecutive press
of the button, the soundtrack switches. If you press the button six times, soundtrack
cycles back to Stereo.
II. When playing a CD, CD-G, DTS-CD, HD-CD, WMA, or MP3 disc, there are three:
Stereo (L/R), L/L, and R/R.
Notes:
Switch to L/L Auto A/D Detect or R/R Auto A/D Detect to have various
antistrophes (you can have an antistrophe with the singing on the disc),
according to the contents on the disc).
When playing a dual-language VCD movie disc, press the L / R button to
select the desired language.
11. Changing the Audio Language (compatible with DVD, SVCD discs)
During disc playback, press Language on the remote once, and the audio language info
banner appears.
When a DVD or SVCD is recorded whit multiple soundtracks, you can use the Language
feature to temporarily change the audio language (the language of the soundtrack)
There are 8 supported languages: Chinese, English, Japanese, French, Spanish, Portuguese,
Germany and Latin. With each consecutive press of the Language button, the audio language
switches and the corresponding serial number appears on the screen. For example, “Language
Icon: [1 English DTS 6CH] or [Off]” (the availability of the languages are disc-dependent).
12. Subtitles (compatible with DVD, SVCD discs)
Press the Subtitle button on the remote once, and the subtitle info banner appears.
When a DVD or SVCD is recorded with subtitles, you can use the Subtitle feature to view the
subtitles on-screen. By default, subtitles are off. The info banner will display Subtitle Off.
To display subtitles, press the Subtitle button again. The default language with its
corresponding serial number will be displayed in the info banner and subtitles will be displayed in
chapter 2
12
Additional Operation
that language. There are 8 supported subtitles: Chinese, English, Japanese, French, Spanish,
Portuguese, Germany and Latin. With each consecutive press of the Subtitle button, the subtitle
switches. For example, “Language Icon: [1 English DTS 6CH] or [Off]” (the availability of the
subtitles are disc-dependent). To turn subtitles off, press the Subtitle button until Subtitle Off is
displayed.
13. Changing the Camera Angle (compatible with DVD discs)
During disc playback, press Angle on the remote once, and the angel icon appears.
Some DVDs contain multiple angles of a particular scene or sequence, so you can use the
Angle feature to view.
Press the Angle button again to go to the next camera angle. If multiple camera angles are
available, the Angle icon displays the current angle number and the number of angles available.
For example: “Angle Icon: [* / *] or [Off]”; 1 / 4 indicates that angle one is being displayed, and
there are four different angles available. (This feature is disc-dependent. If no additional camera
angles are available, the “Invalid Key” will be displayed.)
14. Changing the TV System (compatible with DVD, SVCD, VCD, CD, CD-G,
DTS-CD, HD-CD, WMA, MP3/JPEG discs)
Press P / N button on the remote to display current TV system.
Press the P / N button again to change to the next TV system. There offers four systems:
NTSC, PAL60, PAL, and AUTO. With each consecutive press of the P / N button, the TV system
switches. If you press the button five times, the TV system cycles back..
Notes:
If AUTO TV system selected, it can auto reach the highest definition depends
on the disc.
If it isn’t full screen state (note: Wide Screen program would never reach full
screen state) or in black and white, press the P / N button to adapt TV System
to the TV set of NTSC or PAL.
When playing in different TV system, some discs may not have their features
entirely fulfilled in some certain standard.
Auto System of TV set is recommended.
15. Mute the Audio Output (compatible with DVD, SVCD, VCD, CD, CD-G, DTS-CD,
HD-CD, WMA, MP3/JPEG discs)
Pressing the Mute button allows you to reduce sound to an inaudible level, and “MUTE” will
be displayed on screen. Press the button again or press the Vol +/- button to return to the normal
condition.
Notes:
When mute, the microphone also has no audio output.
If the player playback disc without sound, please try to press Mute button to
resume.
chapter 2
13
Additional Operation
16. Zoom In the Video Image (compatible with DVD, SVCD, VCD, JPEG discs)
a) The Zoom Function allows you to enlarge or zoom out the video image and to pan
though the image. Press Zoom repeatedly to activate the function and choose the
required zoom factor: Zoom 1, Zoom 2, Zoom 3, Zoom 1/2, Zoom 1/3, Zoom 1/4,
Zoom Off.
Notes:
This feature does not work when the Disc Menu appears.
b)
Use the Arrow buttons to pan across the screen when the zoom factor is 1, 2 or 3.
17. Repeat a Specific Segment on the Disc that You Define (compatible with DVD,
SVCD, VCD, CD, CD-G, DTS-CD, HD-CD, WMA, MP3 discs)
a) During the normal or fast motion playback, press the A-B button once, and “REPEAT
A-” will appears on the screen. This indicates the start of the loop to be repeated.
b) During the normal of fast motion playback, press A-B again, and “REPEAT A-B” will
appears on the screen. It indicates the end of the loop.
Looping will run from set point A to set point B until you turn off Repeat.
c) Press A-B again to cancel A-B loop mode.
When playing a SVCD, VCD, or CD disc, you can repeat a specific segment only
in one track. When the next track begins, A-B Repeat turns off automatically.
When playing a DVD disc, you can repeat a specific segment only in one title /
chapter.
18. 3D Surround Mode (compatible with SVCD, VCD, CD, CD-G, HD-CD, MP3 discs)
Press the 3D button on the remote once, and current 3D surround mode info will be displayed
on the screen. Press the Arrow buttons to highlight the 3D surround setup menu items; Press the
3D button again to turn off the menu.
Use the Up / Down arrow buttons and press Enter to choose surround mode.
chapter 2
14
Additional Operation
“EQ: [STANDARD]” is highlighted, as the graph showed below:
“EQ: [CLASSIC]” is highlighted, as the graph showed below:
“EQ: [ROCK]” is highlighted, as the graph showed below:
chapter 2
15
Additional Operation
“EQ: [JAZZ]” is highlighted, as the graph showed below:
“EQ: [POP]” is highlighted, as the graph showed below:
chapter 2
16
Additional Operation
“EQ: [USER]” is highlighted, as the graph showed below, and the graph can vary
according to your settings:
Press Left / Right arrow buttons to highlight the band you want to tune; Then press Up /
Down arrow buttons to increase or decrease the value.
Display the Band
chapter 2
17
Additional Operation
Adjust the key
Notes:
When setting SRND, EQ is auto setup to STANDARD.
When setting EQ, SRND is auto setup to OFF.
19. Volume control (compatible with DVD, SVCD, VCD, CD, CD-G, DTS-CD, HD-CD,
WMA, MP3/JPEG discs)
You can press the Volume button on the front of TV set or the amplifier to control the
sound level.
Pressing the Vol+ button on the remote allow you to amplify the sound level; Pressing
Vol- will reduce the sound level.
Notes:
During DVD PCM output playback, this feature does not work.
chapter 2
18
Playing WMA, MP3 and JPEG discs
Chapter 3 Playing WMA, MP3 and JPEG discs
Place a MP3 / JPEG disc into the tray, and the player will auto search the directories saved
MP3 / JPEG files. After searching, it will auto go to the first directory saved MP3 files (to the
disc containing both mp3 and jpeg files; To the disc containing single type of files, it will auto
go to the first directory) and play the first song in the directory (“01:” is highlighted).The
screen displays as the picture below:
Current
directory
name
Current MP3/JPEG file
name. If a JPEG file
playing, the name should be
*.jpg.
The playing file
is a MP3 music.
The playing file is
a JPEG picture.
File Switch Region: Displays the
file type of the playing and the
switching.
Use the Arrow buttons to enter the Directory Region and highlight the desired directory, then
the first track under it starts playback; Also you can use the Arrow buttons to enter the File Region
and select the file you want to play.
Notes:
I. Press the Left and Right arrow buttons, you can activate Directory Region, File Region
and File Switch Region separately.
chapter 3
19
Playing WMA, MP3 and JPEG discs
II.
III.
IV.
V.
VI.
VII.
The highlight in Directory Region and File Region is shown as the picture above; While it
appears a transparent rectangle in File Switch Region.
In File Switch Region, you can press the Left and Right arrow buttons to switch the
highlight, then press Enter; the “M”, “P”, and “G” button is illustrated in the above
picture. For example, if a disc with MP3 and JPEG files but without any NES files is
loaded, the color of the letter “M” and “P” will appear to white and “G” black. If a MP3
file playing, “M” turns darker.
To the disc with WMA, MP3 and JPEG files, when playing a JPEG picture, press the
Return button to return to JPEG list.
You can press the Numeric buttons to select the file you want to play. For example, if you
desire the 15th track in current list, press the “10+” button once, then press “5”, the 15th
starts playback.
Notes: When playing a disc with MP3 files, video cannot be output while only digital audio
can.
When playing JPEG pictures, press the Program button to choose the pictures switched
mode. There are 17 switch modes; Press Program repeatedly to activate the function and
choose the required switch mode: Spread from Up to Down, Spread from Down to Left,
Spread from Left to Right, Spread from Right to Left, Spread from Left Up to Right Down,
Spread from Right Up to Left Down, Spread Left Down to Right Up, Spread from Right
Down to Left Up, Spread from Center to Up / Down, Fold from Up / Down to Center, Fold
from Left / Right to Center, Horizontal Shutter, Vertical Shutter, Fold from the Corners to
the Center, Random Play, Off.
When a picture playing or pausing, press the Arrow buttons to change the display angle:
Up: flip vertical
Down: flip horizontal
Left: rotate 908 counter-clockwise
Right: rotate 908 clockwise
VIII. When a picture playing or pausing, press the Menu button, the screen displays small
pictures. Up to 12 small pictures are displayed per screen. To view the next 12 pictures,
press the Next button to go forward and the Prev button to go to the previous page. You can
also select and play a picture in full screen by press that number on the remote.
chapter 3
20
The Setup Menu System
Chapter 4 The Setup Menu System
1.
General Steps of Setup Menu
a)
Press the Setup button, the main setup menu appears.
When the main menu displayed, the DVD system will auto pause.
b)
Press the Left and Right arrow buttons to highlight the icon of the desired page, then
press the Down or Right arrow button to activate that page; For example, if you want to
setup the video page, press Right to highlight the video icon, the video page will be
displayed on the screen.
c)
Press the Down arrow button to highlight the desired option. Press Enter or press Right
to select, the choices of that option appear on the right; For example, press the Down
arrow button to highlight the BRIGHTNESS option, then press Enter to select, the
brightness choices appear on the right.
chapter 4
21
The Setup Menu System
d)
Press the Arrow buttons to highlight the Exit Setup option, then press Enter or Setup
again to exit Setup Menu.
Notes:
When setup, the pressing of the following buttons will turn off the setup menu, while the
choices that have been changed will be saved: P / N, Subtitle, F.F, F.R, Vol +/-, PBC,
Title, Return, Play, Stop, Resume, Pause / Step, Next, Prev, S.F, S.R, Zoom, Preview,
Goto, Program, Repeat, A-B, Angle, language, Soundtrack, 3D, Record, Display, Mute,
Setup.
2.
Setup Items Introduction
a)
SYSTEM SETUP
The system setup options are illustrated below:
chapter 4
22
The Setup Menu System
TV SYSTEM
According to the Color System of the TV, you can choose the TV System.
AUTO: Choose this settings if your DVD player is connected to a multi-system TV.
NTSC: Choose this settings if your DVD player is connected to a NTSC TV.
PAL: Choose this settings if your DVD player is connected to a PAL TV.
PAL60: Choose this settings if your DVD player is connected to a PAL60 TV.
The default setting is NTSC.
SCREEN SAVER
If the screen saver is on, when your DVD player is in Stop, Open, or No Disc state, or
there is a frame frozen for more than 60sec, the screen saver will be displayed. This feature
can protect the screen from damage.
ON: Choose this setting to activate the screen saver.
chapter 4
23
The Setup Menu System
OFF: Choose this setting to cancel the screen saver
The default setting is ON.
VIDEO
Interlace-YUV: Choose this setting if your DVD player is connected to a TV with Y,
Cb, Cr video cables.
TV-RGB: Choose this setting if your DVD player is connected to a TV with an
S-Video cable or composite video cables.
P-SCAN: Choose this setting if your DVD player is connected to a progressive
scan TV with Y, Cb, Cr video cables.
PC-VGA: Choose this setting if your DVD player is connected to a progressive
scan TV or a monitor with a VGA video cable.
Notes:
When your DVD player output composite video, you can choose the setting
randomly.
Choose TV-RGB / P-SCAN if your DVD player is connected to a progressive scan
TV.
The default setting is TV-RGB.
chapter 4
24
The Setup Menu System
TV TYPE
16 : 9 (Wide Screen): Choose this setting if your DVD player is connected to a
wide screen TV. If you choose this setting and you don’t have a wide screen TV, the
images on the screen may appear distorted due to vertical compression.
4 : 3 LB (Letter Box): Choosing this setting if your DVD player is connected to a
normal ratio TV. connector You’ll see the movies in their original aspect ratio
(height-to-width ratio). You’ll see the entire frame of the movie, but it will take up
a smaller portion of the screen vertically. The movie might appear with black bars
at the top and bottom of the screen.
4 : 3 PS (Pan & Scan): Choosing this setting if your DVD player is connected to a
normal ratio TV. You can fill the movie to the entire screen of your TV. This might
mean that parts of the picture (the left and right edges) won’t be seen.
Notes:
The image display ratio is related to the recorded disc format. Some disc can not
display images in the aspect ratio you choose.
If you play a disc recorded in 4:3 format on a wide screen TV, black bars will
appear on the left and right side of the screen.
You must adjust the screen setting depending on the type of the television you have.
chapter 4
25
The Setup Menu System
PASSWORD
The password option is initialized locked, and you cannot set the ratings limit or
change the password. In order for the Ratings feature work, the password mode must be
turned on. If you want to set the ratings limit, you will need to enter the default
password, which is 0000, then press Enter to confirm. To change the password, you will
be prompted for the old password, then be prompted for a new. Enter a 4-digit number
(this is your password).
RATING
The Rating feature is a rating limit system, like movie ratings. It works with DVD
discs that have been assigned a rating. This helps you control the types of DVDs that
your family watches.
There are two rating options: NO ADULT and KID SAFE.
Select the VIEW ALL option to cancel the rating limit.
The default setting is VIEW ALL.
chapter 4
26
The Setup Menu System
Notes:
If the password option is locked, you cannot set the ratings limit; the rating limit
doe not work when the password option unlocked.
DEFAULT
Choose this option to resume all the setup options to default settings.
b) LANGUAGE SETUP
The language setup options are illustrated below:
Highlight the OSD LANGUAGE option, and press the Arrow buttons to choose the
OSD language you prefer. Press Enter to confirm, and it will display OSD in that
language; There are 8 optional OSD languages: Chinese, English, Japan, French,
Spanish, Portuguese, German and Latin.
chapter 4
27
The Setup Menu System
Highlight the AUDIO LANG option, and press the Arrow buttons to choose the audio
language you prefer. Press Enter to confirm. If the disc you are playing has that
language available, it will output audio in that language; There are 8 optional audio
languages: Chinese, English, Japan, French, Spanish, Portuguese, German and Latin.
Highlight the SUBTITLE LANG option, and press the Arrow buttons to choose the
subtitle language you prefer. Press Enter to confirm. If the disc you are playing has that
language available, it will displays subtitles in that language; There are 8 optional audio
languages: Chinese, English, Japan, French, Spanish, Portuguese, German, and Off.
chapter 4
28
The Setup Menu System
Highlight the MENU LANG option, and press the Arrow buttons to choose the menu
language you prefer. Press Enter to confirm. If the disc you are playing has that
language available, it will displays menu in that language; There are 8 optional menu
languages: Chinese, English, Japan, French, Spanish, Portuguese, German, and Off.
Notes:
If your preferred language isn’t available, the disc’s default language will be
played.
The default language of your DVD player is Chinese.
c)
AUDIO SETUP
The audio setup options are illustrated below:
Highlight the AUDIO OUT option, and press the Arrow buttons to choose the audio
chapter 4
29
The Setup Menu System
output mode you prefer. Press Enter to confirm; There are 3 optional audio output
modes: ANALOG, SPDIF / RAW, and SPDIF/ PCM.
ANALOG: From the Coaxial Output jack and the Optical Output jack, no signal is
output.
SPDIF/ RAW: Choose this setting if your DVD player is connected to a power
amplifier with a coaxial cable or an optical cable; When playing a disc recorded
with Dolby Digital, DTS and MPEG audio formats, the corresponding digital
signals will be output from the Coaxial Output jack or Optical Output jack. This
player’s digital output jacks are designed for a connection to a Dolby Digital, DTS ,
or MPEG receiver or decoder.
SPDIF / PCM: Choose this setting if your DVD player is connected to a 2-channel
digital stereo amplifier; When playing a disc recorded with Dolby Digital and
MPEG audio formats, audio signals will be modulated into a 2-channel PCM signal,
and it will be output from the Coaxial Output jack or Optical Output jack.
MIC SETUP
There are two MIC settings in the MIC SETUP option: AUTO and OFF. When
selecting AUTO, the player will auto detect and deal with the input voice. When
selecting OFF, the player will do nothing with the MIC input. For example, when
playing a VCD2.0 karaoke disc, choose AUTO to enable Auto A/D Detect Feature.
chapter 4
30
The Setup Menu System
ECHO
Use the Up and Down arrow button to move the scroll and adjust the echo.
MIC VOL
Use the Up and Down arrow button to move the scroll and adjust the microphone
volume.
chapter 4
31
The Setup Menu System
KEY
Use the Up and Down arrow button to move the scroll and adjust the key.
d)
VIDEO SETUP
The video setup options are illustrated below:
BRIGHTNESS
Use the Up and Down arrow button to move the scroll and adjust the brightness.
chapter 4
32
The Setup Menu System
CONTRAST
Use the Up and Down arrow button to move the scroll and adjust the contrast.
HUE
Use the Up and Down arrow button to move the scroll and adjust the hue.
chapter 4
33
The Setup Menu System
SATURATION
Use the Up and Down arrow button to move the scroll and adjust the saturation.
e)
SPEAKER SETUP
The speaker setup options are illustrated below:
DOWNMIX
Use the Up and Down arrow button to move the scroll and adjust the saturation.
LT / RT: Choose this setting, it will be sound like in a movie theatre if the original
movie the disc was recorded from was encoded in the Pro Logic Dolby Digital
format.
STEREO: Choose this setting, when 5.1-channel sound playing, two channels of
signals will be output from the left and right soundtrack; when 2-channel sound
playing, stereo signal will be output.
chapter 4
34
The Setup Menu System
VSS: Choose this setting, when a disc recorded with 5.1-channel sound format
playing, the fictitious surround soundtracks effect will be heard from the main
soundtrack.
OFF: Choose this setting to output the 5.1-channel sound.
SUBWOOFER
There are two settings in this option: OFF / ON. When ON is chosen, the player will
auto detect the subwoofer input then output it. When OFF is chosen and the subwoofer
input will not be output.
BASS MODE
There are three settings in this option: ALL LG SPK, ALL SM SPK, MIXED SPK.
You can adjust subwoofer volume in this option
chapter 4
35
The Setup Menu System
CENTER DELAY
You can adjust center delay in this option.
REAR DELAY
You can adjust rear delay in this option.
chapter 4
36
The Setup Menu System
f)
DIGITAL SETUP
The video setup options are illustrated below:
OP MODE
LINE OUT: Choose this setting to line out the input signal. It will be more suitable
for playing in the night time, for the output volume is low.
RF REMOD: It will be more suitable to choose this setting for playing in the day
time, for the output volume is high.
DYNAMIC RANGE: When “LINE OUT” is selected, choose this setting to adjust the
line out ratio and get different effect. If adjusting to FULL, the audio signal peak value
will be the minimum; while adjusting to OFF, maximum.
NOTE:
This option will be validated when the DOWNMIX OFF.
chapter 4
37
The Setup Menu System
DUAL MONO (LEFT + RIGHT)
Choose this option to setup the L and R mono output mode; There are four modes in this
option: STEREO, MONO L, MONO R, and MIX MONO; It is mainly used in karaoke mode.
REFERENCE:
To protect your DVD player, the interval between two consecutive Power button
operations must be above 30 seconds.
No using for a period of time, please pull out the plug from the electronic outlet.
The player should be operated only on condition that the type of power supply
corresponds to the marking label. Otherwise, it doesn’t work or even be damaged.
The player may not be compatible with some encrypted discs.
If the player stops playback by accident, please power it on again.
chapter 4
38