1
D2330Z_Body_Eng.qxd.4 00.10.11 5:21 PM ページ 3
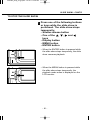
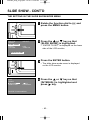
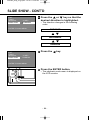
-3-
D2330Z_Body_Eng.qxd.4 00.10.11 5:21 PM ページ 4
FOR PROPER AND SAFE USE
Read and understand all warnings and cautions before using this product.
WARNING
Batteries may become hot or explode due to improper use.
• Use only the batteries specified in this instruction manual.
• Do not install the batteries with the polarity (+/-) reversed.
• Do not subject batteries to fire or high temperatures.
• Do not attempt to recharge, short, or disassemble.
• Do not mix batteries of different types, brands, or ages.
• Follow local regulations for battery disposal.
Use caution, accidents may occur when using this product near young children.
Keep batteries or things that could be swallowed away from young children.
Contact a doctor immediately if an object is swallowed.
Immediately remove the batteries and discontinue use if...
• the camera is dropped or subjected to an impact in which the interior is
exposed.
• the product emits a strange smell, heat, or smoke.
Do not walk while looking at the monitor.
Do not disassemble. Electric shock may occur if a high voltage circuit inside the
camera is touched.
Take your camera to a Minolta Service Facility when repairs are required.
CAUTION
The heat of the camera rises with extended periods of use. Use caution when
handling the camera or removing the batteries and compact flash card.
-4-
D2330Z_Body_Eng.qxd.4 00.10.11 5:21 PM ページ 5
BEFORE YOU BEGIN
Check the packing list before you begin. If some parts are missing, contact your
camera dealer or a Minolta Service Facility listed on the back cover of this manual.
•
•
•
•
•
•
•
•
Minolta Dimâge 2330 ZOOM camera (x 1)
AA-size Alkaline Batteries (x 4)
Video Cable (x 1)
Hand Strap (x 1)
Camera Case (x 1)
USB Cable (x 1)
8MB CompactFlash Card (x 1)
CD-ROM (x 3)
USB Driver Software for Windows®98/Windows®98 Second Edition
Adobe PhotoDeluxe Home Edition 4.0 CD-ROM for Windows®
Adobe PhotoDeluxe 2.0 CD-ROM for Macintosh
• Documentation
Camera Instruction Manual (this manual) (x 1)
Warranty (x 1)
-5-
D2330Z_Body_Eng.qxd.4 00.10.11 5:21 PM ページ 6
TABLE OF CONTENTS
FOR PROPER AND SAFE USE............................................................................4
BEFORE YOU BEGIN............................................................................................5
TABLE OF CONTENTS .........................................................................................6
NAMES OF PARTS..............................................................................................10
CAMERA BODY...........................................................................................10
INSIDE THE TERMINAL COVER ................................................................12
BOTTOM OF BODY.....................................................................................12
DATA PANEL................................................................................................13
VIEWFINDER ..............................................................................................14
QUICK REFERENCES ........................................................................................16
GETTING STARTED............................................................................................16
TAKING PICTURES.............................................................................................16
MONITERING THE CAPTURED IMAGES ..........................................................18
DELETING IMAGES ............................................................................................19
PREPARATION
ATTACHING THE HAND STRAP.........................................................................23
INSERTING THE BATTERIES.............................................................................24
CHECKING THE BATTERY POWER ..........................................................26
AUTO POWER OFF ....................................................................................27
USING THE AC ADAPTER (Sold Separately) ............................................27
INSERTING/REMOVING THE COMPACT FLASH (CF) CARD ..........................28
INSERTING THE CF CARD ........................................................................28
REMOVING THE CF CARD ........................................................................29
TAKING PICTURES
BASIC RECORDING PROCEDURE ...................................................................32
THE RECORDING MODE DISPLAY ON THE LCD MONITOR ..................34
THE DISPLAY OF THE CAMERA SETTINGS ............................................35
ADJUSTING THE FOCUS ...................................................................................36
FOCUS LAMP .............................................................................................36
FOCUS DISTANCE IN THE AUTOFOCUS MODE
(Minimum Focus Distance) ..........................................................................36
THE SUBJECT THAT IS DIFFICULT TO FOCUS
IN THE AUTOFOCUS MODE ......................................................................37
WHEN THE SUBJECT IS NOT IN THE CENTER OF THE FRAME
(Focus Lock Function) .................................................................................38
ADJUSTING THE FOCUS MANUALLY
(Manual Focus Mode)..................................................................................39
-6-
D2330Z_Body_Eng.qxd.4 00.10.11 5:21 PM ページ 7
TABLE OF CONTENTS
FLASH .................................................................................................................41
Flash Range ................................................................................................41
SELECTING THE FLASH MODE ................................................................42
Flash Lamp ..................................................................................................43
ADVANCED OPERATIONS
BURST IMAGE CAPTURE ..................................................................................45
SELF-TIMER........................................................................................................48
DIGITAL ZOOM....................................................................................................51
CLOSE-UP...........................................................................................................53
EXPOSURE COMPENSATION ...........................................................................55
SPECIFYING THE RECORDING MODE
SPECIFYING THE RECORDING MODE ............................................................58
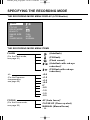
THE RECORDING MODE MENU DISPLAY (LCD Monitor) .......................58
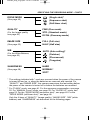
THE RECORDING MODE MENU ITEMS ...................................................58
SPECIFYING THE IMAGE QUALITY MODE ......................................................60
SPECIFYING THE IMAGE SIZE MODE..............................................................63
SPECIFYING THE WHITE BALANCE MODE .....................................................65
SPECIFYING THE SHARPNESS MODE ............................................................68
PLAYBACK MODE
SINGLE-FRAME PLAY ........................................................................................71
THE PLAYBACK MODE DISPLAY ON THE LCD MONITOR .....................72
THE IMAGE INFORMATION DISPLAY IN THE PLAYBACK MODE ...........73
INDEX PLAY ........................................................................................................74
ZOOM PLAY ........................................................................................................77
SLIDE SHOW ......................................................................................................79
TO START THE SLIDE SHOW ....................................................................79
TO STOP THE SLIDE SHOW......................................................................81
THE SETTING IN THE SLIDE SHOW MODE MENU .................................82
DELETING IMAGES
DELETING AN IMAGE ........................................................................................86
DELETING ALL IMAGES.....................................................................................90
Continued on Next Page
-7-
D2330Z_Body_Eng.qxd.4 00.10.11 5:21 PM ページ 8
TABLE OF CONTENTS - CONT’D
SPECIFYING THE PLAYBACK MODE
THE PLAYBACK MODE MENU...........................................................................94
THE PLAYBACK MODE MENU (LCD Monitor)...........................................94
THE PLAYBACK MODE MENU ITEMS AND EACH SETTINGS................94
SPECIFYING THE PRINT SETTINGS WITH THE DPOF ...................................96
SPECIFYING THE IMAGE AND THE NUMBER TO BE PRINTED.............96
SPECIFYING THE INDEX PRINT SETTINGS ..........................................100
TO CANCEL THE PRINT SETTINGS WITH THE DPOF ..........................102
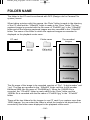
FOLDER NAME .................................................................................................104
On DCF (Design rule for Camera File system) Format.............................106
SETUP
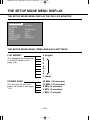
THE SETUP MODE MENU DISPLAY................................................................108
THE SETUP MODE MENU DISPLAY ON THE LCD MONITOR...............108
THE SETUP MODE MENU ITEMS AND EACH SETTINGS.....................108
ADJUSTING THE BRIGHTNESS OF THE LCD MONITOR ..............................110
SPECIFYING THE TIME FOR THE AUTO POWER OFF FUNCTION ..............112
FORMATTING THE CF CARD ..........................................................................114
SETTING THE DATE AND TIME .......................................................................116
SETTING THE BEEP SOUND...........................................................................120
SWITCHING THE VIDEO SIGNAL
FROM THE VIDEO OUTPUT TERMINAL ...................................................122
SWITCHING THE LANGUAGE DISPLAYED ON THE LCD MONITOR ............124
RESETTING TO THE DEFAULT SETTINGS.....................................................126
CONNECTING TO THE PERSONAL COMPUTER
CONNECTING TO THE PERSONAL COMPUTER...........................................129
SYSTEM REQUIREMENT.................................................................................130
CONNECTING TO THE PERSONAL COMPUTER...........................................132
INSTALLATION OF THE DRIVER SOFTWARE ........................................134
WHEN DISCONNECTING THE USB CABLE ...................................................140
For Winsows®98/Windows®98 Second Edition...........................................140
For Windows®2000 Professinal ..................................................................140
For Windows®Me........................................................................................140
For Macintosh ............................................................................................141
CAUTIONS WHEN CONNECTING TO THE PERSONAL COMPUTER ...........142
INSTALLING Adobe PhotoDeluxe .....................................................................144
-8-
D2330Z_Body_Eng.qxd.4 00.10.11 5:21 PM ページ 9
TABLE OF CONTENTS - CONT’D
APPENDIX
WATCHING THE CAPTURED IMAGES ON TV ................................................147
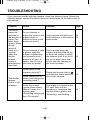
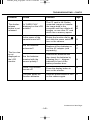
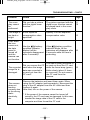
TROUBLESHOOTING .......................................................................................148
NOTES ON THE HANDLING.............................................................................152
CARE AND STORAGE ......................................................................................156
TECHNICAL DETAILS .......................................................................................157
-9-
D2330Z_Body_Eng.qxd.4 00.10.11 5:21 PM ページ 10
NAMES OF PARTS
CAMERA BODY
* Do not touch.
Shutter-release button
Function dial
Data panel
Viewfinder window*
Flash*
Lens*
Self-timer lamp
Terminal cover
Flash sensor*
- 10 -
D2330Z_Body_Eng.qxd.4 00.10.11 5:21 PM ページ 11
NAMES OF PARTS
Flash lamp (orange)
Focus lamp (green)
Power switch
Viewfinder*
Four-way
key ( )
Strap eyelet
MENU button
LCD monitor*
ENTER button
Card-slot door
Display button
Four-way key (
)
Four-way key (
- 11 -
Four-way
key ( )
)
D2330Z_Body_Eng.qxd.4 00.10.11 5:21 PM ページ 12
NAMES OF PARTS - CONT’D
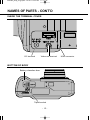
INSIDE THE TERMINAL COVER
DC terminal
Video-out terminal
BOTTOM OF BODY
Battery-chamber door
Tripod socket
- 12 -
USB connector
D2330Z_Body_Eng.qxd.4 00.10.11 5:21 PM ページ 13
NAMES OF PARTS - CONT’D
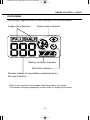
DATA PANEL
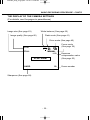
The following diagram shows all items displayed to aid the explanation.
Image-size indicators
Flash-mode indicators
Battery-condition indicator
Self-timer indicator
Number display of recordable remaining frame /
No-card indicator
* Refer to the number of recordable remaining frame as a guide.
The number changes depending on the scene or subject you record.
- 13 -
D2330Z_Body_Eng.qxd.4 00.10.11 5:21 PM ページ 14
NAMES OF PARTS - CONT’D
VIEWFINDER
Focus lamp
(green)
Close-framing guide
Flash lamp
(orange)
Close-framing guide
When you shoot a subject which is closer than 1m through the viewfinder, only
the part under the close-framing guide is recorded. So, use the LCD monitor to
check the image composition when you shoot a subject which is closer than 1m.
- 14 -
D2330Z_Body_Eng.qxd.4 00.10.11 5:21 PM ページ 15
NAMES OF PARTS - CONT’D
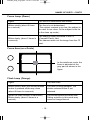
Focus Lamp (Green)
Lights.
The focus is determined and locked.
Blinks quickly (about 8 times
in a second).
The focus is not determined.
(The subject contrast is too low, the subject is
too dark or too close. Or the subject is too far
in the close up mode.)
Blinks slowly (about 2 times in
a second).
The image is being recorded in the CF
(Compact Flash) card.
The camera reads out the image from the CF
card.
Focus Area (as a Guide)
In the autofocus mode, the
focus is adjusted at the
gray part as shown in the
figure.
Flash Lamp (Orange)
Lights.
The flash fires.
Blinks quickly when the shutter-release
button is pressed all-the-way down
(about 8 times in a second).
The flash is being charged. The
shutter-release button is not
released.
(when the flash function is cancelled)
Blinks slowly (about 2 times in a
second).
The shutter speed becomes slow.
Taking a picture in this mode may
cause an image blurred.
- 15 -
D2330Z_Body_Eng.qxd.4 00.10.11 5:21 PM ページ 16
QUICK REFERENCES
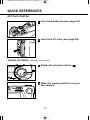
GETTING STARTED
Insert the batteries (see page 24).
Insert the CF card (see page 28).
TAKING PICTURES - See page 32 for details.
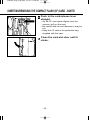
Rotate the function dial to
.
Slide the power switch to turn on
the camera.
- 16 -
D2330Z_Body_Eng.qxd.4 00.10.11 5:21 PM ページ 17
QUICK REFERENCES - CONT’D
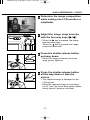
Determine the image composition
while looking into LCD monitor or
viewfinder.
Adjust the image range and size
with the four-way keys ( / ).
• When the
key is pressed, the image
size becomes large.
When the
key is pressed, the image
range becomes wide.
Press the shutter-release button
part-way down.
• When the image is focused, the focus
lamp (green) lights up.
Press the shutter-release button
all-the-way down to take the
picture.
• The captured image is displayed on the
LCD monitor.
• While the captured image is recorded in
the CF card, the focus lamp (green) blinks
slowly (about 2 times in a second).
- 17 -
D2330Z_Body_Eng.qxd.4 00.10.11 5:21 PM ページ 18
QUICK REFERENCES - CONT’D
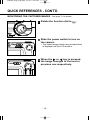
MONITORING THE CAPTURED IMAGES - See page 71 for details.
Rotate the function dial to
.
Slide the power switch to turn on
the camera.
• The latest image (which was recorded last)
is displayed on the LCD monitor.
When the
or
key is pressed,
the image changes to the next or
previous one respectively.
- 18 -
D2330Z_Body_Eng.qxd.4 00.10.11 5:21 PM ページ 19
QUICK REFERENCES - CONT’D
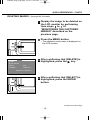
DELETING IMAGES - See page 86 for details.
Display the image to be deleted on
the LCD monitor by performing
from steps to
of
“MONITORING THE CAPTURED
IMAGES” described on the
previous page.
Press the MENU button.
• The playback mode menu is displayed on
the LCD monitor.
DELETE
ZOOM
SLIDE SHOW
PRINT
FOLDER
SELECT
After confirming that [DELETE] is
highlighted, press the
key.
STD.
100MLT02
ENTER TO SELECT
After confirming that [SELECT] is
highlighted, press the ENTER
button.
Continued on Next Page
- 19 -
D2330Z_Body_Eng.qxd.4 00.10.11 5:21 PM ページ 20
QUICK REFERENCES - CONT’D
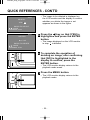
20/37
DELETE?
YES / NO
• The image to be deleted is displayed on
the LCD monitor and the display to confirm
whether you delete the image or not
appears as shown in the figure.
ENTER TO SELECT
:MOVE
2000/08/26 10:43
20/37
DELETE?
YES / NO
ENTER TO DELETE
:MOVE
2000/08/26 10:43
Press the
key so that [YES] is
highlighted and press the ENTER
button.
• The image displayed on the LCD monitor
in step
is deleted.
To complete the operation of
deleting an image, after confirming
that [NO] is highlighted in the
display to confirm, press the
ENTER button.
• The LCD monitor display returns to the
playback mode menu.
Press the MENU button.
• The LCD monitor display returns to the
playback mode.
- 20 -
D2330Z_Body_Eng.qxd.4 00.10.11 5:21 PM ページ 21
QUICK REFERENCES - CONT’D
- 21 -
D2330Z_Body_Eng.qxd.4 00.10.11 5:21 PM ページ 22
PREPARATION
- 22 -
D2330Z_Body_Eng.qxd.4 00.10.11 5:21 PM ページ 23
ATTACHING THE HAND STRAP
Insert the smaller loop of the hand
strap through the strap eyelet.
Insert the other end of the hand
strap through the small loop.
- 23 -
D2330Z_Body_Eng.qxd.4 00.10.11 5:21 PM ページ 24
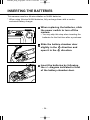
INSERTING THE BATTERIES
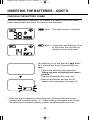
This camera uses four AA-size alkaline or Ni-MH batteries.
* When using AA-size Ni-MH batteries, fully recharge them with a vendorendorsed battery charger.
When replacing the batteries, slide
the power switch to turn off the
camera.
• You may skip this step when inserting the
batteries for the first time after a purchase.
Slide the battery-chamber door
slightly in the
direction and
open it in the
direction.
Insert the batteries by following
the +/– diagram indicated in front
of the battery-chamber door.
- 24 -
D2330Z_Body_Eng.qxd.4 00.10.11 5:21 PM ページ 25
INSERTING THE BATTERIES - CONT’D
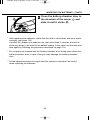
Close the battery-chamber door in
the direction of the arrow
and
slide it until it clicks
.
* After replacing the batteries, check that the built-in clock (date and time) works
correctly (see page 116).
If neither AC adapter nor batteries are used more than 5 minutes, the built-in
clock may delay or be reset to the default setting. In this case, set the date and
time again by following the procedure described on page 116.
* Do not place the camera with the battery-chamber door facing down when the
battery-chamber door is open. Doing so may damage the battery-chamber
door.
* As the batteries become hot right after the camera is operated, be careful
when replacing the batteries.
- 25 -
D2330Z_Body_Eng.qxd.4 00.10.11 5:22 PM ページ 26
INSERTING THE BATTERIES - CONT’D
CHECKING THE BATTERY POWER
When the batteries are installed in the camera, the camera checks the battery
power automatically and shows the result on the data panel.
lights — The battery power is sufficient.
lights — Prepare the new batteries. Even
in this status, the recording or
playback can be performed.
All indicators go out and after that,
blinks
for 5 seconds and then, all indicators go out
again.
— Perform the following either operation.
Taking a picture or playing back cannot
perform.
• Replace all batteries with new ones.
• Remove all batteries and use the AC
adapter (sold separately) (see page 27).
* When nothing is displayed on the data panel, check that the batteries are
installed with a correct polarity (+/–). When nothing is displayed even though
the batteries are installed correctly, replace the batteries with new ones.
- 26 -
D2330Z_Body_Eng.qxd.4 00.10.11 5:22 PM ページ 27
INSERTING THE BATTERIES - CONT’D
AUTO POWER OFF
To save the battery power, this camera will turned off automatically if it is not
operated more than 3 minutes. (Auto Power Off function)
To operate the camera, slide the power switch to turn on the camera again.
* When using the batteries, the time for the auto power off function can be
changed to a minute, 5 minutes, 10 minutes or 30 minutes. See page 112 for
details.
* When using the AC adapter (sold separately), this camera will turn off
automatically if it is not operated more than 30 minutes. The time for the auto
power off function is fixed in 30 minutes.
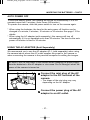
USING THE AC ADAPTER (Sold Separately)
We recommend you to use the AC adapter AC-1 (sold separately) when using
the camera indoor where the AC outlet supplies the power to the camera or
when connecting the camera to the personal computer for editing the images.
Be sure to turn off the power of the camera when changing the power supply
from the batteries to the AC adapter or vice versa. Do not change it when the
power of the camera is turned on.
Connect the mini plug of the AC
adapter to the DC terminal of the
camera.
• The shape of the mini plug may vary
depending on the AC adapter.
Connect the power plug of the AC
adapter to an AC outlet.
- 27 -
D2330Z_Body_Eng.qxd.4 00.10.11 5:22 PM ページ 28
INSERTING/REMOVING THE COMPACT FLASH (CF) CARD
Be sure to turn off the power of the camera when inserting or removing the
CF card into or from the camera. Otherwise, the data in the card may be lost
or the card may be damaged.
If you insert or remove the CF card when the camera is turned on, re-format
the CF card after transferring the data from the card to your computer if the
data is safe.
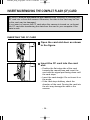
INSERTING THE CF CARD
Open the card-slot door as shown
in the figure.
Insert the CF card into the card
slot.
• Position the flat edge side of the card
towards the camera lens and insert the
card with the signal part facing down until
the card stops.
• Insert the card straight. Do not insert it on
the angle.
• If the card stops halfway, check the
direction of the card. Forcing the card into
the slot may damage the card or the
camera.
- 28 -
D2330Z_Body_Eng.qxd.4 00.10.11 5:22 PM ページ 29
INSERTING/REMOVING THE COMPACT FLASH (CF) CARD - CONT’D
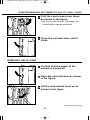
Fold the card-release lever down
as shown in the figure.
• Be sure to fold the lever. Otherwise, the
card-slot door cannot be closed.
Close the card-slot door until it
clicks.
REMOVING THE CF CARD
Confirm that the power of the
camera is turned off.
Open the card-slot door as shown
in the figure.
Lift the card-release lever up as
shown in the figure.
Continued on Next Page
- 29 -
D2330Z_Body_Eng.qxd.4 00.10.11 5:22 PM ページ 30
INSERTING/REMOVING THE COMPACT FLASH (CF) CARD - CONT’D
Push in the card-release lever
straight.
• As the CF card ejects slightly from the
camera, pull out the card.
• Be careful with the card because it may be
hot.
• Keep the CF card in the protection bag
supplied with the card.
Close the card-slot door until it
clicks.
- 30 -
D2330Z_Body_Eng.qxd.4 00.10.11 5:22 PM ページ 31
TAKING PICTURES
- 31 -
D2330Z_Body_Eng.qxd.4 00.10.11 5:22 PM ページ 32
BASIC RECORDING PROCEDURE
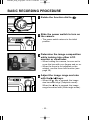
Rotate the function dial to
.
Slide the power switch to turn on
the camera.
• The power switch returns to the initial
position.
Determine the image composition
while looking into either LCD
monitor or viewfinder.
• When holding the camera, be sure not to
cover the lens with your fingers and so on.
• When the focus is not adjusted on the
subject, use the focus lock function (see
page 38).
Adjust the image range and size
with the / keys.
• When the
key is pressed, the image
size becomes large (Telephoto mode).
When the
key is pressed, the image
range becomes wide (Wide-angle mode).
- 32 -
D2330Z_Body_Eng.qxd.4 00.10.11 5:22 PM ページ 33
BASIC RECORDING PROCEDURE - CONT’D
Press the shutter-release button
part-way down.
* When pressing the shutterrelease button, there is a
point where the button
stops halfway. To press the
shutter-released button to
this point is described
“Press part-way down” in
this manual.
• The camera adjusts the focus
automatically. When the subject is focused,
the focus lamp (green) lights up.
• When the focus lamp (green) blinks, follow
the operation from step
again.
• When the flash will fire, the flash lamp
(orange) lights up.
• When the flash lamp (orange) blinks slowly
(about 2 times in a second), the shutter
speed becomes slow. Taking a picture in
this mode may cause an image blurred.
We recommend you to take pictures after
fixing the camera on the tripod.
Press the shutter-release button
the rest of the way down.
• If the flash lamp (orange) blinks when the
shutter-release button is pressed all the
way down, the flash is being charged.
When the shutter-release button is kept
pressed in this status, the shutter is
released at the same time when the flash
is charged.
• The captured image is displayed on the
LCD monitor and is recorded in the CF
card. While the image is recorded, the
focus lamp (green) blinks slowly (about 2
times in a second) and “RECORDING”
blinks on the LCD monitor slowly. Be sure
not to open the battery- chamber door,
disconnect the plug of the AC adapter
or remove the CF card until the
recording in the CF card is completed
(until the focus lamp (green) and
“RECORDING” stops blinking). The data
in the CF card may be damaged or lost.
- 33 -
D2330Z_Body_Eng.qxd.4 00.10.11 5:22 PM ページ 34
BASIC RECORDING PROCEDURE - CONT’D
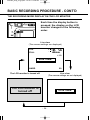
THE RECORDING MODE DISPLAY ON THE LCD MONITOR
Each time the display button is
pressed, the display on the LCD
monitor changes in the following
order.
Live view
(The camera settings are displayed)
STD
FULL
MANUAL
+1.0
Live view
20
HARD
The LCD monitor is turned off
Live view
(The camera settings are not displayed)
The LCD monitor is
turned off
Live view
- 34 -
D2330Z_Body_Eng.qxd.4 00.10.11 5:22 PM ページ 35
BASIC RECORDING PROCEDURE - CONT’D
THE DISPLAY OF THE CAMERA SETTINGS
(For details, see the pages in parentheses)
Image size (See page 63)
White balance (See page 65)
Image quality (See page 60)
Flash mode (See page 41)
Drive mode (See page 45)
Focus mode
(See page 39)
STD
FULL
MANUAL
+1.0
Live view
20
HARD
Sharpness (See page 68)
- 35 -
Exposure
compensation value
(See page 55)
Frame number
D2330Z_Body_Eng.qxd.4 00.10.11 5:22 PM ページ 36
ADJUSTING THE FOCUS
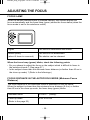
FOCUS LAMP
When the shutter-release button is pressed halfway, this camera adjusts the
focus automatically and the focus lamp (green) shows the focus status (when the
focus mode is set to the autofocus mode.)
Lights
The focus is determined and locked.
Blinks quickly
(about 8 times in a second)
The focus is not determined.
The shutter can be released.
When the focus lamp (green) blinks, check the following points:
• Do you attempt to adjust the focus on the subject which is difficult to focus in
the autofocus mode ? (See page 37.)
• Is the subject closer than the minimum focus distance (or farther than 40 cm in
the close up mode) ? (Refer to the followings.)
FOCUS DISTANCE IN THE AUTOFOCUS MODE (Minimum Focus
Distance)
The focus distance in the autofocus mode is described on the list below.
When the subject is closer than the minimum focus distance (0.4 m) or farther
than 40 cm in the close up mode, the focus lamp (green) blinks.
Standard mode
0.4 m to ∞ (infinity)
Close up mode
(Refer to the page 53)
4 cm to 40 cm
- 36 -
D2330Z_Body_Eng.qxd.4 00.10.11 5:22 PM ページ 37
ADJUSTING THE FOCUS - CONT’D
THE SUBJECT THAT IS DIFFICULT TO FOCUS IN THE AUTOFOCUS
MODE
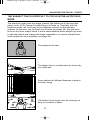
The autofocus mode uses the image contrast (the difference of light and dark
parts) on the CCD (Charge Coupled Device) to focus on. Therefore, with the
autofocus mode, the focus may not be adjusted correctly on the following
subjects. In this case, use the focus lock function (see page 38), that you once
focus on the other subject which is at the same distance as the subject you want
to take the picture and change the image composition, or use the manual focus
mode (adjust the focus manually, see page 39).
The subject is too dark.
The subject has no contrast such as a blue sky
or a white wall.
Some subjects at different distances overlap in
the focus range.
The subject is too bright such as a shining car
body or a surface of water.
- 37 -
D2330Z_Body_Eng.qxd.4 00.10.11 5:22 PM ページ 38
ADJUSTING THE FOCUS - CONT’D
WHEN THE SUBJECT IS NOT IN THE CENTER OF THE FRAME
(Focus Lock Function)
When the subject is not in the center of the frame, the camera adjusts the focus
on the background. In this case, take a picture with the focus lock function.
Aim the camera so that
the subject is in the
center of the frame and
press the shutterrelease button partway down.
• The camera adjusts the
focus automatically. When
the focus is adjusted, the
focus lamp (green) lights.
While you hold
pressing the shutterrelease button partway down, change the
camera position to
obtain the desired
image composition
and press the button
all-the-way down to
take a picture.
- 38 -
D2330Z_Body_Eng.qxd.4 00.10.11 5:22 PM ページ 39
ADJUSTING THE FOCUS - CONT’D
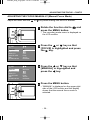
ADJUSTING THE FOCUS MANUALLY (Manual Focus Mode)
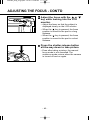
Adjust the focus with the
or
key while looking into the LCD monitor.
Rotate the function dial to
press the MENU button.
and
• The recording mode menu is displayed on
the LCD monitor.
FLASH
+/FOCUS
DRIVE MODE
QUALITY
IMAGE SIZE
WB
SHARPNESS
FLASH
+/FOCUS
DRIVE MODE
QUALITY
IMAZE SIZE
WB
SHARPNESS
0
AF
Press the
or
key so that
[FOCUS] is highlighted and press
the
key.
STD.
FULL
AUTO
NORMAL
0
MANUAL
Press the
or
key so that
[MANUAL] is highlighted and
press the
key.
STD.
FULL
AUTO
NORMAL
Press the MENU button.
• “MANUAL” is displayed on the upper right
side of the LCD monitor and the display
shows that the manual focus mode is
selected.
- 39 -
D2330Z_Body_Eng.qxd.4 00.10.11 5:22 PM ページ 40
ADJUSTING THE FOCUS - CONT’D
Adjust the focus with the
or
key while looking into the LCD
monitor.
• Adjust the focus so that the subject is
displayed clearly on the LCD monitor.
• When the
key is pressed, the focus
position is moved to the part in a long
distance.
• When the
key is pressed, the focus
position is moved to the part in a short
distance.
Press the shutter-release button
all-the-way down to take picture.
• Even after taking a picture, the manual
focus mode is not cancelled. The
autofocus mode returns when the camera
is turned off and on again.
- 40 -
D2330Z_Body_Eng.qxd.4 00.10.11 5:22 PM ページ 41
FLASH
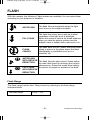
With this camera, the following 5 flash modes are available. You can select them
according to your purpose or condition.
AUTOFLASH
The flash fires automatically when the light
level is low or the subject is backlit.
FILL-FLASH
The flash fires every time a picture is taken
regardless of the light level or backlight.
Select this mode to reduce the harsh shadows
when you take the picture outdoor and the
subject’s face is shaded with a hat and so on.
FLASH
CANCEL
The flash does not fire. Select this mode when
taking a picture in the place where the flash
photography is prohibited such as in a
museum, etc.
AUTOFLASH
WITH RED-EYE The flash fires the short burst 2 times before
REDUCTION
the main flash burst for reducing the red-eye
phenomenon. Select this mode when taking
the picture of people or animals in the dark.
FILL-FLASH
WITH RED-EYE
REDUCTION
Flash Range
The flash range has the limit. Take pictures by referring to the flash range
indicated below.
The flash range
0.4 m ~ 3 m
- 41 -
Continued on Next Page
D2330Z_Body_Eng.qxd.4 00.10.11 5:22 PM ページ 42
FLASH - CONT’D
SELECTING THE FLASH MODE
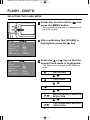
Rotate the function dial to
press the MENU button.
and
• The recording mode menu is displayed on
the LCD monitor.
FLASH
+/FOCUS
DRIVE MODE
QUALITY
IMAGE SIZE
WB
SHARPNESS
FLASH
+/FOCUS
DRIVE MODE
QUALITY
IMAGE SIZE
WB
SHARPNESS
0
AF
After confirming that [FLASH] is
highlighted, press the
key.
STD.
FULL
AUTO
NORMAL
0
AF
STD.
FULL
AUTO
NORMAL
Press the
or
key so that the
desired flash mode is highlighted.
• The flash mode changes in the following
order.
AUTOFLASH
FILL-FLASH
FLASH CANCEL
AUTOFLASH WITH RED-EYE
REDUCTION
FILL-FLASH WITH RED-EYE
REDUCTION
- 42 -
D2330Z_Body_Eng.qxd.4 00.10.11 5:22 PM ページ 43
FLASH - CONT’D
FLASH
+/FOCUS
DRIVE MODE
QUALITY
IMAGE SIZE
WB
SHARPNESS
0
AF
Press the
key.
STD.
FULL
AUTO
NORMAL
Press the MENU button.
• The selected flash mode is displayed with
the icon shown on the previous page on
the upper right side of the LCD monitor
(see page 35). However, when
“AUTOFLASH” is selected, no icon
appears and when “AUTOFLASH WITH
RED-EYE REDUCTION” is selected, only
appears.
• The flash mode returns to “AUTOFLASH
WITH RED-EYE REDUCTION” when the
camera is turned off and on again.
Flash Lamp
The flash lamp (orange) shows the flash status.
Lights
The flash fires.
Blinks quickly when the shutterrelease button is pressed all the
way down (about 8 times in a
second).
The flash is being charged. The shutter-release button is not
released.
Blinks slowly (when the flash
function is cancelled).
(about 2 times in a second).
The shutter speed becomes slow. Taking a picture in this mode
may cause an image blurred.
The flash function is cancelled when the flash mode is set to
“FLASH CANCEL”, when the drive mode is set to the burst image
capture or, when the focus mode is set to the close-up mode.
- 43 -
D2330Z_Body_Eng.qxd.4 00.10.11 5:22 PM ページ 44
ADVANCED OPERATIONS
- 44 -
D2330Z_Body_Eng.qxd.4 00.10.11 5:22 PM ページ 45
BURST IMAGE CAPTURE
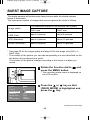
This digital camera will continuously take pictures while the shutter-release
button is held down.
The maxximum number of images that can be captured at a time is follows:
The maximum number of the pictures (as a guide)
Image quality
FULL size
HALF size
FINE (Fine)
about 2 pictures
about 6 pictures
STD. (Standard)
about 4 pictures
about 12 pictures
ECON. (Economy)
about 8 pictures
about 12 pictures
* See page 60 for the image quality and page 63 for the image size (FULL or
HALF size).
* The number of the picture you can take sequentially at a time described on the
list above can be referred as a guide.
The number of the picture changes according to the scene or subject you
record.
Rotate the function dial to
press the MENU button.
and
• The recording mode menu is displayed on
the LCD monitor.
FLASH
+/FOCUS
DRIVE MODE
QUALITY
IMAGE SIZE
WB
SHARPNESS
0
AF
Press the
or
key so that
[DRIVE MODE] is highlighted and
press the
key.
STD.
FULL
AUTO
NORMAL
Continued on Next Page
- 45 -
D2330Z_Body_Eng.qxd.4 00.10.11 5:22 PM ページ 46
BURST IMAGE CAPTURE - CONT’D
FLASH
+/FOCUS
DRIVE MODE
QUALITY
IMAGE SIZE
WB
SHARPNESS
0
AF
STD.
FULL
AUTO
NORMAL
Press the
or
is highlighted.
key so that
• The drive mode changes in the following
order.
Single shot
Sequence shot
Self-timer shot
FLASH
+/FOCUS
DRIVE MODE
QUALITY
IMAGE SIZE
WB
SHARPNESS
Press the
key.
0
AF
STD.
FULL
AUTO
NORMAL
Press the MENU button.
• The sequence shot icon
appears on
the upper right side of the LCD monitor.
(See page 35)
• The flash mode is set to “FLASH CANCEL”
automatically. When taking a sequence
shot, the flash does not fire.
• When the single shot or the self-timer shot
is selected, the flash mode returns to
“AUTOFLASH WITH RED-EYE
REDUCTION”.
- 46 -
D2330Z_Body_Eng.qxd.4 00.10.11 5:22 PM ページ 47
BURST IMAGE CAPTURE - CONT’D
Determine the image composition
while looking into LCD monitor or
viewfinder and adjust the image
range and size with the
or
key.
• When the
key is pressed, the image
size becomes large (Telephoto mode).
When the
key is pressed, the image
range becomes wide (Wide-angle mode).
Press the shutter-release button
part-way down.
Press and hold the shutter-release
button all-the-way down.
• When your finger is lifted from the shutterrelease button or the maximum number of
picture is taken, the sequence shot is
completed.
• When taking a sequence shot, the focus
and exposure adjustments are determined
when the shutter-release button is pressed
part-way down and these adjustments are
applied to all images in the sequence shot
mode.
• Even after taking a sequence shot, the
sequence shot mode capture is not
cancelled. The single shot mode returns
when the camera is turned off and on
again.
- 47 -
D2330Z_Body_Eng.qxd.4 00.10.11 5:22 PM ページ 48
SELF-TIMER
The picture is taken about 10 seconds after the shutter-release button is
pressed.
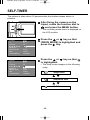
After fixing the camera on the
tripod, rotate the function dial to
and press the MENU button.
• The recording mode menu is displayed on
the LCD monitor.
FLASH
+/FOCUS
DRIVE MODE
QUALITY
IMAGE SIZE
WB
SHARPNESS
FLASH
+/FOCUS
DRIVE MODE
QUALITY
IMAGE SIZE
WB
SHARPNESS
O
AF
Press the
or
key so that
[DRIVE MODE] is highlighted and
press the
key.
STD.
FULL
AUTO
NORMAL
O
AF
STD.
FULL
AUTO
NORMAL
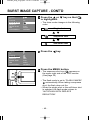
Press the
or
is highlighted.
key so that
• The drive mode changes in the following
order.
Single shot
Sequence shot
Self-timer
- 48 -
D2330Z_Body_Eng.qxd.4 00.10.11 5:22 PM ページ 49
SELF-TIMER - CONT’D
FLASH
+/FOCUS
DRIVE MODE
QUALITY
IMAGE SIZE
WB
SHARPNESS
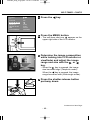
Press the
key.
0
AF
STD.
FULL
AUTO
NORMAL
Press the MENU button.
• The self-timer shot icon
appears on the
upper right side of the LCD monitor.
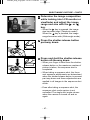
Determine the image composition
while looking into LCD monitor or
viewfinder and adjust the image
range and size with the
or
key.
• When the
key is pressed, the image
size becomes large (Telephoto mode).
When the
key is pressed, the image
range becomes wide (Wide-angle mode).
Press the shutter-release button
part-way down.
Continued on Next Page
- 49 -
D2330Z_Body_Eng.qxd.4 00.10.11 5:22 PM ページ 50
SELF-TIMER - CONT’D
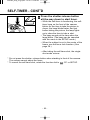
Press the shutter-release button
all-the-way down to start timer.
• While the self-timer is functioning, the selftimer lamp on the front of the camera
blinks. As the time to take the picture is
closer, the lamp blinks faster. And just
before taking the picture, the lamp lights
up to show the time to take a shot.
• The beep sounds at the time when the
lamp blinks. (The beep can be canceled
with the menu in the SETUP mode.)
• When the subject is not in the center of the
frame, use the focus lock function. (See
page 38.)
• After taking the self-timer shot, the singleshot mode returns.
* Do not press the shutter- release button when standing in front of the camera.
The camera cannot adjust the focus.
* To cancel the self-timer shot, rotate the function dial to
, PC or SETUP.
- 50 -
D2330Z_Body_Eng.qxd.4 00.10.11 5:22 PM ページ 51
DIGITAL ZOOM
The digital zoom function can increase the maximum magnification (about 24
mm) of the optical zoom lens (114 mm in the 35 mm film format equivalent) up to
2.5 times.
In the recording mode, press the
key in the recording mode so
that the image is zoomed to the
maximum.
Press and hold the
key for
more than 2 seconds.
• The digital zoom function is set.
• The indicator that shows the image range
appears on the LCD monitor as shown in
the figure left below. When the indicator
appears, remove your finger from the
key.
• The digital zoom function cannot be set
when the LCD monitor is turned off.
STD
FULL
37
Continued on Next Page
- 51 -
D2330Z_Body_Eng.qxd.4 00.10.11 5:22 PM ページ 52
DIGITAL ZOOM - CONT’D
While looking into the LCD
monitor, determine the image
composition so that the desired
image is positioned within the
range of the indicator.
Press the shutter-release button
part-way down.
Press the shutter-release button
all-the-way down to take a picture.
• The focus lock function can be also used
(see page 38).
• Even after taking a picture, the digital
zoom is not cancelled. To cancel the digital
zoom function, press and hold the
key
until the indicator disappears or turn off
and on the camera again.
* The image recorded with the digital zoom function is trimmed in 640 x 480
pixels. Therefore, the recorded image is smaller when displaying it on your
computer or printing out it with fixing the print resolution.
- 52 -
D2330Z_Body_Eng.qxd.4 00.10.11 5:22 PM ページ 53
CLOSE UP
The close up function allows you to take a picture close to the subject up to 4 cm
filling the frame with the subject in about 6 cm x 4 cm.
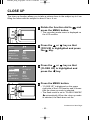
Rotate the function dial to
press the MENU button.
and
• The recording mode menu is displayed on
the LCD monitor.
FLASH
+/FOCUS
DRIVE MODE
QUALITY
IMAGE SIZE
WB
SHARPNESS
FLASH
+/FOCUS
DRIVE MODE
QUALITY
IMAGE SIZE
WB
SHARPNESS
0
AF
Press the
or
key so that
[FOCUS] is highlighted and press
the
key.
STD.
FULL
AUTO
NORMAL
0
CLOSE UP
Press the
or
key so that
[CLOSE UP] is highlighted and
press the
key.
STD.
FULL
AUTO
NORMAL
Press the MENU button.
• “CLOSE UP” is displayed on the upper
right side of the LCD monitor and it shows
that the close up mode is selected.
• The flash mode is set to “FLASH CANCEL”
automatically. When the close up mode
is selected, the flash does not fire.
Continued on Next Page
- 53 -
D2330Z_Body_Eng.qxd.4 00.10.11 5:22 PM ページ 54
CLOSE UP - CONT’D
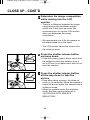
Determine the image composition
while looking into the LCD
monitor.
• There is a difference between the image
range through the viewfinder and the
actual one in the close up mode. We
recommend you to use the LCD monitor
when you determine the image
composition.
• We recommend you to fix the camera on
the stable stand or on the tripod.
• The LCD monitor cannot be turned off in
the close up mode.
Press the shutter-release button
part-way down.
• If the focus lamp (green) blinks, check that
the subject is within the distance from 4
cm to 40 cm (is not apart more than 40 cm
from the camera).
Press the shutter-release button
all-the-way down to take the
picture.
• Even after taking a picture, the close up
mode is not cancelled. When the camera is
turned off and on again, the camera enters
autofocus mode.
• When the camera enters the autofocus
mode, the flash mode is returned to
“AUTOFLASH WITH RED-EYE
REDUCTION”.
- 54 -
D2330Z_Body_Eng.qxd.4 00.10.11 5:22 PM ページ 55
EXPOSURE COMPENSATION
This function makes the image brighter or darker by adjusting the exposure
compensation value for CCD. The bigger the exposure compensation value is,
the brighter the image is and the smaller the exposure compensation value is,
the darker the image is.
Rotate the function dial to
press the MENU button.
and
• The recording mode menu is displayed on
the LCD monitor.
FLASH
+/FOCUS
DRIVE MODE
QUALITY
IMAGE SIZE
WB
SHARPNESS
FLASH
+/FOCUS
DRIVE MODE
QUALITY
IMAGE SIZE
WB
SHARPNESS
0
AF
Press the
or
key so that
[+/–] is highlighted and press the
key.
STD.
FULL
AUTO
NORMAL
+1.0
AF
STD.
FULL
AUTO
NORMAL
Press the
or
key that the
desired exposure compensation
value appears.
• The exposure compensation value from
+2.0 to –2.0 can be specified by 0.5 step.
Continued on Next Page
- 55 -
D2330Z_Body_Eng.qxd.4 00.10.11 5:22 PM ページ 56
EXPOSURE COMPENSATION - CONT’D
FLASH
+/FOCUS
DRIVE MODE
QUALITY
IMAGE SIZE
WB
SHARPNESS
Press the
key.
+1.0
AF
STD.
FULL
AUTO
NORMAL
Press the MENU button.
• The exposure compensation value is
specified and displayed on the upper right
side of the LCD monitor (see page 35).
Press the shutter-release button
all-the-way down to take picture.
* To cancel the exposure compensation function, follow the operation steps
described above and specify 0 for the exposure compensation value, or turn off
and on the camera again.
* When the image to be captured is whitish, increase the exposure
compensation value so that the white part can be easily represented, on the
other hand, when the image to be captured is blackish, decrease the exposure
compensation value so that the black part can be easily represented.
- 56 -
D2330Z_Body_Eng.qxd.4 00.10.11 5:22 PM ページ 57
SPECIFYING
THE RECORDING MODE
- 57 -
D2330Z_Body_Eng.qxd.4 00.10.11 5:22 PM ページ 58
SPECIFYING THE RECORDING MODE
THE RECORDING MODE MENU DISPLAY (LCD Monitor)
FLASH
+/FOCUS
DRIVE MODE
QUALITY
IMAGE SIZE
WB
SHARPNESS
0
AF
STD.
FULL
AUTO
NORMAL
THE RECORDING MODE MENU ITEMS
FLASH
(Autoflash)
(For the Flash mode,
see page 41)
(Fill-flash)
(Flash cancel)
(Autoflash with red-eye
reduction)*
(Fill-flash with red-eye
reduction)
+/(For the Exposure
compensation,
see page 55)
+2.0
+1.5
+1.0
+0.5
0*
-0.5
-1.0
-1.5
-2.0
FOCUS
AF (Auto focus)*
(For the Focus mode,
see page 36)
CLOSE UP (Close up shot)
MANUAL (Manual focus)
- 58 -
D2330Z_Body_Eng.qxd.4 00.10.11 5:22 PM ページ 59
SPECIFYING THE RECORDING MODE - CONT’D
DRIVE MODE
(Single shot)*
(See page 45)
(Sequence shot)
(Self-timer shot)
QUALITY
FINE (Fine mode)
(For the Image quality,
see page 60)
STD. (Standard mode)
IMAZE SIZE
FULL (Full size)
(See page 63)
HALF (Half size)
WB
AUTO (Auto setting)*
ECON. (Economy mode)
(For the White Balance,
see page 65)
(Outdoor)
(Fluorescent)
(Tungsten)
SHARPNESS
HARD
(See page 68)
NORMAL*
SOFT
* The settings indicated with * mark are resumed when the power of the camera
is turned off and on, or when the batteries are removed and inserted. For
“QUALITY” and “IMAGE SIZE”, the camera memorizes the last setting before
the power of the camera is turned off or before the batteries are removed.
* For “FLASH” mode, see page 41. For the exposure compensation, see page
55. For “MANUAL Focus” mode, see page 39. For “CLOSE UP” mode, see
page 53. For the “DRIVE MODE (sequence shot)”, see page 45. For the
“DRIVE MODE (self-timer shot)”, see page 48.
Only the 4 items of “QUALITY” (image quality), “IMAGE SIZE”, “WB” (white
balance) and “SHARPNESS” are described on the following pages.
- 59 -
D2330Z_Body_Eng.qxd.4 00.10.11 5:22 PM ページ 60
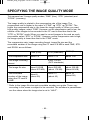
SPECIFYING THE IMAGE QUALITY MODE
This camera has 3 image quality modes; “FINE” (fine), “STD.” (standard) and
“ECON.” (economy).
The image quality is related to the compression rate of the image. The
compression rate is higher in the order of “FINE”
“STD.”
“ECON.”. The
higher the compression rate is, the lower the image quality is. When you want
high quality images, select “FINE”. However, as the compression rate is low, the
number of the images to be recorded in the CF card is less than that in the
“STD.” or “ECON.” mode. When you want to record images in the card as much
as possible, select “STD.” or “ECON.”. However, as the compression rate is high,
the image quality is lower than that in the “FINE” mode.
The compression rate, image recording format, image file size and the
recordable number of the image using the CF card of 8 MB in each FINE, STD.
and ECON. are as follows.
The compression rate
FINE (Fine)
STD. (Standard)
ECON.(Economy)
about 1/6
about 1/12
about 1/25
Exif2.1-JPEG
(DCF standards)
The image recording
format
The image file size
about 910 KB
(about 270 KB)
about 560 KB
(about 170 KB)
about 230 KB
(about 80 KB)
The recordable
number of the image
using the CF card of
8 MB
about 8
(about 28)
about 13
(about 43)
about 33
(about 99)
* Refer to the image file size and recordable number as a guide. These vary
according to the scene or subject to be recorded. The numbers in parentheses
are the values when the image size is set to “HALF”.
- 60 -
D2330Z_Body_Eng.qxd.4 00.10.11 5:22 PM ページ 61
SPECIFYING THE IMAGE QUALITY MODE - CONT’D
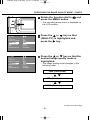
Rotate the function dial to
press the MENU button.
and
• The recording mode menu is displayed on
the LCD monitor.
FLASH
+/FOCUS
DRIVE MODE
QUALITY
IMAGE SIZE
WB
SHARPNESS
FLASH
+/FOCUS
DRIVE MODE
QUALITY
IMAGE SIZE
WB
SHARPNESS
0
AF
Press the
or
key so that
[QUALITY] is highlighted and
press the
key.
STD.
FULL
AUTO
NORMAL
0
AF
FINE
FULL
AUTO
NORMAL
Press the
or
key so that the
desired image quality mode is
highlighted.
• The image quality mode changes in the
following order.
FINE (Fine mode)
STD. (Standard mode)
ECON. (Economy mode)
Continued on Next Page
- 61 -
D2330Z_Body_Eng.qxd.4 00.10.11 5:22 PM ページ 62
SPECIFYING THE IMAGE QUALITY MODE - CONT’D
FLASH
+/FOCUS
DRIVE MODE
QUALITY
IMAGE SIZE
WB
SHARPNESS
0
AF
Press the
key.
FINE
FULL
AUTO
NORMAL
Press the MENU button.
• The selected image quality mode is
specified and displayed on the upper left
side of the LCD monitor (see page 35).
* It does not matter even if there are images recorded in different image quality
modes in a CF card.
* The setting of the image quality mode is stored in the camera’s memory even
after the camera is turned off.
* Changing the image quality mode affects the remaining number of images
which can be recorded in the card. Selecting “FINE”, in particular, may
considerably reduce the remaining number of images. We recommend you to
check the number display of recordable remaining flame on the data panel.
- 62 -
D2330Z_Body_Eng.qxd.4 00.10.11 5:22 PM ページ 63
SPECIFYING THE IMAGE SIZE MODE
Before taking pictures, select the image size. Changing the image size affects the
number of the image which can be recorded in the CF card. The “FULL” or
“HALF” size can be selected.
Image Size
Number of Pixels (W x H)
FULL
1792 x 1200
HALF
HALF
896 x 600
Rotate the function dial to
press the MENU button.
and
• The recording mode menu is displayed on
the LCD monitor.
FLASH
+/FOCUS
DRIVE MODE
QUALITY
IMAGE SIZE
WB
SHARPNESS
0
AF
Press the
or
key so that
[IMAGE SIZE] is highlighted and
press the
key.
STD.
FULL
AUTO
NORMAL
Continued on Next Page
- 63 -
D2330Z_Body_Eng.qxd.4 00.10.11 5:22 PM ページ 64
SPECIFYING THE IMAGE SIZE MODE - CONT’D
FLASH
+/FOCUS
DRIVE MODE
QUALITY
IMAGE SIZE
WB
SHARPNESS
0
AF
FINE
HALF
AUTO
NORMAL
Press the
or
key so that the
desired image size mode is
highlighted.
• The image size mode changes in the
following order.
FULL (Full size)
HALF (Half size)
FLASH
+/FOCUS
DRIVE MODE
QUALITY
IMAGE SIZE
WB
SHARPNESS
0
AF
Press the
key.
FINE
HALF
AUTO
NORMAL
Press the MENU button.
• The selected image size mode is specified
and displayed under the image quality on
the upper left side of the LCD monitor (see
page 35).
* The setting of the image size mode is stored in the camera’s memory even
after the camera is turned off.
* Changing the image size mode affects the remaining number of images which
can be recorded in the card. We recommend you to check the number display
of recordable remaining flame on the data panel when you change the image
size mode.
- 64 -
D2330Z_Body_Eng.qxd.4 00.10.11 5:22 PM ページ 65
SPECIFYING THE WHITE BALANCE MODE
This camera has four white balance modes.
Auto white balance
This adjusts the white balance according to the light
source incident on the CCD. Normally select this
mode.
AUTO
Outdoor mode
Select this mode when taking the picture of the
subject illuminated by a sunlight.
Fluorescent mode
Select this mode when taking the picture of the
subject illuminated by a fluorescent light.
Tungsten mode
Select this mode when taking the picture of the
subject illuminated by an incandescent light or
tungsten light.
Rotate the function dial to
press the MENU button.
and
• The recording mode menu is displayed on
the LCD monitor.
FLASH
+/FOCUS
DRIVE MODE
QUALITY
IMAGE SIZE
WB
SHARPNESS
0
AF
Press the
or
key so that
[WB] is highlighted and press the
key.
FINE
HALF
AUTO
NORMAL
Continued on Next Page
- 65 -
D2330Z_Body_Eng.qxd.4 00.10.11 5:22 PM ページ 66
SPECIFYING THE WHITE BALANCE MODE - CONT’D
FLASH
+/FOCUS
DRIVE MODE
QUALITY
IMAGE SIZE
WB
SHARPNESS
0
AF
FINE
HALF
NORMAL
Press the
or
key so that the
desired white balance mode is
highlighted.
• The white balance mode changes in the
following order.
AUTO (Auto white balance)
Outdoor mode
Fluorescent mode
Tungsten mode
FLASH
+/FOCUS
DRIVE MODE
QUALITY
IMAGE SIZE
WB
SHARPNESS
Press the
key.
0
AF
FINE
HALF
NORMAL
Press the MENU button.
• The selected white balance mode is
specified and the icon of the selected
white balance mode is displayed on the left
side of the flash mode on the upper left
side of the LCD monitor (see page 35).
However, when “AUTO” is selected, no
icon appears on the LCD monitor.
- 66 -
D2330Z_Body_Eng.qxd.4 00.10.11 5:22 PM ページ 67
SPECIFYING THE WHITE BALANCE MODE - CONT’D
* The white balance mode returns to “AUTO” automatically when the camera is
turned off and on again.
- 67 -
D2330Z_Body_Eng.qxd.4 00.10.11 5:22 PM ページ 68
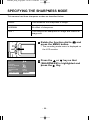
SPECIFYING THE SHARPNESS MODE
This camera has three sharpness modes as described below.
HARD
This enhances the sharpness of image.
NORMAL
No effect of sharpness.
SOFT
This reduces the sharpness of image and makes an
image soft.
Rotate the function dial to
press the MENU button.
and
• The recording mode menu is displayed on
the LCD monitor.
FLASH
+/FOCUS
DRIVE MODE
QUALITY
IMAGE SIZE
WB
SHARPNESS
0
AF
Press the
or
key so that
[SHARPNESS] is highlighted and
press the
key.
FINE
HALF
AUTO
NORMAL
- 68 -
D2330Z_Body_Eng.qxd.4 00.10.11 5:22 PM ページ 69
SPECIFYING THE SHARPNESS MODE - CONT’D
FLASH
+/FOCUS
DRIVE MODE
QUALITY
IMAGE SIZE
WB
SHARPNESS
0
AF
FINE
HALF
AUTO
HARD
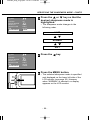
Press the
or
key so that the
desired sharpness mode is
highlighted.
• The sharpness mode changes in the
following order.
HARD
NORMAL
SOFT
FLASH
+/FOCUS
DRIVE MODE
QUALITY
IMAGE SIZE
WB
SHARPNESS
0
AF
Press the
key.
FINE
HALF
AUTO
HARD
Press the MENU button.
• The selected sharpness mode is specified
and displayed on the lower left side of the
LCD monitor (see page 35). However,
when “NORMAL” is selected, no display
appears on the LCD monitor.
- 69 -
D2330Z_Body_Eng.qxd.4 00.10.11 5:22 PM ページ 70
PLAYBACK MODE
- 70 -
D2330Z_Body_Eng.qxd.4 00.10.11 5:22 PM ページ 71
SINGLE-FRAME PLAY
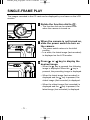
The images recorded in the CF card can be displayed by one frame on the LCD
monitor.
Rotate the function dial to
.
• The function dial can be rotated even
when the camera is turned on.
When the camera is not turned on,
slide the power switch to turn on
the camera.
• The power switch returns to the initial
position.
• In a while, the latest image (last recorded)
is displayed on the LCD monitor.
Press
or
key to display the
desired image.
• When the
key is pressed, the following
image is displayed. When the
key is
pressed, the preceding image is displayed.
• When the latest image (last recorded) is
displayed and the
key is pressed, the
oldest image (first recorded) is displayed.
• When the oldest image (first recorded) is
displayed and the
key is pressed, the
latest image (last recorded) is displayed.
- 71 -
D2330Z_Body_Eng.qxd.4 00.10.11 5:22 PM ページ 72
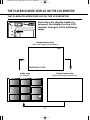
THE PLAYBACK MODE DISPLAY ON THE LCD MONITOR
THE PLAYBACK MODE DISPLAY ON THE LCD MONITOR
Each time the display button is
pressed, the display on the LCD
monitor changes in the following
order.
Single-frame play
(with the image information)
9/37
2000/08/30 15:49
Single-frame play
(with no image information)
Index play
(9 frames)
1
2
3
4
5
6
7
8
9
- 72 -
D2330Z_Body_Eng.qxd.4 00.10.11 5:22 PM ページ 73
THE PLAYBACK MODE DISPLAY ON THE LCD MONITOR - CONT’D
THE IMAGE INFORMATION DISPLAY IN THE PLAYBACK MODE
Frame number of the image/Total
frame number recorded in the CF card
9/37
2000/08/30 15:49
Recorded date and time of the image
1
2
3
4
5
6
7
8
9
When the camera enters the index play mode, the
frame number of the image displayed last in the
single-frame play mode is highlighted. (The ninth
frame is the last displayed image in the figure above.)
- 73 -
D2330Z_Body_Eng.qxd.4 00.10.11 5:22 PM ページ 74
INDEX PLAY
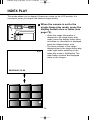
This mode allows you to display 9 frames at a time on the LCD monitor. It is
convenient when you search the desired image quickly.
When the camera is set to the
single-frame play mode, press the
display button once or twice (see
page 72).
9/37
• When the image information is
displayed in the single-frame play
mode, press the display button twice
and when no information is displayed,
press the display button once.
• The frame number of the image
displayed last in the single-frame play
mode right before switching to the
index play mode is highlighted. The
other frame numbers are displayed
white on the images.
2000/08/30 15:49
1
2
3
4
5
6
7
8
9
- 74 -
D2330Z_Body_Eng.qxd.4 00.10.11 5:22 PM ページ 75
INDEX PLAY - CONT’D
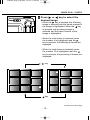
Press
or
key to select the
desired image.
• When the
key is pressed, the following
image is selected and the frame number of
the image is highlighted. When the
key
is pressed, the preceding image is
selected and the frame number of the
image is highlighted.
• When the ninth frame is selected (when
the number 9 is highlighted) and the
key is pressed, the following 9 frames are
displayed.
• When the tenth frame is selected (when
the number 10 is highlighted) and the
key is pressed, the preceding 9 frames are
displayed.
key
1
2
3
10
11
12
4
5
6
13
14
15
7
8
9
16
17
18
key
Continued on Next Page
- 75 -
D2330Z_Body_Eng.qxd.4 00.10.11 5:23 PM ページ 76
INDEX PLAY - CONT’D
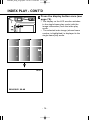
Press the display button once (see
page 72).
• The display on the LCD monitor switches
to the single-frame play mode (with the
image information) from the index play
mode.
• The selected index image (whose frame
number is highlighted) is displayed in the
single-frame play mode.
10
11
12
13
14
15
16
17
18
15/37
2000/08/31 09:48
- 76 -
D2330Z_Body_Eng.qxd.4 00.10.11 5:23 PM ページ 77
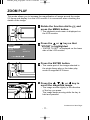
ZOOM PLAY
This mode allows you to increase the magnification of image around the center
2.5 times and display it on the LCD monitor. It is convenient when checking the
details of the image.
Rotate the function dial to
press the MENU button.
and
• The playback mode menu is displayed on
the LCD monitor.
DELETE
ZOOM
SLIDE SHOW
PRINT
FOLDER
SELECT
STD.
100MLT02
Press the
or
key so that
“ZOOM” is highlighted.
• “ENTER TO SET” is displayed on the lower
side of the LCD monitor.
ENTER TO SET
Press the ENTER button.
• The center part of the image selected in
the single-frame play or the index play
mode is magnified 2.5 times.
Press the ,
,
or
key to
scroll the magnified image.
• The image moves slightly in the direction
of the key you press.
The image keeps moving while the key is
held and pressed.
Continued on Next Page
- 77 -
D2330Z_Body_Eng.qxd.4 00.10.11 5:23 PM ページ 78
ZOOM PLAY - CONT’D
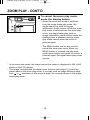
To cancel the zoom play mode,
press the display button.
• When the zoom play mode is switched
from the single-frame play mode, the
single-frame play (with the image
information) mode returns. When the zoom
play mode is switched from the index play
mode, the single-frame play (with no
image information) mode returns when the
display button is pressed, and the index
play mode returns when the button is
pressed again.
• The MENU button can be also used to
cancel the zoom play mode. When the
MENU button is pressed, the play back
mode menu returns and when the button is
pressed again, the signal-frame play mode
returns.
* In the zoom play mode, the image around the center is displayed in 640 x 480
pixels on the LCD monitor.
* The image recorded with the digital zoom function (see page 51) cannot be
played back in the zoom play mode. If you play such an image following steps
from
to
described on the previous page, the camera returns to the singleframe play mode.
- 78 -
D2330Z_Body_Eng.qxd.4 00.10.11 5:23 PM ページ 79
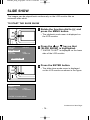
SLIDE SHOW
The images can be played back continuously on the LCD monitor like an
automatic slide show.
TO START THE SLIDE SHOW
Rotate the function dial to
press the MENU button.
and
• The playback mode menu is displayed on
the LCD monitor.
DELETE
ZOOM
SLIDE SHOW
PRINT
FOLDER
SELECT
STD.
100MLT02
Press the
or
key so that
[SLIDE SHOW] is highlighted.
• “ENTER TO SET” is displayed on the lower
side of the LCD monitor.
ENTER TO SET
Press the ENTER button.
• The slide show mode menu is displayed
on the LCD monitor as shown in the figure.
EXIT
START
INTERVAL
DIRECTION
3 SEC
FORWARD
ENTER TO MAIN MENU
Continued on Next Page
- 79 -
D2330Z_Body_Eng.qxd.4 00.10.11 5:23 PM ページ 80
SLIDE SHOW - CONT’D
EXIT
START
INTERVAL
DIRECTION
3 SEC
FORWARD
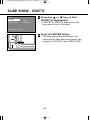
Press the
or
key so that
[START] is highlighted.
• “ENTER TO START” is displayed on the
lower side of the LCD monitor.
ENTER TO START
Press the ENTER button.
• The slide show starts according to the
settings in the slide show mode menu (the
settings of “INTERVAL” and “DIRECTION”).
- 80 -
D2330Z_Body_Eng.qxd.4 00.10.11 5:23 PM ページ 81
SLIDE SHOW - CONT’D
TO STOP THE SLIDE SHOW
Press one of the following buttons
or keys while the slide show is
performed. The slide show stops
temporarily.
- Shutter-release button
- One of the ,
,
and
keys
- Display button
- MENU button
- ENTER button
• When the ENTER button is pressed while
the slide show stops temporarily, the slide
show resumes playback.
• When the MENU button is pressed while
the slide show stops temporarily, the
playback mode menu is displayed on the
LCD monitor.
- 81 -
D2330Z_Body_Eng.qxd.4 00.10.11 5:23 PM ページ 82
SLIDE SHOW - CONT’D
THE SETTING IN THE SLIDE SHOW MODE MENU
Rotate the function dial to
press the MENU button.
DELETE
ZOOM
SLIDE SHOW
PRINT
FOLDER
and
SELECT
Press the
or
key so that
[SLIDE SHOW] is highlighted.
STD.
100MLT02
• “ENTER TO SET” is displayed on the lower
side of the LCD monitor.
ENTER TO SET
Press the ENTER button.
• The slide show mode menu is displayed
on the LCD monitor.
EXIT
START
INTERVAL
DIRECTION
3 SEC
FORWARD
Press the
or
key so that
[INTERVAL] is highlighted and
press
key.
ENTER TO MAIN MENU
- 82 -
D2330Z_Body_Eng.qxd.4 00.10.11 5:23 PM ページ 83
SLIDE SHOW - CONT’D
EXIT
START
INTERVAL
DIRECTION
10 SEC
FORWARD
ENTER TO MAIN MENU
EXIT
START
INTERVAL
DIRECTION
Press the
or
key so that the
desired interval time is
highlighted.
• When the
key is pressed, the time
increases.
When the
key is pressed, the time
decreases.
• The interval time can be specified from 3
to 60 seconds by a second.
• The interval time means the time between
when the image is displayed completely
and when the camera starts reading the
next frame.
Press the
key.
10 SEC
FORWARD
ENTER TO MAIN MENU
EXIT
START
INTERVAL
DIRECTION
10 SEC
FORWARD
Press the
or
key so that
[DIRECTION] is highlighted and
press
key.
ENTER TO MAIN MENU
- 83 -
D2330Z_Body_Eng.qxd.4 00.10.11 5:23 PM ページ 84
SLIDE SHOW - CONT’D
EXIT
START
INTERVAL
DIRECTION
10 SEC
FORWARD
Press the
or
key so that the
desired direction is highlighted.
• The direction changes in the following
order.
ENTER TO MAIN MENU
FORWARD
BACKWARD
RANDOM
EXIT
START
INTERVAL
DIRECTION
Press the
key.
10 SEC
RANDOM
ENTER TO MAIN MENU
Press the ENTER button.
• The playback mode menu is displayed on
the LCD monitor.
- 84 -
D2330Z_Body_Eng.qxd.4 00.10.11 5:23 PM ページ 85
DELETING IMAGES
- 85 -
D2330Z_Body_Eng.qxd.4 00.10.11 5:23 PM ページ 86
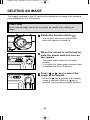
DELETING AN IMAGE
The images recorded in the CF card can be deleted by an image while checking
them displayed on the LCD monitor.
CAUTION
As the deleted image cannot be recovered, be careful when deleting an
image.
Rotate the function dial to
.
• The function dial can be rotated even
when the camera is turned on.
When the camera is not turned on,
slide the power switch to turn on
the camera.
• The power switch returns to the initial
position.
• In a while, the latest image (recorded last)
is displayed on the LCD monitor.
Press
or
key to select the
image to be deleted.
• When the
key is pressed, the following
image is selected. When the
key is
pressed, the preceding image is selected.
- 86 -
D2330Z_Body_Eng.qxd.4 00.10.11 5:23 PM ページ 87
DELETING AN IMAGE - CONT’D
Press the MENU button.
• The playback mode menu is displayed on
the LCD monitor.
DELETE
ZOOM
SLIDE SHOW
PRINT
FOLDER
SELECT
After confirming that [DELETE] is
highlighted, press the
key.
STD.
100MLT02
ENTER TO SELECT
After confirming that [SELECT] is
highlighted, press the ENTER
button.
20/37
• The image to be deleted (the image
displayed on the LCD monitor in step 1) is
displayed on the LCD monitor and the
display to confirm whether you delete the
image or not appears as shown in the
figure.
DELETE?
YES / NO
ENTER TO CANCEL
: CHANGE IMAGE
2000/08/26 10:43
* The color of the background in the left
figure is gray so that you can easily find
out the contents of the display. However,
the image to be deleted (the image
displayed on the LCD monitor in step )
is actually displayed in the background.
Continued on Next Page
- 87 -
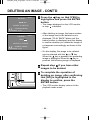
D2330Z_Body_Eng.qxd.4 00.10.11 5:23 PM ページ 88
DELETING AN IMAGE - CONT’D
20/37
DELETE?
YES / NO
ENTER TO DELETE
Press the
key so that [YES] is
highlighted and press the ENTER
button.
• The image displayed on the LCD monitor
in step
is deleted.
: CHANGE IMAGE
2000/08/26 10:43
20/37
DELETE?
YES / NO
ENTER TO CANCEL
: CHANGE IMAGE
2000/08/26 10:43
• After deleting an image, the frame number
of the image next to the deleted one is
displayed (“PLAY BACK” blinks until the
frame number is displayed) and the display
to confirm whether you delete the image or
not appears succeedingly as shown in the
figure.
• On this display, the image to be deleted
can be selected with the
or
key.
When the
key is pressed, the preceding
image is displayed. When the
key is
pressed, the following image is displayed.
Repeat step if you have other
images to be deleted.
To complete the operation of
deleting an image, after confirming
that [NO] is highlighted in the
display to confirm, press the
ENTER button.
• The LCD monitor display returns to the
playback mode menu.
- 88 -
D2330Z_Body_Eng.qxd.4 00.10.11 5:23 PM ページ 89
DELETING AN IMAGE - CONT’D
Press the MENU button.
• The LCD monitor display returns to the
playback mode.
- 89 -
D2330Z_Body_Eng.qxd.4 00.10.11 5:23 PM ページ 90
DELETING ALL IMAGES
All images recorded in the CF card can be deleted.
CAUTION
As the deleted image cannot be recovered, be careful when deleting all
images.
Rotate the function dial to
.
• The function dial can be rotated even
when the camera is turned on.
When the camera is not turned on,
slide the power switch to turn on
the camera.
• The power switch returns to the initial
position.
• In a while, the latest image (recorded last)
is displayed on the LCD monitor.
Press the MENU button.
• The playback mode menu is displayed on
the LCD monitor.
- 90 -
D2330Z_Body_Eng.qxd.4 00.10.11 5:23 PM ページ 91
DELETING ALL IMAGES - CONT’D
DELETE
ZOOM
SLIDE SHOW
PRINT
FOLDER
SELECT
After confirming that [DELETE] is
highlighted, press the
key.
STD.
100MLT02
ENTER TO SELECT
DELETE
ZOOM
SLIDE SHOW
PRINT
FOLDER
ALL
STD.
100MLT02
ENTER TO SELECT
Press the
key so that [ALL] is
highlighted and press the ENTER
button.
• The display to confirm whether you delete
all images or not appears as shown in the
figure.
• Only the images captured with this camera
can be all deleted. Even if you insert the
CF card in which the images captured with
other camera is recorded, the images
cannot be deleted.
DELETE ALL?
YES / NO
ENTER TO CANCEL
20/37
DELETE ALL?
Press the
key so that [YES] is
highlighted.
YES / NO
ENTER TO DELETE
Continued on Next Page
- 91 -
D2330Z_Body_Eng.qxd.4 00.10.11 5:23 PM ページ 92
DELETING ALL IMAGES - CONT’D
Press the ENTER button.
• All images recorded in the CF card are
deleted.
• While all images are deleted, the focus
lamp (green) blinks slowly (about two
times a second).
• After deleting all images in the CF card,
[NO IMAGE] and [ENTER TO MAIN
MENU] are displayed on the LCD monitor.
NO IMAGE
ENTER TO MAIN MENU
- 92 -
D2330Z_Body_Eng.qxd.4 00.10.11 5:23 PM ページ 93
SPECIFYING
THE PLAYBACK MODE
- 93 -
D2330Z_Body_Eng.qxd.4 00.10.11 5:23 PM ページ 94
THE PLAYBACK MODE MENU
THE PLAYBACK MODE MENU (LCD Monitor)
DELETE
ZOOM
SLIDE SHOW
PRINT
FOLDER
SELECT
STD.
100MLT02
THE PLAYBACK MODE MENU ITEMS AND EACH SETTINGS
DELETE
(For deleting images,
see page 86)
SELECT
YES
NO
ALL (Delete all)
YES
NO
ZOOM
(For the zoom play mode,
see page 77)
SLIDE SHOW
EXIT
(For the slide show
mode, see page 79)
START
INTERVAL
3 ~ 60 SEC
DIRECTION
FORWARD
REVERSE
RANDOM
- 94 -
D2330Z_Body_Eng.qxd.4 00.10.11 5:23 PM ページ 95
THE PLAYBACK MODE MENU - CONT’D
PRINT
STD.
(For specifying the print
settings with the DPOF,
see page 96)
INDEX
YES
NO
CANCEL
YES
NO
FOLDER
(Folder name,
see page 104)
100MLT02
(Other folder name)
(Other folder name)
(Other folder name)
(Other folder name)
* For “DELETE” (deleting images), see page 86. For “ZOOM” (zoom play), see
page 77. For “SLIDE SHOW” (auto play), see page 79.
Only the 2 items of “PRINT” (Specifying the print setting with DPOF),
“FOLDER” (Folder name) are described on the following pages.
- 95 -
D2330Z_Body_Eng.qxd.4 00.10.11 5:23 PM ページ 96
SPECIFYING THE PRINT SETTINGS WITH THE DPOF
This camera supports the DPOF™ (Digital Print Order Format) Version 1.00 so
that you can specify the images and the number of copies to be printed and the
print type. So, the specified images can be printed at the specified number only
by handing the CF card or the SmartMedia™, etc. in which not only the captured
images but the DPOF data are recorded, to the photofinishing print services
supporting the DPOF. You do not need to give them the file name or your
password. Also, if you set the media including the DPOF data in the personal
printer which supports the DPOF, you can print the specified images at the
specified number automatically.
* The DPOF is jointly developed by Eastman Kodak Company, Canon Inc., Fuji
Photo Film Co., Ltd., and Matsushita Electric Industrial Co., Ltd. for direct
printing from digital camera.
* This camera does not support “DPOF Version 1.10” which is released in July,
2000.
SPECIFYING THE IMAGE AND THE NUMBER TO BE PRINTED
Rotate the function dial to
press the MENU button.
and
• The playback mode menu is displayed on
the LCD monitor.
DELETE
ZOOM
SLIDE SHOW
PRINT
FOLDER
SELECT
STD.
100MLT02
Press the
or
key so that
[PRINT] is highlighted and press
key.
ENTER TO SELECT
- 96 -
D2330Z_Body_Eng.qxd.4 00.10.11 5:23 PM ページ 97
SPECIFYING THE PRINT SETTINGS WITH THE DPOF - CONT’D
After confirming that [STD.] is
highlighted, press the ENTER
button.
• The display to specify the number to be
printed appears on the LCD monitor.
0
0
0
0
0
0
: QUANTITY
: CHANGE IMAGE
ENTER TO SET
Press
or
key to select the
image to be printed.
• When the image to be printed is selected,
the number to be printed is highlighted.
• When the sixth frame is selected (when
the number to be printed is highlighted)
and the
key is pressed, the following 6
frames are displayed.
• When the seventh frame is selected (when
the number to be printed is highlighted)
and the
key is pressed, the preceding 6
frames are displayed.
Continued on Next Page
- 97 -
D2330Z_Body_Eng.qxd.4 00.10.11 5:23 PM ページ 98
SPECIFYING THE PRINT SETTINGS WITH THE DPOF - CONT’D
Press the
or
key to select
the number to be printed.
• When the
key is pressed, the number
becomes large.
When the
key is pressed, the number
becomes small.
0
0
0
0
0
2
: QUANTITY
: CHANGE IMAGE
ENTER TO SET
Repeat step
and
to specify
the number to be printed for all
images.
• For the image you do not want to print,
specify 0.
3
0
0
1
1
2
: QUANTITY
: CHANGE IMAGE
ENTER TO SET
- 98 -
D2330Z_Body_Eng.qxd.4 00.10.11 5:23 PM ページ 99
SPECIFYING THE PRINT SETTINGS WITH THE DPOF - CONT’D
Press the ENTER button.
• The DPOF file including data of the image
and the number to be printed is recorded
in the CF card.
• After the file is recorded, the LCD monitor
display returns to the playback mode
menu.
Press the MENU button.
• The LCD monitor display returns to the
playback mode.
- 99 -
D2330Z_Body_Eng.qxd.4 00.10.11 5:23 PM ページ 100
SPECIFYING THE PRINT SETTINGS WITH THE DPOF - CONT’D
SPECIFYING THE INDEX PRINT SETTING
This setting allows you to print all images recorded in the CF card on one sheet
as an index print.
The illustration of index print
as an image.
Rotate the function dial to
press the MENU button.
and
• The playback mode menu is displayed on
the LCD monitor.
DELETE
ZOOM
SLIDE SHOW
PRINT
FOLDER
SELECT
STD.
100MLT02
Press the
or
key so that
[PRINT] is highlighted and press
key.
ENTER TO SELECT
DELETE
ZOOM
SLIDE SHOW
PRINT
FOLDER
SELECT
INDEX
100MLT02
ENTER TO SELECT
Press the
key so that [INDEX]
is highlighted and press the
ENTER button.
• The display to confirm whether you print
the images as an index print or not
appears as shown in the figure.
- 100 -
D2330Z_Body_Eng.qxd.4 00.10.11 5:23 PM ページ 101
SPECIFYING THE PRINT SETTINGS WITH THE DPOF - CONT’D
INDEX PRINT
YES / NO
ENTER TO SELECT
INDEX PRINT
Press the
key so that [YES] is
highlighted.
YES / NO
ENTER TO SELECT
Press the ENTER button.
• The DPOF file including data of the index
print setting is recorded in the CF card.
• After the file is recorded, the LCD monitor
display returns to the playback mode
menu.
Press the MENU button.
• The LCD monitor display returns to the
playback mode.
- 101 -
D2330Z_Body_Eng.qxd.4 00.10.11 5:23 PM ページ 102
SPECIFYING THE PRINT SETTINGS WITH THE DPOF - CONT’D
TO CANCEL THE PRINT SETTINGS WITH THE DPOF
All print settings with the DPOF described on pages 96 to 99 can be cancelled.
The index print setting (see page 100) is also cancelled.
Rotate the function dial to
press the MENU button.
and
• The playback mode menu is displayed on
the LCD monitor.
DELETE
ZOOM
SLIDE SHOW
PRINT
FOLDER
SELECT
STD.
100MLT02
Press the
or
key so that
[PRINT] is highlighted and press
key.
ENTER TO SELECT
DELETE
ZOOM
SLIDE SHOW
PRINT
FOLDER
SELECT
CANCEL
100MLT02
ENTER TO SELECT
Press the
key twice so that
[CANCEL] is highlighted and press
the ENTER button.
• The display to confirm whether you cancel
all print settings or not appears as shown
in the figure.
- 102 -
D2330Z_Body_Eng.qxd.4 00.10.11 5:23 PM ページ 103
SPECIFYING THE PRINT SETTINGS WITH THE DPOF - CONT’D
CANCEL PRINT?
YES / NO
ENTER TO SELECT
CANCEL PRINT?
Press the
key so that [YES] is
highlighted.
YES / NO
ENTER TO SELECT
Press the ENTER button.
• The DPOF file including data of the print
settings is deleted and all print settings are
cancelled.
• After the file is deleted, the LCD monitor
display returns to the playback mode
menu.
Press the MENU button.
• The LCD monitor display returns to the
playback mode.
- 103 -
D2330Z_Body_Eng.qxd.4 00.10.11 5:23 PM ページ 104
FOLDER NAME
The folder in the CF card is conformed with DCF (Design rule for Camera File
system) format.
When taking a picture with this camera, the “Dcim” folder is made in the directory
of the CF card and the “100mlt02” folder is made in the “Dcim” folder. The first
captured image is recorded with the file name of “Pict0001.jpg” in the “100mlt02”
folder and all the following captured images are also recorded in the “100mlt02”
folder. The name of the folder in which the captured images are recorded is
displayed on the playback mode menu.
CF card
Folder name
The recorded
images
Pict0001.jpg
Pict0002.jpg
Pict0003.jpg
The file name of the image to be recorded consists of “Pict”, “4-digit number” and
“.jpg”. The files are recorded in the “100mlt02” folder until the 4-digit number
becomes 9999 (the file name of “Pict9999.jpg”). When the 10000th file is
recorded, the “101mlt02” folder is newly made in the “Dcim” folder and the
10000th file is recorded with the file name of “Pict0001.jpg” in the “101mlt02”
folder.
There will be two folders for the images in one CF card if you capture more than
10000 images. You can select the folder in which the image to be played back is
recorded by the folder name displayed in the playback mode menu.
- 104 -
D2330Z_Body_Eng.qxd.4 00.10.11 5:23 PM ページ 105
FOLDER NAME - CONT’D
Even if other digital camera supporting the DCF format is used to record the
captured images in the CF card, you can insert the CF card into this camera and
play back the images by selecting the particular folder name of other digital
camera in the playback mode menu.
Rotate the function dial to
press the MENU button.
and
• The playback mode menu is displayed on
the LCD monitor.
DELETE
ZOOM
SLIDE SHOW
PRINT
FOLDER
SELECT
STD.
100MLT02
Press the
or
key so that
[FOLDER] is highlighted and press
key.
ENTER TO SELECT
DELETE
ZOOM
SLIDE SHOW
PRINT
FOLDER
SELECT
CANCEL
101MLT02
ENTER TO SELECT
Press the
key so that the folder
name in which the image to be
played back is recorded is
highlighted and press the ENTER
button.
• When only “100mlt02” folder exists, the
folder name does not change even the
or
key is pressed.
- 105 -
D2330Z_Body_Eng.qxd.4 00.10.11 5:23 PM ページ 106
On DCF (Design rule for Camera File system) Format
DCF (Design rule for Camera File system) is the image format established
by JEIDA as the standard format of digital camera.
Through this format, the image files can be used between the digital
equipment conformed to DCF.
The following operation can be available between the digital equipment
conformed to DCF:
• The images captured with your digital camera can be played back on the
LCD monitor of other digital camera.
• The images captured with some digital cameras can be printed out from a
printer.
• A recording media (such as a CF card or SmartMedia™) can be used with
any of the digital cameras.
• By using the computer conformed to DCF, even the image data recorded
with some digital cameras can be easily sorted out.
- 106 -
D2330Z_Body_Eng.qxd.4 00.10.11 5:23 PM ページ 107
SETUP
- 107 -
D2330Z_Body_Eng.qxd.4 00.10.11 5:23 PM ページ 108
THE SETUP MODE MENU DISPLAY
THE SETUP MODE MENU DISPLAY ON THE LCD MONITOR
LCD BRIGHT
POWER SAVE
FORMAT
DATE
TIME
BEEP
VIDEO OUT
LANGUAGE
DEFAULT
5
10 MIN.
2000/08/30
17:33
ON
NTSC
ENGLISH
THE SETUP MODE MENU ITEMS AND EACH SETTINGS
LCD BRIGHT
(For adjusting the brightness
of the LCD monitor, see
page 110)
POWER SAVE
(For the time for the auto
power off function, see page
112)
9 (bright)
8
7
6
5
4
3
2
1 (dark)
30 MIN. (30 minutes)
10 MIN. (10 minutes)
5 MIN. (5 minutes)
3 MIN. (3 minutes)
1 MIN. (1 minute)
- 108 -
D2330Z_Body_Eng.qxd.4 00.10.11 5:23 PM ページ 109
THE SETUP MODE MENU DISPLAY - CONT’D
FORMAT
NO
(For formatting the CF card,
see page 114)
YES
DATE
STYLE
(For setting or correcting
the date and time, see page
116)
TIME
YYYY/MM/DD
DD/MM/YYYY
MM/DD/YYYY
DATE
YYYY/MM/DD
TIME
HH : MM
(For setting or correcting
the time, see page 116)
BEEP
ON (The beep sounds.)
(For turning on or off the
beep, see page 120)
OFF (The beep does not sound.)
VIDEO OUT
NTSC
(For switching the video
signal from the video-out
terminal, see page 122)
PAL
LANGUAGE
ENGLISH
(For switching the language
displayed on the LCD
monitor, see page 124)
JAPANESE
DEFAULT
NO
(For resetting the camera,
see page 126)
YES
- 109 -
D2330Z_Body_Eng.qxd.4 00.10.11 5:23 PM ページ 110
ADJUSTING THE BRIGHTNESS OF THE LCD MONITOR
This allows you to adjust the brightness of the LCD monitor according to the
angle at which you watch it or the brightness around the monitor so that the
display on the LCD monitor can be seen clearly.
Rotate the function dial to
and slide the power switch to
turn on the camera.
• The power switch returns to the
initial position.
Rotate the function dial to
“SETUP”.
• The setup mode menu is displayed
on the LCD monitor as shown in the
figure.
LCD BRIGHT
POWER SAVE
FORMAT
DATE
TIME
BEEP
VIDEO OUT
LANGUAGE
DEFAULT
5
3 MIN.
2000/08/30
17:33
ON
NTSC
ENGLISH
After confirming that [LCD
BRIGHT] is highlighted, press
the
key.
• (If the LCD monitor is turned off, the
LCD monitor is automatically turned
on and) the live view screen and the
display to change the brightness of
the LCD monitor appear.
- 110 -
D2330Z_Body_Eng.qxd.4 00.10.11 5:23 PM ページ 111
ADJUSTING THE BRIGHTNESS OF THE LCD MONITOR - CONT’D
LCD BRIGHTNESS
7
ENTER TO SET
Press the
or
key so
that the desired brightness is
highlighted.
• The brightness can be adjusted in
the range from 1 to 9. The smaller
the number is, the darker the LCD
monitor is while the larger the
number is, the brighter the LCD
monitor is.
* The color of the background in the
left figure is gray so that you can
easily find out the contents of the
display. However, the live view
screen is actually displayed in the
background.
Press the ENTER button.
• The brightness of the LCD monitor
is set to the specified value.
After setting, the LCD monitor
returns to the setup mode menu
display.
LCD BRIGHT
POWER SAVE
FORMAT
DATE
TIME
BEEP
VIDEO OUT
LANGUAGE
DEFAULT
7
3 MIN.
2000/08/30
17:33
ON
NTSC
ENGLISH
- 111 -
D2330Z_Body_Eng.qxd.4 00.10.11 5:23 PM ページ 112
SPECIFYING THE TIME FOR THE AUTO POWER OFF FUNCTION
To save the battery power, this camera will be turned off automatically if it is not
operated more than 3 minutes. (Auto Power Off function) The time for the auto
power off function is set to 3 minutes unless you change the setting after you
purchase this camera.
Rotate the function dial to
and slide the power switch to
turn on the camera.
• The power switch returns to the
initial position.
Rotate the function dial to
“SETUP”.
• The setup mode menu is displayed
on the LCD monitor as shown in the
figure.
LCD BRIGHT
POWER SAVE
FORMAT
DATE
TIME
BEEP
VIDEO OUT
LANGUAGE
DEFAULT
7
3 MIN.
2000/08/30
17:33
ON
NTSC
ENGLISH
Press the
or
key so
that [POWER SAVE] is
highlighted and press the
key.
- 112 -
D2330Z_Body_Eng.qxd.4 00.10.11 5:23 PM ページ 113
SPECIFYING THE TIME FOR THE AUTO POWER OFF FUNCTION - CONT’D
LCD BRIGHT
POWER SAVE
FORMAT
DATE
TIME
BEEP
VIDEO OUT
LANGUAGE
DEFAULT
7
3 MIN.
2000/08/30
17:33
ON
NTSC
ENGLISH
Press the
or
key so
that the desired time for the
auto power off function is
highlighted.
• The time for the auto power off
function changes in the following
order.
30 MIN. (30 minutes)
10 MIN. (10 minutes)
5 MIN. (50 minutes)
3 MIN. (3 minutes)
1 MIN. (1 minute)
LCD BRIGHT
POWER SAVE
FORMAT
DATE
TIME
BEEP
VIDEO OUT
LANGUAGE
DEFAULT
7
10 MIN.
Press the
key.
2000/08/30
17:33
ON
NTSC
ENGLISH
* Only when using the batteries, the time for the auto power off function can be
specified. When using the AC adapter (sold separately), the time for the auto
power off function is fixed in 30 minutes and cannot be changed.
* When this camera is connected to the computer (see pages 132, 142), the time
for the auto power off function is fixed 30 minutes automatically regardless of
the setting or the power supply.
- 113 -
D2330Z_Body_Eng.qxd.4 00.10.11 5:23 PM ページ 114
FORMATTING THE CF CARD
This allows you to format the CF card.
CAUTION
As all the images recorded in the CF card are deleted and cannot be
recovered, be careful when formatting the CF card.
Rotate the function dial to
and slide the power switch to
turn on the camera.
• The power switch returns to the
initial position.
Rotate the function dial to
“SETUP”.
• The setup mode menu is displayed
on the LCD monitor as shown in the
figure.
LCD BRIGHT
POWER SAVE
FORMAT
DATE
TIME
BEEP
VIDEO OUT
LANGUAGE
DEFAULT
7
10 MIN.
2000/08/30
17:33
ON
NTSC
ENGLISH
- 114 -
D2330Z_Body_Eng.qxd.4 00.10.11 5:23 PM ページ 115
FORMATTING THE CF CARD - CONT’D
LCD BRIGHT
7
POWER SAVE 10 MIN.
FORMAT
DATE
2000/08/30
TIME
17:33
BEEP
ON
VIDEO OUT
NTSC
LANGUAGE
ENGLISH
DEFAULT
ENTER TO SET
Press the
or
key so
that [FORMAT] is highlighted
and press the ENTER button.
• The display to confirm whether you
format the CF card or not appears.
FORMAT CARD?
YES / NO
ENTER TO SELECT
FORMAT CARD?
YES / NO
Press the
key so that
[YES] is highlighted and
press the ENTER button.
• The format of the CF card starts.
ENTER TO SELECT
• After formatting the CF card, the
LCD monitor returns to the setup
mode menu display.
- 115 -
D2330Z_Body_Eng.qxd.4 00.10.11 5:23 PM ページ 116
SETTING THE DATE AND TIME
When taking a picture, the date and time are recorded as the part of the image
information. If the built -in clock of this camera is not set correctly, the wrong date
and time are recorded. Set the date and time correctly by performing the
procedure below.
Rotate the function dial to
and slide the power switch to
turn on the camera.
• The power switch returns to the
initial position.
Rotate the function dial to
“SETUP”.
• The setup mode menu is displayed
on the LCD monitor as shown in the
figure.
LCD BRIGHT
POWER SAVE
FORMAT
DATE
TIME
BEEP
VIDEO OUT
LANGUAGE
DEFAULT
7
10 MIN.
2000/08/30
17:33
ON
NTSC
ENGLISH
- 116 -
D2330Z_Body_Eng.qxd.4 00.10.11 5:23 PM ページ 117
SETTING THE DATE AND TIME - CONT’D
LCD BRIGHT
7
POWER SAVE 10 MIN.
FORMAT
DATE
2000/08/30
TIME
17:33
BEEP
ON
VIDEO OUT
NTSC
LANGUAGE
ENGLISH
DEFAULT
ENTER TO ADJUST
STYLE
DATE
TIME
Press the
or
key so
that [DATE] is highlighted
and press the ENTER button.
• The display to set the date and time
appears as shown in the figure.
• When you specify only the time,
press the
or
key so that
[TIME] is highlighted and press the
ENTER button and go to step .
YYYY/MM/DD
2000/08/30
17:33
: SELECT
: ADJUST
ENTER:
SET
STYLE
DATE
TIME
YYYY/MM/DD
2000/08/30
17:33
: SELECT
: ADJUST
ENTER:
SET
To change the order of year,
month and day, press the
key once so that
[YYYY/MM/DD] is highlighted.
• If you do not change the order, skip
this step and go to step .
Continued on Next Page
- 117 -
D2330Z_Body_Eng.qxd.4 00.10.11 5:23 PM ページ 118
SETTING THE DATE AND TIME - CONT’D
STYLE
DATE
TIME
YYYY/MM/DD
2000/08/30
17:33
Press the
or
key so
that the desired order of year,
month and day is highlighted.
• The order of year, month and day
changes in the following order.
: SELECT
: ADJUST
ENTER:
SET
YYYY/MM/DD (year/month/day)
DD/MM/YYYY (day/month/year)
MM/DD/YYYY (month/day/year)
• When the order is changed, the
order of the current date displayed
on the LCD monitor also changes
according to the setting.
• If you do not change the order, skip
this step and go to step .
STYLE
DATE
TIME
YYYY/MM/DD
2000/08/30
17:33
: SELECT
: ADJUST
ENTER:
SET
Press the
key once.
• The last 2-digit of year is
highlighted.
• Each time the
key is pressed, the
highlighted part moves in the order
of year
month
day
time
minute (s). Each time the
key
is pressed, the highlighted part
moves in the reverse order.
- 118 -
D2330Z_Body_Eng.qxd.4 00.10.11 5:23 PM ページ 119
SETTING THE DATE AND TIME - CONT’D
STYLE
DATE
TIME
YYYY/MM/DD
2000/09/30
17:33
: SELECT
: ADJUST
ENTER:
SET
STYLE
DATE
TIME
YYYY/MM/DD
2000/09/30
17:33
Press the
or
key to
specify or correct the date
and time.
When you press and hold the
or
key, the value goes
fastforward or fastbackward.
• The value for year can be specified
from 2000 to 2099.
• When other values need to be
changed, repeat step
and .
• If [TIME] is highlighted and the
ENTER button is pressed on step 3,
the display to specify the date and
time appears as shown in the figure.
To correct the time, repeat step
and .
: SELECT
: ADJUST
ENTER:
SET
After the date and time is
specified (corrected), press
the ENTER button.
• The built-in clock of this camera
starts functioning. The LCD monitor
returns to the setup mode menu.
* After replacing the batteries, check that the built-in clock (date and time)
functions correctly.
If the AC adapter is not used and the battery-chamber door is open for more
than 5 minutes, the built-in clock may delay or be reset to the default setting. In
this case, set the date and time again.
- 119 -
D2330Z_Body_Eng.qxd.4 00.10.11 5:23 PM ページ 120
SETTING THE BEEP SOUND
The beep sounds each time you operate this camera with the buttons or function
dial and you can turn off or on the beep. The beep is turned on unless you
change the setting after you purchase this camera.
When you use this camera in the situation you cannot make noise such as a
wedding ceremony, etc., you can turn off the beep.
Rotate the function dial to
and slide the power switch to
turn on the camera.
• The power switch returns to the
initial position.
Rotate the function dial to
“SETUP”.
• The setup mode menu is displayed
on the LCD monitor as shown in the
figure.
LCD BRIGHT
POWER SAVE
FORMAT
DATE
TIME
BEEP
VIDEO OUT
LANGUAGE
DEFAULT
7
10 MIN.
2000/09/30
17:33
ON
NTSC
ENGLISH
- 120 -
D2330Z_Body_Eng.qxd.4 00.10.11 5:23 PM ページ 121
SETTING THE BEEP SOUND - CONT’D
LCD BRIGHT
POWER SAVE
FORMAT
DATE
TIME
BEEP
VIDEO OUT
LANGUAGE
DEFAULT
7
10 MIN.
LCD BRIGHT
POWER SAVE
FORMAT
DATE
TIME
BEEP
VIDEO OUT
LANGUAGE
DEFAULT
7
10 MIN.
LCD BRIGHT
POWER SAVE
FORMAT
DATE
TIME
BEEP
VIDEO OUT
LANGUAGE
DEFAULT
7
10 MIN.
2000/09/30
17:33
ON
NTSC
ENGLISH
2000/09/30
17:33
OFF
NTSC
ENGLISH
Press the
or
key so
that [BEEP] is highlighted
and press the
key.
Select [ON] or [OFF] with the
or
key.
• The setting of the beep changes in
the following order.
ON (The beep sounds.)
OFF (The beep does not sound.)
2000/09/30
17:33
OFF
NTSC
ENGLISH
Press the
key.
• When [OFF] is selected on step ,
the beep does not sound even when
you operate with the buttons or the
function dial.
• The volume of the beep cannot be
changed.
- 121 -
D2330Z_Body_Eng.qxd.4 00.10.11 5:23 PM ページ 122
SWITCHING THE VIDEO SIGNAL FROM THE VIDEO OUTPUT TERMINAL
As this camera has the video-out terminal, you can watch the captured images
on TV by connecting this camera to your TV with the supplied video cable.
The video output signal can be switched between NTSC and PAL.
What is an NTSC system and a PAL system ?
Both are the color television broadcast system. The NTSC system is mainly
used in U.S.A., Japan, Canada, Mexico, the Philippines, Korea, etc. The PAL
system is used in the western Europe such as Germany, England,
Switzerland, Holland, Italy (except for France) and Australia, Singapore,
Thailand, China, etc.
As these systems have no compatibility, you cannot watch the NTSC system
based TV in the area where a PAL system is used.
This camera can switch the video output signal to both an NTSC system and
a PAL system. So you can watch the images on TV not only in your country,
but in other areas.
Rotate the function dial to
and slide the power switch to
turn on the camera.
• The power switch returns to the
initial position.
Rotate the function dial to
“SETUP”.
• The setup mode menu is displayed
on the LCD monitor.
- 122 -
D2330Z_Body_Eng.qxd.4 00.10.11 5:23 PM ページ 123
SWITCHING THE VIDEO SIGNAL FROM THE VIDEO OUTPUT TERMINAL - CONT’D
LCD BRIGHT
POWER SAVE
FORMAT
DATE
TIME
BEEP
VIDEO OUT
LANGUAGE
DEFAULT
7
10 MIN.
LCD BRIGHT
POWER SAVE
FORMAT
DATE
TIME
BEEP
VIDEO OUT
LANGUAGE
DEFAULT
7
10 MIN.
LCD BRIGHT
POWER SAVE
FORMAT
DATE
TIME
BEEP
VIDEO OUT
LANGUAGE
DEFAULT
7
10 MIN.
2000/09/30
17:33
ON
NTSC
ENGLISH
2000/09/30
17:33
ON
PAL
ENGLISH
Press the
or
key so
that [VIDEO OUT] is
highlighted and press the
key.
Select [NTSC] or [PAL] with
the
or
key.
• The setting of the beep changes in
the following order.
NTSC
PAL
2000/09/30
17:33
ON
PAL
ENGLISH
Press the
key.
• The video signal system output from
the video-out terminal is switched to
the selected one.
- 123 -
D2330Z_Body_Eng.qxd.4 00.10.11 5:23 PM ページ 124
SWITCHING THE LANGUAGE DISPLAYED ON THE LCD MONITOR
The language displayed on the LCD monitor can be switched to Japanese or
English.
Rotate the function dial to
and slide the power switch to
turn on the camera.
• The power switch returns to the
initial position.
Rotate the function dial to
“SETUP”.
• The setup mode menu is displayed
on the LCD monitor as shown in the
figure.
LCD BRIGHT
POWER SAVE
FORMAT
DATE
TIME
BEEP
VIDEO OUT
LANGUAGE
DEFAULT
7
10 MIN.
2000/09/30
17:33
ON
NTSC
ENGLISH
Press the
or
key so
that [LANGUAGE] is
highlighted and press the
key.
- 124 -
D2330Z_Body_Eng.qxd.4 00.10.11 5:23 PM ページ 125
SWITCHING THE LANGUAGE DISPLAYED ON THE LCD MONITOR - CONT’D
LCD BRIGHT
POWER SAVE
FORMAT
DATE
TIME
BEEP
VIDEO OUT
LANGUAGE
DEFAULT
7
10 MIN.
2000/09/30
17:33
ON
NTSC
JAPANESE
Select [JAPANESE] or
[ENGLISH] with the
or
key.
• The language changes in the
following order.
ENGLISH
JAPANESE
LCDアカルサ
パワーセーブ
フォーマット
DATE
TIME
BEEP
VIDEO OUT
ゲンゴ
ショキセッテイ
7
10 MIN
2000/09/14
09:48
ナシ
PAL
ニホンゴ
Press the
key.
• The language on displayed on the
LCD monitor is switched to the
selected one.
To Return to the English Screen
1. Redo steps 1 - 2 described in the previous page.
2. Press the
or
key so that [
] is highlighted and
press the
key.
3. Select [
] with the
or
key.
4. Press the
key.
- 125 -
D2330Z_Body_Eng.qxd.4 00.10.11 5:23 PM ページ 126
RESETTING TO THE DEFAULT SETTINGS
This allows you to reset all the settings of this camera to the default at a time.
The camera settings
Flash mode (see page 41)
Exposure compensation value (see page 55)
Focus mode (see page 36)
Drive mode (see page 45)
White balance (see page 65)
Image quality (see page 60)
Image size (see page 63)
Sharpness (see page 68)
The interval for the slide show mode
(see pages 82, 83)
The direction of playback for the slide show
(see pages 82, 83)
The brightness of the LCD monitor
(see page 110)
The time for the auto power off function
(see page 112)
The beep sound (see page 120)
The default settings
Autoflash with red-eye
reduction
0
AF (Autofocus)
Single shot
AUTO
STD. (Standard)
FULL (Full size)
NORMAL
3 seconds
FORWARD
5
3 MIN. (minutes)
ON (The beep sounds)
Rotate the function dial to
and slide the power switch to
turn on the camera.
• The power switch returns to the
initial position.
Rotate the function dial to
“SETUP”.
• The setup mode menu is displayed
on the LCD monitor as shown in the
figure.
- 126 -
D2330Z_Body_Eng.qxd.4 00.10.11 5:23 PM ページ 127
RESETTING TO THE DEFAULT SETTINGS - CONT’D
LCD BRIGHT
7
POWER SAVE 10 MIN.
FORMAT
DATE
2000/09/30
TIME
17:33
BEEP
OFF
VIDEO OUT
PAL
LANGUAGE
JAPANESE
DEFAULT
ENTER TO SET
Press the
or
key so
that [DEFAULT] is highlighted
and press the ENTER button.
• The display to confirm whether you
reset the camera settings to the
default or not appears as shown in
the figure.
DEFAULT?
YES / NO
ENTER TO SELECT
DEFAULT?
YES / NO
ENTER TO SELECT
Press the
key so that
[YES] is highlighted and
press the ENTER button.
• The camera settings are reset to the
default.
• The LCD monitor display returns to
the setup mode menu.
- 127 -
D2330Z_Body_Eng.qxd.4 00.10.11 5:23 PM ページ 128
CONNECTING TO
THE PERSONAL COMPUTER
- 128 -
D2330Z_Body_Eng.qxd.4 00.10.11 5:23 PM ページ 129
CONNECTING TO THE PERSONAL COMPUTER
This camera can be connected to the personal computer by the USB interface.
The CF card in this camera can be detected as a removable disk (removable
media) by connecting this camera to the personal computer with the supplied
USB cable. According to the OS (Operating System) you use, the installation of
driver software is required. See page 131 for details.
You can copy the images from the CF card to the appropriate location of your
computer and vice versa using “My Computer” or “Explorer” on Windows®, or
dragging and dropping files in the finder on Macintosh.
For Windows®
For Macintosh
- 129 -
D2330Z_Body_Eng.qxd.4 00.10.11 5:23 PM ページ 130
SYSTEM REQUIREMENT
Before connecting this camera to the computer, check the system of your
computer referring to the followings.
For IBM-PC/AT and the compatible unit
CPU
The IBM-PC/AT and the compatible unit equipped
with the USB connector.
* Only the CPU which is pre-installed the following
operating system described below can be used.
• The custom or home built machines are excepted.
Operating System
Windows®2000 Professional
Windows®Me
Windows®98/98 Second Edition*1
For Macintosh
CPU
Apple Macintosh series equipped with the USB
connector
Blue & White Power Macintosh G3 series, Power Mac
G4 series, iMac series, iBook, PowerBook G3
Operating System
Mac OS 8.6*2/9/9.0.2/9.0.4
- 130 -
D2330Z_Body_Eng.qxd.4 00.10.11 5:23 PM ページ 131
SYSTEM REQUIREMENT - CONT’D
*1 When using Windows®98/Windows®98 Second Edition, you need to install the
driver software from the supplied CD-ROM (see pages 133 - 137).
*2 When using Mac Os 8.6, you need to install “USB Mass Storage Support
1.3.5” after downloading it from the web site of Apple Computer
(http://asu.info.apple.com/swupdates.nsf/artnum/n11418).
This software is provided by Apple Computer for free of charge.
Use this after reading the caution on the web site, the condition of usage and
the way of installation, etc.
- 131 -
D2330Z_Body_Eng.qxd.4 00.10.11 5:23 PM ページ 132
CONNECTING TO THE PERSONAL COMPUTER
Turn on the power of the computer
to be connected and start up the
operating system (Windows®/Mac
OS).
Confirm that the CF card is
inserted in the camera.
Rotate the function dial to “PC”.
• Be sure to rotate the function dial to PC
before turning on the camera.
Otherwise, the connection cannot be
performed correctly.
Slide the power switch to turn on
the camera.
• The power switch returns to the initial
position.
• “USb” appears on the data panel and
shows that the camera enters the PC
connecting mode as shown in the figure
below.
- 132 -
D2330Z_Body_Eng.qxd.4 00.10.11 5:23 PM ページ 133
CONNECTING TO THE PERSONAL COMPUTER - CONT’D
Open the terminal cover and
connect one side of the supplied
USB cable to the USB connector
of this camera.
• As the both sides of USB connector are
the same shape, you can connect either
side of the USB connector.
• Connect the USB connector securely.
Otherwise, the operation cannot be
performed correctly.
Connect the other side of the
supplied USB cable to the USB
port of the computer.
• Connect the USB connector securely.
Otherwise, the operation cannot be
performed correctly.
• If you connect the camera to the computer
via the USB hub, the operation may not be
performed correctly depending on the
condition of other USB equipment or the
USB hub. We recommend you to connect
to the USB port of the computer directly.
When using Windows®98 / Windows®98
Second Edition and connecting this
camera to the computer with the USB
cable, “Add New Hardware Wizard” dialog
box appears as shown in the figure. Install
the driver software by following the
indication of the dialog box (refer to the
procedure described on the following
pages).
- 133 -
D2330Z_Body_Eng.qxd.4 00.10.11 5:23 PM ページ 134
CONNECTING TO THE PERSONAL COMPUTER - CONT’D
INSTALLATION OF THE DRIVER SOFTWARE
The following operation is required only when Windows®98/Windows®98
Second Edition is used. When Windows®2000 Professional or Windows®Me is
used, the operation described on pages 134 to 137 is not necessary because
the necessary driver software is installed automatically.
When “Add New Hardware
Wizard” dialog box appears,
click [Next>].
When the dialog box as shown
on the left appears, select
“Search for the best driver for
your device. (Recommended)”
and click [Next>].
When the dialog box as shown
on the left appears, insert the
Dimâge 2330 ZOOM CD-ROM
into the CD-ROM drive and put
the check mark on “CD-ROM
drive” and click [Next>].
- 134 -
D2330Z_Body_Eng.qxd.4 00.10.11 5:23 PM ページ 135
CONNECTING TO THE PERSONAL COMPUTER - CONT’D
When the device driver is
detected and the dialog box as
shown on the left appears,
Click [Next>].
When the installation of the
driver software is completed
and the dialog box as shown
on the left appears, click
[Finish].
When “Add New Hardware
Wizard” appears again, click
[Next>].
When the dialog box as shown
on the left appears, select
“Search for the best driver for
your device. (Recommended)”
and click [Next>].
Continued on Next Page
- 135 -
D2330Z_Body_Eng.qxd.4 00.10.11 5:23 PM ページ 136
CONNECTING TO THE PERSONAL COMPUTER - CONT’D
When the dialog box as shown
on the left appears, confirm
that “CD-ROM drive” is
checkmarked and click
[Next>].
When the device driver is
detected and the dialog box as
shown on the left appears,
Click [Next>].
When the installation of the
driver software is completed
and the dialog box as shown
on the left appears, click
[Finish].
When “Add New Hardware
Wizard” appears again, click
[Next>].
- 136 -
D2330Z_Body_Eng.qxd.4 00.10.11 5:23 PM ページ 137
CONNECTING TO THE PERSONAL COMPUTER - CONT’D
When the dialog box as shown
on the left appears, select
“Search for the best driver for
your device. (Recommended)”
and click [Next>].
When the dialog box as shown
on the left appears, confirm
that “CD-ROM drive” is
checkmarked and click
[Next>].
When the device driver is
detected and the dialog box as
shown on the left appears,
Click [Next>].
When the installation of the
driver software is completed
and the dialog box as shown
on the left appears, click
[Finish].
The installation of the driver
software is completed.
- 137 -
D2330Z_Body_Eng.qxd.4 00.10.11 5:23 PM ページ 138
CONNECTING TO THE PERSONAL COMPUTER - CONT’D
On Windows®, when this camera is connected to the computer correctly (and the
driver software is installed correctly if you use the Windows®98/98 Second
Edition), the CF card in this camera is detected as the removable disk and the
icon of “Removable disk” is displayed in “My Computer” on Windows® as shown
below.
On Macintosh, when this camera is connected to the computer correctly, the CF
card in this camera is detected as the removable media and mounted in the
finder on Macintosh as shown below.
- 138 -
D2330Z_Body_Eng.qxd.4 00.10.11 5:23 PM ページ 139
CONNECTING TO THE PERSONAL COMPUTER - CONT’D
By dragging and dropping the data, you can copy the images from the CF
card to the appropriate location of your computer and vice versa in “My
Computer” or “Explorer” on Windows® or in the finder on Macintosh.
* When the icon of the “Removable disk” is not displayed or when the removable
media is not mounted, restart your computer.
* The image file is saved in the “100mlt02” folder of the “Dcim” folder of the
removable disk (media).
* For the operation of copying a file in “My computer”, “Explorer” or in the finder,
refer to the operating instruction manual supplied with the computer, “Help”,
etc.
When this camera cannot be connected to the computer
correctly, check the followings:
• Is the camera set to the PC connecting mode ?
Rotate the function
dial to PC and turn on the power of the camera. (See page 132)
• Is the power of the camera turned on ?
Connect them when the
power of the camera and the computer is turned on.
• Is the CF card inserted into the camera ?
Insert the CF card into the
camera correctly. (See page 28)
• Is the USB cable connected to the USB connector of the camera and the
USB port of the computer securely ?
Connect the USB cable
securely. (See page 133)
• Is the camera connected to the computer via the USB hub ?
Connect
to the USB port of the computer directly. Otherwise, the operation may
not be performed correctly depending on the condition of other USB
equipment or the USB hub.
If there is no problem with the items described above, connect the camera
to the computer again following the procedure described on page 132.
- 139 -
D2330Z_Body_Eng.qxd.4 00.10.11 5:23 PM ページ 140
WHEN DISCONNECTING THE USB CABLE
When disconnecting the USB cable, perform the procedure as described below.
For Windows®98/Windows®98 Second Edition
1
Confirm that the focus lamp (green) does not light or blink and then
disconnect the USB cable.
For Windows®2000 Professional
1
2
3
4
5
Click the “Unplug or Eject Hardware” icon displayed on the task bar on the
lower right of the screen using the right button of the mouse and click
“Unplug or Eject Hardware” using the left button of the mouse. Or double click
the icon of “Unplug or Eject Hardware”.
In the dialog box to Unplug or Eject Hardware, select “USB Mass Storage
Device” using the left button of the mouse and click “Stop” using the left
button of the mouse.
In the dialog box to Stop a Hardware device, select “MINOLTA DIMAGE 2330
ZOOM USB Device” using the left button of the mouse and click “OK” using
the left button of the mouse.
When the message of “The ‘USB Mass Storage Device’ device can now be
safely removed from the system.” appears, click “OK” using the left button of
the mouse.
Disconnect the USB cable.
For Windows®Me
1
2
3
4
5
Click the “Unplug or Eject Hardware” icon displayed on the task bar on the
lower right of the screen using the right button of the mouse and click
“Unplug or Eject Hardware” using the left button of the mouse. Or double click
the icon of “Unplug or Eject Hardware”.
In the dialog box to Unplug or Eject Hardware, select “USB Disk” using the
left button of the mouse and click “Stop” using the left button of the mouse.
In the dialog box to Stop a Hardware device, select “MINOLTA DIMAGE 2330
ZOOME:” using the left button of the mouse and click “OK” using the left
button of the mouse.
When the message of “The ‘USB Disk E:’ device can now be safely removed
from the system.” appears, click “OK” using the left button of the mouse.
Disconnect the USB cable.
• In this case, “Drive E:” is allocated to the Removable Disk (i.e. CF card in the
Dimâge 2330 ZOOM). This drive letter may vary depending on your PC
system.
- 140 -
D2330Z_Body_Eng.qxd.4 00.10.11 5:23 PM ページ 141
WHEN DISCONNECTING THE USB CABLE - CONT’D
For Macintosh
1
Confirm that the focus lamp (green) does not light or blink and then drag
the icon of the removable media and drop it to “Trash”.
• The same icon is displayed again on the desk top.
2
Disconnect the USB cable.
• When the USB cable is disconnected without performing step 1, the
alerting message appears. So be sure to perform step 1 before
disconnecting the USB cable. (However, you can go on the procedure if you
click “OK” even when the alerting message is displayed.)
- 141 -
D2330Z_Body_Eng.qxd.4 00.10.11 5:23 PM ページ 142
CAUTIONS WHEN CONNECTING TO THE PERSONAL COMPUTER
• While this camera is connected to the computer or transferring the image data
between this camera and the computer, do not perform the following
operations. Otherwise, the error may occur, the camera and the computer may
not function correctly, or the image data recorded in the CF card may be
erased or damaged.
• Turn off the power of the camera
• Disconnect the USB cable
• Rotate the function dial
• Remove or insert the CF card
• When disconnecting the USB cable, be sure to confirm that the focus lamp
(green) does not light or blink, and perform the procedure described on pages
from 140 to 141.
Especially for Windows®2000 Professional, be sure to confirm that the access
lamp of the hard disk does not light (it does not access to the hard disc) and
perform the procedure described on pages from 140 to 141
On Windows®2000 Professional, the data transfer is not actually completed due
to the delay of writing even when the display on the computer shows that
copying is finished. As the data is transferred for a while even after the copying
message disappears, do not turn off the power of the camera, disconnect the
USB cable or rotate the function dial during the time. Otherwise, the error may
occur, and the camera and the computer may not function correctly.
• When the camera is connected to the computer, the time for the auto power off
function is fixed in 30 minutes automatically regardless of the power supply you
use or the settings in the SETUP mode (see page 113).
- 142 -
D2330Z_Body_Eng.qxd.4 00.10.11 5:23 PM ページ 143
CAUTIONS WHEN CONNECTING TO THE PERSONAL COMPUTER - CONT’D
• When connecting the camera to the computer and transferring the image data
between them, be sure to check that the battery capacity is full. If the battery
power is low, the power of the camera may be turned off while transferring
data. If this happens, the error may occur, the camera and the computer may
not function correctly, or the image data recorded in the CF card may be
erased or damaged.
When the camera is connected to the computer, we recommend you to use
new batteries with a full power capacity or the AC adapter AC-2 (sold
separately).
- 143 -
D2330Z_Body_Eng.qxd.4 00.10.11 5:23 PM ページ 144
INSTALLING Adobe PhotoDeluxe
To use the supplied image editing application Adobe PhotoDeluxe Home Edition
4.0 (Windows® version) or Adobe PhotoDeluxe 2.0 (Macintosh version), the
following systems are required.
For the IBM-PC/AT and the compatible unit
CPU
Intel Pentium II processor of 233 MHz or more, or the
computer equipped with the fully compatible
processor.
OS
Windows®95, Windows®98,
Windows®NT 4.0 (Service Pack 5)
Memory
32 MB or more of built-in memory (For Windows®NT,
64 MB or more of built-in memory).
Hard disk space
100 MB or more of available hard disk space.
Monitor
Resolution 800 x 600/the color monitor for 16-bit color
video display
CD-ROM drive
Necessary (when installing and using the software).
For Apple Macintosh
CPU
68040 or later processor or better, or Macintosh or
Power Macintosh
OS
Mac OS 8
Memory
A minimum of 16 MB in addition to the requirements
for the Mac OS.
Hard disk space
70 MB or more of available hard disk space.
Monitor
The color monitor capable of displaying 256 colors.
CD-ROM drive
Necessary (when installing and using the software).
- 144 -
D2330Z_Body_Eng.qxd.4 00.10.11 5:23 PM ページ 145
INSTALLING Adobe PhotoDeluxe - CONT’D
Installing to the IBM-PC/AT and the compatible unit
1
2
3
Turn on the computer and start up Windows®.
Insert the Adobe PhotoDeluxe 4.0 CD-ROM into the CD-ROM drive.
When the setup program starts up automatically (Auto-Run), click [Next>].
After that, follow the operations according to the indication displayed on the
screen.
* When the setup program does not start up automatically, select “Start”
“Run” and input “D:\ENGLISH\INSTALL\SETUP.EXE” in the box of “Open”
(when your CD-ROM drive is the D drive) and click [OK].
Installing to the Apple Macintosh
1
2
3
4
5
Turn on the computer and start up Mac OS.
Insert the Adobe Photodeluxe 2.0 CD-ROM into the CD-ROM drive.
When the icon of Adobe PhotoDeluxe 2.0 CD-ROM is displayed on the desk
top, double-click its icon.
Double-click “English” folder to open it.
Double-click “PhotoDeluxe™ Installer” icon.
After that, follow the operations according to the indication displayed on the
screen.
• If you have some problems or difficulties about installing Adobe
PhotoDeluxe, please contact to Adobe Systems Inc.,
http://www.adobe.com/.
- 145 -
D2330Z_Body_Eng.qxd.4 00.10.11 5:23 PM ページ 146
APPENDIX
- 146 -
D2330Z_Body_Eng.qxd.4 00.10.11 5:23 PM ページ 147
WATCHING THE CAPTURED IMAGES ON TV
By connecting this camera to your TV with the supplied video cable, you can
watch the captured images on TV.
Confirm that the video out signal from the video-out
terminal is set to NTSC or PAL according to the color
system in your country. (see page 122).
Turn off the power of the this camera and TV.
Open the terminal cover on the left side of the camera and
connect the mini plug of the supplied video cable to the
video-out terminal of the camera.
• The LCD monitor is turned off.
Connect the other side of the video cable to the video input
terminal on TV.
Turn on the power of TV.
Rotate the function dial to
.
Slide the power switch to turn on the camera.
Switch the video input of TV according to the terminal to
which the video cable is connected.
• The images recorded in the CF card can be displayed both on the LCD
monitor and TV.
You can watch the images in the various play modes
performing the procedure described on pages from 71 to 78.
• The images can be played back in the slide show mode (see page 79), etc.
- 147 -
D2330Z_Body_Eng.qxd.4 00.10.11 5:23 PM ページ 148
TROUBLESHOOTING
If you have any trouble with this camera, check the following items. Should the
difficulty persist, contact the Minolta Service Facility listed on the back cover of
this manual.
Problem
The focus
cannot be
adjusted in
the autofocus
mode (The
focus lamp
(green) blinks
quickly
(about 8
times in a
second)
when the
shutterrelease
button is
pressed partway down.
Check
Solution
Page
Do you attempt to
adjust the focus on the
subject which is
difficult to focus in the
autofocus mode?
Take a picture with the focus
lock function or in the manual
focus mode.
38
39
Do you attempt to take
a picture when the
subject is closer than
the minimum focus
distance (40 cm), or
farther than 40 cm in
the close up mode?
Take a picture when the
subject is farther than 40 cm,
or when the subject is within
the distance from 4 cm to 40
cm (is not apart more than
40 cm from the camera) in
the close up mode.
36
Rotate the function dial to
and slide the power switch to
turn on the camera.
32
The image is recorded in the
CF card. Wait until the
recording is completed and
the focus lamp (green) and
“Recording” stop blinking.
33
Is the power of the
camera turned off?
The shutterrelease
button is not
released.
Is the camera set to
other mode except the
recording mode?
Is the focus lamp
(green) blinks slowly
(about 2 times in a
second) and
“Recording” blinking on
the LCD monitor?
- 148 -
D2330Z_Body_Eng.qxd.4 00.10.11 5:23 PM ページ 149
TROUBLESHOOTING - CONT’D
Problem
Check
The shutterrelease
button is not
released.
Is “CARD FULL”
displayed on the LCD
monitor?
The live view
is not
displayed on
the LCD
monitor.
Solution
Page
The CF card is full. Delete
unwanted images or transfer
the image data to the
computer and then delete all
images, or use other CF card
which has a memory space.
86
90
Is the power of the
camera turned off?
Rotate the function dial to
and slide the power switch to
turn on the camera.
32
Are the batteries
exhausted?
Replace all four batteries or
use the AC adapter (sold
separately).
24
27
Are the batteries
inserted with the
correct polarity?
Remove the batteries and
then insert the batteries by
following the +/– diagram
indicated in front of the
battery-chamber door.
Is the LCD monitor
turned off?
Press the display button to
turn on the monitor.
34
The auto power off
function activates.
Slide the power switch to turn
on the camera again.
27
24
Continued on Next Page
- 149 -
D2330Z_Body_Eng.qxd.4 00.10.11 5:23 PM ページ 150
TROUBLESHOOTING - CONT’D
Problem
Check
Solution
Page
Is the power of the
camera turned off?
Rotate the function dial to
and slide the power switch to
turn on the camera.
71
Are the batteries
exhausted?
Replace all four batteries or
use the AC adapter (sold
separately).
Remove the batteries and
then insert the batteries by
following the +/– diagram
indicated in front of the
battery-chamber door.
Are the batteries
inserted with the
correct polarity?
The image
cannot be
played back
on the LCD
monitor.
The image
recorded in
the flash
mode is dark.
Is the CF card is
inserted in the
camera? (Is “NO
CARD” displayed on
the LCD monitor?)
When “NO CARD” is
displayed on the LCD
monitor and “CF” is displayed
on the data panel, the CF
card is not set. Insert the CF
card.
The auto power off
function activates.
Slide the power switch to turn
on the camera again.
Is the focus lamp
(green) blinks slowly
(about 2 times in a
second) and “PLAY
BACK” blinks on the
LCD monitor?
The camera reads out the
image data from the CF card.
Wait until the reading is
completed and the focus
lamp and “PLAY BACK” stop
blinking.
Did you take a picture
within the flash range?
Take a picture within the
flash range (0.4 to 3 m).
- 150 -
24
27
24
28
27
15
41
D2330Z_Body_Eng.qxd.4 00.10.11 5:23 PM ページ 151
TROUBLESHOOTING - CONT’D
Problem
Check
Solution
Page
The zoom
play cannot
be
performed.
Did you take a picture
with the digital zoom
function?
The picture captured with the
digital zoom function cannot
be played back in the zoom
play mode.
51
78
The image is
too dark or
bright.
Is the exposure
compensation value
specified?
Specify 0 for the exposure
compensation value.
Even when
the lens
comes out,
the data
panel is
turned off
and the
camera can
not function.
Has the
batterycondition indicator
blinked (all the
indicators disappeared
after 5 seconds)?
If the
battery-condition
indicator blinks, all the
indicators will disappear after
5 seconds while the lens is
protruding.
The recorded
image file is
damaged.
Did you remove the CF
card when the image
data was recorded in
or read out from the
CF card?
The data is being recorded in
or read out from the CF card
while the focus lamp (green)
blinks slowly (about 2 times
in a second). Do not remove
the CF card from the
camera.
The camera
does not
function
correctly due
to the strong
static
electricity,
etc.
Remove the batteries and insert them again. When
using the AC adapter (sold separately), disconnect the
plug of the AC adapter from the AC outlet and then
connect it again.
After that, turn on the power of the camera.
* If the power of the camera cannot be turned off
correctly, the CF card may be damaged. In this case,
transfer the image data in the CF card to the
computer and then format the CF card.
- 151 -
55
26
33
—
D2330Z_Body_Eng.qxd.4 00.10.11 5:23 PM ページ 152
NOTES ON THE HANDLING
Batteries
• Battery performance decreases with lower operating temperatures. In a cold
place, we recommend you to prepare new batteries and keep the spare
batteries in a warm place such as inside your coat.
As the performance of Ni-MH battery less decreases, we recommend you to
use the Ni-MH battery in a cold place. Even if the battery performance
decreases due to a cold environment, the battery can recover its power when
the battery warms up.
• Remove the batteries when they are not in use for an extended period. The
battery leakage may damage the battery-chamber.
• Occasionally, when using alkaline batteries, the battery-condition indicator
shows that the battery power is low even if there is enough power capacity.
Continue to use the camera. The low-battery symbol will disappear.
• As the batteries heat up just after the camera is used, be careful when
removing or replacing the batteries. Turn off the power of the camera and allow
the batteries to cool down.
Battery Performance
• The recordable frames: about 120 frames
Test condition:
Temperature: 20°C/68°F
Batteries: 4 AA-size alkaline batteries (supplied accessory)
LCD monitor: ON
• The playback time: Approx. 100 minutes
Test condition:
Temperature: 20°C/68°F
Batteries: 4 AA-size alkaline batteries (supplied accessory)
LCD monitor: displaying images sequentially
* The values given above is determined by Minolta tests.
* The battery performance may differ from the values given above upon the
brand/grade of battery used, operating temperatures, etc.
- 152 -
D2330Z_Body_Eng.qxd.4 00.10.11 5:23 PM ページ 153
NOTES ON THE HANDLING - CONT’D
Operating Temperatures and Conditions
• This camera has been designed for use in temperatures from 0°C to 40°C
(32°F to 104°F).
• Never leave the camera exposed to extreme high temperatures, such as in a
car parked in the sun, or to extreme humidity.
• To prevent condensation from forming, place the camera in a sealed, plastic
bag when bringing it from a cold place to a warm place. Allow it to come to
room temperature before removing it from the bag.
Safety and Handling for the CF card
• Read and follow the instructions manual supplied with the CF card.
• The following may cause data loss or damage. We have no responsibility for
it. We recommend you to copy a backup data in other media such as ZIP disc,
hard disk, CD-ROM, etc.
1 Improper use of card.
2 Static electrical discharge near card or electric noise.
3 Removing the card or interrupting power supply while camera or
equipment is accessing the card (reading, writing, formatting etc.).
4 Non-use of card for an extended period.
5 Using the card over its life
• When the card is formatted, the recorded data is deleted. Be sure to record a
backup data if it is necessary.
• The storage capability of the CF card will diminish with extended use. In this
case, buy a new card.
• Keep away from static electricity and electric noise.
• Do not bend, drop, or subject the card to impact.
• The strong static electricity or shock may damage the card so that recording or
writing in the card cannot be performed. In this case, buy a new card.
• Do not touch the electrical contacts of the card with your fingers or a metal
object.
• Keep away from heat, moisture, and direct sunlight.
• Keep away from small children.
• When not in use, return the card to its protective case.
- 153 -
D2330Z_Body_Eng.qxd.4 00.10.11 5:23 PM ページ 154
NOTES ON THE HANDLING - CONT’D
LCD Monitor Care
• The LCD monitor is manufactured using high precision technology. However,
there may rarely be a lack of color or bright points on the LCD monitor.
• Do not apply pressure on the surface of the LCD monitor. Permanent damage
may occur.
• In a cold environment, the LCD monitor may be temporarily dark. When the
camera warms up, normal display will be restored.
• The LCD monitor may be slow to react in a low temperature or may be dark in
a hot environment. When the camera warms up, normal display will be
restored.
• If there are fingerprints on the LCD monitor surface, gently wipe it with a soft,
clean, dry cloth.
Copyright
• TV program, films, video tapes, and other materials may be copy righted.
Unauthorized recording of such materials may be contrary to the provision of
the copyright laws. And in some performance and exhibition, etc. taking
pictures are prohibited. The image which has a copyright cannot be used
except for the use within the copyright laws.
DPOF
• If the CF card including the DPOF data specified by other camera is set in this
camera, the DPOF data will be cancelled.
• Even if you insert the CF card including the data recorded with other digital
camera supporting the DCF format, the DPOF data for the images captured
with other digital camera (the images in the folder made by other digital camera
supporting the DCF format) cannot be specified in this camera.
- 154 -
D2330Z_Body_Eng.qxd.4 00.10.11 5:23 PM ページ 155
NOTES ON THE HANDLING - CONT’D
Others
• Do not subject the camera to shock or impact.
• Turn off the power of the camera when transporting.
• This camera is neither waterproof nor splashproof.
Inserting or removing batteries and the CF card, or operating the camera with
wet hands may damage the camera.
When using the camera at the beach or near water, take care not to drop water
or sand on the camera. If water, sand, dust or salt content accumulates on the
camera, it may cause the malfunction.
• Do not leave the camera under direct sunlight. Do not point the lens at direct
sunlight. Doing so, CCD may be damaged.
- 155 -
D2330Z_Body_Eng.qxd.4 00.10.11 5:23 PM ページ 156
CARE AND STORAGE
Cleaning
• If the camera or the outside of the lens is dirty, gently wipe it with a soft, clean,
dry cloth. If the camera or lens comes in contact with sand, gently blow away
loose particles. Wiping may scratch the surface.
• To clean the lens surface, first blow away any dust or sand, then, if necessary,
moisten a lens tissue or soft cloth with lens cleaning fluid and gently wipe the
lens.
• Never use organic solvents to clean the camera.
• Never touch the lens surface with your fingers.
Storage
• Store in a cool, dry and well-ventilated place away from dust and chemicals.
For very long periods, store the camera in an airtight container with a silica gel
drying agent.
• Remove the batteries or the CF card from the camera when not in use for an
extended period.
• Do not store the camera in the closet with mothballs.
• We recommend you to press the shutter-release button sometimes during the
storage. Also, check the camera’s operation to make sure it is functioning
properly before using.
Before Important Events such as a Wedding Ceremony, Overseas
Travel
• We recommend you to check the camera’s operation beforehand or take test
pictures, and to prepare spare batteries.
• Minolta has no responsibility for damages incurred by equipment malfunction.
Questions and Service
• If you have questions about your camera, contact your local camera dealer or
write to the Minolta distributor in your area.
• Before shipping your camera for repair, please contact a Minolta Service
Facility for details.
- 156 -
D2330Z_Body_Eng.qxd.4 00.10.11 5:23 PM ページ 157
TECHNICAL DETAILS
Camera Type
Removable recording media type digital camera with LCD
monitor, built-in flash
CCD
Pickup elements:
1/1.75 inch-type inter line CCD, 2,310,000 pixels, with a
base color filter
Pickup system: single
ISO sensitivity: Equivalent to ISO 100
Number of bit converted to A/D:
10 bit
Lens Unit
Focal length:
8 to 24 mm (38 to 114 mm in the 35mm film format
equivalent)
Aperture:
F 3.4 to 3.6
Construction:
9 elements in 6 groups including 3 aspheric surfaces
Focusing range: 40 cm to infinity (The close up mode: 4 cm to 40 cm)
Digital zoom:
maximum zoom in the telephoto mode X2.5
Image Storage
Recording medium:
CF card (Type I)
Image file format:
Exif 2.1 (JPEG), DCF standards, DPOF 1.0
Number of pixels (W x H):
1,792 x 1,200 pixels (Full size),
896 x 600 pixels (Half size)
Storage capacity (Using a 8 MB CF card):
Full size
Half size
FINE
approx. 8 images approx. 28 images
STD. (Standard)
approx. 13 images approx. 43 images
ECON. (Economy) approx. 33 images approx. 99 images
The number of images to be recorded varies depending on
the subject.
Others:
Delete function (Single image, All images)
Format function for the CF card
Continued on Next Page
- 157 -
D2330Z_Body_Eng.qxd.4 00.10.11 5:23 PM ページ 158
TECHNICAL DETAILS - CONT’D
Autofocus
System:
Focus mode:
Manual Focus:
AF system by CCD
Focus locked when the shutter-release button is pressed
halfway.
One shot AF
Available (operated with , ,
and
keys.)
Auto Exposure (AE) Control
Exposure mode: Programmed AE
AE locked when the shutter-release button is pressed
halfway.
Metering:
Center weighted TTL metering
Shutter:
CCD electrical shutter (with a Mechanical shutter)
Shutter speed: 1/500 sec. to 1 sec.
Exposure compensation:
±2EV in 0.5 EV increments
White balance: Automatic, Manual setting available (outdoors, tungsten,
fluorescent)
LCD Monitor
Type:
46 mm (1.8-inch) TFT-LCD module
Pixels:
Approx. 60,000
Bright level:
9 steps
Language display:
Switchable between English and Japanese
Display:
Single frame display, index display (9 frames), slide show,
magnification display (the zoom play, X2.5, changing
magnification area available)
Viewfinder
Type:
Real image zoom finder
Field of view (3 m):
Approx. 80%
Eye-relief:
14 mm
Magnification:
X 0.35 to X1.0
- 158 -
D2330Z_Body_Eng.qxd.4 00.10.11 5:23 PM ページ 159
TECHNICAL DETAILS - CONT’D
Drive Mode
Mode:
Single shot, sequence shot (approx. 1
timer shot
The recordable number of images:
Full size
FINE
Approx. 2 frames
STD. (Standard)
Approx. 4 frames
ECON. (Economy) Approx. 8 frames
Self-timer:
Approx. 10 seconds delayed release
frame/sec.), self-
Half size
Approx. 6 frames
Approx. 12 frames
Approx. 12 frames
Built-in Flash
Charge time:
Flash modes:
Approx. 8 seconds at fill flash
Autoflash, Fill-flash, Flash cancel, Autoflash with red-eye
reduction, Fill-flash with red-eye reduction (Flash cancel in
the close up mode)
Flash intensity control:
Adjusted automatically by an external light
Interface
Video output:
PC interface:
Composite video signal, switchable between NTSC and
PAL
USB port
Power Supply
Batteries:
AA-sized alkaline battery x 4 or AA-sized Ni-MH battery x
4 (AA-sized lithium battery is not available.)
External power: AC adapter (supplied) available (a DC terminal is provided
on the camera body.)
Operating temperature:
0 to 40°C (32 to 104°F)
Dimensions and Weight
Dimensions (W x H x D) :
116 x 73 x 62 mm (4.57 x 2.87 x 2.44 inches) (not
including the projecting parts)
Weight:
Approx. 280g (9.88 oz.) (without batteries and the CF card)
Specifications are based on the latest information available at the time of printing
and are subject to change without notice.
- 159 -
D2330Z_Body_Eng.qxd.4 00.10.11 5:23 PM ページ 160
MEMO
- 160 -
D2330Z_Body_Eng.qxd.4 00.10.11 5:23 PM ページ 161
MEMO
- 161 -
D2330Z_Body_Eng.qxd.4 00.10.11 5:23 PM ページ 162
MEMO
- 162 -