1
Persistent Memory and Powering Up
Any time you change DIP Switches or Software Configuration Settings that
affect parameters the user can change (any filter settings, set temperature
default, Celsius vs Fahrenheit, 12-hour vs 24-hour time, reminders
suppression, etc), you must reset Persistent Memory for your DIP Switch or
Software Configuration Settings changes to take effect. You should also reset
Persistent Memory after loading a new file into a board (using the ESM,
purchased seperately).
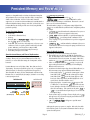
To reset Persistent Memory:
s Power down.
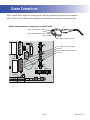
s Set A12 ON (See illustration below).
s Power up.
s Wait until “ ” or “
” is displayed on your panel.
” appears see section below.
Note: If “
s Set A12 OFF. (This can be done safely with power on if you use a nonconductive tool such as a pencil to push the switch back to the OFF
position. Otherwise, power down before setting A12 OFF)
s Power up again (if you powered down in the previous step).
s For all other power ups, leave A12 OFF.
About Persistent Memory and Time of Day Retention:
This system uses memory that doesn’t require a battery to store a variety
of settings. What we refer to as Persistent Memory stores all the User
Preferences, as well as all the filter settings, the set temperature, and the
heat mode.
Persistent Memory is not used for Time of Day. Time of Day needs to be
“kept running” (not just stored) while the power is off, so a separate Real
Time Clock feature (on all models except the EL1000) keeps track of
Time of Day while the unit is off. Time of Day Retention, and Time of Day
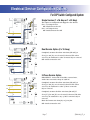
Retention alone, is controlled by the J91 jumper. J91 must be set according
to main system panel used.
Switchbank A
J91
RTC
Enabled
(Not Jumpered)
Switchbank B
J91
RTC
Disabled
(Jumpered)
message on power up:
If “
” appears before (and instead of) “ ” or
”, you have not configured DIP Switches and/or
“
Software Configuration Settings in a valid manner. This must be corrected
before you can reset Persistent Memory.
The switch numbers, jumpers, or configuration settings displayed after
“
” are ones with which the system has found a configuration problem.
For example:
s “
” would mean that the combination of how you’ve set
A5 and how you’ve set B2 is not supported on this system.
s “
” would mean that there is a problem with jumper J99
s “
” would mean that the combination of how
you’ve set pump 3 for 1-speed and blower for 1-speed is not supported
on this system.
s “
” would mean that the combination of how you’ve
set DIP switches which have been assigned to pump 3 and blower is not
supported on this system.
Power Up Display Sequence
Upon power up, you should see the following on the display:
s Three numbers in a row, which are the SSID (the System Software
ID). The third display of these numbers is the Software Version, which
should match the version of your system. For example, if these three
, that is a Mach 3 EL8000 at version 26.
numbers are
s If there is a Configuration Error, the
message (see above) will
appear at this point (and none of the messages below will display).
Otherwise what comes next is:
s An indication of either the input voltage detected (EL1000/EL2000), or
the heater wattage range supported (EL8000/GL2000/GL8000).
s Heater wattage display: “ ” means the system supports a heater
” means the system supports a heater
from 1 kW to 3 kW. “
” means the system supports a 3 kW
from 3 kW to 6 kW. “
heater only. (These ranges may be modified slightly in the case of
special heaters, which the next bullet covers.)
s Input voltage display: A system showing “
” supports 3 kW
to 6 kW heaters. A system showing “ ” supports the very same
heaters, although at 120V those heaters will function at only 1/4 of
” or
their 240V rated wattage. (The system shows only either “
” as a general indication of input voltage; it does not show the
“
actual input voltage.)
s If your system is using a special type of heater, a display such as “ ”
may appear next. If your system is using the generic Balboa heater, no
heater type display will appear.
s “ ” or “
” will appear to signal the start of
Priming Mode.
At this point, the power up sequence is complete. Refer to the User Guide
for the ML Series panel on your system for information about how the spa
operates from this point on.
Page 4
55048-04_97_A