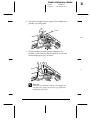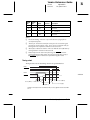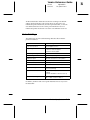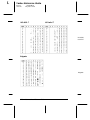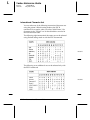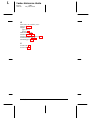
1
Proof Sign-off: Moira Mary Nancy Cindy _______ _______ _______ _______ Verde+ Reference Guide A5 size 10-25-95 4004918-01 Frontmatter DR, pass 3-Rev1 R title page stylusp& COLOR INK JET PRINTER Reference Guide All rights reserved. No part of this publication may be reproduced, stored in a retrieval system, or transmitted in any form or by any means, electronic, mechanical, photocopying, recording, or otherwise, without the prior written permission of Seiko Epson Corporation. No patent liability is assumed with respect to the use of the information contained herein. Neither is any liability assumed for damages resulting from the use of the information contained herein. Neither Seiko Epson Corporation nor its affiliates shall be liable to the purchaser of this product or third parties for damages, losses, costs, or expenses incurred by purchaser or third parties as a result of: accident, misuse, or abuse of this product or unauthorized modifications, repairs, or alterations to this product, or (excluding the U.S.) failure to strictly comply with Seiko Epson Corporation’s operating and maintenance instructions. Seiko Epson Corporation shall not be liable against any damages or problems arising from the use of any options or any consumable products other than those designated as Original EPSON Products or EPSON Approved Products by Seiko Epson Corporation. EPSON, EPSON Stylus, and EPSON ESC/P are registered trademarks and EPSON ESC/P 2 is a trademark of Seiko Epson Corporation. EPSON Connection is a service mark of Epson America, Inc. General Notice: Other product names used herein are for identification purposes only and may be trademarks of their respective owners. EPSON disclaims any and all rights in those marks. The Energy Star emblem does not represent EPA endorsement of any product or service. Copyright © 1995 by Epson America, Inc. Printed on recycled paper with at least 10% post-consumer content 10/95 L Proof Sign-off: Moira Mary Nancy Cindy _______ _______ _______ _______ Verde+ Reference Guide A5 size 10-25-95 Inside front cover DR, pass 1-Rev1 Printer Parts printer cover output tray cover-1 knob control panel paper tray interface card cover cover-2 serial interface parallel interface ink cartridge clamps Control Panel Operate button cover-3 & cover-4 paper thickness lever L Verde+ Reference Guide A5 size 10-25-95 4004918-01 Frontmatter DR, pass 3-Rev1 FCC Compliance Statement For United States Users This equipment has been tested and found to comply with the limits for a Class B digital device, pursuant to Part 15 of the FCC Rules. These limits are designed to provide reasonable protection against harmful interference in a residential installation. This equipment generates, uses, and can radiate radio frequency energy and, if not installed and used in accordance with the instructions, may cause harmful interference to radio or television reception. However, there is no guarantee that interference will not occur in a particular installation. If this equipment does cause interference to radio and television reception, which can be determined by turning the equipment off and on, the user is encouraged to try to correct the interference by one or more of the following measures. ❑ Reorient or relocate the receiving antenna. ❑ Increase the separation between the equipment and receiver. ❑ Connect the equipment into an outlet on a circuit different from that to which the receiver is connected. ❑ Consult the dealer or an experienced radio/TV technician for help. WARNING The connection of a non-shielded equipment interface cable to this equipment will invalidate the FCC Certification of this device and may cause interference levels which exceed the limits established by the FCC for this equipment. It is the responsibility of the user to obtain and use a shielded equipment interface cable with this device. If this equipment has more than one interface connector, do not leave cables connected to unused interfaces. Changes or modifications not expressly approved by the manufacturer could void the user’s authority to operate the equipment. For Canadian Users This digital apparatus does not exceed the Class B limits for radio noise emissions from digital apparatus as set out in the radio interference regulations of the Canadian Department of Communications. Le présent appareil numérique n’émet pas de bruits radioélectriques dépassant les limites applicables aux appareils numériques de Classe B prescrites dans le règlement sur le brouillage radioélectrique édicté par le Ministère des Communications du Canada. ii Verde+ Reference Guide A5 size 10-25-95 4004918-01 Frontmatter DR, pass 3-Rev1 Contents Introduction Energy Star Compliance . . . . Energy-saving Tips . . . . . How to Use This Manual . . . . Where to Get Help . . . . . . . Electronic Support Services Important Safety Instructions . . . . . . . . . . . . . . . . . . . . . . . . . . . . . . . . . . . . . . . . . . . . . . . . . . . . . . . . . . . . . 1 2 2 3 4 6 Choosing Paper and Other Media . . . . . . . . Loading Plain Paper . . . . . . . . . . . . . . . . Loading Oversized Paper . . . . . . . . . . . . Using Special Papers and Other Media . . . . . Loading Special Papers and Transparencies Loading Envelopes and Heavy Paper . . . . . . . . . . . . . . . . . . . . . . . . . . . . . . . . . . . . . . . . . . . . . . . . . . . . . . . . . 1-2 1-4 1-6 1-7 1-8 1-11 . . . . . . . . . . . . . . . . . . . . . . . . . . . . . . . . . . . . 2-2 2-3 2-4 2-6 Chapter 1 Chapter 2 . . . . . . . . . . . . . . . . . . . . . . . . . . . . . . . . . . . . . . . . . . . . . . . . Paper Handling Controlling the Printer Using the Printer’s Control Panel Lights . . . . . . . . . . . . . . Buttons . . . . . . . . . . . . . Using the Default Setting Mode . . . . . . . . . . . . . . . . . . . . . . . . . . . . . . . . . iii R L Verde+ Reference Guide A5 size 10-25-95 4004918-01 Frontmatter DR, pass 3-Rev1 Chapter 3 Maintenance and Troubleshooting Cleaning the Print Heads . . Replacing an Ink Cartridge . Cleaning the Printer . . . . . Transporting the Printer . . . Troubleshooting . . . . . . . Error Lights . . . . . . . . Print Quality Problems . Problems with Printing . Paper Handling Problems . . . . . . . . . . . . . . . . . . . . . . . . . . . . . . . . . . . . . . . . . . . . . . . . . . . . . . . . . . . . . . . . . . . . . . . . . . . . . . . . . . . . . . . . . . . . . . . . . . . . . . . . . . . . . . . . . . . . . . . . . . . . . . . . . . . . . . . . . . . . . . . . . . . . . . . . . . . . . . . . . . . . . . . . . . . . . . . . . . . . 3-2 3-3 3-8 3-9 3-10 3-11 3-12 3-16 3-20 AppleTalk and EtherTalk Networks for Macintosh . . . Connecting the Printer to the Network . . . . . . . . Turning On the Printer’s Network Interface Mode . Interface Boards for the PC . . . . . . . . . . . . . . . . . Using the C823051 or C823061 Serial Interface Board Installing an Optional Interface Board . . . . . . . . . . . . . . . . . . . . . . . . . . . . . . . . . . . A-2 A-3 A-4 A-5 A-5 A-6 . . . . . . . . . . . . . . . . . . . . . . . . . . . . . . . . . . . . . . . . . . . . . . . . . . . . . . . . B-2 B-3 B-6 B-7 B-7 B-8 B-8 B-8 B-9 B-9 B-12 B-12 B-12 B-13 Appendix A Using Optional Interfaces Appendix B Technical Specifications Printing . . . . . . . . Paper . . . . . . . . . . Ink Cartridges . . . . . Mechanical . . . . . . . Electrical . . . . . . . . Environmental . . . . Safety Approvals . . . Fonts . . . . . . . . . . Interface Specifications Parallel Interface . Serial Interface . . Optional Interfaces Initialization . . . . . . Default Settings . . . . iv . . . . . . . . . . . . . . . . . . . . . . . . . . . . . . . . . . . . . . . . . . . . . . . . . . . . . . . . . . . . . . . . . . . . . . . . . . . . . . . . . . . . . . . . . . . . . . . . . . . . . . . . . . . . . . . . . . . . . . . . . . . . . . . . . . . . . . . . . . . . . . . . . . . . . . . . . . . . . . . . . . . . . . . . . . . . . . . . . . . . . . . . . . . . . . . . . . . . . . . . . . . . . . . . . . . . . . . . . . . . . . . . . . . . . . . . . . . . . . . . . . . . . . . . . . . . . . . . . . . . . . . . . . . . . . . . . . . . . . . . Verde+ Reference Guide A5 size 10-25-95 4004918-01 Frontmatter DR, pass 3-Rev1 Appendix C Commands and Character Tables Command List . . . . . . . . . . . . . . . . . . . . Character Tables . . . . . . . . . . . . . . . . . . . International Character Sets . . . . . . . . . . Characters Available with ESC (^ Command . . . . . . . . . . . . . . . . . . . . . . . . . . . . . . . . C-2 C-3 C-10 C-11 Glossary Index v R Proof Sign-off: Moira Mary Nancy Cindy Verde+ Reference Guide _______ _______ _______ _______ A5 size 10-26-95 Introduction DR, pass 4-Rev1 Introduction This manual contains general operating and maintenance instructions for your EPSON® Stylus® Pro or Pro XL printer, as well as troubleshooting guidelines and technical specifications. For instructions on setting up your printer and using the Microsoft® Windows® or Apple® Macintosh® printer driver, see the appropriate Setup and Software Guide. Note: Be sure to check the ReadMe icon in the Windows EPSON group or on your Macintosh hard disk for the latest information about your printer and software. Your printer supports a wide variety of settings that give you the flexibility to improve print quality or speed up printing. Using the printer driver software (described in the Setup and Software Guide), you can control settings such as document type, printing mode, and halftoning to produce just the right effects in your printed documents. To make your job easy, both the Windows and Macintosh printer drivers include an option that analyzes the elements on a page to be printed and automatically adjusts the driver settings so your printed results are appropriate for the image type. See the Setup and Software Guide for complete instructions on using the driver. Energy Star Compliance As an Energy Star Partner, EPSON has determined that the Stylus Pro and Pro XL printers meet the Energy Star guidelines for energy efficiency. (All of EPSON’s ink jet printers conform to Energy Star standards.) Introduction 1 R L Verde+ Reference Guide A5 size 10-26-95 Introduction DR, pass 4-Rev1 The EPA estimates that if all desktop computers, printers, and other peripheral devices met Energy Star standards, energy cost savings would exceed $1 billion annually and carbon dioxide emissions would be reduced by 20 million tons. Energy-saving Tips Here are a few tips you can use to be even more energy-wise: ❑ If your monitor isn’t Energy Star compliant, turn it off when you’re not using it. ❑ Turn off your computer, printer, and monitor each day when you are done using them. ❑ Use the print preview option in your software so you can catch errors before you print. ❑ If you have an electronic mail system available to you, send E-mail rather than memos. Not only is this faster, but you’ll save paper and storage space too. How to Use This Manual After you have set up the printer as described in the Setup and Software Guide, refer to this manual for the following information: Chapter 1, “Paper Handling,” explains how to select the right paper for your print job and load paper and other media in your printer. Chapter 2, “Controlling the Printer,” provides instructions for managing the printer’s operation through its control panel. It also describes how to access the printer’s Default setting mode. 2 Introduction Verde+ Reference Guide A5 size 10-26-95 Introduction DR, pass 4-Rev1 Chapter 3, “Maintenance and Troubleshooting,” contains instructions for cleaning the print heads, replacing the ink cartridges, and cleaning and transporting the printer. You’ll also find troubleshooting guidelines. Appendix A, “Optional Interfaces,” describes optional interfaces you can install in your printer to enhance its capabilities and explains how to install a card. Appendix B, “Technical Specifications,” gives the specifications for the Stylus Pro and Pro XL printers. Appendix C, “Commands and Character Tables,” lists the EPSON ESC/P 2 commands supported by the printer and shows the printer’s built-in character tables. A Glossary and an Index are provided at the end of the manual. Where to Get Help If you purchased your printer in the United States or Canada and you need technical assistance, you can call an EPSON Color Specialist at one of the following numbers: ❑ For the EPSON Stylus Pro: (800) 788-0343 ❑ For the EPSON Stylus Pro XL: (800) 667-0664. EPSON also provides customer support and service through a network of Authorized EPSON Customer Care Centers and provides the following services when you dial (800) 922-8911: ❑ EPSON technical information library fax service ❑ Product literature on current and new products Introduction 3 R L Verde+ Reference Guide A5 size 10-26-95 Introduction DR, pass 4-Rev1 ❑ Assistance in locating your nearest Authorized EPSON Reseller or Customer Care Center ❑ Technical information on the installation, configuration, and operation of EPSON products ❑ Customer relations. You can purchase ink cartridges, paper, parts, printed manuals, and accessories for EPSON products from EPSON Accessories at (800) 873-7766 (U.S. sales only). In Canada, call (800) BUY-EPSON for sales locations. If you purchased your printer outside the United States or Canada, contact your EPSON dealer or the marketing location nearest you for customer support and service. If you need help with any software program you are using, see that program’s documentation for technical support information. Electronic Support Services If you have a modem, the fastest way to access helpful tips, specifications, drivers, application notes, tables for DIP switch or jumper settings, and bulletins for EPSON products is through the online services below. EPSON Bulletin Board Service You can call the EPSON Bulletin Board Service (BBS) at (310) 782-4531. No membership is required. Make sure your communications software is set to 8 data bits with 1 stop bit, no parity bit, and a modem speed up to 28.8 Kbps. See the documentation that came with your communications software for more information. 4 Introduction Verde+ Reference Guide A5 size 10-26-95 Introduction DR, pass 4-Rev1 CompuServe online support CompuServe® members can call the Epson America Forum on CompuServe. If you are already a member, simply type GO EPSON at the prompt to reach the Epson America Forum. If you are not currently a member of CompuServe, you are eligible for a free introductory membership as an owner of an EPSON product. This membership entitles you to: ❑ An introductory credit on CompuServe ❑ Your own user ID and password ❑ A complimentary subscription to CompuServe Magazine, CompuServe’s monthly publication. To take advantage of this offer, call (800) 848-8199 in the United States and Canada and ask for representative #529. In other countries, call the following U.S. telephone number: (614) 529-1611, or your local CompuServe access number. World Wide Web site If you are connected to the Internet and have a Web browser, you can access EPSON’s World Wide Web site at http://www.epson.com. EPSON’s home page links users to What’s New, EPSON Products, EPSON Connection, Corporate Info and EPSON Contacts. Link to the EPSON Connection for the latest drivers and FAQs (Frequently Asked Questions) and the EPSON Chat area. To get in touch with EPSON around the world, EPSON Contacts includes Contact Information for local EPSON subsidiaries. SM Introduction 5 R L Verde+ Reference Guide A5 size 10-26-95 Introduction DR, pass 4-Rev1 Important Safety Instructions Before using your printer, read the following safety instructions to make sure you use the printer safely and effectively. ❑ Turn off and unplug the printer before cleaning. Clean with a damp cloth only. Do not spill liquid on the printer. ❑ Do not place the printer on an unstable surface or near a radiator or heat register. ❑ Do not block or cover the openings in the printer’s cabinet or insert objects through the slots. ❑ Use only the type of power source indicated on the printer’s label. ❑ Connect all equipment to properly grounded power outlets. Avoid using outlets on the same circuit as photocopiers or air control systems that regularly switch on and off. ❑ Do not let the power cord become damaged or frayed. ❑ If you use an extension cord with the printer, make sure the total ampere rating of the devices plugged into the extension cord does not exceed the cord’s ampere rating. Also, make sure the total of all devices plugged into the wall outlet does not exceed 15 amperes. ❑ Except as specifically explained in this Reference Guide, do not attempt to service the printer yourself. ❑ Unplug the printer and refer servicing to qualified service personnel under the following conditions: If the power cord or plug is damaged; if liquid has entered the printer; if the printer has been dropped or the cabinet damaged; if the printer does not operate normally or exhibits a distinct change in performance. Adjust only those controls that are covered by the operating instructions. 6 Introduction Proof Sign-off: Moira Mary Nancy Cindy Verde+ Reference Guide _______ _______ _______ _______ A5 size 10-25-95 Chapter 1 DR, pass 2-Rev1 Chapter 1 Paper Handling 1 Choosing Paper and Other Media . . . . . . . . . . . . . . . . . 1-2 Loading Plain Paper 1-4 . . . . . . . . . . . . . . . . . . . . . . . . Loading Oversized Paper . . . . . . . . . . . . . . . . . . . . . Using Special Papers and Other Media . . . . . . . . . . . . . . Loading Special Papers and Transparencies . . . . . . . . . Loading Envelopes and Heavy Paper . . . . . . . . . . . . Paper Handling 1-6 1-7 1-8 1-11 1-1 R L Verde+ Reference Guide A5 size 10-25-95 Chapter 1 DR, pass 2-Rev1 This chapter describes how to choose the right paper for your print job and how to load all kinds of paper and other media in your printer. You can use plain paper, special coated paper, high-quality glossy paper, transparencies, and envelopes. Choosing Paper and Other Media You can use most plain paper with your printer and achieve good results. Coated papers give you better results because they reduce the amount of ink that is absorbed. However, if the coated paper does not absorb enough ink, the ink can smear. To ensure the best results, EPSON provides special papers and transparencies that are formulated for the inks used in EPSON ink jet printers. These papers include the following: 1-2 ❑ EPSON Special coated paper for 360 dpi. Use this paper for best results when printing at 360 dpi. Five sample sheets are included with your printer. ❑ EPSON Special coated paper for 720 dpi. Use this paper for best results when printing at 720 dpi. Five sample sheets are included with your printer. ❑ EPSON High-quality glossy paper. Use this paper with 720 dpi to produce camera-ready composites. When printing on glossy paper, use only EPSON high-quality glossy paper. ❑ EPSON Transparency film. When printing transparencies, use only EPSON transparencies. For best results, use transparencies within six months of opening the package. Do not use the printer driver’s 720 dpi printing mode when printing transparencies. Paper Handling Verde+ Reference Guide A5 size 10-25-95 Chapter 1 DR, pass 2-Rev1 To order EPSON papers and transparencies, contact your dealer or call EPSON Accessories at (800) 873-7766 (U.S. only). In Canada, call (800) BUY-EPSON for sales locations. Use the following part numbers when ordering: Paper Size Part Number Special coated paper for 720 dpi Letter (8.5 x 11 inches) A3 (297 x 420 mm) Legal (8.5 x 14 inches) Super A3/B (13 x 19 inches) B (11 x 17 inches) S041062 S041068 S041067 S041069 S041070 Special coated paper for 360 dpi Letter (8.5 x 11 inches) A3 (297 x 420 mm) Super A3/B (13 x 19 inches) S041060 S041065 S041066 High-quality glossy paper Letter (8.5 x 11 inches) A3 (297 x 420 mm) Super A3/B (13 x 19 inches) B (11 x 17 inches) S041072 S041073 S041074 S041075 Transparency film Letter (8.5 x 11 inches) S041064 When selecting transparency film or high-quality glossy paper, use only EPSON transparencies or glossy paper. Any other brands are not supported. Paper Handling 1-3 R L Verde+ Reference Guide A5 size 10-25-95 Chapter 1 DR, pass 2-Rev1 Loading Plain Paper The following procedure describes how to load plain bond paper. You can load up to 100 sheets of plain paper. For information on loading oversized paper or special types of media, see the next sections. (For complete specifications on paper types, see Appendix B.) Always load paper with the printable surface down. The printable surface is marked with an arrow on most plain paper packaging. 1. Remove the output tray from the top of the paper tray. rear edge guide left edge guide 2. Slide the left edge guide inside the paper tray to the left as far as it will go. 3. Flip up the rear edge guide and slide it toward you as far as it will go. 4. Fan a stack of paper; then tap it on a flat surface to even the edges. 1-4 Paper Handling WS-13 Verde+ Reference Guide A5 size 10-25-95 Chapter 1 DR, pass 2-Rev1 R 5. Load the stack of paper, printable side down, so that its right edge rests against the right side of the paper tray. Slide the stack into the tray until you feel some resistance. Then slide the left edge guide against the left edge of the paper as shown below. WS-14 You can load up to 100 sheets of plain bond paper, but do not load paper above the arrow mark on the left edge guide. 6. Slide the rear edge guide against the rear edge of the paper. WS-15 7. Place the output tray on top of the paper tray. Paper Handling 1-5 L Verde+ Reference Guide A5 size 10-25-95 Chapter 1 DR, pass 2-Rev1 8. Change the Media Type and other printer driver settings so they are appropriate for the paper you loaded. (See your Setup and Software Guide for instructions.) Loading Oversized Paper If you are loading paper that is larger than the paper tray, you need to pull out the paper tray extension. Follow these steps: 1. Remove the output tray and remove any paper in the paper tray. 2. The paper tray extension acts as the rear edge guide, so make sure the built-in rear edge guide is folded down as shown in the illustration below. 1-4 paper tray extension 3. Gently pull the extension out using both hands—one to hold the paper tray in position and the other to pull out the extension. 4. Load the stack of paper in the tray and then slide in the extension until it meets the edge of the paper stack. 1-6 Paper Handling Verde+ Reference Guide A5 size 10-25-95 Chapter 1 DR, pass 2-Rev1 R 5. Replace the output tray and fold out its extension. 1-5 Using Special Papers and Other Media This section explains how to use and load special coated paper, glossy paper, transparencies, and envelopes in your printer. When using these special types of media, keep the following in mind: ❑ Use special coated paper and glossy papers within one year of purchase. Use transparencies within six months. ❑ Do not touch the printable surface of the paper. The moisture and oils on your hands can reduce print quality. Hold sheets by their edges. ❑ Be sure to load paper with the printable surface face down. The printable side is whiter than the other, and is usually identified on the package. ❑ When printing on high-quality glossy paper or transparencies, remove each sheet from the output tray immediately after it is printed. Make sure each sheet is dry before stacking. Paper Handling 1-7 L Verde+ Reference Guide A5 size 10-25-95 Chapter 1 DR, pass 2-Rev1 ❑ Return unused sheets to their original package as soon as possible after you finish printing. Unfavorable storage conditions—especially high temperature, humidity, and direct sunlight—can damage the media. ❑ Remember to select the appropriate setting in the driver software before you print. See your Setup and Software Guide for instructions. ❑ You can print on sheets of labels in your printer; just follow the instructions for loading plain paper on page 1-4. Make sure the sheets are not curled and that no labels are peeled away from the backing when you load them. You may need to adjust the paper thickness lever; see page 1-11. ❑ If the paper doesn’t feed properly or jams, see “Troubleshooting” in Chapter 3. Loading Special Papers and Transparencies Follow these guidelines when printing on coated paper, glossy paper, or transparencies: ❑ Use special coated paper for 360 or 720 dpi or transparencies only under these normal operating conditions: Temperature: Humidity: ❑ 59° to 77° F (15° to 25° C) 40% to 60% RH When printing on glossy paper, remove each sheet from the output tray as soon as it is printed and do not stack sheets until they are completely dry. The paper tray can hold 70 sheets of coated paper, 30 sheets of high-quality glossy paper, or 50 transparencies. 1-8 Paper Handling Verde+ Reference Guide A5 size 10-25-95 Chapter 1 DR, pass 2-Rev1 R Follow these steps to load special papers and transparencies: 1. Remove the output tray from the top of the paper tray. 1-1 2. Slide the left edge guide inside the paper tray to the left as far as it will go and slide the rear edge guide toward the front of the printer as far as it will go. 3. Fan a stack of paper; then tap it on a flat surface to even the edges. 4. Before you load paper, make sure the printable surface is face down. For coated papers, the printable side is whiter than the other side. For glossy paper and transparencies, the printable side is face down when the cut corner is facing the right outside corner of the paper tray, as shown in the following illustration. Paper Handling 1-9 L Verde+ Reference Guide A5 size 10-25-95 Chapter 1 DR, pass 2-Rev1 Load the paper or transparencies firmly against the right side of the paper tray. Slide the stack into the tray until you feel some resistance. Then slide the left edge guide against the left edge of the paper stack. 1-6 5. Slide the rear edge guide against the rear edge of the paper. 1-3 6. Change the Media Type and other printer driver settings to match the paper or transparencies you loaded as described in your Setup and Software Guide. 1-10 Paper Handling Verde+ Reference Guide A5 size 10-25-95 Chapter 1 DR, pass 2-Rev1 Once your driver settings are correct, choose Print in the File menu of your application program to print on the sheets you loaded. Loading Envelopes and Heavy Paper This section explains how to load envelopes and heavy paper. For detailed specifications on paper thickness and weight, see Appendix B. When printing, follow these guidelines: ❑ Do not use envelopes that are curled, folded, or bent. ❑ Do not use envelopes that are too thin; they may curl during printing. ❑ Do not choose 720 dpi resolution for envelope printing. ❑ If you are using a DOS application, you may be able to select 720 dpi if your DOS program supports 720 dpi printing. You can select from Bi-D, Uni-D, or Auto print directions using the Default setting mode. The Uni-D setting is recommended when printing at 720 dpi. ❑ When loading heavy paper (paper that is thick or stiff), it is recommended that you load one sheet at a time. Adjusting the paper thickness lever When printing on envelopes, labels, or heavy paper, you need to adjust the paper thickness lever to compensate for the extra paper weight. 1. Make sure the printer is turned on. Then press the Pause button and open the cover. 2. While holding down the Alt button, press the Font button, and then release both buttons. The carriage moves to the lever-adjusting position and the Data light flashes. Paper loaded in the printer is ejected when you adjust this lever. Paper Handling 1-11 R L Verde+ Reference Guide A5 size 10-25-95 Chapter 1 DR, pass 2-Rev1 3. Rotate the paper thickness lever clockwise as far as it will go. 1-8 4. Press the Alt button. Then press Pause. 5. Close the printer cover. Loading the paper tray After adjusting the paper thickness lever, follow these steps to load the paper tray: 1. Remove the output tray and remove any paper from the paper tray. 2. If you are printing on envelopes, pull back the paper tray extension. Then remove the rear edge guide, turn it around, and reinstall it as shown. 1-9 1-12 Paper Handling Verde+ Reference Guide A5 size 10-25-95 Chapter 1 DR, pass 2-Rev1 R 3. Insert the paper or envelopes into the paper tray. It is best to load sheets of heavy paper one at a time. If you’re loading envelopes, insert them as shown. You can load up to 10 envelopes. 1-10 4. Adjust the rear and left edge guides as shown above so the media feeds straight into the paper path. 5. Change the Media Type and other printer driver settings so they are appropriate for the media you loaded, as described in your Setup and Software Guide. Once you select the appropriate printer settings, choose Print in the File menu to print on the media you loaded. After you are finished printing on heavy paper or envelopes, rotate the paper thickness lever by turning it counterclockwise to its original position. Also return the rear edge guide to its paper position, if necessary. Paper Handling 1-13 Proof Sign-off: Moira Mary Nancy Cindy _______ _______ _______ _______ Verde+ Reference Guide A5 size 10-25-95 Chapter 2 DR, pass 2-Rev1 Chapter 2 Controlling the Printer Using the Printer’s Control Panel . . . . . . . . . . . . . . . . . Lights . . . . . . . . . . . . . . . . . . . . . . . . . . . . . . . Buttons . . . . . . . . . . . . . . . . . . . . . . . . . . . . . . 2-2 2-3 2-4 Using the Default Setting Mode . . . . . . . . . . . . . . . . . . 2-6 2 Controlling the Printer 2-1 R L Verde+ Reference Guide A5 size 10-25-95 Chapter 2 DR, pass 2-Rev1 This chapter explains how to control the printer using the control panel. It also describes the additional printer functions you can perform using the Default setting mode. Using the Printer’s Control Panel The printer’s front control panel contains lights for displaying the printer status and buttons for controlling certain settings. Operate button 5-1 Since most printer settings can be controlled from your software, you do not often need to use the control panel. This section describes how to read the lights and the buttons on the control panel. 2-2 Controlling the Printer Verde+ Reference Guide A5 size 10-25-95 Chapter 2 DR, pass 2-Rev1 Lights Operate On when the printer is on. Flashes when the printer is turned on or off. Data On when data is being received by the printer or when data remains in printer memory. Paper Out On when the printer runs out of paper. Rapid flashing indicates a paper jam. No Ink Cartridge On when one or both ink cartridges are not installed. The printer will not work unless both cartridges are installed. Font Indicates the font selected through the control panel. Because you normally choose fonts from your software, ignore this light. Economy On when economy printing mode is selected. In economy mode the printer uses less ink by printing fewer dots per character, which may make black text look gray. Use this mode only for printing rough drafts of text from DOS applications. Condensed On when condensed mode is selected. The printer prints selected fonts at 60% of their width so more characters can fit on a page. (Software can override this setting.) Pause On when printing is paused. This light flashes when you clean the print heads or replace ink cartridges, or when an error occurs. Never turn off the printer when the Pause light is flashing. Controlling the Printer 2-3 R L Verde+ Reference Guide A5 size 10-25-95 Chapter 2 DR, pass 2-Rev1 Note: See “Error Lights” in Chapter 3 for more information on troubleshooting. Buttons Operate c Turns the printer on and off. Caution: Always turn off the printer by pressing the Operate button. Then wait until the Operate light stops flashing before unplugging the printer. Never turn off the printer while the Pause light is flashing. Font Controls the fonts available on the printer. Normally you should use your software to select fonts. See Appendix B for samples of the seven built-in fonts. Load/Eject (or Black) Loads or ejects a sheet of paper. The printer normally loads and ejects paper automatically. When pressed with Alt, cleans the black print head. Pause (or Reset) Stops printing temporarily. Press it again to resume printing. When pressed with Alt, clears the printer’s buffer and resets the printer settings to their factory defaults. Economy/Condensed (or Color) Selects economy or condensed mode. In economy mode, the printer uses less ink to produce text and images. Condensed printing reduces the size of characters to approximately 60% of their normal width. It is best to use your software to select character size, however. When pressed with Alt, cleans the color print head. 2-4 Controlling the Printer Verde+ Reference Guide A5 size 10-25-95 Chapter 2 DR, pass 2-Rev1 Alt/Cleaning Used in combination with other buttons to reset the printer, clean the print heads, or adjust the paper thickness lever. See “Cleaning the Print Heads” in Chapter 3 and “Loading Envelopes and Heavy Paper” in Chapter 1 for more information. Using special button combinations The functions listed below are available when you hold down a combination of buttons when turning on the printer. Self test (Operate + Load/Eject) Checks the paper length and performs a self test by printing fonts and colors. Hold down the Load/Eject button and then press the Operate button for several seconds until the printer advances a sheet of paper. See “Testing the Printer” in Chapter 1 of the Setup and Software Guide. To stop the self test, press Pause and then turn off the printer. Hex dump (Operate + Font + Load/Eject) On a PC, prints data in hexadecimal code for troubleshooting analysis. See the Troubleshooting section in Chapter 3. Default setting mode (Operate + Economy/Condensed) Enters the Default setting mode. See “Using the Default Setting Mode” on page 2-6 for more information. Note: To exit the hex dump or Default setting mode, press the Pause button and then the Operate button to turn off the printer. Reset printer (Alt + Pause) Clears the printer’s buffer and resets the printer settings to their factory defaults. Hold down both buttons for about 5 seconds. Controlling the Printer 2-5 R L Verde+ Reference Guide A5 size 10-25-95 Chapter 2 DR, pass 2-Rev1 Black print head cleaning (Alt + Load/Eject) Runs a cleaning cycle for the black print head. See “Cleaning the Print Heads” in Chapter 3. Color print head cleaning (Alt + Economy/Condensed) Runs a cleaning cycle for the color print head. See “Cleaning the Print Heads” in Chapter 3. Using the Default Setting Mode Additional printer functions are available through the Default setting mode. Because the printer’s factory defaults are designed to meet the needs of almost all users, you rarely need to change the printer functions described in this section. If necessary, however, you can turn on the Default setting mode and change the settings using the control panel buttons. The table below lists the settings you can select in the Default setting mode. Default values are shown in bold type. Setting 2-6 Options Print direction Auto, Bi-D, Uni-D Network interface mode On, Off Auto line feed On, Off Loading position 3 mm, 8.5 mm Interface mode Auto I/F mode, Parallel I/F, Serial I/F, Option I/F Auto interface wait mode 10 seconds, 30 seconds Character table Italic U.S.A., Italic France, Italic Germany, Italic U.K., Italic Denmark, Italic sweden, Italic Italy, Italic Spain I, PC437, PC850, PC860, PC863, PC865, PC861, PC437, Greek, PC853, PC855, PC852, PC857, PC866, PC869, BRASCII, Abicomp, MAZOWIA, Code MJK, ISO 8859-7, ISO Latin 1T, or Bulgaria Controlling the Printer Verde+ Reference Guide A5 size 10-25-95 Chapter 2 DR, pass 2-Rev1 Print direction. Specifies how the print head moves across the page. The options are Uni-D, Bi-D, and Auto (default). When Uni-D is on, the print head prints in only one direction to provide the most precise alignment for graphics and text. In Bi-D printing, the print head prints in both directions. Bi-D is faster, but the vertical alignment may not be as precise as Uni-D. When Auto is selected, the printer switches automatically between Uni-D and Bi-D as necessary when it receives data. Network interface mode. If you’re having trouble printing when the printer is connected to multiple computers, turn on network interface mode. By default, network interface mode is off. Auto line feed. Specifies that a carriage return character encountered in the print file be accompanied by a line feed command. By default, auto line feed is off. If text lines print on top of one another, turn on auto line feed. Loading position. Determines the top margin by defining how close to the paper edge the first line can print. The loading position can be 3 mm (default) or 8.5 mm. Normally you should use your software to adjust your top margin. Interface mode. Determines from which interface the printer receives print data. By default, the printer automatically switches as needed between the parallel, serial, and optional interfaces. However, if you are experiencing communication problems, you might want to set the interface mode to one of the following: Parallel, Serial, or Optional. Auto interface wait mode. Determines the interface timeout period, either 10 or 30 seconds, when the Auto I/F mode is selected for the Interface mode option. The printer does not accept data from another interface for the period defined. Controlling the Printer 2-7 R L Verde+ Reference Guide A5 size 10-25-95 Chapter 2 DR, pass 2-Rev1 Character table. Selects the set of characters and symbols that can be printed. The default is the U.S.A. character table. If you commonly use a language containing accents, symbols, or other characters not available in the U.S.A. character table, change to a different character table. For a list of the character tables, see Appendix C. To turn on Default setting mode and print instructions, turn off the printer. Then hold down the Economy/Condensed button while you turn the printer back on. Follow the instructions that describe how to change the default settings by pressing the buttons on the control panel. When you are finished, press Pause to exit the Default setting mode. If there is still a sheet of paper in the printer, press Load/Eject to eject it. Then turn off the printer. 2-8 Controlling the Printer Proof Sign-off: Moira Mary Nancy Cindy Verde+ Reference Guide _______ _______ _______ _______ A5 size 10-25-95 Chapter 3 DR, pass 2-Rev1 Chapter 3 Maintenance and Troubleshooting Cleaning the Print Heads . . . . . . . . . . . . . . . . . . . . . . 3-2 Replacing an Ink Cartridge . . . . . . . . . . . . . . . . . . . . 3-3 Cleaning the Printer . . . . . . . . . . . . . . . . . . . . . . . . . 3-8 Transporting the Printer . . . . . . . . . . . . . . . . . . . . . . 3-9 Troubleshooting . . . . . . . . Error Lights . . . . . . . . Print Quality Problems . . Problems with Printing . Paper Handling Problems 3-10 3-11 3-12 3-16 3-20 . . . . . . . . . . . . . . . . . . . . . . . . . . . . . . . . . . . . . . . . . . . . . . . . . . . . . . . . . . . . . . . . . . . . . . . . . . . . . . . . . . . . . . . . . . . . . . . 3 Maintenance and Troubleshooting 3-1 R L Verde+ Reference Guide A5 size 10-25-95 Chapter 3 DR, pass 2-Rev1 Instructions in this chapter tell you how to do the following to maintain and care for your printer: ❑ Clean the print heads ❑ Replace the ink cartridges ❑ Clean the printer ❑ Transport the printer. The Troubleshooting section, which begins on page 3-10, gives you solutions to possible problems you may encounter. Cleaning the Print Heads The printer periodically cleans its print heads, so normally you should not need to manually activate a cleaning cycle. However, the ink nozzles in the print head may become clogged occasionally, reducing the print quality. If this happens, you can initiate a print head cleaning cycle to clear the print head nozzles so they deliver ink properly. Note: Because the cleaning cycle uses ink, do not clean the print head(s) unless you notice a decline in print quality. You must clean the print heads one at a time. Each cleaning cycle takes about one minute. During the cleaning cycle, the carriage moves back and forth and you can hear the printer recharging the print heads. The Pause light flashes throughout the cleaning cycle and then stays on when the cycle is finished. Follow these steps to clean either or both print heads: 1. Make sure the printer is turned on and open the cover. 2. Press the Pause button. (Make sure the Pause light comes on.) 3-2 Maintenance and Troubleshooting Verde+ Reference Guide A5 size 10-25-95 Chapter 3 DR, pass 2-Rev1 3. To clean the color print head, hold down the Alt button and press Economy/Condensed (or Color). The cleaning cycle begins and the Pause light flashes. The cleaning cycle is over when the Pause light stops flashing. To clean the black print head, hold down the Alt button and press Load/Eject (or Black). The cleaning cycle begins and the Pause light flashes. The cleaning cycle is over when the Pause light stops flashing. 4. Press the Pause button and close the printer cover. After cleaning the print heads, run a self test to check the print quality. If it is still not satisfactory, repeat the cleaning cycle. (You may need to do this several times.) If it does not improve after you clean the print heads five times, replace one or both ink cartridges as described in the next section. Replacing an Ink Cartridge You need to replace an ink cartridge when it runs out of ink (the printer stops printing that color) or if print quality declines and cleaning the print head did not improve it. You can check print quality by doing a printer self test, as described in your Setup and Software Guide. Use only these EPSON ink cartridges in your Stylus Pro or Pro XL: Black ink cartridge Color ink cartridge S020034 S020036 When you need new ink cartridges, contact your dealer or call EPSON Accessories at (800) 873-7766 (U.S. only). In Canada, call (800) BUY-EPSON for sales locations. Maintenance and Troubleshooting 3-3 R L Verde+ Reference Guide A5 size 10-25-95 Chapter 3 DR, pass 2-Rev1 c Caution: Use only genuine EPSON cartridges and do not refill them. Other products may cause damage not covered by EPSON’s warranty. Leave the old cartridge installed in the printer until you are ready to replace it with a new one. Attempting to print without a cartridge installed can damage the printer. Once you install the ink cartridges, do not open the clamps or remove the cartridges except to replace them with new ones. Once you remove a cartridge, you cannot reuse it. Any paper in the paper path is ejected automatically when you replace the cartridge. Follow these steps to replace either or both ink cartridges: 1. Make sure the printer is on and open the printer cover. 2. Press the Pause button and check that the Pause light comes on. 3. Hold down the Alt button for about five seconds until the print head moves slightly left, to the ink cartridge install position. The Pause light begins flashing. The carriage returns to the home position after 60 seconds if no ink cartridge is removed. 3-4 Maintenance and Troubleshooting Verde+ Reference Guide A5 size 10-25-95 Chapter 3 DR, pass 2-Rev1 R 4. Pull up the cartridge clamp to open it. The cartridge rises partially out of the printer. WS-8 5. Lift the cartridge out of the printer and dispose of it carefully so any excess ink does not spill. Do not take the used cartridge apart or try to refill it. 7-1 w Warning: If ink gets on your hands, wash them thoroughly with soap and water. If ink gets into your eyes, flush them immediately with water. Maintenance and Troubleshooting 3-5 L Verde+ Reference Guide A5 size 10-25-95 Chapter 3 DR, pass 2-Rev1 6. Remove the new ink cartridge from its foil package and remove the tape seal from the top of the cartridge. 7-2 black cartridge color cartridge c Caution: You must remove the tape seal from the cartridge. Leaving the tape on will permanently damage it. 7. Lower the ink cartridge into its holder with the label facing up and the arrow on the top of the cartridge pointing to the back of the printer. The larger (color) cartridge goes on the left. WS-10 3-6 Maintenance and Troubleshooting Verde+ Reference Guide A5 size 10-25-95 Chapter 3 DR, pass 2-Rev1 R 8. Push down the ink cartridge clamp until it locks in place. WS-11 9. Clean the print heads to ensure that ink is properly delivered to each nozzle. Cleaning is recommended but not required. If you replaced the black cartridge, hold down the Alt button while you press the Load/Eject (or Black) button. This cleans the black print head. If you replaced the color cartridge, hold down the Alt button while you press the Economy/Condensed (or Color) button. This cleans the color print head. After you clean the print head(s), skip to step 11. 10. If you did not clean the print heads, press the Alt button to charge the printer’s ink delivery system. The Pause light flashes during the process. 11. Close the printer cover. When the charging cycle finishes, the Pause light stops flashing and stays on. Press the Pause button to turn off the light and resume printing. Maintenance and Troubleshooting 3-7 L Verde+ Reference Guide A5 size 10-25-95 Chapter 3 DR, pass 2-Rev1 Cleaning the Printer To keep your printer operating at its best, you should clean it occasionally as follows: 1. Turn off the printer and disconnect the power cord and interface cable(s). 2. Remove any paper from the paper tray. 3. Use a soft brush to carefully brush away all dust and dirt. 4. If the outer case or the inside of the paper tray is dirty, clean it with a soft, clean cloth dampened with mild detergent. Keep the printer cover closed to prevent water from getting inside. 5. If the inside of the printer accidentally gets soiled with ink, wipe it off with a damp cloth. w c Warning: Be careful not to touch the gears inside the printer. Caution: Never use alcohols or thinners to clean the printer; these chemicals can damage the components as well as the case. Be careful not to get water on the printer mechanism or electronic components. Do not use a hard or abrasive brush. Do not spray the inside of the printer with lubricants; unsuitable oils can damage the mechanism. 3-8 Maintenance and Troubleshooting Verde+ Reference Guide A5 size 10-25-95 Chapter 3 DR, pass 2-Rev1 Transporting the Printer If you need to transport your printer, carefully repack it in the original box and packing materials as follows: 1. Press the Pause button, and then turn off the printer. 2. Open the printer cover and make sure that the print head is locked in the far right position. If it isn’t, turn on the printer, wait about 10 seconds, and turn it off. c Caution: Do not remove the ink cartridges when transporting the printer. Transporting the printer without the cartridges installed can damage it. 3. Use a strong adhesive tape to secure the print head to the side of the printer. 4. Unplug the power cord from the electrical outlet. 5. Disconnect the interface cable from the printer. 6. Remove the output tray from the top of the paper tray and remove any paper. 7. Remove the paper tray from the printer. 8. Attach the protective material to the printer. See the Notice Sheet that was packed with the printer. 9. Repack the printer and attachments in the original box. Keep the printer flat during transport. Maintenance and Troubleshooting 3-9 R L Verde+ Reference Guide A5 size 10-25-95 Chapter 3 DR, pass 2-Rev1 If you notice problems with the printed image after transporting the printer, clean the print heads as described at the beginning of this chapter. If your printed images are misaligned vertically, calibrate the printer as described in the Setup and Software Guide. Troubleshooting This section describes what you can do if you are having problems printing. It is divided into the following sections: ❑ Error lights. See this section to identify a problem indicated by the control panel lights. ❑ Print quality problems. See this section if the print quality is not good or not what you expect. ❑ Problems with printing. See this section if your printer is not printing. ❑ Paper handling problems. See this section if you have paper jams or other problems with paper feeding incorrectly. If you have a printing problem, check the appropriate section and follow all suggestions that apply to your problem. Also check the ReadMe icon on your Macintosh hard disk or in the Windows EPSON group for the latest information. If none of the suggested solutions solve your problem, call (800) 922-8911 in the U.S. and Canada. 3-10 Maintenance and Troubleshooting Verde+ Reference Guide A5 size 10-25-95 Chapter 3 DR, pass 2-Rev1 Error Lights Certain problems are identified by the control panel lights. The following table describes the meaning of each light pattern and what you should do to correct the problem. Light(s) Problem Solution Paper Out is on Printer is out of paper Load paper in the paper tray and press the Load/Eject button to feed the paper into the printer. Paper Out is flashing Paper jam Clear the paper jam. No Ink Cartridge is on Ink cartridge is not installed correctly Check ink cartridges and make sure both are installed correctly. Data and Pause are flashing Carriage error Turn the printer off, check for and clear any carriage obstructions (paper, etc.), and turn the printer back on. If the error persists, contact your dealer or an authorized service provider. All lights except Operate are flashing Fatal error Turn the printer off, wait 10 seconds, and then turn it on again. If this does not correct the problem, you can reset the printer’s factory defaults by pressing the Alt and Pause buttons. (Note that this will remove any changes you have made to the printer’s default settings.) If resetting the printer does not fix the problem, contact your dealer or an authorized service provider. Maintenance and Troubleshooting 3-11 R L Verde+ Reference Guide A5 size 10-25-95 Chapter 3 DR, pass 2-Rev1 Print Quality Problems Print quality problems can often be solved by cleaning the print heads as described earlier in this chapter. Then print a self test to check the print quality and help identify what the problem may be. (Note that it may take as many as five cleaning cycles to solve a print quality problem.) If cleaning the print heads does not improve the print quality, try the following: ❑ Make sure you selected Color or Monochrome correctly in the printer driver. ❑ Check whether the ink cartridges are empty. Print a self test as described in the Setup and Software Guide. After the first page prints, the printer prints an entire page of text lines in various colors, including black, magenta, cyan, and yellow. If the black lines don’t print, replace the black ink cartridge; if any of the colored lines don’t print, change the color ink cartridge. ❑ For color or complex grayscale images, turn on MicroWeave and turn off High Speed mode. ❑ Use a higher quality paper. For best print quality, use EPSON special coated papers for 360 and 720 dpi or EPSON high-quality glossy paper (720 dpi only). ❑ Make sure the Media Type setting matches the type of paper loaded in the printer. ❑ If you’re printing a scanned image and the colors are not right, first try to fix the problem using your scanning software program. If print quality does not improve, see the following specific problems. 3-12 Maintenance and Troubleshooting Verde+ Reference Guide A5 size 10-25-95 Chapter 3 DR, pass 2-Rev1 Printed output is not what you expect or is faint or blurred. Clean one or both print heads as described earlier in this chapter. You may not be printing on the correct side of the paper. On coated paper, print only on the white coated side; on glossy paper or transparencies, print only with the cut corner facing the right outside corner of the paper tray. Remove each sheet as it is printed to prevent smearing by the next sheet. Check that the paper thickness lever is set correctly for the type of paper. (See “Loading Envelopes and Heavy Paper” in Chapter 1 for more information.) Faint or blurred printouts can result if you print on plain paper when the paper thickness lever is set for thick paper. Use a higher quality paper. If you are using 720-dpi resolution, you will get better results if you use EPSON special coated paper for 720 dpi or EPSON high-quality glossy paper. Also, check that the Media Type setting in the driver is set for the type of paper loaded. Check whether economy printing mode is on. To turn off this mode, press the Economy/Condensed button until the Economy light goes off. Check whether your paper is moist or damp. Ink jet printers are sensitive to moisture absorbed by paper. Do not store paper in damp or humid places. If you are printing color graphics at 360 or 720 dpi, make sure MicroWeave is on and High Speed mode is off. Also check that the Brightness and Contrast settings (Windows driver) or Light/Dark setting (Macintosh driver) are appropriate for the image. Maintenance and Troubleshooting 3-13 R L Verde+ Reference Guide A5 size 10-25-95 Chapter 3 DR, pass 2-Rev1 If you are using a PC, your Windows video driver might not be compatible with the printer. Use the standard Windows VGA driver or contact the manufacturer of your video card for an updated driver. For information on changing the video driver, see your Windows documentation. Replace one or both ink cartridges. Vertical lines do not align. Calibrate your printer as described in the Setup and Software Guide. You see white banding in your printout. Turn on MicroWeave in the printer driver. Clean one or both print heads. The printout contains incorrect or garbled characters. Make sure EPSON Stylus Pro or Pro XL is selected as the default Windows printer driver (PC driver) or is the last printer selected in the Chooser (Macintosh driver). If you are running Windows, make sure the Print Manager is turned off in the Control Panel Printers utility; see your Windows documentation or online help for instructions. Print jobs may be held in the EPSON Spool Manager (Windows) or the EPSON Monitor2 utility (Macintosh). Select any print jobs marked pending, waiting, or held; then select Delete or Cancel Printing. 3-14 Maintenance and Troubleshooting Verde+ Reference Guide A5 size 10-25-95 Chapter 3 DR, pass 2-Rev1 You see incorrect colors in your printout. Make sure EPSON Stylus Pro or Pro XL is selected as the default Windows printer driver (PC driver) or is the last printer selected in the Chooser (Macintosh driver). Check that the printer driver’s Brightness and Contrast settings (PC driver) or Light/Dark setting (Macintosh driver) are appropriate for the image. If you scanned the image, the different color interpretation technologies used by your scanner, monitor, and printer can never produce an exact color match with the original image. However, check your scanner documentation for utilities you can use to calibrate your scanner to your monitor and printer to more closely match colors. If you are printing from a DOS application using economy mode, black text or graphics will appear gray on your printout; turn off economy mode to achieve deeper blacks. Printing starts too high or too low on the page, or the page length or margins are not what you expect. Make sure you selected the correct Paper Size option in the printer driver; see your Setup and Software Guide for instructions. Use your software program to adjust the margins or change the number of lines per page, or change the page length setting to match the paper you are using. Change the loading position of the paper using Default setting mode. See “Using the Default Setting Mode” in Chapter 2. Maintenance and Troubleshooting 3-15 R L Verde+ Reference Guide A5 size 10-25-95 Chapter 3 DR, pass 2-Rev1 Problems with Printing If you cannot get the printer to print, first check that paper is loaded in the printer. Then check that the printer is plugged into a working electrical outlet that is not controlled by a switch or timer. Verify that the interface cable is securely connected to the printer and computer. After you have done all this, see the following specific problems. Printing has stopped and the Pause light is on. Printing is temporarily suspended. Press the Pause button to continue. Printing has stopped but the Pause light is off. One or both ink cartridges may be empty or too old. A cartridge is too old if it has been used longer than six months or beyond the date on its packaging. First clean the print heads as described earlier in this chapter. If this does not solve the problem, replace the ink cartridges. The cable between the printer and your PC or Macintosh might not meet the specifications for the printer or computer. For a parallel connection with your PC, you need a shielded, twisted-pair, parallel cable with a D-SUB, 25-pin, male connector for the computer and a 36-pin, Centronics® compatible connector for the printer. The cable should not be longer than 10 feet. For the serial interface on a Macintosh you need an RS-422, 8-pin, mini DIN, male/male cable. To ensure proper communication, use the standard Apple/System Peripheral-8 cable (part number M1097). If you are connecting the printer to a AppleTalk® or EtherTalk network, see Appendix A. Turn off the printer and perform a self test as described in the Setup and Software Guide. If the self test does not print, the problem is with the printer. If the self test prints correctly, the problem is probably caused by your software. 3-16 Maintenance and Troubleshooting Verde+ Reference Guide A5 size 10-25-95 Chapter 3 DR, pass 2-Rev1 The No Ink Cartridge light is on, and the printer does not print. One or both ink cartridges are not installed. Install both ink cartridges. The printer makes a grinding noise and does not feed paper. Something is pressing against the knob on the printer’s right side. Turn off the printer and move it so there is at least two inches of space around the knob. The printer will not work if anything is pressing against the knob. All lights except the Operate light flash and nothing prints. Contact your dealer or an authorized service provider. Printing stops and the Data and Pause lights flash. There is a problem with the carriage. Turn off the printer. After a few seconds, turn it back on and try printing again. If this does not solve the problem, contact your dealer or an authorized service provider. The printer sounds like it is printing, but nothing prints. The print heads may need cleaning. See “Cleaning the Print Heads” on page 3-2 for instructions. One or both ink cartridges are empty or too old. A cartridge is too old if it has been used longer than six months or beyond the date on its packaging. Try running a self test, as described in the Setup and Software Guide. If nothing prints in black or color, you need to replace the ink cartridges. Maintenance and Troubleshooting 3-17 R L Verde+ Reference Guide A5 size 10-25-95 Chapter 3 DR, pass 2-Rev1 After upgrading your computer to Windows 95, the printer driver does not work correctly. You need to reinstall the EPSON Stylus Pro or Pro XL printer driver using Windows 95. See your Setup and Software Guide for Windows. You see error messages on your PC because of printing conflicts. Before sending print jobs to the printer, the EPSON Spool Manager stores them in a temporary directory. If you see error messages when trying to print or printing is very slow, the problem may be caused by other temporary files in the temporary directory. To change the EPSON Spool Manager default directory, follow these steps: 1. Make a directory on your hard disk to store the Spool Manager files, for example, C:\SPLTEMP. 2. Open the EPSON program group and double-click the Spool Manager icon. 3. Make sure Stylus Pro (or Stylus Pro XL) is selected, and then open the Queue menu. 4. Select Setup. In the Queue Setup dialog box, change the spool directory to the one you created in step 1. 5. Also make sure the Use Print Manager for this port checkbox is checked. Then select OK or press Enter. 6. Open the Options menu and select Default Spool Directory. 7. In the dialog box, change the spool directory to the one you created in step 1. Then select OK. 8. Close the Spool Manager. 3-18 Maintenance and Troubleshooting Verde+ Reference Guide A5 size 10-25-95 Chapter 3 DR, pass 2-Rev1 The printer prints blank pages. Make sure EPSON Stylus Pro or Pro XL is selected as the default Windows printer driver (PC driver) or is the last printer selected in the Chooser (Macintosh driver). Make sure you selected the correct Paper Size option in the printer driver; see your Setup and Software Guide for instructions. Also make sure the margins you selected in your application software fit the paper size you’re using. Verify that the ink cartridges are not empty by running a self test. Text printing is slow. You may be using printer driver settings that are more suitable for graphics printing and unnecessarily slowing down text printing. To speed up text printing only, turn off MicroWeave mode and turn on High Speed mode. Some combinations of Printing Mode (resolution) and Media Type do not allow you to select these settings; if this is the case for your settings, select a lower resolution, possibly using 180 dpi for drafts and 360 dpi for your final output. However, do not turn off MicroWeave when printing final copies of high-quality graphics or photographs. Ink cartridges do not last as long as expected. The ink cartridge life depends on the amount of ink used in printing. If you often print pages with large graphics and dense text, you will use up cartridges faster than if you print pages with less ink coverage. Cleaning the print heads more often than necessary also consumes ink. Maintenance and Troubleshooting 3-19 R L Verde+ Reference Guide A5 size 10-25-95 Chapter 3 DR, pass 2-Rev1 The printer does not seem to receive print jobs. On a PC, release any print jobs that may be held in the EPSON Spool Manager. Start Spool Manager and click any job marked pending or held. Then open the Document menu and select Delete. Verify the EPSON Stylus Pro or Pro XL print queue is not held, open the Queue menu and click Hold if there is a checkmark beside the option. On a Macintosh, release any print jobs that may be held in the EPSON Monitor2 utility. Click the upper right corner of the screen and select Monitor2 from the menu. Click any print job shown under Waiting and click Cancel Printing. Make sure EPSON Stylus Pro or Pro XL is selected as the default Windows printer driver (PC driver) or is the last printer selected in the Chooser (Macintosh driver). If you’re an experienced user, you can use the hex dump mode to pinpoint communication problems between the printer and a software program. To turn on hex dump mode, first turn off the printer. Then hold down the Load/Eject and Font buttons and turn on the printer. Then send a print job. The printer prints the exact codes it receives from the computer in hexadecimal format. Report the codes to an authorized service provider. Paper Handling Problems This section describes how to clear paper jams inside your printer and ensure that paper feeds properly. 3-20 Maintenance and Troubleshooting Verde+ Reference Guide A5 size 10-25-95 Chapter 3 DR, pass 2-Rev1 R Clearing and preventing paper jams If paper has jammed inside the printer, clear the jam as follows: 1. Turn off the printer. 2. Open the printer cover. 3. Push in the knob on the right side of the printer and turn it counterclockwise as shown below. 8-1 Be sure to turn the knob in the direction shown; otherwise ink from the printed sheet can come off onto the printer and smear other sheets. 4. Pull the paper out carefully. If it tears, make sure you remove any remaining pieces. 5. If paper is caught in the paper eject area, gently pull it out of the printer. 6. Close the printer cover. 7. Turn on the printer to move the print heads to the correct positions. Maintenance and Troubleshooting 3-21 L Verde+ Reference Guide A5 size 10-25-95 Chapter 3 DR, pass 2-Rev1 If paper jams frequently, try the following: ❑ Use a higher quality paper, one that is not too thin, too thick, or rough. Make sure it is suitable for ink jet printers. For best quality, use EPSON special coated and highquality glossy papers. See Chapter 1 for more information about loading paper and Appendix B for paper specifications. ❑ Fan the stack of paper before you load it. ❑ Do not load too many sheets in the input tray. You can load up to 100 sheets of plain paper, 70 sheets of special coated paper, 30 sheets of high-quality glossy paper, 50 sheets of transparency film, or 10 envelopes. For heavy paper, it is best to load sheets one at a time. Paper feeding problems If paper is not feeding properly, the most likely causes are the following: ❑ Paper is curled or folded. Use flat, undamaged paper. ❑ The paper is of poor quality; use a better quality paper. ❑ Too many sheets are loaded in the paper tray. You can load up to 100 sheets of plain paper, 70 sheets of special coated paper, 30 sheets of high-quality glossy paper, 50 sheets of transparency film, or 10 envelopes. ❑ The paper is too thin or thick or has been exposed to excess humidity; see Appendix B for paper specifications. ❑ The edge guides are too tight or too loose. Adjust the rear and left edge guides for the size of the paper. If you still have paper feeding problems, see the following suggestions. 3-22 Maintenance and Troubleshooting Verde+ Reference Guide A5 size 10-25-95 Chapter 3 DR, pass 2-Rev1 The printer loads more than one sheet at a time. Remove the stack of paper and fan it. Tap it on a flat surface to even the edges. Then reload the paper. The paper is too thin or thick or was exposed to excess humidity; see Appendix B for exact specifications. If you are using heavy paper, load sheets one at a time. Make sure the paper thickness lever is set correctly for your media type; see Chapter 1 for instructions. Make sure the printer driver’s Copies setting and the copies setting in your application software are set to print one copy at a time. Also verify that you have selected the correct paper size in the driver and in your application software. Ejected paper is wrinkled. The paper is too thin or damp. Do not store paper in damp or humid places. Paper does not fully eject. Use the Load/Eject button to eject the page. Make sure you selected the correct paper size in the driver software. See your Setup and Software Guide for instructions. The paper is too long. Use paper that is within the specified size. See Appendix B for exact specifications. Maintenance and Troubleshooting 3-23 R L Verde+ Reference Guide A5 size 10-25-95 Chapter 3 DR, pass 2-Rev1 Paper is feeding crooked. The paper is old or creased. Use only new, smooth sheets of paper. Too much paper is loaded in the paper tray. Remove a few sheets. The paper is not the proper size and quality; see Appendix B for exact specifications. 3-24 Maintenance and Troubleshooting Proof Sign-off: Moira Mary Nancy Cindy _______ _______ _______ _______ Verde+ Reference Guide A5 size 10-25-95 Appendix A DR, pass 3-Rev1 Appendix A Using Optional Interfaces A AppleTalk and EtherTalk Networks for Macintosh . . . . . . . Connecting the Printer to the Network . . . . . . . . . . . . Turning On the Printer’s Network Interface Mode . . . . . A-2 A-3 A-4 Interface Boards for the PC . . . . . . . . . . . . . . . . . . . . . Using the C823051 or C823061 Serial Interface Board . . . A-5 A-5 Installing an Optional Interface Board . . . . . . . . . . . . . . A-6 Using Optional Interfaces A-1 R L Verde+ Reference Guide A5 size 10-25-95 Appendix A DR, pass 3-Rev1 You can use various interface boards to supplement the capabilities of your printer’s built-in hardware interfaces for use with your Macintosh or PC. For example, if you want to connect your printer to an AppleTalk or EtherTalk network, you need to install a LocalTalk® or Ethernet® interface board. This appendix provides information for using optional interfaces with your Macintosh or PC and describes how to install a board in your printer. AppleTalk and EtherTalk Networks for Macintosh If you want to connect the printer to an AppleTalk or EtherTalk network so multiple Macintosh computers can share the printer, you need to obtain a LocalTalk or Ethernet interface board. Contact your dealer or call EPSON Accessories at (800) 873-7766 (U.S. only). In Canada, call (800) BUY-EPSON for sales locations. If you install the LocalTalk board, you also need to obtain a Locking Connector Kit (DIN 8 version) for the printer. (If your Macintosh is not already part of the network, you need to obtain an additional kit for your Macintosh.) If you install the EtherTalk board connected to a thin coaxial (10BASE2) cable and the printer is the last device on the network, you need to obtain a 50-ohm terminator. The Ethernet transceiver is included on the EPSON Ethernet board, so you do not need to obtain an Ethernet adapter box for the printer. A-2 Using Optional Interfaces Verde+ Reference Guide A5 size 10-25-95 Appendix A DR, pass 3-Rev1 Connecting the Printer to the Network How you connect the printer to the network depends on your network type: ❑ If you are connecting to a LocalTalk network, attach a LocalTalk locking connector box to the LocalTalk connector on the back of the printer. Attach one end of a LocalTalk cable to this connector box. Attach the other end of the cable to an available port on any connector box that is part of the network. For more information about creating an AppleTalk network, see the owner’s guide that comes with the LocalTalk Locking Connector Kit. ❑ If you are connecting to an EtherTalk network using a thin coaxial (10BASE2) cable, first attach the T-connector supplied with the board to the 10BASE2 connector on the Ethernet interface board. Connect the network cable to one node of the T-connector. If the printer is not the last device in a daisy-chain, connect another network cable to the other node of the T-connector. If the printer is the last device, attach a 50-ohm terminator to the other node of the T-connector. ❑ If you are connecting to an EtherTalk network using a twisted-pair (10BASE-T) cable, connect the network cable’s RJ-45 connector to the 10BASE-T connector on the Ethernet interface board. Using Optional Interfaces A-3 R L Verde+ Reference Guide A5 size 10-25-95 Appendix A DR, pass 3-Rev1 Turning On the Printer’s Network Interface Mode If you encounter problems when using the printer on a network, you may need to turn on the printer’s network mode using the buttons on the control panel. Follow these steps: 1. Make sure the printer is off and paper is loaded in the paper tray. 2. While holding down the Economy/Condensed button, turn on the printer. (Hold the button down for approximately 5 seconds.) After the printer warms up, it prints a page listing the available control panel languages. 3. Unless you want to change the language of the control panel, press the Alt button. (Press the Font button to change the control panel language.) The printer prints two instruction sheets that describe how to change default printer settings. 4. Press the Font button until the Courier and Sans Serif H lights are on and the Roman T light is off. 5. Press the Alt button until the Operate light is on and the Data and Paper Out lights are off. 6. Turn off the printer. A-4 Using Optional Interfaces Verde+ Reference Guide A5 size 10-25-95 Appendix A DR, pass 3-Rev1 Interface Boards for the PC The following EPSON interface boards are compatible with your printer: Interface board Model number Serial Interface board C823051/C823061 32KB Serial Interface board C823071/C823081 32KB Parallel Interface board C823101 Twinax Interface board C823151 Coax Interface board C823141 Ethernet Interface board C823312 If you are not sure whether you need an optional interface, or if you want to know more about interfaces, contact your dealer. Using the C823051 or C823061 Serial Interface Board To use the C823051 or C823061 interface board, see the sections below for information on selecting the baud rate, handshake timing, and error handling. For all other data transfer conventions, such as word structure and communications protocol, see your interface board manual. Selecting the baud rate You can select from the following baud rates: 300, 600, 1200, 2400, 4800, 9600, and 19200 bps (bits per second). To set the baud rate, see the bit-rate selection table in your interface board manual. Using Optional Interfaces A-5 R L Verde+ Reference Guide A5 size 10-25-95 Appendix A DR, pass 3-Rev1 Handshake timing When the vacant area for data in the input buffer drops to 256 bytes, the printer outputs an X-OFF code or sets the DTR flag to 1 (MARK) to indicate that it cannot receive data. When the vacant area for data in the buffer increases to 512 bytes, the printer outputs an X-ON code or sets the DTR flag to 0 (SPACE) to indicate that it is ready to receive data. Error handling When the printer detects a parity error, it prints an asterisk (*). The printer ignores all other errors, including framing and overrun errors. Installing an Optional Interface Board 1. Turn off the printer. 2. Unplug the printer’s power cord from the electrical outlet and disconnect any interface cables. c Caution: Do not install or remove an interface board when the printer is connected to the electrical outlet. If you do, you may damage your printer or computer. 3. Remove the two screws securing the shield plate to the optional interface slot; then lift off the plate as shown in the following illustration. Store the plate in case you later remove the interface board. A-6 Using Optional Interfaces Verde+ Reference Guide A5 size 10-25-95 Appendix A DR, pass 3-Rev1 R 6-1 4. Be sure to set any switches and jumpers on the interface board. See the board’s manual for details. If your interface board has a jumper labelled JG, make sure that you set it to on, or the board will not work properly. 5. Slide the interface board along the slots on both sides of the interface compartment. Push it in firmly to fully insert the connector at the rear of the interface board into the printer’s internal socket. 6-2 6. Secure the interface board in the slot with the two screws included with the interface board. Using Optional Interfaces A-7 L Verde+ Reference Guide A5 size 10-25-95 Appendix A DR, pass 3-Rev1 7. Connect the proper interface cable to the interface board and to your computer. Connect other interface cables if you are using more than one computer. 8. Reconnect any interface cables you disconnected in step 2. 9. Make sure the printer is off. Then plug in the power cord. 10. If you are connecting your printer to an AppleTalk or EtherTalk network, follow the guidelines on page A- 3. You may need to change the settings for the interface options using the printer’s Default setting mode. See “Using the Default Setting Mode” in Chapter 2 for more information. A-8 Using Optional Interfaces Proof Sign-off: Moira Mary Nancy Cindy Verde+ Reference Guide _______ _______ _______ _______ A5 size 10-25-95 Appendix B DR, pass 2-Rev1 Appendix B Technical Specifications Printing . . . . . . . . . . . . . . . . . . . . . . . . . . . . . . . . B-2 Paper . . . . . . . . . . . . . . . . . . . . . . . . . . . . . . . . . B-3 Ink Cartridges . . . . . . . . . . . . . . . . . . . . . . . . . . . . B-6 Mechanical . . . . . . . . . . . . . . . . . . . . . . . . . . . . . . B-7 Electrical . . . . . . . . . . . . . . . . . . . . . . . . . . . . . . . B-7 Environmental . . . . . . . . . . . . . . . . . . . . . . . . . . . . B-8 Safety Approvals . . . . . . . . . . . . . . . . . . . . . . . . . . B-8 . . . . . . . . . . . . . . . . . . . . . . . . . . . . . . . . . B-8 Fonts Interface Specifications Parallel Interface . . Serial Interface . . . Optional Interfaces . . . . . . . . . . . . . . . . . . . . . . . . . . . . . . . . . . . . . . . . . . . . . . . . . . . . . . . . . . . . . . . . . . . . . . . . . . . . . . . . . . . . . . . . . . . . B-9 B-9 B-12 B-12 Initialization . . . . . . . . . . . . . . . . . . . . . . . . . . . . . B-12 Default Settings . . . . . . . . . . . . . . . . . . . . . . . . . . . B-13 Technical Specifications B-1 B R L Verde+ Reference Guide A5 size 10-25-95 Appendix B DR, pass 2-Rev1 Printing Printing method: On-demand ink jet Nozzle configuration: 64 monochrome (black) nozzles (16 × 4 staggered) 48 color nozzles (16 × 3, cyan, magenta, yellow) Printable columns and printing speed*: * Character pitch (characters per inch) Printable columns LQ printing speed (characters per second) Pro Pro XL 10 80 127 200 12 96 152 240 15 120 190 300 17 (10 condensed) 137 218 340 20 (12 condensed) 160 254 400 Print speeds vary depending on system configuration, software application, resolution, and amount of page covered. Figures are based on letter-size paper with color printing. Resolution: Maximum 720 × 720 dpi Paper feed speed: 89 milliseconds per 1⁄6-inch line; 2.2 inches per second Input buffer: 64KB Print direction: Bidirectional with logic seeking Control code: ESC/P 2 and expanded raster graphics code Paper feeding: Auto sheet feeder Line spacing: 1⁄6-inch (default), programmable to or in 1⁄360-inch increments using control codes 1⁄8-inch B-2 Character tables: 1 Italic and 20 graphics character tables Character sets: 14 International and 1 legal character sets Technical Specifications Verde+ Reference Guide A5 size 10-25-95 Appendix B DR, pass 2-Rev1 Paper Note: Since the quality of any particular brand or type of paper may be changed by the manufacturer at any time, EPSON cannot guarantee the use of any particular brand or type of paper. Always test samples of paper stock before purchasing large quantities or printing large jobs. Paper path: Sheet feeder, front entry Paper tray capacity: 100 sheets at 17 lb (64 g/m2) paper 70 sheets of EPSON special coated paper 50 sheets of EPSON transparency films 30 sheets of EPSON high-quality glossy paper 10 envelopes Paper size: Letter (8.5 × 11 inches) A4 (210 × 297 mm) Legal (8.5 × 14 inches) US B (11 × 17 inches)* Super A3/B (13 × 9 inches)* A3 (297 × 420 mm)* Statement (8.5 × 5.5 inches) Executive (7.5 × 10 inches) * Stylus Pro XL only Paper types: Plain paper and special papers distributed by EPSON (special coated paper, highquality glossy paper, and transparencies) Paper thickness: 0.003 to 0.004 inch (0.08 to 0.11 mm) Paper weight: 17 to 24 lb (64 to 90 g/m2) Use 24 lb (90 g/m2) paper under normal temperature and humidity conditions Transparencies: Size Letter (8.5 × 11 inches) A4 (210 × 297 mm) Thickness 0.003 to 0.0033 inch (0.075 to 0.085 mm) Technical Specifications B-3 R L Verde+ Reference Guide A5 size 10-25-95 Appendix B DR, pass 2-Rev1 Envelopes: 9.5 × 4.1 inches (241 × 104 mm) 8.7 × 4.3 inches (220 × 110 mm) Size No. 10 DL Paper types Plain, bond, or air mail paper Paper thickness Less than 0.020 inch (0.52 mm) Paper weight 20 to 24 lb (75 to 90 g/m2) Note: Poor quality paper may reduce print quality and cause paper jams and other problems. If you encounter problems, switch to a higher grade of paper. ❑ B-4 ❑ Print on special coated paper, high-quality glossy paper, envelopes, and transparency films only under these normal conditions: Temperature: 59 to 77°F (15 to 25°C) Humidity: 40 to 60% RH ❑ Store high-quality glossy paper under the following conditions: Temperature: 59 to 77°F (15 to 25°C) Humidity: 20 to 60% RH ❑ ❑ Use envelopes that do not curl. The following EPSON genuine papers are available: S041062 Special coated paper for 720 dpi printing (Letter) S041067 Special coated paper for 720 dpi printing (Legal) S041068 Special coated paper for 720 dpi printing (A3) S041070 Special coated paper for 720 dpi printing (B) S041069 Special coated paper for 720 dpi printing (Super A3/B) S041060 Special coated paper for 360 dpi printing (Letter) S041066 Special coated paper for 360 dpi printing (Super A3/B) S041065 Special coated paper for 360 dpi printing (A3) S041072 High-quality glossy paper (Letter) S041074 High-quality glossy paper (Super A3/B) S041073 High-quality glossy paper (A3) S041075 High-quality glossy paper (B) S041064 Transparency film (Letter) Technical Specifications Verde+ Reference Guide A5 size 10-25-95 R Appendix B DR, pass 2-Rev1 Printable area: Single sheets A BL BR A-1 C Envelopes A A-2 BR BL C A The minimum top margin is 0.12 inch (3 mm). BL The minimum left margin is 0.12 inch (3 mm). BR The minimum right margin is: For Stylus Pro: 3.8 mm (0.15 inch) for A4 size paper 3 mm (0.12 inch) for Statement and Executive size paper 9.7 mm (0.38 inch) for Letter and Legal size paper and transparencies 13.8 mm (0.54 inch) for DL envelopes 35.1 mm (1.38 inch) for No. 10 envelopes For Stylus Pro XL: 3 mm (0.12 inch) for all paper sizes, and envelopes C The minimum bottom margin is 0.55 inch (14 mm) Technical Specifications B-5 L Verde+ Reference Guide A5 size 10-25-95 Appendix B DR, pass 2-Rev1 Ink Cartridges Black ink cartridge (S020034): Color Black Print capacity* Approximately 1.5 million characters (315 dots/char, Roman 10) Cartridge life* 2 years from production date and up to 6 months after opening the package, at 77°F (25°C); based on letter size paper Temperature Storage: –22 to 104° F (–30 to 40° C) 1 month at 104° F (40° C) Transit: –22 to 140° F (–30 to 60° C) 1 month at 104° F (40° C) 120 hours at 140° F (60° C) Freezing:** 24.8° F (–4° C) Dimensions 1.1 inches (W) × 2.7 inches (D) × 1.7 inches (H) (26.9 mm × 67.4 mm × 41.8 mm) Color ink cartridge (S020036): * Colors Cyan, magenta, and yellow Print capacity* In each color, approximately 1.2 million characters (670 sheets/color, letter, 5% duty at 360 dpi) Cartridge life* 2 years from production date and up to 6 months after opening the package at 77° F (25° C); based on letter size paper Temperature −22 to 104° F (−30 to 40° C) 1 month at 104° F (40° C) Transit: −22 to 140° F (−30 to 60° C) 1 month at 104° F (40° C) 120 hours at 140° F (60° C) Freezing:** 21.2° F (−6° C) Dimensions 2.1 inches (W) × 2.7 inches (D) × 1.7 inches (H) (54 mm × 67.4 mm × 41.8 mm) Storage: The cartridge life may vary. If you often print large graphics and dense text, you will use up ink cartridges faster than if you print pages with less ink coverage. Cleaning the print heads more often than necessary will also consume ink. ** The ink thaws in approximately 2 hours at 77°F (25°C). B-6 Technical Specifications Verde+ Reference Guide A5 size 10-25-95 c Appendix B DR, pass 2-Rev1 Caution: Use only genuine EPSON ink cartridges and do not refill them. Other products may cause damage not covered by EPSON’s warranty. Do not use an ink cartridge after the expiration date on the package. Mechanical Paper feed method: Friction with auto sheet feeder Print head life: 1 billion dots per nozzle Total print volume: 75,000 pages Dimensions and weight: Stylus Pro Width 19.0 inches (482 mm) Depth 20.9 inches (530 mm) Height 7.2 inches (182 mm) Weight 16.7 lb (7.5 kg) Stylus Pro XL Width 22.8 inches (580 mm) Depth 23.5 inches (597 mm) Height 7.2 inches (182 mm) Weight 22.1 lb (10 kg) Electrical Input voltage range: 103.5 to 132 V Rated frequency range: 50 to 60 Hz Input frequency range: 49.5 to 60.5 Hz Rated current: 0.6 A Power consumption: Approx. 20 W (during self test, LQ at 10 cpi) Technical Specifications B-7 R L Verde+ Reference Guide A5 size 10-25-95 Appendix B DR, pass 2-Rev1 Environmental Temperature: Operation 50 to 95° F (10 to 35° C) Storage* –4 to 140° F (−20 to 60° C) 1 month at 104° F (40° C) 120 hours at 140° F (60° C) Humidity: Operation 20 to 80% RH Storage* 5 to 85% RH (without condensation) * Stored in shipping container Safety Approvals Safety standards: UL 1950 with D3, CSA 22.2 950 with D3 R.F.I.: FCC part 15 subpart B class B Fonts The printer comes with an installed set of fonts, shown below, which are selectable with the Font button on the control panel. However, the printer always uses the fonts you select with your software program. The only time you need to select the printer’s installed fonts is when your software program does not allow you to select fonts. font2& B-8 Technical Specifications Verde+ Reference Guide A5 size 10-25-95 Appendix B DR, pass 2-Rev1 Interface Specifications Your printer is equipped with an 8-bit parallel interface and a serial interface. Parallel Interface Data format: 8-bit parallel, IEEE P1284 mode compatible Synchronization: STROBE pulse Handshake timing: BUSY and ACKNLG signals Signal level: TTL compatible Connector: 36-pin, Centronics compatible Pin assignments Signal pin Return pin 1 19 STROBE IN STROBE pulse to read data. 2 3 4 5 6 7 8 9 20 21 22 23 24 25 26 27 DATA 1 DATA 2 DATA 3 DATA 4 DATA 5 DATA 6 DATA 7 DATA 8 IN IN IN IN IN IN IN IN These signals represent information in bits 0 to 7 of parallel data respectively. Each signal is at HIGH level when data is logical 1 and LOW when it is logical 0. 10 28 ACKNLG OUT Signal Direction Description About a 5-µs pulse. LOW indicates data has been received and the printer is ready to accept more data. Technical Specifications B-9 R L Verde+ Reference Guide A5 size 10-25-95 B-10 Appendix B DR, pass 2-Rev1 Signal pin Return pin 11 29 BUSY OUT A HIGH signal indicates the printer cannot receive data. The signal goes HIGH in the following cases: 1) During data entry (for each character) 2) During initialization 3) During self test and default-setting printing 4) During a printer-error state 12 30 PE OUT A HIGH signal indicates the printer is in a paper-out state or in an error state 13 - SLCT OUT Pulled up to +5 V through 1 kΩ resistance 14 - AUTO FEED XT IN Signal Direction Description When this signal is LOW, the paper is automatically fed one line after printing 15 - NC - Not used 16 - GND - Logic ground level 17 - CHASSIS GND - Printer’s chassis ground, which is connected to the logic ground 18 - NC - Not used 19-30 - GND - Twisted-pair return signal ground level 31 16 INIT IN 32 - ERROR OUT Technical Specifications When this signal goes LOW, the printer controller is reset to its state when the power is first turned on and the print buffer is cleared. This level is normally HIGH; its pulse width must be more than 50 µs at the receiving terminal. This signal level goes LOW when the printer: 1) Is out of paper 2) Is in an error state 3) Has no ink cartridges installed Verde+ Reference Guide A5 size 10-25-95 Signal pin Return pin 33 - 34 - 35 - 36 - NC - Signal GND Direction Appendix B DR, pass 2-Rev1 R Description - Same as for pins 19-30 NC - Not used +5 V OUT Pulled up to +5 V through 1 KΩ resistance Not used Notes: ❑ The column heading “Direction” refers to the direction of signal flow as viewed from the printer. ❑ “Return pin” denotes the twisted-pair return pin to be connected at signal ground level. For the interface wiring, be sure to use a twisted-pair cable for each signal and to complete the connection on the return side. ❑ All interface conditions are based on TTL level. Both the rise and fall times of each signal must be less than 0.2 microseconds. ❑ Data transfer must be carried out by observing the ACKNLG or BUSY signal. Data transfer to this printer can be carried out only after receipt of the ACKNLG signal or when the level of the BUSY signal is LOW. Timing chart The figure below shows the timing chart for the parallel interface. BUSY ACKNLG DATA AAR03A STROBE 0 µs (Min.) 0.5 µs (Min.) 0 µs (Min.) 5 µs (Typ.) Transition time (both the rise and the fall) of every signal must be less than 0.2 µs. Technical Specifications B-11 L Verde+ Reference Guide A5 size 10-25-95 Appendix B DR, pass 2-Rev1 Serial Interface The printer’s built-in serial interface is based on the RS-422 standard to allow the printer to be connected to an Apple Macintosh. Standard: Based on RS-422 Synchronization: Asynchronous Bit rate: 57.6 Kbps/230.4 Kbps Handshaking: DTR and XON/XOFF protocol Word format: 8 bits None 1 bit 1 bit Data bit Parity bit Start bit Stop bit Connector: 8-pin mini-circular connector Recommended cable: Apple System/Peripheral-8 (part number M0197) or equivalent Optional Interfaces The available interfaces are listed in Appendix A. Please refer to the specifications in the user’s guide packed with the optional interface card. Initialization The printer can be initialized (returned to a fixed set of conditions) in these ways: B-12 Hardware initialization ∗ The printer is turned on. ∗ The printer receives an INIT signal from the parallel interface: pin 31 goes LOW. Software initialization ∗ Software sends the ESC @ (initialize the printer) command. The last panel settings are kept. Control panel initialization ∗ Hold down the Alt button and press the Pause button (buffer clear). The last panel settings are kept. Technical Specifications Verde+ Reference Guide A5 size 10-25-95 Appendix B DR, pass 2-Rev1 All three initialization methods reset the font according to the default settings selected using the control panel. However, ESC @ does not initialize the printer mechanism, clear the input data buffer, or clear the user-defined character set. The control panel initialization does not initialize the printer mechanism or clear the user-defined character set. Default Settings The table below shows the default settings that take effect when the printer is initialized. Item Default setting Top-of-form position Current paper position Page length Single sheets: 61 lines for letter-size paper 65 lines for A4-size paper Left and right margins Cancelled Line spacing 1⁄ Character pitch Last font selected on control panel Vertical tab position Cleared Horizontal tab positions Every eight characters Font selection Last font selected on control panel Special printing effects Cancelled (except condensed and economy printing) User-defined character set Hardware/control panel initialization: cleared Software initialization: deselected only Graphic mode assignment ESC K = ESC ∗ 0, ESC L = ESC ∗ 1, ESC Y = ESC ∗ 2, ESC Z = ESC ∗ 3 6-inch line spacing In addition, hardware and control panel initialization erases any text in the data buffer. Technical Specifications B-13 R Proof Sign-off: Moira Mary Nancy Cindy _______ _______ _______ _______ Verde+ Reference Guide A5 size 10-30-95 Appendix C DR, pass 3-Rev1 Appendix C Commands and Character Tables Command List . . . . . . . . . . . . . . . . . . . . . . . . . . . . C-2 Character Tables . . . . . . . . . . . . . . . . . . . . . . . . . . . International Character Sets . . . . . . . . . . . . . . . . . . Characters Available with ESC (^ Command . . . . . . . . C-3 C-10 C-11 C Commands and Character Tables C-1 R L Verde+ Reference Guide A5 size 10-30-95 Appendix C DR, pass 3-Rev1 Command List This printer supports the following ESC/P 2 commands in your DOS software programs. If you need more information about using printer commands, you can purchase the ESC/P 2 Reference Manual (ESCP2REF) from EPSON Accessories by calling (800) 873-7766 (in the U.S. only). In Canada, call (800) BUY-EPSON for sales locations. General operation: ESC @, ESC U 1/0, ESC EM R Paper feeding CR, FF, LF, ESC 0, ESC 2, ESC 3 n, ESC + n Page format ESC ( c nn, ESC ( C nn, ESC C n, ESC C 0 n, ESC N n, ESC O, ESC L n, ESC Q n Print position motion ESC $ n1 n2, ESC \ n1 n2, ESC ( V nn, ESC ( v nn, ESC D nn, HT, ESC B nn, VT, ESC J n Font selection ESC k n, ESC X nn, ESC P, ESC M, ESC g, ESC p 1/0, ESC x n, ESC 4, ESC 5, ESC E, ESC F, ESC ! n Font enhancement SI, DC2, SO, ESC W 1/0, DC4, ESC w 1/0, ESC G, ESC H, ESC S 0, ESC S 1, ESC T, ESC ( - nn, ESC - 1/0, ESC q n Spacing ESC SP n, ESC ( U nn, ESC c n1 n2 Character handling ESC ( t nn, ESC t n, ESC R n, ESC & nn, ESC : 0 n 0, ESC % n, ESC 6, ESC 7, ESC ( ^ nn Bit image ESC * nn Graphics ESC ( G nn, ESC . nn Color ESC r n MicroWeave ESC ( i Select dot size ESC ( e nn Binary mode commands for ESC . 2 or ESC . 3 <XFER>, <MOVX>, MOVY>, <COLR>, <CLR>, <EXIT>, <CR>, <MOVXBYTE>, MOVXDOT> C-2 Commands and Character Tables Verde+ Reference Guide A5 size 10-30-95 Appendix C DR, pass 3-Rev1 R Character Tables The printer comes with an installed set of character tables. However, when printing from Windows and most DOS software programs, the printer prints the characters you see on screen and does not use its built-in character tables. Unless you’re printing from a DOS program, and cannot print the character you need, you should never have to change the character table. These character tables are selected using the printer’s Default setting mode or by using software commands. All tables except the italic are the same as the PC437 table for hex codes 00 through 7F, so only the PC437 table is shown completely. The rest of the tables show only the characters for hex codes 80 through FF. PC437 (U.S., Standard Europe) pc437 Commands and Character Tables C-3 L Verde+ Reference Guide A5 size 10-30-95 Appendix C DR, pass 3-Rev1 PC850 (Multilingual) PC860 (Portuguese) PC850, PC860 PC861 (Icelandic) PC863 (Canadian-French) PC861, PC863 C-4 Commands and Character Tables Verde+ Reference Guide A5 size 10-30-95 PC865 (Nordic) Appendix C DR, pass 3-Rev1 R PC437 (Greek) PC865, PC437g& PC853 (Turkish) PC855 (Cyrilic) PC853, PC855 Commands and Character Tables C-5 L Verde+ Reference Guide A5 size 10-30-95 Appendix C DR, pass 3-Rev1 PC852 (East Europe) PC857 (Turkish) PC852, PC857 PC866 (Russian) PC869 (Greek) PC866, PC869 C-6 Commands and Character Tables Verde+ Reference Guide A5 size 10-30-95 BRASCII Appendix C DR, pass 3-Rev1 R Abicomp BRASCII, ABICOMP MAZOWIA Code MJK MAZOWIA, MJK Commands and Character Tables C-7 L Verde+ Reference Guide A5 size 10-30-95 Appendix C DR, pass 3-Rev1 ISO 8859-7 ISO Latin 1T IOS88590, ISOLATIN Bulgaria Bulgaria C-8 Commands and Character Tables Verde+ Reference Guide A5 size 10-30-95 Appendix C DR, pass 3-Rev1 R Italic No characters are available for hex code 15 in the italic character table. Italic Commands and Character Tables C-9 L Verde+ Reference Guide A5 size 10-30-95 Appendix C DR, pass 3-Rev1 International Character Sets You can select one of the following international character sets using the printer’s Default setting mode or the ESC R command. For example, when you select “Italic France,” the characters in the “France” row on the table below are used in the italic character table. The following eight international character sets can be selected using Default setting mode or with the ESC R command. intset10 The following seven additional sets can be selected only with the ESC R command. intset20 C-10 Commands and Character Tables Verde+ Reference Guide A5 size 10-30-95 R Appendix C DR, pass 3-Rev1 Characters Available with ESC (^ Command To print the characters in the table below, use the ESC ( ^ command. ESC Commands and Character Tables C-11 Proof Sign-off: Moira Mary Nancy Cindy _______ _______ _______ _______ Verde+ Reference Guide A5 size 10-25-95 Glossary DR, pass 1-Rev1 Glossary auto line feed When this feature is selected in the printer’s Default setting mode, each carriage return (CR) code is automatically followed by a line feed (LF) code. bidirectional printing Printing in which the print head prints in both directions (bidirectionally). This increases print speed but may reduce precise vertical alignment. Also called high speed printing. character table The collection of letters, numbers, and symbols that constitute the set of characters used in a particular language. CMYK A method of specifying and creating colors using cyan (blue-green), magenta, yellow, and black (K). condensed printing Printing in which the width of each character is approximately 60% of the width of standard characters. control code A special code used to control a printer function such as performing a carriage return or line feed. cpi Characters per inch. Determines the size and number of text characters that will fit in one inch. Also called character pitch. default A value or setting that takes effect when the equipment is turned on, reset, or initialized. dithering A way of arranging dots on a page to simulate a shade or tone. See also halftoning. dpi Dots per inch. The dpi measures the resolution. See also resolution. Glossary 1 R L Verde+ Reference Guide A5 size 10-25-95 Glossary DR, pass 1-Rev1 driver See printer driver. economy printing Printing in which images are printed with fewer dots to save ink and increase printing speed. error diffusion A halftoning method where dot patterns are randomly distributed in an image to create soft edges. ESC/P 2 Enhanced version of the ESC/P® printer command language. ESC/P is the EPSON Standard Code for Printers. The system of commands sent by the computer to control the printer. It is standard for all EPSON printers and supported by most application software for personal computers. font A style of type designated by a family name, such as Courier or Helvetica. grayscale An image consisting of multiple shades of gray, ranging from white to black. halftoning Method of repeating tiny dot patterns to represent images. hex dump A troubleshooting feature that helps identify the cause of communication problems between the printer and the computer. When the printer is in hex dump mode, it prints each code it receives in hexadecimal notation and ASCII characters. Also called data dump. high speed printing Printing in which the printer produces text and images by printing in both directions (bidirectionally). This provides faster output than unidirectional printing. initialization The process of restoring the printer’s default settings (fixed set of conditions). 2 Glossary Verde+ Reference Guide A5 size 10-25-95 Glossary DR, pass 1-Rev1 ink jet A non-impact method of printing in which the printer produces each character by precisely spraying ink onto paper. interface The connection (via a cable) between the computer and the printer over which print data is transmitted to the printer. media Materials upon which data is printed such as envelopes, plain paper, special paper, and transparency film. MicroWeave A printing method in which images are printed in finer increments to reduce the possibility of banding and to produce laser-like images. printable area The area of a page on which the printer can print. It is smaller than the physical size of the page due to margins. printer driver A software program that sends commands for using the features of a particular printer. reset To return the printer to its default settings. resolution A measure of the amount of detail that can be represented. Resolution of printed images is measured in number of dots per inch (dpi). Your printer has three resolution settings: 720 × 720, 360 × 360, and 180 × 180 dpi. RGB A method of specifying color by its component proportion of red, green, and blue. Computer monitors use this method to represent colors. self test A method for testing the printer’s operation. Running the self test prints the characters stored in the printer’s ROM. unidirectional printing Printing in which the print head prints in one direction only. Unidirectional printing is useful for printing graphics because it allows precise vertical alignment. Glossary 3 R Proof Sign-off: Moira Mary Nancy T. Cindy _______ _______ _______ _______ Verde+ Reference Guide A5 size 10-25-95 Index DR, pass 2-Rev1 Index A Accessories, purchasing, Intro-4, 3-3 Aligning vertical lines, 3-14 Alt button, 2-5–6, 3-3 Apple Macintosh, Intro-1, 3-16, A-2 AppleTalk network, A-2 Auto interface wait mode, 2-6–7 Auto line feed, 2-6–7 Auto sheet feeder, B-2 B Banding, 3-4 Baud rate, A-5 BBS, see Bulletin Board Service Bidirectional printing, 2-7, B-2 Black button, 2-4 Black ink cartridge, see Ink cartridges Blank pages, 3-19 Blurred images, 3-13–14 Bottom margin, 3-15, B-5 Buffer, input, B-2 Bulletin Board Service, Intro-4 Buttons, control panel, 2-2, 2-4–6 C C823051 serial interface card, A-5 C823061 serial interface card, A-5 Cable coaxial, A-2–3 printer, 3-16 Calibrating the printer, 3-10, 3-14 Carriage return character, 2-7 Cartridges, see Ink cartridges Character pitch, B-13 Character tables available, B-2, C-3–11 international, C-10 selecting, 2-6, 2-8 Cleaning buttons, 2-5–6 print heads, 2-4–6, 3-7 printer, 3-8 Clearing paper jams, see Jammed paper Coated papers loading, 1-7–11 selecting, 1-2–3 specifications, B-3–5 Coaxial cable, A-2–3 Color button, 2-4 Color images, 3-12, 3-15 Color ink cartridge, see Ink cartridges Color Specialist, Intro-3 CompuServe, Intro-5 Condensed button, 2-4–6 light, 2-3 mode, 2-3–4 Connecting to multiple computers, 2-7, A-2–4 Control code, B-2 Control panel, 2-2–6 Cord, power, Intro-6, 3-8 Crooked paper, 3-24 Customer support, Intro-3–5 D Dampness, see Humidity Data light, 2-3, 3-11, 3-17 Default settings at initialization, 2-5, B-13 mode, 2-5–8 Dimensions, printer, B-7 Dpi, 1-3 Driver, see Printer driver, Video driver DTR flag, A-6 Dump, see Hex dump mode Index 1 R L Verde+ Reference Guide A5 size 10-25-95 Index DR, pass 2-Rev1 E G Economy button, 2-4–6, light, 2-3, 3-13 mode, 2-3–4, 3-13, 3-15 Edge guides, 1-4, 1-6, 1-10, 1-13 Ejecting paper, 2-4, 3-23 Electrical specifications, B-7 Electronic support services, Intro-5 Energy, conserving, Intro-2 Energy Star compliance, Intro-1–2 Envelopes loading, 1-7, 1-11–13 specifications, B-4–5 Environmental specifications, B-8 EPSON Accessories, Intro-4, 3-3 America Forum, Intro-5 Bulletin Board Service, Intro-4 Color Specialist, Intro-3 Customer Care Centers, Intro-3 papers, 1-2–3, B-4 Spool Manager, 3-14, 3-18, 3-20 Web site, Intro-5 Error lights, 3-11 Error messages, 3-18 ESC ( ^ command, C-11 ESC/P 2 commands, 2-7, C-2 Ethernet interface card, A-2–3 EtherTalk network, A-2 Garbled characters, 3-14 Gears, printer, 3-8 Glossy paper loading, 1-7–11 selecting, 1-2–3 specifications, B-3–4 Graphic mode assignment, B-13 Grayscale, 3-12 Grinding noise, 3-17 F Faint images, 3-13–14 Fast printing, 2-7 Feeder, see Auto sheet feeder Feeding problems, 3-22–24 Film, see Transparencies Fonts button, 2-4–5, 3-20 condensed, 2-4 default selection, B-13 light, 2-3 specifications, B-8 2 Index H Handshake timing, A-6, B-9, B-11 Heads, see Print heads Heavy paper, loading, 1-11–13 Help, where to get, Intro-3–5 Hex dump mode, 2-5, 3-20 High-quality paper, see Glossy paper High Speed mode, 3-12 Horizontal tab positions, B-13 Humidity for paper, 1-8, 3-13, 3-23, B-4 for printer, B-8 I Initialization, B-12–13, Ink cartridges clamps, 3-5 conserving ink, 2-4, 3-19 empty, 3-12 life expectancy, 3-19, B-6 old, 3-19 ordering, 3-3 print capacity, B-6 replacing, 3-3–7, 3-16 specifications, B-6–7 tape seal, 3-6 Ink delivery system, charging, 3-7 Input buffer, B-2 Verde+ Reference Guide A5 size 10-25-95 Interface cable, 3-16 cards, A-5–8 mode, 2-6–7 optional, A-5–8 parallel, 2-7, B-9–11 serial, 2-7, A-5, B-12 specifications, B-9–12 wait mode, auto, 2-6–7 International character tables, C-10 Internet, Intro-5 Index DR, pass 2-Rev1 M Jammed paper clearing, 3-20–22 preventing, 3-21–22 Macintosh, Intro-1, 3-16, A-2 Maintenance, 3-2–8 Manuals, how to use, Intro-2–3 Margins default setting, B-13 left and right, B-5 top and bottom, 2-7, 3-15, B-5 Mechanical specifications, B-7 Media Type setting, 3-12 Messages, error, 3-18 Microsoft Windows, Intro-1, 3-10 MicroWeave, 3-12–14 Monitor2 utility, 3-14, 3-20 Moving the printer, see Transporting the printer L N Labels, printing, 1-8, 1-11 Large paper, see Oversized paper Left margin, B-5, B-13 Lever, see Paper thickness lever Lights control panel, 2-3 error conditions, 3-11 Line feed, auto, 2-6–7 Line spacing, B-2, B-13 Lines aligning, see Vertical lines, aligning white, see Banding Load/Eject button, 2-4–6, 3-20 Loading coated papers, 1-7–11 envelopes, 1-11–13 glossy paper, 1-7, 1-11 oversized paper, 1-6–7 plain paper, 1-4–5 problems, 3-22–23 transparencies, 1-7–11 Loading position, adjusting, 2-6–7, 3-15 Lubricants, 3-8 Network interface mode, 2-6–7, A-4 Networks, A-2–4 No Ink Cartridge light, 2-3, 3-11, 3-17 Notice sheet, 3-9 Nozzles, print head, 3-7, B-2 J O Online support, Intro-5 Operate button, 2-2, 2-4–5 light, 2-3 Ordering paper, 1-3 Output tray, 1-4 Oversized paper, loading, 1-6–7 Index 3 R L Verde+ Reference Guide A5 size 10-25-95 Index DR, pass 2-Rev1 P Page length, B-13 Paper coated, see Coated papers ejecting, 2-4 envelopes, see Envelopes feed speed, B-2 feeding problems, 3-22–24 glossy, see Glossy paper handling, 1-2–11, 3-20–24 jams, 3-21–22 ordering EPSON, 1-3 oversized, 1-6–7 path, B-3 plain, see Plain paper printable area, B-5 printable surface, 1-4, 1-7, 1-9, 3-13 selecting type, 1-2–3 size, B-3 special, see Special papers specifications, B-3–5 storing, 1-8, 3-13 thickness, 3-23, B-3–4 transparencies, see Transparencies types, 1-3, B-3–4 weight, B-3–4 wrinkled, 3-23 Paper Out light, 2-3 Paper thickness lever, 1-3–4, 1-11–13, 3-13, 3-23 Paper tray, 1-4 capacity, B-13 extension, 1-6 Parallel interface, 2-7, B-9–11 Pause button, 2-4–6 light, 2-3, 3-11, 3-17 Pin assignments, B-9–11 Pitch, character, B-13 4 Index Plain paper, 1-2 loading, 1-4–5 specifications, B-3 Power button, 2-4 consumption, B-7 cord, Intro-6, 3-8 light, 2-3 Print direction, 2-6–7, B-2 Print heads cleaning, 2-4–6, 3-2–3, 3-7 life expectancy, B-7 nozzles, 3-2, 3-7, B-2 securing, 3-9 Print quality problems, 3-12–15 Print speed increasing, 2-7 specifications, B-2 Printable area, B-5 Printable columns, B-2 Printable surface, 1-4, 1-7, 1-9, 3-13 Printer buffer, B-2 cable, 3-15 calibrating, 2-6, 3-10, 3-14 cleaning, 3-8 cleaning print heads, 2-4–6, 3-2–3, 3-7 controlling, 2-2–8 defaults, 2-6, B-13 dimensions, B-7 driver, Intro-1, 1-10–11 hex dump mode, 2-5, 3-20 initializing, B-12–13 pausing, 2-4 problems with, 3-16–20 resetting, 2-4–5 specifications, B-2–13 testing, 2-5, 3-12 transporting, 3-9–10 weight, B-7 Verde+ Reference Guide A5 size 10-25-95 Printing bidirectional, 2-7 fast, 2-7 method, B-2 problems with, 3-16–20 slow, 3-19 specifications, B-2 unidirectional, 2-7 Problems, see Troubleshooting Q Quality, see Print quality R ReadMe icon, Intro-1, 3-10 Reset printer, 2-4–5 Resolution, B-2 Right margin, B-5, B-13 S Safety approvals, B-8 Safety instructions, Intro-6 Scanned image, 3-12 Securing print heads, 3-9 Self test, 2-5, 3-3, 3-12, 3-17 Serial interface, 2-7, B-12 cards, A-5 Service, Intro-4–5 Shading, see Grayscale Sheet feeder, auto, B-2 Slow printing, 3-19 Spacing, line, B-2, B-13 Special papers loading, 1-7–13 selecting, 1-2–3 specifications, B-3–5 Special printing effects, B-13 Index DR, pass 2-Rev1 Specifications, B-2–13 Speed, see Print speed Spool Manager, 3-14, 3-18, 3-20 Stop printing, see Pause Support, online, Intro-5 T Tab positions, B-13 Technical assistance, Intro-4–5, 3-10 Telephone numbers, Intro-4–5 Temperature for ink cartridges, B-6 for paper, 1-8, B-4 for printer, B-8 Testing the printer, 2-5, 3-12 Timeout period, 2-7 Timing chart, B-11 Top margin, 2-7, 3-15, B-5 Transparencies loading, 1-7–11 selecting, 1-2–3 specifications, B-3–4 Transporting the printer, 3-9–10 Troubleshooting, 3-10–24 Turning printer on and off, see Operate Typefaces, see Fonts U Unidirectional printing, 2-7 User-defined character set, B-13 V Vertical lines, aligning, 3-14 Vertical tab position, B-13 Index 5 R L Verde+ Reference Guide A5 size 10-25-95 Index DR, pass 2-Rev1 W Wait mode, auto interface, 2-6–7 Web site, Intro-5 Weight paper, B-3–4 printer, B-7 White banding, 3-14 Windows, Intro-1, 3-10 Windows 95, reinstalling driver, 3-18 World Wide Web, Intro-5 Wrinkled paper, 3-23 X X-OFF code, A-6 X-ON code, A-6 6 Index