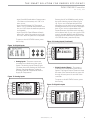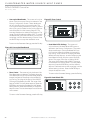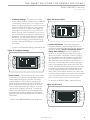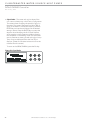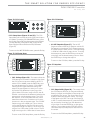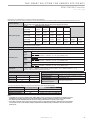
1
DOAS CM3500
Controller
Table of Contents
Dehumidification Equipment Standard Limited Warranty 3
Installation
IAQ Controller Details
Application, Operation
& Maintenance
97B0065N01
Rev: 31 July, 2013
4
7
Service Menu
17
Factory Configuration
23
Alarm Menu
29
Remote Room Sensor Configuration
32
Hardware Details
33
Specifications
35
Points List
39
Revision History
48
CLIMATEMASTER WATER-SOURCE HEAT PUMPS
DOAS CM3500 Controller
R e v. : 3 1 J u l y, 2 0 1 3
This Page Intentionally Left Blank
2
C l i m a t e M a s t e r Wa t e r - S o u r c e H e a t P u m p s
THE SMART SOLUTION FOR ENERGY EFFICIENCY
DOAS CM3500 Controller
R e v. : 3 1 J u l y, 2 0 1 3
Dehumidification Equipment Standard Limited Warranty
CAUTION!
CAUTION! ONLY TRAINED, QUALIFIED PERSONNEL
SHOULD INSTALL AND/OR SERVICE CLIMATEMASTER.
SERIOUS INJURY, DEATH AND PROPERTY DAMAGE
CAN RESULT FROM IMPROPER INSTALLATION/SERVICE
OF THIS EQUIPMENT HIGH VOLTAGE ELECTRICAL
COMPONENTS AND REFRIGERANT UNDER PRESSURE
ARE PRESENT.
DEHUMIDIFICATION EQUIPMENT
STANDARD LIMITED WARRANTY
ClimateMaster warrants the dehumidifying unit to be free
from defects in materials and workmanship subject to the
terms, conditions and limitations stated herein.
Terms
ClimateMaster warrants all components (except as noted)
for a period of two (2) years from the date of shipment.
This warranty shall be limited to the supply of new or
rebuilt parts for the part which has failed because of
defects in workmanship or material, and does not include
the cost for labor, transportation or other costs not herein
provided for. Replaced parts are warranted only for the
remaining portion of the original warranty period.
Conditions - The warranty is subject to the following
conditions:
7. This warranty shall be null and void if defects or
damages result from unauthorized opening of the
refrigerant circuit, tampering with factory set controls,
or operating outside the original design conditions.
8. ClimateMaster shall not be liable for labor costs
incurred in diagnosing the problem, or the removal or
replacement of the part or parts being repaired.
9. ClimateMaster must preauthorize all warranty
coverage described herein.
Extended Warranty
Your ClimateMaster unit may have extended warranties
beyond this Standard Limited Warranty document.
Extended warranties are only available at the time of the
purchase of the original equipment. These extended
warranties are covered under a separate document
and their terms and conditions are separate from
this document. It is mentioned in this document for
informational purposes only. Any and all incidental or
consequential damages are expressly excluded from
this warranty. Some states do not allow the exclusion of
incidental or consequential damages for personal injury,
so the above limitations may not apply to you for certain
damages. This warranty gives you specific legal rights,
and you may also have other rights, which vary from state
to state. No person or representative is authorized to
make any warranty or assume any liability not strictly in
accordance with the aforementioned.
1. The unit must be properly installed and maintained in
accordance with the ClimateMaster “Installation and
Operation Manual” provided with each unit and/or
other documentation provided.
2. The Start-Up Report must be completed and returned
to ClimateMaster within 30 days of the start-up.
3. This warranty shall not apply to any part that has
been tampered with, or has been subject to misuse,
negligence or accident. A warranty can be obtained for
altered equipment but only with written consent from
ClimateMaster.
4. The following parts and components are excluded
from the warranty: belts, filters, driers, fuses and
refrigerant.
5. Refrigerant coils or other components that corrode
due to improperly balanced pool chemistry or
corrosive air quality will not be warranted.
6. All replacements or repairs will be FOB Oklahoma
City, OK.
c l i m a t e m a s t e r. c o m
3
CLIMATEMASTER WATER-SOURCE HEAT PUMPS
DOAS CM3500 Controller
R e v. : 3 1 J u l y, 2 0 1 3
Installation
Your ClimateMaster controller is designed for precise
monitoring and control of air temperature and relative
humidity (RH) within a conditioned environment. This
CM3500 control system is easy to install and operate. It
features either an internal display terminal (IDT), as part of
the controller, or a wall-mountable remote display terminal
(RDT), in cases where the controller mounted display or IDT
would prove hard to view or use. Both allow you to view and
adjust setpoints and modes of operation. They also indicate
the operating status of major components inside of the
dehumidifier. Most sensors and inputs have been factoryinstalled and wired inside of the dehumidifier. In most cases,
you need only mount and wire the supply air temperature
sensor and, if provided, the RDT. The RDT, which is simply
an interface tool, contains no sensors. You do not need to
install it in the room you wish to dehumidify. If purchased
with your system, CO2 and remote room sensors may
require mounting as well.
Your controller is provided with a duct-mountable
temperature sensor for the supply air. If the unit was
purchased with the zone reset option, it also has one or
multiple remote room sensors. Additionally, if the unit
was purchased with the CO2 option, it has an indoor and
outdoor CO2 sensor.
• A duct-mount sensor is normally used in applications
where continuous blower operation is desired. A
duct-mount sensor helps ensure consistent conditions
throughout the space. Install the duct-mount sensor in
the supply air duct.
• ClimateMaster DOAS ordered with the zone reset
option are supplied with a remote room sensor. Up to
CAUTION!
CAUTION! A potential drawback of this sensor is that it
relies on a continuous stream of air moving past it. Using a
duct-mount sensor with a non-continuous blower may lead to
short-cycling of the refrigeration compressor..
four of these sensors may
be wired to the system.
This wall-mountable display is an IP30 rated device
Operating conditions must be between 32.0°F and
120.0°F and less than 85% RH. The controller’s RS485
Figure 1: CM3500 Room Sensor
serial interface communicates via three-way plug-in
terminals. Install a twisted pair plus shielded cable,
20-22 AWG. Total length of the network must not
exceed 1,500 feet. The capacitance between the wires
must not exceed 90 pF/M. (See your wiring schematic
for connection details.) These remote devices require
a separate 24Vac 50/60HZ 1.5VA power connection.
Provide a dedicated 250 mAT fuse for each sensor.
Use a class 2 safety transformer with a minimum
rating of 4VA. If the sensor is wired to F1 and F2 of
the dehumidifier control panel terminal, G0 must be
connected to F2.
• ClimateMaster DOAS ordered with the CO2
control package require sensors for the indoor
CAUTION!
CAUTION! Undersized wiring will cause inaccurate sensor
readings. Do not run sensor wiring adjacent to, OR in the
same conduit as, wires carrying more than 24 VAC.
Figure 2: CO2 Sensors
CAUTION!
CAUTION! Do not mount the sensor in a section of duct where
false readings may occur due to dead air regions, solar heat
gain or thermal losses in winter. Do not mount the sensor where
water is likely to drip on it. Install two (2), 18 gauge (0-500 feet)
OR two (2), 24 gauge (0-100 feet) wires from the sensor to the
labeled terminal strip in the control panel of the dehumidifier.
(See your wiring schematic for connection details.)
CAUTION!
CAUTION! Undersized wiring will cause inaccurate sensor
readings. Do not run sensor wiring adjacent to, OR in the
same conduit as, wires carrying more than 24 VAC.
4
C l i m a t e M a s t e r Wa t e r - S o u r c e H e a t P u m p s
THE SMART SOLUTION FOR ENERGY EFFICIENCY
DOAS CM3500 Controller
R e v. : 3 1 J u l y, 2 0 1 3
and outdoor CO2 levels. These measurements are
used to determine the CO2 differential level in the
conditioned space. This differential is the variable
compared to the CO2 setpoint and used in the
control loop to provide more or less outdoor air into
the conditioned space. The outdoor CO2 sensor is
installed in a protective enclosure and is designed to
operate in outdoor conditions ranging from -40°F to
158°F. 24VAC power is required for this device and
the output is 4-20mA. (See your wiring schematic for
connection details.) The indoor CO2 sensor is installed
in a high impact ABS enclosure and has an operating
temperature range of 32°F to 122°F. 24VAC power is
required for this device and the output is 4-20mA.
(See your wiring schematic for connection details.)
Note: You must use the ClimateMaster CM3500 control
system to control or interlock with the room heating system.
CAUTION!
CAUTION! Do not run sensor wiring adjacent to, OR in the
same conduit as, wires carrying more than 24 VAC.
This prevents wide fluctuations in room air temperature. It
also prevents the heater from trying to heat the room while
the dehumidifier is running in the cooling mode.
• The standard ClimateMaster CM3500 Controller
provides a dry contact closure to operate the auxiliary
space heater. The contact closes to energize a heater
(may be supplied by others) which has its own power
source. Install two wires from the thermostat terminal
blocks on the heater to the terminal strip on the control
panel of the dehumidifier. (See your wiring schematic
for connection details.)
• As an option, ClimateMaster will provide a
proportional 0-10 VDC direct-acting signal to
modulate a heating coil control valve or other auxiliary
modulating heater. Most proportional valves have
either three (3) or four (4) terminals for field-installed
wiring.
a. Four-terminal valves have two terminals for 24 VAC
power and two terminals for the signal input.
b. Three-terminal valves have one terminal for the
“hot” 24 VAC input, a second terminal for the
“positive” signal input and a third, common
terminal for the “neutral” 24 VAC input and the
“negative” signal input. You must follow the
instructions included with the valve cut sheet.
Observe the proper polarity or you may damage
both the valve and the controller. (See your wiring
schematic for connection details.)
The optional RDT must be mounted in a dry, noncorrosive environment. Operating conditions must be
between 0.0°F and 140.0°F and less than 90% RH.
The optional RDT is an IP40 device and is powered
through the cable provided. If a longer length is required,
there are two options. For locations of the RDT up to 150
feet, use a standard 24 AWG, 6 conductor phone cable.
CAUTION!
CAUTION! Moisture can damage the circuitry of the
display. The display can either be mounted directly to the
dehumidifier or located up to 20 feet away using the cable
that came with the display.
For locations of the sensor up to 1,500 feet, use 22 AWG,
3 twisted pair cable. (See your wiring schematic for connection details.) Pull the connector through the hole in
the back of the mounting bracket. Attach the bracket to
the wall. After plugging the cord into the back of the RDT,
feed any extra wiring back into the hole of the mounting
bracket and gently snap the RDT into the bracket.
CAUTION!
CAUTION! Do not run the RDT wiring in the same conduit
as, OR adjacent to wires carrying over 30 VAC.
Figure 3: Optional RDT
c l i m a t e m a s t e r. c o m
5
CLIMATEMASTER WATER-SOURCE HEAT PUMPS
DOAS CM3500 Controller
R e v. : 3 1 J u l y, 2 0 1 3
The CM3500 microprocessor controller is a powerful,
flexible controller with many useful features including:
• Display of room air temperature, relative humidity and
refrigerant pressures.
• Display of equipment operating status such as
dehumidification and cooling.
• Display of alarms for abnormal conditions such as
sensor failures or tripped safety controls.
• An optional seven-day occupancy timer which can
control outdoor air dampers (if used) to bring in fresh
air when the dehumidifier is an occupied state.
• A convenient, easy-to-understand display interface
which allows the operator to view and change
setpoints and time schedules.
Table 1: RDT Troubleshooting
Problem
The remote terminal allows the operator to monitor the
operation of the dehumidifier and view the alarm screens
and history to insure proper dehumidifier operation. It is
important that the remote terminal remains functional for
safe and efficient unit operation. If you think the remote
terminal is not functioning correctly, refer to the table in
Section 1.7.1 that follows.
• The RDT allows the operator to monitor the operation
of the dehumidifier and view the alarm screens and
history to ensure proper dehumidifier operation. It
is important that the RDT remains functional for safe
and efficient unit operation. If you think the RDT is not
functioning correctly, refer to table 1 that follows.
6
Solution
No power is getting to the remote
No LEDs lit on the remote
terminal. Check field wiring between
terminal.
remote terminal and controller.
The display address has been altered.
Remote terminal shows:
Press the UP, ENTER and DOWN keys
“NO LINK”.
together for 4 seconds and set the display
address to 32.
The system has experienced an alarm
and is waiting for it to be acknowledged.
Press ENTER from the Alarm Screen.
Red alarm LED is lit.
If the red LED stays lit, clear the alarm
condition and then press ENTER from the
Alarm Screen.
If the remote terminal is not functioning after review of the above, consult
ClimateMaster’s Service Department at (405) 745-6000.
C l i m a t e M a s t e r Wa t e r - S o u r c e H e a t P u m p s
THE SMART SOLUTION FOR ENERGY EFFICIENCY
DOAS CM3500 Controller
R e v. : 3 1 J u l y, 2 0 1 3
IAQ Controller Details
Figure 4: Remote Display Terminal
Figure 5: Internal Display Terminal
Menu Overview and General Instructions
The CM3500 Controller is pre-programmed and
configured at the factory for use in the application you
have specified. The remote display terminal (RDT Figure 4) or the internal display terminal (IDT - Figure 5)
allows the operator to monitor and adjust the setpoints
of your ClimateMaster DOAS. The RDT has an LCD
screen and 6 keys. The keys on the left hand side of the
remote terminal, top to bottom, are the ALARM key
shown as an alarm bell, PROGRAM key abbreviated
“Prg” and the ESCAPE key abbreviated “Esc.” The
keys on the right hand side of the remote terminal, top
to bottom, are the UP key shown as an up arrow, the
ENTER key shown as a left arrow and the DOWN key
shown as a down arrow. The IDT also has an LCD screen
and 6 keys. The keys on the top row to the right of the
LCD screen are the ALARM key shown as an alarm bell,
PROGRAM key abbreviated “Prg” and the ESCAPE key
abbreviated “Esc.” The keys on the bottom row to the
right of the LCD screen are the UP key shown as an up
arrow, the DOWN key shown as a down arrow and the
ENTER key shown as a left arrow.
The Home Screen, displaying the ClimateMaster
logo, shows 2 items below it; the current supply air
temperature and the current unit status. The IAQ
displayed in the upper right of the screen indicates
that the product series of the program installed in the
controller is for Indoor Air Quality. Below this line, “Esc
Menu” indicates that if the Esc key is pressed, the Main
Menu will be displayed. Pressing Esc on any other screen
will take you back one screen. Menu screens allow the
user to select from a series of actions. The action that
is capitalized on the screen is selected by pressing the
ENTER key. To cycle through the selections on a menu
screen, use the UP and DOWN keys. If setpoints or
selections can be altered on a screen, the ENTER key
will cycle through those items. Once the cursor is over
an item, the UP and DOWN arrow keys will modify the
setting. Numeric values require that the ENTER key be
pressed to accept the value. An “on” or “off” selection is
altered as soon as the UP or DOWN keys are pressed. To
view the alarms from any menu, simply press the ALARM
key. The UP and DOWN keys will display any active
alarm. When an alarm is triggered, the red LED behind
the ALARM key will light and remains on until the alarm
is acknowledged. Alarm acknowledgement and history
instructions are shown on the main Alarm Screen. To
escape from the alarm screens, press the Esc key and the
Home Screen will be displayed. Screens which display a
small up arrow in the upper right and a small down arrow
in the lower right are part of a series of screens which can
be accessed by pressing either the UP or DOWN arrow
keys. If the operator has not pressed a key for an hour,
the remote terminal will return to the Home Screen.
Main Menu
Pressing the Esc key from the Home Screen displays the
MAIN MENU (Figure 6). This menu allows the operator
to select the STATUS MENU, Setpoint Menu, set a
Temporary Occupancy, change the Occupancy Schedule
and view the Unit Revision.
Figure 6: Main Menu
c l i m a t e m a s t e r. c o m
7
CLIMATEMASTER WATER-SOURCE HEAT PUMPS
DOAS CM3500 Controller
R e v. : 3 1 J u l y, 2 0 1 3
To return to the Home Screen, press the Esc key.
To return to the STATUS MENU, press the Esc key.
• Status Menu - Selecting the STATUS MENU from the
MAIN MENU allows access to the Modes & Time, I/O
Status and Starts & Run Times.
• I/O Status - Selecting the I/O Status from the
STATUS MENU displays Digital Inputs, Analog
Inputs, Digital Outputs and Analog Outputs.
Room Sensor Data and Expansion I/O will also be
shown on this screen if these options were purchased with the IAQ system.
Figure 7: Status Menu
To return to the STATUS MENU, press the Esc key.
Figure 9: I/O Status
To return to the MAIN MENU, press the Esc key.
• Modes & Time - Selecting Modes & Time from
the SERVICE MENU displays a text explanation
of the unit. The Occupied state (either Occupied
or Unoccupied) is shown as well as the unit status.
The Unit Status will show one of the following
states:
•
•
•
•
•
•
•
Zone Satisfied/Off
Heating Required
Cooling Required
Dehumidifying
Dehumid/Heat
Dehumid/Cool
Low Suction Pressure
The Compressor Command On/Off, Auxiliary Heat
On/Off and current date and time will also be
shown. If any compressor is waiting for its nonshort cycling timer to time out, this will be shown
here as well.
Figure 8: Modes & Time
8
• Digital Inputs (Binary) - The Digital Inputs
Screen shows the state of the contacts wired
into port J5 of the controller. This screen is
provided for troubleshooting the control
system. Input Point ID1: Digital Occupied
Contact status - “On” if this contact is made,
and “Off” if this contact is open.
- Input Point ID2: Air Flow Switch status “On” if air flow is present, and “Off” if there
is no air flow.
- Input Point ID3: Motor Overload Contacts
status “On” if no overloads are present, and
“Off” if an overload exists.
- Input Point ID4: Damper End Switch status
“On” when the Damper is open, and “Off”
when the damper is closed.
- Input Point ID5: Low Voltage Monitor status
“On” if voltage is acceptable, and “Off” if a
low voltage exists.
- Input Point ID6: Condensate Level Switch
status “On” if the level is acceptable, and
“Off” if the level is high.
- Input Point ID7: Water Flow Switch status
“On” if the water flow is acceptable, and
“Off” when the water flow is low.
C l i m a t e M a s t e r Wa t e r - S o u r c e H e a t P u m p s
THE SMART SOLUTION FOR ENERGY EFFICIENCY
DOAS CM3500 Controller
R e v. : 3 1 J u l y, 2 0 1 3
- Input Point ID8: Smoke Alarm Contact status
“On”when no alarm exists, and “Off” if an
alarm occurs.
- Input Point ID9: Water Coil Thermostat
status -“On” if the water temperature is too
low, and “Off” when the water temperature
is acceptable.
- Input Point ID10: Filter Differential Switch
status “On” when filter pressure is too high,
and “Off” when the pressure is acceptable.
To return to the I/O STATUS screen, press
the Esc key.
Pressing the UP or DOWN keys will display
the second Analog Inputs Screen (Figure
12). If your unit comes standard with dual
refrigerant circuits, the Suction Pressure and
Discharge Pressure of circuit B are displayed
here. If your unit has a Heat Wheel with
Freeze Protection, the Exhaust Air Humidity
will be shown here. If your unit is set for CO2
control, the Heat Wheel Supply Differential
Pressure will be shown here. To return to the
I/O STATUS screen, press the Esc key.
Figure 12: Analog Inputs (Continued)
Figure 10: Digital Inputs
• Analog Inputs - These two screens are
provided for troubleshooting the control
system. The Analog Inputs Screen (Figure
11) shows the current readings of the Suction
Pressure, Discharge Pressure, Intake Air
Humidity, Intake Air Temperature and the
Supply Air Temperature.
• Digital Outputs (Binary) - This screen is
provided for troubleshooting the control
system. The Digital Output Screen will show
the state of the devices wired into ports J12
through J18 and ports J21 and J22 of the
controller.
Figure 11: Analog Inputs
To return to the I/O STATUS screen, press
the Esc key.
Figure 13: Digital Outputs
c l i m a t e m a s t e r. c o m
9
CLIMATEMASTER WATER-SOURCE HEAT PUMPS
DOAS CM3500 Controller
R e v. : 3 1 J u l y, 2 0 1 3
• Analog Outputs - This screen is provided
for troubleshooting the control system. The
Analog Outputs Screen shows the following:
- Y1 – Hot Gas Command
- Y2 – Auxiliary Heating Command
- Y3 – VFD Command (shown if your IAQ
system comes standard with a heat wheel
VFD for freeze protection)
- Y4 – Exhaust Fan VFD Command (shown if
your IAQ system is set for CO2 control)
- Y5 – Recirculation Damper Actuator Command
- Y6 – Outside Air Damper Actuator Command
The Analog Outputs Screen will also
show the Supply Air Temperature or the
Zone Temperature and the Unit Status as
this data will relate to the Hot Gas and
Auxiliary Heat Commands. The Intake Air
Dewpoint is also shown on this screen as
this is a calculated output function.
To return to the I/O STATUS screen, press
the Esc key.
Figure 14: Analog Outputs
Figure 15: Room Sensor Data
• Expansion I/O - This screen is provided for
troubleshooting the control system but is
only shown if the expansion I/O board has
been connected to the main controller and
is functioning. This screen shows the four
(4) Digital Inputs and the four (4) Digital
Outputs on the board. It also shows the
following:
- AI1 – CO2 concentration of Outdoor
Sensor
- AI2 – CO2 concentration of Indoor Sensor
- AI3 – Heat Wheel Exhaust Pressure
- AI4 – Reheat Condenser Differential Air
Pressure.
- AO1 – Supply Fan VFD Command.
To return to the I/O STATUS screen press the
Esc key.
• Room Sensor Data - This screen is provided
for troubleshooting the control system but
is only shown if the Zone Reset is selected
in the Factory Configuration of the unit. The
Remote Room Sensor Temperature and
Humidity Readings wired into the system are
shown on this screen by the device address.
The average of these sensors is shown as
well.
Figure 16: Expansion I/O Data
To return to the I/O STATUS screen press the
Esc key.
10
C l i m a t e M a s t e r Wa t e r - S o u r c e H e a t P u m p s
THE SMART SOLUTION FOR ENERGY EFFICIENCY
DOAS CM3500 Controller
R e v. : 3 1 J u l y, 2 0 1 3
• Starts and Run Times - Selecting the Starts & Run
Times displays the number of starts for the Blower
and the Compressors on the unit. This is strictly a
display screen and is provided for troubleshooting
the unit only.
To return to the STATUS MENU, press the Esc key.
Figure 17: Starts and Run Times
required, or to indicate the alarm condition of the
unit. The WATER PUMP selection will start and run
the pump for a minute before the compressors will
be allowed to start. The pump will also run for two
(2) minutes after the compressors 24 shutdown.
The REMOTE ALARM OUTPUT, when selected,
will turn the output off to indicate an alarm mode.
This output will be on when the unit is in a normal
running mode. Select the appropriate item with
the UP and DOWN keys and press the ENTER key
to select.
To return to the MAIN MENU, press the Esc key.
Figure 19: Blower/Unit Setup
• Setpoint Menu - Selecting the Setpoint Menu from
the STATUS MENU allows for selection of the Blower/
Unit Setup or the temperature setpoints specific to
the unit. Select the appropriate item with the UP and
DOWN keys and press the ENTER key to select.
• Supply Air Temperature Setpoint - This screen
will only be shown if the zone or outside air reset
options are not selected. This screen allows the
Supply Air Temperature Setpoint to be modified.
The value of the setpoint ranges from 45.0°F to
99.9°F with a 72.0°F default. To modify the setpoint,
press the ENTER key and use the UP and DOWN
arrow keys until the desired setting is shown. Press
the ENTER key to accept the setpoint value.
To return to the MAIN MENU, press the Esc key.
Figure 18: Setpoint Menu
• Blower/Unit Setup - Selecting the Blower/Unit
Setup enables adjustments to the operation of
the damper and the operation of Output 8. The
blower operation can be set for FIELD DAMPER,
RECIRCULATION or CONTINUOUS. Set the
blower operation for FIELD DAMPER when the
intake air is supplied directly from outdoors. Set
the blower operation to RECIRCULATION when
a mixing box is used to supply the intake air. In
this mode the blower will cycle automatically. Set
the blower to CONTINUOUS when a mixing box
is used and the blower needs to run continuously.
Output 8 can be set to cycle a water pump, if
To return to the TEMPERATURE SETTINGS
MENU, press the Esc key.
Figure 20: Supply Air Temperature Setpoint
c l i m a t e m a s t e r. c o m
11
CLIMATEMASTER WATER-SOURCE HEAT PUMPS
DOAS CM3500 Controller
R e v. : 3 1 J u l y, 2 0 1 3
• Zone Reset Setpoints - In the Zone Reset mode
of operation, the Supply Air Temperature Setpoint
is calculated based upon the actual zone air temperature and the zone air temperature setpoint
and will fall between the High and Low Limit
Setpoints. This mode requires the remote room
sensor be installed in the conditioned space. For
operation of the remote room sensor, see section
- Operation of the Remote Room Sensor. As the
zone air temperature increases above the zone
air setpoint, the setpoint is continuously modified
to achieve a faster return to setpoint. The same
logic applies to a decrease in zone air temperature below the setpoint. The High Limit and Low
Limit Setpoints create the band within which the
calculated zone air temperature setpoint will fall.
This screen will only be shown if the Zone Reset
option is selected. The Zone Reset Setpoint as
well as the High and Low Limit Setpoints can be
modified within this screen. The value of the Zone
Reset Setpoint ranges from 55.0°F to 95.0°F, with
a default of 72.0°F. To modify the setpoint, press
the ENTER key and use the arrow keys until the
desired setting is shown. Press the ENTER key to
accept the setpoint value. The value of the High
Limit ranges from 40.0°F to 140.0°F, with a 90.0°F
default and the value of the Low Limit ranges
from 35.0°F to 70.0°F, with a 60.0°F default. The
pAD Setpoint setting allows the setpoint at the
zone sensor to be Locked and Unlocked. In the
Unlocked mode, the zone sensor addressed as 2
allows modification of the zone air setpoint. In the
Locked mode, none of the zone sensors allow this
setpoint to be modified. Also, in the Zone Reset
mode, the Home Screen and the Analog Output
Screen will display the actual zone air temperature
instead of the supply air temperature.
To return to the TEMPERATURE SETTINGS MENU,
press the Esc key.
Figure 21: Zone Reset
• Operation of the Remote Room Sensor - The
remote room sensor supplied with the Zone Reset
option will also allow modification of the Zone Air
Setpoint. This can only be changed on the remote
room sensor assigned as address 2. Pressing the
UP or DOWN buttons will display and flash the
current setpoint. Pressing the UP or DOWN buttons again will change the setpoint in 0.1° increments. Pressing and holding down either of these
buttons enables faster scrolling of the setpoint.
The last displayed value will become the setpoint
after a few moments. The setpoint will assume
the value of the last device to modify it, either the
remote room sensor or the remote terminal.
Figure 22: Remote Room Sensor
The remote room sensor displays the occupancy
status of the unit. A house icon is shown to the
left of the temperature. If the house icon is empty,
the unit is in the unoccupied mode. If a figure of a
person is displayed within the house icon, the unit
is in the occupied mode.
The remote room sensor can also be used to override the occupancy of the unit for several hours.
Press the SLEEP button, symbolized as a crescent
moon on the left side of the sensor, fourth button
from the top.
This will display “1” and the crescent moon. The
unit will now be in the occupied mode for one
hour. Pressing the button multiple times allows up
to nine hours of occupancy. To cancel the occupancy set from the remote room sensor, simply
press the SLEEP button again, or set the hours to
zero. When the crescent moon icon disappears,
the occupancy override is cancelled. The bottom
left button on the remote room sensor flips the
large temperature and small humidity display to
the large humidity and small temperature display
12
C l i m a t e M a s t e r Wa t e r - S o u r c e H e a t P u m p s
THE SMART SOLUTION FOR ENERGY EFFICIENCY
DOAS CM3500 Controller
R e v. : 3 1 J u l y, 2 0 1 3
for a few seconds. This allows the humidity to be
displayed in a larger font. The remaining buttons
on the left side of the remote room sensor are disabled for this application. Pressing them will display an icon of a lock. The remote room sensor will
flash “ALr” to indicate that an alarm has occurred.
The display of the current alarm must be viewed
from the IDT or the RDT. The remote room sensor
will flash “oLn” to indicate that the sensor is offline
from the controller. To change the internal settable parameters of the remote room sensor, see
Section - Remote Room Sensor Configuration.
• Outside Air Reset - In the Outside Air Reset
mode of operation, the supply air temperature
setpoint will be modified based upon the outside
air temperature and where it falls within four temperature ranges. When the outside air temperature is below the lower temperature range setting,
the highest SAT Setpoint will be used. When the
outside air temperature falls between the low
setting and the medium setting, the second highest SAT Setpoint will be used. When the outside
air temperature falls between the medium setting and the high setting, the second lowest SAT
Setpoint will be used. When the outside air temperature rises above the high setting, the lowest
SAT Setpoint will be used. This screen will only be
shown if the Outside Air Reset option is selected.
This screen allows the Outside Air Low, Medium
and High Setpoints as well as the four SAT
Setpoints to be modified. The range of all setpoints on this screen is 55° to 95.0°F. However, the
Outside Air Low Setting cannot be greater than
the Outside Air Medium Setting. The Outside Air
Medium Setting cannot be less than the Outside
Air Low Setting and it cannot be greater than the
Outside Air High Setting. Lastly, the Outside Air
High Setting cannot be less than the Outside Air
Medium Setting. Also, the highest SAT Setpoint
cannot be set lower than the second highest SAT
Setpoint. The second highest SAT Setpoint cannot be set higher than the highest SAT Setpoint
and lower than the second lowest SAT Setpoint.
The second lowest SAT Setpoint cannot be set
higher than the second highest SAT Setpoint and
lower than the lowest SAT Setpoint. The lowest
SAT Setpoint cannot be set higher than the second lowest SAT Setpoint. To modify the setpoints,
press the ENTER key and use the arrow keys until
the desired setting is shown. Press the ENTER key
to accept the setpoint value.
To return to the TEMPERATURE SETTINGS MENU,
press the Esc key.
Figure 23: Outside Air Reset
• Unoccupied Settings - This screen will only be
shown if the Zone Reset and the Unoccupied
Control is selected in the Factory Configuration
Screen. These setpoints will only be used in the
unoccupied mode. The range of the Cooling
Setpoint is from the current Heating Setpoint setting to 95.0°F with a default of 65.0°F. The range
of the Heating Setpoint is from 40.0°F to the current Cooling Setpoint setting with a default of
85.0°F. To modify the setpoint, press the ENTER
key and use the arrow keys until the desired setting is shown. The range of the Unoccupied
Humidity Setpoint is 20.0% to 99.9%, with a
default of 60.0%. To modify the setpoint, press
the ENTER key and use the arrow keys until the
desired setting is shown. Press the ENTER key to
accept the setpoint value.
To return to the TEMPERATURE SETTINGS MENU,
press the Esc key.
Figure 24: Unoccupied Settings
c l i m a t e m a s t e r. c o m
13
CLIMATEMASTER WATER-SOURCE HEAT PUMPS
DOAS CM3500 Controller
R e v. : 3 1 J u l y, 2 0 1 3
• Temporary Occupancy
This screen allows the unit to be set to the occupied
mode for a preset amount of time. Press the ENTER
key and enter the hours you would like the unit to be
temporarily in the occupied mode. Press the ENTER
key again and enter the minutes you would like the
unit to be temporarily in the occupied mode. Press the
ENTER key again and the cursor will begin blinking
over the “Press Prg to set” message. Pressing the Prg
key will override the schedule and allow the unit to be
temporarily occupied. The screen will now show
“Override On.” To clear this occupied override, set the
hours and minutes to zero and press the Prg key. The
screen will now show “Override Off.”
• Schedule Options - This screen sets the number
of active occupancy schedules. Setting at least
one active schedule allows the occupancy schedule timing to be set from the Current Schedule
Screen. If the number of active schedules is left at
zero, no occupancy scheduling will be active.
To return to the OCCUPANCY SCHEDULE
MENU, press the Esc key.
Figure 27: Schedule Options
Figure 25: Temporary Occupancy Settings
• Occupancy Schedule
Select the SCHEDULE SETUP from the MAIN MENU
to show the OCCUPANCYSCHEDULE MENU. From
this menu you can access and adjust the Schedule
Options, Temporary Holidays, Annual Holidays and
Time settings.
To return to the MAIN MENU, press the Esc key.
Figure 26: Occupancy Schedule
14
• Current Schedule - The bottom of this screen
allows you to set the occupancy timing for the
selected day of the week (DOW). Select the
schedule to modify the start time and stop
time. This is the time span that the unit will be
in the occupied mode. All times are set in the
24 hour format. As the DOW is selected, the
UP and DOWN keys allow for Monday, Tuesday,
Wednesday, Thursday, Friday, Saturday, Sunday
and any holiday to be occupied during that time.
Up to 10 schedules can be active at any time.
These allow for different start and stop times
on various days of the week, weekends or programmed holidays.
To return to the OCCUPANCY SCHEDULE MENU,
press the Esc key.
C l i m a t e M a s t e r Wa t e r - S o u r c e H e a t P u m p s
THE SMART SOLUTION FOR ENERGY EFFICIENCY
DOAS CM3500 Controller
R e v. : 3 1 J u l y, 2 0 1 3
Figure 28: Schedule Options (Current Schedule)
• Temporary Holidays - The Temporary Holiday settings are for holidays that change dates from year
to year, such as Memorial Day or Thanksgiving. Up
to 10 different temporary holidays can be set from
this screen. Select the number to assign to the
Annual Holiday and then select the Start Date and
the End Date for that holiday.
To return to the OCCUPANCY SCHEDULE MENU,
press the Esc key.
Figure 30: Schedule Options (Annual Holidays)
• Set Time - This screen sets the time, date and
day of week. To modify these settings, press the
ENTER key until the cursor is over the appropriate item and use the arrow keys until the desired
setting is shown. All times are set in the 24 hour
format. Pressing the ENTER key will step to the
next item. If any item was modified, the message
“Enter to Set” will be shown. Press the ENTER key
to accept the time an date values.
To return to the OCCUPANCY SCHEDULE MENU,
press the Esc key.
Figure 31: Set Time
Figure 29: Schedule Options (Temporary Holidays)
• Annual Holidays - The Annual Holiday settings
are for holidays with dates that remain constant
year to year, such as New Years Day and the 4th of
July. Up to 10 different annual holidays can be set
from this screen. Select the number to assign to
the Annual Holiday and then select the Start Date
and the End Date for that holiday.
To return to the OCCUPANCY SCHEDULE MENU,
press the Esc key.
c l i m a t e m a s t e r. c o m
15
CLIMATEMASTER WATER-SOURCE HEAT PUMPS
DOAS CM3500 Controller
R e v. : 3 1 J u l y, 2 0 1 3
• Unit Revision - The Unit Revision Screen shows the
version of the application program that is running
along with the release date of the software (Figure 32).
This information should be passed to ClimateMaster in
the event a service call is necessary.
Figure 32: Unit Revision
The SERVICE MENU and FACTORY CONFIGURATION
are accessible only from this screen. Press the UP and
DOWN keys at the same time to display these menus
(Figure 33).
Figure 33: Unit Revision (Service Menu)
16
C l i m a t e M a s t e r Wa t e r - S o u r c e H e a t P u m p s
THE SMART SOLUTION FOR ENERGY EFFICIENCY
DOAS CM3500 Controller
R e v. : 3 1 J u l y, 2 0 1 3
Service Menu
Service Menu - Selecting the SERVICE MENU will display
the Login Screen (Figure 34). Enter the service password,
1234, and press ENTER.
Figure 36: Unit Setup Menu
Figure 34: Login Screen
The SERVICE MENU gives access to the Unit Setup,
Parameter Settings, Sensor Offsets and Pressure /SAT
Alarms (Figure 35).
Figure 35: Service Menu
• Intake Air Dewpoint - The default setting for
the Intake Air Dewpoint Setpoint and Deadband
can be modified on this screen. These settings
are preset at the factory before the controller is
shipped and should only be modified by a trained
technician. The range of the Intake Air Dewpoint
Setpoint is 0.0° to 99.9°F with a default of 60.0°F.
The range of the Deadband is 0.0 to 9.9°F with a
default of 3.0°F. The Actual Intake Air Dewpoint is
shown for reference. To modify settings, press the
ENTER key until the desired setpoint is selected
and use the arrow keys until the desired value is
shown. Press the ENTER key to accept setpoint
value.
To return to the Unit Setup Screen, press the Esc key.
To return to the Unit Revision Screen, press the Esc key.
The user remains logged in for 10 minutes after the
password is entered. During this time, the Login screen
reads “Still Logged In, Press PRG to Enter.” Within this
10 minute log-in, the service menu may be re-entered by
simply pressing the Prg key.
Figure 37: Intake Air Dewpoint
• Unit Setup - Selecting the Unit Setup from the
SERVICE MENU allows you to select the Intake Air
Dewpoint, Intake Air Temp and Default Settings.
To return to the SERVICE MENU, press the Esc key.
c l i m a t e m a s t e r. c o m
17
CLIMATEMASTER WATER-SOURCE HEAT PUMPS
DOAS CM3500 Controller
R e v. : 3 1 J u l y, 2 0 1 3
• Intake Air Temp Setpoints - This screen shows
the Cooling and Heating Setpoints as well as the
Deadband that is applied to each. The range
of the Cooling Setpoint is between the current
Heating Setpoint setting and 95.0°F, with a default
of 70.0°F. The range of the Heating Setpoint is
between 40.0°F and the current Cooling Setpoint
setting with a default of 68.0°F. The range of
Deadband is 0.0 to 9.9°F, with a default of 1.0°F.
The Actual Intake Air Temperature is shown for reference. To modify the setpoints, press the ENTER
key and use the arrow keys until the desired setting is shown. Press the ENTER key to accept setpoint value.
To return to the Unit Setup Screen, press the Esc key.
Figure 38: Intake Air Temp Setpoints
Figure 39: Default Setpoints
• Parameter Settings - Selecting the Parameter
Settings from the SERVICE MENU accesses the Timer
Settings, Hot Gas Settings, Aux(iliary) Heat Settings,
Unoccupied Deadbands, Zone Reset, Heat Wheel and
Condenser Control parameters.
To return to the SERVICE MENU, press the Esc key.
Figure 40: Parameter Settings
• Default Setpoints - This screen allows the user to
load the default setup or save and load a custom
setup. This enables the user to save all setpoints
and retrieve them at a future time. To use this
feature, set the Save Custom Setup to “Yes.” This
saves all setpoints to a file which can be retrieved
when desired. To retrieve this file, set the Load
Custom Setup to “Yes.” If you would like to return
to the factory default setup, set the Load Default
Setup to “Yes.” Press the ENTER key until the cursor displays the option you would like to modify.
Press the UP key to display “Yes.” Press the
ENTER key to load or save the file. The “Yes” you
selected to load or save the file will automatically
return to a “No” to verify that the file was loaded
or saved.
To return to the Unit Setup Screen, press the Esc key.
18
C l i m a t e M a s t e r Wa t e r - S o u r c e H e a t P u m p s
THE SMART SOLUTION FOR ENERGY EFFICIENCY
DOAS CM3500 Controller
R e v. : 3 1 J u l y, 2 0 1 3
• Timer Settings - Included on this screen is timing for a multi-stage controller. Up to three (3)
stages of heat are available by setting the heat
stage to the appropriate number in the Factory
Configuration of the unit. This control will employ
a veneer sequence which will allow the first stage
to be variable from the auxiliary heat analog output. The second or third stages will be cycled on
sequentially, after the analog output has been at
100% for the Heater Stage On delay time. The
stages will cycle off in the same manner. After
the analog output is at 0% for the Heater Stage
Off delay time, the third and second stages will
cycle off sequentially. The Water Flow Alarm time
enables a delay after starting the water pump.
The water flow switch will need to be on before
this delay times out or a Low Water Flow alarm
will disable the unit. The Compressor On delay
allows the water pump to run for one (1) minute
before the compressor will turn on. The Pump/
Valve Off delay runs the pump for two (2) minutes
after the compressor is cycled off. To modify these
setpoints, press the ENTER key and use the arrow
keys until the desired setting is shown. Press the
ENTER key to accept the setpoint value.
To return to the Parameter Settings, press the
Esc key.
Figure 41: Time Delay Settings
• Hot Gas Control Settings - This screen allows the
Hot Gas PID Gain (or Proportional Band), Reset
(or Integral) and the Rate (or Derivative) to be
modified for loop tuning. The range of the Gain is
0.0 to 999.9°F. The range of the Reset is 0 to 999.
The range of the Rate is 0 to 999. To modify these
setpoints, press the ENTER key and use the arrow
keys until the desired setting is shown. Press the
ENTER key to accept the setpoint value.
To return to the Parameter Settings, press the Esc key.
Figure 42: Hot Gas Control
• Auxiliary Heat Control - This screen allows the
Aux Heat PID Gain (or Proportional Band), Reset
(or Integral) and the Rate (or Derivative) to be
modified for loop tuning. The range of the Gain is
0.0 to 999.9°F. The range of the Reset is 0 to 999.
The range of the Rate is 0 to 999. To modify these
setpoints, press the ENTER key and use the arrow
keys until the desired setting is shown. Pressing
the ENTER key will now change the setpoint.
To return to the Parameter Settings, press the Esc key.
Figure 43: Auxiliary Heat Control
c l i m a t e m a s t e r. c o m
19
CLIMATEMASTER WATER-SOURCE HEAT PUMPS
DOAS CM3500 Controller
R e v. : 3 1 J u l y, 2 0 1 3
• Unoccupied Deadbands - This screen will only be
shown if the Unoccupied Control is selected in the
Factory Configuration Screen. These deadbands
will only be used in the unoccupied mode. The
Cooling and Heating Deadband is used to prevent
short cycling and is added to the Cooling Setpoint
and subtracted from the Heating Setpoint. The
Humidity Deadband is added to the Setpoint. The
range of both Deadbands is 0.0 to 9.9°F. To modify
the Deadbands, press the ENTER key and use the
arrow keys until the desired setting is shown. Press
the ENTER key to accept the deadband value.
To return to the Parameter Settings, press the Esc key.
Figure 44: Unoccupied Deadbands
• Zone Control - This screen will only be shown if the
Zone Reset option is selected. This screen allows the
Zone Reset PID Gain (or Proportional Band), Reset (or
Integral) and Rate (or Derivative) to be modified for
loop tuning. The range of the Gain is 0.0 to 999.9°F.
The range of the Reset is 0 to 999. The range of the
Rate is 0 to 999. To modify these setpoints, press the
ENTER key and use the arrow keys until the desired
setting is shown. Press the ENTER key to accept the
setpoint values. The calculated setpoint is also shown
on this screen.
Figure 45: Zone Control
• Heat Wheel VFD Settings - This screen will
only be shown if the Heat Wheel VFD option is
selected in the Factory Configuration. This screen
allows modification of the Heat Wheel PID Gain
(or Proportional Band) and Reset (or Integral) for
loop tuning. It also allows for modifying the Heat
Wheel Humidity Setpoint, as well as displaying the
Heat Wheel Humidity from the internal humidity
sensor. The range of the Gain is 0.0% to 99.9%.
The range of the Reset is 0.0 to 999.9. The range
for the Setpoint is 0.0% to 99.9%. To modify these
setpoints, press the ENTER key until the desired
setpoint is selected and use the arrow keys until the
desired setting is shown. Press the ENTER key to
accept the setpoint value.
To return to the Parameter Settings, press the Esc key.
Figure 46: Heat Wheel VFD
To return to the Parameter Settings, press the Esc key.
20
C l i m a t e M a s t e r Wa t e r - S o u r c e H e a t P u m p s
THE SMART SOLUTION FOR ENERGY EFFICIENCY
DOAS CM3500 Controller
R e v. : 3 1 J u l y, 2 0 1 3
• Condenser Settings - This screen will only be
shown if the Condenser Control option is selected
in the Factory Configuration. On a single circuit
system, the discharge pressure controls the cycling
of the condenser fans based upon the setpoints
listed. On a dual circuit system, the highest discharge pressure controls the cycling of the condenser fans. All of the Condenser Fan cut-in and
cut-out setpoints are available for modification on
this screen. To modify these setpoints, press the
ENTER key until the desired setpoint is selected
and use the arrow keys until the desired setting
is shown. Press the ENTER key to accept the setpoint value.
To return to the Parameter Settings, press the Esc key.
Figure 47: Condenser Settings
• Sensor Offsets - This screen allows the control values
of the analog input points to be adjusted if calibration
shows these devices to be inaccurate. The range
of these offsets is - 99.9 to 99.9 for the refrigerant
pressures, temperatures and humidity. The range for
the air pressure and CO2 sensors is -99 to 99. Care
must be used when applying an offset to an analog
value as erratic operation can result. To modify the
offsets, press the ENTER key until the desired offset
is selected and use the arrow keys until the desired
setting is shown. Press the ENTER key to accept the
offset value.
Figure 48: Sensor Offsets
• Pressure/SAT Alarms - This screen displays the
Refrigerant Selection, High Discharge Pressure and
Low Suction pressure cut-out values for the appropriate
refrigerant selected. (NOTE: The operator cannot
change these settings.) The Cooling Mode Low
Pressure Trip is shown because if the unit is set as a
heat pump, and the compressor is used for heating,
the low pressure trip is varied based upon the glycol
ratio. See Section 2.3.5 Glycol Ratio for details. The
SAT Alarm band and time delay are also shown on
this screen. The SAT Alarm will be active if the actual
supply air temperature falls outside of this band. The
band is defined as the SAT setpoint plus and minus the
band setting. As shipped, this would be 82°F to 62°F.
To avoid nuisance alarms, the time delay allows for a
delay of the alarm condition after the unit is set to the
occupied mode. Since the unoccupied control operates
in a much wider band than the occupied control, this
alarm will not be active in the unoccupied mode.
To return to the SERVICE MENU, press the Esc key.
Figure 49: SAT Alarm
To return to the SERVICE MENU, press the Esc key.
c l i m a t e m a s t e r. c o m
21
CLIMATEMASTER WATER-SOURCE HEAT PUMPS
DOAS CM3500 Controller
R e v. : 3 1 J u l y, 2 0 1 3
• Glycol Ratio - This screen will only be shown if the
unit is set as a heat pump in the Factory Configuration.
This screen allows modifying the percent of glycol in
the water. The range of the setpoint is 0% to 30% of
glycol in the water. To modify this setpoint, press the
ENTER key and use the arrow keys until the desired
setting is shown. Press the ENTER key to accept the
setpoint value. Modifying the % of Glycol Setpoint
will change the suction pressure trip setting used by
the compressor in the heating mode. The calculated
suction pressure trip setting as well as the glycol Loop
Temp. Limit are displayed below the % of Glycol
Setpoint. (These are calculated values and cannot be
modified from this screen.)
To return to the SERVICE MENU, press the Esc key.
Figure 50: Glycol Ratio
22
C l i m a t e M a s t e r Wa t e r - S o u r c e H e a t P u m p s
THE SMART SOLUTION FOR ENERGY EFFICIENCY
DOAS CM3500 Controller
R e v. : 3 1 J u l y, 2 0 1 3
Factory Configuration
Factory Configuration - The Factory Configuration is
preset before the controller is shipped and changes
to the configuration could cause damage to the unit.
These settings should only be modified by a factory
trained technician. Selecting Factory Configuration from
the UNIT REVISION screen displays the Login Screen.
The factory configuration password, which is different
than the service password, must be entered correctly to
continue to the Factory Configuration Screen. The user
is logged in for 10 minutes after the password is first
entered. During this time, the Login Screen reads “Still
Logged In, Press PRG to Enter.” Within this 10-minute
login, the Factory Configuration may be re-entered
by simply pressing the Prg key. Multiple configuration
screens are available and can be cycled through by
pressing the UP and DOWN keys before selecting an
option on the screen.
• Unit - Model Type - This setting defines the equipment
model and size which, along with the CFM, defines the
airflow envelope of the unit. Changing this to a setting
which does NOT match the actual model will cause
serious operational issues. To change the unit type, press
the ENTER key until the cursor selects the unit. Use the
arrow keys until the desired setting is shown.
• Wet-bulb Setpoint (Figure 51) - In order to cycle the
compressors correctly, the design wet bulb condition
must be set. The range of this setting is 0.0 F to 999.9°F.
To change the setting, press the ENTER key until the
cursor selects Wet-bulb. Use the arrow keys until the
desired setting is shown. Press the ENTER key to select
this setting and step to the next option.
To return to the UNIT REVISION screen, press the Esc key.
• Altitude Setpoint (Figure 51) - In order to cycle the
compressors correctly in the dehumidification mode,
the enthalpy needs to be calculated, which requires
an accurate setting for the altitude. The range of this
setting is 0 ft to 9999 ft. To change the setting, press
the ENTER key until the cursor selects Altitude. Use the
arrow keys until the desired setting is shown. Press the
ENTER key to select this setting and step to the next
option.
To return to the UNIT REVISION screen, press the Esc key.
Figure 51: Altitude Setpoint
Press the ENTER key to select this setting and step to
the next option.
• CFM (Figure 51) - This sets the design airflow of
the system, which, along with the unit size, dry bulb,
wet bulb and dewpoint, determines the compressor
staging. The range of the CFM is 850 to 14,500 which
covers the operating range of every size unit. To change
the CFM, press the ENTER key until the cursor selects
this setting. Use the arrow keys until the desired setting
is shown. Press the ENTER key to select this setting and
step to the next option.
To return to the UNIT REVISION screen, press the Esc key.
• Dry-bulb Setpoint (Figure 51) - In order to cycle the
compressors correctly, the design dry bulb condition
must be set. The range of this setting is 0.0 to 999.9°F.
To change the setting, press the ENTER key until the
cursor selects Dry-bulb. Use the arrow keys until the
desired setting is shown. Press the ENTER key to select
this setting and step to the next option.
To return to the UNIT REVISION screen, press the Esc key.
c l i m a t e m a s t e r. c o m
23
CLIMATEMASTER WATER-SOURCE HEAT PUMPS
DOAS CM3500 Controller
R e v. : 3 1 J u l y, 2 0 1 3
• Set Units to °F or °C - Selecting this option allows the
temperature units (values) to be set as °F or °C. To change
the units, press the ENTER key until the cursor selects the
°F or °C. Press the UP key.
Figure 52: Set Units to ºF or ºC
• Low Pr Fault Count (Figure 52) - The settings for the
low pressure fault count are set here. Press the ENTER
key until the cursor selects the correct setting. Use the
arrow keys until the desired setting is shown. Press the
ENTER key to select this setting and step to the next
option.
To return to the UNIT REVISION screen, press the Esc key.
• Heat Wheel VFD (Figure 54) - Selecting ON will
allow analog output #3 (Y3 – See Sec. 2.2.1.2.4 Analog
Outputs) to control the Heat Wheel VFD to prevent
freezing. To turn this option ON or OFF, press the
ENTER key until the cursor selects Heat Wheel VFD.
Use the arrow keys until the desired setting is shown.
Press the ENTER key to select this setting and step to
the next option.
A warning screen (Figure 53) will now appear stating
that the default temperature setpoints will be loaded
if you select this option. CAUTION: If you modify the
units after the dehumidifier has been running, all
temperature settings will need to be reset. To change
the units, press the ENTER key until the cursor selects
°F or °C. Press the UP key and the ENTER key again. If
you are sure you would like to change the units, press
the PRG key and then the ENTER key. ALL temperature
settings will now need to be checked, and adjusted, if
necessary.
Pressing the ESC key will return to the FACTORY
CONFIG screen.
Figure 53: Warning Screen
To return to the UNIT REVISION screen, press the Esc key.
• Condenser Control (Figure 54) - Selecting this option
allows the condenser fans to be controlled by the
discharge pressure sensor and the setpoints shown
in the Condenser Settings screen (See Sec. 2.3.2.7.
Condenser Settings) of the Parameter Settings menu
(See Sec. 2.3.2. Parameter Settings). To turn this option
ON or OFF, press the ENTER key until the cursor
selects Condenser Control. Use the arrow keys until
the desired setting is shown. Press the ENTER key to
select this setting and step to the next option.
To return to the UNIT REVISION screen, press the Esc key.
• CO2 Control (Figure 54) - Enabling the CO2 control
can vary the speed of the supply and exhaust fan as
well as the position of the outdoor and recirculation
dampers based upon CO2 and air pressure differential
levels. To enable or disable this option, use the arrow
keys until the desired setting is shown (Enabled or
Disabled). Press the ENTER key to select this setting
and step to the CO2 Setup Menu.
To return to the UNIT REVISION screen, press the Esc key.
24
C l i m a t e M a s t e r Wa t e r - S o u r c e H e a t P u m p s
THE SMART SOLUTION FOR ENERGY EFFICIENCY
DOAS CM3500 Controller
R e v. : 3 1 J u l y, 2 0 1 3
Figure 54: CO2 Control
Figure 56: C02 Settings
• CO2 Setup Menu (Figures 54 and 55) - The CO2
Setup Menu will be shown when the CO2 Control option
is Enabled. To view the CO2 PARAMETERS menu, press
the Prg key (Figure 54) This allows access to the Damper
Control, Setpoints, CO2 Setpoint PID, Supply Air PID,
Recirc Damper PID and Exhaust Air PID parameters
(Figure 55)
To return to the UNIT REVISION screen, press the Esc key.
Figure 55: C02 Setup Menu
• Air Diff Setpoints (Figure 57) - The Air Diff
Setpoints screen allows the P1 Setpoint and the P3
Diff setpoint to be altered. The P1 Setpoint range is
0 to 0.999 inches of water column. The P3 Diff range
is -0.300 to 0.300 inches of water column. To modify
these setpoints, press the ENTER key and use the
arrow keys until the desired setting is shown. Press
the ENTER key to change the setpoint.
To return to the CO2 Setup Menu, press the Esc key.
Figure 57: Setpoints
• CO2 Settings (Figure 56) - This screen allows the
CO2 settings to be viewed or altered. It also allows
the CO2 control to be set to HAND or AUTO. To
set the CO2 to HAND, press the ENTER key once
and use the arrow keys to display “CO2 HAND”.
Pressing ENTER again selects this setting and
steps to the next selection to allow you to manually set the CO2 differential in parts per million
(ppm). When CO2 control is set to AUTO, the differential is calculated as the difference between the
space sensor and the outdoor sensor. The “CO2
Diff Setpoint” is the CO2 differential level, which
determines the amount of outside air to be introduced into in the conditioned space. The CO2 Diff
Setpoint range is 0 to 2000 ppm. This is done by
varying the P2 setpoint from the P2 Low Limit setting to the P2 High Limit setting. The P2 Low Limit
range is 0 to 1.999 inches of water column. The P2
High Limit range is 0 to 1.999 inches of water column.
To return to the CO2 Setup Menu, press the Esc key.
• CO2 Setpoint PID (Figure 58) - This screen allows
the CO2 Setpoint PID Gain (or Proportional Band),
Reset (or Integral) and the Rate (or Derivative) to be
modified for loop tuning. The range of the Gain is
0.000 to 0.999 inches of water column. The range
of the Reset is 0 to 999. The range of the Rate is 0
to 999. To modify these setpoints, press the ENTER
key and use the arrow keys until the desired setting is shown. Press the ENTER key to change the
setpoint. The process variable (CO2 Diff) and the
calculated output (P2 Setpoint) are also shown on
this screen.
To return to the CO2 Setup Menu, press the Esc key.
c l i m a t e m a s t e r. c o m
25
CLIMATEMASTER WATER-SOURCE HEAT PUMPS
DOAS CM3500 Controller
R e v. : 3 1 J u l y, 2 0 1 3
Figure 60: Recirc Damper PID
Figure 58: CO2 Setpoint PID
• Supply Air PID (Figure 59) - This screen modifies
the Supply Air PID Gain (or Proportional Band),
Reset (or Integral) and the Rate (or Derivative) for
loop tuning. The range of the Gain is 0.000 to 0.999
inches of water column. The range of the Reset is 0
to 999. The range of the Rate is 0 to 999. To modify
these setpoints, press the ENTER key and use the
arrow keys until the desired setting is shown. Press
the ENTER key to accept the setpoint value. The
process variable (P1 Pressure) and the calculated
output (SA VFD CMD) are also shown on this screen.
To return to the CO2 Setup Menu, press the Esc key.
Figure 59: Supply Air PID
• Exhaust Air PID (Figure 61) - This screen allows
the Exhaust Air PID Gain (or Proportional Band),
Reset (or Integral) and the Rate (or Derivative) to be
modified for loop tuning. The range of the Gain is
0.000 to 0.999 inches of water column. The range of
the Reset is 0 to 999. The range of the Rate is 0 to
999. To modify these setpoints, press the ENTER key
and use the arrow keys until the desired setting is
shown. Press the ENTER key to accept the setpoint
value. The process variable (P3 Pressure) and the
calculated output (EA VFD CMD) are also shown on
this screen.
To return to the CO2 Setup Menu, press the Esc key.
Figure 61: Exhaust Air PID
• Recirc Damper PID (Figure 60) - This screen
allows the Recirc Damper PID Gain (or Proportional
Band), Reset (or Integral) and the Rate (or Derivative)
to be modified for loop tuning. The range of the
Gain is 0.000 to 0.999 inches of water column. The
range of the Reset is 0 to 999. The range of the Rate
is 0 to 999. To modify these setpoints, press the
ENTER key and use the arrow keys until the desired
setting is shown. Press the ENTER key to accept the
setpoint value. The process variable (P2 Pressure)
and the calculated output (RECIRC DMP) are also
shown on this screen.
• Set as Heat Pump (Figure 62) - Setting this option to
“On” will allow the unit to be used as a heat pump. To
turn the option ON or OFF, press the ENTER key until
the cursor selects this setting. Use the arrow keys until
the desired setting is shown. Press the ENTER key to
select this setting and step to the next option.
To return to the UNIT REVISION screen, press the Esc key.
To return to the CO2 Setup Menu, press the Esc key.
26
C l i m a t e M a s t e r Wa t e r - S o u r c e H e a t P u m p s
THE SMART SOLUTION FOR ENERGY EFFICIENCY
DOAS CM3500 Controller
R e v. : 3 1 J u l y, 2 0 1 3
• Heat Control (Figure 62) - This option allows the
modulating heating output to function in either the SCRDirect or Reverse mode. Selecting Direct will deliver a
direct minimum to maximum output corresponding to
0-10 VDC for heating applications which require 10 VDC
for maximum heating. Selecting Reverse will deliver a
minimum to maximum output corresponding to 10-0 VDC
signal. Note that digital input # 9 (Input Point ID9 – Sec
2.2.1.2.1 Digital Inputs) will act as a freeze protection input
in the Reverse mode. When Reverse is selected and input
#9 is energized, the output of the signal will be 0 VDC to
force maximum heating until input #9 is de-energized.
To change the heat control setting, press the ENTER key
until the cursor selects this setting. Use the arrow keys
until the desired setting is shown. Press the ENTER key to
select this setting and step to the next option.
To return to the UNIT REVISION screen, press the Esc key.
• Heat Stages (Figure 62) - Modifying this option
determines how many heat stages are to be controlled.
The operator has the choice of 1, 2 or 3. To change the
number of heaters, press the ENTER key until the cursor
selects this setting. Use the arrow keys until the desired
setting is shown. Press the ENTER key to select this
setting and step to the next option.
To return to the UNIT REVISION screen, press the Esc key.
Figure 62: Heat Control and Stages
• Control by (SAT, Zone Reset or OA Reset) - This
option configures the unit for SAT, Zone Reset or
OA Reset (Outside Air Reset). To modify this option,
press the ENTER key and use the arrow keys until
the desired setting is shown. Press the ENTER key to
select this setting and step to the next option.
• Select Zone - This option will be available only
when the “Control by” option is set to Zone Reset.
The “Select Zone” option can then be selected for
Average or High/Low. Averaging the sensors simply
averages the readings. The High/Low selection uses
the extreme sensor in the group to control the unit.
The highest sensor would control the SAT in the
cooling mode and the lowest sensor would control the
SAT in the heating mode. To modify this option, press
the ENTER key until the cursor shows Select Zone. Use
the arrow keys until the desired setting is shown. Press
the ENTER key to select this setting and step to the
next option.
To return to the UNIT REVISION screen, press the Esc key.
• UnOcc Temp Cntrl - Setting this option to “On”
allows the unit to use the Unoccupied Temperature
Setpoints as a night setback control for the Zone Reset
of the SAT. To select this option, press the ENTER key
until the cursor selects UnOcc temp Cntrl. Use the
arrow keys until the desired setting is shown. Press the
ENTER key to select this setting and step to the next
option.
To return to the UNIT REVISION screen, press the Esc key.
• pAD Sm Display - This setting allows the smaller
display on the pAD remote zone sensor equipped with
the humidity sensor, to display the Time, Setpoint,
Temperature, RH Setpoint or the RH. Note that the
IAQ system does not use the RH Setpoint from the
pAD sensor at this time. To change this display, press
the ENTER key until the cursor selects this setting. Use
the arrow keys until the desired setting is shown. Press
the ENTER key to select this setting and step to the
next option.
To return to the UNIT REVISION screen, press the Esc key.
Figure 63:
To return to the UNIT REVISION screen, press the Esc key.
c l i m a t e m a s t e r. c o m
27
CLIMATEMASTER WATER-SOURCE HEAT PUMPS
DOAS CM3500 Controller
R e v. : 3 1 J u l y, 2 0 1 3
• Zone Reset Setup (Figure 64) - This screen will only
be shown if the Zone Reset is selected. It determines
the number of remote room sensors used in the
system for Average or High/Low control of the Zone
Reset. To change this number, use the arrow keys to
select this option and enter the number of sensors
used in the system. Press the ENTER key to select this
setting and step to the next option.
To return to the UNIT REVISION screen, press the Esc key.
Figure 64: Zone Reset Setup
• Building Management Communication - This screen
allows the Building Management Communication
setting to be modified. The communication type
can be selected as LONWORKS®, BACnet™ MSTP,
BACnet™ EtherNET or ModBus® Slave. The correct
serial card must be installed in the controller for the
BMS communications to be active. In the ModBus®
Slave mode, the baud rate and address will be
displayed. The baud rate can be set to 1200, 2400,
4800, 9600, or 19200. The address should be set for
the node number of this dehumidifier on the ModBus®
network. This screen also displays whether the network
is online or offline.
To return to the UNIT REVISION screen, press the Esc key.
Figure 65: Building Management Communication
28
C l i m a t e M a s t e r Wa t e r - S o u r c e H e a t P u m p s
THE SMART SOLUTION FOR ENERGY EFFICIENCY
DOAS CM3500 Controller
R e v. : 3 1 J u l y, 2 0 1 3
Alarm Menu
Alarm Screen
The ALARM MENU can be accessed anytime by pressing
the ALARM button. The main alarm screen includes the
instructions for viewing and resetting the alarms, as well
as a means to access the alarm history page. Pressing
the ENTER button while viewing this alarm screen or the
active alarm will reset any alarm that has returned to its
safe state. Any active alarm can be viewed by pressing
the DOWN key from this page. If no active alarms are
shown, no alarms are active. To view the Alarm History
Screen, press the ALARM button.
• Motor Fault (Figure 68) - The Motor Fault Alarm
activates whenever any of the motor overload devices
indicate an overloaded condition. In this state, the unit
will stop and not restart until the alarm condition is
reset manually on the Alarm Screen. The red ALARM
LED on the display will stay lit until the alarm is reset,
even after the alarm condition is cleared, to alert the
operator the alarm occurred.
Figure 68: Motor Fault
To return to the home screen, press the Esc button.
Figure 66: Heat Control and Stages
• Low Suction Pressure (Figure 67) - The Low Suction
Pressure Alarm activates whenever the Suction
Pressure falls below 22#. In this active alarm state, the
unit will stop and not restart until the unit is manually
reset. This condition would only occur on a loss of
refrigerant in a circuit or an extremely low operating
temperature. The red ALARM LED on the display will
stay lit until the alarm is reset, even after the alarm
condition is cleared, to alert the operator the alarm
occurred.
• High Discharge Pressure Circuit A or Circuit B
(Figure 69) - The High Discharge Pressure Alarm
activates whenever the Discharge Pressure rises above
the High Pressure Trip Setpoint shown in the SERVICE
MENU/Pressure SAT Alarms screen. (See Section
2.3.4. Pressure/SAT Alarms.) In this state, the unit
will stop and not restart until the alarm condition is
reset manually on the Alarm Screen. The red ALARM
LED on the display will stay lit until the alarm is reset,
even after the alarm condition is cleared, to alert the
operator the alarm occurred.
Figure 67: Low Suction Pressure
Figure 69: High Discharge Pressure Alarm
c l i m a t e m a s t e r. c o m
29
CLIMATEMASTER WATER-SOURCE HEAT PUMPS
DOAS CM3500 Controller
R e v. : 3 1 J u l y, 2 0 1 3
• Multiple Low Suction Pressure Alarm Circuit A or
Circuit B - This alarm activates only if the compressors
have cycled on a low suction pressure condition
multiple times. Although the unit will try an automatic
reset, the red ALARM LED on the display will stay lit
until the alarm is reset, even after the alarm condition
is cleared, to alert the operator the alarm occurred.
• Room Reset Network Failure - The Room Reset
Network Failure Alarm activates if the Remote Room
Sensor is offline or disconnected from the controller.
In this state, the unit will be placed in SAT Control and
continue to run in this mode with the alarm active.
When the Remote Room Sensor is back online with the
controller, the unit will return to Zone Reset Control
automatically. The red ALARM LED on the display will
stay lit until the alarm is reset, even after the alarm
condition is cleared, by the operator.
• Low Voltage Monitor - The Low Voltage Monitor
Failure activates if the voltage becomes low enough
to damage the electrical equipment. The optional
monitor is required to activate this condition. In this
state the unit will stop and signal an alarm condition.
The red ALARM LED on the display will stay lit until
the alarm is acknowledged, even after the alarm
condition is cleared, to alert the operator the alarm
occurred.
• High Condensate Level - The High Condensate Level
Failure activates if the condensate drain is plugged
for any reason. An optional level switch is required to
activate this condition. In this state the unit will stop
and signal an alarm condition. The red ALARM LED on
the display will stay lit until the alarm is acknowledged,
even after the alarm condition is cleared, to alert the
operator the alarm occurred.
• Temperature Sensor Failure - A Temperature Sensor
Failure is active if the supply or intake air temperature
sensors are in a shorted or open condition. In this
state, the unit will stop and not restart until the alarm
condition is cleared. The red ALARM LED on the
display will stay lit until the alarm is acknowledged,
even after the alarm condition is cleared, to alert the
operator the alarm occurred.
• Low Water Flow - The Low Water Flow Failure
activates if the water in the heat pump loop stops
flowing. An optional flow switch is required to activate
this condition. In this state the unit will stop and
signal an alarm condition. The red ALARM LED on the
display will stay lit until the alarm is acknowledged,
even after the alarm condition is cleared, to alert the
operator the alarm occurred.
• Supply Air Temperature Out of Range - A Temperature Sensor Failure activates if the supply air temperature is above or below the setpoint by the offset (25°F
default) after a delay (5 minutes default).In this state, the
unit will stop and not restart until the alarm condition is
cleared. The red ALARM LED on the display will stay lit
until the alarm is acknowledged, even after the alarm
condition is cleared, to alert the operator the alarm
occurred.
• Smoke Alarm - The Smoke Alarm activates if the
smoke alarm contact opens. In this state the unit
will stop and signal an alarm condition. The red
ALARM LED on the display will stay lit until the alarm
is acknowledged, even after the alarm condition is
cleared, to alert the operator the alarm occurred.
• Air Filter Service Required - The Air Filter Service
Required Failure activates if the pressure differential
across the air filter exceeds the normal pressure. An
optional pressure switch is required to activate this
condition. In this state the unit will not stop but only
signal an alarm condition. The red ALARM LED on the
display will stay lit until the alarm is acknowledged,
even after the alarm condition is cleared, to alert the
operator the alarm occurred.
30
• Low Air Flow - The Low Air Flow failure activates if
the air flow switch is not closed 15 seconds after the
blower has started. The switch has to open for more
than 2 seconds to initiate this alarm. In this state the
unit will stop and signal an alarm condition. The red
ALARM LED on the display will stay lit until the alarm
is acknowledged, even after the alarm condition is
cleared, to alert the operator the alarm occurred.
C l i m a t e M a s t e r Wa t e r - S o u r c e H e a t P u m p s
THE SMART SOLUTION FOR ENERGY EFFICIENCY
DOAS CM3500 Controller
R e v. : 3 1 J u l y, 2 0 1 3
• Alarm History Screen (Figure 70) - The Alarm History
Screen is accessible from the Alarm Screen by pressing
the ALARM button. This screen lists a history of alarm
conditions by time and date which have existed on the
IAQ system. The most recent alarm will be displayed
as 001 along with the Supply Air Temperature, Outside
Air Temperature, Outside Relative Humidity, Suction
Pressure, Discharge Pressure and the state of the unit
when the alarm occurred. On units with dual refrigerant
circuits, the circuit B suction and discharge pressures
are also shown when the alarm occurred. To access
the history of alarms, press the DOWN key. The last
100 alarm conditions are saved in this history with the
101st being overwritten.
Figure 70: Alarm History Screen
c l i m a t e m a s t e r. c o m
31
CLIMATEMASTER WATER-SOURCE HEAT PUMPS
DOAS CM3500 Controller
R e v. : 3 1 J u l y, 2 0 1 3
Remote Room Sensor Configuration
Remote Room Sensor Configuration (Figure 71)
For zone reset controlled dehumidifiers, a sensor in the
conditioned space is required. The Remote Room Sensor
is used with the CM3500 to accomplish this. The remote
room sensor is available as a temperature sensor to
reset the supply air setpoint based on the conditioned
space temperature. It is also available as a temperature
and relative humidity sensor. In this configuration,
unoccupied control in the conditioned space can also be
accomplished. Up to four room sensors can communicate
data to the CM3500 controller. These will require
addresses of 2, 3, 4 and 5. For installations requiring less
than four room sensors, start the addresses from 2 and
work up. The room sensor with address 2 will allow
zone setpoint modification. The zone setpoint can be
modified by using the UP and DOWN keys. Simply press
one of these keys to display the setpoint. When the
appropriate setpoint is displayed, wait a few seconds
and the setpoint will be saved. The remote room
sensor with address 2 can also be used to temporarily
override occupancy from one to nine hours. To override
occupancy, press the SLEEP button on the left side of
the Remote Room Sensor. The SLEEP button, symbolized
as a crescent moon on the left side of the sensor, is the
fourth button from the top. An icon showing a crescent
moon and the number of hours the occupancy will be
overridden is displayed. To increase the hours, press the
SLEEP button repeatedly until the appropriate number
of hours is displayed. To disable the temporary override,
press the SLEEP button until “0” (zero) hours is displayed.
The temporary override will then end.
Internal setup of the remote room sensor is
accomplished by pressing the DOWN key and, while
holding the DOWN key, pressing the UP key for 4
seconds. When the display blinks “Par”, keep pressing
the UP key, release the DOWN key and press the bottom
key on the left hand side of the sensor for three seconds.
The display will now show the current device address as
“Ad01”. Select and modify respectively with the bottom
key on the left hand side of the sensor, the UP and DOWN
keys. “Ad01” is the pAD address, settable from 1 – 32.
“br01” is the baud rate and needs to be set at 0. “En01”
set to 0 disables the buzzer. “Pc01” is the offset of the
zone temperature from -9.9 to 9.9.
Figure 71: Remote Room Sensor
Additionally, any Remote Room Sensor connected to the
CM3500 will also display important information such as
an alarm condition, the occupied mode and whether the
room sensor network connection has failed. An alarm
condition is displayed as “ALr” and will flash between
the room temperature and “ALr.” A bell icon will also
blink on the display. The occupancy of the unit will be
displayed as a house icon to the left of the room
temperature. If the house icon is empty, the dehumidifier
is in the unoccupied mode. If a human figure is in the
house, the dehumidifier is in the occupied mode. If the
network connection has failed, “oLn” is displayed to
indicate that the Remote Room Sensor is offline.
32
C l i m a t e M a s t e r Wa t e r - S o u r c e H e a t P u m p s
THE SMART SOLUTION FOR ENERGY EFFICIENCY
DOAS CM3500 Controller
R e v. : 3 1 J u l y, 2 0 1 3
Hardware Details
Programmable Controller
The programmable controller is preprogrammed by
ClimateMaster for the control of your unit. Two types
of controllers are used. The small unit is used for all
QV units and most QS units. A medium unit is required
on QS units with a dual refrigerant circuit and/or if a
VFD is used to prevent freezing of a heat wheel. The
ClimateMaster replacement part number for both of
these controllers is available by calling our customer
service department.
Remote Terminal
This wall-mountable remote display is an IP40 rated
device. Operating conditions must be between 0.0°and
140°F and less than 90% RH. The remote display is
powered through the cable provided. The maximum
distance when using a 6 conductor phone cable is 150
feet, and 1,500 feet when using a 22 AWG 3 twisted pair
cable. The ClimateMaster replacement part number for
the remote terminal is available by calling our customer
service department.
Remote Room Sensor
The Remote Room Sensor is an electronic device
designed as an interface to supply temperature and/
or humidity data from remote areas to the control
system. The unit operates on an RS485 pLAN network.
The ClimateMaster replacement part number for the
Remote Room Sensor is available by calling our service
department. The system’s network addressing must be
correctly set in order for the remote information to be
sent to the control system. Generally, the controller itself
is at address 1 and the first Remote Room Sensor is at
address 2. The second Remote Room Sensor will be
address 3, the third will be address 4 and the fourth will
be address 5. The addresses are set in the PARAMETER
MENU of the Remote Room Sensor. Holding both the
UP and DOWN buttons together for 4 seconds will
display the PARAMETER MENU. While continuing to
hold the UP button, press the button on the lower left
of the Remote Room Sensor to enter the menu. The
settable parameters can now be seen using the UP or
DOWN buttons. To modify a parameter, press the lower
left button. The parameter value will now fl ash allowing
the UP and DOWN buttons to modify it. When the
values are correct, hold the lower left button to enter the
modified values into the remote room sensor memory.
Please refer to the Remote Room Sensor instructions for
further parameter definitions and product specifications.
Suction Pressure Transducer
The Suction Pressure Transducer is a 0.5 - 4.5 VDC to
0 - 250 psig ratiometric device. The body is brass with
a ¼ SAE female refrigerant connection. This transducer
must be supplied with 4.5 to 5.5 VDC power. A display
reading of 0.0 psig for the transducer indicates the
device is disconnected or defective. For this device to
function, 5.0 VDC must be present from the black to
green wires on the transducer. To verify the output of
the transducer, measure the DC voltage (should read
between 0.5 to 4.5 VDC) from the white to green wires
on the transducer and use this voltage in the following
formula to determine the pressure (0-250 psig).
Pressure (psig) = (62.5)*(V) – 31.25
Example, if V = 2.50 VDC, then;
Pressure (psig) = (62.5)*(2.50) – 31.25
= 156.25 – 31.25
= 125 psig
The Suction Pressure Transducer’s replacement part
number is available from ClimateMaster by calling our
customer service department.
Discharge Pressure Transducer
The Discharge Pressure Transducer is a 0.5 - 4.5 VDC to
0 - 652 psig ratiometric device. The body is brass with
a ¼ SAE female refrigerant connection. This transducer
must be supplied with 4.5 to 5.5 VDC power. A display
reading of 0.0 psig for the transducer indicates the
device is disconnected or defective. For this device to
function, 5.0 VDC must be present from the black to
green wires on the transducer. To verify the output of
the transducer, measure the DC voltage (should read
between 0.5 to 4.5 VDC) from the white to green wires
on the transducer and use this voltage in the following
formula to determine the pressure (0-652psig).
Pressure (psig) = (163)*(V) – 81.5
Example, if V = 2.50 VDC, then;
Pressure (psig) = (163)*(2.50) – 81.5
= 407.5 – 81.5
= 326 psig.
The ClimateMaster replacement part number for the
Discharge Pressure Transducer is available by calling our
customer service department.
c l i m a t e m a s t e r. c o m
33
CLIMATEMASTER WATER-SOURCE HEAT PUMPS
DOAS CM3500 Controller
R e v. : 3 1 J u l y, 2 0 1 3
Differential Air Pressure Transducer
The Differential Air Pressure Transducer is 0.5 - 4.5 VDC
to 0 – 1.5 inches of water column device. This transducer
must be supplied with 14.5 to 17 VDC power.
CO2 Sensor
The CO2 sensor is a non-dispersive infrared technology
(NDIR) repeatable to +/- 20ppm, +/- 1% of measured
value. The output is 4-20 mA with a range of 0-2000
ppm. This transducer must be supplied with 20-30 VDC.
Supply Air Temperature Sensor
The Supply Air Temperature Sensor is a resistive NTC
Bulb type device with a 10 foot cable. The temperature
range is -58.0° to 212.0°F and the environmental rating
is IP67. The failure mode of this device will display a
reading of -623.3°F if the sensor is open, and display
a reading of 687.3°F if the sensor is shorted. The
ClimateMaster replacement part number for the Supply
Air Temperature Sensor is available by calling our service
customer department.
Intake Air Temperature and Relative Humidity
Sensor The Intake Air and Relative Humidity Sensor is
internally mounted in the air stream of the unit, behind
the air filter. The failure mode of the temperature sensor
internal to this device will display a reading of 137.6°F
if the sensor is open and display a reading of -42.4°F if
the sensor is shorted. This may seem reversed, but is
accurate, as the readings have been scaled internally in
the program and the device has a negative temperature
coefficient. A reading of 0.0% humidity indicates a failure
of the RH sensor. The ClimateMaster replacement part
number for the Intake Air Temperature and Relative
Humidity Sensor is available by calling our customer
service department.
Air Flow Switch
The Air Flow Switch is internally mounted in the air
stream of your dehumidifier. The ClimateMaster
replacement part number for the Air Flow Switch is
available by calling our customer service department.
34
C l i m a t e M a s t e r Wa t e r - S o u r c e H e a t P u m p s
THE SMART SOLUTION FOR ENERGY EFFICIENCY
DOAS CM3500 Controller
R e v. : 3 1 J u l y, 2 0 1 3
Specifications
Mechanical Characteristics
Dimensions
SMALL version fitted on 13 DIN rail modules, 110 x 227.5 x 60 mm
MEDIUM, LARGE and EXTRA LARGE version fitted on 18 DIN rail modules, 110 x 315 x 60 mm
Installation
DIN rail
Plastic Case
• fitted on DIN rail according to DIN 43880 and CEI EN 50022 standards;
• material: technopolymer;
• flame retardancy: V0 (UL94) and 960°C (IEC 695);
• ball pressure test: 125°C;
• resistance to creeping current: ≥250 V;
• color: grey RAL7035;
Electrical Specifications
Power supply (controller with terminal connected)
Terminal block
28 TO 36 Vdc +10/-20% and 24 Vac +10/-15% 50 to 60 HZ maximum power
input P= 15 W (24 Vdc power supply), P= 40 VA (24 Vac)
with plug-in male/female connectors, max voltage 250 Vac; cable cross-section:
min. 0.5 mm2 - max 2.5 mm2
CPU
H8S2320, 16 bit, 24 MHz
Memory (FLASH MEMORY)
2+2 MB; in the extended versions further memory of 32 MB or higher
Data memory (static RAM)
512 kB at 16 bit (296 kB BIOS; 216 application sw)
Parameter data memory
13 kB at 16 bit (max. limit: 400,000 writes per memory location) and a
further 32 kB E2prom (not available to the pLAN)
Working cycle duration (applications of average complexity) 0.2 s (typical)
Clock with battery
standard
Digital Inputs
Type
Optically-isolated
8, 14, 18, respectively on the SMALL, MEDIUM and EXTRA LARGE N.O and N.C., LARGE
boards, according to the combinations shown below:
Maximum number
Optoinsulated input no. to 24
Vac 50/60 Hz or 24 Vdc
Optoinsulated
input no. to
Inputs
8
12
14
none
2
4
8
14
18
Small
Medium/Extra Large
Large
Classification of the measuring circuits (CEI EN
61010-1)
Category I (J5, J7, J20) 24 Vac/Vdc
Category III (J8, J19) 230 Vac
WARNING!
WARNING! - 230 Vac 50/60 Hz (10/-15%);
- the two 230/24 Vac inputs present on J8 and J12 have
the same common pole and consequently will be both 24
Vac/Vdc or both 230 Vac. Basic insulation between the two
inputs;
- for DC inputs, connect the negative pole to the common
terminal.
Note: separate as much as possible the probe and
digital input signal cables from the cables carrying
the inductive loads and the power cables, to avoid
possible electromagnetic disturbance.
c l i m a t e m a s t e r. c o m
35
CLIMATEMASTER WATER-SOURCE HEAT PUMPS
DOAS CM3500 Controller
R e v. : 3 1 J u l y, 2 0 1 3
Analog Inputs
10 bit A/D converter in the CPU
universal: (inputs B1, B2, B3, B6, B7, B8) NTC temperature sensor (-50T90°C;
R/T 10 k at 25°C), HT NTC 0T150°C, voltage: 0 to 1 Vdc, 0 to 5 V ratiometric or 0
to 10 Vdc, current: 0 to 20 mA or 4 to 20 mA, selectable via software. Input resistance in 0 to 20 mA= 100
passive: (inputs B4, B5, B9, B10) NTC temp. sensor (see universal type),
PT1000 (-100T200°C; R/T 1000 at 0°C) or voltage-free digital input (5 mA), selectable via software;
5, 8, 10, on the SMALL, MEDIUM and EXTRA LARGE N.O., LARGE and EXTRA
LARGE N.C. boards respectively
Analog conversion
type
Maximum number
Time constant for each input
0.5s
Precision
± 0.3 % of full scale
Classification of the measuring circuits (CEI EN 61010-1)
Category I
WARNING!
WARNING! The 21 Vdc available at the +Vdc terminal (J2)
can be used to power any active probes, the maximum
current is 150 mA, thermally protected against short-circuits.
To supply the ratiometric 0 to 5 V probes, use the +5VREF
(Imax: 60 mA) present at terminal J24.
Analog Outputs
Type
0 to 10 Vdc optically-isolated
Maximum number
4, 4, 6, on the SMALL, MEDIUM and EXTRA LARGE N.O./N.C., LARGE boards respectively
Power supply
External 24 Vac/Vdc
Resolution
8 bit
Maximum load
1 k (10 mA)
Precision
± 2% of end scale on outputs: Y1, Y2, Y3 and Y4
-2%/+5% of end scale on: Y5 and Y6
Type
Relay
Maximum number
8: SMALL; 13: MEDIUM; 18: LARGE; 27: EXTRA LARGE N.C.; 29: EXTRA LARGE N.O.
Digital Outputs
36
C l i m a t e M a s t e r Wa t e r - S o u r c e H e a t P u m p s
THE SMART SOLUTION FOR ENERGY EFFICIENCY
DOAS CM3500 Controller
R e v. : 3 1 J u l y, 2 0 1 3
Groups from 2 to 5 outputs have 2 “common” poles for easy assembly.
Make sure that the current running through the common terminals does not exceed the rated current of each individual terminal, that is 8A.
The outputs can be divided into groups. There is double insulation between groups (between cells in the table).
Note: the relays in the same group must have the same power supply (24 or 230 Vac).
Insulation distance
Version
Makeup of the groups
Relays with same insulation
SMALL
Type of relay
1...7
A type
8
A type
-
-
-
MEDIUM
Type of relay
1...7
A type
8
A type
9...13
A type
-
-
LARGE
Type of relay
1...7
A type
8
A type
9...13
A type
14...18
A type
-
EXTRA LARGE N.O.
Type of relay
1...7
A type
8
A type
9...13
A type
14...16
B type
17...20
B type
21...24
B type
25...29
B type
EXTRA LARGE N.C.
Type of relay
1...7
A type
8
A type
9...13
A type
14...16
C type
17...20
C type
21...24
C type
25...27
C type
Note: the relays in the individual cells of the table have basic insulation between them, while between groups
(cell-cell) there is double insulation.
Changeover contacts
1: SMALL (relè 8); 3: MEDIUM e EXTRA LARGE N.O./N.C. (relè 8, 12 e 13); 5: LARGE (relè 8, 12, 13, 14 e 15)
warning: the relay outputs have different characteristics according to the model of pCO3.
Relay
Type A
type of relay: SPDT, 2000 VA, 250 Vac, 8 A resistive
pCO3 approval: UL873: 2.5 A resistive, 2 A FLA, 12 A LRA, 250 Vac, C300 pilot duty (30000 cycles)
EN 60730-1: 2 A resistive, 2 A inductive, cos = 0.6, 2(2) A (100000 cycles)
type of relay: SPDT, 1250 VA, 250 Vac, 5 A resistive
Switchable power
Relay
Type B
Relay
Type C
pCO3 approval: UL873: 1 A resistive, 1 A FLA, 6 A LRA, 250 Vac, D300 pilot duty (30000 cycles)
EN 60730-1: 1 A resistive, 1 A inductive, cos = 0.6, 1(1) A (100000 cycles)
type of relay: SPDT, 1250 VA, 250 Vac, 5 A resistive
pCO3 approval: UL873: 1 A resistive, 1 A FLA, 6 A LRA, 250 Vac, D300 pilot duty (30000 cycles)
EN 60730-1: 1 A resistive, 1 A inductive, cos = 0.6, 1(1) A (100000 cycles)
1: SMALL (output 7); 2: MEDIUM - EXTRA LARGE N.O./N.C. (outputs 7, 12); 3: LARGE (OUTPUTS 7, 12, 14)
operating voltage 24 Vac/Vdc; maximum power: 10 W
SSR outputs
pLAN network/user terminal connection
Relation Between AWG and Wire Cross-section
AWG
Cross-section (mm2)
Current
20
0.5
2
15
1.5
6
14
2.5
8
Type
RS485 half-duplex asynchronous
Transmission speed
62.5 Kbps or 115.2 Kbps, selectable via software
Terminal connector
6 pin telephone (J10)
pLAN network/graphic terminal/
3 pin plug-in connector (J11)
ARIA terminal connector
The maximum distance between the pCO and user terminal is shown in the following table
Power Supply Distance
Power Supply
telephone
Cable Type
50 m
taken from the pCO (150 mA)
AWG24 shielded cable
200 m
taken from the pCO (150 mA)
AWG20/22 shielded cable
500 m
separate power supply via TCONN6J000
Note:
• a maximum of one terminal (pCOT, pCOI, pGD0, pGD1) can be connected, or two terminals but without using the
backlighting on display. One version of the pCO3 features optically-isolated connection to the pLAN network.
• the graphic terminal and ARIA terminal should be always powered with a separate power supply.
• the 21 Vdc present at +Vterm (J24) can be used to power an external terminal with a maximum input of 2 W. Only
one terminal can be connected (for example PLD terminal or ARIA terminal) in addition to the one connected to
terminal J10.
c l i m a t e m a s t e r. c o m
37
CLIMATEMASTER WATER-SOURCE HEAT PUMPS
DOAS CM3500 Controller
R e v. : 3 1 J u l y, 2 0 1 3
Other Specifications
Storage conditions
-40T70 °C, 90% RH non-condensing
Operating conditions
-25T70 °C, 90% RH non-condensing
Index of protection
IP20, IP40 front panel only
Environmental pollution
normal
Class according to protection against electric shock
PTI of the insulating materials
to be incorporated into Class I and/or II appliances
250 V
Period of stress across the insulating parts
long
Type of action
1C
Type of disconnection or microswitching
microswitching
Category of resistance to heat and fire
category D (UL94 - V0)
Immunity against voltage surges
category 1
Aging characteristics (operating hours)
80,000
No. of automatic operating cycles
100,000 (EN 60730-1); 30,000 (UL 873)
Software class and structure
Class A
Category of immunity to voltage surges (CEI EN 61000-4-5)
Category III
The device is not designed to be hand-held
38
C l i m a t e M a s t e r Wa t e r - S o u r c e H e a t P u m p s
THE SMART SOLUTION FOR ENERGY EFFICIENCY
DOAS CM3500 Controller
R e v. : 3 1 J u l y, 2 0 1 3
Points List
BACNET Points List
Unit Type: Program Version 2.1.x & Above
#
Description
Type
1
Network Occupied Input
BV
2
Occupied
BV
3
Alarm Active
BV
4
Air Flow
BV
5
Supply Fan
BV
6
Compressor #1
BV
7
Compressor #2
BV
8
Compressor #3
BV
9
Compressor #4
BV
10
Condenser Fan #1
BV
11
Condenser Fan #2
BV
12
Condenser Fan #3
BV
13
Condenser Fan #4
BV
14
OA Damper Status
BV
15
Auxiliary Heating Required
BV
16
Remote Reset
BV
#
Description
Type
1
Suction Pressure
AV
2
Discharge Pressure
AV
3
Intake Air Relative Humidity
AV
4
Intake Air Temperature
AV
5
Intake Air Dewpoint
AV
6
Supply Air Temperature
AV
7
Zone Air Temperature
AV
8
Zone Air Relative Humidity
AV
9
Suction Press Circuit B
AV
10
Discharge Press Circuit B
AV
11
Reheat Command
AV
R/W
Status
Read/
Write
Read
Only
Read
Only
Read
Only
Read
Only
Read
Only
Read
Only
Read
Only
Read
Only
Read
Only
Read
Only
Read
Only
Read
Only
Read
Only
Read
Only
Read/
Write
R/W
Status
Read
Only
Read
Only
Read
Only
Read
Only
Read
Only
Read
Only
Read
Only
Read
Only
Read
Only
Read
Only
Read
Only
Comments
0 = Unoccupied, 1=Occupied.
Confirmation of Occupied Status.
Confirmation of Alarm Status. 0 = Alarm, 1 = Normal.
Confirmation of Air Flow. 0 = No Flow, 1 = Flow.
Confirmation of Supply Fan, 0 = Off, 1 = On.
Confirmation of Compressor #1, 0 = Off, 1 = On.
Confirmation of Compressor #2, 0 = Off, 1 = On.
Confirmation of Compressor #3, 0 = Off, 1 = On.
Confirmation of Compressor #4, 0 = Off, 1 = On.
Confirmation of Condenser Fan #1, 0 = Off, 1 = On.
Confirmation of Condenser Fan #2, 0 = Off, 1 = On.
Confirmation of Condenser Fan #3, 0 = Off, 1 = On.
Confirmation of Condenser Fan #4, 0 = Off, 1 = On.
Confirmation of OA Damper. 0 = Closed, 1 = Open.
Confirmation of Aux. Heat, 0 = Not Required, 1 = Required.
Write 1 to Reset. 0 is set after a program scan.
Comments
In Tenths, linear from 0 to 250 psig.
In Tenths, linear from 0 to 650 psig.
In Tenths, linear from 0 to 100 %.
In Tenths, linear from -42°F to 137°F.
In Tenths, calculated value in °F.
In Tenths, linear from -58 to 212 °F.
In Tenths, linear from -58 to 212 °F.
In Tenths, linear from 0 to 100 %.
In Tenths, linear from 0 to 250 psig.
In Tenths, linear from 0 to 650 psig.
In Tenths, linear from 0 to 100 %.
c l i m a t e m a s t e r. c o m
39
CLIMATEMASTER WATER-SOURCE HEAT PUMPS
DOAS CM3500 Controller
R e v. : 3 1 J u l y, 2 0 1 3
Points List
BACNET Points List
Unit Type: Program Version 2.1.x & Above
#
Type
12
Auxiliary Heating Comm.
AV
13
Supply Fan VFD Comm.
AV
14
Exhaust Fan VFD Comm.
AV
15
Outside Air Damper Comm.
AV
16
Recirc. Damper Command
AV
17
Intake Air Cooling Deadband
AV
18
Intake Air Heating Deadband
AV
19
Intake Air Differential
AV
20
Supply Air Setpoint
AV
21
Zone Air Setpoint
AV
22
Zone Air High Limit Setpoint
AV
23
Zone Air Low Limit Setpoint
AV
24
Unoccupied Cooling Setpoint
AV
25
Unoccupied Heating Setpoint
AV
26
Unoccupied Differential
AV
27
Unoccupied RH Setpoint
AV
28
Unoccupied RH Differential
#
40
Description
Description
AV
Type
1001
Unit Status
INT
1002
CO2 In Zone
INT
1003
CO2 Outside
INT
1004
CO2 Differential
INT
1005
CO2 Setpoint
INT
1006
P1 Setpoint
INT
1007
P3 differential
INT
1008
Heat Wheel Supply Pressure
INT
1009
Heat Wheel Exhaust Pressure
INT
1010
Reheat Condenser Pressure
INT
1011
Alarm Code
INT
R/W
Status
Read
Only
Read
Only
Read
Only
Read
Only
Read
Only
Read/
Write
Read/
Write
Read/
Write
Read/
Write
Read/
Write
Read/
Write
Read/
Write
Read/
Write
Read/
Write
Read/
Write
Read/
Write
Read/
Write
R/W
Status
Read
Only
Read
Only
Read
Only
Read
Only
Read
Only
Read
Only
Read
Only
Read
Only
Read
Only
Read
Only
Read
Only
Comments
In Tenths, linear from 0 to 100 %.
In Tenths, linear from 0 to 100 %.
In Tenths, linear from 0 to 100 %.
In Tenths, linear from 0 to 100 %.
In Tenths, linear from 0 to 100 %.
In Tenths, settable from 0.0 to 9.9 °F.
In Tenths, settable from 0.0 to 9.9 °F.
In Tenths, settable from 0.0 to 5.0 °F.
In Tenths, settable from 45.0 to 99.9 °F.
In Tenths, settable from 55.0 to 95.0 °F.
In Tenths, settable from 40.0 to 140.0 °F.
In Tenths, settable from 35.0 to 70.0 °F.
In Tenths, settable from Unoccupied Heating Setpoint to 95.0 °F.
In Tenths, settable from 40.0 to Unoccupied Cooling Setpoint °F.
In Tenths, settable from 0.0 to 9.9 °F.
In Tenths, settable from 20.0 to 99.9 %.
In Tenths, settable from 0.0 to 9.9 %.
Comments
0=Satisfied/Off, 1=Heating, 2=Cooling, 3=Dehumidifying,
4=Dehum/Heat, 5=Dehum/Cool, 6=Low Suction Pressure.
0 to 2000 ppm.
0 to 2000 ppm.
CO2 In Zone minus CO2 Outside, 0 to 2000 ppm.
Settable from 0 to 2000 ppm.
Settable from 0 to 999 inches of wc, in thousandths.
Settable from -300 to 300 inches of wc, in thousandths.
Inches of water column, in thousandths. 1452 = 1.452 “wc
Inches of water column, in thousandths.
Inches of water column, in thousandths.
Alarm code. See table at end of list.
C l i m a t e M a s t e r Wa t e r - S o u r c e H e a t P u m p s
THE SMART SOLUTION FOR ENERGY EFFICIENCY
DOAS CM3500 Controller
R e v. : 3 1 J u l y, 2 0 1 3
Points List
BACNET Points List
Unit Type: Program Version 2.1.x & Above
CODE
ALARM DESCRIPTION
1
Low Suction Pressure
2
Motor Overloads
3
High Discharge Pressure A
4
High Discharge Pressure B
5
Multiple Low Pressure A
6
Multiple Low Pressure B
7
Temperature Sensor Fault
8
pAD Network Fault
9
SAT Out of Range
10
Air Filter Clogged
11
Low Voltage Fault
12
High Condensate Level
13
Low Water Flow
14
Smoke Alarm
15
Low Air Flow
16
Freeze ‘Stat Alarm
c l i m a t e m a s t e r. c o m
41
CLIMATEMASTER WATER-SOURCE HEAT PUMPS
DOAS CM3500 Controller
R e v. : 3 1 J u l y, 2 0 1 3
Points List
LON Points List
Unit Type: Program Version 2.1.x & Above
#
DESCRIPTION
TYPE
SNVT
Dir
UNITS
1
Suction Pressure
2
Discharge Pressure
3
Intake Air Relative Humidity
4
Intake Air Temperature
5
6
7
COMMENTS
AV
30
Out
K Pa
Linear from 0.0 to 1724.0 K Pa.
AV
30
Out
K Pa
Linear from 0.0 to 4482.0 K Pa.
AV
81
Out
%
Linear from 0.0 to 100.0 %.
AV
105
Out
°C
Linear from -42.0 to 58.0 °C.
Intake Air Dewpoint
AV
105
Out
°C
Calculated value in °C.
Supply Air Temperature
AV
105
Out
°C
Linear from -50.0 to 100.0 °C.
Zone Air Temperature
AV
105
Out
°C
Linear from -50.0 to 100.0 °C.
8
Zone Air Relative Humidity
AV
81
Out
%
Linear from 0.0 to 100.0 %.
9
Suction Pressure Circuit B
AV
30
Out
K Pa
Linear from 0.0 to 1724.0 K Pa.
10
Discharge Pressure Circuit B
AV
30
Out
K Pa
Linear from 0.0 to 4481.0 K Pa.
11
Reheat Command
AV
81
Out
%
Linear from 0.0 to 100.0 %.
12
Auxiliary Heating Command
AV
81
Out
%
Linear from 0.0 to 100.0 %.
13
Supply Fan VFD Command
AV
81
Out
%
Linear from 0.0 to 100.0 %.
14
Exhaust Fan VFD Command
AV
81
Out
%
Linear from 0.0 to 100.0 %.
15
Outside Air Damper Command
AV
81
Out
%
Linear from 0.0 to 100.0 %.
16
Recirc. Damper Command
AV
81
Out
%
Linear from 0.0 to 100.0 %.
17
Intake Air Cooling Deadband
AV
105
In
°C
Settable from 0.0 to 5.5 °C.
18
Intake Air Heating Deadband
AV
105
In
°C
Settable from 0.0 to 5.5 °C.
19
Intake Air Differential
AV
147
In
°C
Settable from 0.0 to 5.5 °C.
20
Supply Air Setpoint
AV
105
In
°C
Settable from 7.2 to 37.7 °C.
21
Zone Air Setpoint
AV
105
In
°C
Settable from 12.7 to 35.0 °C.
22
Zone Air High Limit Setpoint
AV
105
In
°C
Settable from 4.4 to 60.0 °C.
23
Zone Air Low Limit Setpoint
AV
105
In
°C
Settable from 1.6 to 21.1 °C.
24
Unoccupied Cooling Setpoint
AV
105
In
°C
Settable from Unoccupied Heating Setpoint to 35.0 °C.
25
Unoccupied Heating Setpoint
AV
105
In
°C
Settable from 4.4 °C to Unoccupied Cooling Setpoint.
26
Unoccupied Differential
AV
147
In
°C
Settable from 0.0 to 5.5 °C.
27
Unoccupied RH Setpoint
AV
81
In
%
Settable from 20.0 to 99.9 %.
28
Unoccupied RH Differential
AV
81
In
%
Settable from 0.0 to 9.9 %.
1
Unit Status
INT
8
Out
2
CO2 In Zone
INT
29
Out
0 to 2000 ppm.
3
CO2 Outside
INT
29
Out
0 to 2000 ppm.
4
CO2 Differential
INT
29
Out
5
CO2 Setpoint
INT
29
In
Settable from 0 to 2000 ppm.
6
P1 Setpoint
INT
8
In
Settable from 0 to 999 inches of wc, in thousandths.
7
P3 differential
INT
9
In
Settable from -300 to 300 inches of wc, in thousandths.
8
Heat Wheel Supply Pressure
INT
8
Out
Inches of water column, in thousandths. 1452 = 1.452 “wc
9
Heat Wheel Exhaust Pressure
INT
8
Out
Inches of water column, in thousandths.
10
Reheat Condenser Pressure
INT
8
Out
Inches of water column, in thousandths.
11
Alarm Code
INT
8
Out
Alarm code. See table at end of list.
42
0=Satisfied/Off, 1=Heating, 2=Cooling, 3=Dehumidifying,
4=Dehum/Heat, 5=Dehum/Cool, 6=Low Suction Pressure.
CO2 In Zone minus CO2 Outside, 0 to 2000 ppm.
C l i m a t e M a s t e r Wa t e r - S o u r c e H e a t P u m p s
THE SMART SOLUTION FOR ENERGY EFFICIENCY
DOAS CM3500 Controller
R e v. : 3 1 J u l y, 2 0 1 3
Points List
LON Points List
Unit Type: Program Version 2.1.x & Above
#
DESCRIPTION
TYPE
SNVT
DIR
UNITS
COMMENTS
1
Network Occupied Input
DGT
95
In/Out
2
Occupied
DGT
95
Out
Confirmation of Occupied Status.
3
Alarm Active
DGT
95
Out
Confirmation of Alarm Status. 0 = Alarm, 1 = Normal.
4
Air Flow
DGT
95
Out
Confirmation of Air Flow. 0 = No Flow, 1 = Flow.
5
Supply Fan
DGT
95
Out
Confirmation of Supply Fan, 0 = Off, 1 = On.
6
Compressor #1
DGT
95
Out
Confirmation of Compressor #1, 0 = Off, 1 = On.
7
Compressor #2
DGT
95
Out
Confirmation of Compressor #2, 0 = Off, 1 = On.
8
Compressor #3
DGT
95
Out
Confirmation of Compressor #3, 0 = Off, 1 = On.
9
Compressor #4
DGT
95
Out
Confirmation of Compressor #4, 0 = Off, 1 = On.
10
Condenser Fan #1
DGT
95
Out
Confirmation of Condenser Fan #1, 0 = Off, 1 = On.
11
Condenser Fan #2
DGT
95
Out
Confirmation of Condenser Fan #2, 0 = Off, 1 = On.
12
Condenser Fan #3
DGT
95
Out
Confirmation of Condenser Fan #3, 0 = Off, 1 = On.
0 = Unoccupied, 1=Occupied.
13
Condenser Fan #4
DGT
95
Out
Confirmation of Condenser Fan #4, 0 = Off, 1 = On.
14
OA Damper Status
DGT
95
Out
Confirmation of OA Damper. 0 = Closed, 1 = Open.
15
Auxiliary Heating Required
DGT
95
Out
Confirmation of Aux. Heat, 0 = Not Required, 1 = Required.
16
Remote Reset
DGT
95
In/Out
CODE
Write 1 to Reset. 0 is set after a program scan.
ALARM DESCRIPTION
1
Low Suction Pressure
2
Motor Overloads
3
High Discharge Pressure A
4
High Discharge Pressure B
5
Multiple Low Pressure A
6
Multiple Low Pressure B
7
Temperature Sensor Fault
8
pAD Network Fault
9
SAT Out of Range
10
Air Filter Clogged
11
Low Voltage Fault
12
High Condensate Level
13
Low Water Flow
14
Smoke Alarm
15
Low Air Flow
16
Freeze ‘Stat Alarm
c l i m a t e m a s t e r. c o m
43
CLIMATEMASTER WATER-SOURCE HEAT PUMPS
DOAS CM3500 Controller
R e v. : 3 1 J u l y, 2 0 1 3
Points List
MODBUS Points List
Unit Type: Program Version 2.1.x & Above
Coil
Address
Description
Modbus
Function
1/5
R/W
Status
Read/
Write
Read
Only
Read
Only
Read
Only
Read
Only
Read
Only
Read
Only
Read
Only
Read
Only
Read
Only
Read
Only
Read
Only
Read
Only
Read
Only
Read
Only
Read/
Write
Modbus
Function
R/W
Status
00002
Network Occupied Input
00003
Occupied
1
00004
Alarm Active
1
00005
Air Flow
1
00006
Supply Fan
1
00007
Compressor #1
1
00008
Compressor #2
1
00009
Compressor #3
1
00010
Compressor #4
1
00011
Condenser Fan #1
1
00012
Condenser Fan #2
1
00013
Condenser Fan #3
1
00014
Condenser Fan #4
1
00015
OA Damper Status
1
00016
Auxiliary Heating Required
1
00017
Holding
Register
Address
Remote Reset
00002
Suction Pressure
3
00003
Discharge Pressure
3
00004
Intake Air Relative Humidity
3
00005
Intake Air Temperature
3
00006
Intake Air Dewpoint
3
00007
Supply Air Temperature
3
00008
Zone Air Temperature
3
00009
Zone Air Relative Humidity
3
00010
Suction Press Circuit B
3
00011
Discharge Press Circuit B
3
00012
Reheat Command
3
44
Description
1/5
Read
Only
Read
Only
Read
Only
Read
Only
Read
Only
Read
Only
Read
Only
Read
Only
Read
Only
Read
Only
Read
Only
Comments
0 = Unoccupied, 1=Occupied.
Confirmation of Occupied Status.
Confirmation of Alarm Status. 0 = Alarm, 1 = Normal.
Confirmation of Air Flow. 0 = No Flow, 1 = Flow.
Confirmation of Supply Fan, 0 = Off, 1 = On.
Confirmation of Compressor #1, 0 = Off, 1 = On.
Confirmation of Compressor #2, 0 = Off, 1 = On.
Confirmation of Compressor #3, 0 = Off, 1 = On.
Confirmation of Compressor #4, 0 = Off, 1 = On.
Confirmation of Condenser Fan #1, 0 = Off, 1 = On.
Confirmation of Condenser Fan #2, 0 = Off, 1 = On.
Confirmation of Condenser Fan #3, 0 = Off, 1 = On.
Confirmation of Condenser Fan #4, 0 = Off, 1 = On.
Confirmation of OA Damper. 0 = Closed, 1 = Open.
Confirmation of Aux. Heat, 0 = Not Required, 1 = Required.
Write 1 to Reset. 0 is set after a program scan.
Comments
In Tenths, linear from 0 to 250 psig.
In Tenths, linear from 0 to 650 psig.
In Tenths, linear from 0 to 100 %.
In Tenths, linear from -42°F to 137°F.
In Tenths, calculated value in °F.
In Tenths, linear from -58 to 212 °F.
In Tenths, linear from -58 to 212 °F.
In Tenths, linear from 0 to 100 %.
In Tenths, linear from 0 to 250 psig.
In Tenths, linear from 0 to 650 psig.
In Tenths, linear from 0 to 100 %.
C l i m a t e M a s t e r Wa t e r - S o u r c e H e a t P u m p s
THE SMART SOLUTION FOR ENERGY EFFICIENCY
DOAS CM3500 Controller
R e v. : 3 1 J u l y, 2 0 1 3
Points List
MODBUS Points List
Unit Type: Program Version 2.1.x & Above
Holding
Register
Address
Description
Modbus
Function
R/W
Status
00013
Auxiliary Heating Comm.
3
00014
Supply Fan VFD Comm.
3
00015
Exhaust Fan VFD Comm.
3
00016
Outside Air Damper Comm.
3
00017
Recirc. Damper Command
3
00018
Intake Air Cooling Deadband
3/6
00019
Intake Air Heating Deadband
3/6
00020
Intake Air Differential
3/6
00021
Supply Air Setpoint
3/6
00022
Zone Air Setpoint
3/6
00023
Zone Air High Limit Setpoint
3/6
00024
Zone Air Low Limit Setpoint
3/6
00025
Unoccupied Cooling Setpoint
3/6
00026
Unoccupied Heating Setpoint
3/6
00027
Unoccupied Differential
3/6
00028
Unoccupied RH Setpoint
3/6
00029
Holding
Register
Address
Unoccupied RH Differential
3/6
Read
Only
Read
Only
Read
Only
Read
Only
Read
Only
Read/
Write
Read/
Write
Read/
Write
Read/
Write
Read/
Write
Read/
Write
Read/
Write
Read/
Write
Read/
Write
Read/
Write
Read/
Write
Read/
Write
Modbus
Function
R/W
Status
00210
Unit Status
3
00211
CO2 In Zone
3
00212
CO2 Outside
3
00213
CO2 Differential
3
00214
CO2 Setpoint
3
00215
P1 Setpoint
3
00216
P3 differential
3
00217
Heat Wheel Supply Pressure
3
00218
Heat Wheel Exhaust Pressure
3
00219
Reheat Condenser Pressure
3
00220
Alarm Code
3
Description
Read
Only
Read
Only
Read
Only
Read
Only
Read
Only
Read
Only
Read
Only
Read
Only
Read
Only
Read
Only
Read
Only
Comments
In Tenths, linear from 0 to 100 %.
In Tenths, linear from 0 to 100 %.
In Tenths, linear from 0 to 100 %.
In Tenths, linear from 0 to 100 %.
In Tenths, linear from 0 to 100 %.
In Tenths, settable from 0.0 to 9.9 °F.
In Tenths, settable from 0.0 to 9.9 °F.
In Tenths, settable from 0.0 to 5.0 °F.
In Tenths, settable from 45.0 to 99.9 °F.
In Tenths, settable from 55.0 to 95.0 °F.
In Tenths, settable from 40.0 to 140.0 °F.
In Tenths, settable from 35.0 to 70.0 °F.
In Tenths, settable from Unoccupied Heating Setpoint to 95.0 °F.
In Tenths, settable from 40.0 to Unoccupied Cooling Setpoint °F.
In Tenths, settable from 0.0 to 9.9 °F.
In Tenths, settable from 20.0 to 99.9 %.
In Tenths, settable from 0.0 to 9.9 %.
Comments
0=Satisfied/Off, 1=Heating, 2=Cooling, 3=Dehumidifying,
4=Dehum/Heat, 5=Dehum/Cool, 6=Low Suction Pressure.
0 to 2000 ppm.
0 to 2000 ppm.
CO2 In Zone minus CO2 Outside, 0 to 2000 ppm.
Settable from 0 to 2000 ppm.
Settable from 0 to 999 inches of wc, in thousandths.
Settable from -300 to 300 inches of wc, in thousandths.
Inches of water column, in thousandths. 1452 = 1.452 “wc
Inches of water column, in thousandths.
Inches of water column, in thousandths.
Alarm code. See table at end of list.
c l i m a t e m a s t e r. c o m
45
CLIMATEMASTER WATER-SOURCE HEAT PUMPS
DOAS CM3500 Controller
R e v. : 3 1 J u l y, 2 0 1 3
Points List
MODBUS Points List
Unit Type: Program Version 2.1.x & Above
CODE
46
ALARM DESCRIPTION
1
Low Suction Pressure
2
Motor Overloads
3
High Discharge Pressure A
4
High Discharge Pressure B
5
Multiple Low Pressure A
6
Multiple Low Pressure B
7
Temperature Sensor Fault
8
pAD Network Fault
9
SAT Out of Range
10
Air Filter Clogged
11
Low Voltage Fault
12
High Condensate Level
13
Low Water Flow
14
Smoke Alarm
15
Low Air Flow
16
Freeze ‘Stat Alarm
C l i m a t e M a s t e r Wa t e r - S o u r c e H e a t P u m p s
THE SMART SOLUTION FOR ENERGY EFFICIENCY
DOAS CM3500 Controller
R e v. : 3 1 J u l y, 2 0 1 3
c l i m a t e m a s t e r. c o m
47
CLIMATEMASTER WATER-SOURCE HEAT PUMPS
DOAS CM3500 Controller
R e v. : 3 1 J u l y, 2 0 1 3
Revision History
Date:
Item:
7/31/13
Points List Tables
10/17/11
First Published
Action:
Added
7300 S.W. 44th Street
Oklahoma City, OK 73179
Phone: 405-745-6000
Fax: 405-745-6058
climatemaster.com
*97B0065N01*
97B0065N01
ClimateMaster works continually to improve its products. As a result, the design and specifications of each product at the time of order may be
changed without notice and may not be as described herein. Please contact ClimateMaster’s Customer Service Department at 1-405-745-6000 for
specific information on the current design and specifications. Statements and other information contained herein are not express warranties and
do not form the basis of any bargain between the parties, but are merely ClimateMaster’s opinion or commendation of its products. For the latest
version of this document go to climatemaster.com.
ClimateMaster is a proud supporter of the Geothermal Exchange Organization - GEO. For more information visit geoexchange.org.
© ClimateMaster, Inc. 2009
48
C l i m a t e M a s t e r Wa t e r - S o u r c e H e a t P u m p s