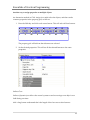
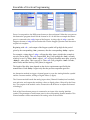
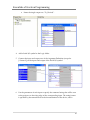
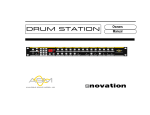
1
 Essentials of Crestron Programming Essentials of Crestron Programming
2 Essentials of Crestron Programming
Introduction The intent of this workbook is to review the design and programming of the Virtual Presentation Room project discussed in the Essentials of Crestron Programming class. The class introduces programmers to important SIMPL Windows and VTPro‐e programming techniques, and how they apply to Crestron control systems. This includes an understanding of how control systems use touchpanels and keypads as user interfaces. Through these interfaces, users send signals that are processed by the control system (manipulated by logic symbols) and outputted to eventually control a device. The first section of this workbook reviews the VTPro‐e project, “Essentials Class Master TP.vtp”, designed for a TPS‐15G‐QM touchpanel. This project contains all the pages and subpages necessary for controlling the Virtual Presentation Room. The second section reviews the SIMPL Windows program, “Essentials Master Program ver1.smw”, which contains all the logic for controlling the system. Virtual Presentation Room The Virtual Presentation Room is a one‐room system that provides audio/video switching and routing of four video sources to the display device, motorized screen and drape control, and lighting control. The user interfaces include a TPS‐15G‐QM, XPanel, and CNX‐B12 keypad. 3 Essentials of Crestron Programming
Crestron VisionTools Pro‐e Example VTPro‐e Project Open the classroom touchpanel project, “Essentials Class Master TP.vtp”. This project is designed for a TPS‐15G‐QM and provides buttons for source selection and volume, screen and drape control, and lighting control. It also provides subpages that contain the transport controls for each source type. In addition, a video preview window and video page allows the touchpanel to display the same video source being routed to the display device. Finally, the project provides the end user with real‐time feedback. The ProjectView tab on the left side of the screen is a tree with the top‐level project name and subentries for the pages and subpages being used in the project. The subentries are identified by the following icons: = Home Page. This page is the first page displayed when the panel starts up. Every VTPro‐e project must have one page “marked as first”. To mark a page as first, right‐
click the page as select Mark Page As First. = Page. A page can contain subpages, which are listed as sub‐entries under the page entry. = Subpage. Subpages are designed to appear on top of a standard page only when needed, and then to disappear when no longer necessary. = Subpage reference. A subpage reference is a placeholder for a subpage. A green color indicates that the associated subpage will be visible on top of the standard page in the design view. A white color indicates that the subpage won’t be visible. 4 Essentials of Crestron Programming
To make a subpage visible or hidden, right‐click the subpage reference and select or clear the check mark next to Visible. The detail view in the center of the screen is is where you design the layout of each page and draw objects. The property grid on the right side of the screen is a tree that consists of all the properties that can be assigned to the selected object, page or subpage. For example, selecting a button will display properties for synchronization, appearance, digital press join, reserved joins and all other button properties. To create a VTPro‐e project Click the Create a New Project button. This will open the “Name New Project File As” dialog. Locate the directory where the project will be saved. Select the panel type from the drop‐down list. To re‐create the classroom project, select the TPS‐15G‐QM. Type a name for the project and click Create. 5 Essentials of Crestron Programming
The new project will be visible in the ProjectView tab. If the classroom project is also open, then both projects will be listed in the tab. To create a new page button. (The down arrow next to the button allows you Click the Create New Page to select a theme, if one is available for the given panel type.) Type a name for the page. For the example project, type “Main” and click OK. The Main page will be the home page, so mark it as first by right‐clicking the page and selecting Mark Page as First. 6 Essentials of Crestron Programming
Every project in VTPro‐e must have a home page; if you don’t mark a page as first, then you will be prompted to do so when saving the project. Page Properties Selecting the Main page will display the page properties. Display grid = Select Yes or No to display or hide the alignment grid. (You can also specify the grid size in pixels.) Displaying the grid provides a visual guide when aligning objects. Hiding the grid allows you to see the page design. Snap to grid = Select this check box to snap the corners of objects to the nearest grid point. Background color = Select a background color for a page by clicking the button and selecting the desired color from the color box. In the example project, the background color is set to White. 7 Essentials of Crestron Programming
Create the Power button Click the Button tool and drag out a small button on the upper left corner of the page, as seen in the classroom project. This button will toggle the system power on and off. Select the button to display the properties in the property grid tree. An alternative method to assign properties is to double‐click the object to open the Properties dialog. However, Crestron recommends using the property grid to set properties. The property grid displays the same properties as the dialog, although the properties are arranged differently. 8 Essentials of Crestron Programming
The Active State and Inactive State entries in the tree allow you to specify the button’s appearance in the active (pressed) and inactive (released) states. Synchronize States
VTPro-e allows you to synchronize selected state properties between the active and
inactive states. This means that if synchronization is turned on, state properties such as
frame thickness will be applied automatically to both the active and inactive states.
To toggle synchronization select Yes or No from the Synchronize States drop-down list.
When synchronization is on, the Synchronize
properties.
icon will identify the synchronized
The example project sets the following properties for the Power button:
Synchronize States = No
Text = “Power” Face color = gray Frame color = blue Inactive text color = blue 9 Essentials of Crestron Programming
Active text color = red. The red active text color signifies that when the button is pressed and the button is in the active state, the text label will turn red. When the button is released, the text color will be blue again. State Style = Shaded Contrast and Depth = minimum (25%). This gives the button a flat appearance. Frame = Medium Thickness with 2D style. 10 Essentials of Crestron Programming
Style and Shape Aliased = Yes Style = None Shape = Radius – 3. The radius setting rounds the corners of the button. When anti‐aliasing is selected, this smooths out rough edges and corners that may be visible with objects of a certain size or color. Otherwise, the Aliased setting is the same as “unaffected”. Digital Press Join Select the “Digital Press Join” property and assign digital press join 7 to the Power button. You can do this either by clicking 7 on the list box, or typing 7 directly into the text field. The digital press join will be mapped to the corresponding digital input (<fb7>) and
digital output (<press7>) of the touchpanel symbol in SIMPL Windows. The digital input
sets the feedback state of the button to active (high) or inactive (low), while the output is
triggered when the button is pressed.
Lock Position and Size: Select Yes on this property to lock the button at its current position and size. In this mode the button cannot be moved or resized (the resize 11 Essentials of Crestron Programming
handles turn to small padlocks). To unlock, select No. (In the example project, all Lock properties are set to Yes.) Simulation Mode
These feedback options only have an effect if Simulation Mode is enabled (by selecting the Simulation Mode check box on the Compile tab of the Project Properties). Simulation mode enables VTPro‐e to generate a .SIM project suitable for client demonstrations. The simulation project is an XPanel executable that demonstrates the touchpanel project on the customerʹs PC without need to connect to any equipment. Select a feedback behavior from the list. The choices are: Interlock: The buttonʹs feedback will be interlocked with another button or group of buttons. (The other button(s) must also be assigned interlocked feedback.) When the button is clicked it will display in the active state until another button with interlocked feedback is clicked. In this way only one button in the interlock group will show active feedback at one time. Momentary: The buttonʹs feedback will be active for as long as the mouse pointer is left‐
clicking the button. When the mouse pointer is released the buttonʹs feedback will be 12 Essentials of Crestron Programming
inactive. Toggle: The buttonʹs feedback will toggle between the active and inactive state with each mouse click. To copy an object Click the object to select it. Press Ctrl+C to copy the object to the clipboard, and Ctrl+V to paste. ‐or‐ Use the Copy and Paste commands on the Edit menu. Drag the newly copied object to the desired position on the page. and drag the cursor across all the To select multiple objects click the Select tool objects to be copied. This will activate the objects, making the handles visible. All the selected objects can then be copied using the copy and paste commands. When you copy an object, all its properties will also be copied, so it will be necessary to adjust properties such as text labels and join numbers in the new objects. Create the Screen Group 13 Essentials of Crestron Programming
Click the Border tool and drag out a box long enough to fit the two Up and Down screen buttons. Position the border under the Power button, as shown in the example project. Set the following Border properties: Text = “Screen” Align the text on the top center of the border. To do this, click the Alignment property and select Upper Center. Appearance To make the border face transparent click the Face Color Flag property and select Transparent. The transparent indication will be shown as a blue‐highlighted T. Select the Frame and Text options. The classroom project settings are shown here: 14 Essentials of Crestron Programming
Create two button objects inside the border and label them as shown in the classroom project. One button will be labeled Up, and the other, Down. Assign the Up button digital press join number 21, and assign the Down button digital press join 22.. The Up and Down digital press joins will be mapped to the corresponding digital outputs (<press21> and <press22>) and digital inputs (<fb21> and <fb22>) of the touchpanel symbol in SIMPL Windows. The button presses will be interlocked and routed to the relay card on the control system to control the screen. When objects are stacked on top of each other, you can use the Depth commands (on the Layout menu) to bring an object to the front or back, or to move it up or down one level. Create the Drapes Group Create a border labeled “Drapes” and group together two buttons labeled Open and Close. A quick way to do this is to use the methods described to copy the Screen group (which will copy the appearance properties) and re‐label the border and buttons. Assign the Open button join number 23, and the Close button, join 24. The Open and Close digital press joins will be mapped to the corresponding digital outputs (<press23> and <press24>) and digital inputs (<fb23> and <fb24>) of the touchpanel symbol in SIMPL Windows. The button presses will be latched and routed to the single relay that controls the drapes. 15 Essentials of Crestron Programming
Create the Lights Button Create a button labeled “Lights” with digital press join number 31. Position it at the bottom left corner of the page. The Lights digital press join will be mapped to the corresponding digital output (<press31>) and digital input (<fb31>) of the touchpanel symbol. The signals will control the display of the Light Presets subpage, described next, and enable the user to select a lighting preset. 16 Essentials of Crestron Programming
Subpages and Subpage References Subpages are designed to appear on top of a standard page when needed, and then to disappear when no longer necessary. Subpages are not typically the same size as a page. Instead, a subpage often defines a smaller area that may contain buttons for controlling transport functions, for example, or a message about lamp life. 17 Essentials of Crestron Programming
The Lighting Presets subpage contains four lighting buttons arranged horizontally. The subpage is designed to appear on the bottom center portion of the Main page when the “Lights” button is pressed. To create a subpage Click the Create New Subpage button. Type a name for the subpage. For the example project, type Lighting Presets and click OK. This will create a subpage the size of a standard page. Click and drag the sides of the subpage window until the window appears to be the appropriate size. Then position the cursor on the lower left corner of the resized window and take note of the dimensions (width, height) that appear in the status bar. 18 Essentials of Crestron Programming
Type the dimensions in the Width and Height fields. This will resize the subpage to the indicated dimensions. Draw four buttons on the subpage arranged horizontally. Label and assign digital press joins to the buttons as follows: “High” (join 32), “Medium” (join 33), “Low” (join 34) and “Off” (join 35). Click the Close button to close the subpage window, and click Yes when prompted to save the changes. The subpage will now be listed in the ProjectView tree, as a subentry under the project name. To add the subpage to the Main page, drag it to the bottom center of the Main page. 19 Essentials of Crestron Programming
Select the subpage to display the subpage reference properties. Assign a digital feedback join of 31. The digital feedback join is mapped to the corresponding digital input (<fb31>) on the
touchpanel symbol in SIMPL Windows. When the input goes high, the subpage appears
on the page, and when it goes low, this hides the subpage. Since the “Lights” button was
also assigned join 31, this signifies that the Light Presets subpage will appear when the
user presses the “Lights” button.
Lock the subpage in place by selecting Yes on the Lock property. 20 Essentials of Crestron Programming
Create source buttons and indirect text field Click the Border tool and drag out a border that will fit the source selection buttons. The border should have a Transparent face color and no text label. Add four buttons inside the border, arranged horizontally. Label the buttons: “DVD”, “Apple 1”, Apple 2” and “DSS”. Click Assign The Click Assign tool allows you to quickly assign join numbers and other properties to multiple objects. Use Click Assign to assign digital press join numbers to the source selection buttons, as follows: Click the Digital Assign Digital Join tool. If the Click Assign toolbar is not visible, make it visible by clicking the Options menu. Then point to Toolbars and select Click Assign. 21 Essentials of Crestron Programming
Click Start at the Selected Join. This will enable the Starting Join list. Select 51 as the starting join. This signifies that the numbering of the digital press joins will start at digital press join 51. Click OK. The cursor will now turn into a hand icon. Click the DVD button. This will automatically assign digital press join 51, which will be indicated on the status bar. Click the Apple 1, Apple 2, and DSS buttons. This will assign digital press joins 52, 53 and 54. Turn off Click Assign by pressing the Esc key. 22 Essentials of Crestron Programming
The Click Assign toolbar allows you to click assign such additional properties as: Style: Select the Click Assign Style tool and select the desired style properties. For the example project, the Style is set to Aliased – None. The State Style is set to Shaded, with the minimum setting for Contrast and Depth. Frame Style: Select the Click Assign Frame Style tool and select the 2D option. Frame Thickness: Select the Click Assign Frame Thickness Medium option. Frame Color: Select the Click Assign Frame Color color box. tool and select the tool and select Blue from the tool and select Blue from the color Text Color: Select the Click Assign Text Color box. Note that the Text Color option will apply the Inactive state text color. To set the color in the active state, go back to the properties of each button and set the Active color. Upon selecting each style property, click each of the source selection buttons to automatically apply the properties to each clicked button, and then press Esc to exit Click Assign. 23 Essentials of Crestron Programming
Another way to assign properties to multiple objects An alternative method to Click Assign is to multi‐select the objects, and then set the common properties in the property grid, as follows: 1. Press the Shift key and click each source button. This will select all four buttons. The property grid will indicate that 4 buttons are selected. 2. Set the desired properties. This will set all the selected buttons to the same properties. Indirect Text Indirect (dynamic) text allows the control system to send text strings to an object’s text field during run time. Add a long button underneath that’s the length of the four source select buttons. 24 Essentials of Crestron Programming
This button will have no button press functionality, but rather will be used display text indicating which source is currently selected. As the selected source changes, the displayed text will also change. In the property grid set the Synchronize States property to Yes, and leave the Digital Press Join field blank since pressing the button will have no effect. Go to the Inactive State or Active State and expand the Indirect Text property. Set the Enable property to Yes and then assign Text Join 2. This is a serial Indirect Text join. The indirect text join is mapped to the corresponding serial input (<text‐o2>) on the touchpanel symbol detail in SIMPL Windows. The serial string will be transmitted to the touchpanel during run time. Reserved Joins Reserved join numbers allow objects to adjust functions that are local (internal) to the touchpanel. Reserved joins are not mapped to the SIMPL program. Instead, a reserved join can be used to control an internal function such as the audio volume. In the example project, reserved joins are used to set the LCD brightness of the panel. 25 Essentials of Crestron Programming
To program reserved joins Create a transparent border and label it “Panel”. (Align the text on the top right corner of the border.) Create two buttons, labeled Up and Down. Assign the the same appearance properties as the other buttons on the page. On the Up button, select the Digital Press Join property, and click the down arrow button. This will display the list of all reserved joins. Select the function “LCD Brt Up” from the Reserved Join list. This signifies that the Up button will raise the LCD brightness level of the panel when pressed. On the Down button, select the “LCD Brt Dn” reserved join. This signifies that the Down button will lower the LCD brightness level of the panel when pressed. Click the Gauge tool and draw an analog gauge next to the Up and Down buttons. 26 Essentials of Crestron Programming
Select the gauge and click the Analog Feedback Join property. Select the “LCD Brt” reserved join from the list. This signifies that the gauge will display the brightness level. As specified in the example project, the Gauge object is assigned the following appearance properties: In addition, the Design property provides options for the appearance of the indicator, as follows: 27 Essentials of Crestron Programming
Add Clock and Date Click the Clock tool and draw a clock on the upper right corner of the Main page. The Clock object will display the time of day according to the format shown in the property grid. Click the Button tool and draw a button under the Clock object. This button will display the date, as parsed from the internal control system clock. In the button property grid, expand the Indirect Text property. Enable indirect text and assign serial join 1. The indirect text join will be mapped to the corresponding serial input (<tx‐o1>) on the touchpanel symbol in SIMPL Windows. The control system will send the formatted date (day/month/year) to the button’s indirect text field. 28 Essentials of Crestron Programming
Create Volume Controls Create a transparent border labeled “Volume”, to be positioned on the center right portion of the Main page. Create three Volume control buttons labeled Up, Down and Mute, and three volume preset buttons labeled 25%, 50% and 75%. Use Click Assign to assign the following digital press joins: Up (digital press join 11) Down (digital press join 12) Mute (Digital press join 13) 25% (Digital press join 14) 29 Essentials of Crestron Programming
50% (Digital press join 15) 75% (Digital press join 16) The Volume buttons will be used to adjust the volume level up and down, mute the volume, and recall volume preset levels specified in the SIMPL Windows program. tool and draw a transparent slider. Assign Analog Touch/Feedback Click the Slider join 1. The slider object allows the user to adjust the volume by setting the level with their finger. The Analog Touch/Feedback join maps to the corresponding analog input <an_fb1> and analog output <an_act1> of the touchpanel symbol in SIMPL Windows. The input will set the volume level, while the output reports the level set by the user. Click the Percent tool and draw a Percent object under the slider. Assign the percent object Analog Feedback Join 1, the same as the slider object. In this way, both the Slider and Percent objects will display the current audio volume level. Create Light Level Gauges Click the Border tool and create a transparent border labeled “Lights”. Position the border in the bottom right corner of the Main page. tool and draw 8 transparent gauges. (Or use the copy and paste Click the Gauge method to copy the 8 gauges.) Use the Click Assign Analog Join to the gauges (from left to right). tool to assign Analog Feedback joins 2 through 9 30 Essentials of Crestron Programming
The Analog Feedback joins are mapped to the corresponding analog inputs (<an‐fb2> through <an‐fb9>) on the touchpanel symbol in SIMPL Windows. Video Windows The classroom project includes a button labeled “Video” on the Main page. This button displays a small preview of the currently selected video source. When the user presses the Video button, the project flips to a full‐page video window. To create the video page Click the Create new page button and type a name for the page. For the example project name the page “Video” and click OK. This will open a new, blank page. Click the Video tool and draw a video window of any size. Expand the Design property in the property grid and select Full Screen as the Video Size. Expand the Source property and select RGB 1 as the Default Input. Alternatively, an Input Selection join can be assigned, that would allow the video source to be selected during run time. For the example program however, the source will be hard coded at RGB 1. 31 Essentials of Crestron Programming
Page Flips The properties of a button object allow you to assign a “page flip”, which signifies that when the button is pressed the page will flip to a specified target page. This allows the user to navigate between pages of the project without need to program the page flips in SIMPL Windows. tool and draw out a button the size of While still on the Video page, click the Button the entire page. This means the button will completely cover the Video window. In the button property grid set the following properties: Synchronize States = Yes Text = no text (delete the text label) Face Color Flag = Transparent Frame Thickness = None Page Flip = Main The page flip list will show all the pages that have been defined so far in the project. (For the example project only one other page, Main, has been defined.) In addition to the list of pages, there is a Return option. This signifies that when the user presses the button, the page will flip to whichever page was last displayed. 32 Essentials of Crestron Programming
When objects are stacked on top of each other, you can use the Depth commands (on the Layout menu) to bring an object to the front or back, or to move it up or down one level. Close the Video page and re‐open the Main page. Now it will be necessary to create a small video object and button that will allow the user to preview the video and flip to the full‐size Video page. Draw a small Video object and position it next to the Power button on the upper left portion of the Main page. 33 Essentials of Crestron Programming
Click the Button tool and create a button that covers the video object. In the Properties of the button, remove the text label and assign Transparent face color. Set the frame thickness to None. Click the Page Flip property and select “Video” as the target page. This signifies that when the user presses the button, the page will flip to the full‐size Video page. Additional subpages In addition to the Lighting Presets subpage, the example project includes subpages that contain the transport controls for the source devices. The subpages are designed to appear in the center of the Main page when the source is selected, and to disappear when the source button is selected again, or when a different source is selected (in which case the new subpage will then appear in the center of the Main page). 34 Essentials of Crestron Programming
To create the DSS subpage Click the Create New Subpage tool. Type a name for the subpage. For the example project, type DSS Controls and click OK. This will create a subpage the size of a standard page. Click and drag the sides of the subpage window until the window appears to be the appropriate size. Then position the cursor on the lower left corner of the resized window and take note of the dimensions (width, height) that appear in the status bar. In the classroom project, the width of the DSS subpage is 708 pixels; the height, 500 pixels. Type the dimensions into the Width and Height fields in the property grid. 35 Essentials of Crestron Programming
This will resize the subpage to the indicated dimensions. Create Keypad buttons Click the Button tool and draw out a button for the numeric keypad. Use the Copy and Paste method to create twelve keypad buttons in all. Arrange the buttons in a keypad configuration. Click Assign Button Text Click the Click Edit Text tool. This will turn the cursor into a hand icon. Click the top left button to enable the button’s text field. Type “1” in the text field. Repeat for button “2”. Label all the keypad buttons (1 through 9, 0, Enter and Cancel). 36 Essentials of Crestron Programming
If text doesn’t fit, you can adjust the size of the font in the property grid (Font property). Press the Esc key to turn off Click Assign. Use Click Assign to assign the following digital press joins: button 1 (join 101) through button 9 (join 109), Enter button (join 99), button 0 (join 100) and Cancel button (118). The digital press joins map to the corresponding digital inputs and outputs of the touchpanel symbol in SIMPL Windows. The outputs transmit the user’s keypad entry to the control system. The inputs set the feedback state of the button. Use the property grid to assign all the other physical appearance properties of the buttons. (Use multi‐select to select all the buttons at once.) 37 Essentials of Crestron Programming
Create the navigation buttons Use the Button tool to draw a button that will be programmed as the Up navigation button. In the property grid expand the Font property. Select Crestron Transport or Crestron Transport Outline from the Font list. The Crestron Transport font consists of symbols that represent transport functions such as Pause, Play or Rewind. Each symbol corresponds to a letter of the alphabet (not case‐
sensitive), as follows: 38 Essentials of Crestron Programming
Type K (corresponding to the Up navigation function) in the text field. Under Style and Shape, select Aliased and Elliptical. Draw three additional buttons, to be programmed as Left, Right and Down navigation buttons. Multi‐select all the navigation buttosn and use the property grid to set them all to the Elliptical shape. Use Click Assign to assign the following properties: Font: Select the Click Assign Font tool. Then select Crestron Transport as the font. Click each button that should be assigned the Font. Text: Select the Edit Text navigation buttons. tool to label the Left (“I”), Right (“H”) and Down (“J”) Digital Press Joins: Select the Click Assign Digital Join tool to assign digital press join numbers to the navigation buttons. Up = 110; Down = 111; Left = 112; Right = 113. Draw a button and position it in the center of the navigation buttons. Label it “Select” and assign digital press join 114. Click the Digital Gauge tool and draw out a rectangle over the navigation buttons. Assign Analog Feedback Join 11. The analog feedback join maps to the corresponding analog input <an‐fb11> on the touchpanel symbol in SIMPL Windows. It will be used to display the currently selected channel number. 39 Essentials of Crestron Programming
Graphics The DSS Controls subpage in the example project includes channel preset buttons with graphics: To import an image into the project Click the ResourceView tab. Right‐click the top‐level project folder and click Import Image. Locate the graphic file and click Import. This will create a new folder called Image Files, which will contain the graphic. ‐or‐ 40 Essentials of Crestron Programming
To import an image from another VTPro‐e project With both projects open and the ResourceView tab selected, drag the image from the Image Files folder of the original project and drop it on the Image Files folder of the target project. To import an image directly into an object Expand the Graphic property in the property grid. Select the Graphic Resource property and click the down arrow. Select Import. Locate the directory where the image file is located. Use the Graphic properties to adjust additional properties of the image, such as Size and Alignment. When an image is imported into a project, it does not reside in a separate folder, but is “embedded” as part of the VTP project file. Create channel selection buttons Use the drag and drop method to import the channel selection bitmap files from the “essentials class master tp” project to the target project. Draw a button that will function as the ABC preset button. Remove the text label. Click the Graphic Resource property and click the down arrow. This will show all the images that were previously imported into the current project. Select “abc.bmp” from the list. 41 Essentials of Crestron Programming
The Graphic Size property provides a number of sizing options, such as stretching the image to cover the entire button. For the example project select “Original Size/Shrink to Fit/0 pixel offset”. Create the remaining channel selection buttons using Click Assign. Click Assign Graphics 1. Select the Click Assign Graphic tool. 2. Select Project Graphic Resources as the property to modify. 3. Select cbs.bmp. 42 Essentials of Crestron Programming
4. Click the button that will be used to select the CBS channel preset. 5. Adjust the “Size” property as described before. 6. Repeat steps 1 through 4 for each of the preset buttons: ABC, CBS, ESPN, FOX, HBO and NBC. Use Click Assign to assign digital press join numbers: ABC = 119, NBC = 120, CBS = 121, FOX = 122, HBO = 123, ESPN = 124. The digital press join number map to the corresponding <press> outputs and <fb> inputs of the touchpanel symbol in SIMPL Windows. The SIMPL program will route the outputs to a Stepper symbol to simulate the keypad button presses that will select the channel preset. 43 Essentials of Crestron Programming
Create the remaining subpages The classroom project includes two additional subpages that contain the transport controls for the DVD player and Apple TVs. DVD Controls subpage Apple TV Controls subpage 44 Essentials of Crestron Programming
The procedure for creating the additional subpages is the same as for the DSS and Lighting Presets pages. The only new element in these subpages is the inclusion of two separate fonts on the same button. For example, three of the Apple TV subpage buttons contain both text and transport symbols: This is accomplished by creating a Text object on top of a Button object, as follows: Create a button and label it “Track –“. Position the text on the upper center of the button. Click the Text tool and draw out a box small enough to fit inside the “Track –“ button. Expand the Text property. Select the Crestron Transport font and type F (not case‐
sensitive) in the text field. The letter “F” corresponds to the Previous Track transport function. Drag the Text object to the button and position it under the “Track –“ text. 45 Essentials of Crestron Programming
Simulation File Simulation mode enables VTPro‐e to generate a .SIM project suitable for client demonstrations. The simulation project is an XPanel executable that demonstrates the touchpanel project on the customerʹs PC without need to connect to any equipment. After the project is compiled in simulation mode, VT Pro‐e creates a .SIM project folder in the designated projects directory. The .SIM folder contains all the project files necessary to demonstrate the project on a PC, including the XPanel.EXE file. To enable simulation mode Right‐click the top‐level project folder in ProjectView, and click Properties to open the Project Properties dialog. Click the Compile tab and select the Simulation check box. To generate and open the SIM file With simulation mode enabled, compile the finished project by pressing F12, or clicking Compile on the File menu. (If you compile the classroom project, this will generate two errors, since Xpanel does not support video windows.) Open the designated directory for VTPro‐e project files. This directory will now include a subfolder with the name of the project and a .sim extension. Open the SIM folder and click the EXE file to open the Xpanel project. The feedback behavior of the XPanel simulation project will depend on the “Simulation
Mode” options selected in the Buttton properties dialog of each button in the project.
46 Essentials of Crestron Programming
Interlock: If this option is selected, the buttonʹs feedback will be interlocked with another button or group of buttons. (The other button(s) must also be assigned interlocked feedback.) When the button is clicked it will display in the active state until another button with interlocked feedback is clicked. In this way only one button in the interlock group will show active feedback at one time. Momentary: If this option is selected, the buttonʹs feedback will be active for as long as the mouse pointer is left‐clicking the button. When the mouse pointer is released the buttonʹs feedback will be inactive. Toggle: If this option is selected, the buttonʹs feedback will toggle between the active and inactive state with each mouse click. Limitations of simulation mode In simulation mode only one Interlock button group is allowed per page. So if you wanted to demonstrate an interlock for setting lighting levels and another one for source selection, this will not work. One way to overcome this is to create a separate subpage for each interlock. However, this would no longer be representive of the actual user interface. For customer demonstrations such as this, Crestron recommends converting the project to an XPanel (by using the “Save As” command to save the project to an XPanel target), and bringing a small, portable control processor such as the QM‐RMC to the customer site. The project can then be demonstrated using XPanel. 47 Essentials of Crestron Programming
Crestron SIMPL Windows We have seen how you can use VisionTools Pro‐e to create powerful touchpanel control interfaces that include pop‐up subpages for specific device transport controls, dynamic text, multi‐mode buttons, high‐resolution graphics, video windows, and more. We also saw how VTPro‐e uses join numbers to identify button presses, feedback, and other digital, analog and serial signals. These join numbers map to inputs and outputs on the touchpanel symbol detail in SIMPL Windows. The signals are processed by the control system, manipulated by logic symbols, and outputted to eventually control a device. Crestron SIMPL Windows provides tools to configure, program, test and debug an integrated control system application. The configuration aspect of SIMPL Windows allows you to select the control system, user interfaces, network devices and controlled equipment required for the installation. To these hardware components you can assign port addresses, Network IDs and IP addresses, set communication parameters and specify which device is connected to which card or network control module. You can also specify what VTPro‐e projects are required for the system. The programming aspect allows you to select the logic symbols the system will require, assign signals to those symbols and connect the signals to other symbols or devices as determined by the program logic. SIMPL Windows includes a wide variety of symbols that are constantly being expanded to support virtually every possible application. As you become more proficient at using SIMPL Windows it will become obvious that there are many ways to solve the same control problem. This allows for programming creativity and independent flexibility. Finally, the testing aspect allows you to test and debug the program using diagnostic tools such as the Crestron Toolbox, SIMPL Debugger and Network Analyzer. 48 Essentials of Crestron Programming
Virtual Presentation Room The SIMPL Windows program that controls the Virtual Presentation Room is based on a PRO2 control system. The equipment rack also includes a CNX‐PAD8A switcher and CNAMPX‐2x60 audio amplifier. Non‐Crestron equipment includes the audio/video source devices. 49 Essentials of Crestron Programming
The PRO2 provides slots for control via RS‐232, IR, relays, Cresnet and Ethernet. (The Ethernet connection to the touchpanel is for uploading files.) To create a new SIMPL Windows program 1. Start SIMPL Windows and click the New SIMPL Program button. You can open several instances of SIMPL Windows at one time. For example, you can open the classroom program titled “Essentials Master Program Ver1.smw”, and use this program as a reference when creating a new program in another instance of SIMPL Windows. 2. Fill out the Program Header as desired and click OK. (To edit the program header click Edit Program Header on the Project menu.) This will open the Configuration view, which consists of three windows: a Device Library and two System Views. The Device Library is a tree with folders for all Crestron and third‐party hardware. As you select devices from the tree the SIMPL Windows status bar will display a description of the device. 50 Essentials of Crestron Programming
3. Add the control processor by dragging it from the Control Systems folder of the Device Library to a Systems Views window. Or double‐click the text in the lower System Views window and select the control system. (For example, select the PRO2 to re‐create the classroom program.) About Configuration View The Configuration View allows you to do the following: • Select the control system. 51 Essentials of Crestron Programming
•
•
•
•
•
Select additional Crestron hardware required for the installation. This can include plug‐in control cards, network control modules, touchpanels, and wireless remotes. Select user devices made by third‐party manufacturers. These are usually the devices being controlled and can include CD players, DVD players, TVs and any other equipment the end user interfaces with using the control system. Configure the devices by specifying which units are connected to which control cards or network modules. Assign ports, network addresses and IP information. Specify communication settings and document the system with connection/installation notes. Specify what VisionTools Pro‐e projects are required for the system. •
Crestron hardware Cresnet devices include network control modules, lighting modules, touchpanels, keypads and any other Crestron equipment that communicates with the control system via the Cresnet network. The Cresnet slot on the control system provides up to 252 Network IDs for Cresnet devices. The quickest and most efficient way to add Crestron hardware is to double‐click the card slot or Network ID in the lower System View tree. This will open a list of Crestron devices that are compatible with that slot. For example, to add a Cresnet device, double‐
click the C2Net‐Device item or the Network ID subentry in the tree. Then scroll down the Device list to locate the device. 52 Essentials of Crestron Programming
If you add a Cresnet device to the top‐level C2NET‐Device slot, SIMPL Windows will auto‐assign the Network ID, first by the default factory ID and then sequentially. To quickly add multiple devices, right‐click the device in the Device Library and select Add multiple copies from the submenu. Then enter the number of devices and click OK. Ethernet devices Ethernet devices include network control modules, touchpanels, and any other Crestron equipment that communicates with the control system via Ethernet. To add an Ethernet device the control system must have an Ethernet network interface card installed, which provides up to 252 network IP addresses. Some Crestron Ethernet‐
enabled control systems provide built‐in Ethernet network interface cards, while others have expansion slots for installing the Ethernet card. If the control system does not provide a built‐in Ethernet card (such as the PRO2), you have to drop it into the expansion slot before you can add Ethernet devices. To add an Ethernet card 1. Expand the PRO2 in the lower System View window. 53 Essentials of Crestron Programming
2. Double‐click the C2Z Card Slot and select the desired Ethernet card. 54 Essentials of Crestron Programming
User Devices User devices include any third‐party AV devices the end user interfaces with through the Crestron control system. The User Devices folders in the Device Library include hundreds of driver files that control devices in a number of formats, the most common being IR. In fact, the User DB and Project DB folders contain only IR devices. To add an IR device, the control system must have an IR card installed. Most Crestron control systems provide a built‐in IR card; for example, the C2I‐IR8 card is built into the PRO2. It provides eight ports that support IR and 1‐way RS‐232 formats. In addition, Crestron manufactures plug‐in IR cards, such as C2IR‐8, that can be installed in the expansion slots of the control system. Once you have an IR card installed, you can select IR devices from the User Devices folder, which itself contains three subfolders for the Crestron Database, User Database and Project Database. The database folders are organized according to Manufacturer or Device Type. You can identify IR devices because they have an IR icon. To add an IR device, locate the device and drag it to the IR card slot or port address in the tree view: If you add an IR device to a card slot, SIMPL Windows will auto‐assign port addresses sequentially, starting with the first open port. You can add drop multiple IR devices to the same port, although if you connect more than 5 IR devices to the same IR port you must use an IR sprayer. In addition, an IR device must not be dropped into the same port with a 1‐way RS‐232 device. The devices must be of the same control format. Another method is to right‐click the IR device and select Add Device to System from the submenu. As shown below, you also have the option to add multiple copies of the device. If you select this option SIMPL Windows will add the devices sequentially to each open port. 55 Essentials of Crestron Programming
The submenu also includes the option to display the device functions, which can help you verify that the device provides the expected commands. Click Show IR Functions to view the commands. Relays Many devices employ internal electronics that allow functions to be triggered through a simple electrical contact. In the world of control systems, this is accomplished using relays. Devices such as screens, drapes and projector lifts tend to use this type of interface. In addition, some not‐dimmed lighting circuits can be switched on and off using relays. Crestron manufactures relays of many different flavors: low‐power relays for use with devices that do not draw a lot of current or require high voltages, and high‐power relays for direct control of motors and lighting circuits. In addition, relays can either be mechanical or solid‐state. To configure a relay device, the control system must have a relay card installed. Most Crestron control systems provide a built‐in relay card; for example, the C2I‐RY8 card is built into the PRO2. It provides eight low‐voltage relay ports. In addition, Crestron manufactures plug‐in relay cards, such as CNXRY‐8, that can be installed in the expansion slots of the control system. 56 Essentials of Crestron Programming
Virtual Presentation Room Equipment List Use the methods described in this section to add the following Cresnet, Ethernet and user devices: Cresnet Interfaces (add to Slot 09) TPS‐15G‐QM C2N‐FTB CNX‐BF12 CNX‐B2 Ethernet Interface (add to previously added Ethernet card on Slot 08) XPanel Switchers (Cresnet, add to Slot 09) CNAMPX‐2x60 CNX‐PAD8A Lighting Module (Cresnet, add to Slot 09) CLX‐1DIM8 User Devices (IR, add to Slot 05) Toshiba HDA2 (DVD Player, Port A) Apple TV (Digital Video Server, Port B) Apple TV (Digital Video Server, Port C) DirectTV D10 (Satellite Receiver, Port D) 57 Essentials of Crestron Programming
Device Settings Once you have added a device, you can double‐click the device to bring up the Device Settings dialog. This dialog provides a number of configuration options, which may differ depending on the device type. Device Name: Use this tab to change the default name of the device and enter a device location. The new name will appear in the System Views and Program View, as well as in the title bar of the deviceʹs symbol. The device name and location will be included in the Device by Location report. Itʹs a good idea to provide descriptive names and specific locations for all network devices, as this can aid in debugging. Devices that draw power from the Cresnet network will also display the power consumption in watts. Net ID: To change the Cresnet ID of the device, select the new ID from the list. The Network ID you assign to a device in SIMPL Windows must be the same as the deviceʹs hardware ID, which is the internal ID set at the factory. You generally have to change the hardware IDs of Crestron devices so that they match the IDs assigned in the software. The procedure for changing the hardware ID differs depending on the device, and is described in each unitʹs documentation. 58 Essentials of Crestron Programming
Ethernet/Serial Upload Address (touchpanels only): Use these tabs to configure an alternate upload address (if any) that will be used to upload files to the touchpanel. For example, in the Virtual Presentation Room program, the TPS‐15G‐QM is connected to the control system via Cresnet, but uses an Ethernet address for upload. UI Project (touchpanels only): Use this tab to import the associated VTPro‐e touchpanel project into the SIMPL Windows program. Click Browse to locate the VTP project file and select one of the four check boxes. The default option is “Include in archives and import joins”, which will import the assigned joins from the VTPro‐e project. This signifies that the joins will automatically be defined on the touchpanel symbol detail, using Crestron naming conventions. 59 Essentials of Crestron Programming
IP Net Address (Ethernet devices only): Use this tab to configure the IP information of the Ethernet device. To change the IP ID, select the ID from the list. To specify a static IP Address, click Use IP Address and type the address in the text field. (For an XPanel interface, the default address should be set to localhost: 127.0.0.1) If the device is configured for DHCP or has been assigned a host name, click Use Host Name and type the fully‐qualified domain name. Relay settings In the classroom program, two of the C2I‐RY8 relays ports will be programmed to raise the projector screen Up and Down, and one relay port will be programmed for control of the drapes. To rename the ports, expand the C2I‐RY8 slot and double‐click Port 1 to open the Device Settings dialog. Type “Screen Up” as the device name. 60 Essentials of Crestron Programming
Rename Port 2 to “Screen Down”. Rename Port 3 to “Drapes”. Program View Click the Program button to open the Program View. Program View allows you to do the following: • Add each logic symbol the program will require. • Assign signals to each symbol. • Connect each signal to other symbols or devices as required by the program logic. The Program View consists of three windows: Symbol Library, Program View and Detail View. 61 Essentials of Crestron Programming
Symbol Library The Symbol Library consists of three directories: Logic Symbols: Logic Symbols perform operations that manipulate the states of output signals in the program. Programmers will typically use many logic symbols when programming in SIMPL Windows. Logic symbols allow programmers independent flexibility by offering many different ways to solve a control problem. Logic symbols can range from the very basic ones such as the AND, OR, or NOT symbols, to symbols designed for very special applications. Crestron Modules: Crestron modules are logic modules that control third‐party devices. Modules are self‐contained logic programs that have been pre‐coded, tested and debugged at Crestron. These dedicated modules can be plugged into a program and used to generate all the proper control codes for a device automatically. User and Project Modules: User Modules are user‐created logic modules. User modules are available to any SIMPL Windows program. In some cases you may have modules that you know you will only need for a particular project. Or else you may have accumulated a large number of user modules that you want to organize differently depending on the project. You can thus designate a user module as a Project Module; a project module is only visible in a given program. Program View 62 Essentials of Crestron Programming
The Program View window consists of three directories: Central Control Modules: A tree of the control system’s programmable slots, plug‐in control cards, and hardware devices connected at the assigned network IDs. In SIMPL Windows, all symbol definitions must be ʺcompleteʺ for the program to compile. A symbol that is incomplete will have a *!* identifier in front of it. If a device symbol is incomplete, the top‐level Central Control Modules folder will show the *!* marker, as will the slot that contains the incomplete device symbol. In the classroom program the TPS‐15G‐QM has the incomplete marker in front of it because the symbol contains a required parameter called “Permanent String Size”. Once this parameter is defined in the program the incomplete marker will go away. Logic: This folder holds the logic symbols that have been added to the program from the Symbol Library. Subsystems Crestron recommends using Subsystems (subfolders) to organize the symbols in the Logic folder for easy location of specific logic functions. In this way, programmers can easily navigate through and identify the various parts of the program. To create a subsystem, right‐click the Logic folder and click Insert Subsystem. This will add a new subfolder under the Logic folder named “New Subsystem”. Multiple Subsystems are displayed in numerical order starting from S‐1 (S‐1, S‐2, S‐3, S‐4…). To rename the subsystem, right‐click it and select View/Edit Symbol Comment. Then type the name in the comment field. The name should be descriptive and unambiguous. 63 Essentials of Crestron Programming
Subsystems can be nested, meaning that one subsystem folder can contain other subsystem folders. The Virtual Presentation Room program contains the following subsystems, which allow outside programmers to immediately locate and understand the logic flow: Logic symbols You can bring logic symbols into the program by selecting them in the Symbol Library and dragging them into Program View. Note that if you drop a symbol directly into Detail View, it will not be placed in the Logic folder or any subsystem. Speed Keys Another way to bring a logic symbol into a program is to select a subsystem and type the speed key name of the logic symbol. For example, the Analog Preset symbol’s speed key name is Preset (not case‐sensitive). You can determine a symbol’s speed key name by selecting it in the symbol library and reading the speed key name in the SIMPL Windows status bar. 64 Essentials of Crestron Programming
Detail View The Detail View window shows the symbol detail of device symbols and logic symbols in the program. The Detail View is customizable; you can adjust the active layout in Detail View by cascading symbol details or tiling the details vertically or horizontally. For further information on customizing the work space, view the options described in the online help file. Programming Interfaces User interfaces are usually the most convenient place to begin programming. To program a user interface, locate it in Program View by expanding the appropriate slot or folder. Then drag the interface to Detail View or double‐click it. This will display the touchpanel definition in Detail View. For example, to begin programming the TPS‐15G‐QM that controls the Virtual Presentation Room, open the Cresnet slot 09 on the PRO2 and drag the TPS‐15G‐QM symbol to Detail View. The first button to be programmed will be the Power button, which was assigned digital press join 7 in VTPro‐e. Power Button Click to select the <press7> digital output, and type “Power Event”. (The space will automatically be converted to an underscore.) 65 Essentials of Crestron Programming
Feedback Button feedback describes the buttonʹs active appearance. For keypads, feedback is usually indicated with a LED located inside the button housing. For touchpanels, feedback can vary, and often includes changing the frame and text color, along with a simulated 3D appearance. In the TPS‐15‐G‐QM project, the Power button’s text label changes color, and the 3D appearance inverts. Visual Button Feedback
Feedback is vitally important to a good user interface design. For one thing, feedback lets the user know that a button press has registered with the system. This is especially important for touchpanels, where the user cannot tell from feel alone whether they pressed in the right spot. Another purpose feedback serves is to provide information to the user about the current state of the system (that the DVD is currently in PLAY mode, for example). In this case, care should be taken to make the feedback be as accurate as possible, as inaccurate or vague feedback will only serve to confuse the user. Whether a button is pressed or not is determined by the user (or the userʹs finger to be exact!) but it is a signal that decides whether a button is shown in its feedback state or not. Therefore, the signal is the driving force for the button feedback. Where the signal comes from depends upon what type of feedback is needed. The most basic type of feedback is called momentary feedback. Momentary feedback causes the button to display in its feedback state only when the button itself is pressed. This type of feedback makes sense for functions that occur only while the button is pressed. For example, volume up and volume down buttons typically receive momentary feedback because the volume level only changes (goes up or down) while the corresponding button is pressed. Momentary feedback can be achieved simply by connecting the button press signal name to the feedback signal for the same button, as shown in the diagram below. 66 Essentials of Crestron Programming
Certain buttons may call for more complex feedback. In the Virtual Presentation Room program, for example, the Power button will alternatately turn the system power on and off. To indicate this with feedback, the button should display in the feedback state when the Power is on, and turn off when the Power turns off. Clearly, momentary feedback will not do the trick here, so we must use logic symbols to generate the desired behavior. The following example shows how to do this using the Toggle symbol. To program Toggled feedback 1. Drag the Toggle symbol from the Memory folder to the Power subsystem. ‐or‐ Click the Power subsystem to select it, and type the speed key name of the Toggle symbol, which is, simply, Toggle. This will add the symbol to the folder. 2. Drag the Toggle symbol to Detail View. 3. With the Toggle symbol and TPS‐15G‐QM symbol both open, click and drag the “Power_Event” digital output of the touchpanel to the <clock> input of the Toggle symbol. 67 Essentials of Crestron Programming
Each rising edge of the <clock> input will cause the outputs to toggle their state. 4. Define the signals that will be toggled with each rising edge of the Clock input: the <out> signal will be named “Power_On”, because this signal will trigger a series of power events when the system power turns on. The <out*> signal is the complement of <out> and will be named “Power_Off”, because this signal will trigger actions when the Power button is pressed again, to turn the system power off. 5. To define the button feedback for the Power event, click and drag the “Power_On” signal back to the <fb7> input of the touchpanel symbol detail. Screen Up and Screen Down The Screen Up and Screen Down buttons were assigned digital press joins 21 and 22 in the VTPro‐e project. These signals will be used to open and close the corresponding relays on the C2I‐RY8 card. Since only one of the Screen buttons should show active feedback at a time, the signals will be routed to an Interlock symbol. 68 Essentials of Crestron Programming
The Interlock symbol will latch an output high on the rising edge of its corresponding input. In addition, any other output signal that was previously high will be latched off. Thus this symbol will have at most one output high at any given time. This property is called break before make. In essence, this symbol will remember which input was last driven high, making it very handy when the user has to select from a number of choices. In the Virtual Presentation Room program this signifies that when the user presses the Screen Up button, this will trigger the Screen Up input of the interlock symbol, latching the Screen_Up_FB output high. Since this output is the driving source of the <fb21> input of the touchpanel, the button will show active feedback for as long as the Screen Up interlock is latched high. Similarly, when the user presses the Screen Down button, this will trigger the Screen Down input of the Interlock symbol, latching the corresponding output high, and activating the corresponding button feedback. Note that in this example the output signals of the Interlock symbol are being used for feedback only, and are not being routed to the C2I card to open and close the relays. This is because the outputs of the Interlock are latched, and it is generally considered poor programming to drive momentary functions (such as a relay command) with a latching signal, even though in some cases it may work correctly. Since we have momentary signals already on the input side of the symbol, it is “cleaner” to use these to drive the relays. We have seen how the Interlock and Toggle symbols are event‐driven; that is, when an event (a rising‐edge transition, for example) occurs the symbol drives its output signals to the appropriate levels. Sometimes this is not sufficient, however, and you need to control when things will happen. In the case of relay controls, the controlled screen needs to be asserted for a period of time, as specified by the manufacturer. The One Shot symbol allows this type of time‐based control. 69 Essentials of Crestron Programming
The One Shot symbol responds to a rising edge on the <trig> input by driving the output signal (connected to <out>) high for the duration specified by the double‐precision <time> parameter. The output signal will remain high only for this duration, regardless of what is happening on the <trig> input. Once <out> has gone low, the symbol may be re‐triggered by another rising edge. The output <out*> is the complement of <out>, just as we saw with the Toggle symbol. One Shot also has a <reset> input. This input allows you to cancel a One‐Shot operation that is already in progress. That is, once the output pulse has started, the only way to cancel it before the full <pulse_time> has elapsed is by driving the <reset> input high. Shown above are two One Shot symbols that are triggered off by the Screen Up and Screen Down button presses (since only one relay can be open at a time), generating a 2‐
second output pulse to drive the relay command. Drapes Control The Virtual Presentation Room uses a single‐switch drape controller for opening and closing the drapes. Such controllers often have a low‐voltage contact closure interface: close the contact and the drapes close, open the contact and the drapes open. Since the touchpanel has two buttons being routed to one relay, we clearly need a latching signal to connect to the relay. A Set/Reset Latch symbol will work perfectly for this application. The Set/Reset Latch symbol implements the most basic memory element, also known as a set/reset flip‐flop. The symbol has two possible states, referred to (oddly enough) as set and reset. A rising edge of the <set> input will set the latch and cause <out> to go high. Once this transition is seen the output will not change until a rising edge is seen on the 70 Essentials of Crestron Programming
<reset> input. When reset, <out> will go low and <out*> (the complement of <out>) will go high. In this example the signal for Drapes Close is connected to the <set> input, and the signal for Drapes Open is connected to the <reset> input. The output of the Latch is connected to the relay itself. When the Latch is set, the signal connected to <out> will be high, thus closing the relay and closing the drapes. When the Latch resets, the signal connected to <out*> will be high, thus opening the relay. Lighting Control Feedback In the Virtual Presentation Room program, the button feedback for the Lighting controls is designed such that when the Lights button on the touchpanel is pressed, the Lighting subpage will be displayed. The Lighting subpage will continue to be displayed until a specified time period expires before the user presses one of the Lighting preset buttons (High, Med, Low or Off). If the user does press one of the Lighting preset buttons, this will start the timer over again. The subpage won’t close until the timer expires with no further user input. This type of programming is accomplished using a Retriggerable One‐Shot symbol. The Retriggerable One‐Shot is almost functionally identical to the One Shot. The only difference is that the Retriggerable One‐Shot will recognize a rising‐edge on the <trig> input even while <out> is high, causing it to re‐trigger and start the count all over again. <out> will not go low until the full duration specified by the double precision <pulse_time> parameter has elapsed since the last trigger. In this example the Retriggerable One‐Shot is driven by an OR symbol, which drives its output high whenever any one or more of the inputs is high. 71 Essentials of Crestron Programming
The OR symbol detects when a relevant button has been pressed, and each press will cause the Retriggerable One Shot symbol to be retriggered, thus starting the countdown over again. When 5 seconds have passed with no buttons being pressed, “Light_Presets_FB” will go low. The “Light_Presets_FB” output is routed into the corresponding input of the touchpanel symbol, which will open or close the subpage accordingly. Meanwhile, the feedback to the Light Preset buttons is programmed using the Interlock symbol. (Light Preset 1 = High; Light Preset 2 = Med; Light Preset 3 = Low; Light Preset 4 = Off.) Lighting Presets Upon pressing a lighting preset button (High, Med, Low or Off) the eight‐light zone will go to the programmed lighting levels, and these levels will be displayed on gauge objects on the touchpanel. This programming is accomplished using four Analog Preset symbols, one for each lighting preset button. The Analog Preset symbol allows you to set the current state of an analog signal to a specified value. In the single‐input form, the Analog Preset symbol has a single digital input, and multiple analog outputs. Each output has a corresponding parameter. On the rising edge of the input each analog output will take on the value specified by its corresponding 72 Essentials of Crestron Programming
parameter. The <ramp time> parameter specifies how long it takes from the moment the digital input goes high to the moment that the analog outputs achieve their desired values. During that time the analog outputs will fade linearly. Due to the nature of analog signals in general, the analog output will maintain this value until this symbol or another symbol explicitly changes its value. The light level analogs are also routed to the gauge objects on the touchpanel, to display the current light levels. 73 Essentials of Crestron Programming
74 Essentials of Crestron Programming
The overview of the Lighting logic is given in the following diagram: 75 Essentials of Crestron Programming
Source Selection Feedback The programming for source selection feedback utilizes an Interlock‐Toggle symbol, which incorporates Interlock and Toggle functions in one symbol. This is necessary because each source select button will toggle the corresponding transport control subpage open and closed. At the same time, the buttons need to be interlocked so that only one subpage can be active at one time. The Interlock‐Toggle symbol accomplishes this because it toggles the state of a given output high and low with each rising edge of the corresponding input, and also interlocks the outputs so that only one output can be high at one time (break before make). A rising edge of the <clear> input immediately forces all outputs to zero. The signal attached to this input is part of the Power Off event and will be discussed later. Serial I/O Upon selecting a source, the touchpanel will display a message indicating the currently selected source. The string is updated during run time as the selected source changes. The SIMPL program will utilize the Serial I/O symbol to send strings dynamically to the touchpanel. As seen in the example, each of the source selection button presses has been routed to an <in> input on the Serial I/O symbol. On the rising edge of an input, the corresponding string (indicated in the parameter field) will be transmitted on <tx$>. The <tx$> output is 76 Essentials of Crestron Programming
routed to the serial input on the touchpanel symbol at <text‐o2>, corresponding to indirect text join 2, which was assigned in VTPro‐e. A subsequent rising edge of an input will clear <tx$> and transmit the new string, so that the current device text will always be displayed on the touchpanel. CNX‐PAD8A Source Selection In the Virtual Presentation Room program, each source selection button is responsible for changing the CNX‐PAD8A switcher to the corresponding input source. One way to accomplish this is to use an Analog Initialize symbol with a digital input assigned for each source. Each source is assigned a parameter with the corresponding switcher input number of the CNX‐PAD8A. The analog output is then routed to the CNX‐PAD8A to perform the switch. The Analog Initialize symbol sets the current state of an analog signal to a specified value. In the single output form, the symbol has multiple digital inputs and a single analog output. Each input has a corresponding parameter. On the rising edge of a digital input the analog output will take on the value specified by the corresponding parameter. The Analog Initialize differs from the Analog Preset discussed earlier, in that the latter symbol linearly ramps the analog value to the target value in the specified time period, whereas the Analog Initialize “steps” the analog value to the new value immediately, with no ramp time. This is appropriate for a function such as source selection, which does not require a smoothly ramping transition (as with lighting or volume). When a symbol modifies the value of one of its analog outputs, the signal connected to that output will hold the new value and retain it until that symbol or another symbol changes the value. In the case where a signal has more than one driving source, the value on the signal will be based on the symbol that changed its value last. 77 Essentials of Crestron Programming
More on Serial Strings By default, serial signals are transient, meaning that the data on a serial signal is only valid for the logic wave (defined below) in which it was created. A logic wave is a processor unit of measurement defined as the elapsed time between the moment a signalʹs state changes and the moment that all symbols connected to that signal have been evaluated. This is analogous to the term ʺpropagation delayʺ used when describing digital hardware. Symbols such as the Make String Permanent symbol allow serial strings to be retained in memory for as long as the program is running. (The serial data is removed from memory when the program resets or shuts down.) In addition, most Crestron touchpanels include a <Permanent String Size> parameter that makes serial strings connected to the touchpanel symbol permanent. Time and Date The VTPro‐e project includes an indirect text field in which the current date is displayed. The date is taken from the internal clock of the control system and can be formatted in different ways. Since uploading a new VisionTools Pro‐e project to a touchpanel will cause the touchpanel lose the date (but not the time), the programming includes a Make String Permanent symbol. The Clock Driver symbol is used to retrieve the time of day from the internal clock of the control system. The <dst> parameter specifies the format for Daylight Savings Time,
where 1d corresponds to United States DST. The TOD is transmitted on the <tod$> serial output.
78 Essentials of Crestron Programming
The TOD string is routed to the input of a Serialize Date symbol, which formats the
string as specified by the <format> parameter. The value of 4d will format the string as:
month/day/year.
The resulting formatted <date$> string is routed to a Make String Permanent symbol
with a Permanent String Size parameter of 50d (50 characters). It is also connected to the serial input on the touchpanel symbol at <text‐o1>, corresponding to indirect text join 1, which was assigned in VTPro‐e. Note that in addition to the Date, the Source_Text string being routed to the source
selection text field is also connected to the Make String Permanent symbol.
Volume
The Volume Up and Volume Down buttons are programmed using an Analog Ramp
symbol, which is another symbol that generates a smoothly transitioning analog output,
rather than a stepped output like the Analog Initialize.
When the user presses the Up or Down button, this will ramp the volume level up or
down until the button is released, or until it reaches 100% (or 0%). The <ramp_time>
parameter specifies the time it takes to ramp the volume from 0% to 100% (and vice
versa). The volume mute button is attached to the <mute> input, which will mute the
audio (cutting it immediately to 0% ) for as long as that input is high.
The analog output of the Analog Ramp symbol is routed to the volume input of the CNXPAD8A to adjust the volume of the currently selected source.
79 Essentials of Crestron Programming
The button feedback for the Up and Down buttons is simply momentary feedback. The button will display in the active state for as long as the button is being pressed. When the button is released, the button feedback will revert to the inactive state. The only programming this feedback type requires is to tie the same signal name to both the input and output of the touchpanel symbol. Volume Mute Feedback In the following example the feedback for the Mute button is handled by a Toggle symbol. As well, the Volume_Mute output is connected to the <clock> input of the Toggle, thus toggling the button feedback with each press of the Mute button. In addition, the Volume Up and Down signals are put through an OR symbol. If either of these signals goes high, this will activate the output of the OR symbol, thus driving the Toggle symbol’s <reset> input high and turning off the mute button feedback. Volume Preset In addition to the Volume Up and Down buttons, the VTPro‐e project provides three Volume Preset Buttons that set the volume to 25%, 50% and 75%. The SIMPL program accomplishes this using an Analog Initialize symbol, which sets an analog signal to a specific value. However, as discussed earlier the Analog Intitalize will immediately “step” the output to the target value, and the effect can be that the volume will cut too abruptly. Instead, a smooth transition from the current volume level to the preset level is needed. In this case the output of the Analog Initialize is routed to an Analog Rate Limiter, which smooths out the transition as required. 80 Essentials of Crestron Programming
The Analog Rate Limiter provides one analog input and one analog output. The <ramp_time> parameter specifies the time it takes to ramp the output from 0% to 100% (or vice‐versa). As a new target value is seen on the input, the output will smoothly transition from its current level to the target level. In this example the volume preset buttons activate the Analog Initialize symbol, stepping the analog output to the preset levels. The output of the Init symbol is routed to the Analog Rate Limiter. The resulting smoothly transitioning analog output, <Volume_Level>, is routed to the CNX‐PAD8A to adjust the volume. Another way the user can adjust the volume is by adjusting the Slider object on the touchpanel with their finger. Thus the corresponding analog output of the touchpanel symbol is also routed to the Analog Rate Limiter. 81 Essentials of Crestron Programming
Volume Presets Feedback The Volume Preset buttons must show active feedback when the current volume level is at the preset level. The volume level is also reported by the Percent object on the touchpanel, as well as the Slider object. The output of the Analog Rate Limiter is a raw analog value from 0d to 65535d, whereas the presets are percentages from 0% to 100%. To facilitate the feedback programming, the raw analog value needs to be scaled to 0d to 100d. Enter the Analog Scaler symbol. The raw analog <Volume_Level> value is connected to an analog input of the Scaler. The <span> is the range of values over which the analog signal will be scaled, which in this example is 100d. The offset is 0d, signifying no offset from the original volume level. The Analog Equate symbol is used to drive the feedback for the preset buttons when the slider is at the correct level. The Analog Equate symbol drives an output high if the value seen on its analog input is equal to the corresponding parameter. Since a slider is not likely to land on the exact preset value, the scaled value generated by the Analog Scaler ensures that the preset button will display feedback as expected. 82 Essentials of Crestron Programming
The overview of the Volume logic is given in the following diagram: 83 Essentials of Crestron Programming
Apple TVs The Virtual Presentation Room features 2 Apple TV servers. This section will discuss how to use Buffer symbols for devices that use a shared set of buttons. The touchpanel project provides one subpage that contains the transport controls for an Apple TV device. This subpage can be called up by either of the two Apple TV sources in the SIMPL program. The Buffer symbol allows the program to determine which Apple TV source the transport buttons will control. The Buffer symbol can be thought of as a gate that can be opened or closed, thus controlling the flow of data. When the gate is open, digital signals are allowed to flow unaltered from the inputs to the corresponding outputs. When the gate is closed, all output signals are set to logic low and the input signals have no effect on them. Opening and closing the gate is handled by the <enable> input. When the signal connected to this input is high, the Buffer is enabled (the gate is open), and when this signal is low, the symbol is disabled (the gate is closed). The source select button press for Apple TV 1 will be connected to the <enable> input of one Buffer symbol, while the button press for Apple TV 2 will be connected to the <enable> input of a second Buffer symbol. When a given Buffer is enabled the transport control signals will flow uninterrupted to the corresponding IR port. Note from the example that only one Buffer should be enabled at any given time. If two Buffers were enabled at once, pressing the PLAY button would cause multiple commands to be issued, which is not what we want. Therefore, the SIMPL program 84 Essentials of Crestron Programming
routes the source select buttons through an Interlock‐Toggle , which ensures that only one source can be selected at one time. The overview of the Apple TV logic is given in the following diagram: DSS Presets The DSS touchpanel subpage includes several channel presets. When the user presses a channel preset button, the SIMPL program should trigger the associated numeric keypad entries on the IR driver to set the channel to the selected preset. The program should account for the minimum period between key presses required by the DSS device (as specified by the manufacturer), and complete the channel selection by “pressing” the Enter key. This can be accomplished using the Stepper symbol, which simulates human button presses. 85 Essentials of Crestron Programming
Preset 1 corresponds to the HBO preset button on the touchpanel. When the user presses this button the program should set the channel to 119. In the above example the button press is connected to the <trig> input of the Stepper. A rising edge of <trig> starts the Stepper; the state of <trig> has no further effect on the Stepper operation until the entire sequence is complete. Beginning with <o1>, each output of the Stepper symbol will go high for the period
given by the corresponding <len> parameter, after the corresponding <delay> expires.
For example, a rising edge of <trig> will start the delay timer, which in the example is
set to 0s (for no delay). The <o1> output (DSS_Key1) will go high for <len1> seconds,
which is set to 0.1s. When <len1> expires, <o1> will go low and the next delay, given by
<delay2>, takes effect. This is set to 0.2s. Then <o2> will go high for <len2> seconds,
and so forth, until the last key (DSS_Enter) is triggered.
The length of the delay time depends on the device requirements specified by the
manufacturer. Each <delay> begins only after the previous output has gone low.
An alternative method to trigger a channel preset is to use the Analog Initialize symbol and the Crestron module, Analog to Digital Pulses (3 digits). The Crestron module breaks the analog input value (Channel Number) into hundreds, tens and units, and outputs the resulting values as digital pulses, followed by the Enter key. The outputs of the module can be connected to the IR driver to adjust the channel accordingly. Each of the Preset button presses is connected to an input of the Analog Initialize symbol. The parameter of each button press is the corresponding channel number. This channel number will be transmitted as an analog value to the module. 86 Essentials of Crestron Programming
Symbol completeness and commenting out In the above example, the digital input to the module is marked with the special signal name “//”. This section will discuss the concept of symbol completeness and commenting out signals. In SIMPL Windows, all symbol definitions must be ʺcompleteʺ for the program to compile. A symbol that is incomplete will have *!* marker in front of it. The *!* marker will also appear in the subsystem where the symbol is located in Program View, as well as the top‐level Logic folder. The concept of completeness differs depending on the symbol type: Most device symbols, such as touchpanels, use ʺrandom completenessʺ, i.e., you can connect any signal or leave any signal blank and the symbol will still be considered complete. Most logic symbols and modules use ʺlist completenessʺ, where every signal is a required field. That is, you must fill in every input in order, every output in order, and every parameter in order. The only exception to this is if a given signal is surrounded by brackets [ ]. This signifies that the signal is optional and not required for programming. 87 Essentials of Crestron Programming
You can collapse a symbol to shorten the signal/parameter list. Otherwise the visible fields must be defined to complete the symbol. Other symbols use different completeness, e.g., a Buffer symbol, which must have an output defined for every defined input. (These symbols expand the inputs, outputs and parameters together if they are related.) You can comment out a symbol that is incomplete and the incompleteness of the program goes away until the symbol is commented back in. You can also ʺauto‐completeʺ a symbol by using the Make Symbol Complete command. This will automatically assign the special signal name “//” to unambiguous signals, and fill in all parameters with a default value of 0d. (Parameters that require selecting from a list will not be automatically defined; such parameters must be assigned manually to make the symbol complete.) To make a symbol complete • Select the symbol, either in Detail View or Program View and press Ctrl+I. ‐or‐ • Right‐click the symbol, either in Detail View or Program View and select Make Symbol Complete. ‐or‐ To make all the symbols in the selected node complete, right‐click the node, e.g., the Logic folder or subsystem, and select Make Symbol Complete. If you do not want to use an input or output of a symbol, you can give the signal the special signal name ʺ//ʺ. Internally, the compiler converts each instance of ʺ//ʺ to a 0 or reserved signal name not being used elsewhere in the program, so that the symbol/module will work properly. (Because each instance of ʺ//ʺ is converted individually, none of the ʺ//ʺ signals are connected together.) To assign the signal name //
•
Select the signal and type the two forward slashes //, adding no other characters to
the signal name.
88 Essentials of Crestron Programming
-or•
Right-click the signal and select Insert special "//" signal.
•
Select the signal and press Alt+F5.
-or-
You can temporarily disable symbols in a program by commenting them out. In SIMPL
Windows, an excluded symbol will have a comment marker (two forward slashes "//") as
a prefix. The compiler ignores any line of code that appears after the comment marker.
You can use comments if the code in a section of your program is broken and you want to
bypass it in order to debug some other part of the program.
To comment out a symbol
•
In either Detail View or Program View, right-click the symbol and select
Comment Out Symbol on the submenu to check it off.
•
In either Detail View or Program View, select the symbol and press Alt+F1.
-or-
Once you have commented out the symbol you will see the comment marker in the
symbol's title bar in Detail View. In Program View, the symbol will also have the
comment marker.
You can toggle the above commands to remove the comment marker and enable the
symbol.
89 Essentials of Crestron Programming
User Modules
Crestron processors control serial devices using physical standards such as RS‐232, RS‐
422, and RS‐485. Unlike IR, RS‐232 control does not use ready‐to‐go driver files. Instead, the protocol that the device is expecting will be provided by the manufacturer in the unitʹs documentation. This protocol includes the data that the device expects to receive and transmit, the format of the serial commands, the speed at which it communicates (baud rate), the error checking (parity), and other elements which all have to be adjusted in a module to match the manufacturerʹs specification. Because of the absence of a driver file, RS‐232 control is generally considered more difficult to program than IR. This is because each time an RS‐232 device is to be programmed, the programmer must look up the protocol in the manual, and then write the necessary logic into the program to send this data. (To counter this, many devices have dedicated Crestron modules written for them. These modules can be plugged into a program and used to generate all the proper control codes automatically.) The Virtual Presentation Room incorporates a simple module that sends serial command strings to the projector to turn the projector on and off and to select sources. The serial output string of the module is transmitted to the COM port via the <tx$> input of the built in serial driver, and on to the projector via the serial cable. Elements of a user module A module consists of an Argument Definition, which represents how the symbol will look in SIMPL Windows, and logic symbols. The inputs, outputs and parameters of the Argument Definition are associated with signals and parameters defined in the module. 90 Essentials of Crestron Programming
The internal logic is not visible to users of the module. Thus the Argument Definition can be thought of as a black box; the user does not need to know the inner workings of the symbol to use it in a program. The signal and parameter names used in the Argument Definition become the signal cues that will be appear in the symbol detail. 91 Essentials of Crestron Programming
When you compile a program containing a user module, the Argument Definition symbol disappears and all of the logic defined in the module is physically placed in the program. As described before, the Virtual Presentation Room program implements a very simple module that turns the projector on and off and selects sources. The module consists of one Serial I/O symbol symbol that routes the command strings to the COM port during run time. To create the projector module 1. Start a new instance of SIMPL Windows and click the New SIMPL Module button. 2. Fill out the optional information in the General tab of the module header. 3. Open the Argument Definition in Detail View and define the cues of the module as follows: •
To expand the number of inputs, press Alt+Plus. Or Shift+Alt+Plus and enter the number of inputs to add. •
Name the first input cue “Projector_On”. Name the second input cue “Projector_Off”. •
To create a visual space on the module between the Projector On/Off inputs and the source selection inputs, use the special signal name [~Unused~]. Name the source selection input cues. •
92 Essentials of Crestron Programming
•
Name the single output cue “To_Device$”. 4. Add a Serial I/O symbol to the Logic folder. 5. Connect the input and output cues of the Argument Definition (except for [~Unused~]) to the inputs and output of the Serial I/O symbol. 6. Use the parameters of each input to specify the command string that will be sent to the projector on the rising edge of the corresponding input. The string format is specified by the manufacturer in the documentation for the device, and is 93 Essentials of Crestron Programming
typically expressed in hex format. 7. Save the Module in the designated user module directory. The module can now be used in a SIMPL Program. SystemBuilder/D3 Pro If the module is intended for use in SystemBuilder or D3 Pro, the module must include a Virtual Serial Driver symbol, which instructs the application how to connect the module to a COM port in the program. The Virtual Serial Driver is connected to the Argument Definition as follows: • Connect the <tx$> input of the Virtual Serial driver to the serial output of the Argument Definition. • Connect the <rx$> output of the Virtual Serial driver to the serial input of the Argument Definition. (Not applicable to the projector module.) • Connect any optional signals of the Virtual Serial Driver to the Argument Definition, if they have been defined. The inputs of the Virtual Serial Driver connect to the outputs of the Argument Definition; the outputs of the Virtual Serial Driver connect to the inputs of the Argument Definition. (Not applicable to the projector module.) • Use the parameters of the Virtual Serial Driver to specify the communication settings of the device. 94 Essentials of Crestron Programming
Keypad logic The Virtual Presentation Room program includes a C2N‐FTB flip top box, which has a limited set of buttons. In this example we will see another example of Buffer symbols being used so that a single button press can control the Up and Down functions of multiple devices. The feedback to the keypad is accomplished first using an Interlock symbol. 95 Essentials of Crestron Programming
The outputs of the Interlock are routed to the Enable inputs of Buffer symbols that correspond to the particular device being controlled. Power button logic We will now return to the Power button to complete the programming of the Power events that will be triggered with each press of the Power button. Earlier we saw how the Stepper symbol allows the system to simulate physical button presses; and now we will again use the Stepper symbol, this time to trigger multiple events off a single button press. Recall that the Power button press on the touchpanel was routed to an Interlock symbol, and the Power_FB signal was connected back to the input to show the button in active feedback when the power is on. Now we will connect the two outputs of that Interlock to two Stepper symbols to trigger the events. 96 Essentials of Crestron Programming
The outputs of the Stepper can be routed to the associated inputs of the different devices. Clear sources One of the actions triggered by the Power Off event is the Clear Sources output. This output is routed to the Clear input of the source Interlock‐Toggle symbol. A rising edge of the clear input immediately forces all outputs low. In this case the outputs are the subpage feedback signals being routed to the touchpanel. 97 Essentials of Crestron Programming
The Clear sources output is also routed to the Serial I/O symbol used to display the source text on the touchpanel page. A rising edge of the input transmits an empty string to the text field. 98 Essentials of Crestron Programming
Doc. ECP rev10/2008 99 Crestron Electronics, Inc.
15 Volvo Drive Rockleigh, NJ 07647
Tel: 888.CRESTRON
Fax: 201.767.7576
www.crestron.com
Programming Guide – DOC. 6798A
03.09
Specifications subject to
change without notice.