1
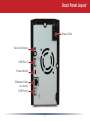
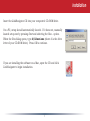
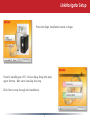
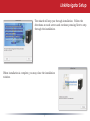
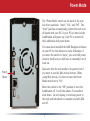
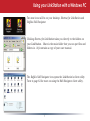
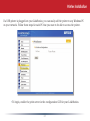
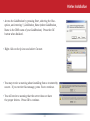
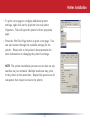
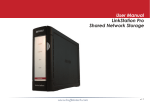
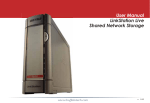
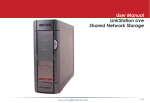
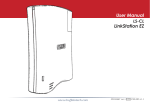
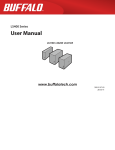
User Manual
LS-WTGL/R1
www.buffalotech.com
LinkStation Pro Duo
v2.2
Introduction
Congratulations on your new LinkStation Pro Duo. This user manual is intended to assist
you in configuring it.
Because we’re constantly updating our products, the images and text in this manual may vary
slightly from the images and text displayed by your LinkStation. These changes are minor
and should not affect the ease of setup adversely. As time passes, future user interfaces,
updated software, and later versions of this manual may be freely available for download at
our web site www.buffalotech.com.
If you run into difficulties or need additional help, feel free to contact our technical support.
Contact information for Buffalo Technology and our technical support is available on pages
66 and 67.
Table of Contents
Back Panel Layout.............................................................4
Installation........................................................................5
Power Mode Switch............................................................8
Using your LinkStation with a PC ..................................... 9
Using your LinkStation with a Mac.................................. 13
Add Additional Hard Drives . ........................................... 17
Using the Function Button . ............................................ 18
Advanced Settings .......................................................... 20
Network Settings.............................................................. 24
Disk Management............................................................ 26
Shared Folders................................................................. 32
Groups............................................................................ 36
Users............................................................................... 37
Passwords........................................................................ 38
WebAccess....................................................................... 39
Installing a Printer........................................................... 43
Troubleshooting Multiple Shares...................................... 48
Backups .........................................................................50
Maintenance & Notification.............................................. 54
System Status ................................................................ 59
Client Utility.................................................................... 64
Troubleshooting............................................................... 66
Specifications................................................................... 67
Contact Information (USA)............................................... 68
Contact Information (Europe) .......................................... 69
GPL Information .............................................................68
Back Panel Layout
Power Cable
Function Button
USB Port 1
Power Switch
Ethernet Cable
(to router)
USB Port 2
Installation
Insert the LinkNavigator CD into your computer’s CD-ROM drive.
On a PC, setup should automatically launch. If it does not, manually
launch setup.exe by pressing Start and selecting the Run... option.
When the Run dialog opens, type d:\LSnavi.exe (where d is the drive
letter of your CD-ROM drive). Press OK to continue.
If you are installing the software on a Mac, open the CD and click
LinkNavigator to begin installation.
LinkNavigator Setup
Press the Begin Installation button to begin.
If you’re installing on a PC, click on Easy Setup (the pink,
upper button). Mac users can skip this step.
Click Next to step through the installation.
LinkNavigator Setup
The wizard will step you through installation. Follow the
directions on each screen and continue pressing Next to step
through the installation.
When installation is complete, you may close the installation
window.
Power Mode
The “Power Mode” switch on the back of the unit
has three positions: “Auto”, “On”, and “Off”. The
“Auto” position automatically powers the unit on or
off based with your PC. If your PC is turned on the
LinkStation will power up; if the PC is turned off
the LinkStation will power down.
You must have installed the NAS Navigator software
on your PC for this feature to work. Otherwise, if
you move the switch to “auto”, your unit will power
down by itself and you will have to manually turn it
back on.
Power
Mode
Also note that the unit needs to be powered on if
you want to use the Web Access feature. When
using Web Access, it is best to leave the Power
Mode switch set to “On”.
Move the switch to the “Off” position to turn the
LinkStation off. It will take about 35 seconds to
shut down. Do not unplug or interrupt power to
the unit until shutdown is complete and all LEDs
are off.
Using your LinkStation with a Windows PC
Two new icons will be on your desktop: Shortcut for LinkStation and
Buffalo NAS Navigator.
Clicking Shortcut for LinkStation takes you directly to the folders on
your LinkStation. Share is the main folder that you can put files and
folders in. Info contains a copy of your user manual.
The Buffalo NAS Navigator icon opens the LinkStation’s client utility.
Turn to page 62 for more on using the NAS Navigator client utility.
Accessing LinkStation Data from your PC
To Access LinkStation Data from a PC:
Your LinkStation uses “shares” (folders) to hold data. A share called “share” is already
configured on your LinkStation, and you can create additional shares in Shared Folders.
To start using your LinkStation, you can either click on the Shortcut for LinkStation on
your desktop, or you may just use drive L in My Computer, which setup has mapped to the
default share in your LinkStation.
10
Accessing LinkStation Data from your PC
You can map additional driveletters to shares on your LinkStation.
From the Start menu, select Run.... Enter your LinkStation’s
hostname (if you don’t know it, you can get it from the NASnavigator
utility) or IP address. Press OK.
Your LinkStation should open. “Share” is a data folder in your
LinkStation by default. “Info” contains your user manuals. If you
have created other folders, they will be visible here too. You can map
drive letters to any of these folders.
11
Accessing LinkStation Data from your PC
From the Tools pull-down menu, select Map Network Drive. Choose a drive letter from the Drive:
pull down menu. To specify the folder to map, either find it with Browse or enter \\LinkStation_
Name\share_name in the Folder: field, where LinkStation_Name is your LinkStation’s hostname
(page 21) and share_name is the name of a folder on your LinkStation. Check the Reconnect at
logon checkbox to have Windows connect to this mapped drive everytime it starts. When finished,
press the Finish button. Your share is now mapped to a drive letter.
12
Using your LinkStation with a Mac
After installing the LinkNavigator software, your Mac will have two
new icons on the desktop.
The LS-ProDuoSettings.txt file contains the IP address of your
LinkStation. NAS Navigator is the LinkStation’s client utility.
With the information in the LS-ProDuoSettings.txt file, you can easily
connect to the LinkStation from any of your computers on your local
network.
The NAS Navigator icon opens the LinkStation’s client utility. See
page 64 for more on using the NAS Navigator client utility.
13
Accessing LinkStation Data from a Mac
You can add a link to your LinkStation’s share
folder to your desktop by adding it to the Mac’s
server list. Begin by clicking Go, and then
choose Connect to Server.
In the Server Address field, enter your
LinkStation’s IP address in the form smb://
ipaddress (where “ipaddress” is your
LinkStation’s IP address), and click Connect.
You can get your LinkStation’s IP address from
the LS-ProDuoSettings.txt file on your desktop,
or see page 16.
14
Accessing LinkStation Data from a Mac
Select Guest and click on Connect. Note: If you have configured share
permissions on your LinkStation, select Registered User and enter your
login credentials.
Select the volume that you want to mount, such as share or share-mac,
from the list of folders on the LinkStation.
The share will open. A link to it
will appear on your desktop.
15
Accessing LinkStation Data from a Mac
If you don’t know your LinkStation’s IP address, there are
several ways to get it.
One simple method is to use the NAS Navigator client utility
(included on your CD) to find your LinkStation(s). Just click
on the icon for your LinkStation and you’ll be able to read its
IP address.
The LS-ProDuoSettings.txt file on your desktop contains the IP
address of the linkstation at the time that the setup program
was run.
You can always get the LinkStation’s IP address from your
router’s configuration utility. Many Buffalo routers list this
information on the Client Monitor page, as shown to the right.
Consult your router’s documentation for instructions on
identifying the LinkStation’s IP address.
16
LinkStation Expansion
LinkStation Pro Duo has two USB 2.0 ports on the rear. This port can be used for adding an
external USB Hard Drive or a USB Printer. LinkStation will share connected USB devices, allowing
everyone on the network to use them. To connect a USB hard drive to your LinkStation, simply
plug it into the USB port.
Once your USB hard drive is connected, see page 28 for configuring your LinkStation to use it.
To configure a USB printer, see page 43.
17
Using the Function Button
The Function Button has several functions.
You can copy digital media files directly to the LinkStation
Mini from a USB storage device, such as a digital camera, USB
flash drive, or external hard disk.
Function
Button
1. Connect your USB device to one of the USB ports on the
LinkStation. The Function LED will glow solid blue for 60
seconds.
2. While the Function LED is still glowing blue, press the
function button.
The following folder is created automatically:
DirectCopy/pictures/yyyymmdd
where yyyy is the year, mm is the month, and dd is the day.
The following filetypes will be copied for USB MSC devices:
avi, divx, asf, mpg, mpe, m1v, vob, mts, m2ts, m2t, mpeg, mpeg2, vdr, spts, tp, ts, 3gp, mov,
m4v, wmv, dvr-ms, xvid, mp4, m4v, jpg, jpeg, gif, png, tif, tiff, yuv, bmp, mp3, mpa, wma, aac,
apl, ac3, lpcm, pcm, wav, m3u, m4a, mp4, m4b, aif, aiff, flac, ogg, mp2, mp1, mp4. If the USB
device doesn’t follow the USB MSC standard, then all files will be copied.
18
Using the Function Button
Initialization - You can easily bring your LinkStation back to
factory settings with the following steps.
Function
Button
Power
Switch
1. Move the power switch to the ‘Off’ position. The LinkStation
will shut down after about 90 seconds.
2. While holding down the function button, move the power
switch to the ‘On’ postion. The function LED on the front of the
LinkStation will begin to flash blue.
3. While the Function LED is still flashing, hold down the
function button for six seconds.
Dismount - Before disconnecting USB devices from the LinkStation, they should be dismounted.
Hold the function button down until the function LED glows blue, and then turns off. It’s now
safe to unplug your USB device.
Note: Unplugging USB devices without dismounting them first may corrupt your data!
19
Advanced Settings
The Configuration GUI
The Configuration GUI may be accessed at any time
by typing the IP address of your LinkStation into
the URL bar of a browser running on a computer
connected to the same network as the LinkStation.
You may also open the Configuration GUI from NAS
Navigator by right-clicking on your LinkStation and
choosing Open Web Admin.
20
Advanced Settings
This login prompt will appear. Enter admin for the user name. Until you change it, the
password for the admin account will be password. Press the OK button when finished.
User name: admin
Password: password
See page 38 to change your password.
21
Advanced Settings - Home
Welcome to Advanced Settings, the configuration GUI for the LinkStation! Bookmark this page in
your browser so it can be easily accessed for future configuration changes. If the LinkStation’s
IP Address changes, you will need to recreate the link. You can also get here by typing http://
LinkStation_Name into a Web browser, where LinkStation_Name is the name (hostname) of your
LinkStation.
You are now at Home. Notice that the Home button is lit up in yellow. You can navigate this menu
by clicking on the buttons at the left of the screen. Here at “Home”, you can see basic information
about your LinkStation’s current configuration. You may close this screen by clicking Logout at the
bottom left, or by just closing the browser window.
22
Advanced Settings
Basic
You may modify your LinkStation’s hostname and
description under Hostname Setup. A friendly,
easy-to-remember name (e.g. “LinkStation”) is
recommended.
Make sure that the date and time are correct
in Date and Time Setup. To synchronize time
settings with those in your computer, press
Use Local Time. To have your system time
automatically set by an NTP server, enable NTP
Server and enter an IP Address for an NTP server
(e.g. 192.43.244.18) or use the supplied default
NTP server.
Ensure that both the Display Language and the
Windows Client Language are set to languages
that you’re comfortable with.
Once desired fields have been completed, press
the Apply button.
23
Advanced Settings
Network (IP Address Properties)
In most networks, LinkStation will get its IP
Address automatically from a DHCP server.
You may disable DHCP here. If DHCP is
disabled and an IP Address is not set manually,
it will default to 192.168.xxx.xxx with subnet
mask 255.255.0.0. The LinkStation’s IP
Address, Subnet Mask, Default Gateway
Address, and DNS Server address may all be
entered manually under IP Address Properties.
Ethernet Frame Size may also be set manually
on this page. Only use JumboFrame settings
when operating in a Gigabit environment where
all other clients support the same JumboFrame
setting.
Click Apply after making any changes.
24
Advanced Settings
Network (Workgroup/Domain)
If you are unfamiliar with Domain/Active Directory
networking, then please leave the Network Type selected as
Workgroup and Workgroup Name set to Workgroup.
To make your LinkStation a member of a workgroup or
an NT domain, enter the appropriate information into the
fields on this page and click Apply.
If using NT Domain or Active Directory, LinkStation must be
added as a member computer in the Domain Server.
Setting NT Domain or Active Directory for network type
integrates the LinkStation with a server. The LinkStation
Pro participates as a member device in the Domain and
Active Directory networks, allowing the LinkStation to use
Users and Groups that reside on the Domain or Active
Directory System. If Active Directory is used, then the
LinkStation will automatically receive update information
from the domain controller(s). To configure the LinkStation Pro on an Active Directory network, you must
have the Domain Administrator login credentials. Enter the Domain Name and Domain Controller into the
appropriate fields. In an Active Directory environment, check the Active Directory Domain checkbox and fill
in the remaining fields. The Authentication Setup fields will be automatically filled out, so no input is needed
there. Once you have finished, press Apply.
25
Advanced Settings
Disk Management (Drive Properties)
This page shows the properties for
the drives in your LinkStation Pro
Duo. If you have a USB hard drive
plugged into the linkstation, its
properties will appear here as well.
26
Advanced Settings
Disk Management (RAID Setup)
Configure your RAID settings here. To change
the type of RAID array used, click on “RAID
Array 1” under RAID Setup.
27
Advanced Settings
Disk Management (USB hard drives)
From here you can see your USB hard drive’s
system information. If the hard drives’
information isn’t displayed properly, try
restarting your USB hard drives and then
restarting your LinkStation. Some USB
hard drives must be reformatted from within
LinkStation before they can be assigned
shares. Select Disk Format from the left-side
menu to format your USB hard disk(s).
28
Advanced Settings
Disk Management (Disk Check)
Disk Check checks any of your hard drives for
errors. To use Disk Check, select the disk that
you want to check from the target pulldown
and click Select Target. Then click on Start
Disk Check.
29
Advanced Settings
Disk Format
To format a hard drive or array, select it from
the Target Disk drop box. Choose the file
system desired from the File System dropbox
(internal drives can only be formatted with XFS).
Note that FAT32 has a 4 gigabyte filesize limit
for individual files. If you choose FAT32 for your
file system, you will not be able to store single
files larger than 4 gigabytes on the drive. Use of
the XFS or EXT3 file systems is recommended.
Press Select Target Disk when done, and then
Start format.
Depending on the size of the target hard disk or
array, a Disk Format may take several hours to
complete. Performance will be slow during the
disk format.
30
Advanced Settings
Disk Erase
To remove all data from a Disk, use Disk Erase.
Once erased, this data cannot be restored.
31
Advanced Settings
Shared Folders
To add new shares on your
LinkStation, select Shared
Folders from the left side menu,
and then click the Add button
under Shared Folders Setup.
To delete a share or shares,
check the checkbox next to
the shares you’d like to delete,
and press the Delete button.
Deleting shares will remove the
share and erase all of the files
and folders inside that share.
32
Advanced Settings
Adding a new Shared Folder
To add a new shared folder, enter a name for it
in the Shared Folder Name box and choose which
Disk Space it will reside in. You may also choose
which operating systems and features the share
will support by putting the appropriate checks
next to Shared Folder Support, and whether
the share supports the Recycle Bin by putting
a selecting Enable or Disable. Enter a Shared
Folder Description and a Remote Backup Password
if desired. Click Apply to build the new shared
folder.
Appletalk support is available for use with
legacy Macs. Checking “Apple” by Shared Folder
Support turns on AppleTalk, letting you use your
LinkStation with older Macs. Note that Appletalk
files are limited to 2GB maximum filesize and 32
characters for filenames. If a folder with AppleTalk
on is accessed from a modern OS through SMB, these limitations will not apply.
Remote Backup Password will set a password on this share for other LinkStations who want to
use it as a remote backup target. This password will not affect users attempting to access the
share; it only pertains to remote LinkStations trying to access this share for backup tasks.
33
Advanced Settings
Shared Folders (Access restrictions)
To use Access Restrictions for a share, select
Enable.
Highlight groups or users in the All Groups/
Users column and use the left-pointing arrow
buttons (located just to the left of each box) to
move individual groups or users from the All
Groups/Users column to the Read Only box (if
you want to give them read access only) or all
the way to the Writable box, if you want to give
them full access to the share. Right-pointing
arrows will move highlighted users or groups
back to the right.
Click Apply when you have your groups and
users in the appropriate boxes.
34
Advanced Settings
Shared Folders (Service Setup)
To allow FTP Access to your LinkStation, choose Enable for FTP Server. To enable legacy
AppleTalk support, choose Enable for AppleTalk Protocol.
FTP Server Info: Enabling the FTP Server will allow users to connect to shares via FTP protocol.
Their username and password is used for their login credentials, and they will only have access to
shares that have read-only or writeable access to on the LinkStation. The network administrator
of your network may need to enable traffic on port 21 to the LinkStation for FTP to work over the
Internet.
Click the Apply button to set up these services.
35
Advanced Settings
Group Management
Groups allow for easier management of permissions
in some networks, specifically networks with a lot of
users in different departments.
To Delete a group, put a check next to its name and
click Delete. To add a group to your LinkStation,
click Add.
Add a name and a description to the Add New
Group fields. Put checks next to each Member User
that you want to be part of the group. Click Apply
when your group is set up the way you want it.
Active Directory and Domain Groups are not shown
here but are available under Share Management.
Members can be added or removed from a group
at any time by editing the group. This is done by
clicking on the Group name on the main Group
Settings page.
36
Advanced Settings
User Management
LinkStation is preconfigured with two users,
admin and guest, out of the box. The admin
and guest user accounts cannot be deleted. To
delete any other user, put a check next to their
name and click Delete. To add a new user, click
Add.
The Add New User dialog will appear. Enter a User
Name, Password, and User Description for the new
user and click the Apply button. If a user will be
accessing the LinkStation from a Windows 95/98
computer, their password should be 15 characters
or less. Mac OS 8 and OS 9 users’s passwords
should be 9 characters or less. Users of other OSs
may have passwords of up to 20 characters.
37
Advanced Settings
User Management (changing passwords)
To change an account’s password, click on the
name of the account under User Settings. Note:
if a user name and password are used to log into
a user’s windows computer or domain, the same
user name and password should be used when
creating the user’s account on the LinkStation, or
problems accessing shared folders may occur.
Enter the desired new password in both boxes
and click Apply.
38
WebAccess
With Buffalo’s WebAccess, you can access your LinkStation from anywhere in the world with an
Internet connection. It’s easy to access your files, or share them with other people, wherever they
may be.
WebAccess is set up from within the
Configuration GUI. First, select ‘Web Access’,
and then ‘Service Setup’ from the menu on the
left.
To use Webaccess, set ‘Web Access Service’ to
Enable.
You may enable SSL Encryption if desired.
Using ‘BuffaloNAS.com’ is recommended.
Otherwise, you’ll have to manage your own DNS
settings.
‘Auto-Configure Firewall’ is also recommended if your router supports UPnP (most do since 2001).
If you choose not to enable this, you must manually configure your router and firewall to forward
internal port 9000 to the Internet.
Choose a name for your BuffaloNAS account and a password (“key”). This name is the name that
will be used to access your LinkStation and to share with your friends. The password for this
protects other people from using it, so picking a strong password is recommended.
Click Help in the top right of the window for detailed information on each setting.
39
Configuring WebAccess
Select ‘Folders Setup’ in the left-side menu. Any shares on your
LinkStation will appear on the list to the right. Click on the icon beside it to select a share for web access.
Choose your desired level of Web Access from the ‘Web Access
Settings’ dropbox:
‘Disable’ will prevent remote access to this share through
WebAccess. This is the default setting.
‘Allow Anonymous’ will allow anyone to access the share. Choose
this if you want your LinkStation share and all files on it to be
freely accessable by everyone.
‘Allow All Groups/Users’ will allow only people who have an
account on the LinkStation to access this share remotely.
‘Use Inherited Folder Permissions’ will allow people with an
account on the LinkStation to access the share remotely only
if they have read permissions on the specific share that they’re
accessing.
Click the Apply button to save your changes.
40
Using WebAccess
To access your LinkStation remotely, open a browser
window on any computer connected to the Internet and go to
buffalonas.com.
In the dialog box, type the BuffaloNAS name that you set on
page 37.
Alternately, you can go directly to your share by typing
BuffaloNAS.com/your_BuffaloNAS_name in the URL window.
The folders from your LinkStation’s share will appear. Files
from anonymous shares will appear to the right. To see files
from shares that are not set to anonymous, you will need to
log in. The ‘login’ link is on the top left corner of the page.
41
Using WebAccess
To access individual folders on the right, click
on their open links.
Clicking on individual files will give you other
options, depending on the filetype. Clicking
on the Audio link at the bottom left corner of
the page will give you options for playing music
files, including the opportunity to launch a
Flash-based music player that will stream your
audio files directly through the Web interface.
42
Printer Installation
If a USB printer is plugged into your LinkStation, you can easily add the printer to any Windows PC
on your network. Follow these steps for each PC that you want to be able to access the printer.
• To begin, enable the print server in the configuration GUI for your LinkStation.
43
Printer Installation
• Access the LinkStation by pressing Start, selecting the Run...
option, and entering \\LinkStation_Name (where LinkStation_
Name is the DNS name of your LinkStation). Press the OK
button when finished.
• Right click on the lp icon and select Connect.
• You may receive a warning about installing from a trustworthy
source. If you receive this message, press Yes to continue.
• You will receive a warning that the server does not have
the proper drivers. Press OK to continue.
44
Printer Installation
• The Add Printer Wizard will launch. Select the proper
driver for your printer. If the specific printer is not
in the list, you will be required to insert the CD that
came with your printer into your PC’s CD-ROM drive
and press the Have Disk button. Refer to your printer
documentation for further information on installing
your printer if necessary. Press OK to finish.
• If lp is the only printer installed on the PC, then it will
automatically be set as the default printer. If it’s not
the only printer, you may make it the default printer
by clicking Printers and Faxes in Control Panel, right
clicking on the lp printer icon and selecting the Set as
Default Printer option from the File drop-down menu.
45
Printer Installation
• To print a test page or configure additional printer
settings, right click on the lp printer icon and select
Properties. This will open the printer’s driver properties
page.
• Press the Print Test Page button to print a test page. You
can also browse through the available settings for the
printer. Please refer to the printer’s documentation for
more information on changing the printer’s settings.
NOTE: The printer installation process can be done on any
machine on your network. Multiple machines may print
to the printer at the same time. Repeat this process on all
computers that require access to the printer.
46
Print Server (Delete Print Queue)
If a corrupt print job is sent to a
printer, printing may suddenly fail.
If your print jobs seem to be locked
up, clearing the print queue may
resolve the issue.
To delete the print queue, press the
Delete button. This will clear all
current print jobs. Users will have
to re-send any incomplete print jobs
to the printer.
If there are still problems printing to
the printer, then check the printer
manufacturer’s documentation for
troubleshooting information. Also,
verify that the USB cable is securely
fastened to both the printer and the
LinkStation. Finally, you may try turning the LinkStation off, turning the printer off, turning the
printer back on, and then turning the LinkStation back on again.
47
Accessing Multiple Shares from a single PC
When accessing multiple shares to a Windows
PC, you may see this error message.
This is caused by having multiple shares to the
same resource using different login credentials.
The error occurs when connecting to at least one secure, restricted share. Due to a constraint in
Microsoft Windows, only one set of login credentials can access or map drive letters for a network
resource such as the LinkStation. As such, only one username and password can be used while
mapping drives to a PC. If unsecure, unrestricted shares are mapped and then an attempt to map a
secure, restricted share is made from the same PC, this error will occur. To prevent this, you must
create all mapped shares using the same login and password information. Please follow the steps
on the next page to remedy this problem.
48
Advanced Settings
Mapping Multiple Shares
When mapping any share, select the Connect using a different
user name option. A login and password prompt will appear.
Use the username and password required by any secure,
restricted shares for all shares. All mapped shares on a
single PC must use the same username and password!
If only unrestricted shares are being mapped, then it’s not necessary to set a username and
password for shares. Multiple mapped drives to unrestricted shares can exist without a username
or password as long as no restricted, secure shares are mapped. If an unrestricted share and a
restricted share are both being mapped or accessed, use the restricted username and password for
the unrestricted share login by using the Connect using a different user name option. This will allow
a Windows PC to access both shares without any problems.
49
Advanced Settings
Disk Backup
To create a backup job, click on a job number.
The Edit Backup Job dialog will appear.
50
Advanced Settings
Disk Backup (Edit Backup Job)
A Backup Job can run regularly on a daily or
weekly schedule, or immediately by appropriate
choices in the Backup Job Schedule field. Date
and Time for the backup may be entered,
and Encryption and Compression enabled or
disabled. Enable Overwrite Backup to have
each scheduled backup write over the previous
backup, or Differential Backups to backup only
files changed since the previous backup.
Select the folder to be backed up from the
Local Backup Shared Folder dropbox, and
the destination for the backup files from the
Destination Backup Shared Folder dropbox.
The destination folder may be on a USB
drive attached to the LinkStation, or another
LinkStation on the network. Click on Select to
approve the backup targets.
Click the Apply button when your backup job is
set up the way you want it, or Clear Job to stop
a job from running again.
51
Advanced Settings
Disk Backup (LinkStation List)
The LinkStation list shows other LinkStations in your network that you can configure network
backups to.
Press Refresh to get a list of LinkStations on your network.
52
Advanced Settings
Disk Backup (Add LinkStation)
To add a remote LinkStation to your network, enter its numerical IP Address in the Remote
LinkStation IP Address field and click the Add to List button. For remote LinkStation backups,
make sure both firewalls are configured to allow traffic in and out of their networks.
Note: Disk Backups between two LinkStations use port 8873 for encrypted backups and port 873
for backups with no encryption.
53
Advanced Settings
Maintenance (Notification)
If your LinkStation is remotely managed, you
may choose to receive nightly status reports
and be notified of any disk events by email.
To set this up, enable Mail Notification and
enter the IP Address of your SMTP server*
in the SMTP Server Address field. Select a
Subject line for the emails (i.e. “LinkStation
Status Report”) and enter the email address of
each person you want to receive notification
emails into a Recipient Mail Address field.
* SMTP server must be an open type server. Currently, there’s no provision for entering a
username or password.
54
Advanced Settings
Maintenance (UPS Settings)
If using an Uninteruptable Power Supply, configure the LinkStation’s UPS settings here.
55
Advanced Settings
Maintenance (Alert Settings)
Alerts can be configured on the
LinkStation to make audible noises
when a problem is detected. Along with
the audible noise, alert emails will be
sent out if Mail Notification was properly
configured. Please select the features
you would like to receive an audible
sound alert from and then press the
Apply button.
56
Advanced Settings
Maintenance (Shutdown)
From the Shutdown page, press Apply to shutdown LinkStation. This has the same function as
holding down the power button on the front of LinkStation, but may be done remotely. Turning
on the LinkStation after a shutdown requires a physical button push on the front of LinkStation.
The Restart Now button simply reboots the LinkStation, bringing it back to functionality after
about 120 seconds.
57
Advanced Settings
Maintenance (Initialization)
Initialization is a reset procedure that
restores all settings back to the default, out
of box, configuration. All configuration,
users, groups, and backup jobs are lost,
but actual data and shares on the hard are
NOT lost. If you want all data to be erased,
reformat the drive.
Specify whether the LinkStation shall
keep its administrator password after a
initialization or whether the password
should be reset to the default password
(default password is password). Press the Apply button once you make the selection.
Press the Restore button to begin the initialization process; this will restore all settings to factory
defaults but will NOT erase the data on the hard drives.
58
System Status (System Information)
This page shows you the System Information for your LinkStation.
Firmware updates are occasionally available from www.buffalotech.com for the LinkStation Pro
Duo. These must be executed from a Windows PC on the same network. Your router, switch, or
hub should pass through ports 8873 and 22939 for this to work (most do).
59
Advanced Settings
System Status (USB Details)
This page shows you details on USB hard drives and UPSs plugged into your LinkStation. In this
example, no USB hard drives are plugged in to the LinkStation.
60
Advanced Settings
System Status (Drive Properties)
This page shows you the properties of
all hard drives in and attached to your
LinkStation.
61
Advanced Settings
System Status (Network Information)
This page shows you the System Information for your network connection.
62
Advanced Settings
System Status (Logs)
Choose a Log from the dropdown menu and click View to see it.
63
LinkStation Client Utility
This is the Buffalo NAS Client Utility. Installed
on your PC, it allows you to access each of
the LinkStations (and TeraStations) on your
network. Click View to get icons for each of
your LinkStations. Highlight each tab to show
the Host Name, Workgroup, IP Address, and
Subnet Mask, Gateway, and MAC Address
of the associated LinkStation, as well as the
firmware version it’s running.
Right-click on a LinkStation for more options.
You can open the Web Admin GUI, map a share
to a drive letter, or create a shortcut on your
desktop.
To change a LinkStation’s IP Address, click
Menu and choose Properties.
64
LinkStation Client Utility
IP Address Setup
From the IP Settings tab, you may enter your IP Address and Subnet Mask manually, or enable
your LinkStation to acquire them automatically from a DHCP server. Press OK when you’re done.
65
Troubleshooting
Disk Errors
If LinkStation encounters a disk error, it will be reported in the LinkStation status on the top
of any of the Web-Based configuration screens. Run a Disk Scan in the event of this error. If
that doesn’t work, try a reformat. Reformatting the drive will delete all of the data on it so try
to backup any data you can before beginning. Finally, if none of the above solutions help, then
please contact Technical Support for further assistance.
LED Flash Codes:
3
4
5
6
7
flashes
flashes
flashes
flashes
flashes
-
Partition problem with hard drive. Reformat the hard drive.
Fan problem.
ROM problem.
Hard Drive can not be recognized.
Problem with motherboard (RAM, LAN, or Hard Drive controller).
66
Technical Specifications
Data Transfer Rates:
10/100/1000 Mbps
Hard Drives:
(2) SATA
7200 rpm
Main Connector Type:
RJ-45 (Ethernet)
USB Interface:
USB 2.0/1.1
Protocol Support:
TCP/IP
SMB, FTP (File Sharing)
HTTP (Management)
NTP (Time Synchronization)
Power Supply:
Internal; 100-240V 50/60Hz
Client OS Support:
Windows® Vista™, XP, 2000,
Mac OS® 10.3.9 or later
Power Consumption:
~21W (with no USB devices connected)
Dimensions:
3.9” x 6.4” x 8.7” (99 x 163 x 221 mm)
Weight:
~6.8 lbs. (3.1 kgs)
Operating Environment:
41°-95° F, 5°-35° C; 20-80% non-condensing
67
Contact Information (North America)
Buffalo Technology USA Inc.
11100 Metric Blvd., Suite 750
Austin, TX 78758
GENERAL INQUIRIES Monday through Friday
8:30am-5:30pm CST
Direct: 512-794-8533 | Toll-free: 800-456-9799 | Fax: 512-794-8520 | Email: sales@
buffalotech.com
TECHNICAL SUPPORT North American Technical Support by phone is available 24 hours a day, 7 days a week. (USA
and Canada).
Toll-free: (866) 752-6210 | Email: [email protected]
68
Contact Information (Europe)
Buffalo Technology UK Ltd.
2 Bracknell Beeches, Old Bracknell Lane
Bracknell, Berkshire, RG12 7BW
United Kingdom
GENERAL INQUIRIES Email: [email protected]
TECHNICAL SUPPORT Buffalo Technology provides technical support in English, German, French, Italian and
Spanish. For opening hours and relevant telephone numbers, please go to:
www.buffalo-technology.com/contact
69
GPL Information (North America)
Thank you for your interest in Buffalo products. Our GPL software delivery policy is outlined below.
For each individual product and revision, please send one individually packaged self addressed padded CD
shipping envelope, containing a blank CD-R to the following address:
Buffalo Technology USA Inc.
11100 Metric Blvd., Suite 750
Austin, TX 78758
Attn. GPL Department
Within the envelope containing the self addressed padded CD shipping envelope, please include a bank
draft or money order for $20 (USD) (made out to Buffalo Technology) to cover our handling fee, postage and
CD preparation. The CD-R should have the name of the product and revision number clearly written on the
actual CD-R (not on the insert).
We do not send GPL source in bulk on a DVD. And order confirmation is not required by the GNU General
Public License.
We are more than happy to comply with your request; however, we must ask you to comply with our GPL
distribution policy, which complies with the GNU General Public License.
Sincerely,
Buffalo Technology GPL Department
70
GPL Information (Europe)
Thank you for your interest in Buffalo products. Our GPL software delivery policy is outlined below.
For each individual product and revision, please send one individually packaged self addressed padded CD
shipping envelope, containing a blank CD-R to the following address:
Buffalo Technology Ireland Ltd
Free Zone East, Shannon, Co. Clare
Ireland
Attn. GPL Department
Within the envelope containing the self addressed padded CD shipping envelope, please include a bank draft
or money order for €20 (Euro) (made out to Buffalo Technology) to cover our handling fee, postage and CD
preparation. The CD-R should have the name of the product and revision number clearly written on the
actual CD-R (not on the insert).
We do not send GPL source in bulk on a DVD. And order confirmation is not required by the GNU General
Public License.
We are more than happy to comply with your request; however, we must ask you to comply with our GPL
distribution policy, which complies with the GNU General Public License.
Sincerely,
Buffalo Technology GPL Department
71