1
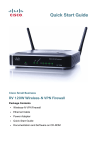
Welcome
Quick Start Guide
Thank you for choosing the WAP200 Wireless-G Access Point with Power
Over Ethernet. This access point lets you connect Wireless-G (802.11g) or
Wireless-B (802.11b) devices to your wired network so you can add computers
to the network wirelessly.
This guide describes how to physically install your WAP200 and how to set up
a basic configuration by using the WAP200 web-based configuration utility.
1
Before You Begin
2
Getting to Know the WAP200
The WAP200 Access Point also offers the convenience of Power over Ethernet
(PoE), which allows the access point to receive data and power over a single
Ethernet network cable.
Front Panel
The LEDs on the front panel of the access point display information about
network activity.
• WAP200 Wireless Access Point
• Detachable Dipole Antennas (2)
• Power Adapter
• Desktop Stands (2)
• 5-Foot Category 5 Ethernet Cable (1.5 meters)
• Administration Guide on CD-ROM
• Quick Start Guide
Placement Tips
RESET Button—Resets the access point to the factory default configuration.
You need to press this button for about ten seconds to reset the access point.
ETHERNET Port—Connects the access point to Ethernet network devices,
such as a switch or router that may or may not support PoE.
• Ambient Temperature—To prevent the WAP200 from overheating, do not
operate it in an area that exceeds an ambient temperature of 104°F (40°C).
• Air Flow—Be sure that there is adequate air flow around the WAP200.
• Mechanical Loading—Be sure that the WAP200 is level and stable to avoid
any hazardous conditions.
Stand Option
To place the access point vertically in a stand, follow these steps.
• Cables for WAN interfaces or additional LAN interfaces
The WAP200 Access Point has two detachable 2dBi omni-directional antennas.
These antennas are located on the back of the device.
• PC with Microsoft Internet Explorer 6.0 or later for using web-based system
management tools
For best range performance, adjust the two antennas so that they form a 90
degree angle.
• Uninterruptible Power Supply (UPS) to provide backup power to essential
devices
Installing the WAP200
WAP200 Access Point Antennas
• Tools for installing the hardware
• One or more Ethernet network switches
3
You can place the access point horizontally on its rubber feet, vertically in a
stand, or mount it on the wall.
POWER Port—Connects the access point to power using the supplied power
adapter. Use this port if you do not have a PoE switch in your network.
• An active Internet account
Package Contents
The ports of the access point are on the back panel of the access point.
The WAP200 Access Point with Rangebooster can support communications
on up to four wireless networks, using Multiple Basic Service Set Identifier
(BSSID) and Virtual Local Area Network (VLAN) technology.
Before you begin the installation, make sure that you have the following
equipment and services:
Cisco Small Business
Model WAP200
Wireless-G Access Point with Power Over Ethernet
and Rangebooster
Back Panel
POWER LED—(Green) Lights up and remains lit when the access point is
powered on.
PoE LED—(Green) Lights up when the access point is powered through an
Ethernet cable.
WIRELESS LED—(Green) Lights up when the wireless module is active on the
access point. This LED flashes when the access point is actively sending to or
receiving data from a wireless device.
ETHERNET LED—(Green) Lights up when the access point successfully
connects to a device through the Ethernet network port. This LED flashes when
the access point is actively sending to or receiving data from one of the devices
over the Ethernet network port.
STEP 1 Locate the left side panel of the WAP200 Access Point.
STEP 2 With the two large prongs of one of the stands facing outward, insert
the short prongs into the little slots in the WAP200 Access Point, and
push the stand upward until the stand snaps into place.
Repeat this step with the second stand.
Wall-Mount Option
To mount the WAP200 Access Point on a wall, follow these steps.
4
Connecting the Equipment
STEP 3 Plug the power adapter into an electrical outlet.
6
STEP 1 Determine where you want to mount the WAP200 Access Point and
install two screws (not supplied) that are 2-15/16 inches apart
(approximately 7.46 cm.).
STEP 2 With the back panel pointing up (if installing vertically), line up the
WAP200 Access Point so that the wall-mount crisscross slots on the
bottom of the access point line up with the two screws.
The WAP200 Access Point works right out of the box with the default settings.
However, you can change these settings using the WAP200 web-based
configuration utility.
• Using a PoE switch
• Using a standard switch
Before you begin to use the WAP200 web-based configuration utility, make
sure that you have a computer that meets the following requirements:
Using a PoE Switch to Connect the WAP200 to the Network
251580
2-15/16
Wall
mount
slots
You can connect the WAP200 Access Point to your network in one of the
following ways:
Getting Started with the
Configuration
To connect the WAP200 Access Point to your network using a PoE switch,
simply connect the Ethernet port of the access point to an Ethernet port on the
PoE switch.
• Internet Explorer (version 6 and higher), Firefox, and Safari (for Mac).
• Your computer is connected to the same network as the WAP200. By
default, the WAP200 Access Point has an IP address of 192.168.1.245 and
a default mask of 255.255.255.0.
STEP 3 Place the wall-mount slots over the screws and slide the WAP200
To access the WAP200 Access Point:
Access Point down until the screws fit snugly into the wall-mount slots.
STEP 1 Start a web browser. In the Address bar, enter the default IP address of
The LEDs on the front panel light up as soon as the WAP200 Access Point
powers on.
Americas Headquarters
Cisco Systems, Inc.
170 West Tasman Drive
San Jose, CA 95134-1706
USA
http://www.cisco.com
Tel: 408 526-4000
800 553-NETS (6387)
Fax: 408 527-0883
5
Verifying the Hardware
Installation
To verify the hardware installation, complete the following tasks:
The LEDs on the front panel light up as soon as the WAP200 Access Point
powers on.
• Check the cable connections.
• Check the LED states (see Getting to Know the WAP200, page 1).
Cisco, Cisco Systems, the Cisco logo, and the Cisco Systems logo are registered trademarks or
trademarks of Cisco Systems, Inc. and/or its affiliates in the United States and certain other
countries. All other trademarks mentioned in this document or Website are the property of their
respective owners. The use of the word partner does not imply a partnership relationship between
Cisco and any other company. (0705R)
© 2009 Cisco Systems, Inc. All rights reserved.
Printed in the USA on recycled paper containing 10% postconsumer waste.
Using a Standard Switch to Connect the WAP200 to the Network
To connect the WAP200 Access Point to your network using a standard switch,
follow these steps.
STEP 1 Use the supplied Ethernet cable to connect the Ethernet port of the
access point to an Ethernet port on the switch.
STEP 2 Connect the included power adapter to the Power port of the WAP200
Access Point.
78-19067-01
NOTE If you need help resolving a problem, visit the Cisco Small Business
Support Community at www.cisco.com/go/smallbizsupport. For
technical documentation and other links, see Where to Go From
Here, page 2.
the WAP200: 192.168.1.245.
For more information on how to change the default password and other
configuration parameters, see Cisco WAP200 Wireless-G Access Point with
Power Over Ethernet and Rangebooster Administration Guide.
8
Where to Go From Here
Support
Cisco Small Business Support
Community
www.cisco.com/go/smallbizsupport
Online Technical Support and
Documentation (Login Required)
www.cisco.com/support
Phone Support Contacts
www.cisco.com/en/US/support/
tsd_cisco_small_
business_support_center_contacts.html
Software Downloads
(Login Required)
Go to tools.cisco.com/support/downloads,
and enter the model number in the Software
Search box.
STEP 2 When the login page appears, enter the user name and password.
The default user name is admin.
Product Documentation
The default password is admin. Passwords are case sensitive.
WAP200 Access Point
STEP 3 Click OK.
7
Suggested Next Steps
Congratulations, you are now ready to begin using your WAP200. You may
wish to consider taking some of the following steps:
• Change the default password of the access point to protect it from
unauthorized use.
• Upgrade the firmware.
• Depending on your deployment requirements, you might need to change
some of the configuration parameters of the access point.
www.cisco.com/en/US/products/ps10048/
index.html
Cisco Small Business
Cisco Partner Central for Small
Business (Partner Login
Required)
www.cisco.com/web/partners/sell/smb
Cisco Small Business Home
www.cisco.com/smb
Marketplace
www.cisco.com/go/marketplace