1
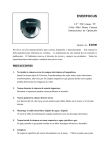
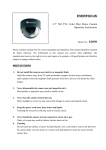
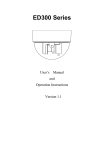
ED300 Series
User’s
Manual
and
Operation Instructions
Version 1.0
Table of Contents
Notice ............................................................................................. 1
Safety Warning ............................................................................... 2
Introduction.................................................................................... 3
Specification ................................................................................... 4
Major Parts Names and Functions .......................................... 5
Installation Instructions ............................................................ 7
Adjustments................................................................................ 8
Lens Adjustments ...................................................................... 9
1
Notice
This manual is presented to the users of ED300 by EverFocus Electronics Corp.
With years of engineering researches, EverFocus has spared all efforts to provide
the high quality products to the worldwide users. For the policy of continual
product improvement, EverFocus reserves the right to make changes to the
product specifications and documentation without notice. All the components
of the products, including accessories, components, and outlook, are based on
the agreements of each deals to satisfy all kinds of users. Please be advised that
every step of operation must follow the instruction of this manual to keep ED300
working under the best condition. Please notice that EverFocus will not be
charged any claims or renewing cases resulted from inappropriate operation.
2
Safety Warning
1. Do not expose the camera to humidity and dust.
Moisture can damage the camera and cause the danger of electric
shock. If the camera is mounted outdoors, a camera housing is
required. Do not install the camera at where there is greasy
smoke or steam, where the humidity is too high, or where there is a
lot of dust to prevent damages to the camera.
2. Do not disassemble the camera.
Do not disassemble the camera body as it is dangerous and may
cause the damages to the camera. Refer all servicing to qualified
service personnel.
3. Handle the camera with care.
Be careful when handling the camera, do not drop it or subject it
too strong shock or vibration to prevent any damages to it.
4. Do not install the camera near electric or magnetic fields.
Installed the camera away from TV, radio transmitter, magnet,
electric motor, transformer, audio speakers because the magnetic
fields generate from above devices will distort the video image.
3
5. Do not install the camera in the high temperature environment.
Installed the camera away from stoves, or other heat generating
devices, or where it could be subject to direct sunlight as the high
temperatures could cause deformation, discoloration or other
damages of the camera. Install the camera at where the
temperature range will stay between 0 to 50(32 to 122).
6. Cleaning
Use a soft cloth to remove the dirt from the unit. Use lens tissue
or a cotton tipped applicator and ethanol to clean the camera lens.
4
Introduction
The ED300 Series Cameras are compact, full functioned CCD Color Cameras. Their
stylish appearance can be applied as per installer's ideal locations on the ceiling. The
dome camera designed with advanced digital processing curcuitry for high resolution
1/4" color interline transfer CCD sensor, it has DIP switch for AGC on/off, BLC on/off.
The dome camera uses a vari focal auto iris lens for discreet surveillance or close-up
viewing and it features with iris LEVEL volume control for the best viewing quality.
Main Features
!"Designed with advanced digital signal processing circuitry for high image quality.
!"The high sensitivity of 1.0 lux / F=1.2 is achieved by high-resolution 1/4” Interline
transfer CCD.
!"Built-in Vari Focal type, mechanical auto iris lens, f=2.8-5.8mm, F=1.4-1.8.
!"Able to adjust the viewing range with manual zoom lens. !"With manual PAN/TILT mechanism.
!"BLC and AGC function on/off switchable.
!"Compact size : 108mm O.D. x 80mm H.
!"System available for NTSC or PAL
5
Specification
Pickup device:
Video format:
Scanning system:
Picture elements:
Effective picture elements:
Horizontal resolution:
Sensitivity:
S/N ratio:
Varifocal lens:
IRIS level:
Back light comp.:
Auto Gain Control:
Auto white balance:
Gamma correction:
Monitor output pin:
Video output:
Sync. mode:
Audio
Power source
Dimension:
Operating temperature:
Power consumption:
1/4" Interline transfer CCD
NTSC/PAL
NTSC: 525 TV lines, 60 fields/sec; PAL: 625 TV lines, 50 fields/sec.
NTSC: 811(H) x 508 (V); PAL: 795 (H) x 596 (V)
NTSC: 768 (H) x 494 (V); PAL: 752 (H) x 582 (V)
480 TV lines
1.0 lux / F=1.2
> 48 dB
f=2.8~5.8mm, F1.4~1.8 manual zoom and focus adjustment,
mechanical auto IRIS
Adjustable
On / Off Switch
On / Off Switch
Yes
0.45
Yes, 1.0 Vp-p / 75 ohm, test point pin
1.0Vp-p/75ohm
Internal sync.
Available for model ED300A
12VDC, 300mA
108 mm O.D. x 80 mm H
0oC to +50oC
5W max.
6
Major Parts Names and Functions
ED300
ED300A(with audio)
)
%
&
&
$
%
$
12
#
*
12
11
+
,
'
(
13
11
7
) Camera Cover
* Level Volume Control
This cover will protect the camera from dust
and damage.
The iris level control for the lens.
$ Lens
This Vari-Focal Lens allows users to adjust
the Zoom and Focus manually.
# Base
The camera unit is set in the dome base when
it is shipped from the factory.
% Focus Ring
To set the focus, loosen the Focus ring knob
first, then turn the ring toward <FAR> or
<NEAR> as necessary. When the focus is
obtained as desired, tighten the focus ring
knob.
& Zoom Ring
Loosen the zoom ring knob, then you can
adjust the viewing range. Turn the ring
towards <WIDE> or <TELE> as necessary.
When the setting is finished, tighten the
zoom ring knob.
' Auto Gain Control on/off switch.
The factory setting is AGC on.
( Back Light Compensation on/off
switch
The factory setting is BLC off.
+ Ground Pin
For monitor use.
Please see ,.
, Monitor Pin
When setting up the camera, connect a
monitor to this video output pin and to the
GROUND pin using alligator clip cables, then
using the image displayed on the monitor, set
the surveillance angle.
11
Power input DC-JACK
Use the connector to connect
12VDC-power adaptor.
12
with
Video Output BNC Connector
Use the connector to connect with the video in
connector of a monitor.
13
Audio Output RCA Connector
Use the connector to connect with the audio in
connector of a monitor.
8
Installation Instructions
1. Remove the plastic dome cover.
2. Lossen the two screws of the supporting bracket to remove the
camera body.
3. Using four screws to fix the camera base on the ceiling.
4. Put the camera body back to the supporting bracket, then tighten the
two screws to fix the camera.
5. Connect the BNC connector of the camera to a color monitor, or
other video device through a 75 ohm type coaxial cable with BNC
female connector at cable extension.
6. Connect the DC+12V regulated power source of the camera (DC
Jack) to the DC12V Power-in jack with 2mm, center+, outer- plug.
7. Connect the audio output connector of the camera(model ED300A)
to the audio in connector of the monitor.
NOTE:
Be very careful not to scratch or damage the lens while making any kind of
setting.
9
Lens Adjustments
- Zoom and focus adjustments
After the camera was installed, the zoom and
focus of the lens must be adjusted.
1. Loosen the zoom ring knob, and then turn the
ring towards <WIDE> or <TELE> as
necessary to obtain the desired view range.
WIDE side (Zoom out)
The viewing range will be wider and the
subject is smaller.
TELE side (Zoom in)
The viewing range will be smaller and the subject is larger.
2. Loosen the focus ring knob, then turn the ring towards <FAR> or <NEAR> as
necessary to obtain the clear video image.
3. Repeat steps 2 and 3 until the best image is obtained. Once the lens setting
finished, tighten the zoom ring and the focus ring knobs.
10
Adjustments
✦ Auto Gain Control Adjustment
AGC ON: The sensitivity increases
automatically when the light is low.
AGC OFF: A low-noise picture is
obtained under a low light condition.
✦ Back Light Compensation
Adjustment
When the background of the subject is very bright and the subject itself is
dark, set the BLC (Back Light Compensation) ON. The BLC will
measure the light of the image center and the lens iris will automatically
set for optimum image quality.
✦ Level Volume Control
The iris level of lens can be adjusted by the level control. Turn the level
control to the right direction and video images will become brighter; turn
the level control to the left direction and the video images will become
darker.
EverFocus Electronics Corp.
Head Office:
10F-6, No.79 Sec. 1 Shin-Tai Wu Road,
Hsi-Chi, Taipei, Taiwan
TEL : 886-2-26982334
FAX : 886-2-26982380
USA Office:
2975 Huntington Drive, Suite 101-102
San Marino, CA. 91108
U.S.A.
TEL : 1-626-844-8888
FAX : 1-626-844-8838
Toll free : 1-888-383-6287 or
Hong Kong Office:
Room 18, 11/F1, Pacific Trade Centre
2 Kai Hing Road, Kowloon Bay, Hong Kong
TEL : 852-2758-9871
FAX : 852-2758-9056
European Office:
Fasanenweg 3, D-46446 Emmerich
Germany
TEL : 49-2822-9394-0
FAX : 49-2822-939495
P/N : MED3G00100