1
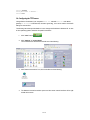
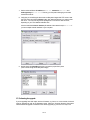
Viola Systems Ltd.
Lemminkäisenkatu 14-18B
FIN-20520, Turku
Finland
tel +358-(0)201-226 226
fax +358-(0)201-226 220
e-mail [email protected]
APPLICATION NOTE VA-09-5-2
UPGRADING THE ARCTIC FIRMWARE
Version history:
2.0 Updated to match newer SW/FW versions
1.0 Released - JaL
Date: Oct-29-2009
Version: 2.0
Author: LaH
© 2009 VIOLA SYSTEMS LTD.
WWW.VIOLASYSTEMS.COM
APPLICATION NOTE
Copyright and Trademarks
Copyright 2009, Viola Systems Ltd. All rights to this document are owned solely by Viola Systems
Ltd. All rights reserved. No part of this document may be transmitted or reproduced in any form or
by any means without a prior written permission from Viola Systems.
Ethernet™ is a trademark of Xerox Corporation. Windows™, Windows XP™ and Internet
Explorer™ are trademarks of Microsoft Corporation. Netscape™ is a trademark of Netscape
Communications Corporation. Mozilla® and Firefox® are registered trademarks of Mozilla
Foundation. Linux™ is a trademark of Linus Torvalds. Cisco® is a registered trademark of Cisco
Systems Corporation. All other product names mentioned in this document are the property of their
respective owners, whose rights regarding the trademarks are acknowledged.
Disclaimer
Viola Systems reserves the right to change the technical specifications or functions of its products
or to discontinue the manufacture of any of its products or to discontinue the support of any of its
products without any written announcement and urges its customers to ensure that the information
at their disposal is valid.
Viola software and programs are delivered “as is”. The manufacturer does not grant any kind of
warranty including guarantees on suitability and applicability to a certain application. Under no
circumstance is the manufacturer or the developer of a program responsible for any damage
possibly caused by the use of a program. The names of the programs as well as all copyrights
relating to the programs are the sole property of Viola Systems. Any transfer, licensing to a third
party, leasing, renting, transportation, copying, editing, translating, modifying into another
programming language or reverse engineering for any intent is forbidden without the written
consent of Viola Systems.
Viola Systems has attempted to verify that the information in this document is correct with regard to
the state of products and software on the publication date of the document. We assume no
responsibility for possible errors which may appear in this document. Information in this document
may change without prior notice from Viola Systems.
2 / 15
Table of contents
TABLE OF CONTENTS .........................................................................................................................................3
1. GENERAL ..............................................................................................................................................................4
1.1. PURPOSE .............................................................................................................................................................4
1.2. SUMMARY ..........................................................................................................................................................4
1.3. TARGET AUDIENCE ............................................................................................................................................5
1.4. CONVENTIONS ...................................................................................................................................................5
2. PRE-REQUISITES ...............................................................................................................................................5
3. INSTRUCTIONS...................................................................................................................................................5
3.1. IDENTIFYING THE ARCTIC .................................................................................................................................5
3.1.1.
Arctic Router......................................................................................................................................5
3.1.2.
Arctic Gateway ..................................................................................................................................6
3.2. FIRMWARE IMAGES ...........................................................................................................................................6
3.2.1.
Naming conventions ..........................................................................................................................6
3.2.2.
Availability .........................................................................................................................................6
3.3. CONNECTING THE EQUIPMENT .........................................................................................................................7
3.4. SETTING UP THE COMPUTER’S TERMINAL EMULATION...................................................................................7
3.5. CONFIGURING THE ENVIRONMENT ...................................................................................................................8
3.5.1.
Changing the Arctic’s IP address if needed..................................................................................10
3.6. CONFIGURING THE TFTP-SERVER .................................................................................................................11
3.7. PERFORMING THE UPGRADE ...........................................................................................................................13
3.7.1.
Kernel upgrade ................................................................................................................................14
3.7.2.
Filesystem image upgrade ..............................................................................................................14
3.7.3.
The generation of SSH keys ............................................................................................................14
3 / 15
1. General
1.1. Purpose
This document describes how to upgrade the firmware of certain Arctic products. See the next
chapter for applicable products.
Note:
•
Don’t begin upgrading a firmware without first verifying the procedure and file
versions from Viola Systems Ltd. Technical Support (abbreviated later in this
document as Technical Support).
1.2. Summary
The Arctics that share the same architectural platform can be upgraded with very similar
instructions. This document contains instructions that are common for the following Arctics:
Arctic product Product code GPRS Router 2270 EDGE Router 2281 GPRS Gateway 2260 EDGE Gateway 2265 IEC‐104 Gateway (GPRS) IEC‐104 Gateway (EDGE) Modbus Gateway (GPRS) Modbus Gateway (EDGE) 2205 2208 2202 2203 Example use case Connecting remote Ethernet devices to central site via GPRS cellular network Connecting remote Ethernet devices to central site via GPRS/EDGE cellular network Connecting remote serial and/or Ethernet devices to central site via GPRS cellular network Connecting remote serial and/or Ethernet devices to central site via GPRS/EDGE cellular network Connecting remote IEC‐101/104 RTUs and/or Ethernet devices to central site via GPRS cellular network Connecting remote IEC‐101/104 RTUs and/or Ethernet devices to central site via GPRS/EDGE cellular network Connecting remote Modbus RTUs and/or Ethernet devices to central site via GPRS cellular network Connecting remote Modbus RTUs and/or Ethernet devices to central site via GPRS/EDGE cellular network Note:
•
•
Do not apply these instructions to other Arctic models than listed above
There is a separate application note for upgrading the Viola Arctic 3G Gateway
The upgrade is consisting of two parts:
•
•
Kernel image upgrade
File system image upgrade.
It is not always needed to upgrade the kernel image of Arctic. Consult Technical Support regarding
the procedure and what files are needed.
4 / 15
1.3. Target audience
The target audience for this document is:
•
•
Field engineers
Customers' technical personnel
1.4. Conventions
The following conventions may be used in this document:
•
•
•
•
•
The menu items in graphical user interfaces are denoted as bolded italic font and the
sequence of mouse clicks, while configuring the devices in menus is separated with an
arrow. Example: “Click Tools Æ System log”.
The console or command line output is printed with courier font and user input is printed
with bold courier font. Example:
[root@host]# date
Thu Oct 29 13:05:00 CET 2009
The usernames and passwords are denoted with courier font.
Parameter-value pairs are denoted with courier font.
The placeholders for actual values are written between “<” and “>” mark.
For example, the <IP_address> would mean a place to write the actual IP address.
2. Pre-requisites
•
•
•
It is assumed that the reader of this document has a basic knowledge of Linux and
Windows systems, IP networking, serial-connected devices and computers in general
The root password of Arctic is known
Arctic’s user’s manual is available
In addition, the following equipment is needed:
•
•
•
•
•
A computer with a serial port (native rather than USB-to-serial)
A cross-connected serial cable (Refer to Arctic’s and computer’s documentation)
A cross-connected Ethernet cable
A terminal emulation program (e.g. PuTTY in Windows)
A TFTP server (e.g. tftpd32 http://tftpd32.jounin.net/)
3. Instructions
3.1. Identifying the Arctic
The Arctic can be identified by:
•
•
•
3.1.1.
The sticker on the bottom of the Arctic
From Configurator graphical user interface (Main screen Æ System)
From command line (by command firmware).
Arctic Router
Visually one can also separate the Router from Gateway by counting the number of serial ports.
Arctic Router products have only one console serial port.
5 / 15
3.1.2.
Arctic Gateway
The Arctic Gateway products have two serial ports; one for console or application (selectable with a
switch) and one for application use only.
The “application” use may be for transparent serial protocols (Arctic GPRS Gateway) or for some
special protocol (Arctic IEC-104 Gateway).
3.2. Firmware images
Depending on the case, you will need either kernel or root filesystem file image, or both. Usually the
files are delivered by Technical Support with MD5 checksums. Checksums can be compared in the
computer before transferred to Arctic, in order to verify the integrity of the files.
3.2.1.
Naming conventions
The Linux kernel image
The filename is in form of linux.<version_number>,
e.g. linux.501
The root filesystem image
The filename is in form of jffs.<cellular_radio><router/gateway><version_number>,
e.g. jffs.edgerouter508
Note:
•
3.2.2.
Some filenames do not define the <cellular_radio>, (which differentiates e.g. the EDGEcapable Arctics from GPRS -capable ones). The Technical Support will give further
instructions on filenames, if needed.
Availability
The firmware images can be obtained by sending an email to [email protected].
6 / 15
3.3. Connecting the equipment
1. Verify that the power switch of Arctic is in “OFF” position.
2. Connect the power supply and Serial cable to the Arctic as shown in the picture below.
3. Connect the serial cable to a computer and verify that Arctic’s power supply is connected
to proper voltage outlet.
4. Connect an Ethernet crossover cable between the Ethernet interface of the Arctic and the
Ethernet interface of the computer
5. In case of Arctic Gateway product, check that the Serial port 1 in Arctic is put to Console
mode by the Console/RS1 switch in Arctic’s front panel.
Note: In the picture below, there is the Arctic GPRS Router that has no console switch or a second
serial port.
.
3.4. Setting up the computer’s terminal emulation
In this example, we assume that the computer used in the upgrade is a PC equipped with Windows
XP operating system (OS). In case of other operating systems/computers, refer to OS’
documentation for details on using an OS specific terminal emulation program.
The instructions below are for PuTTY (PuTTY is a freeware terminal emulator application which
can act as a client for the SSH, Telnet, rlogin, serial and raw TCP computing protocols).
You may also use the HyperTerm, which is a default application in WIndows XP, but because of
certain screen layout restrictions, it would be better to use PuTTY or other third party terminal
emulator, like Tera Term Pro.
Ensure the terminal is set for 19200 bps, 8 data bits, none-parity, 1 stop bit and no flow
control on your computer as in image below. See the next chapter for configuration details.
7 / 15
3.5. Configuring the environment
1. If you’re using PuTTY, start by clicking the Serial button and change the Speed from
"9600" to "19200".
2. The Serial line should match the serial port where the null modem cable is connected to
your computer; typically it is "COM1". You may wish to check which serial (COM) ports are
in use. In Windows XP, go to Control panel Æ System Æ Hardware Æ Device Manager
Æ Ports (COM&LPT) and check which “COM” ports are available, if any. If you do not
have serial ports at all, consider using USB-to-serial adapter.
3. Now you can click Open to open the serial connection between your computer and Arctic.
4. If you encounter problems in connecting, check the rest of the serial settings by clicking the
Serial menu-item from the left tab of the Putty Window. The settings should be as follows:
Serial line to connect to: COM1 (or the respective available COM-port in your PC)
Speed (baud): 19200
Data bits: 8
Stop bits: 1
Parity: None
Flow control: None
In Windows HyperTerminal the respective configuration would be as in the following
picture:
8 / 15
5. Power on the Arctic. Log in as root user and type reboot at the command line, then
right away press continuously any key, e.g. “Enter” in order to interrupt the boot sequence
of Arctic.
See the sequence below:
# reboot
(Start pressing “Enter key”)
Restarting system.
PPCBoot 1.1.6 (Apr 14 2005 - 18:44:18)
Viola Systems Arctic Board
CPU:
MOTOROLA Coldfire MCF5272
Board:
Viola Systems Oy Arctic Board
http://www.violasystems.com/
DRAM:
32 MB
FLASH:
8 MB
In:
serial
Out:
serial
Err:
serial
Net:
00:06:70:01:02:03
Hit any key to stop autoboot: 0
arctic>
arctic>
arctic>
You can stop pressing the key after you will see the arctic> prompt.
6. Verify the network settings of the Arctic.
At the arctic> prompt type command printenv. Plenty of information will appear.
Pay attention to the following lines:
netmask=255.0.0.0
serverip=10.0.0.1
9 / 15
ipaddr=10.10.10.10
7. If the IP address information in step 6 is correct (i.e. matches your Arctic configuration)
then proceed to chapter 3.6. If not, follow the instructions on next chapter.
3.5.1.
Changing the Arctic’s IP address if needed
Arctic network setting can be changed by changing the following parameters:
•
•
•
ipaddr (IP address of Arctic device, default is 10.10.10.10)
netmask (Netmask used by Arctic device, default 255.0.0.0)
gatewayip (Gateway used to access hosts outside local LAN)
Still at the arctic> prompt, the command printenv shows the parameters with their values and
command saveenv saves the values to flash memory.
An example printout for interrupting the boot sequence, printing the configuration and changing the
IP address of the Arctic:
PPCBoot 1.1.6 (Apr 14 2005 - 18:44:18)
Viola Systems Arctic Board
CPU:
Board:
MOTOROLA Coldfire MCF5272
Viola Systems Oy Arctic Board
http://www.violasystems.com/
DRAM:
32 MB
FLASH:
8 MB
In:
serial
Out:
serial
Err:
serial
Net:
00:06:70:02:07:4E
Hit any key to stop autoboot: 0
arctic>
arctic> printenv
baudrate=19200
loadaddr=0x20000
pm=1384004456
gatewayip=0
flashmem=8MB
bootdelay=2
bootargs=root=/dev/mtdblock2 rw
bootcmd=bootm ff820000
hwver=3.1
hostname=Arctic1
prodname=Arctic EDGE Router
watchdog=1
conswitch=1
ethaddr=00:06:70:02:07:4E
ipaddr=10.10.10.10
netmask=255.0.0.0
serverip=10.10.10.11
stdin=serial
stdout=serial
stderr=serial
Environment size: 342/4092 bytes
Disabling watchdog
arctic> setenv ipaddr 10.10.10.10
arctic> setenv netmask 255.0.0.0
arctic> setenv gatewayip 10.0.0.1
10 / 15
arctic> saveenv
Saving Enviroment to EEPROM...
arctic> boot
3.6. Configuring the TFTP-server
Change first the IP address of your computer to 10.0.0.1, netmask 255.0.0.0 and default
gateway 10.10.10.10. In Windows XP, command ipconfig /all can be used to check the IP
settings in command line.
The following instructions provide details on how to change the IP address in Windows XP. In case
of other operating system, follow the OS-specific instructions.
1. Click "start" button:
2. Click "Settings" Æ "Control Panel".
The Control Panel in Windows XP looks like one of the following:
3. Click "Network connections" icon, which looks like one of the following:
4. The Network Connections window opens and the correct network interface will be rightclicked with a mouse:
11 / 15
Choose the LAN interface where the
LAN cable is connected to.
5. Click the correct LAN interface icon with mouse's right button and click "Properties" from
the list. You will see the following screen of LAN properties.
6. Scroll down the "This connection uses the following items" list to see the "Internet
Protocol (TCP/IP)". Click the "Internet Protocol (TCP/IP)" in order to make it active and
click "Properties".
12 / 15
7. Set the values as follows: IP address as 10.0.0.1, netmask as 255.0.0.0 and
default gateway as 10.10.10.10. This way your computer is belonging to the same
network as the Arctic.
8. Verify that you are offering the kernel and root filesystem images with TFTP server. Start
the TFTP server and click the Browse button, then select the directory you want to share
with TFTP. You may have to grant the privileges for TFTP server to work as server,
depending on your virus detection software suite.
Check as well that the Server interface (IP address of the network card) is 10.0.0.1 if
you have multiple network interfaces in your computer.
9. Double-check with Show Dir button that you have the proper files in place
(Arctic’s kernel image and/or filesystem image).
3.7. Performing the upgrade
If you’re upgrading from older major version of firmware, e.g. from 4.0.1 to 5.0.8 series, the kernel
must be upgraded as well as the filesystem image. Follow the Technical Support’s instructions
whether the kernel upgrade is needed in minor version upgrade (e.g. from 5.0.7 to 5.0.8) or not.
13 / 15
3.7.1.
Kernel upgrade
1. Download the kernel file using TFTP to Arctic. In arctic> prompt, enter the following
command:
tftp 20000 <kernel_filename>
Replace the <kernel_filename> with the actual filename of the kernel file, e.g. linux.501.
If you encounter timeouts in transfer, re-check the cabling and IP settings in Arctic and in
PC.
2. After successful TFTP-transfer, erase the Arctic flash using the following commands:
protect off ff820000 ffffffff
erase ff820000 ffffffff
3. After successful flash erasing, copy the kernel to flash memory using the following
command:
cp.b 20000 ff820000 $(filesize)
Note:
•
3.7.2.
The $(filesize) is not a placeholder for the actual file size, do
not replace it with the size of the kernel file, instead type exactly as
above.
Filesystem image upgrade
1. After successful kernel update, download root filesystem image to Arctic using the
following TFTP command:
tftp 20000 <filesystem_image_filename>
Replace the <filesystem_image_filename> with the actual filename of the filesystem image
file, e.g. jffs.edgerouter508.
2. After successful TFTP download of filesystem image, copy it to flash using following
command:
cp.b 20000 ff900000 $(filesize)
Note:
•
•
The $(filesize) is not a placeholder for the actual file size, do
not replace it with the size of the kernel file, instead type exactly as
above.
If you haven’t performed the kernel upgrade, you will have to enter
the following commands prior flashing the filesystem image to the
flash memory:
protect off ff900000 ffffffff
erase ff900000 ffffffff
3. After successful copying, the Arctic can be rebooted.
3.7.3.
The generation of SSH keys
After reboot Arctic is upgraded and ready for use, except that the SSH-VPN keys need to be
generated manually.
14 / 15
The SSH keys can be generated by issuing the following command in Arctics command line (do not
interrupt the boot but instead let the Arctic boot up completely and login as root user either via
serial console or telnet session and execute the command below):
genkeys.sh
The key generation will take some minutes. Now the firmware upgrade is completed.
15 / 15