1
Chlorine filter (if fitted)
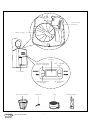
fig. 2
The filter eliminates the taste of chlorine from the water. To install
the filter, proceed as follows :
• Remove the chlorine filter from the plastic bag and rinse it in
tap water.
• Lift the water tank lid and remove the chlorine filter holder
from its housing by lifting it upwards (fig. 2).
• Open the chlorine filter holder and carefully place the filter in
the holder as shown in fig. 3.
• Close the filter holder and replace it in its housing pushing it
fully down.
• The chlorine filter must be replaced every 80 uses, and alzays
after six months of operation.
How to prepare the filter coffee
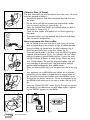
fig. 3
fig. 4
fig. 5
fig. 6
• Lift the lid and fill the tank with fresh, clean water up to the
level corresponding to the number of cups of coffee required
using the coffee jug marked with the level indicators (fig. 4).
• Place the permanent filter in the filter holder (fig. 5).
• Place the ground coffee in the filter, using the measuring spoon
supplied, and level evenly (Fig. 6). As a general rule, use a level
measuring spoon of ground coffee (around 7 grams) for each
cup (for example, 8 spoons to make 8 cups). Never use more
than 14 level spoons.The quantity of ground coffee used will
vary according to personal taste. Use good quality, medium
ground coffee, packaged for filter coffee makers.
• Close the lid and place the jug on the plate with the lid on (fig.
7).
• Your appliance has an AROMA button.When this is pressed,
percolation of the coffee is slowed down to extract more of
the aroma.To activate the function, press the AROMA button.
The light on the button comes on. You are recommended to use
the AROMA button when you do not want to make a full jug of coffee.
• Press the "ON/AUTO/OFF" switch (Fig. 8).The light on the button comes on to indicate that the drip coffee maker is operating and "BREW" appears on the display.
fig. 7
Filter Coffee Maker
fig. 8
6