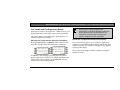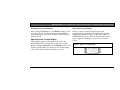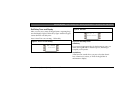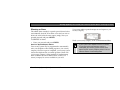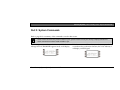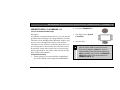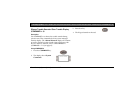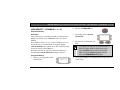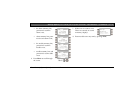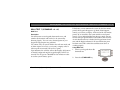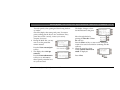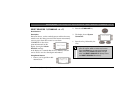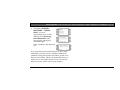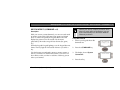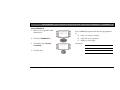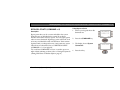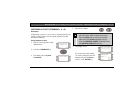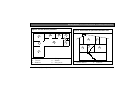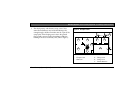
1
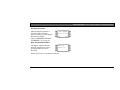
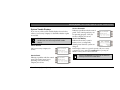
Security System
User's Guide
EN
Keypad
Security System | User's Guide
This system includes a telephone line seizure feature. The system can be programmed to communicate with a
central monitoring station to report system events. You cannot use your phone while the system is communicating
with the central monitoring station. In the unlikely event that the central station is not able to receive the report, your
phone may be unavailable for up to 20 minutes while the control panel makes additional communication attempts.
Bosch Security Systems | 9/04 | 4998122475D
2
Security System | User's Guide | Contents
Contents
Introduction..................................................................................6
About This User’s Guide ...........................................................7
Part I: Security System Basics...................................................8
Using the Keypad ..........................................................................8
Keypad Keys ..................................................................................8
Points.............................................................................................10
What is a Point?...........................................................................10
Controlled Points.........................................................................10
Perimeter Points...........................................................................10
Interior Points ..............................................................................10
24-Hour Points.............................................................................10
Fire Points.....................................................................................10
Non-Fire Points............................................................................11
Your Custom Display .................................................................12
Bosch Security Systems | 9/04 | 4998122475D
View Faulted or Bypassed Points.............................................. 14
To Automatically Scroll Faulted or Bypassed Points.............. 14
To Manually Scroll Faulted or Bypassed Points ..................... 15
Warning Displays and Tones .................................................... 15
Keypad Quiets for Keystrokes................................................... 15
Priority of Events ........................................................................ 15
Fire Alarms .................................................................................. 16
Silencing Fire Alarms ................................................................. 16
Burglary Alarms .......................................................................... 18
Silencing Burglary Alarms ......................................................... 18
Fire Trouble and Fire Supervisory Events ............................... 19
Silencing Fire Trouble and Fire Supervisory Conditions....... 19
Special Fire Trouble and Fire Supervisory Displays .............. 19
Viewing Fire Trouble and Fire Supervisory Conditions ........ 20
3
Security System | User's Guide | Contents
Non-Fire Point Trouble and Supervisory Events.....................20
Silencing Non-Fire Trouble and Supervisory Events..............20
Viewing Non-Fire Trouble Events ............................................21
Special System Trouble Display ................................................21
Entry Delay Tone and Display ..................................................21
Exit Delay Tone and Display.....................................................23
Keystroke Checking Tones ........................................................23
Silencing an Alarm ......................................................................24
How Your System Reports Alarms ...........................................24
Part II: System Commands......................................................25
Passcode Protected Commands and Functions........................27
Turning the System On (Arming)..............................................28
To Turn Your Security System On (Arm)................................28
Turning the System Off (Disarming).........................................29
To Turn Your Security System Off (Disarm) ...........................29
Turning the System On (Arming) With a Duress Passcode ...30
Bosch Security Systems | 9/04 | 4998122475D
Turning the System On (Arming) With Doors or Windows
Open............................................................................................. 31
MASTER ARM ? (COMMAND + 1) ..................................... 35
Description................................................................................... 35
Using Master Arm ...................................................................... 35
Master Arming all Areas ............................................................ 37
PERIMETER INSTANT (COMMAND + 2)......................... 38
Turn On the Perimeter With No Delays ................................. 38
Using Perimeter Instant.............................................................. 38
PERIMETER DELAY ? (COMMAND + 3) .......................... 40
Turn On the Perimeter With Delays ........................................ 40
Using Perimeter Delay ............................................................... 40
Silence Trouble Sounder/Clear Trouble Display
(COMMAND + 4)...................................................................... 42
Description................................................................................... 42
Using COMMAND 4................................................................. 42
VIEW MEMORY ? (COMMAND + 4 + 0) .......................... 43
4
Security System | User's Guide | Contents
View Event Memory...................................................................43
WALK TEST ? (COMMAND + 4 + 4) ...................................45
Walk Test .....................................................................................45
Using Walk Test ..........................................................................45
RESET SENSORS ? (COMMAND + 4 + 7) ..........................49
Reset Sensors ...............................................................................49
Using Reset Sensors ....................................................................49
WATCH MODE ? (COMMAND + 6)....................................51
Description ...................................................................................51
Using Watch Mode .....................................................................51
PERIMETER PARTIAL ? (COMMAND + 8) .......................53
Partially Turn On the Perimeter................................................53
Special Alerts (COMMAND + 7, COMMAND + 9).............55
Description ...................................................................................55
Using COMMAND 7 .................................................................55
Using COMMAND 9 .................................................................56
BYPASS A POINT? (COMMAND + 0)..................................57
Bosch Security Systems | 9/04 | 4998122475D
Description................................................................................... 57
Using Bypass a Point .................................................................. 57
UNBYPASS A POINT? (COMMAND + 0 + 0).................... 60
Description................................................................................... 60
Using Unbypass a Point ............................................................. 60
Appendix.................................................................................... 63
Security System Limitations....................................................... 63
Fire Safety and Evacuation ........................................................ 64
Standard Displays ....................................................................... 67
System Trouble Displays............................................................ 70
Security System Glossary ........................................................... 73
5
Security System | User's Guide | Introduction -
Introduction
Your security system helps to secure life, property, and investments against fire, theft, and bodily harm. The keypad is an
advanced digital device that offers a variety of features not available with other systems. Its highly visible, backlit keypad and
built-in sounder alert you to a number of system events. A familiar ATM style design and ease-of-use make it ideal for property
monitoring.
Bosch Security Systems | 9/04 | 4998122475D
6
Security System | User's Guide | About This User’s Guide -
About This User’s Guide
This owner’s manual is divided into three main sections:
Bold Text is the text on the display.
Security System Basics: Covers how to use the
D1260/D1260B Keypad, the various keys, what a “Point” is
and the various types of Points, and custom displays.
System Commands: This section covers system commands,
such as turning the system on and off, bypassing points, etc.
Your security company programs the functions described in
this section. Some of them may not be included in your
system. Some of the functions covered might require you to
enter your personal passcode.
Appendix: Covers the limitations of a Security System, Fire
Safety and Evacuation, Maintenance and Service of your
Security System and How to Clean the Keypad.
Text that is Bold and Italics represents a key on the keypad,
for example: COMMAND.
Bosch Security Systems | 9/04 | 4998122475D
7
Security System | User's Guide | Part I: Security System Basics -
Part I: Security System Basics
Using the Keypad
Your security system provides quick access to functions by
pressing the COMMAND key and one or two additional digit
(0 to 9) keys.
Another way to access functions is through the Menu List.
This is done by pressing the key adjacent to Menu> shown in
the display. For the rest of the manual, these are referred to as
“soft key,” meaning that their function changes depending on
the screen displayed.
Pressing the key adjacent to <Previous or Next> while in the
Menu List allows you to scroll up or down through the list of
functions programmed by your security company.
For example, if Reset Sensors?> is being displayed, pressing
the soft key adjacent to this will begin the function.
To exit the Menu List, press the <Exit soft key.
Use the Menu List to locate functions you don’t use often or
that don’t have a command number.
Keypad Keys
COMMAND
Use the COMMAND key in combination
with one or two numeric keys to perform
a function.
Pressing the key adjacent to the function being displayed
initiates the function.
Bosch Security Systems | 9/04 | 4998122475D
8
Security System | User's Guide | Part I: Security System Basics - Keypad Keys
ENTER
The ENTER key is used to complete the
entry of your passcode at the command
enter. Whenever a function requires you
to enter your passcode at the keypad, first
press the digits of the code and then press
the ENTER key. Your system does not
recognize your passcode until you press
ENTER.
Previous
When viewing a list, pressing the <Previous
key will take you back to the previously
shown item.
Next
Press the Next> key to pass over the
present item(s) in a menu or list.
DISPLAYS:
Exit
When Exit> appears in the keypad display,
pressing the key adjacent to it will exit you
out of the function you are in.
This can be displayed on either side of the
display.
Bosch Security Systems | 9/04 | 4998122475D
9
Security System | User's Guide | Part I: Security System Basics - Points
Points
Perimeter Points
What is a Point?
These points usually include all exterior doors and windows of
the building.
A “point” is a detection device, or group of devices connected
to your security system. Points display individually at the
keypad with custom text. The text can describe a single door,
motion sensor, smoke detector, or an area such as UPSTAIRS
or GARAGE. There are two basic types of points: controlled
and 24-hour.
Controlled Points
Controlled points respond to alarm conditions depending
upon whether the system is turned on (armed) or turned off
(disarmed). Controlled points are programmed to respond
instantly to alarm conditions or to provide a delay for you to
reach the keypad and disarm the system.
The type of alarm appears before the point text when there is
an alarm. There are two types of controlled points: perimeter
points and interior points.
Bosch Security Systems | 9/04 | 4998122475D
Interior Points
These points usually include interior forms of burglary
detection devices, such as motion sensors, or inside doors.
24-Hour Points
24-hour points are always on, even when the burglary system
is disarmed (turned off). There are two types of 24-hour
points: fire points and non-fire points.
Fire Points
Fire points exclusively monitor fire detection devices. They
are always armed and cannot be disarmed. You can clearly
distinguish fire points from other non-fire points at the
keypad.
10
Security System | User's Guide | Part I: Security System Basics - Points
When there is a fire alarm, the display *FIRE ALARM* is on
the first line, text identifying the point as a fire point is
displayed on the second line, and instructions for silencing the
alarm are displayed on the third and fourth lines.
Fire alarms have a unique audible warning signal.
Non-Fire Points
Non-fire 24-hour points are always armed and cannot be
disarmed. Examples are 24-Hour Burglary, 24-Hour Panic and
24-Hour Emergency.
Bosch Security Systems | 9/04 | 4998122475D
11
Security System | User's Guide | Part I: Security System Basics - Your Custom Display
Your Custom Display
“At an idle state” means that the system is not currently
performing a function entered by a user. There are three idle
states the system may be in:
• Turned on (Armed)
• Turned off (Disarmed) with no points faulted (doors or
windows open) in the area
•
Turned off with faulted points (doors or windows open) in
the area.
This manual uses the default idle state displays for examples
of these idle states. Your security company may have
programmed custom text for the idle displays in your system.
The custom text and the default text for the three system idle
displays follow.
Default Text
Custom Text
________________
Area Name Text
Appears on the top line of the display
Throughout this manual, all examples of “AREA # NAME TEXT” will use “AREA 1 WAREHOUSE.” The actual name
of Area 1 will differ depending on the specifics of your system.
Bosch Security Systems | 9/04 | 4998122475D
12
Security System | User's Guide | Part I: Security System Basics - Your Custom Display
Default Text
Custom Text
Area Is On Text
Indicates the area is turned on (armed) and
ready to detect intruders.
________________
Area Off Text
Indicates the area is turned off (disarmed).
24-hour points remain armed.
________________
Area Not Ready Text
Indicates that the area is turned off, but not
ready to arm.
________________
The Silence> soft key will only appear if the trouble tone is sounding.
Bosch Security Systems | 9/04 | 4998122475D
13
Security System | User's Guide | Part I: Security System Basics - View Faulted or Bypassed Points
View Faulted or Bypassed Points
To properly arm your system, all the exterior points (doors
and windows) and interior points (motion sensors, inside
doors, etc.) in the system must be in the normal (not faulted)
condition. Viewing the faulted points helps you find faulted
points (such as doors or windows that are left open) and
correct them so proper arming is possible.
Your keypad offers two ways of displaying faulted and
bypassed point information. The first causes the faulted or
bypassed point information to scroll automatically through the
display. The second allows you to manually scroll through
each individual point description.
To Automatically Scroll Faulted or Bypassed Points
1. Ensure your keypad shows idle text. The View Points>
soft key will be displayed on the third line of the keypad
when there are faulted points.
Bosch Security Systems | 9/04 | 4998122475D
2.
3.
4.
5.
Press the digit key. The text for Area 1 is displayed first
followed by the number (#) of faulted points on the next
line.
Press the View Points> soft key to automatically scroll
through the faulted points.
The display changes to show the point text description of
the faulted points. If there is more than one faulted point,
the display will automatically cycle through all of them
before returning to idle text.
These displays scroll at the rate of three seconds per
faulted point.
If there are no faulted or bypassed points, the View
Points> soft key will not appear. Instead, the display
shows Area Is Off idle text.
The display returns to idle text after scrolling through the
faulted and bypassed point information.
14
Security System | User's Guide | Part I: Security System Basics - Warning Displays and Tones
To Manually Scroll Faulted or Bypassed Points
1. Ensure your keypad shows idle text.
2. Press the View Points> soft key to display the first
faulted point.
3. Press the Next> soft key or the <Previous soft key
repeatedly to display the faulted and bypassed point
information.
4. If faulted or bypassed points in other areas exist, then the
display will indicate the Area number and the number of
faulted/bypassed points before returning to idle text.
5. If there are no faulted or bypassed points in other areas,
the display will return to idle text.
Warning Displays and Tones
Your keypad emits one of several distinct tones and displays
custom text to alert you to system events. Additional bells or
sirens may also be connected to your system. Bells or sirens
mounted on the exterior of your premises alert neighbors to
emergencies and provide an audible guide for police and fire
fighters.
Keypad Quiets for Keystrokes
Pressing any key on the keypad lights the keys and quiets any
warning tones. If you don’t press another key within 20
seconds, the keypad lights go out and the warning tones
resume.
Priority of Events
If more than one event occurs, your system sorts them into
one of four groups. The groups (highest priority first) are:
• Fire Alarms
• Burglary Alarms
Bosch Security Systems | 9/04 | 4998122475D
15
Security System | User's Guide | Part I: Security System Basics - Fire Alarms
• Fire Troubles and Fire Supervisory conditions
• Non-Fire Troubles and Non-Fire Supervisory conditions.
The group with the highest priority scrolls first in the keypad’s
display. Descriptions of the tones and displays for each group
and instructions for silencing the tones are included in the
descriptions that follow.
Fire Alarms
Fire alarms are the highest priority events. When a fire point
activates, your keypad emits a pulsating high-pitched fire tone.
Evacuate all occupants and investigate for smoke or fire.
Ensure that all occupants know the difference between the
burglary tone and the fire tone. The tone sounds for the time
set by your security company.
The keypad display shows the point text of the first point that
went into fire alarm and displays the message Enter Passcode
+ ENTER key to silence.
Silencing Fire Alarms
Entering a personal passcode with the proper authority level
silences a fire alarm and disarms the system if it was armed.
Bosch Security Systems | 9/04 | 4998122475D
16
Security System | User's Guide | Part I: Security System Basics - Fire Alarms
The system will now display *Alarm Silenced* … and then
the number of points in alarm (# FIRE ALARMS) and then
the area text appears (AREA 1 NAME TEXT) followed by
the custom text of all the points in alarm (SMOKE
DETECTOR), in the order of occurrence.
If there is more than one point causing an alarm, the display
will show each point for three seconds before showing the
next one.
When the last alarm is shown, the next display is the first
alarm.
Your system may be programmed so that you cannot silence
some fire alarms until the fire event clears. Entering
COMMAND 4 clears the scrolling point text from the display.
To clear the event memory and remove the *Alarm
Silenced* message from the display, press the Clear
Display> soft key.
The display will show the instructions for clearing the
message. Enter a valid passcode and press the Clear> soft
key.
If a fire trouble still exists, the display shows Fire Trouble. To
remove this display, the fire point(s) must be returned to
normal.
If you have not cleared the *Alarm Silenced* display and
wish to review cleared events, use COMMAND 40.
The *Alarm Silenced* message will continue to alternate
with idle text as a reminder that it is still possible to view the
text of the points in alarm by using the View Memory
function (refer to VIEW MEMORY ? (COMMAND + 4 + 0) on
page 43) for more information.
Bosch Security Systems | 9/04 | 4998122475D
17
Security System | User's Guide | Part I: Security System Basics - Burglary Alarms
Burglary Alarms
Burglary alarms are the second priority. When a burglary
point activates while your system is armed, your keypad emits
a steady high-pitched burglary tone. The tone sounds for the
time set by your security company.
The keypad display shows the number of burglary points
activated, the message Enter Passcode + ENTER key to
Silence” and then custom text for each activated point
If there is more than one point causing an alarm, the display
will show each point for three seconds before showing the
next one. When the last alarm is shown, the next display is the
first one.
The system will now display *Alarm Silenced* and then the
number of points in alarm (### ALARMS) and the custom
text of all the points in alarm, in the order of occurrence will
display.
Entering COMMAND 4 clears the scrolling point text from
the display.
The *Alarm Silenced* message will continue to alternate
with idle text as a reminder that it is still possible to view the
text of the points in alarm by using the View Memory
function (refer to VIEW MEMORY ? (COMMAND + 4 + 0) on
page 43) for more information.
Silencing Burglary Alarms
To clear the event memory and remove the *Alarm
Silenced* message from the display, press the Clear
Display> soft key.
Entering a personal passcode with the proper authority level
silences a burglary alarm and disarms the system if it was
armed.
The display will show the instructions for clearing the
message. Enter a valid passcode and press the Clear> soft
key.
Bosch Security Systems | 9/04 | 4998122475D
18
Security System | User's Guide | Part I: Security System Basics - Fire Trouble and Fire Supervisory Events
Fire Trouble and Fire Supervisory Events
When a fire trouble or fire supervisory condition occurs, your
keypad emits three warble tones, then a pause (repeatedly).
The system displays the number of fire points that are in a
trouble or supervisory condition.
Some systems may be programmed to
automatically re-sound the keypad’s trouble tone
after a period of time if the fire trouble or fire
supervisory condition remains. Consult your
security company for further information.
Silencing Fire Trouble and Fire Supervisory Conditions
Special Fire Trouble and Fire Supervisory Displays
Pressing COMMAND 4 or Silence> soft key silences and
clears Fire Trouble and/or Fire Supervisory conditions.
If you silence the keypad or clear a trouble or supervisory
condition for a Fire Point from the display and the fire point
remains in trouble, Fire Trouble or Fire Supervisory appears
in the keypad’s display.
They remain in the display until the condition causing the
trouble is cleared.
In addition to this, entering a personal passcode with the
proper authority level silences a fire trouble and disarms the
control panel if it was armed. Use COMMAND 40 if you
wish to review these cleared troubles.
Bosch Security Systems | 9/04 | 4998122475D
19
Security System | User's Guide | Part I: Security System Basics - Non-Fire Point Trouble and Supervisory Events
Some fire points, when activated, will display
FIRE TROUBLE for a preset amount of time. If no
other fire activity is detected, this condition will
automatically clear. If the condition remains or
another fire detector is tripped, a fire alarm will
occur.
Viewing Fire Trouble and Fire Supervisory Conditions
After pressing COMMAND 4 or Silence> soft key, Fire
Trouble continues to automatically scroll through the display.
To view the faulted fire points, press any numeric key, then
press Next> to scroll these displays manually if you wish.
Events scroll from oldest to newest.
Bosch Security Systems | 9/04 | 4998122475D
Non-Fire Point Trouble and Supervisory Events
When a trouble event occurs, your keypad may be
programmed to emit three warble tones, then a pause
(repeatedly).
If the system was armed, the keypad display shows the
number of non-fire trouble events or non-fire supervisory
events and then custom text for each activated point.
Silencing Non-Fire Trouble and Supervisory Events
Pressing COMMAND 4 or the Silence> soft key silences and
clears Trouble and/or non-fire Supervisory conditions. In
addition to this, entering a personal passcode with the proper
authority level silences a trouble and disarms the control panel
if it was armed. If you wish to review these cleared troubles,
using COMMAND 40 can do this.
20
Security System | User's Guide | Part I: Security System Basics - Special System Trouble Display
Viewing Non-Fire Trouble Events
Entry Delay Tone and Display
After pressing COMMAND 4 or the Silence> soft key, press
any numeric key to view the faulted points. Press Next> to
scroll these displays manually if you wish. Events scroll from
oldest to newest.
When you enter an armed system through a point
programmed for entry delay, the keypad emits a repeating
warble tone and displays Figure 1 which means AREA 1
WAREHOUSE is in entry delay for three seconds and then
Figure 2 appears reminding you to turn off your security
system.
Special System Trouble Display
These displays appear on all keypads in the system. See
Standard Displays for a description of each system trouble
display. Pressing COMMAND 4 or the Silence> soft key will
silence a system trouble tone, but the System Trouble display
will not clear until the faulted condition is corrected.
Bosch Security Systems | 9/04 | 4998122475D
Figure 1: Area 1 is in entry delay
21
Security System | User's Guide | Part I: Security System Basics - Special System Trouble Display
Figure 2: Enter Passcode
If you fail to turn off the security system before the entry delay
time expires, it will sound the burglary tone and may also
send an alarm report to your security company.
Bosch Security Systems | 9/04 | 4998122475D
22
Security System | User's Guide | Part I: Security System Basics - Exit Delay Tone and Display
Exit Delay Tone and Display
Figure 4: Exit now
After you arm your system, the keypad emits a repeating beep
tone and displays Figure 3 followed by Figure 4 and the keypad
counts down the exit delay time.
Area # Area Text is now arming… followed by
Figure 3: Area 1 is now arming
Keystroke Checking Tones
Valid Entry
If you press an appropriate key for the function or entry you
desire, the keypad emits a muted beep tone, indicating it
accepted your keystroke.
Invalid Entry
A flat buzz tone sounds when you press a key that doesn’t
have a function to execute, or when the keypad has no
information to display.
Bosch Security Systems | 9/04 | 4998122475D
23
Security System | User's Guide | Part I: Security System Basics - Silencing an Alarm
Silencing an Alarm
The audible alarm sounds for a specific period of time before
it automatically shuts off. If an alarm occurs and you want to
silence the siren before the time expires, simply enter your
personal passcode and press ENTER.
To SILENCE an alarm:
• Enter your passcode and press ENTER.
How Your System Reports Alarms
Your security system may be programmed to automatically
seize your telephones when sending reports to your security
company. Once the report is completed, your security system
restores the telephone line to normal operation (check with
your security company). Other methods of communicating
alarm conditions are also available. Please consult your
security company for services available in your area.
Bosch Security Systems | 9/04 | 4998122475D
Your system makes repeated attempts to send reports to your
security company.
Notify your security company of the communications failure.
If your system uses telephone lines as its means
of communication and telephone service is
interrupted, your security system cannot send
reports to your security company unless it has an
alternate means of transmitting them.
24
Security System | User's Guide | Part II: System Commands -
Part II: System Commands
Refer to page 26 for a summary of the commands covered in this section.
Some of these functions may not be available in your system. Please consult your security company to determine
which commands have been made available to you.
If you attempt to enter a function that’s not available, the
message NOT AUTHORIZED appears briefly in the display.
Bosch Security Systems | 9/04 | 4998122475D
If the function is available in the system but your passcode is
not authorized to perform the function, then **No Authority**
will display on the Keypad.
25
Security System | User's Guide | Part II: System Commands Press the COMMAND key and then the one or two digits shown in the table below to perform the function. When you use a
command to perform a function, the displays in the function list below do not appear at your keypad.
COMMAND
Function
Master Arm
COMMAND
Function
Watch Mode
Perimeter Instant
Special Alert
Perimeter Delay
Perimeter Partial
Silence Trouble Sounder & Clear Trouble
Display
View Memory
Special Alert
Bypass a Point
+
Walk Test
+
+
Unbypass a Point
Reset Sensors
+
Bosch Security Systems | 9/04 | 4998122475D
26
Security System | User's Guide | Part II: System Commands - Passcode Protected Commands and Functions
Passcode Protected Commands and Functions
Commands and/or Functions within your system may be
programmed to require a valid passcode prior to gaining
access to that function. This ensures that only authorized
people have access to specific functions.
3.
Enter the passcode and press
the ENTER key.
Follow the steps shown below when entering a Command or
Function that requires a passcode:
1. At the display Enter Passcode
and press the ENTER key.
2.
The passcode is shown as
asterisks (*) when entered
and advance from the right
side of the display to the left
until all passcode digits are
entered.
Bosch Security Systems | 9/04 | 4998122475D
27
Security System | User's Guide | Part II: System Commands - Turning the System On (Arming)
Turning the System On (Arming)
Your security system can be turned on (armed) in many
different ways, depending on the arming command used.
Arming Commands are those commands used to turn the
system on. The most basic arming command is to arm the
entire system. The simplest way to arm your system is to enter
your personal passcode or COMMAND 1.
displays Area # Area Text is
now arming… followed by
Exit now! # seconds remaining
and counts down the exit delay
time.
There are several other arming commands to turn the system
on. These are described later in this manual.
To Turn Your Security System On (Arm)
1. Enter your passcode and press
ENTER.
2.
After you arm your system, the keypad emits a repeating
beep tone,
Bosch Security Systems | 9/04 | 4998122475D
28
Security System | User's Guide | Part II: System Commands - Turning the System Off (Disarming)
Turning the System Off (Disarming)
Entering your personal passcode turns off your security
system. When the system is turned on, you must enter through
a designated entry door to prevent an instant alarm condition.
Opening the door starts entry delay time and the Keypad
emits a pulsing “beep” tone to remind you to turn the system
off. Enter your passcode before the delay time expires and the
system will turn off.
To Turn Your Security System Off (Disarm)
1. Enter your passcode and press ENTER.
2. You must press the ENTER key within 8 seconds of
entering your passcode, or the passcode entry will be
invalid.
3. The display returns to idle disarmed text.
If you enter through the wrong door or fail to disarm before
the entry delay time expires, you will cause an alarm.
If this happens, silence the alarm (by entering your personal
passcode and pressing ENTER) and call your security
company to let them know that it is not an emergency
situation.
Bosch Security Systems | 9/04 | 4998122475D
29
Security System | User's Guide | Part II: System Commands - Turning the System On (Arming) With a Duress Passcode
Turning the System On (Arming) With a Duress
Passcode
Your passcode may have a special duress feature that is
simply your personal passcode with its last digit increased by
one or two digits.
For example, if your passcode is 1234, your duress passcode
might be 1235 or 1236.
If an intruder demands that you arm or disarm the security
system, you can use your duress passcode. The duress
passcode arms or disarms the system and sends a duress
report to your security company. There is no alarm tone or
visual indication at the premises that the report is sent. Check
with your security company before attempting to use this
feature.
Bosch Security Systems | 9/04 | 4998122475D
30
Security System | User's Guide | Part II: System Commands - Turning the System On (Arming) With Doors or Windows Open
Turning the System On (Arming) With Doors or
Windows Open
If a protected door or window is open, you may have the
option of “force arming” with that point faulted. Faulted points
(opened doors or windows) that are force armed are not
included in the system. The remaining points arm normally.
Force armed points either return to normal operation after
you turn off your system or return to normal when the door or
window is closed. Your system might not offer force arming or
it may be restricted to specific points. Contact your security
company for more information.
1. Use your passcode or an
arming function to start
the arming process.
Bosch Security Systems | 9/04 | 4998122475D
2.
The display shows
Check Area #.
3.
One of the messages below may display in place of Check
Area #.
Indicates the system is
programmed not to arm
with particular points
faulted (doors or
windows open).
31
Security System | User's Guide | Part II: System Commands - Turning the System On (Arming) With Doors or Windows Open
Indicates that the
system’s number of
allowable bypassed
points has been reached.
Your system’s maximum
number of bypassed
and/or force armed
points is set by your
security company. Check
with them to learn this
number.
4.
Bosch Security Systems | 9/04 | 4998122475D
Indicates that more than
the number of allowable
points are faulted.
Bypassed points are
counted as faulted. Your
system’s maximum
number of bypassed
and/or force armed
points is set by your
security company. Check
with them to learn this
number.
The display shows
AREA 1 WAREHOUSE
Not Ready to Arm.
32
Security System | User's Guide | Part II: System Commands - Turning the System On (Arming) With Doors or Windows Open
5.
6.
Pressing the View Points> soft key will show the specifics
for any points that are faulted or bypassed.
Faulted points are displayed first followed by bypassed
points.
The display changes to
show the number of
faulted points in the area.
Press Next> soft key
repeatedly to scroll
through the point text for
each faulted point.
Bosch Security Systems | 9/04 | 4998122475D
7.
If you do not want to go
through the list of faulted
points and want to go
directly to the Force
Arm> soft key or
Force/Bypass Arm>
soft key, press the
COMMAND key.
Once the last faulted
point is displayed,
pressing the Next> soft
key will start displaying a
summary and then
specifics of any bypassed
points.
33
Security System | User's Guide | Part II: System Commands - Turning the System On (Arming) With Doors or Windows Open
8.
9.
Once the last bypassed
point is displayed, the
display will change to
show the soft key to
either force arm the
faulted points (Force
Arm>) or force arm the
faulted/bypassed points
(Force/Bypass Arm>).
Press the appropriate soft key to arm your system with the
faulted/bypassed points removed from service.
Bosch Security Systems | 9/04 | 4998122475D
34
Security System | User's Guide | Part II: System Commands - MASTER ARM ? (COMMAND + 1)
MASTER ARM ? (COMMAND + 1)
Using Master Arm
Using the COMMAND +1 shortcut will only arm
the area where the keypad has been assigned.
For example, if the keypad is assigned to Area 1,
only Area 1 will be armed when COMMAND + 1
is pressed.
Description
Use this function to turn on the entire system, both perimeter
and interior. When you turn the system on, the display shows
how many seconds of exit delay time you have to exit the
protected area. You should leave before exit delay time
expires.
Leaving after exit delay has expired will cause the entry delay
to start only if the person exits through a point set for
Entry/Exit delay. Exiting through any other point should
cause an immediate alarm. You may also cause an alarm on
an interior device. Enter your personal passcode to disarm the
system.
Your cleaning service, a serviceman, or others may also use
this function to turn on your system when they leave.
Bosch Security Systems | 9/04 | 4998122475D
1.
The display shows disarmed
idle text.
2.
Press the COMMAND key.
3.
The display shows *System
Command*.
35
Security System | User's Guide | Part II: System Commands - MASTER ARM ? (COMMAND + 1)
4.
Press the 1 key
5.
The display shows Exit now!
# seconds remaining (# =
exit delay time remaining).
6.
After the exit delay time
expires, the display changes
to idle armed text.
7.
To disarm your security
system, enter your personal
passcode and press ENTER.
Bosch Security Systems | 9/04 | 4998122475D
36
Security System | User's Guide | Part II: System Commands - Master Arming all Areas
Master Arming all Areas
If you prefer, you may use MASTER ARM ?> command in
the Command Menu to initiate this function and allows you to
arm all or selected areas.
Press the Menu> key to enter the Command Menu, then
press Next> repeatedly until you reach the MASTER
ARM?> prompt. Then press the soft key adjacent to
MASTER ARM?>.
Or press the Next> soft key to view each unarmed area and
optionally arm each one. To arm a selected area, press Next>
until the desired area appears (Area name text along with Arm
Area # ?). Then press Arm>.
When arming individual areas, the keypad will momentarily
display that the area is arming before providing the option to
arm additional disarmed areas.
Upon entering this menu
selection MASTER ARM
ALL ? is displayed first.
Press Arm> to Master Arm
all areas.
Bosch Security Systems | 9/04 | 4998122475D
37
Security System | User's Guide | Part II: System Commands - PERIMETER INSTANT (COMMAND + 2)
PERIMETER INSTANT (COMMAND + 2)
Turn On the Perimeter With No Delays
Description
Using Perimeter Instant
1. Interior points are not armed with this command and may
remain faulted while arming with COMMAND 2.
2. Press the COMMAND key.
Use this function to turn on only the perimeter of your
building, leaving the interior of the building disarmed. This
function allows no exit or entry delay time through the
perimeter, including the designated exit delay door.
3.
The display shows *System
Command*.
This function is useful in residential systems when everyone is
home and ready to retire for the evening. You can have the
security of an armed perimeter, yet move freely throughout
the interior of the premises.
4.
Press the 2 key.
It is also useful in commercial systems when you are working
before or after business hours and wish to have the perimeter
armed. Remember there are no entry or exit delays when you
use this function. You must disarm (turn off) the system to
enter or exit the premises.
Bosch Security Systems | 9/04 | 4998122475D
If you prefer, you may use the Command Menu in
place of steps 2 and 3 to initiate this function.
Press the Menu> key to enter the Command
Menu, then press Next> repeatedly until you
reach the PERIMETR INST ?> prompt. Press the
key adjacent to PERIMETR INST ?>.
38
Security System | User's Guide | Part II: System Commands - PERIMETER INSTANT (COMMAND + 2)
5.
The display shows Perimeter On Instant.
After arming the perimeter without delays, you cannot
enter or exit the premises without disarming the system.
Opening a perimeter door before disarming will generate
an alarm. If this happens, silence the alarm by turning
your system off and call your security company to let
them know that it is not an emergency situation.
Bosch Security Systems | 9/04 | 4998122475D
39
Security System | User's Guide | Part II: System Commands - PERIMETER DELAY ? (COMMAND + 3)
PERIMETER DELAY ? (COMMAND + 3)
2.
Press the COMMAND key.
3.
The display shows *System
Command*.
4.
Press the 3 key.
Turn On the Perimeter With Delays
Description
In residential systems this function allows you to only arm the
perimeter and exit through a door programmed for exit delay.
The interior of the building remains disarmed. People or pets
are free to move throughout the interior of the premises.
This function is also useful in commercial systems when you
are working before or after business hours and wish to have
the perimeter armed. Other system users can enter through
doors programmed for entry delay, which will start the entry
delay sounder and countdown.
Using Perimeter Delay
1. Interior points are not armed with this command and
may remain faulted while arming with COMMAND 3.
Bosch Security Systems | 9/04 | 4998122475D
If you prefer, you may use the Command Menu in
place of steps 2 and 3 to initiate this function.
Press the key adjacent to Menu> to enter the
Command Menu, then press the key adjacent to
Next> repeatedly until you reach the PERIMETR
DELAY ?> prompt. Press the key adjacent to
PERIMETR DELAY ?>.
40
Security System | User's Guide | Part II: System Commands - PERIMETER DELAY ? (COMMAND + 3)
5.
The display shows Exit now! #
seconds remaining (# = exit
delay time remaining).
6.
After the exit delay expires,
Perimeter On Delayed
appears.
Bosch Security Systems | 9/04 | 4998122475D
41
Security System | User's Guide | Part II: System Commands - Silence Trouble Sounder/Clear Trouble Display (COMMAND + 4)
Silence Trouble Sounder/Clear Trouble Display
(COMMAND + 4)
3.
Press the 4 key.
4.
The Keypad sounder is silenced.
Description
Use COMMAND 4 to silence the trouble sounder during
system events. This command also clears system messages
from the display. The *Alarm Silenced* display will continue
to scroll to remind you that cleared events can be seen with
the View Memory function (refer to VIEW MEMORY ?
(COMMAND + 4 + 0) on page 43).
Using COMMAND 4
1. Press the COMMAND key.
2.
The display shows *System
Command*.
Bosch Security Systems | 9/04 | 4998122475D
42
Security System | User's Guide | Part II: System Commands - VIEW MEMORY ? (COMMAND + 4 + 0)
VIEW MEMORY ? (COMMAND + 4 + 0)
2.
Press the COMMAND key.
3.
The display shows *System
Command*.
4.
Press the 4 key, followed by the
0 key.
View Event Memory
Description
Your system stores events that occurred since the last time
display was cleared. Use COMMAND 40 to view Event
Memory.
Event Memory allows you or a service technician to review
events after they are cleared from the keypad’s display.
*Alarm Silenced* will continue to scroll to remind you that
events are stored in Event Memory.
If you prefer, you may use the Command Menu in
place of steps 2 and 3 to initiate this function.
Each time you turn the system on, the Event Memory is
erased and the *Alarm Silenced* message is cleared.
Using View Memory
1. Ensure your keypad shows idle
disarmed text.
Bosch Security Systems | 9/04 | 4998122475D
+
Press the Menu> key to enter the Command
Menu, then press Next> repeatedly until you
reach the VIEW MEMORY ?> prompt.
5.
Your system displays event summary lines and point text
in this order:
43
Security System | User's Guide | Part II: System Commands - VIEW MEMORY ? (COMMAND + 4 + 0)
6.
•
fire alarm summary line,
point text for each fire
alarm event;
7.
If there are no events to view,
There are currently no events
in memory displays.
•
alarm summary line, point
text for each alarm event;
8.
Return to idle text at any time by pressing <Exit.
•
fire trouble summary line,
point text for each fire
trouble event;
•
trouble summary line, and
point text for each trouble
event.
Press Next> to scroll through
the events.
Bosch Security Systems | 9/04 | 4998122475D
44
Security System | User's Guide | Part II: System Commands - WALK TEST ? (COMMAND + 4 + 4)
WALK TEST ? (COMMAND + 4 + 4)
Walk Test
Description
Use this function to test keypads, detection devices, and
sounders (both interior and exterior) to be certain they
function properly. You can review untested points at your
keypad to help pin-point any problems.
You cannot arm your system while in the walk test mode, and
no alarm reports are sent to your security company unless a
24-hour point is activated (such as fire or panic).
Upon initiation, the walk test will test the burglary bell pattern
on the bell output and ring the keypad burglary bell for two
seconds. The AC power is disabled for four minutes in order
to test the system’s battery power.
Bosch Security Systems | 9/04 | 4998122475D
If the battery cannot maintain the system for the four-minute
period, the keypad will appear to go dead. If this happens,
contact your security company. At the end of the four-minute
period, AC is returned to the system and the control panel
restores. To test individual detection devices, simply activate
sensors and open protected doors and windows one-at-a-time.
As each detection device is faulted, the Keypad emits a brief
tone and the display indicates for 60 seconds that the point
has been tested. This verifies that each detection device is
working properly.
Using Walk Test
1. Ensure your keypad shows idle
disarmed text.
2.
Press the COMMAND key.
45
Security System | User's Guide | Part II: System Commands - WALK TEST ? (COMMAND + 4 + 4)
3.
The display shows *System
Command*.
4.
Press the 4 key, followed by the
4 key.
5.
+
The burglary bell sounds for two
seconds.
When the display shows ###
points remain to be tested you
can begin. (### is the number
of points)
If you prefer, you may use the Command Menu in
place of steps 2 and 3 to initiate this function.
If you know the point number, you can enter it by
pressing its number key and then the ENTER key
Press the Menu> key to enter the Command
Menu, then press Next> repeatedly until you
reach the WALK TEST ?> prompt. Press the
WALK TEST ?> soft key.
The display will change to show the point that
was entered. If the point is invalid the message
Invalid Point or This is not a valid walk point
appears.
Bosch Security Systems | 9/04 | 4998122475D
46
Security System | User's Guide | Part II: System Commands - WALK TEST ? (COMMAND + 4 + 4)
6.
7.
Test each point by first opening and then closing the door
or window.
Check the display after testing each point. For interior
points, walking past the device once is sufficient. If any
point does not test correctly, contact your security
company for service.
During the Walk Test you may
want to see the points that
remain untested.
Press the View untested pts>
soft key.
The display shows ### pts
untested.
Press the Point information>
soft key to see information
about specific points that have
not yet been tested.
Bosch Security Systems | 9/04 | 4998122475D
The display changes to show
the information for that point.
8.
Move through this list by
pressing the Next Pt> or Prev
Pt> soft keys.
Press the Exit> soft key to return to the ### points
remain to be tested screen before continuing with the
walk test.
When all points have been
tested, 0 points remain to be
tested. is displayed.
Press <Exit.
47
Security System | User's Guide | Part II: System Commands - WALK TEST ? (COMMAND + 4 + 4)
The display momentarily
shows All points have been
tested before returning to idle
text.
Bosch Security Systems | 9/04 | 4998122475D
48
Security System | User's Guide | Part II: System Commands - RESET SENSORS ? (COMMAND + 4 + 7)
RESET SENSORS ? (COMMAND + 4 + 7)
2.
Press the COMMAND key.
3.
The display shows *System
Command*.
4.
Press the 4 key, followed by the
7 key.
Reset Sensors
Description
Detection devices, such as smoke detectors and shock sensors,
must be reset after being activated. This function momentarily
removes power from these sensors to reset them.
COMMAND 47 also clears
point information from the
display, leaving the *Alarm
Silenced* message
in the display as a reminder that the View Memory function
can be used to view the cleared point information.
Using Reset Sensors
1. Ensure your keypad shows idle
disarmed text.
Bosch Security Systems | 9/04 | 4998122475D
+
If you prefer, you may use the Command Menu in
place of steps 2 and 3 to initiate this function.
Press the Menu> key to enter the Command
Menu, then press Next> repeatedly until you
reach the RESET SENSORS ?> prompt. Press
the RESET SENSORS ?> soft key.
49
Security System | User's Guide | Part II: System Commands - RESET SENSORS ? (COMMAND + 4 + 7)
5.
This display SENSORS…
RESETTING… PLEASE
WAIT…shows for
approximately three seconds
and then shows Retrieving
Panel Information while
retrieving the control panel
information again
before returning to idle disarmed
text.
If you enter this function and the detector or sensor resets
momentarily, but then returns to a faulted condition, the
conditions causing the activation may still be present or the
detector may be faulty. Check to be certain that there is no
smoke, fire, or other danger present. If you can’t reset the
detector or sensor contact, your security company.
Bosch Security Systems | 9/04 | 4998122475D
50
Security System | User's Guide | Part II: System Commands - WATCH MODE ? (COMMAND + 6)
WATCH MODE ? (COMMAND + 6)
Contact your security company to find out which
points are watch points and whether or not your
system automatically turns the Watch Mode on
whenever you disarm.
Description
With your security system disarmed, you can use watch mode
to monitor some points. Each time some points are faulted
(door or window is opened) the keypad chimes once and
displays the point text for 60 seconds. No alarms are
generated by this mode except 24-hour alarms (fire, panic,
etc.).
When the keypad’s keypad lighting is on, the keypad does not
chime. The keys light for 20 seconds whenever you strike a
key.
Use this function in residential systems to monitor entries or
exits in your home. In commercial systems, it can serve as a
door chime to alert you when a customer or delivery person
enters your business.
Bosch Security Systems | 9/04 | 4998122475D
Using Watch Mode
1. Ensure your keypad shows idle
disarmed text.
2.
Press the COMMAND key.
3.
The display shows *System
Command*.
4.
Press the 6 key.
51
Security System | User's Guide | Part II: System Commands - WATCH MODE ? (COMMAND + 6)
5.
The display shows *Watch
mode is now on.
6.
To disable Watch Mode, press
Command + 6 again.
The keypad will display Watch
mode is now off.
Bosch Security Systems | 9/04 | 4998122475D
52
Security System | User's Guide | Part II: System Commands - PERIMETER PARTIAL ? (COMMAND + 8)
PERIMETER PARTIAL ? (COMMAND + 8)
Partially Turn On the Perimeter
Using Perimeter Partial
1. Ensure your keypad shows idle
disarmed text.
Description
This function is used to turn on the perimeter of your building
while selected portions of the perimeter remain turned off.
Perimeter points that are not secure (faulted) when this
function is entered are automatically bypassed and are not
included in the system. This function does not turn on the
interior of your building. Entry/exit delays are provided with
this arming command.
Use this function in residential systems to turn on the front of
your house while the interior and the rear perimeter doors are
left turned off, giving you freedom of movement between the
house and patio.
In commercial systems, when you need access to the large
overhead doors to receive deliveries, using this function will
allow you to keep the rest of the building perimeter armed.
Bosch Security Systems | 9/04 | 4998122475D
2.
Before using this function, decide which points are to be
left turned off. Fault the points (doors and windows) by
leaving them open. The points must remain open until
after the exit delay time expires.
Press the COMMAND key.
3.
The display shows *System
Command*.
4.
Press the 8 key.
53
Security System | User's Guide | Part II: System Commands - PERIMETER PARTIAL ? (COMMAND + 8)
5.
6.
The display shows Exit now! #
seconds remaining.
When exit delay time expires
and the system turns on, the
display shows Perimeter On
Partial.
When performing a
COMMAND 8 and no points
are faulted or if the points return
to normal before the exit delay
time expires, the system is
turned on as in COMMAND 3.
Bosch Security Systems | 9/04 | 4998122475D
54
Security System | User's Guide | Part II: System Commands - Special Alerts (COMMAND + 7, COMMAND + 9)
Special Alerts (COMMAND + 7, COMMAND + 9)
3.
The display shows *System
Command*.
4.
Press the 7 key.
Description
Commands 7 and 9 can be programmed to respond to a
choice of numerous situations that may need immediate
attention. They may also be used to send a silent alarm to
your security company without sounding an alarm signal on
the premises. Check with your security company for the
options they offer.
Using COMMAND 7
1. Ensure your keypad shows idle
disarmed text.
2.
Your COMMAND 7 special alert has been programmed
to:
notify your security company
ring a bell on your premises
display at your keypad
Description
Press the COMMAND key.
Bosch Security Systems | 9/04 | 4998122475D
55
Security System | User's Guide | Part II: System Commands - Special Alerts (COMMAND + 7, COMMAND + 9)
Using COMMAND 9
1. Ensure your keypad shows idle
disarmed text.
2.
Press the COMMAND key.
3.
The display shows *System
Command*.
4.
Press the 9 key.
Bosch Security Systems | 9/04 | 4998122475D
Your COMMAND 9 special alert has been programmed
to:
notify your security company
ring a bell on your premises
display at your keypad
Description
56
Security System | User's Guide | Part II: System Commands - BYPASS A POINT? (COMMAND + 0)
BYPASS A POINT? (COMMAND + 0)
Description
Bypass points that you do not want included in the system.
Points that are not included in the system do not detect
intruders and cannot send any reports. You can bypass points
when an area is disarmed. Bypassing a point reduces the level
of security and should be used with discretion. Points remain
bypassed until you unbypass them or some points may return
when the area is disarmed (refer to UNBYPASS A POINT?
(COMMAND + 0 + 0) on page 60).
You could use COMMAND 0 to leave a window open over
night without initiating an alarm (refer to Turning the System On
(Arming) With Doors or Windows Open on page 31).
Bosch Security Systems | 9/04 | 4998122475D
Using Bypass a Point
1. Ensure your keypad shows idle
disarmed text.
2.
Press the COMMAND key.
3.
The display shows *System
Command*.
4.
Press the 0 key.
57
Security System | User's Guide | Part II: System Commands - BYPASS A POINT? (COMMAND + 0)
If you prefer, you may use the Command Menu in
place of steps 2 and 3 to initiate this function.
Press the Menu> key to enter the Command
Menu, then press Next> repeatedly until you
reach the BYPASS A POINT ?> prompt. Then
press the BYPASS A POINT ?> soft key
5.
When the point text of the point
you wish to bypass appears,
press the Bypass> soft key,
or the ENTER key.
The display shows:
If you know the point number
you wish to bypass, enter the
number and press the Enter>
soft key or the ENTER key.
If you don’t know the number of the point you wish to
bypass, you can view the list of devices that can be
bypassed by pressing the Next> soft key.
Continuously pressing Next> scrolls through these
devices.
Bosch Security Systems | 9/04 | 4998122475D
58
Security System | User's Guide | Part II: System Commands - BYPASS A POINT? (COMMAND + 0)
6.
7.
One of the following messages displays (FRONT DOOR
is used here as an example):
• FRONT DOOR is not bypassed indicates the point is
not bypassed and the option is given to bypass it. If
Bypass> is pressed, FRONT DOOR is bypassed is
displayed, indicating the point was successfully
bypassed.
• FRONT DOOR is already bypassed indicates that
the point has already been bypassed.
• FRONT DOOR cannot be bypassed indicates the
system is programmed not to allow that point to be
bypassed.
• Invalid Point. Please try again indicates that the
device is not assigned to the area that you are in or an
invalid point was entered.
• No additional points indicates that there are no points
remaining to be bypassed.
You can return to idle text by pressing the <Exit soft key.
Bosch Security Systems | 9/04 | 4998122475D
8.
If the bypassed point is a 24 hour point, the message
24Hr Point Bypassed begins scrolling in the display. If
the bypassed point is a fire point, the message Fire Point
Bypassed scrolls in the display.
59
Security System | User's Guide | Part II: System Commands - UNBYPASS A POINT? (COMMAND + 0 + 0)
UNBYPASS A POINT? (COMMAND + 0 + 0)
4.
Press the 0 + 0 keys.
+
Description
If you prefer, you may use the Command Menu in
place of steps 2 and 3 to initiate this function.
Press the Menu> key to enter the Command
Menu, then press Next> repeatedly until you
reach the UNBYPAS A POINT ?> prompt. Press
the UNBYPAS A POINT ?> soft key.
Unbypassing a point is a way to return a bypassed point to the
security system so that it can once again respond to trouble
and alarm conditions.
Using Unbypass a Point
1. Ensure your keypad shows idle
disarmed text.
5.
2.
Press the COMMAND key.
3.
The display shows *System
Command*.
Bosch Security Systems | 9/04 | 4998122475D
The display shows:
If you know the point number
you wish to unbypass, enter the
number and press the Enter>
soft key or the ENTER key.
60
Security System | User's Guide | Part II: System Commands - UNBYPASS A POINT? (COMMAND + 0 + 0)
If you don’t know the number of the point you wish to
unbypass, you can view the list of devices that can be
bypassed by pressing the Next> soft key.
Continuously pressing Next>
scrolls through these devices.
When the point text of the point
you wish to unbypass appears,
press the Unbypass> soft key or
the ENTER key.
6.
One of the following messages displays (FRONT DOOR
is used as an example here):
• FRONT DOOR is not bypassed indicates the point is
in the system, and therefore cannot be bypassed.
• FRONT DOOR is bypassed. indicates that the point
has already been bypassed.
If the Unbypass> is selected, FRONT DOOR is now
unbypassed displays and indicates the point was
successfully unbypassed.
•
•
Bosch Security Systems | 9/04 | 4998122475D
If a 24 hour or Fire Point is bypassed and you
attempt to unbypass it when it is still faulted, Cannot
unbypass 24hr faulted points will be displayed.
Invalid Point indicates that the device is not assigned
to the area that you are in, or the number that was
entered was not a valid point in the system.
No Additional Points indicates that there are no
points remaining to be unbypassed. (The display will
exit the function and return to idle text.)
61
Security System | User's Guide | Part II: System Commands - UNBYPASS A POINT? (COMMAND + 0 + 0)
7.
You can return to idle text by pressing the <Exit soft key.
Bosch Security Systems | 9/04 | 4998122475D
62
Security System | User's Guide | Appendix - Security System Limitations
Appendix
Security System Limitations
Not even the most advanced security system can guarantee
protection against burglary, fire, or environmental threats. All
security systems are subject to possible compromise or failureto-warn for a variety of reasons including, but not limited to,
the following:
• If sirens or horns are placed outside the hearing range of
people in remote areas of the building or in areas that are
frequently closed off, they do not provide the intended
protection.
• If intruders gain access through unprotected points of
entry, the system will not detect their entrance.
• If intruders have the technical means of bypassing,
jamming, or disconnecting all or part of the system, they
will not be detected.
Bosch Security Systems | 9/04 | 4998122475D
•
If the AC power supply is OFF and the back-up battery is
either missing or dead, sensors will not detect intrusion
nor the fire points detect the presence of smoke.
• Smoke detectors cannot detect smoke in chimneys, walls,
or roofs, or smoke blocked by a closed door. They may
not detect smoke or fire on a level of the building
different from the one on which they are located. Smoke
detectors may not be able to warn in time about fires
started by explosions, improper storage of flammables,
overloaded electrical circuits, or other types of hazardous
conditions.
• If phone lines are out of service, reports from the security
system to the security company cannot be sent.
Telephone lines are vulnerable to compromise by several
means.
Inadequate maintenance and failure to test are the most
common causes of alarm failure. It is strongly recommended
that you test your system once a week to be sure that all
system components are working properly.
63
Security System | User's Guide | Appendix - Fire Safety and Evacuation
Although having a security system may make you
eligible for reduced insurance premiums, the
system is no substitute for insurance. Warning
devices cannot compensate you for loss of life or
property.
Fire Safety and Evacuation
Residential fire is a leading cause of accidental death. Most
fire related deaths occur at night when occupants suffocate in
their sleep from smoke and toxic gases, rather than from
burns. To help reduce this risk, the following program should
be implemented.
1. Minimize fire hazards. Smoking in bed, cleaning with
flammable liquids such as gasoline, leaving children home
alone, and using unsafe holiday decorations are some of
the common causes of household fire.
2. Install a fire alarm system. The primary purpose of this
system is to give the earliest possible warning of danger.
Bosch Security Systems | 9/04 | 4998122475D
3.
4.
A smoke detector should be provided to protect each
sleeping area in a home (refer to Figure 5 and Figure 6 on
page 65).
Practice an escape plan. Because there may be very little
time between detection of a fire and the time it becomes
deadly, it is important that every member of the family
understand how to quickly evacuate according to the
plan.
64
Security System | User's Guide | Appendix - Fire Safety and Evacuation
Figure 5: Smoke detector placement
2
4
Figure 6: Smoke detector placement (elevation view)
5
3
1
1
6
2
1
3
2
1
2
3
1 - Smoke detector
2 - TV room
3 - Bedroom
4 - Dining room
5 - Kitchen
6 - Living room
Bosch Security Systems | 9/04 | 4998122475D
1 - Smoke detector
2 - Bedroom
65
Security System | User's Guide | Appendix - Fire Safety and Evacuation
5.
Plan both primary and alternate escape routes. Since
stairwells and hallways may be blocked during a fire,
exiting through a bedroom window must be a part of the
escape plan. If the sleeping area is above the ground
floor, install a means of safely descending outside the
building if one does not already exist (refer to Figure 7).
Figure 7: Escape routes
2
5
4
3
3
7
3
6
1
1 - Fire
2 - Escape route
3 - Bedroom
Bosch Security Systems | 9/04 | 4998122475D
4567-
Kitchen
Dining room
Living room
Smoke detector
66
Security System | User's Guide | Appendix - Standard Displays
6.
7.
As a part of this plan, all family members should arrange
to meet at a location away from the house (such as a
neighbor’s house) so you will know that everyone is
accounted for.
If it is determined that the alarm was accidentally
sounded, the bell should be silenced, the detectors reset,
and your security company notified immediately that
there is no emergency situation.
Standard Displays
Your keypad uses standard and custom displays to show the
status of the security system. Many standard displays are
described below. Your system may not use all of them.
Descriptions of your custom text follow.
*System Command*
Displays when you press the
COMMAND key. The system is
waiting for you to enter a one or
two digit number to complete the
command.
Entry Delay display
When the system is turned on, entering through a delay door
starts entry delay time. The keypad emits a tweedle tone and
displays the following:
Bosch Security Systems | 9/04 | 4998122475D
67
Security System | User's Guide | Appendix - Standard Displays
Enter passcode and press the
ENTER key to disarm
*No Authority*
The system does not recognize the
passcode entered and displays *No
Authority*.
followed by Area # Name Text is
in entry delay.
NOT AUTHORIZED
You must turn off the system before entry delay time expires
to avoid creating an alarm event.
The passcode entered does not have
the authority to perform the
function requested and displays
NOT AUTHORIZED.
Exit Delay display
Perimeter On Delayed
Arming your system starts exit delay time. The keypad emits a
repeating beep tone and displays the following
Indicates that the perimeter is
armed (turned on) with entry/exit
delay time and displays Perimeter
On Delayed.
(refer to PERIMETER DELAY ?
(COMMAND + 3) on page 40)
Exit now! # seconds remaining (#
= the number of seconds left in exit
delay).
Bosch Security Systems | 9/04 | 4998122475D
68
Security System | User's Guide | Appendix - Standard Displays
Perimeter On Instant
Indicates that the perimeter is
armed (turned on) without
entry/exit delay time and displays
Perimeter On Instant.
(refer to PERIMETER INSTANT
(COMMAND + 2) on page 38)
Area must be disarmed first
This display indicates that the
function requested can only be
performed when the area is
disarmed.
Disarm the area first to perform the function.
Bosch Security Systems | 9/04 | 4998122475D
69
Security System | User's Guide | Appendix - System Trouble Displays
System Trouble Displays
If you see any of the system trouble displays shown below,
contact your security company to determine whether repairs
are needed.
The Silence> soft key is only displayed if a
trouble tone was sent along with the trouble
display.
Call for Service
Call your security company for
service.
Service Panel
Indicates a problem with the control
panel. The control panel is not
operating. Call your security
company for service.
Bosch Security Systems | 9/04 | 4998122475D
Service Parameter
Indicates a problem with the control
panel. Your control panel may not
be operating properly. Call your
security company for service.
Service Low Battery
Indicates the security system’s
battery is low, or temporarily
draining faster than the system can
charge it.
If this display remains or appears frequently, call your security
company for service. Entering COMMAND 4 or pressing the
Silence> soft key silences the trouble buzz.
Entering COMMAND 4 or pressing the Silence>
soft key silences the trouble buzz.
70
Security System | User's Guide | Appendix - System Trouble Displays
Service AC Failure
Indicates that AC power to the
security system is interrupted.
Check the plug-in transformer and
circuit breaker.
The display clears when AC power returns.
Serv Battery Missing
Indicates the security system’s
battery is disconnected or shorted.
In the event your security system
fails to communicate, the keypad
buzzes and displays
Comm Fail Route Grp1 (Route
Group number can be from 1 to 4)
Comm Fail Route Grp1 (2-4)
Your security system makes repeated attempts to
communicate with the security company.
Notify your security company.
Service Phone Line #1 (or #2)
Indicates telephone line trouble.
Call your phone company from
another phone to report telephone
trouble.
This message may not appear in some systems.
Bosch Security Systems | 9/04 | 4998122475D
Notify your security company of the communication trouble.
Service Keypad
Indicates that a keypad, other than
the one displaying the message, is in
a trouble condition.
71
Security System | User's Guide | Appendix - System Trouble Displays
Service Printer
Indicates that a local printer (if
installed) at your premises is in a
trouble condition.
Check to be sure the printer is powered on, the paper is correctly
inserted, and the printer is selected. Contact your security
company if you have questions or the display doesn’t clear. You
system may not include a local printer. Printer number could also
be 18 or 19.
Service D9210
Indicates that one of the D9210
Access Control Modules (possible
of 8 total) connected to the control
panel has encountered a problem.
Contact you security company.
Bosch Security Systems | 9/04 | 4998122475D
Service Point Bus 1 (or 2)
Displays when a problem has
occurred with one of the control
panel’s circuits. Call your security
company.
Fire Point Bypass
This display indicates that fire
points have been bypassed.
24 Hour Bypass
This display indicates that 24-hour
points have been bypassed.
72
Security System | User's Guide | Appendix - Security System Glossary
Security System Glossary
Area
Arm
Authority
Level
Bypass
A group of detection devices connected to your
security system.
To turn your controlled points (burglar
detection devices) on. When an area is armed
and a controlled point trips, an alarm occurs or
entry delay begins. When an area is disarmed,
faulting controlled points does not generate
alarms.
Your security company or security
representative assigns an authority level to your
passcode. The authority level determines which
keypad functions you can execute.
Selectively remove points from the security
system. You might bypass a point in order to
arm the perimeter with a window open.
Bosch Security Systems | 9/04 | 4998122475D
Central
Station
Closing
Report
Command
Menu
A facility where trained personnel monitor
your security system 24 hours a day. Your
security system may be programmed to contact
the central station during alarm conditions,
enabling central station personnel to dispatch
the proper authorities.
A report your system can be programmed to
send to the central station indicating that an
area has been armed. Opening and closing
reports are commonly used by commercial
accounts.
A list of functions programmed by your
security company. They can perform most
keypad functions with only two or three
keystrokes.
73
Security System | User's Guide | Appendix - Security System Glossary
Entry Delay
Exit Delay
Faulted
Point
A programmed delay of system alarm response
that allows you to enter an armed area through
the correct point and disarm the area. If you
don’t disarm before the delay time expires, the
system begins an alarm response which may
include reports to the central station.
A programmed delay of system alarm response
that allows you to exit after arming an area. If
you exit after the delay time expires, an alarm
is triggered. You must disarm the system. If
you don’t disarm before the delay time expires,
the system may begin an alarm response
(depending on if any interior points were
armed) that may include reports to the central
station.
A point that is not normal (a door or window is
open).
Bosch Security Systems | 9/04 | 4998122475D
Force Arm
Idle Text
Master
Arm
Menu
Opening
Report
Perimeter
Arm
To turn on (arm) the security system even
though one or more points are faulted. Force
arming bypasses the faulted points.
The security system displays idle text at
keypads when it is not performing a user
requested function. Idle text shows the arming
status of the system.
To turn on (arm) both interior points and
perimeter points.
A list of functions you execute from a keypad.
A report your system can be programmed to
send to the central station indicating that an
area has been disarmed. Opening and closing
reports are commonly used by commercial
accounts.
An arming command that arms only the
perimeter points.
74
Security System | User's Guide | Appendix - Security System Glossary
Point
Relay
Trouble
A detection device, or group of devices
connected to your security system. Points
display individually at the keypad with custom
text. The text can describe a single door,
motion sensor, smoke detector, or an area such
as UPSTAIRS or GARAGE.
Your system may have relays programmed to
provide control of devices, such as premises
lighting or entry gates. Your security company
programs relays for automatic control and/or
control from your keypad.
A service condition that needs to be corrected,
such as a broken wire.
Bosch Security Systems | 9/04 | 4998122475D
75
For technical support, please contact:
© 2004 Bosch Security Systems
4998122475D