1
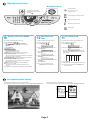
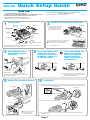
MFC-590 Control Panel
Navigation Keys
* Access the Menu
* Go to next menu level
You can print a list of basic
operational steps by pressing
Reports, 1 .
* Accept an option
* Scroll through the current menu level
* Back to previous menu level
* Forward to next menu level
* Exit the Menu
Date and
10 Set
Time
11 Set Station ID
Your MFC displays the date and time, and
prints it on every fax you send.
You should store your name and fax number to be
printed on all fax pages you send.
B. Press
or
to select FAX ONLY, FAX/TEL,
TAD:ANSWER MACH., MANUAL mode, and press
Menu/Set.
A. Press Menu/Set,
A. Press Menu/Set,
C. Press Stop/Exit.
B. Enter the last two digits of the year and
press Menu/Set.
9
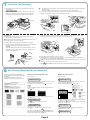
Select a Receive Mode
Choose the mode that best suits your needs.
A. Press Menu/Set,
2
,
1
,
2
.
FAX ONLY
For use with a dedicated fax line.
Every call is answered as a fax.
FAX/TEL
(with an External Telephone)
For receiving fax and voice calls on one line.
The machine answers every call and receives a fax or pseudo
rings for you to pick up a voice call.
TAD:ANSWER MACH. (with an External Answering Machine)
For use with an external answering device.
The TAD answers every call and stores voice messages.
Fax messages are printed.
MANUAL
(with an External Telephone)
You control the phone line and must answer every call
yourself.
1
,
2
.
2.DATE/TIME
1
,
3
.
3.STATION ID
YEAR:XX
FAX:
MONTH:XX
C. Enter two digits for the month and press
Menu/Set.
DAY:XX
D. Enter two digits for the day and press
Menu/Set.
TIME:XX:XX
E. Enter the time in 24-hour format and press
Menu/Set.
B. Enter your fax number, then press Menu/Set.
NAME:
C. Enter your name using the dial pad and the chart
below, then press Menu/Set. Use the right arrow to
create spaces.
Press Key
once
twice
2
3
4
5
6
7
8
9
A
D
G
J
M
P
T
W
B
E
H
K
N
Q
U
X
three times four times five times
C
F
I
L
O
R
V
Y
2
3
4
5
6
S
8
Z
A
D
G
J
M
7
T
9
D. Press Stop/Exit.
F. Press Stop/Exit.
Note: If you can’t step forward, press
Stop/Exit and repeat from step A.
For more details, see Entering Text in Owner’s Manual.
Note: If you can’t step forward, press Stop/Exit and
repeat from step A.
For more details, see Receive Mode Settings in Owner’s Manual.
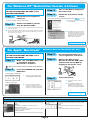
For Improving Print Quality
If horizontal streaks appear like this, clean the print head.
If characters and lines are stacked like this, check alignment.
(See Cleaning the Print Head in Owner’s Manual or visit us at http://solutions.brother.com)
(See Print Quality Check in Owner’s Manual or visit us at http://solutions.brother.com)
Page 3