1
Keep wiring away from moving engine parts, exhaust pipes and high-tension cable. Be sure to tape wires
that pass through holes on the firewall to prevent fraying.
CAUTION: Do not connect the wire harness to the control module until all wiring to vehicle is complete.
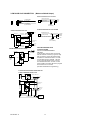
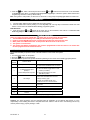
6 PIN HEAVY GAUGE WIRING CONNECTIONS:
Remember that what the system does to start a vehicle is to duplicate the functions of the ignition key
switch! Below, we will explain the three basic functions of the ignition switch. Since this installation will
require analysis of the ignition switch functions, we recommend making the three connections below at
the ignition switch harness directly.
Violet Wire—Starter Output
Careful consideration for the connection of this wire must be made to prevent the vehicle from starting
while in gear. Understanding the difference between a mechanical and an electrical Neutral Start
Switch will allow you to properly identify the circuit and select the correct installation method. In addition
you will realize why the connection of the safety wire is required for all mechanical switch
configurations.
Failure to make this connection properly can result in personal injury and property damage.
In all installations it is the responsibility of the installing technician to test the remote start unit and
assure that the vehicle can not start via RF control in any gear selection other than park or neutral.
In both mechanical and electrical neutral start switch configurations, the connection of the VIOLET wire
will be made to the low current start solenoid wire of the ignition switch harness. This wire has +12 volts
when the ignition switch is turned to the “START” (CRANK) position only. This wire has 0 volts in all
other ignition switch positions.
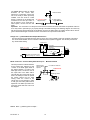
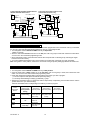
NOTE: This wire must be connected to the vehicle side of the starter cut relay (when used). For the
electrical neutral switch configuration, this connection must be made between the starter inhibit relay
(when used) and the neutral safety switch as shown in the following diagram. Failure to connect this
wire to the ignition switch side of the neutral safety switch can result in personal injury and property
damage. SEE NEUTRAL START SAFETY TEST FOR FURTHER DETAILS.
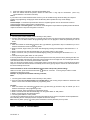
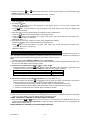
VIOLET Wire
“Off”
Neutral Safety
Switch
“On”
“Acc”
“Start”
Starter
Ignition
Switch
Start Cut Relay
(When Used)
Closed in Park or
Neutral Only
Red Wire (2) — +12V Power Input
Remove the two 20A fuses prior to connecting these wires and do not replace them until the satellite
has been plugged into the control module. These wires are the source of current for all the circuits the
relay satellite will energize. They must be connected to a high current source. Since the factory
supplies (+) 12V to the key switch that is used to operate the motor, it is recommended that these wires
be connected there.
Note: If the factory supplies two separate (+) 12V feeds to the ignition switch, connect one RED wire of
the satellite to each feed at the switch.
Yellow Wire – Ignition 1 Output
Connect the YELLOW wire to the ignition 1 wire from the ignition switch. The ignition wire should
receive “12 volts” when the ignition key is in the “ON” or “RUN” and “START” or “CRANK” position.
When the ignition is turned “OFF”, the ignition wire should receive “0” voltage. The YELLOW wire
must be connected.
PINK Wire – Ignition 2 Output
E9 IN REV. A
5