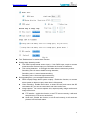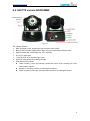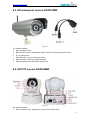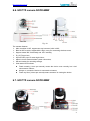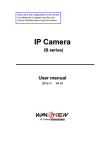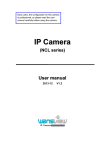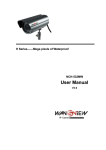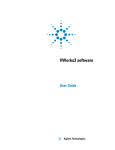
1
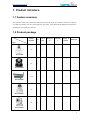
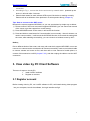
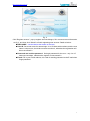
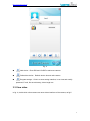
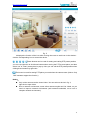
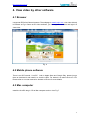
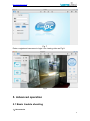
Z series—— Operation Guide 【Plug & Play IP camera】 2013-6 V3.0.0 http://www.wansview.com Statement If the user manual can not help you to solve the problem, please call our technology center for the solutions. We will update the content for the new functions without notice. Notice 1、 Installation Environment Keep away from the places for high-temperature, heat source and direct sunlight; Keep away from water and when get wet, cut off the power immediately. Avoid to use in damp environment, the reference range for operation humidity is below 85%RH. Avoid to use in overheating and too cold environment, the reference range for operation temperature is -10℃~ +50℃ Please install it horizontally or wall mounting, avoid to strenuous vibration place and not put other equipments onto the item 2、 Transport and Handling The package is well-designed to ensure the security during the delivery, so please do not change the package at random. 1) Do not move the ip cameras from overheated to supercooled condition frequently, otherwise it will frost and shorten the service life. 2) Do not move the item when is power on, otherwise the main board might be damaged. Notice: 1. Please check the power supply before it is working 2. Be careful not to bang the camera or subject it to strong impacts or shocks. 3. Do not directly touch the optical components for the image sensor, if necessary, please place a clean and moistened cloth with alcohol and wipe the dirt gently; When not in use, please place the dust cover on to the item to protect the image sensor. 4. Do not aim the camera directly into the sun or at other intense light sources that could affect the image quality (it is not the problem for the ip camera), also shorten the service life for the image sensor. 5. Keep away from laser when it is working, otherwise the image sensor can be damaged. 6. If the equipment is not working properly, please contact the store or the service center, do not disassemble or modify the equipment in any way. (Problems caused by unauthorized modification or repair should be at your own risk.) 2 http://www.wansview.com Index 1. 2. 3. 4. 5. 6. Product introduce .......................................................................................................................4 1.1 Feature summary .....................................................................................................................4 1.2 Product package ......................................................................................................................4 Install device ...............................................................................................................................5 View video by PC Client Software ...........................................................................................6 3.1 Register account ......................................................................................................................6 3.2 Login software ........................................................................................................................8 3.3 View video ..............................................................................................................................9 View video by other software.................................................................................................. 11 4.1 Browser ................................................................................................................................. 11 4.2 Mobile phone software ......................................................................................................... 11 4.3 Mac computer ....................................................................................................................... 11 Advanced operation .................................................................................................................12 5.1 Basic trouble shooting...........................................................................................................12 5.2 Local management ................................................................................................................13 5.2.1 Inquire device name and status ...........................................................................14 5.2.2 WIFI setting .............................................................................................................15 5.2.3 Alarm setting ...........................................................................................................15 Z series product family ............................................................................................................17 6.1. VGA PTZ camera NCZ550W ..............................................................................................17 6.2. HD PTZ camera NCZ550MW .............................................................................................18 6.3. HD waterproof camera NCZ551MW ..................................................................................19 6.4. HD PTZ camera NCZ552MW .............................................................................................19 6.5. HD cube camera NCZ553MW ............................................................................................20 6.6. HD PTZ camera NCZ554MW .............................................................................................21 6.7. HD PTZ camera NCZ555MW .............................................................................................21 3 http://www.wansview.com 1. Product introduce 1.1 Feature summary The Z series is the new H.264 Plug and Play IP Camera. Once you connect camera to internet, no need any setting, you can see anywhere, any place, via manufacturer Mobile phone and PC software to view what you care for! 1.2 Product package Accessory Type Power adaptor CD Cable Bracket A Bracket L Stand of plastic 5V √ √ √ √ √ √ 5V √ √ √ - √ √ 12V √ √ √ - √ √ 5V √ √ √ - √ √ 5V √ √ √ - √ - Network Antenna NCZ550W NCZ550MW NCZ551MW NCZ552MW NCZ553MW 4 http://www.wansview.com 5V √ √ √ √ √ √ 5V √ √ √ - √ √ NCZ554MW NCZ555MW Notice Please check carefully if all listed items are included in the package, if anything missing, please contact vendor in time. The item number with letter M is Mega Pixel, 720P camera, otherwise it’s VGA camera. The label for device series # and verify code are put at the bottom of the device, it is unique, please take care of it. 2. Install device Typical home network connection as fig.1 Fig. 1 Please check if the power supply voltage is 5V; Make sure you have a internet connection and can access the internet via the 5 http://www.wansview.com connection; According to Fig. 1, connect the device and router by network cable,powered up the device; it will work after 2 minutes. Please check status for work indicator LED to see if the device is working normally. Please refer to its definition of the products in Z series product family (Chapter 6). Tips: How to connect to the WIFI router Because the camera supports WPS/QSS, so you can set wireless by simple way as below. 1) Please confirm if the router connected supports WPS/QSS (you can check user manual of the router or get the support from router factory); 2) Press WPS/QSS button on the router, it will launch the function. 3) Press and hold on reset button for 5 seconds after it runs normally(about 2 minutes, not need to connect cable), it will launch the WPS/QSS function, then match the setting with the router, after matching successfully, you can connect it to wireless router by WIFI. Notice: Due to different kinds of the router, and many old router don’t support WPS/QSS, so we are not sure our camera can be connected to all routers successfully, need to use network cable to connect camera and router at first, and then refer to user manual of mobile phone, or content of this manual to set Wifi (chapter 5.2.2), and then unplug the cable to use the WiFi connection. 3. View video by PC Client Software There are 2 steps to view by PC: 1. Install LiveIPC software 2. Register an account 3.1 Register account Before viewing video by PC, run LiveIPC software in CD, it will install viewing video program into your computer, launch the software, the login interface as fig.2 6 http://www.wansview.com Fig. 2 Click “Register account”,pop up register account dialogue, fill in correct account information as fig. 3, and then click “Submit” to finish registering new account. Detail as below: EID/VCODE:see the label at the bottom of the item; User ID:Set a user name for remote login(4 to 15 letters with numbers, and the user name is unique one, should be not same as others’, otherwise the registration will be not successful) ; Password and confirm password:Set login password for the user(only 4 to 15 letters and numbers, otherwise the register is unsuccessful) ; E-mail:Fill in your E-mail address, it is used for sending password to the E-mail when forgot password. 7 http://www.wansview.com Fig.3 Notice: You must know EID and VCODE of one IP camera when register account, after register successfully, the camera will be first camera managed by the account. If the account only manages a camera, the account will be deleted also when delete the camera, so you can’t use the account to login again, need to re-register new account. 3.2 Login software In fig.2,enter registered user name and password, click “Sign in” to access device management as fig.4. 8 http://www.wansview.com Fig. 4 Add device:Enter EID and VCODE to add more camera. Refresh device list:Refresh device list and online status. Program settings:Click it to enter setting interface, it can view and modify password, E-mail, file save directory, video length etc. 3.3 View video In fig. 4, double click online camera can enter video interface of the camera, as fig.5. 9 http://www.wansview.com Fig. 5 It displays the function of the icon when moving the cursor to each icon in the window, click the corresponding icon to control the device. These buttons can be used for setting and calling PTZ preset position, you can use right-click to click these buttons when moving the PTZ to some place, and then select “set” or “clear” preset place in pop-up. Also you can call the PTZ preset position when clicking these buttons by right-click. The button is used for setting PTZ place you need when the camera start. (Notice: Only 720P cameras support the function.) Notice: Only online camera can be viewed video. You can select a device in fig. 4, right-click to open video. Due to network environment, some online camera maybe can’t be visited, so you need to improve network environment (add network bandwidth, not to use in complex network environment). 10 http://www.wansview.com 4. View video by other software 4.1 Browser It supports IE/Firefox/Chrome browser. The webpage is www.liveipc.com, view video directly in browser as Fig.6. Same as PC client software, you can register username and login it to view video. Fig. 6 4.2 Mobile phone software There is an APP named “ LiveIPC” both in Apple Store and Google Play, please just go there to download it and install it to view the video. For Android, we also include it in CD. Please refer to our user manual for Android or iPhone for more details. 4.3 Mac computer Install the LiveIPC.dmg in CD to Mac computer and run it as Fig.7. 11 http://www.wansview.com Fig. 7 Enter a registered username to login it for viewing video as Fig.8. Fig.8 5. Advanced operation 5.1 Basic trouble shooting 1) Reset device 12 http://www.wansview.com If you forget encryption password, or can’t use camera normally, you can try to restore factory default as following steps: Power off the device; Press and hold “Reset” button, and then power on the device; Continue hold the “Reset” button for at least 5 seconds, then release; After camera restart, it will go back to factory default setting automatically, it need around 2 minutes; During the reset, please don’t power off the device, otherwise the above operation is not succeeded, you need to repeat above operation. 2) Forgot register account information If you forget password, you can click “Forgot password” in fig.2, it will pop up a dialogue, enter user name, click “Submit”, it will send password to your registered E-mail. If forgot user name or E-mail address, so you need to re-register a user. If the user you forgot manages many cameras, need to add these cameras to the new user one by one, and it will automatically delete these cameras one by one from old user. The old user will be deleted automatically when all cameras are moved to new user. 5.2 Local management You can set and mange device by local management when PC and camera are in same LAN (like Figure 1). In Fig. 2,click local management link, will pop up a device list as fig. 9. Fig. 9 13 http://www.wansview.com Search device:search and list cameras in LAN Add device:Fill in IP address and port manually, and add it to device list. Open video:Click it to enter video play interface. Admin password:The factory default user of camera is admin, password is 123456. In fig. 6 interface, many operations need to enter admin user. You can also reset admin user and password by this button. Video encryption:If set video encryption before, it will pop up a dialogue when open video, you must enter password to view video. Device property:Open this interface to set some parameters. Due to device property has many setting items, so introduce the key content for you as below. 5.2.1 Inquire device name and status Fig. 10 In this interface, you can view EID, name, ip address and version of device etc, and can set device name. 14 http://www.wansview.com 5.2.2 WIFI setting WiFi setting interface as fig. 11, please set the WiFi as following step: 1) 2) 3) 4) 5) 6) 7) Fig. 11 Tick “Enable Wi-Fi”,click “Apply” to save the settings, then restart the device Click “Search Wi-Fi”, pop up search dialogue; Click “search” it will list all searched WiFi signal; Choose WiFi signal you want to join in, click “Select” button and close search dialogue; In key blank, fill in encryption password of selected WiFi; Set WiFi IP address(obtain automatically by default) , then click “Apply” to save the setting; Unplug the cable, Wifi connection is done. Notice: Because WiFi uses common channel, it is vulnerable to interference from other wireless signals, and different environment (such as open place or buildings), the transmission distance will be different, please pay attention to the reliable distance to ensure work properly. When searching signals, please use the signal with intensity value above 30%. WIFI supports 802.11b/g/n. 5.2.3 Alarm setting Alarm setting interface as fig. 12, it can set alarm parameters. 15 http://www.wansview.com Fig. 12 Tick “Enable alarm” to active alarm function Setting alarm detection mode: Tick DIDO input(External sensor input):if tick DIDO input, need to connect external sensor at alarm input port, otherwise the function is inefficient; Tick moving detection:It will trigger the alarm when it detects any motion. Sensitivity value 0 means disable moving detection; Sensitivity value 1 means lowest sensitivity; Sensitivity value 10 means highest sensitivity; During setting time, you can appoint alarm action: DIDO output(Linkage alarm system output):Enable the function, to connect alarm system to alarm out port, alarm time is 30 seconds; Video recording:Enable the function, to insert SD card, and ensure the SD card works OK, you can set record time and video cache here; Image capture:You can set capture size, capture quality, image number and image cache here. FTP transfer:enable the function, to set FTP server correctly, it will send two pictures to FTP server each alarm; Send mail:Enable the function, to set E-mail correctly, it will send two pictures to E-mail each alarm. 16 http://www.wansview.com 6. Z series product family 6.1. VGA PTZ camera NCZ550W Fig. 13 The camera features: Max. resolution is VGA, support two way intercom, build-in MIC; Build in WIFI module, support 802.11b/g/n, easy for connecting wireless router; Support rotate 350°horizontally and 100°vertically; Built-in IR_CUT, 4mm lens; 8 pcs IR LED, up to 5 meter night vision; Alarm in/out for external alarm system connection; SD card socket for recording storage; The network status LED will light green when the device is connected to internet by cable; it lights orange when the device is connected to internet by WiFi; The work status LED will light blue when the device is connected to internet, it lights red when someone is viewing the device. 17 http://www.wansview.com 6.2. HD PTZ camera NCZ550MW Fig. 14 The camera features: Max. resolution is HD, support two way intercom, build in MIC; Build in WIFI module, support 802.11b/g/n, easy for connecting wireless router; Support rotate 290°horizontally and 120°vertically; IR_CUT, 3.6mm lens; 11 pcs IR LED, up to 8 meter night vision; Micro SD card socket for recording storage Work status LED indicate: Flash normally (1 time per second) means the device runs normally, but it isn’t connected to internet; Always on, means the device is connected to internet; Flash very fast (3 times per second) means someone is viewing the device. 18 http://www.wansview.com 6.3. HD waterproof camera NCZ551MW Fig. 15 The camera features: Max. resolution is HD; Build in WIFI module, support 802.11b/g/n, easy for connecting wireless router; IR_CUT, 8mm lens; 36pcs IR LED, up to 25 meter night vision; Micro SD card socket for recording storage Support waterproof level IP66 for outdoor use. 6.4. HD PTZ camera NCZ552MW Fig. 16 The camera features: Max. resolution is HD, support two way intercom, build in MIC; 19 http://www.wansview.com Build in WIFI module, support 802.11b/g/n, easy for connecting wireless router; Support rotate 290°horizontally and 120°vertically; IR_CUT, 3.6mm lens; 10 pcs IR LED, up to 8 meter night vision; Micro SD card socket for recording storage Work status LED indicate: Flash normally (1 time per second) means the device runs normally, but it isn’t connected to internet; Always on, means the device is connected to internet; Flash very fast (3 times per second) means someone is viewing the device. 6.5. HD cube camera NCZ553MW Fig.17 The camera features: Max. resolution is HD, support two way intercom, build in MIC; Build in WIFI module, support 802.11b/g/n, easy for connecting wireless router; IR_CUT, 3.6mm lens; 12pcs IR LED, up to 8 meter night vision; Built-in Micro SD card socket Work status LED indicate: Flash normally (1 time per second) means the device runs normally, but it isn’t connected to internet; Always on, means the device is connected to internet; Flash very fast (3 times per second) means someone is viewing the device. 20 http://www.wansview.com 6.6. HD PTZ camera NCZ554MW Fig. 18 The camera features: Max. resolution is HD, support two way intercom, build in MIC; Build in WIFI module, support 802.11b/g/n, easy for connecting wireless router; Support rotate 350°horizontally and 100°vertically; IR_CUT, 4mm lens; 8 pcs IR LED, up to 5 meter night vision; Alarm in/out for external alarm system connection; SD card socket for recording storage; Work status LED indicate: Flash normally (1 time per second) means the device runs normally, but it isn’t connected to internet; Always on, means the device is connected to internet; Flash very fast (3 times per second) means someone is viewing the device. 6.7. HD PTZ camera NCZ555MW 21 http://www.wansview.com Fig. 19 The camera features: Max. resolution is HD, support two way intercom, build in MIC; Build in WIFI module, support 802.11b/g/n, easy for connecting wireless router; Support rotate 340°horizontally and 90°vertically; IR_CUT, 3.6mm lens; 10 pcs IR LED, up to 6 meter night vision; Alarm in/out for external alarm system connection; SD card socket for recording storage; Work status LED indicate: Flash normally (1 time per second) means the device runs normally, but it isn’t connected to internet; Always on, means the device is connected to internet; Flash very fast (3 times per second) means someone is viewing the device. Statement: 1. If any question about the manual, please contact our technical support. 2. The company reserved the right to update the manual from time to time without prior notice. 22