1
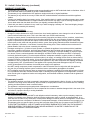
J. Lighting Instructions (Standing Pilot)
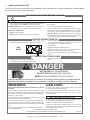
FOR YOUR SAFETY READ BEFORE LIGHTING
WARNING: If you do not follow these instructions exactly, a fire or explosion may result causing property damage, personal injury or loss of life.
A. This appliance has a pilot which must be lighted by hand. When lighting the
pilot, follow these instructions exactly.
• Immediately call your gas supplier from a neighbor’s phone. Follow the gas supplier’s instructions.
B. BEFORE LIGHTING, smell all around the appliance area for gas. Be sure to smell
next to the floor because some gas is heavier than air and will settle on the floor.
• If you cannot reach your gas supplier, call the fire department.
WHAT TO DO IF YOU SMELL GAS
• DO NOT try to light any appliance.
• DO NOT touch any electric switch; do not use any phone in your building.
C. Use only your hand to push in or turn the gas control knob. Never use tools. If
the knob will not push in or turn by hand, DO NOT try to repair it, call a qualified
service technician. Force or attempted repair may result in a fire or explosion.
D. DO NOT use this appliance if any part has been under water. Immediately call
a qualified service technician to inspect the appliance and to replace any part of
the control system and any gas control which has been under water.
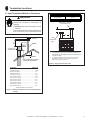
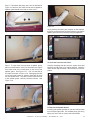
LIGHTING INSTRUCTIONS
1
Turn off all electric power to the appliance
6.
Turn knob on gas control counterclockwise to
2.
Push in gas control knob slightly to turn clockwise
to “OFF”.
7.
Push in control knob all the way and hold in. Immediately depress red or
black piezo button. It may require several depressions of the red or black
piezo button until PILOT lights . If PILOT light does not light after 10 seconds, return to step 2. Continue to hold the control knob in for about one
minute after the pilot is lit. Release knob and it will pop back out. Pilot
should remain lit. If it goes out, repeat steps 2 through 5.
8.
Reinstall fixed glass assembly. Reinstall decorative front.
9.
Turn gas control knob counterclockwise to
Note: Knob cannot be turned from “PILOT” to “OFF” unless
knob is pushed in slightly. DO NOT force.
3.
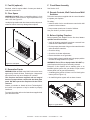
Open the fixed glass assembly. You may need to remove the decorative front.
4.
Wait five (5) minutes to clear out any gas. Then smell for gas, including near the floor. If you smell gas, STOP! Follow “B” in the Safety
Information located at the top of this label.
5.
Find the pilot. The pilot is inside combustion chamber next to the
main burner.
1.
Turn off all electric power to the appliance if service is to provided.
2.
Move switch to “OFF” position.
“PILOT”.
“ON”.
10. Turn on electric power to the appliance.
11. To light burner, turn the wall control or on/off switch to “ON”.
TO TURN OFF GAS TO APPLIANCE
3.
Push in gas control knob slightly and turn clockwise to
DO NOT force.
“OFF”.
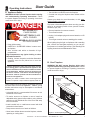
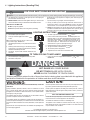
DANGER
HOT GLASS WILL CAUSE BURNS.
DO NOT TOUCH GLASS UNTIL COOLED.
NEVER ALLOW CHILDREN TO TOUCH GLASS.
A barrier designed to reduce the risk of burns from the hot viewing glass is provided with this appliance
and shall be installed for the protection of children and other at-risk individuals.
CAUTION:
WARNING:
DO NOT CONNECT LINE VOLTAGE (110/120 VAC OR 220/240 VAC) TO THE CONTROL VALVE.
Hot while in operation. DO NOT touch. Severe burns may result. Keep children, clothing, furniture, gasoline and other liquids having flammable vapors away.
Improper installation, adjustment, alteration, service or maintenance can cause
injury or property damage. Refer to the owner’s information manual provided with
this appliance. For assistance or additional information, consult a qualified installer,
service agency or the gas supplier.
DO NOT operate the appliance with fixed glass assembly removed, cracked or
broken. Replacement of the fixed glass assembly should be done by a licensed or
qualified service person.
This appliance needs fresh air for safe operation and must be installed so there are
provisions for adequate combustion and ventilation air.
If not installed, operated, and maintained in accordance with the manufacturer’s instructions, this product could expose you to substances in fuel or fuel combustion which
are known to the State of California to cause cancer, birth defects, or other reproductive
harm.
Keep burner and control compartment clean. See installation and operating instructions accompanying appliance.
NOT FOR USE WITH SOLID FUEL
For use with natural gas and propane. A conversion kit, as supplied by the manufacturer, shall be used to convert this appliance to the alternate fuel.
Also Certified for Installation in a Bedroom or a Bedsitting Room.
This appliance must be installed in accordance with local codes, if any; if none,
follow the National Fuel Gas Code, ANSIZ223.1/ NFPA 54, or the National Gas and
Propane Installation code, CSA B149.1.
For additional information on operating your
Hearth & Home Technologies fireplace, please refer to www.fireplaces.com.
12
Heat & Glo • SL-550 / 750 / 950TR-E • 2118-900 Rev. AC • 3/15
464-903i