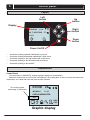
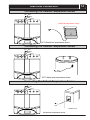
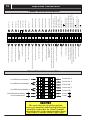
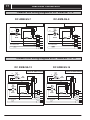
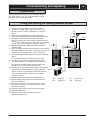
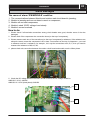
1
INSTALLATION AND MAINTENANCE MANUAL AIR SOURCE HEAT PUMP WITH DC INVERTER (SPLIT TYPE) MODEL: AWB-SS-7 DC AWB-SS-9 DC AWB-SS-12 DC AWB-SS-15 DC - Please Read This Manual Before Using The Heat Pump - 1 Contents System description Principle of operation ............................................ 3 Unit Description .................................................... 3 Principle of heatpump ........................................... 4 Control panel Layout .................................................................. Explanation .......................................................... Functions ............................................................. Symbols ............................................................... 5 5 6 6 General information for the installer Transport and storage ............................................ 7 Installation .............................................................. 7 Copper pipe connecting ........................................ 7 Inspection of the installation .................................. 7 Pipe connections General .................................................................. 8 Copper Pipe connections ...................................... 8 Pipe connection (heating medium) ........................ 9 Pipe connections (water heater) ............................ 9 How to connect the copper pipes ......................... 10 The step and diagram of collect refrigerant .......... 11 Pump capacity diagrams, heating medium side .. 12 How to adjust the rate of flow .............................. 12 Electrical connections Connection of power cord ................................... 13 Connecting the room temperature sensor ........... 13 Connecting the outside temperature sensor ........ 14 Connecting the water tank temperature sensor ... 14 Connecting the defrost temperature sensor ......... 14 1.5mm2 terminal connection ............................. 15 2.5mm2 terminal connection ............................... 15 Wiring diagram ( Indoor Unit ) .............................. 16 Wiring diagram ( Outdoor Unit ) ........................... 17 Commissioning and adjusting Preparations ........................................................ 18 Filling and venting the heating medium system ... 18 Inspection ............................................................. 19 Adjust the heat medium pump .............................. 19 Readjusting, heat medium side ............................ 19 Emptying the water heater .................................. 19 Control General Information ............................................. 20 Menus .................................................................. 20 Main Menu Information ........................................ 20 Sub-menu Operation............................................. 21 Sub-menu Heat Curve .......................................... 22 Sub-menu Temperature ....................................... 23 Sub-menu Integral ................................................. 23 Degree Minute's(DM) instruction............................ 24 Sub-menu Time Setting ........................................ 27 Sub-menu DEFROST ............................................ 28 Sub-menu SETTING ............................................. 30 Sub-menu Operating Time .................................... 31 Sub-menu Reset ................................................... 32 Sub-menu Man Test .............................................. 32 Sub-menu LANGUANG.......................................... 33 Adjustments to be made regularly ........................ 33 Heat Generation-General....................................... 33 Adjustment of the CURVE valve ........................... 33 Adjustment of ROOM valve.................................... 34 Adjustment of Part of the Heat Curve .................... 36 Adjustment the MIN and MAX valve ..................... 37 Adjustment of the HIGH T STOP and LOW T STOP value ............................................. 37 Graph of recent change in TEMPERATURE..........38 Maximum Return Line Temperature ..................... 38 Warm water Production........................................... 39 Regular checks .......................................................39 Check of the Operating Mode ............................... 39 Checking the Water Level of the Heating system . 40 Checking the safety valves .................................... 40 In the event of leakage .......................................... 40 Alarm Messages .................................................... 41 Terminology and Abbreviations ............................. 50 Description of the switch board ............................. 51 Dealing with malfunctions Draining, heat medium side ................................ 52 Draining, the chassis............................................. 52 Component placement Component positions 1 ........................................ 53 Component positions 2......................................... 54 Component positions 3 ....................................... 55 List of components List of components ................................................ 56 Dimensions Dimensions and setting-out coordinates .............. 57 Dimensions of the DC AWB-SS-7 outdoor unit .... 58 Dimensions of the DC AWB-SS-9 outdoor unit .... 58 Dimensions of the DC AWB-SS-12 outdoor unit ... 59 Dimensions of the DC AWB-SS-15 outdoor unit ... 59 Accessories Accessories .......................................................... 60 Enclosed kit .......................................................... 60 Technical specifications Technical specifications ....................................... 61 System description 2 Principle of operation BWB-SS DC series consists of a heat pump, water heater, electrical module, circulation pumps and a control system. BWB-SS DC series is connected to the collector and heating medium circuits. The heat from the heat source (rock, soil, lake) is taken up via a closed collector system in which a mixture of water and antifreeze circulates. Groundwater can also be used as a heat source, but this requires an intervening heat exchanger. The brine emits its heat to the refrigerant in the heat pump’s evaporator. It then vaporises and is compressed in the compressor. The refrigerant, the temperature of which has now been raised, is passed to the condenser where it gives off its energy to the heating medium circuit and, if necessary, to the water heater. After the condenser there is a built-in electrical module which cuts in if there is a high demand. The heating medium side and the hot water side must be fitted with the necessary safety equipment in accordance with the applicable regulations. HW Water Tank cycle water inlet CW Heating return Water Tank cycle water return Heating flow Expansion vessel Three - way valve Liquid valve Heating medium (VB), flow Gas valve Heating medium (VB), return Heating medium pump Electrical auxiliary heater Water Tank Compressor Outdoor unit Condenser Expansion valve 3 System description Unit Description In order to get the best results from the climate system AWB-SS series you should read through the section For the System manager in these Installation and Maintenance instructions. AWB-SS DC series is a climate system for heating houses and apartment buildings as well as industrial properties. Ground, rock or lakes can be used as the heat exchange source. AWB-SS DC series is a complete heating installation for heating and hot water. It is fitted with new design on the market to be developed specifically for heat pumps. A new evaporator enables a new and improved circulation system for the refrigerant. The heat pump has an 260, 300 or 360 litre water tank and an immersion heater. The Tap Water Stratification system improves the efficiency of heat transfer by keeping the water in distinct thermal layers in the water tank. The unit is fitted with a regulating computer , which is controlled over a graphic display unit. Heat is distributed throughout the house over a hydronic heating system referred to as low temperature system with a maximal water temperature to radiators (feed line temperature) of 65°C. Most of the heating demand is taken care of by the heat pump (compressor unit), the auxiliary heater being started only when demands exceed available heat pump capacity. AWB-SS DC series consists of five main components: a. Heat Pump Unit Rotory or Scroll-compressor Stainless steel heat exchangers Circulation pumps for heating systems Valves and safety equipment for refrigerant system, complete with necessary electric components b. Water Heater 260 , 300 or 360 litre (option) Lined with copper sheet against corrosion or made of stainless steel Maintenance free as no anode is used c. Reversing Valve Opening or closing the connection to water heater according to operating mode: heating or warm water production d. Auxiliary Heater 3/6/9 kW electric heating element Three-step capacity control Fitted on feed line Delivers back-up heat in case of great heat demand that exceeds heat pump capacity e. Regulating Equipment The regulating system controls heat pump components (compressor, circulation pumps, auxiliary heater and reversing valve). Based on data received from sensors, it starts or stops heat pump operation and determines whether heating or warm water shall be produced. The system consists of: Control computer with graphic display unit Temperature sensors (outside air,room, feed line, return line ) System description 4 Principle of heat pump A heat pump can exploit the energy contained in natural heat sources. Or, to put it differently, the heat pump ”collects” heat energy from the heat source. This makes the heat pump a very environmentally friendly and economically sound alternative for space heating. a. A hose filled with liquid (Brine system) is immersed into a lake, dug into the ground or sunk into the rock. The Brine system absorbs the heat energy of the heat source so that the temperature of the water circulating in the hose is raised a few degrees. b The Brine system is circulated to the heat pump’s evaporator. Here the heat energy of the Brine system causes the refrigerant, circulating through the evaporator, to boil and turn into a gas – it evaporates. c The refrigerant, having absorbed heat energy, is circulated to the compressor where pressure and temperature are raised. d The refrigerant continues to the condenser. When condensing, it releases heat energy to the heat carrier, circulating through the condenser. The temperature of the refrigerant sinks, and it returns to its liquid state. e The heat energy released is carried by the heating circuit to water heater and radiator or floor heating systems. f At last the refrigerant is led through the expansion valve, where its pressure is reduced, and then continues to the evaporator. The process is restarted. . The heat pump has two separate liquid circuits Refrigerant circuit – circulating inside the heat pump. Through evaporation, compression and condensation it absorbs energy from the outdoor unit and releases it to the heat carrier. The refrigerant is chlorine-free. Heating circuit – water transporting heat energy to the heating system (radiators/floor coils) and the water heater. Condenser Expantion valve/ pressure drop Heating Circuit Compressor/ pressure increase Refrigerant Refrigerant Circuit Evaporator Fan 5 Control panel Layout Left button Up button Display Right button MONDAY 11:30 W. T. HEATING 37 115% Down button Power On/Off • One button pointing upwards marked with a up arrow • One button pointing downwards marked with a down arrow • One button pointing to the right marked with a right arrow • One button pointing to the left marked with a left arrow • One button pointing to the ON/OFF Explanation Control Panel The control panel of AWB-SS DC features a graphic display five control buttons . Beside the control panel you will find the User’s Manual, a short description of how to increase and reduce room temperature, and a label with name and phone number of dealer. , •The running speed percentage of compressor. ROOM MONDAY 20 11:30 OPER.WARMWATER 95 % 1 HDO CSP Graphic display Control panel 6 Functions The control computer is operated with the help of a user friendly menu system that is displayed on the control panel. There is a main menu and several sub-menus accessible from the main menu. The menus are described in detail further down. To be able to select the desired menu and increase or reduce preset values, you will use the five buttons. The right-hand button on the control panel is used to open the desired menu. The left-hand button is used to return to the previous menu. The up and down buttons are used to navigate between the parameters of a menu. A cursor (arrow) on the left-hand side of the display indicates which menu can be opened. The up and down buttons are also used if you wish to increase or reduce a preset value. Symbols For you to know at a glance the actual operating mode of the heat pump, one of the following symbols will be shown in the lower part of the display depending on which part of the unit is working: The heat pump is running. Warm water is being produced. The auxiliary heater is activated. The figure next to the symbol indicates capacity step. Indicates the status of warm water production. If the symbol is empty, warm water temperature is under the setting temperature. If the symbol is full, warm water temperature reached to the setting temperature There is a room heating demand. HDO When this symbol appears, the heat pump is not running due to external signal stop it; heat pump will restore running as soon as signal input again CSP When this symbol appears, the compressor was not running due to high pressure of refrigerant system; the compressor will be stopped as soon as water temperature over 50 °C and refrigerant system pressure over 4.0MPA, electrical heater will start as supplementary; compressor will restores as soon as water temperature less than 50 °C and refrigerant pressure get right. NOTICE During heat pump running, if the water tank symbol twinkles once in every second, it means water tank temperature is too low and it is in antifreezing protection. At the time warm water heating will forcibly start until water temperature get to 20 ć, then go back to previous running mode. 7 General information for the installer Transport and storage Inspection of the installation The AWB-SS DC series must be transported and stored upright and dry. The AWB-SS DC series may however be carefully laid on its back when being moved into a building. Current regulations require the heating installation to be inspected before it is commissioned. The inspection must be carried out by a suitably qualified person and should be documented. The above applies to closed heating systems. If the heat pump is replaced, the installation must be inspected again. H M flo w 4 9 (5 °C 0) H o t w a te r5 1°C 0 -2 +2 1 0 R 0 R 0 +2 1 AWB-SS DC series is placed on a firm base, preferably a concrete floor or foundation. Install BWB-SS DC series with its back to an outside wall, ideally in a room where noise does not matter. If this is not possible, avoid placing it against a wall behind a bedroom or other room where noise may be a problem. Any wall that backs on to a bedroom should be fitted with sound insulation. Route pipes so they are not fixed to an internal wall that backs on to a bedroom or living room. -2 H M flo w 4 9 (5 °C 0) H o t w a te r 5 1°C Installation Notice Copper pipe connecting 1. in line filter on the return line; 2.To clean system with a power flush before installing the heat pump and fill with clean water; 3. To use flow gauge to get the correct flow for each unit. Overview of external structure + + + + + + + + 1) The maximun length of the connecting copper pipe between the mainframe and outdoor unit is 15 meters. 2) There is no need to charge extra refrigerant into the copper pipe while its length is less than 5 meters. 3) While the copper length is more than 5 meters, copper pipe while its length is less than 5 meters.every extra 10g refrigerant must be charged for per increased 1 meter length. Pipe connections 8 General Pipe installation must be carried out in accordance with current norms and directives. The heat pump can operate up to a return temperature of about 58* °C and an outgoing temperature of about 70* °C from the heat pump. The compressor produces up to 65* °C, the rest is obtained using additional heating. The other heat pumps has a max return temperature of approximately 50 °C and an outgoing max temperature from the heat pump of approximately 60 °C. Since the AWB-SS DC eries is not fitted with shut-off valves, these must be fitted outside of the heat pump to make future servicing easier. During assembly the pipes for the heat medium and water heater and possibly hot water circulation are routed backwards. The distance between AWB-SS DC series and the wall ought to be 50 mm. NOTE! 7KHSLSHV\VWHPQHHGVWREHIOXVKHG RXWEHIRUHWKHKHDWSXPSLVFRQQHFWHG VRWKDWGHEULVFDQQRWGDPDJH FRPSRQHQWSDUWV Copper pipe connections Copper tuble size Modle Size Gas tube Liquid tube AWB-SS- NOTE! AWB-SS- AWB-SS- AWB-SS- 7 9 12 15 5/ 8" 5/ 8" 3/ 4" 3/ 4" 3/ 8" 3/ 8" 1/ 2" 1/ 2" GHIURVWLQJWHPSHUDWXUHVHQVRUDQGRXWVLGH WHPSHUDWXUHVHQVRUVKRXOGEHFRQQHFWHG WRRXWGRRUXQLWWKURXJKWKHFRQQHFWLQJ RXWOHWRIPDLQIUDPHDQGRXWGRRU XQLW 9 Pipe connections Pipe connections (heating medium) Pipe connections for the heat medium side are made at the top. All required safety devices, shut-off valves (as close to the heat pump as possible), and particle filter (supplied) are fitted. When connecting to a system with thermostats on all radiators, a relief valve must be fitted, or some of the thermostats must be removed to ensure sufficient flow. Pipe connections (water heater) The heat pump´s water heater must be fitted with the necessary valve equipment. The heat pump should be supplemented with an electric water heater if a bubble pool or other significant consumer of hot water is installed. The valve coupling in COMPACT (electrical water heater) can be divided. The mixing valve stays in COMPACT and the remaining valve coupling can be used for incoming cold water in AWB-SS series. VENTING VALVE SAV P SAV EXP CW HW Pipe connection for floor heating only VENTING VALVE When the system is used for floor heating only, Please connect the pipe according to the diagram, in order to make the system run effectively. It means the water-tank inlet pipe and the floor supply pipe connected together as the total water supply pipe. P SAV EXP NOTE! 7KHYHQWLQJYDOYHVKRXOGEHVHWRQ WKHWRSRIWKHKHDWLQJPHGLXPV\VWHP Pipe connections 10 How to connect the copper pipes Piping Connecton 1. Open the cover of the outdoor unit. 2. Connect the pipe to the indoor unit and outdoor unit. Wipe the quick connectors with clean cloth to prohibit dust and impurity entering the pipes. Align the centre of the pipe and fully screw in the angular nuts with Finger. connecting pipe thick pipe thin pipe end nut Connector high pressure valve low pressure valve 3. Use Vacuum pump to remove the air from indoor unit and connection pipe. 4. Connect the electric cable as per circuit diagram, and bundle it with the connecting pipe. 5. Take off the nuts in the mouths of high valve and low valve, turn the valves core anticlockwise with hexagon panner till the valves are opened completely. Recover and tighten the nuts. 6. Check leakage: check if there is leakage at each connection of the pipes or nuts. If yes, remedial neasure must be taken, leakage is not permitted in any case. Attention : When connectiong the pipe, a suitable pitching spanner must be used. If other spanner is used, it may damage the joint due to inappropriate force. On connecting the pipe, one should ensure that the insulating material of the pipe be closely fitted to the nuts at the joint. On connecting to the external unit, the pipe should be wrapped with sponge padding to prevent rain water from flowing in. When bending the pipe, the radius cannot be too small and be about 150 160 mm. 11 Pipe connections The step and diagram of collect refrigerant If the outdoor unit needs to be disconnected and moved to another place, please recycle the gas back into the compressor according to the following steps before doing the disconnecting: 1.Turn to the menu: OPERATION---MAN TEST MAN TEST ADD 1 ADD 2 ADD 3 3 WAY 4 WAY WARM PUMP OUT FAN H () OFF OFF OFF OFF OFF OFF OFF OUT FAN L () CMP CMP B OUT PTC 1 OUT PTC 2 OFF OFF OFF OFF OFF MAN TEST SET TO ADD 1 ADD 2 ADD 3 3 WAY 4 WAY WARM PUMP OUT FAN H () OFF OFF OFF OFF OFF ON ON OUT FAN L () CMP CMP B OUT PTC 1 OUT PTC 2 OFF ON OFF OFF OFF 2. Remove the cap of two valves with the spanner. Liquid valve Gas valve 3. Tighten the core of the liquid valve (the smaller one) with valve key at first . After about 20 seconds, tighten the core of the gas (the bigger one) with valve key. Valve key Valve key Gas valve Liquid valve 20 seconds Gas valve Liquid valve 4. Exit the " MAN TEXT "at once or turn the " WARM PUMP " ," OUT FAN " ," CMP " to OFF,at that time the HEATPUMP was stopped. 5. Tighten the cap of two valves. Gas valve Liquid valve 6. loose the nut of the connect pipe to the outdoor unit valve with 2 spanner, disconnect the connect pipe and the two valves. 12 Pipe connections Pump capacity diagrams, heating medium side DC AWA-SS-7 Available pressure Available pressure kPa 80 70 60 50 40 30 20 10 0 DC AWA-SS-9 / DC AWA-SS-12 kPa WILO RS-25/6 1 2 3 Flow 0.22 0 0.44 Available pressure 0.66 0.88 1.10 1.32 1.54 1.76 l/s 1.96 2.24 l/s 80 70 60 50 40 30 20 10 0 WILO RS-25/8 1 2 3 Flow 0 0.22 0.44 0 .66 DC AWA-SS-15 kPa 80 70 60 50 40 30 20 10 0 WILO RL-25/7.5 2 Tillgängligt tryck 1 3 Flow 0 0.28 0.56 0.84 1.12 1.4 1.68 How to adjust the rate of flow WILO RS-25/6 The pump is adjustable to adjust the flow: 1, 2, or 3. WILO RS-25/8 The pump is adjustable to adjust the flow: 1, 2, or 3. WILO RL-25/7.5 The pump is adjustable to adjust the flow: 1, 2, or 3. 0.88 1.10 1.32 1.54 1.76 l/s 13 Electrical connection Connection of the power cord Five core cable ( 2.5mm2 x 2.1m,5cord) Power Supply L1 L2 L3 N L2 L3 N L1 + + + + NOTE! (OHFWULFDOLQVWDOODWLRQDQGVHUYLFHPXVW EHFDUULHGRXWXQGHUWKHVXSHUYLVLRQRI DTXDOLILHGHOHFWULFLDQLQDFFRUGDQFH ZLWKWKHVWLSXODWLRQVLQIRUFH Connecting The Room Temperature Sensor PG WTT RT OCT + + + + Room temperature sensor Room temperature sensor RT=Room temperature sensor Electrical connection 14 Connecting The Outside Temperature Sensor PG WTT RT OCT + + + + Outside air temperature sensor Outside air temperature sensor OCT=Outside air temperature sensor Connecting The Outside Temperature Sensor PG WTT RT OCT + + + + WTT WTT=Water tank temperature sensor Connecting The Defrost Temperature Sensor PG WTT RT OCT + + + + PG Outdoor unit PG=Defrost temperature sensor WTT FEED EHI WF HDO From Water Tank Temperature Sensor From Water feed Temperature Sensor From Electrical auxiliary heater Temperature Sensor From Water Flow Switch From External relay signal control port From Electrical heater 1 From Electrical heater 2 From Electrical heater 3 From MAIN PCB / CN15 From MAIN PCB / CN15 PO PG PQ From Outside Air Temperature Sensor N EH3 N From Electrical heater GND From From Compressor GND From NOTE! 7KHFRQQHFWLQJZLUHRIRXWGRRUXQLWIDQ ZDWHUF\FOHSXPSWZRDQGHOHFWULFDOKHDWHUIRXU VKRXOGEHFRQQHFWHGWRWKHPP2 WHUPLQDO WKURXJKWKHKROHRQWKHVRXQGLQVXODWLRQERDUG DQGFRQQHFWWRRXWVLGHZLWKWKHFRSSHUSLSHV From Common Terminal (CT) From K1 N 2.5mm2 terminal connection EH1 From Fuse 1 EH2 From Fuse 2 From K1 N From Fuse 3 From Water cycle pump2 From Outdoor Unit FAN GND From Oudoor Unit Eletrical heater 4-L GND From From PCB2 / CN2 N-IN From From Common Terminal (CT) WCP2 N From MAIN PCB / CN11-N GND From MAIN PCB / CN11N(AC)-OUT EH4 N From MAIN PCB / CN13 OFAN-L From Outdoor Unit FAN-N /Outdoor EH4-N From MAIN PCB / CN14 OFAN-H OFAN -L From Outdoor Unit FAN-LOW-L From MAIN PCB / CN21-N OFAN -H N From From MAIN PCB / CN21-L GND From PCB2 / CN6 4WV N WCP From PCB2 / CN2 N-IN From Outdoor Unit FAN-HIGH-L From Four_way Valve From Water cycle pump 3-Way Valve's Relay ( port 1) 3-Way Valve's Relay ( port 3) From AC Contactor - A2 3WV N L From Three-way valve forwaterflow From Water Temperature Thermostat 2 (WTP2 70C) From Water Temperature Thermostat 1 (WTP1 40C) From Compressor Exhaust Temperature Sensor From Switch Board E-HEATER port From MAIN PCB / CN15 LP From Defrost Temperature Sensor From MAIN PCB / CN23 From MAIN PCB / CN24 From MAIN PCB / CN22 From PCB2 / T4 From PCB2 / CN14 From PCB2 / CN15 connect together From PCB2 / CN15 From PCB2 / T3 From PCB2 / T2 From PCB2 / T1 CSP From Low Pressure Pressostat ROOM CFDT From Compressor stop protection From Compressor Frequency Decrease For Protection From Room Temperature Sensor RETURN From Water return Temperature Sensor 15 Electrical connection 1.5mm2 terminal connection Electrical connection 16 Indoor Unit Wiring Diagram of DC AWB-SS- 7 / 9 K1 EHI / WF NO BLACK BLUE BLACK BLACK BLACK CN 26 CN 25 NO CN 5 NO CN 4 4 BLACK BLUE 1 BLACK Compressor Circuit Board 3WV 3 Way Valve 4WV 4 Way Valve WCP Water Circulating Pump WCP2 Water Circulating Pump 2 OFAN Outdoor Unit Fan Motor EH 4 CT Common Terminal OFAN-H RE Relay for 3 Way Valve PQ PG EV CN16-N N CN 13 OFAN-L CN16-L CN23 EH 1 Electrical Heater 1 EH 2 Electrical Heater 2 EH 4 Electrical Heater 4 EV Electronic Expansion Valve CN22 MAIN PCB CN27 5 WHITE Cn11 N(AC)-OUT BLUE/WHITE CN8 CN9 CN10 CN2 WCP 2 CN4 RED WHITE BLACK WTP2 BLACK CN6 CN1 BLUE BLUE Electric Heater EHI/WF Interruptor / Water Flow Switch N CN17 YELLOW BLACK BLUE BLACK CN614 CN11-N U CN 14 OFAN-H V CN21-L CM WTP1 OFAN-L WHITE CN5 CFDT Compressor Frequency Decrease For Protection LP Low Pressure Switch CSP Compressor Stop For Protection HDO External Signal Controls Heat Pump Start and Stop L L P3 P6 BLACK P1 P1 L3 L2 L1 W BLACK 5 CN15 CN24 CFDT LP CSP WHITE PO CN21-N 3WV BLACK 4WV EXPANSION VALVE CN11-L BLACK BROWN 2 CM PCB COM BLACK CN 6 CN 27 COM COM BLUE L-IN CN 8 N-IN S 5 Switch Board BLUE PCB2 T4 WCP 7 CN 1 T3 BLACK 3 4 CN 14 T2 BLACK RE 8 CN 15 CN 2 CT T1 AC Contactor SB HDO CN 3 RETURN WTT FEED ROOM SB 6 RED BLUE BLUE BLACK BLACK Air Break Switch AC WHITE BLACK F1 [ 15A ] K1 BLACK EH 1 BLACK BROWN BLACK BLACK F2 [ 15A ] EH 2 BLACK BLUE BROWN BLACK A2 A1 AC BLUE WTT Water Tank Temperature Sensor ROOM Room Temperature Sensor PO Ambient Temperature Sensor PG Defrost Temperature Sensor PQ Exhaust Temperature Sensor FEED Water Feed Temperature Sensor RETURN Water Return Temperature Sensor WTP1 Water Temperature Thermostat (40°C) WTP2 Water Temperature Thermostat (70°C) Indoor Unit Wiring Diagram of DC AWB-SS- 12 / 15 K1 BLACK BLUE BLACK BLACK BLACK BLACK BLUE NO CN 26 BROWN EXPANSION VALVE EV BLACK WTP1 WHITE CN 14 CN 13 CN16-N CN21-L CN16-L CN15 CN24 CN19-N V BLACK CN21-N U 5 CN5 W WHITE RED WHITE PO BLACK 4WV PG 3WV CN19-L CN23 CN22 CN 18 5 OUTDOOR MAIN PCB BLUE/WHITE CN 11 BLACK CN11 CN10 CN13 CN12 A B CN4 A CN2 C C CN120 CN6 B N CN16 OFAN-L N 4 5 WHITE BLACK WHITE RED 1 3WV 3 Way Valve 4WV 4 Way Valve WCP Water Circulating Pump WCP2 Water Circulating Pump 2 OFAN Outdoor Unit Fan Motor CT Common Terminal RE Relay for 3 Way Valve EH 1 Electrical Heater 1 EH 2 Electrical Heater 2 EH 3 Electrical Heater 3 EH 4 Electrical Heater 4 EV Electronic Expansion Valve CFDT Compressor Frequency Decrease For Protection LP Low Pressure Switch PTC BLUE 2 L1 WCP 2 CSP Compressor Stop For Protection HDO External Signal Controls Heat Pump Start and Stop WTT Water Tank Temperature Sensor ROOM Room Temperature Sensor 3 WHITE L3 L2 L1 CN15 BROWN BROWN BLACK F1 [ 15A ] EH 1 F3 [ 15A ] EH 3 RED BLUE BROWN BLACK A2 A1 AC BLACK F2 [ 15A ] BLACK BROWN RED EH 2 BLACK Compressor Circuit Board Electric Heater EHI/WF Interruptor / Water Flow Switch N RED BLUE CAP BLACK RED 60uf BLACK BLUE RED WTP2 CM PCB CN 6 CN 4 YELLOW OFAN-H CN17 CN27 CN614 EH 4 CN8 BLACK BLACK BLACK PQ CFDT LP CSP BLACK CN 6 NO CN 25 1 2 Switch Board COM BLUE CN 8 L-IN 4 WCP 5 CN 1 CN 5 NO CN 4 COM COM CN 27 AC Contactor SB BLUE PCB2 T4 BLACK 3 N-IN CN 14 S CN 15 CN 2 T1 T2 T3 BLACK 7 8 6 HDO CN 3 CT 4 RETURN WTT FEED ROOM SB RE RED BLUE EHI / WF BLUE BLACK BLACK Air Break Switch AC K1 PO Ambient Temperature Sensor PG Defrost Temperature Sensor PQ Exhaust Temperature Sensor FEED Water Feed Temperature Sensor RETURN Water Return Temperature Sensor WTP1 Water Temperature Thermostat (40°C) WTP2 Water Temperature Thermostat (70°C) 17 Electrical connection Outdoor Unit Wiring Diagram of DC AWB-SS- 7 / 9 DC AWB-SS-9 DC AWB-SS-7 OUTDOOR UNIT WIRING DIAGRAM OUTDOOR UNIT WIRING DIAGRAM WHITE WHITE CAPACITOR CAPACITOR RED WHITE RED ORANGE BLUE RED GND FAN MOTOR WHITE BLACK EH 4 CHASSIS HEATER BLACK BLUE WHITE DEFROST TEMPERATURE SENSOR GND FAN MOTOR WHITE BLACK OFAN-H EH 4 OFAN-H YELLOW OFAN-L OFAN-L WHITE DEFROST TEMPERATURE SENSOR N BLACK CHASSIS HEATER N PG PG Outdoor Unit Wiring Diagram of DC AWB-SS- 12 / 15 DC AWB-SS-15 DC AWB-SS-12 OUTDOOR UNIT WIRING DIAGRAM CAPACITOR C1 WHITE RED BLUE C1 ORANGE FM 1 BLACK RED FAN MOTOR 1 RED YELLOW BLACK WHITE CAPACITOR CAPACITOR C2 C2 RED ORANGE RED BLUE FM 2 FM 2 GND WHITE BLACK EH 4 CHASSIS HEATER BLACK BLUE DEFROST TEMPERATURE SENSOR FAN MOTOR 1 WHITE WHITE FAN MOTOR 2 BLUE FM 1 WHITE RED OUTDOOR UNIT WIRING DIAGRAM CAPACITOR BLACK BLACK WHITE FAN MOTOR 2 DEFROST TEMPERATURE SENSOR EH 4 CHASSIS HEATER YELLOW OFAN-L PG BLACK BLACK OFAN-H N GND WHITE BLACK BLACK WHITE OFAN-H OFAN-L N PG Commissioning and adjusting 18 Preparations Before starting up the system, check that the heating, hot water circuits are full and thoroughly vented. Check the pipe system for leakage. Filling and venting the heating medium system 1. Check the heating medium system for leakage. 2. Connect the filling pump and return line on the heating system's service connections as shown in figure. 3. Close the valve between the service connections. 4. Open the valves on the service connections(AV1,AV2). 5. Pushing the white manual lever down to bottom (this has already been done when the machine leaves factory), then three way valve's water tank port is closed CW (the "B" port), room heat port is open (the "A" port). HW 6. Start the filling pump, and fill until there is fluid in the return pipe. 7. Open up Power ON from control panel to start machine, then heat medium water pump is running, the valve will return to the up position when power is restored. 8. Firmly pushing the white manual lever down to midway and in. in this position both the 'A' and 'B' ports are open. 9. The filling pump and the heating medium pump are now operational. The fluid should circulate via the container with tap water until it emerges from the return hose without being mixed with air. AV1 AV2 SF AVT Heating return Expansion vessel Heating flow Water Tank 10. Stop machine, heat medium water pump stop running. Depressing the white manual lever lightly and then Outdoor unit pulling the lever out, pushing the while manual lever down to bottom position, and then "A" port open, "B" port is closed. 11. Stop the filling pump and clean the particle filter. AVT 12. Start the filling pump, open the valve between the CW service connections. 13. Close the valve on the service connection's return line. Now pressurise the system (to max 3 bar) with the filling pump. 14. Close the valve (AV2) on the service connection. 15. Stop the filling pump. 16. Select the auto operating mode using the operating mode button. Closes AV Draining Cold water SF HW Particle filter Hot water 19 Commissioning and adjusting Inspection Adjust heat medium pump Readjusting, heat medium side Check the flow temperature and the return temperature on the control panel. The difference between these two temperatures, with floating condensing, should be 5 — 10 °C when the house is being heated without additional heat. Adjust the flow with the knob on the heating medium pump (16). A high difference could depend on a low heat medium flow. A low difference indicates a high heat medium flow. Air is initially released from the hot water and venting may be necessary. If bubbling sounds can be heard from the heat pump, the entire system requires further venting. When the system has stabilised (correct pressure and all the air removed) the heating controls can be set at the required values. The pump is adjustable to adjust heat medium flow. NOTE! 7KHFRPSUHVVRUPXVWQRWEHIRUFHGWR VWDUWZLWKSHULRGVVKRUWHUWKDWVWDUW SHUPLQXWHV Emptying the water heater The siphon principle is used to empty the water heater. This can be done either via the drain valve on the incoming cold water pipe or by inserting a hose into the cold water connection. Control 20 General information Menu Navigation The right-hand button on the control panel is used to open the desired menu. The left-hand button is used to return to the previous menu. The up and down buttons are used to navigate between the parameters of a menu. A cursor (arrow) on the left-hand side of the display indicates which menu can be opened. The up and down buttons are also used if you wish to increase or reduce a preset value. Display of current operating mode During normal operation, the following information will be displayed: • Desired (preset) room temperature • Date / time / timer • Whether there is a heating demand or not. If there is, there will also be symbols telling which heat source is working, heat pump or auxiliary heater or both (see ”Symbols”). • Which operating mode has been selected. ROOM MONDAY 20 11:30 OPER.WARMWATER 95 % 1 HDO CSP When display at the interface, press button Right for 5 seconds for locking the display (will show a symbol of lock.) All buttons are not available after lock is active, until press button Right for 5 seconds to open the lock˗ if the lock is active and then power supply cut off, the lock will be open after power supply resume. Main Menu INFORMATION To open the main menu INFORMATION, press the right- or left-hand button once. Return Open next menu INFORMATION OPERATION HEATCURVE TEMPERATURE INTEGRAL TIMESETTING SETTING OPER.TIME RESET MAN TEST ALARM RECORD LANGUAGE Sub menus To select the desired sub-menu use the up or down button. Open the menu by pressing the right-hand button once. To return to the main menu, press the left-hand button once. OPERATION Running mode: Water tank heating, Room heating, Room heating 1, Room heating 2, Auto; HEATCRVE The setting of this submenu will affect the room temperature; CURVE is program that adjusts feed water temperature according outdoor ambient temperature, factory setting is ambient temperature 0ഒ as feed water temperature 40ć, that is CURVE =40; the value of CURVE is adjustable from 22ć to 56ć. How to change the slope—two points decide one beeline, point one is (0,40), the other point could be (18,24), the point (18,24) is not changing when changing the slope, because factory setting is that heat pump stops when outdoor ambient temperature is 18ć, so the feed water temperature should be 24ć. TEMPERATURE Temperature items setting. 21 Control Menus INTEGRAL Integral is a program to set the startup time and distance between compressor and electrical heater, to set stop conditions of compressor and electrical heater. This program is depends on the "feed water temperature degeneratiaon" and Time. COMPRESSOR A -60᧤0᧥ ADD1 500᧤-60᧥ TIMESETTING To set Time, year, month, date, and week; electrical heater timing, water tank heating timing, whole unit timing. SETTING To set Emergency mode 1, Emergency mode 2, night mode, day mode, start conditions of electrical heater. OPER.TIME To calculate how much time have been running by compressor, electrical heater. RESET Return to factory settings: press button Right to go back all factory settings. MAN TEST Engineer testing ALARM RECORD To record 8 alarm histories recently; the newest alarm message will be seen in the first line. Press the right button to check alarm history. Sub-Menu OPERATION OPERATION WARMWATER ROOMHEAT ROOMHEAT 1 ROOMHEAT 2 HEATPUMP ADD.HEAT ON ON WARMWATER᧶ Water tank heating( warmwater) mode: when enter this mode( under this mode has a program call ಫcompressor restart determined by water temperature degeneration’), heat pump only heat the water tank. The unit stops running as soon as water tank’s temperature gets to setting temperature, then compressor restart determined by water tank temperature degeneration( CMPDIFTEMP) ROOMHEAT᧶ Room heating mode: when enter this mode, heat pump only heat the room. In this mode heat pump runs according to the relationship between Time and Feed water temperature, under a constant ambient temperature, operator can change the feed water temperature through slope of the CURVE. ROOMHEAT1᧶ Room heating mode 1: when enter this mode, heat pump only heat the room. In this mode heat pump runs according to Feed water temperature, operator can set the feed water temperature directly (adjustable from 20 to 65ć, factory setting is 45ć) ROOMHEAT2᧶ Room heating mode 2: when enter this mode, heat pump only heat the room. In this mode heat pump runs according to room air temperature, operator can set the room air temperature directly (adjustable from 16 to 31ć, factory setting is 27ć) WARMWATER+ROOMHEAT᧤ROOMHEAT1 or ROOMHEAT2᧥᧶ Auto mode: select (෭) water tank heating and room heating at the same time, enter Auto mode. After enter this mode, water tank heating has the priority (compressor restart when in water tank heating must follow program ‘CMPDIF TEMP’). When water tank get to setting temperature, three -way valve will change its direction to room heatingorcoolingautomatically. If the water tank temperature decrease, three-way valve’s direction will go back to water tank heating. Control 22 Menus ADD.HEAT ᧤ON or OFF᧥ ON᧶select ON, electrical heater is running normally. OFF᧶select OFF, only switch off electrical heater᧨the others are running normally. If you wish to change operating mode: a. Open the main menu INFORMATION by pressing the right-hand button once. You will find the cursor at the sub-menu named OPERATION. b. Open the OPERATION menu by pressing the right-hand button once. You will find the cursor at the previously selected operating mode. c. Select the desired mode by pressing either the ”up” or ”down” button. Return to the main menu by pressing the left-hand button twice. Sub-Menu HEAT CURVE This menu is used for making adjustments that affect the room temperature. For more information, please refer to ”Adjustments to be made regularly” on page 22. HEATCURVE CURVE MIN MAX CURVE CURVE CURVE CURVE Menu Text CURVE MIN 5 0 -5 ROOM 40 22 70 0 0 0 10 HIGH T° STOP LOW T° STOP Description The value entered shows the temperature of the water to be distributed to the radiators (feed water temperature) when the outside air temperature is 0°C. Adjustment of value for lowest feed water temperature allowed. 50 -50 Adjustable by used(see ”Adjustment of CURVE value” on p22.) used(see ”Adjustment of MIN & MAX value” on p26. ) used(see ”Adjustment of MIN & MAX value” on p26. ) used(see ”Adjustment of CURVE value” on p25.) used(see ”Adjustment of CURVE value” on p25.) used(see ”Adjustment of CURVE value” on P25 .) used(see ”Adjustment of CURVE value” on p23.) MAX Adjustment of value for highest feed water temperature allowed. CURVE 5 Adjustment of room temperature when the outside air temperature is +5°C. Adjustment of room temperature when the outside air temperature is 0°C. Adjustment of room temperature when the outside air temperature is -5°C. The translation of heat curve origin: change Room value also can change Curve valve, in this way, the Curve’s slope is not change; if change the Curve directly, its slope will change; to change every Room value, the translation of Curve is1ć. When outdoor ambient temperature is higher than this setting is adjustable this setting, the hot water to room or water tank will from 0 to 50ć,factory be stopped setting is 50ć. CURVE 0 CURVE – 5 CURVE ROOM HIGH T STOP LOW T STOP When outdoor ambient temperature is lower than this setting is adjustable this setting, the hot water to room or water tank will from 0 to -50 ć, factory be stopped; setting is -50ć. 23 Control Menus Sub-Menu TEMPERATURE This menu shows the different temperatures of the heating system. All temperature changes registered over the last 60 minutes are stored in the control system and can be viewed in the shape of graphs. TEMPERATURE WARMWT ROOM RETURN FEED. PIPE OUT CMPDIF TEMP CONSTANT 0 30(50) 30(53) 30(60) 30(65) 22 25 5 WARMWT˖ water tank temperature, the first value is water tank real temperature, the second value in ‘ ( )’ is water tank setting temperature; the setting temperature is adjustable from 20 ć to 62ć, factory setting is 45ć.(compressor restart must follow the program ‘CMPDIF TEMP’) ROOM ˖ room air temperature, the first value is room real air temperature, the second value in ‘ ( )’ is room air setting temperature; the setting temperature is adjustable from 16 to 31ć, factory setting is 27ć. RETURN˖ Display real return water temperature. FEED˖1.the first value is real feed water temperature, the second value in ‘( )’ is feed water setting temperature in ROOMHEAT MODE, it is adjusted by slope of Curve according to outdoor ambient temperature. Factory setting is that feed water temperature is 40ć when outdoor ambient temperature is 0ć, that is to say Curve is 40, the value of Curve is adjust from 22ć to 56ć. This setting is only available for Room heating, not for water tank heating. 2. under ROOMHEAT 1 mode, FEED setting can be adjust directly from 20 to 65ć, factory setting is 45ć; this setting is only available for room heating, not for water tank heating. PIPE˖Display outdoor unit evaporator temperature (for defrosting) OUT˖Display outdoor ambient temperature. CMPDIF TEMP: compressor restart determined by water temperature degeneratiaon of water tank. This setting is only for water tank heating, it is adjustable from 3 to 15 ć, and factory setting is 5ć. When at item WARMWT or ROOM or RETURN or FEED, or PIPE, press button Right 5 seconds will display the information as follow kind of chart, to check how the temperature is going in one hour. Sub-Menu INTEGRAL INTEGRAL OFF CMP ADD * ADD ADD .A 1 2 3 00 00 - 60 ( 00) - 500 ( - 60 ) - 550 (- 500) - 600 (- 550) Integral (DM) is a program to set the startup time and distance between compressor and electrical heater according to heat demand and heat output, to set stop conditions of compressor and electrical heater. This program is depends on the "feed water temperature degeneratiaon" and Time. To enter this menu operator can change the factory setting: Control 24 Menus Menu Text OFF CMP.A ADD1 ADD2 ADD3 * Description When the value (testing) reaches the value setting by user, the system will be closed. When the value (testing) reaches the value setting by user, the compressor will be start-up. And the value (testing) under the value (setting), the compressor will be closed. When the value (testing) reaches the value setting by user, the ADD 1 will be start-up. And the value (testing) under the value (setting), the ADD1 will be closed. When the value (testing) reaches the value setting by user, the ADD2will be start-up. And the value (testing) under the value (setting), the ADD2 will be closed. Adjustable by USER When the value (testing) reaches the value setting by user, the ADD 3 will be start-up. And the value (testing) under the value (setting), the ADD3 will be closed. USER USER USER USER Degree Minute s(DM) instruction Degree Minute = The corresponding value of temperature difference between the Feed water and the Desired water X Running time ( through integral to change; every minute for a cumulative) Temperature difference between the feed water and the desired water ( ć ) -31 ~ -40 -21 ~ -30 -11 ~ -20 -1 ~ -10 1 ~ 10 11 ~ 20 21 ~ 30 31 ~ 40 The corresponding value -40 -30 -20 -10 10 20 30 40 For example: (Under desired temperature) Feed water temperature decrease 1ć (under desired temperature) in 1 minutes, Degree Minute=-10 X 1= -10; Feed water temperature continue decrease 2ć(under desired temperature) in another 1 minutes, Degree Minute=-10 X 1 + (-10) = -20; Feed water temperature continue decrease 3ć(under desired temperature) in another 1 minutes, Degree Minute=-10 X 1 + (-20) = -30; Feed water temperature continue decrease 4ć(under desired temperature) in another 1 minutes, Degree Minute=-10 X 1 + (-30) = -40; …………………… Before the Degree Minute reach - 60 (adjustable) ,the compressor is off, but when the Degree Minute reach - 60 (adjustable) ,the compressor automatic start, and the flow temperature will begin increase. (Higher than desired temperature) when the actual water supply temperature reach / higher than the desired temperature, the DM will be changed. 25 Control Degree Minute s(DM) instruction For example : the DM was cumulated to -160 in this time. 1 minutes later when the Feed water temperature higher than desired temperature for 1ć. 10X1=10 , Degree Minute= -150; Another 1 minutes later when the Feed water temperature higher than desired temperature for 2ć. 10X1=10, Degree Minute= -140; Another 1 minutes later when the Feed water temperature higher than desired temperature for 3ć. 10X1=10, Degree Minute= -130; Another 1 minutes later when the Feed water temperature higher than desired temperature for 4ć. 10X1=10, Degree Minute= -120; …………………… Compressor off when Degree Minute reach 0 (adjustable) . The relationship between compressor and DM The relationship between compressor (on and off) and DM,the relationship between heater(on and off) and DM. The above chart is describing that running of compressor and electrical heater depend on Integral The compressor’s DM is -60 start, 0 is off, A0=-60 startup. Electrical heater 1 ’s DM is -500 start,when the feed water temperature reach the setting value the electrical heater is off, A0+A2=-60-440=-500 start up.Electrical heater 2 / 3 is the same principle. The constant temperature function is only available in Room heating, but not in water tank heating. Constant temperature function has two kinds: Integral (DM) and Constant room temperature 1. The constant area diagram: T1, room return water temperature, Ts, room air setting temperature or feed water temperature. T=T1-Ts+2 ć +1.0 +0.5 0 -1 0 1 2 -2 3 -3 4 -4 5 -5 6 -6 7 -7 8 9 Control 26 Menus After compressor start running, when ‘setting return water temperature – actual return water temperature constant temperature setting, and the electrical heater does not start, then enter constant temperature control The temperature and its frequency during constant temperature program. Recorded by the above chart ƸT=T1-Ts+2ć, ƸT has 10 areas, from 0 to 9, the rule of constant temperature program’s frequency is follow: a) when ƸT is changing i) When ƸT is increasing, the frequency increase 1 to run ii) When ƸT is decreasing, the frequency decrease 1 to run b) when ƸT stay at a area as 3 minutes, the rules as follow: 4 ̚ 8: the present frequency increase 1( keep 10 min to increase 1) ˈuntil get the maximum frequency. 3: frequency is unchanged 0̚2: The present frequency decrease 1 to run, until the frequency is get to F1 2ˊConstant temperature of Integral˖ The constant area is from 00 to -600 (DM) ˈIt is running as integral changing. INTEGRAL OFF CMP ADD ADD ADD .A 1 2 3 * 00 00 - 60 ( 00) - 500 ( - 60 ) - 550 (- 500) - 600 (- 550) 1 ˖ When integral is coming to negative side, the frequency is increase 1 to run; the frequency will unchangeable until get to maximum integral; 2 ˖ When integral is coming to positive side, the frequency is decrease 1 to run; the frequency will unchangeable until get to minimum integral. 3˖ Room air constant temperature a˅When ƸT is increasing, the frequency increase 1 to run; ƸT will unchangeable until frequency is get to maximum. b) When ƸT is decreasing, the frequency is decrease 1 to run. If the present frequency is F1, the frequency is unchangeable even if ƸT decrease. 27 Control Menus 3.1.2.6 Sub-Menu TIMESETTING How to enter the Sub-Menu TIMESETTING: You need to choose the " TIMESETTING" on the main menu ( INFORMATION). Press the right button. Then " TIMESETTING" menu can be seen. TIME SETTING WARMWATER 2 ON ROOM TIME 2 ON DATE 2010 - 10 - 10 DAY MONDAY TIME 15:04 ROOM TIME 1 ON 8:00 ROOM TIME 1 OFF 11:00 14:25 ROOM TIME 2 OFF 21:10 15:00 WARMWATER 2 OFF 22:00 ADD TIME ON WARMWATER 1 ON 00:00 10:00 ADD TIME OFF WARMWATER 1 OFF 12:00 00:00 TIMESETTING˖use button Up and down to select each item. DATE To display year, month, date. DAY TO display day of week. TIME To display time, or adjust time. ROOM TIME 1 ON When you choose the symbol ‘¥’, the Auto start function of Room heating is active. Select ‘͖’to cancel this function. If this function is active the heat pump will start heating room at the time of your choosing. ROOM TIME 1 OFF When you choose the symbol ‘¥’, the Auto stop function of Room heating is active. Select ‘͖’to cancel this function. If this function is active the heat pump will stop heating room at the time of your choosing. ROOM TIME 2 ON The second timer for Room heating; function the same with ROOM TIME 1 ON ROOM TIME 2 OFF The second timer for Room heating; function the same with ROOM TIME 1 OFF WARMWATER TIME 1 ON When you choose the symbol ‘¥’, the Auto start function of water tank heating is active. Select ‘͖’to cancel this function. If this function is active the heat pump will start heating water tank at the time of your choosing. WARMWATER TIME 1 OFF When you choose the symbol ‘¥’, the Auto stop function of water tank heating is active. Select ‘͖’to cancel this function. If this function is active the heat pump will stop heating water tank at the time of your choosing. WARMWATER TIME 2 ON The second timer for water tank heating; function the same with WARMWATER TIME 1 ON WARMWATER TIME 2 OFF The second timer for water tank heating; function the same with WARMWATER TIME 1 OFF More information for above timers: After you set any of the above timers, so-called timer mode; under timer mode the heat pump will only runs the heating mode according to the timer which already be set; for example, to set the WARMWATER heating timer only, the heat pump will only do the water tank heating; if you need hot water and room heating please set ROOM timer and WARMWATER timer at the same time. If the time ON and OFF be set at the same number such as ON 8:00, OFF 8:00, the timer function will be no effective. ADD TIME ON When you choose the symbol ‘¥’, the Auto start function of Supplementary electrical heater is active. Select ‘͖’to cancel this function. If this function is active the heat pump will start heating by Supplementary electrical heater at the time of your choosing. Control 28 Menus ADD TIME OFF When you choose the symbol ‘¥’, the Auto stop function of Supplementary electrical heater is active. Select ‘͖’to cancel this function. If this function is active the heat pump will stop heating by Supplementary electrical heater at the time of your choosing. Sub-Menu DEFROST How to enter the Sub-Menu DEFROST: You need to choose the "DEFROST" on the main menu ( INFORMATION). Press the right button. Then " DEFROST" menu can be seen. You can choose " Intell Defrost" or " Manual Defrost" DEFROST INTELL. DEF. MANUAL. DEF. DEF. TIME INTERVAL START TEMP EXIT TEMP SINCE TIME 0 M 1 BETW. TIME DEF.ADD 15 M 40 M -4 15 0 M INTELL.DEF: Intelligent defrost program: after you choose this function, defrost program is intelligent and automatical; when outdoor unit’s heat changer ( evaporator)’s pipe temperature is less than 3 ćcontinuously for 40 minutes, and the temperature is less than setting temperature, will start the defrosting. After defrosting: The longest time is 10 minutes 60 s ON 10 s ON F8/F8HZ compressor, F2 ON Four-way valve, OFF ON outdoor fan) OFF 30s OFF ON ON In Intelligent defrost mode, operator can adjust the setting of defrosting according to different ambient temperature and humidity. Select START TEMP, then press button Right for a long time, to enter the defrosting setting: Outdoor ambient temperature Defrost start temperature (pipe at evaporator) Outdoor ambient temperature Defrost start temperature (pipe at evaporator) Outdoor ambient temperature Defrost start temperature (pipe at evaporator) 2 -3 -7 -11 -16 -20 1 -3 -8 -12 -17 -21 0 -4 -9 -13 -18 -22 -1 -5 -10 -14 -19 -23 -2 -6 -11 -15 -20 -24 -3 -7 -12 -16 -21 -25 -4 -8 -13 -17 -22 -26 -5 -9 -14 -18 -23 -27 -6 -10 -15 -19 -24 -28 29 Control Menus When choose Intelligent defrost mode, the Defrost start temperature will be the same as above form when the ambient temperature is lower than 2 degree, all the value of the form is factory setting and they are adjustable from 0 to -30 degree. Press button Right 5 seconds to enter the form, operator can select any defrost start temperature and revise it. For example, after change the defrost start temperature to be -12 degree under ambient temperature is -3 degree, all the defrost temperature which more than -12 degree will change automatically to -12 degree under the kinds of ambient temperature which less than -3 degree. Outdoor ambient temperature Defrost start temperature (pipe at evaporator) -3 Change to -12 -6 Change to -12 -9 Remain-13 -4 Change to -12 -7 Change to -12 -10 Remain-14 -5 Change to -12 -8 -11 Remain-15 Outdoor ambient temperature Defrost start temperature (pipe at evaporator) Remain-12 Outdoor ambient temperature Defrost start temperature (pipe at evaporator) After confirmation, the factory setting will change to above and be as new default. MANUAL.DEF: Manually defrost (adjustable defrost program)˖This function is semi-automatic. For example, operator can change the value of INTERVAL( the distance between two defrosting) to be 40 min, and the START TEMP(the start temperature of defrosting) to be -4degree, when the defrosting time request and temperature request were meet at the same time, heat pump go to defrost. Defrost finish: when outdoor evaporator pipe temperature (EXIT TEMP)’s setting is 15 degree or EXIT TIME (defrosting timing), the defrosting will finish as soon as get one of them. DEF.TIME: Duration of defrostingˈadjustable from 2 to 20min(factory setting is 15min˅defrosting duration INTERVAL: Interval of defrosting ˈadjustable from 25 to 70min(factory setting is 40min˅ START TEMP˖ Start temperature of defrosting( pipe temperature of outdoor evaporator)ˈadjustable from 2 to -30 degree˄ factory setting is -4 degree˅ EXIT TEMP˖ Exit temperature of defrosting( pipe temperature of outdoor evaporator), adjustable from 0 to 20degree ˄factory setting is 15degree˅ SINCE TIME: Start and exit time of defrosting, to indicate whole time of defrosting. BETW.TIME: To record the interval between the ending of first defrosting and the beginning of second defrosting. DEF.ADD: How many electrical heaters will start running when heat pump is defrosting; factory setting (default) is 1 piece only; it is adjustable from 1 to 3; Control 30 Menus Sub-Menu SETTING SETTING EMERGENCY 1 EMERGENCY 2 STERILAZE ADD START ADD DELAY ADD DIF TEMP OUTADD.HEAT HDO OFF OFF ADD ENFORCE WATER PUMP OFF ON 40 30M 4 ON EMERGENCY1 (ON or OFF) Emergency mode 1˄emergency 1˅:˄ON or OFF˅ˈfactory setting is OFF(after select emergency mode, the unit will continuously execute the same objective (room heating only, water tank heating only, or auto) When select ON, compressor will be switch off, only electrical heater, water pump or other temperature protection are available. When in water tank heating, the electrical heater will instead of compressor; when in room heating mode, the electrical heater will runs depends on Integral; when in room heating mode 1, the electrical heater will runs depends on Integral; when in room heating mode 2, the electrical heater automatically starts, unless operator off the electrical heater. EMERGENCY2(ON or OFF) EMERGENCY 2 EMERGENCY 2 CMP STOP OFF -25 Emergency mode 2˄ emergency 2˅:˄ON or OFF˅ˈfactory setting is OFF: (after select emergency mode, the unit will continuously execute the same objective (room heating only, water tank heating only, or auto) When select this mode, compressor will stop determined by outdoor ambient temperature, the temperature setting is from 0 to -50 degree adjustable, factory setting is -25 degree, only electrical heater, water pump or other temperature protection are available. When in water tank heating, the electrical heater will instead of compressor; when in room heating mode, the electrical heater will runs depends on Integral; when in room heating mode 1, the electrical heater will runs depends on Integral; when in room heating mode 2, the electrical heater automatically starts, unless operator off the electrical heater. STERILIZE: Sterilize water temperature: ˄60ć--90ć adjustable˅default is 60ć Sterilize duration :˄10—90minutes˅default is10 minutes Sterilize period :˄7----99days˅default is 15 days STERTLIZE WATER TEMP DURATION PERIOD 60 10 M 15 D If the water tank’s temperature always less than 60ć (default) and last 360 hours(period), the heat pump will start the sterilize function ( the electrical heater start as soon as water get to 50ć), until water temperature get to 60ć(default) and last 10 minutes( default); or if 3 hours later the water temperature still can not reach 60ć, the sterilize function will exit. 31 Control Menus ADD START : ( 10 to 65 degree adjustable , factory setting is 40 degree ) Electrical heater start water temperature, it is adjustable from 10 - 65°C, factory setting is 40°C, this means when compressor heat the water temperature over 40°C, then allow the electrical heater to start, this setting is for energy-saving and water tank heating (WARMWATER) only. ADD DELAY: ( 3 to 10Min adjustable ,factory setting is 10M ) Time delay of electrical heater starting: from 3 to 30 minutes adjustable, factory setting is 10 minutes. For example, since compressor has been running 15 minutes, when 10 minutes ˄factory setting˅later the return water temperature remain or decrease, the electrical heater will start automatically. ADDDIF TEMP Additional electrical heater restart determined by water temperature degeneration: it is adjustable from 1 to 10 degree (factory setting is 4 degree); the electrical heater will stop when the water get to setting temperature, then restarts as soon as the water temperature decrease 4 degree (factory setting) OUTADD.HEAT ON (OFF) To control outdoor unit electrical heater (bottom electrical heater, evaporator heater), factory setting is ON, the heater will start when ambient temperature is less than 0 ˚ɋ, and stop when ambient temperature is more than 2˚ɋ When the outdoor electrical heater is select OFF, the outdoor heater can not start automatically. Display : OUT ADD . HEAT OFF HDO ON ( ) Choose " " to activate the function 'External signal controls heat pump to start or stop'; there are two signal connections (NC), when external signal switch on them, the compressor, electrical hearer and motor will stop running (The water pump will keep running if the operation mode is 'Room heating'); After switch off them, the compressor, electrical heater, motor will restart and work as previous setting. This function is for the countries which electricity has two different prices in high peak and low peak that they can use signal to stop heat pump when in high peak electricity and start the heat pump when in low peak electricity; Notice: never input electricity directly to HDO terminals! ADD ENFORCE This function is only available for WARMWATER( water tank heating);when you select"ON",the ADD (additional electrical heater) will start enforcedly as soon as compressor start, then stop as soon as water reach setting temperature; when you select "OFF",the ADD only start after fulfill two other conditions ( ADD START and ADD DELAY). WATER PUMP It can be set to ON or OFF, factory setting is ON; this setting will be effective for ROOMHEAT 1 and ROOM HEAT 2 modes. To set ON: the water pump will keep running even if feed water temperature reaches setting temperature in ROOMHEAT 1 mode; the water pump will keep running even if room air temperature reaches setting temperature in ROOMHEAT 2 . To set OFF: the water pump will stop running as soon as feed water temperature reaches setting temperature in ROOMHEAT 1; 20 minutes later water pump will restart and running 3 minutes for detecting water temperature to see if necessary to restart heat pump; The water pump will stop running as soon as room air temperature reaches setting temperature in ROOMHEAT 2; the water pump will restart as soon as room air temperature decreased. Sub-Menu OPERATING TIME OPERATION TIME * HEATPUMP ADD 1 ADD 2 ADD 3 0 H 0 H 0 H 0 H Control 32 Menus Description Adjustable by HEATPUMP Total operating hours of heat pump since installation. Operating time will not be reset to zero. can not ADD Total operating hours of auxiliary heater 1 (3kW) since installation. Operating time will not be reset to zero. can not Total operating hours of auxiliary heater (6kW) since installation. Operating time will will not be reset to zero. can not Total operating hours of auxiliary heater (9kW) since installation. Operating time will will not be reset to zero. can not Menu Text ADD2 ADD3 * Sub-Menu RESET Reset to factory setting value. Sub-Menu MAN TEST How to enter the Sub-Menu MAN TEST: You need to choose the " MAN TEST" on the main menu ( INFORMATION) And press the right button for 3 second . MAN TEST ADD 1 ADD 2 ADD 3 3 WAY 4 WAY WARM PUMP OUT FAN (H) OFF OFF OFF OFF OFF OFF OFF OUT FAN (L) CMP CMP B OUT PTC 1 OUT PTC 2 OFF OFF OFF OFF OFF Man test for installation On sub-menu OPERATION---MAN TEST ADD1 / 2 / 3 ON or OFF ADD1 / 2 / 3 ( electrical heater 1 / 2 /3 ) 3 WAY 4 WAY ON or OFF ON or OFF 3-WAY VALVE 4-WAY VALVE WARM PUMP ON or OFF WATER PUMP OUT FAN (H) ON or OFF OUTDOOR FAN - HIGH SPEED OUT FAN (L) ON or OFF OUTDOOR FAN - LOW SPEED CMP ON or OFF COMPRESSOR CMP B ON or OFF COMPRESSOR B ( invalid ) OUT PTC 1 ON or OFF OUT DOOR UNIT COMPRESSOR HEATER OUT PTC 2 ON or OFF OUT DOOR UNIT CONDENSER AND CHASSIS HEATER P.S : the compressor only runs 5 minutes for testing, at that time its frequency is 45Hz. This menu is for installation engineer, user operation is prohibitive. The testing function will dissolve as soon as the menu is off the interface. Sub-Menu ALARM RECORD To record 8 alarm histories recently; the newest alarm message will be seen in the first line. Press the right button to check alarm history. 33 Control Adjustments to be made regularly Sub-Menu LANGUAGE LANGUANG Language selection : How to enter the Sub-Menu of LANGUAGE: You need to choose the " LANGUAGE"on the Main menu ( INFORMATION ). Press the right button. Then "LANGUAGE"menu can be seen. Use Up and Down botton to select the language , and press Right button to confirm. ENGLISH FRENCH Most settings will be made by the installation contractor in connection with installation. Adjustments to be made regularly by the user are the following: • Selection of operating mode • Adjustment of desired room temperature by changing the ROOM value. • Adjustment of heat curve • Adjustment of maximum and minimum values for feed line temperature • Adjustment of the value for HIGH T STOP or LOW T STOP is possible. (Please refer to ”Adjustment of HIGH T STOP or LOW T STOP value” on p. 40).. Heat Generation- General The indoor temperature should be adjusted by changing the heat curve of the installation. The control computer determines the correct temperature of the water to be distributed to the heating system based on the heat curve. The heat curve will be adjusted in connection with installation. It must be adapted later on, however, to obtain a pleasant indoor temperature under any weather condition. A correct heat curve reduces maintenance and saves energy. The heat curve determines the feed line temperature depending on the outside air temperature. The lower the outside air temperature, the higher the feed line temperature. In other words, the temperature of the water feed to the radiators will increase exponentially as the outside air temperature falls. If you select CURVE in the sub-menu named HEAT CURVE, a diagram will be displayed. It represents the relation of outside air temperature to feed line temperature. This relation is referred to as heat curve. Heat curve Feed line temperature CURVE 40 C 18 64 56 Relation of outside air temperature to Feed line temperature 48 40 32 24 18 5 0 -5 C Outside air temperature Adjustment of the CURVE value The heat curve will be adjusted by the CURVE value. This value indicates the feed line temperature to the radiators at 0°C outside temperature. At outside air temperatures lower than 0°C, the water sent to the radiators will be warmer than 40°C. At outside temperatures higher than 0°C, the water will be colder than 40°C. When you increase the CURVE value, the heat curve will become steeper and when you reduce it, it will become flatter. This is the most energy and cost efficient way to set the indoor temperature and should therefore be used for long term temperature settings. If you wish to make a temporary change of temperature, you can simply change the ROOM value (see ”Adjustment of the ROOM value” on page37). Control 34 Adjustments to be made regularly CURVE is program that adjusts feed water temperature according outdoor ambient temperature, factory setting is ambient temperature 0ć as feed water temperature 40ć, that is CURVE =40; the value of CURVE is adjustable from 22ć to 56ć. How to change the slope—two points decide one beeline, point one is (0,40), the other point could be (18,24), the point (18,24) is not changing when changing the slope, because factory setting is that heat pump stops when outdoor ambient temperature is 18ć, so the feed water temperature should be 24ć. CURVE 40 C 18 64 56 48 40 32 24 18 5 0 C -5 Change of value for CURVE If you wish to change the CURVE value: 1.Open the main menu INFORMATION by pressing the right-hand button once. You will find the cursor at the sub-menu named OPERATION 2.Press the ”down” button to move the cursor to the sub-menu called HEAT CURVE. 3.Press the right-hand button once to open the menu. You will find the cursor at the parameter CURVE 4.Open the selected parameter by pressing the right-hand button once. 5.Increase or reduce the preset value using the ”up” or ”down” button. You will see from the diagram how the gradient of CURVE changes. Press the left-hand button three times to return to the main menu. Adjustment of ROOM value As mentioned above, you can also adjust heat curve and indoor temperature by changing the ROOM value. If you use ROOM value to adjust the heat curve, the gradient does not change, i.e. it doesn’t become steeper or flatter. Instead, the whole curve is moved by 1°C for every degree by which the ROOM value is changed. The relation feed line temperature to outside air temperature will not be affected. The feed line temperature will be increased or reduced by the same number of degrees all along the heat curve. See the following diagram. Adjustment of the ROOM value should only be used for temporary changes of the indoor temperature. For long term settings, the CURVE value should be adjusted as this is the most energy and cost efficient way to set the indoor temperature. For adjusting the heat curve, please refer to the chapter ”Adjustment of the CURVE value” on page 36. You need to choose the "room"on the Sub-menu ( TEMPERATURE ),then press the right button. Use UP and DOWN button to adjust the "ROOM CURVE". Factory setting of ROOM value is 20°C. 40 C CURVE 18 64 56 48 40 32 24 18 5 0 -5 C Changing the ROOM value 35 Control Adjustments to be made regularly If you wish to change the ROOM value: 1 Press the ”up” or ”down” button once to open the ROOM value for adjustment. 2 Increase or reduce the preset value using the ”up” or ”down” button so that the desired room temperature is reached. Wait for 10 seconds or press the left-hand button once to return to the main menu. When enter ‘Room heat’ mode, user could control compressor and electrical heater through regulate heat curve or DM (degree minute). under a certain ambient temperature ,the time start of compressor is determined by degree minute(DM). Now we are giving two situations to explain. 1. ‘start quickly’ is determined by FEED(heat curve) Suppose now the feed water temperature is 25ć; regulate the heat curve to let the setting of water temperature to be a higher value such as 55ć,that is FEED25(55). At that time, DM (degree minute) decrease -30 per minute, when the DM reach -60, compressor will start right away. (Notice: if the water temperature setting is lower than feed water temperature DM would turn to positive number, and then compressor does not start. Of course, you also can regulate the DM to be near the value for compressor start, such as -20. 40 C CURVE 18 64 turn it up 56 48 40 32 24 18 5 0 -5 C 2. ‘start slowly’ is determined by FEED(heat curve) Suppose now the feed water temperature is 25ć,if regulate the heat curve to let the setting of water temperature to be a lower value such as 30ć, that is FEED25(30); at that time, the DM would decrease 10 per minute, the time to reach -60 is becoming longer, only after some time, then compressor can start. You also can regulate the DM to be more far away from the value for compressor start, such as (-100). CURVE 40 C 18 64 curve is a little flat 56 48 40 32 24 18 5 0 -5 C When enter room heat mode, it needs customer to regulate the heat curve or DM (degree minute) according to own request. Control 36 Adjustments to be made regularly Adjustment of Part of the Heat Curve At outdoor temperatures between -5°C and +5°C part of the heat curve may need adjusting if the indoor temperature does not stay at the preset ROOM value. For this reason, the control system includes a function adjusting the curve at three outside temperatures: -5°C, 0°C, +5°C. This function will allow you to increase or reduce the feed line temperature, without affecting the heat curve, at three specific outdoor temperatures. If, for example, the outside temperature is -5°C, the feed line temperature will change gradually in the outdoor temperature range of 0°C to -10°C, maximum adjustment being reached at -5°C. The diagram below shows an adjusted CURVE -5. The point of maximum adjustment is clearly visible. As we have seen, you can choose to adjust the heat curve at three specified out- side air temperatures: . -5°C,0°C and +5°C. The feed line temperature can be changed by plus/minus 3 degrees. 34 C CURVE 0 43 C CURVE 3 64 64 64 56 56 56 48 48 48 40 40 40 32 32 32 24 18 5 0 -5 C 24 18 5 0 -5 C 45 C CURVE 24 18 5 0 -5 0 C When outdoor ambient temperature is 5ć, this setting is available to change the feed water temperature, it is adjustable by operator: heat curve is not change (the slope is no change), but the point near 5ć (from 0ć to 10ć), curve can be change step by step; the variable is the biggest at 5ć, it is f3ć When outdoor ambient temperature is 0ć,this setting is available to change he feed water temperature, it is adjustable by operator: heat curve is not change ( the slope is not change), but the point near 0ć (from -5ć to +5ć), curve can be change step by step; the variable is the biggest at 0ć,it is f3ć. When outdoor ambient temperature is -5ć,this setting is available to change he feed water temperature, it is adjustable by operator: heat curve is not change ( the slope is not change), but the point near -5ć (from 0ć to -10ć), curve can be change step by step; the variable is the biggest at 0ć,it is ±3ć. If you wish to change a specific part of the heat curve: 1. Open the main menu INFORMATION by pressing the right-hand button once. You will find the cursor at the sub- menu OPERATION. 2. Press the ”down” button to move the cursor to the sub-menu HEAT CURVE. 3. Open the selected menu by pressing the right-hand button once. You will find the cursor at the parameter CURVE. 4. Using the ”up” or ”down” button, select either CURVE 5, CURVE 0 or CURVE -5. 5. Open the selected curve by pressing the right-hand button once. 6. Raise or lower the value, using respectively the ”up” or ”down” button. To return to the main menu, press the left- hand button three times. 37 Control Adjustments to be made regularly Adjustment of the MIN and MAX value The MIN and MAX value is the lowest respectively highest value that is allowed for the supply line temperature. Adjusting the minimum and maximum supply line temperature is particularly important if your home has floor heating. If your house has floor heating and parquet floor, the supply line temperature should not be higher than 45°C. Else the floor might get damaged. If you have floor coils and stone tiles, the MIN value should be 22-25°C in summer when no heating is required to obtain a comfortable floor temperature. MIN is the minimum setting of feed water temperature; it is adjustable by operator from10 to 30 ć, factory setting is 22ć; if the room’s floor use ceramic tile, then the setting of MIN can not less than 22ć (this value can get a comfortable floor temperature); the heat pump will restart as soon as actual feed water temperature less than MIN setting. MAX is the maximum setting of feed water temperature, it is adjustable by operator from 30 to 70ć, and factory setting is 70ć; if heat pump is using for floor heating, this setting is very important, because at the time the feed water temperature can not higher than 70ć, otherwise could be dangerous; the heat pump will stop as soon as actual feed water temperature more than MAX setting. If there is a basement to your house, the MIN value should be adjusted to a suitable temperature in summer too, to avoid a humid and chilly basement. In such cases, the value for HEAT STOP needs being adjusted upwards. If you wish to change the MIN or MAX value: 1. Open the main menu INFORMATION by pressing the right- or left-hand button once. You will find the cursor at the sub-menu OPERATION 2. Press the ”down” button to move the cursor to the sub-menu HEAT CURVE 3. Open the selected menu by pressing the right-hand button once. You will find the cursor at the parameter CURVE. 4. Press the ”down” button to move the cursor to MIN. 5. Open the selected parameter by pressing the right-hand button once. The cursor is at MIN 6. Raise or lower the value, using the ”up” and ”down” button respectively. 7. Press the left-hand button three times to return to the main menu. Repeat the procedure to change the MAX value, replacing MIN by MAX at step 4. Adjustment of the HIGH T STOP and LOW T STOP value ‘HIGH T STOP’ and ‘LOW T STOP’ functions are only for room heating, the water tank heating still works normally when the two functions are active. The HIGH T STOP and LOW T STOP function stops water production to room floor when the outside air temperature is equal to higher or lower than the value entered for HIGH T STOP or LOW T STOP. When the function is activated, the circulation pump will be turned off. The factory setting of the HIGH T STOP is 50°C.( 0 ~50 °C adjustable ) The factory setting of the LOW T STOP is -50°C.( -50 ~0 °C adjustable ) If you wish to change the HIGH T STOP OR LOW T STOP value: 1 Open the main menu INFORMATION by pressing the right- or left-hand button once. You will find the cursor at the sub-menu OPERATION 2 Press the ”down” button to move the cursor to the sub-menu HEAT CURVE 3 Open the selected menu by pressing the right-hand button once. 4 You will find the cursor at the parameter CURVE. Control 38 Adjustments to be made regularly 5 Press the ”down” button to move the cursor to HIGH T STOP or LOW T STOP. 6 Open the selected parameter by pressing the right-hand button once. The cursor moves to HIGH T STOP or LOW T STOP. 7 Raise or lower the value, using respectively the ”up” or ”down” button. 8 Press the left-hand button three times to return to the main menu. Graph of recent changes in TEMPERATURE All temperatures registered during the last hour can be viewed in the sub-menu TEMPERATURE in the shape of a graph. This will enable you to monitor changes in the different system temperatures. FEEDLINE 48 C 64 48 32 16 0 -16 60 30 There is a graph available for all temperatures, except for the OUT / ROOM temperature,where you can only view the measured value. The integral value that is displayed represents the heating system’s energy balance. If you wish to check the TEMPERATURE graphs: 1 Open the main menu INFORMATION by pressing the right- or left-hand button once. You will find the cursor at the sub-menu OPERATION. 2 Press the ”down” button to move the cursor to the sub-menu TEMPERATURE 3 Open the menu by pressing the right-hand button once. 4 You will find the cursor at the parameter OUT. 5 Press the ”down” or ”up” button to move the cursor to the desired temperature. 6 Open the selected value by pressing the right-hand button once. A graph will be shown in the display. 7 Move the cursor along the time axis using the ”up” (plus) or the ”down” (minus) button. The exact temperature at the selected point of time appears at the top of the display. Press the left-hand button three times to return to the main menu. 8 39 Control Maximum Return Line Temperature The maximum return line temperature, i.e. temperature of the water returning from the heating system, should be adapted to each individual installation. The correct temperature value for your system will be entered by your installation contractor in connection with installation and can be adjusted later. Warm Water Production The temperature of the water distributed to the water heater is controlled by the regulating pressure switch and cannot be adjusted. Reading of warm water temperature. To check the actual warm water temperature on the display: 1 Open the main menu INFORMATION by pressing the right- or left-hand button once.You will find the cursor at the sub-menu OPERATION. 2 Press the ”down” button to move the cursor to the sub-menu called TEMPERATURE. 3 Open the menu by pressing the right-hand button once. 4 Press the ”down” button to move the cursor to the parameter WARMWATER. 5 Open the selected parameter by pressing the right-hand button for 3 seconds. A graph will be shown of last hour’s warm water temperatures. 6 Press the left-hand button three times to return to the main menu. The value displayed next to the parameter WARMWATER is the actual hot water temperature. The value in brackets is the temperature at which warm water production will start. When the actual temperature falls below that value, warm water production starts. The starting value is not adjustable. Regular Checks Check of Operating Mode In the event of an alarm, The background light of LCD will flash and an alarm message will be displayed. ALARM AND.HEAT OVER OR FLOW TROUBLE Check the alarm indicator regularly to make sure that the heat pump works properly. You would not always notice if there is something wrong, as the auxiliary heater would start automatically (provided, of course, operating mode AUTO was selected). For more information, please refer to the chapter ALARM MESSAGES on p. 40. Control 40 Regular Checks Checking the Water Level of the Heating System The pressure of the heating system should be checked once monthly. The pressure, shown on the external pressure gauge, should be 1-1,5 bar. If the value is below 0.8 bar with cold water in the heating system, more water must be added (applies to a closed expansion vessel). To find out where the pressure gauge is located. You can use ordinary tap water for filling the heating system. In some rare cases the water quality would be unsuitable for this purpose (corrosive or calcareous water). In case of doubt, we would recommend that you call your installation contractor. Don’t use any water treatment additives for the heating system! Checking the Safety Valves Both safety valves of the heating system should be checked at least four times a year to prevent lime deposits to clog the mechanism. To find out where the safety valves are located. The safety valve of the water heater protects the closed heater against positive pressure. It is fitted on the cold water inlet line, its outlet opening facing down- wards. If the safety valve is not checked regularly, the water heater might be damaged. It is quite normal that the safety valve lets out small amounts of water when the water heater is being charged, especially if a lot of warm water was used previously. To check the safety valves, give the cap a quarter of a turn clockwise until the valve lets out some water through the overflow pipe. If a safety valve does not work properly, it must be replaced. Check with your installation contractor. The opening pressure of the safety valve is not adjustable. In the Event of Leakage In the event of leakage in the warm water lines between unit and water taps, the shut-off valve on the cold water inlet line should be closed immediately. Call your installation contractor . In the event of leakage in the system circuit, turn off the heat pump and call your installation contractor immediately. 41 Control Alarm Messages In the event of an alarm message, try to re-start the unit with the safety switch. If this does not work, try to solve the problem with the help of the table below. Call your installation contractor if you need help. Table : Alarm Messages Alarm DISPLAY EEPROM DISPLAY-TRANSITION COMMUNICATE TRANSITION EEPROM TRANSITION-MAIN COMMUNICATE MAIN-MODULE COMMUNICATE Explanation EEPROM reading failure from display The communications failure between display board and transition circuit board EEPROM reading error from transition circuit board The communications error between transition circuit board and main circuit board The communications error between main circuit board and module OUTDOOR TEMP. Outdoor ambient temperature sensor error MODULE VOLTAGE OVER Outdoor module voltage over-low error IPM MODULE IPM module error CMP TOP OVER Compressor top temperature over CMP TEMP. Compressor exhausts temperature sensor error RETURN TEMP. Return water temperature sensor error WARM WATER TEMP. Water tank temperature sensor error FEEDLINE TEMP. Feed water temperature sensor error PIPE TEMP. Pipe temperature sensor error( defrosting) ADD HEAT OVER OR FLOW TROUBLE Water flow error or electrical heater HIGH PRESS Pressure over high LOW PRESS Pressure over low ROOM TEMP. Room air temperature sensor error WARM WATER TEMP. TOO LOW The water tank temperature is too low Control 42 Alarm Messages The cause of alarm ‘IPM MODULE’ could be: 1ǃThe communications between Module and outdoor main circuit board is jamming; 2ǃModule is jamming and can not detect current or compressor; 3ǃModule can not start compressor; 4ǃModule’s rated 15VDC voltage is not steady 5ǃModule’s current overload˗ How to do: 1. Please check if all terminals connections among circuit boards were good, whether some of the wire damaged; 2. Please check if the compressor wire connection loose (on the top of compressor); 3. Please measure each two of the connections (on the top of compressor)’s resistance, if the resistance are always the same, means the compressor is fine. there 3 connections on the top of compressor , you need to measure each two 's resistance, for example , let 's say the connections are A, B, C, then you need to measure the resistance of AB, AC, BC; 4. please check wire connection between the outdoor circuit board and module; see the follow picture 5. Check the DC voltage between terminal P and N if normal, the DC voltage should be: AWB-SS-7 / 9 DC: 380VDC AWB-SS-12 / 15 DC:(trinal phase): 540VDC N P 43 Control Alarm Messages 6. check the if DC voltage between A(first wire) and B(third wire) is normal, it should be 13.5V ~16.5V A B The cause of alarm ‘TRANSITION-MAIN COMMUNICATE’ could be: 1. The connection between transition circuit board and main circuit board is wrong; 2. The connection between transition circuit board and main circuit board is not good, such as had creepage; 3. The transition circuit board or main circuit board was damaged. How to do˖ 1. Check the connection wire between transition circuit board and main circuit board, their live wires, zero curves was connected correctly; 2. Check the connection wire between transition circuit board and main circuit board, the wire must be less than 20 meters, the terminals must be water- proof; 3. If the connection is fine, then the cause could be the transition circuit board or main circuit board, please check their lights. The cause of alarm ‘MODULE VOLTAGE OVER’ could be: 1. Water flow was not enough; 2. One of the sensors got problem; 3. Ambient temperature was too high How to do: 1. Check if the water flow was not enough; 2. Check all the sensors if they are normal. Control 44 Alarm Messages The cause of alarm ‘CMP TOP OVER’ could be: 1. Water flow was not enough; 2. Refrigerant was not enough 3. Ambient temperature was too high; How to do: 1. Check if the water flow was not enough, so that the heat exchange efficiency was not good; 2. Check the refrigerant quantity, and make sure the system has not any leak. ; The cause of alarm ‘ADD OVER OR WATER FLOW TROUBLE ’ could be: 1. Water flow is not enough; 2. The connection of water flow switch was loose or water flow switch was broken; 3. There some air inside the water system, so that the heat exchange area was not enough; 4. The thermostat switch of the electrical heater was broken; How to do: 1. Always ensure enough water flow; otherwise the flow switch can not open; 2. Check the wire connection of water flow switch was normal or not, or replace a water flow switch; 3. Before install the system, please vent the air out from the water system, follow manual’s instruction; 4. Measure the thermostat switch of electrical heater by ampere meter. The cause of ‘LOW PRESS’ could be ˖ 1. The refrigerant was not enough 2. The connection of low pressure switch was loose, or the switch was broken; 3. The outdoor fan can not run How to do: 1. Check if there any place leak refrigerant, especially on the connections valves; 2. Check if the wire connection of low pressure switch was ok, or replace a new low pressure switch; 3. Check if the outdoor unit’s fan was running, if not, please check if the fan was normal The cause of ‘HIGH PRESS’ could be ˖ 1. The water flow was not enough; 2. The high pressure switch’s connection was not good; or the switch was broken; 3. The ambient temperature was too high. How to do: 1. Always ensure enough water flow; otherwise the flow switch can not open; 2. Check if the wire connection of high pressure switch was ok, or replace a new one; 45 Control Alarm Messages The cause of alarm ‘WARM WATER TEMP.’ could be: 1. The connection of water tank temperature sensor was loose; 2. The water tank temperature sensor was broken; How to do: 1. Find the connection and make sure it is fine; 2. As per resistance table of the sensor, please measure the sensor’s resistance, to judge the sensor was good or bad; replace a new one if the sensor get problem. The cause of alarm ‘FEEDLINE TEMP.’ could be: 1. The connection of feed water temperature sensor was loose; 2. The feed water temperature sensor was broken; How to do: 1. Find the connection and make sure it is fine; 2. As per resistance table of the sensor, please measure the sensor’s resistance, to judge the sensor was good or bad; replace a new one if the sensor get problem. The cause of alarm ‘RETURN TEMP.’ could be: 1. The connection of return water temperature sensor was loose; 2. The return water temperature sensor was broken; How to do: 1. Find the connection and make sure it is fine; 2. As per resistance table of the sensor, please measure the sensor’s resistance, to judge the sensor was good or bad; replace a new one if the sensor get problem. The cause of alarm ‘PIPE TEMP.’ could be: 1. The connection of pipe temperature sensor (on evaporator, for defrosting) was loose; 2. The pipe temperature sensor was broken; How to do: 1. Find the connection and make sure it is fine; 2. As per resistance table of the sensor, please measure the sensor’s resistance, to judge the sensor was good or bad; replace a new one if the sensor get problem. The cause of alarm ‘OUTDOOR TEMP.’ could be: 1. The connection of outdoor ambient temperature sensor was loose; 2. The outdoor ambient temperature sensor was broken; How to do: 1. Find the connection and make sure it is fine; 2. As per resistance table of the sensor, please measure the sensor’s resistance, to judge the sensor was good or bad; replace a new one if the sensor get problem. Control 46 Alarm Messages The cause of alarm ‘CMP TEMP.’ could be: 1. The connection of compressor exhaust air temperature sensor was loose; 2. The compressor exhaust air temperature sensor was broken; How to do: 1. Find the connection and make sure it is fine; 2. As per resistance table of the sensor, please measure the sensor’s resistance, to judge the sensor was good or bad; replace a new one if the sensor get problem. Circuit Board Picture For DC AWB-SS- 7 and DC AWB-SS-9 Display Transition circuit board Module Main circuit board 47 Control Circuit Board Picture For DC AWB-SS- 12 and DC AWB-SS-15 Display Transition circuit board Module Main circuit board Power board Control 48 Sensors resistance table compressor exhaust temperature sensor resistance tć -20 -19 -18 -17 -16 -15 -14 -13 -12 -11 -10 -9 -8 -7 -6 -5 -4 -3 -2 -1 0 1 2 3 4 5 6 7 8 9 10 11 12 13 14 15 16 17 18 19 R(Kȍ) 542.7 511.9 483 455.9 430.5 406.7 384.3 363.3 343.6 325.1 307.7 291.3 275.9 261.4 247.8 234.9 222.8 211.4 200.7 190.5 180.9 171.9 163.3 155.2 147.6 140.4 133.5 127.1 121 115.2 109.8 104.6 99.69 95.05 90.66 86.49 82.54 78.79 75.24 71.86 AD 3 3 4 4 4 4 5 5 5 6 6 6 7 7 8 8 8 9 9 10 10 11 12 12 13 13 14 15 15 16 17 18 19 20 20 21 22 23 24 25 Unit˖ ć--Kȍ (compressor exhaust temperature sensor ˅55K tć R(Kȍ) AD tć R(Kȍ) AD 20 60 68.66 26 13.59 95 21 61 65.62 28 13.11 97 22 62 62.73 29 12.65 99 23 63 59.98 30 12.21 101 24 64 57.37 31 11.79 103 25 65 54.89 32 11.38 106 26 66 52.53 34 10.99 108 27 67 50.28 35 10.61 110 28 68 48.14 36 10.25 112 29 69 46.11 38 9.902 114 30 70 44.17 39 9.569 117 31 71 42.33 40 9.248 119 40.57 42 8.94 121 32 72 38.89 43 8.643 123 33 73 34 74 37.3 45 8.358 125 35 75 35.78 47 8.084 127 36 76 34.32 48 7.82 129 37 77 32.94 50 7.566 132 38 78 31.62 52 7.321 134 39 79 30.36 53 7.086 136 40 80 29.15 55 6.859 138 41 81 28 57 6.641 140 42 82 26.9 59 6.43 142 43 83 25.86 60 6.228 144 44 84 24.85 62 6.033 146 45 85 23.89 64 5.844 148 22.89 66 5.663 150 46 86 22.1 68 5.488 152 47 87 48 88 21.26 70 5.32 154 49 89 20.46 72 5.157 156 19.69 74 5 157 50 90 51 91 18.96 76 4.849 159 52 92 18.26 78 4.703 161 53 93 17.58 80 4.562 163 54 94 16.94 82 4.426 165 16.32 84 4.294 167 55 95 56 96 15.73 86 4.167 168 57 97 15.16 88 4.045 170 58 98 14.62 90 3.927 172 59 99 14.09 93 3.812 173 tć 100 101 102 103 104 105 106 107 108 109 110 111 112 113 114 115 116 117 118 119 120 121 122 123 124 125 126 127 128 129 130 R(Kȍ) 3.702 3.595 3.492 3.392 3.296 3.203 3.113 3.025 2.941 2.86 2.781 2.704 2.63 2.559 2.489 2.422 2.357 2.294 2.233 2.174 2.117 2.061 2.007 1.955 1.905 1.856 1.808 1.762 1.717 1.674 1.632 B(25/50)=3950K+-3% R(90 ć)=5Kȍ+-3% AD 175 177 178 180 181 183 184 186 187 188 190 191 193 194 195 196 198 199 200 201 202 203 204 206 207 208 209 210 211 211 212 256 256 256 256 256 256 256 256 256 49 Control Sensors resistance table 2 water/ambient/pipe sensor resistance T -20 -19 -18 -17 -16 -15 -14 -13 -12 -11 -10 -9 -8 -7 -6 -5 -4 -3 -2 -1 0 1 2 3 4 5 6 7 8 9 10 11 12 13 14 15 16 17 18 19 R 115.266 108.146 101.517 96.3423 89.5865 84.219 79.311 74.536 70.1698 66.0898 62.2756 58.7079 56.3694 52.2438 49.3161 46.5725 44 41.5878 39.8239 37.1988 35.2024 33.3269 31.5635 29.9058 28.3459 26.8778 25.4954 24.1932 22.5662 21.8094 20.7184 19.6891 18.7177 17.8005 16.9341 16.1156 15.3418 14.6181 13.918 13.2631 AD 16 17 18 19 21 22 23 24 26 27 29 30 31 34 35 37 39 41 42 45 47 49 51 54 56 58 61 63 67 68 71 74 76 79 82 85 87 90 93 96 Unitġ §--Kȍ ˄water/ambient/pipe sensor) T R AD T R AD 20 60 12.6431 99 2.35774 197 21 61 12.0561 102 2.27249 198 22 62 11.5 105 2.19073 200 23 63 10.9731 107 2.11241 202 24 64 10.4736 110 2.03732 203 25 65 10 113 1.96532 205 26 66 9.55074 116 1.89627 206 27 67 9.12445 119 1.83003 207 28 68 8.71983 122 1.76647 209 29 69 8.33566 125 1.70547 210 30 70 7.97078 128 1.64691 211 31 71 7.62411 131 1.59068 212 32 72 7.29464 133 1.53668 214 33 73 6.98142 136 1.48481 215 34 74 6.68355 139 1.43498 216 35 75 6.40021 142 1.38703 217 36 76 6.13059 144 1.34105 218 37 77 5.87359 147 1.29078 219 38 78 5.62961 150 1.25423 220 39 79 5.39689 152 1.2133 221 40 80 5.17519 155 1.17393 222 41 81 4.96392 157 1.13604 223 42 82 4.76253 160 1.09958 224 43 83 4.5705 162 1.06448 225 44 84 4.38736 165 1.03069 226 45 85 4.21263 167 0.99815 226 46 86 4.04589 169 0.96681 227 47 87 3.88673 172 0.93662 228 48 88 3.73476 174 0.90753 229 49 89 3.58962 176 0.8795 229 50 90 3.45097 178 0.85248 230 51 91 3.31847 180 0.82643 231 52 92 3.19183 182 0.80132 231 3.07075 184 0.77709 232 53 93 2.95896 186 0.75373 233 54 94 55 95 2.84421 188 0.73119 233 2.73823 190 0.70944 234 56 96 57 97 2.63682 192 0.68844 234 58 98 2.53973 193 0.66818 235 59 99 2.44677 195 0.64862 236 T 100 101 102 103 104 105 106 107 108 109 110 111 112 113 114 115 116 117 118 119 120 121 122 123 124 125 126 127 128 129 130 131 132 133 134 135 136 137 138 139 R 0.62973 0.61148 0.59386 0.57683 0.56038 0.54448 0.52912 0.51426 0.49989 0.486 0.47256 0.45957 0.44699 0.43482 0.42304 0.41164 0.4006 0.38991 0.37956 0.36954 0.35982 0.35042 0.3413 0.33246 0.3239 0.31559 0.30754 0.29974 0.29216 0.28482 0.2777 0.27078 0.26408 0.25757 0.25125 0.24512 0.23916 0.23338 0.22776 0.22231 AD 236 237 237 237 238 238 239 239 240 240 240 241 241 241 242 242 242 243 243 243 244 244 244 244 245 245 245 245 246 246 246 246 246 247 247 247 247 247 247 248 Control 50 Terminology and Abbreviations Evaporate In the evaporator, energy from the heat source is absorbed by the refrigerant passing through the evaporator. The refrigerant turns into gas. (See ”Heat Pump Principle” on p. 4). INTEGRAL INTEGRAL is the heat balance of the heating system. Production of heat is regulated acc. to a calculated heat demand value. This value is determined by comparing the actual supply line temperature with its calculated (setpoint) value. The difference between the two values is multiplied by the time during which the difference is active. The resul- ting value is referred to as the integral. The integral value is automatically established when heat is being produced. The value can be viewed in the sub-menu TEMPERATURE. Compressor The compressor raises temperature and pressure of the the refrigerant (See ”Heat Pump Principle” on p.4). Condenser In the condenser, the refrigerant releases its heat energy to the heating circuit. (See ”Heat Pump Principle” on p.4) CURVE The CURVE value will be adjusted on the control panel. The value indicates the temperature of the water distributed to the radiators (supply line temperautre) at an outside air temperature of 0°C. Refrigerant Circuit in the heat pump filled with refrigerant that by evaporation, compression, and circuit condensation absorbs heat energy from the sytem circuit and releases it to the Heating circuit. Radiator Heating element Control T he control computer regulates the whole installation. All system settings and computer temperature changes are stored and registered in the computer. Settings are adjusted iav the graphic display on the control panel. Heating circuit The heating circuit receives heat energy from the refrigerant circuit and carries it to the water heater or radiator/ floor coil systems. (See further”Heat Pump Principle” on p.4). Heat curve The heat curve is the control computer’s instrument for determining the required supply line temperature of the heating system. Indoor temperature will be adjusted by adjustment of the CURVE value 51 Description of the switch board Connect to common Terminal (CT) When test or repair the machine, the compressor, water cycle pump and outdoor fan motor can be force manual startup. Connect to WTP1 Connect to common Terminal (CT) Function Water Pump : Control the Water Cycle Pump E-Heater : Control the Electrical Heater 1 and 2 O-Warm Water : Control the 3 way valve turn to the Water Tank Heating side ( B side ) WARNING ! THE SWITCH BOARD IS FOR EMERGENCY ONLY, AND MUST BE OPERATED BY SERVICE ENGINEER ONLY! I-Room Heating : Control the 3 way valve turn to the Room NORMAL Heating side ( A side ) Reserved : Invalid ROOM HEATING WATER PUMP NOTE! E- HEATER O - WARM WATER RESERVED WARM WATER I - ROOM HEATING The manual switch board is use only if the necessary for test or repair. When the heat pump is running normally, the switch board must be in normal state. Connect to the PCB 2 ( CN1 L-IN) 1˖The switch board is only for emergency, such as circuit boards were broken; and it must be operated by service engineer only. 2˖When control systems are normal, it is forbidden to operate the switch board; the switch boards are only available when circuit board or compressor broken; before using the switch board, it must set and ensure the , OPER. is OFF at the display. ROOM 20 MONDAY 11:30 OPER.OFF 1 HDO CSP A> NORMAL: switch boards must keep the position as drawing then allow heat pump to runs normally. B> ROOM HEATING: room heating only; switch boards must keep the position as drawing then allow heat pump to heat room, the feed water temperature is fixed with 40ć; before using this mode, it must set and ensure the OPER. is OFF at the display . C> WARMEATER: water tank heating only; switch boards must keep the position as drawing then allow heat pump to heat water tank, the feed water temperature is fixed with 70ć; before using this mode, it must set and ensure the OPER. is OFF at the display. Dealing with malfunctions Draining, heat medium side Close the shut-off valves in heating medium system. open the drain valve ( 27 ). A small amount of water runs out, however, to fully empty the heating medium side requires the connector that joins the heating medium side and the connection on the heat pump VB-flow to be loosened a little to allow air to enter so the remaining water can run out. When the heating medium is empty the requisite service can be carried out. 25 Draining Hole of heat medium system 52 Draining, the chassis The drain-pipe for the chassis is already assembled in advance before leaving the factory. The consumer is required to place the hose at appropriate location. 27 Draining Hole of the chassis If the operating disturbance cannot be rectified by means of the above, an installation engineer should be called. 53 Component placement 1 2 3 4 6 5 7 10 9 11 12 13 8 + + + 15 Please Note : The picture for reference only ! + 14 16 Component placement 54 DC AWB-SS-15 for example 17 35 34 18 33 19 32 20 31 21 30 22 29 23 28 24 25 26 27 Please Note : The picture for reference only ! 55 Component placement 3X400 V / 3 / 50 HZ + + + + 36 47 37 + + + + + + + + + + + + 46 + + 38 + + + + + + + + + + + + 45 + + 3 4 + 0057W + + + + 39 + 104 44 104 A + E28077 ROHS 104 A 104 + + + 40 + + + + + + + 43 + 42 52 48 53 + + + 49 54 + + + 41 50 104 A 104 55 51 Please Note : The picture for reference only ! List of components Please Note : The List for reference only ! 1 2 3 4 Plastic top board Control panel Left side board Right side board 31 32 33 34 Water Flow switch High pressure pressostat 1 High pressure pressostat 2 Condenser 5 6 7 8 9 10 11 12 Front board Handles Stainless steel adjustable feet Low Pressure valve High Pressure valve Low pressure needle valve High pressure needle valve Heating Flow( To Water Tank ) Ø 28 mm 35 36 Electrical Control Box Electric relay 37 38 39 40 Capacitor AC contactor 1 Electrical Bridge 1 Power Board 13 14 15 16 17 Heating Flow( To Floor ) Ø 28 mm Heating Return Ø 28 mm Temperature sensor connection hole Power cord connection hole Structural framing 41 42 43 44 45 46 47 Terminal Connector Transition Circuit board Module Electrical Bridge 2 Reactance Power Terminal Connector PTC (Thermister) 18 Pillars 19 20 Drying filter Four way valve 21 22 23 Three-way valve for waterflow Electrical Auxiliary heater Low pressure pressostat 24 25 26 27 28 29 30 Compressor Waterspout Oil tank Draining valve for heating system Drying filter Heating medium pump Expansion valve 48 49 50 51 52 53 54 Switch board Fuse 1 for Electrical heater 1 Fuse 2 for Electrical heater 2 Fuse 3 for Electrical heater 3 AC contactor 2 Public Terminals Transformer 55 56 Main circuit board Room temperature sensor 57 58 Ourside air temperature sensor Copper connectors 59 60 Drainpipe Draining connector 56 57 Dimensions Dimensions and setting-out coordinates 970mm 80mm m 600m 60mm 685 mm Dimensions 58 730 710 Dimensions of the DC AWB-SS-7 outdoor unit 310 830 800 770 Dimensions of the DC AWB-SS-9 outdoor unit 360 880 59 Dimensions 1230 1200 Dimensions of the DC AWB-SS-12 outdoor unit 310 830 1250 1220 Dimensions of the DC AWB-SS-15 outdoor unit 390 930 Accessories 60 Enclosed kit 56 Outside air temperature sensor Room temperature sensor 57 58 60 59 61 Technical specifications Technical specifications 3 x 400 V IP 21 Refrigerant : R410A Model AWB-SS-7(DC) AWB-SS-9(DC) AWB-SS-12(DC) AWB-SS-15(DC) Heating Capacity at 7/35ć (KW) 7.000 9.013 11.880 14.650 Heating Power Input at 7/35ć (KW) 1.640 2.115 2.801 3.520 400V/3/50Hz 400V/3/50Hz 400V/3/50Hz Power supply (V/Ph/Hz) 400V/3/50Hz Compressor brand Hitachi Hitachi Hitachi Hitachi Compressor type Rotary Rotary Scroll Scroll Starting current, compressor (A) 1.5 1.5 2.5 2.5 Running current, (heating) (A) 7.5 9.6 4.5 5.7 Operating current of electrical heater 6kw/9kw (A) 13X3 (9kw) 13X3 (9kw) Max Output, heating medium pump (W) 13X2 (6kw) 151 13X2 (6kw) 151 151 Connection heating return, o.d.ø (mm) 28 Connection heating flow, o.d.ø (mm) 28 Water tank inlet/outlet, o.d.ø (mm) 28 Required ceiling height (mm) 1980 Max pressure in water tank (Mpa) 0.6 (6 bar) Max pressure in spiral copper pipe (Mpa) 0.25 (2.5 bar) Refrigerant quantity (R410A) 205 (kg) 1.75 2.10 2.80 3.60 Gas tube/Liquid tube (Inch) 5/8", 3/8" 5/8", 3/8" 3/4", 1/2" 3/4", 1/2" Heating medium flow,Rated (m³/h) 1.20 1.50 2.05 2.50 Max Discharge Pressure (Mpa) 4.0 4.0 4.0 4.0 Max Suction Pressure (Mpa) 0.95 0.95 0.95 0.95 IP 21 Enclosure class Noise of indoor unit dB(A) 49 50 50 51 Noise of outdoor unit dB(A) 45 46 48 49 Net Weight/Gross Weight of indoor unit (kg) 203/223 212/240 228/256 235/263 Dimension of Indoor unit (LxWxH) (mm) 600x685x970 600x685x970 600x685x970 600x685x970 Net Weight/Gross Weight of outdoor unit Dimension of Outdoor unit (LxWxH) (kg) (mm) 30/35 830x310x730 46/50 880x360x800 48/56 830x310x1230 52/64 930x390x1250