1
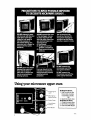
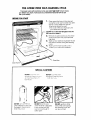
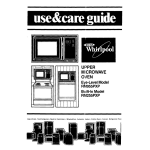
30-1NCH BUILT-INMICROWAVE AND
SELF-CLEANING OVENS
Model RM275PXL
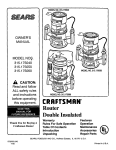
use
Conlrol Panel
Microwave
Automatic Oven
LightSwltch
Upper Oven
Lock Lever
Cover Panel
Broil Element
Oven Rack Guides
Model and Serial
Number Plate
Bake Element
Self-Cleaning
Lower Oven
Fiberglass
Copy
Air-Flow
Door
Heat Seal
Your Model
!t you need
information
ready
and
servtce,
Serial
or call
Numbers
w,th
a questJo
I. Complete
Model
and Serial Numbers
behind
the mqcro,,_ave
oven door on the
2 Purchase
date from sales slip
your
Copy
this information
in these
warranty
and sales slip together
See
the
(from
oven
Here
'-_ :_a_ethis
me plate
trt_'ne)
just
spaces•
Keep this book,
in a handy
_lace.
"Cooklng
Guide"
for
Important
safety
Information,
_ _i_¸'¸¸¸
,
v L¸ :!_:_;i
_¸ : .....
¸¸ :
:/
.....
_i_
¸
_
, _
;
Your responsibilities...
Proper installation
and safe use of the ovens are your personal
responsibilities.
Reacl this "Use and Care Guide" and the "Cooking
Guide" carefully
for important
use and safety information.
Instal tion
You must be sure your oven is...
• installed and leveled in a wall
that will hold the weight;
• installed in a welt-ventilated
area protected from the
weather;
Proper use
You must be sure your oven is...
• used only for jobs expected
of home ovens;
• used only by people who can
operate it properly;
• properly
maintained.
properly connected
to the correct electric supply and
grounding.
(See "Installation
Instructions."]
I
I
I
I
Contents
Your Responsibilities
..........................
Installation
.................................
Proper Use ..................................
Safety ......................................
Precautions to Avoid Possible Exposure to
Excessive Microwave
Energy ..............
Using the Microwave
Upper Oven .............
Setting the Controls ..........................
Cook Power Chart .........................
Defrosting .................................
Keep Warm ...............................
The Meal Sensor Temperature
Probe ........
Cleaning the Microwave
Oven ..............
Important Information
......................
How Microwave
Ovens Work .................
Bi-Level Oven Rack ..........................
Using Your Lower Oven ........................
Setting the Clock ............................
Using the Minute Timer .......................
The Lower Oven Controls. ....................
Baking or Roasting
........................
Adjusting the Oven Temperature Control ..
Using the Automatic
MEALTIMER- Clock
....
Broiling
...................................
Broiling Chart .............................
The Lights ...................................
The Oven Vent ..............................
Cleaning
and Caring for Your Oven
..........
Control Panel and Knobs ....................
The Lower Oven Self-Cleaning
Cycle
........
Cleaning
Chart .............................
The Optional
Rotisserie ......................
If You Need Service or Assistance
..............
1. Before Calling forAssistahce ..............
2. If You Need Assistance ....................
3.
If You Need Service .......................
4. It You Have a Problem
....................
2
2
2
3
4
4
5
5
5
5
6
8
8
I0
10
11
11
12
12
13
13
14
15
15
16
16
16
16
I7
20
20
21
21
22
22
22
t
/
/
/
"Trek
\
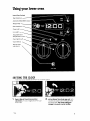
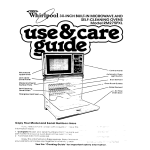
Using your microwave
upper oven
Probe
Light
Signal
Meal
Probe
Sensor
Control
Digital
Timer
Cook
Power
Control
Start
"
To Stop the Oven:
1. Push in and turn the
timer knob counterclockwise
to 00:00.
OR
2. Open the oven door.
To Restart the Oven:
1. Close the oven door.
2. Settimer{if
needed).
3. Push the STARTButton,
Button
Tmk
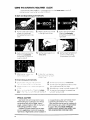
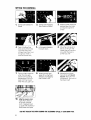
SETTING
THE CONTROLS
,_,_ st. e you understand
the basics
of mtcrowave
oven cooking
_!._1 w_'n recipes
from your
MICRO MENUS
Cookbook
Follow
: J_eluI -J
NEVER STAITI" THE OVEN WHEN IT'S EMPTY. Tr_;ov_-'qc.Jnber;ornqqed
;,._ It, .3st :; cup at water
Be sure you _,'_ave read and
understand
me directions
Put food
I.
the
Case
,
the
coot
Make
Fortest!ng
°
sure t locks
The c,,ewon't work _t _he door
cIosedhgntry
over'
before
you start
the d_recfions
.!:e_ Cook
Power
to
.._eslred setting tram HI to KEEP
WARM Some recipes
require
._1,fferent COOk Powers for
,sn "
tses! results
{See
chart
/
4_
::etoookir
_;tlr'nesupto
t3 mpnutes :_y pushing
in
the timer k[:ob and turn-
5.
Set
CO()klr-i._Q
!;'*!es
i:)ng_-r
thor] 1O m_nutes by turr__ng the timer knob and
wheel
First set the knob
then move
the wheel
png clockwise
The oven
I_gintwillg_
on Tosettime
for ess rho _ 30 seconds•
,
Push the START Button
oven I_ght will stay
You wi!! hear a fan
",qg
during
oven
The
on
_unoperation
When the set t_rne _, up, the oven
will shut off
automatically.
You will hear
a bell, the light
wil! go off and the fan will stop
;'r t:mer [ :3st 30 secL,!!CS men :,ack fo de
s_red h'-qe
DEFROSTING
Example:
!o s" 2? r'lnutes
• Set2 miqute
30 <econds
turning
k r)otT
• Se" z_,_'"
rr J'ujt, '-_D', Dushin(_
_,O seconds
by pushing
in and
Jp on wheel
For defrosting
set Cook Power Control
to
[;EFROST (MED-LO)
See the Defrost Guide
qslde
the oven door or your MICRO
MENUS
.T.ookDook
COOK
POWER CHART
[;ec:;)e£
_"
!n
I.,_O,.-: i 1) e:_S :
(:"'
.'_.
Ibe
_;_1:!
IC,
ne MICRO
MENUS
q
defrost
times
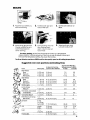
KEEP WARM
(-oak
_ _'_.er settings
frorn HI to
uther books and rnaga:-J_tterent percentages
wer The toi!owing
chart
'i_',C,f!
HI -. 100% of full
t,,ll-.D-HI70% of full
MED50% of full
MED-LO([
EFROST)30% of full
LO15% of full
KE; :_ WARM 5% of full
trr,
for suggested
power
power
power
power
power
power
Hot, cooked
foods
for 60 m_nutes
(:.c._'_be safely
kept
warm
• Resetthetimer
H'more time ,s required.
Keeping _oods warn:
ior_ger than about
1 hour, 40
minutes
is not recommended.
The quality
of
some foods
wi!! suffer with extended
time
_, Foods
during
cooked
covered
KEEP WARM
• Pastry itemsip_es
dncovered
dunng
• Meals kept
ered dunng
should
be
covered
turnovers,
elcJshould
KEEP WARM
warr'r_ on a plate
KEEP WARM
should
be
De cov5
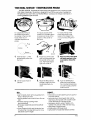
THE MEAL SENSOR
TEMPERATURE PROBE
The MEAL SENSOR + Temperature
Probe helps take guesswork out of cooking roasts
and larger casseroles. The probe is designed
to turn offthe oven when it senses the
temperature
you want. See your MICRO MENUS _Cookbook
for helpful information
in
cooking different types of foods,
For casseroles,
the tip of
the probe
should
be in
the center
of the food, Stir
foods when recommended.
probe.
Replace
/
'4
(' Cable
For liquids,
balance
the
probe
on a wooden
spoon
or spatula
so the tip of the
probe
is in the center
of
the liquid.
the
Plug
'_
,_,_.q_.____irSensor
,
Insert
For roasts, the tip of the
probe
should be in the
center
of the largest
muscle, but not touching
fat or
bone.
at least
tempera!ure
the food.
_
__ of the
probe
2.
Socket
Place
into
food
in the
oven
3.
and plug the probe
into
the socket
on the oven
wall.
The Probe
Light will
come
Signal
Make sure the probe does
not touch any part of the
oven Interlor. Close the
door.
on.
!I
4.
Set the
Cook
Power
if
Move the Meal Sensor
pointer to the final cooking temperature
you
want.
5.
desired.
• use hot pads
food or food
when removing
from oven.
probe
from
• unplug
probe
from socket
to turn off oven
light,
• stir foods during
cooking
when
recommended.
• stir soups, casseroles
serving.
• cover
roasts with foil
6
Push the START Button.
When
the
probe
senses
the cooking
temperature,
a buzzer sounds,
and the
oven turns off.
DON'T...
DO===
minutes
decide
,
and
drinks
and
let stand
after cooking.
Remove
to cook
it longer.
before
foil
a few
if you
• let probe or probe cable touch any part of
the oven interior.
• let probe touch foil (if used]. Foil can be
kept away from probe with wooden toothpicks. Remove foil if arcing occurs.
• use paper, plastic wrap or plastic containers. They will be in the oven too long.
• use probe in regular oven.
• force probe into frozen food.
• use probe for foods that need to simmer.
*Tmk
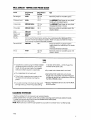
MEAL SENSOR _ TEMPERATURE PROBE GUIDE
Food
Cook Power
Setting
Meal Sensor
Setting
Tlps
Beverages
HIGH
165F to
170F
Balance
HIGH
170 F
Use MEDIUM Cook Power for very thick
foods such as baked beans.
Casseroles
MEDIUM HIGH
170 Fto
175 F
Use MEDIUM Cook Power for very thick
mixtures. Stir once or twice.
Chowders
MEDIUM HIGH
180F
Balance probe
once or twice.
Dips
MEDIUM
140 F
Meat Loaf
{beef]
MEDIUM
HIGH
170 F
Poultry
Do not use the Meal Sensor probe when cooking
poultry. Because of the
amount of bone and shape of poultry, there is no place where the meat is
thick enough to place the probe properly.
Sandwiches
MEDIUM
110 F
Place sandwich
on paper napkin.
Insert probe from side so tip is in center
of filling.
Thick sandwiches
work best.
Soup
HIGH
165 F to
170 F
Balance
probe
once or twice.
Canned
Food
probe
on wooden
on wooden
on wooden
spoon.
spoon. Stir
spoon.
Stir
TIPS
• Casseroles cooked
using the MEAL SENSOR
probe should be made from precooked
foods. Do not use raw meats, raw vegetables and cream sauces in casseroles.
• Dry casseroles
• Thaw
frozen
microwave
probe.
do not work well.
casseroles
oven
and
before
meats
inserting
in the
the
• If you are cooking individual
servings such
as mugs of soup, check the probe setting
CLEANING
in several ofthe items -all the mugs may
not heat atthe same rate.
• Dry meat
loaf mixtures
don't work well.
• Remember that roasts may vary in size,
shape and composition.
Use the timings for
minutes per pound as a guideline
as well as
the MEAL SENSOR probe.
• Starchy vegetables
SENSOR probe.
tend to stick to the MEAL
THE PROBE:
1. Remove probe from microwave
oven using hot pads.
2. Wipe probe with a hot sudsy cloth. Use a plastic scouring pad to remove stubborn foods.
3. Probe may be placed
in the silverware
basket of the dishwasher.
4. Be careful notto kink the cable.
NOTE: Make sure you have the right probe for your oven. It will have "LO-Z" on the handle.
xTmk
.EANING
_iL-'_e after
water ant
THE MICROWAVE OVEN
w_th warm
] soft cloth
sudsy
or sponge
he contr¢
panel
may be
:ie.aned
v, th q sob socp',,,
-,i.,_ _y g ]ss cleaqer
cloth
For stubborn
soil boil a cup
of water in the oven for 2 or "}
Be sure to clean
where the door
minutes
the sod
frame
Rinse
Do not use abrasive
Steam
cleaners
IMPORTANT
Before
_ou start using your
forrqottOFt Will help you avota
Metallic
t
_
soften
or steel
wool
touch
well
when
areas
oven
closed.
pads.
INFORMATION
m_crowave
oven, read
damage
to you, oven
this section
carefully.
This
trim
Staple
I
will
the
and
j!f'_
Twist-Tie
LIIl
_.J, )kit
can
can
; ,'_ metql
damage
co_'tainers
containers
the oven. So
with hidden
metnl
[",_qst-fies
fo!i-_mlng
staples
,,-netallic
glaze or
trpm) Te,r d_nnerware
or cook
w_re be orp usin(j
_.]:ber.
;: :no!
_roum
]-;d so _e plastics
con
melt if L sed when heahng
foods f_ " more than 4
"_nute
Totest a dish for safe use, put it
into the oven with a cup of
water beside it. Cook on high
Cook Power for one minute.
If the dish gets hot and the
water stays cool, do not
use it.
NEVER COOK OR REHEAT A
WHOLE EGG. Slice hard
boiled eggs before
heating. Steam build-up
in
whole eggs may cause
them to burst and possibly
damage
the oven
NEVER start a microwave
Don't let anything
touch
the top ofthe
oven cavity.
oven when its empty.
The
oven can be damaged
If
you experiment,
put a
container
of water
in the
oveq
Conlinued
next
page
Rough or harsh cleaners
DO NOT store things in the
can scratch or dull the
oven.
oven finish. DO NOT USETHEM.
P
Make popcorn
only in
poppers designed for use
in microwave
ovens.
Follow popper directions.
Results are the popper
manufacturer's
responsibility.
Liquids healed in certain
containers may overheat.
The liquid may then splash
out with a loud noise. This
does not harm the oven.
but you should not use
such containersto heat
liquids again.
DO NOT OVERCOOK
POTATOES.At the end of the
recommended
cooking
time they should be
slightly firm. Wrap in foil
and set aside for 5 minutes.
They will finish cooking
while standing.
USEHOT PADS. Microwave
energy does not heat
containers, but the hot
food does.
Follow MICRO MENUS"
Cookbook
directions
carefully to properly
Cook different types of
food. If using a different
cookbook, you may
need to experiment with
tlmes and Cook Powers.
• Double-check
all
settings.
• Usethe oven only for
defrosting, cooking or
reheating.
It is normal for the inside of
the oven door to look wavy
after the oven has been running for a while.
If your electric power line
voltage is lessthan the
normal 240 volts,cooking
times may be longer
i
q3k
Overcooking
some foods
can cause them to scorch
or flame..,especlally
_s
like potatoes, popcorn,
snacks, etc. See the
MICRO MENUS"
Cookbook.
_Tmk
At times, an extra fan
automatically
turns on to
help protect the microwave oven from exc_
heat; you may notice a
louder sound level w_ten
this fan is running ....
• li
9
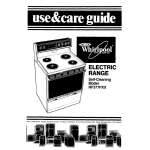
HOW MICROWAVE OVENS WORK
Microwave
make
its own
ovens are safe, Microwave
heat,
and
it's this heat
Mode
that
energy
cooks
Mixer
is not hot. It causes food to
the food.
Bottom
Magnetron
\ ,....,_../21
1
\v/
Oven
Microwaw;s
are
like TV
Metal
Cavity
The bottom
wave
oven
A magnetron
produces
microwaves
The microwaves
move
into the oven where
waves
or Itght waves.
You
can't see them
Dut you can
see what hley do
they are scattered
around
a stirrer [like a fan)
Microwaves
bounce
off
metal
oven walls and are
absorbed
V/l/
Floor
by
waves
bounce
of your microlets micro-
through,
off the
Then
metal
they
floor, back
through
the
bottom,
and are absorbed
by the food.
by food
,rL
f
MiorowawPs
poss through
glass, paper
and plastic
without
heahng
them so food
absorbs
the. energy
Microwaves
balance
off rnetai pans
so food does not absorD
the
energy
Microwaves
may not reach
the center
of a roast. The heat
around
the outside
is what
The microwaves
water
molecules
As the molecules
disturb
in the food
bounce
cooks the roast all the way
through.
This is one of the
reasons
for letting
some
foods [roasts, baked
potatoes] stand for a while after
cQoking,
or for stirring some
foods during
the cooking
time.
around
Dumping
into each
other, heat is made.
like rubbing your hands together.
Th,s is the heat that cooks
BI-LEVEL OVEN RACK
_se the Bi-Level
Oven
The rack can be turned
Rack to stack
upside-down
First Position:
Use the rack only when heating
more than one container
of food.
Do not let a container
touch the top of the
oven.
Second
when
of the
Position:
using
over,
a taller
CLEANING
Turn rack
container
upside-down
on the
bottom
THE RACK
• Wash by hand with a mild detergent.
• Wash on the top rack of a dishwasher
• Do not use abrasive
scrubbers
or cleansers
10
foods when cooking
in more than one container.
to help fit taller
containers
on the bottom
of the
SPECIAL CAUTIONS
• Put food in containers,
tainers
on rack.
then
place
con-
• Do not cook
foods directly
on rack without
putting
them in conta;ners
first,
• Do not use wlth browning
dish.
• Use only in the microwave
oven.
• Do not let food or container
touch
the top of
the oven.
• Do not store rack in the oven,
• Use only when
one container.
cooking
foods
in more
than
Using your lower oven
Lower
Oven
Stop
Controls
Time Knob
Automatic
Minute
Start
MEALTIMI:R"
Timer
Time
C_eon
Knob
Light
Lock
Light
Adjustable
Oven
Temperature
Oven
Signal
Oven
Selector
Manual
Light
Control
Light
Oven
Switch
SETTING
THE CLOCK
Push in and
t,
Clock
Push in Minute
turn the
Tlmer
clockwise
_Jntil clock
time of da,_
Tmk
Minute
Knob
digits
Timer
and
Knob
to set the Clock.
turn
show
the ngnl
=
Let the Minute
counterclockwise
Tlmer Knob pop out. Turn
until the Minute
Timer
d_al shows OFF. The clock setting
will
change
if you push in when turnlng.
11
USING THE MINUTE
TIMER
DO NOT PUSH IN THE KNOB wbe_.
t
•
'he \qtnL, t_ n,"ne,
_d!h".g
Without
pushing
in the Minute Timer
Knob, turn it until the hme showlng
in t_:e
window
_slonger than y,)u want
2,
Without
the
3.
When
the
To stop
without
PUSHING
IN AND
TURNING
pushing
setting
THE KNOB CHANGES
you
time
in, turn the
want
Is
shows
up
a
knob
buzzer
wil!
the buzTer turn the dia!
pushing
in the knob.
THE CLOCK
back
so
in the wrndow
SouriO
to OFF
SETTING.
THE LOWER OVEN CONTROLS
The lower
oven
Temperature
THE OVEN
With
the
heats
"),,,
two
k r!oLbS
the
B.'_;ru_-_ .l:t ._,,-__,n -j sethng
O\,en
Selector
tar thO oven
3p:I
_'_,e
Ov,_Zln
tr_ *_e(_r
SELECTOR
Oven
BROIL. only
_s cor/froi_eli
Contro.
Select, or on
the top
(Broi!_ng
elemer,_
D:_ _5!
With the Oven Selector
on
8Ak_ tr,e bottom
element
J _,_._
......
:_t -I
_'_e
work
",h_ ::_
Wffh the Oven Selector
on
r_MED BAKE the MEALTIMER
(/i-r£ k cGrl _'_(?usea to turn the
v_,n on .::]rn_ off automatically
";F_LTIMER
Clock
Dg
!4]
THE OVEN TEMPERATURE CONTROL
Use the
Oven
Temperature
Control
to set baking
or roa.,t
ing temperature
when the
Oven Selector
is on BAKE or
TIMED BAKE
12
When
b_-,th t,_? Oven
Selec-
tor and rempei-ature
Oontro_
are or'., BROIL Ine broil etemerit
beats
o _, me
time
Tr, e
Oven Temperature
Control
can be set on a temperature
for slower broiling
(see Broiling page 15)
"Tmk
BAKING
OR ROASTING
Pc,tdr@ 'Q(.'.,.[S
want
therY
.,,,'he @ y,D_J
_,et#'.,re' turnJr'_g on
the over-,
Rack(s)
should
De placed
so food can De centered
in
Lift rack
at front and
pull
out
the oven
Always
leave at
least I' ± to 2 inches
[4-5 cm)
between
the sides of the pan
and the oven walls and pans.
For more information,
see the
"Cooking
Guide'
2
4
Set the Oven Selector
BAKE
on
Set the Oven Temperature
Control
to the Da_(_ng
+emperatu!e
_.:'.cJ ,^.'o'r"
Let the oven preheat
Signal
Light goes off
until
the
6
Putfood
rock
,nth.
::_,en
wc711.i on
_r-j(: f
ADJUSTING
During baking, the elements
will turn on and offto help
keep the oven temperature
at the setting. The Signal Light
will turn on and off with the
elements.
The top element helps heat
during baking, but does not
turn red.
When baking
is done,
both knobs to OFF
D_-""ub+
turn
THE OVEN TEMPERATURE CONTROL
Does yc ,Jr new ovep seem to be hotter or colder
at the same settings
than your
old oven?
the temoercture
se;ling
_n ,,'our o!d oven may have changed
gradually over:_e
year.<, rt;e ;:lc:(:;urate sethng ,:',' v _ur new :)yen can seem different
If you thin
the
:_'.v_r, Temoer,a_ure
needs,
_dl, _sting. foblow
these
OFF
steps
OFF
1oi
Tooth
I.
Pul!outth,
of the
center
Oven
perature
Tem-
_ ontrc'.l
3
Notches
To lower
the tern
peroture
move
.-')lac ,_ r_ng so toath
:s closer to LO Each
qotch
about
equals
10 F (5 C)
Tighten the locking screw. Replace
the knob.
Tooth
,
TO raise
Nolches
the tem-
perature,
move
black
ring so
tooth is closer to
HI. Each notch
equals
about
10F
,15C)
13
USING
THE AUTOMATIC
The Automatic
at times you set
MEALTIMER
MEALTIMER
even when
CLOCK
Clock
is designed
you are not around
to turn the
lower
oven
on and
off
To start and stop baking automatically:
I.
4.
7.
Put the lower oven rack(s)
where
you want them
and place
the food in the
oven
2.
Push in and turn the
lime Knob clockwise
Stop
5.
to the hme you wont
oven to shut off
the
After
botn
rijrr',
To stop
I.
2.
baking
Js done
kr_d::,bs to OFF
baking
sJre
Set the
Oven
the
to lhe t,me
SPECIAL
8.
re stop
the
the preset
krloDsto
on
6.
Set the Oven
want
bak-
Temperature
Control
on the baking
temperature
you war_t
oven
before
hrne
OFF
ci(ck
yOU wont
in the over_
_s set to the
nqht
turn
both
vou
Sto_.; T-me Knob
wont
the
oven
4.
Se_ the
Oven
Selector
5,
SeTthe
Oven
Temperature
hrne
baking
clockto shut off
temperature
baking
on TIMED BAKE
Control
you
6.
After
7.
1o slop the oven before
turn both knobs to OFF
_s done,
on the
want
turn both
the
knobs
preset
to OFF
time.
CAUTION:
Use foods
that will not go bad or spoil
while waiting
for cooking
to start. Avoid
using dishes
with milk or eggs,
cream
soups, cooked
meats
or fish, or any item
with baking
powder
or yegst.
Smoked
or frozen
meats
may be used;
so can vegetables,
fruits and casseroletype foods, Vegetables
can be cooked
14
Selector
you
Start
automatically:
Push _n .:,,rid turn the
wise
Push in and turn the
Time Knob clockwise
to the time
qng to start
at gay
3,
3.
sure the clock
is set
right time of day
TIMED BAKE
pLpTne oven rdJCklS )vv_rQ
trlern and pl_Dcethe
food
Mo_e
Make
to the
a covered
baking
dish with about a haltcup (tt8 mL) of water for I to 1_/2hours.
Any food that has to wait for cooking
to
start should be very cold or frozen before
it is put in the oven. MOST UNFROZEN
FOODS SHOULD NEVER STAND MORE THAN
TWO HOURS BEFORE COOKING STARTS.
in
BROILING
/
I,
Place the rack where
want it for broiling.
.,
you
Set the Oven Temperature
Control
on BROIL (or on a
lower temperature
for
slower
broiling].
2.
Put the broiler pan and
food on the rack.
3.
Set the Oven Selector
BROIL.
5.
During broiling,
the
door must be partly
6.
When broiling
is done,
turn both knobs to OFF.
open. A built-in
hold it there.
oven
stop
will
For slower brolllng, set the Oven Temperature
Control on a temperature
instead of BROIL. The broil element will then turn on and off instead of staying
The lower the temperature
setting, the slower the broiling.
The Oven Selector
must be on BROIL and the door partly
Suggested
oven-rack
positions
on
on.
open for all brolllng temperatures.
and broiling
times
Approximate
Temperature
ist slde
Minutesset to BROIL
2nd side
Food
Description
inches (cm) from top
of food to Broil Element
Beef Steaks
Rare
Medium
Well done
1"(2.5 cm)
1"[2.5 cm)
1 "(2.5 cm)
3" (8 cm]
3" [8 cm)
3" [8 cm)
7-9
9-1 1
1 1-1 3
3-5
4-7
5-7
Beef Stea ks
Rare
Medium
Well Done
11/'(4 cm]
1!/2" [4 cm)
1_/2"(4 cm)
4"-5" [10-13 cm)
4"-5" [10-13 cm)
4"-5"(tO-t3cm)
13-15
17-19
19-21
6-8
8-10
14-16
Hamburgers
_iz" [1 cm]
3" (8 cm)
6-8
4-5
Lamb Chops
Medium
I "[2.5 cm)
3" (8 cm)
6-8
4-5
Ham slice, precooked
or tendered
(I-2.5 cm)
3" [8 cm)
6-8
4-5
3" (8 cm]
6
4
15
10
7"-9" (18-23 ore)
3" [8 cm)
3" (8 cm)
25-30
10-I 2
11-16
7-8
9-14
5-7
3" {8 cm)
4"-5" (10-13 cm)
3
3
6-7
4-5
Canadian
Bacon
Pork Rib or Loin Chop
Well done
Chicken
Fish
Liver
1i2,,.1 ,,
'/2" [1 cm]
_/4"-1"
(2-2.5 ore}
2-3 lb.
(1-1 5 kg}
cut in half
whole
fillets
ore)
1/2 "_ 3/d "
[1-2 cm)
Frankfurters
4"-5"{10-13
15
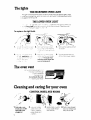
The lights
THE MICROWAVE OVEN LIGHT
The light pn the microwave
oven comes
on when
)u set the cooking
time, when the oven is on. and
i: plugged
intothe
socket.
the oven door is open,
when the temperature
when
probe
THE LOWER OVEN LIGHT
_ ,_- z ._,_._
_sr, me
., _ _
To replace
_-_.P light
Oven
Light
_-) s_ the
the light
will
switch
£wltcm
corn!!'
{)r_ vvqen
at the
again
t,
bottom
'!:; ,d open
of t'ne
control
the
oven
door
panel•
or when
Close
the
you
oven
_-;htjt ,' (bP
bulb:
f
f
I,
T,lrQ
oft
h_"
electric
:3.Remove
[.)(;w_,r
the
light
bulb
from
_ts socket
,
_€_:_,
cc
:
_r]_
or_,'_
RPpi._c_-, tn,_ cull
cover
(]rid SriOp the wlr(_ holde_
i-" p!_:ce
The bulb must
have this cover when the
,E_:
oven
DuiD
7Vlfh
40 ._.,at appliance
J_(]lJa[
Perv
IE.* tr¢_r'r'l
v"rletv
_, _ i-_W(
,',
:_:
a
,
r.;uIO
r'qOS'
:.i}ro
isbeing
,
Turn the power
back on
at the main power
supply
used.
The oven vent
Hot ,ulr and moisture
get o jr of
the lower oven through
a vent just above
the oven door
Do not block
_-_,or baking
the vent.
can
result
Cleaning and caring for your oven
CONTROL
I.
First mak_
knobs are
then
pull knob
straight
16.
sure
on OFF
off
2,
PANEL AND KNOBS
'Jse war:n soap_
water _nd a s,off
cloth to w_pe the
panel
R_nse and
_',,ipe dr',,,
3.
Wash
knobs
_n warm
soapy
water
Rinse
well and dry,
4.
Push knobs
straight
back on. Make
sure
they are on OFF.
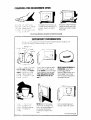
THE LOWER OVEN SELF-CLEANING
CYCLE
The lower oven self-cleaning cycle uses very hlgh heat to burn away
soil. Before you start, make sure you understand exactly how to use
the cycle safely.
BEFORE YOU START
1.
Clean
areas
that
may
not be cleaned
during
the cycle.
Use hot water and detergent or a soapy
steel-wool
pad on...
• the frame around
the oven
• the inside of the door,
part outside
the oven
especially
seal.
DO NOT try to clean the fiberglass
NOT move it or bend it.
2.
seal.
Remove
any pots or pans you may
stored
in the oven. They can't stand
the
DO
have
the
high heat.
Wipe out any loose soil or grease.
This will
help reduce
smoke during
the cleaning
cycle.
Make sure the motor socket cover
is
3.
4.
closed
if your
oven
has o rotisserie
Clean Door
Clean
Frame
SPECIAL CAUTIONS
DO NOT bloCk
th@ vent
dunng
'the clean,ng
Air must move
freely
best results
DO NOT touch
cycre
tor
the oven
during
the cleaning
_tcan burn you
cycle
I
!
DO NOT use commercial
oven
cleaners
nn your
DO NOT force
oven
Damage
to the porcelain
finish may occur
the
Lock
Lever The lever _sdesigned
to stay locked
until the
oven is cool
safely
open
enough
to
DO NOT use foil
or other
liners in the oven. During
the cleaning
cycle,
foil
can burn or melt
17
SETTING THE CONTROLS
1.
Set the Oven
Selector
to
2.
SettheOven
ture Control
CLEAN,
1
5.
Push in the Stop Time
Knob and turn the hand
clockwise
about two
Temperato CLEAN.
.
The Lock Light comes
on
when the oven gets
above
normal
baking
temperatures.
The Lock
Lever can't be moved
when
10.
the
Lock
Light
1
sure the clock
and
start and stop time dials
all have the right time
of day.
Lift the panel between
the oven doors.
.
When the Lock Light
goes off, turn the Oven
Selector
and Temperature Control
to OFF.
.
Move
the Lock
Lever all
the way to the right The
Clean
Light will come
on
only when the lever is
all the way over.
or three hours. [Two hours
for light soil, three or
more for heavier
soil]
.
Make
Move
back
force
the Lock Lever
to the left. Do not
it. Wait until it will
move
easily
the
Clean
This turns off
Light
is on
After the oven Is cool,
wipe
off any residue
or ash with a damp
cloth. If needed,
touch
up spots with cleanser
soapy
steel-wool
pad.
or
DO NOT TOUCH THE OVEN DURING THE CLEANING CYCLE. IT CAN BURN YOU.
48
SPECIAL TIPS
j_
Keep th,. k_tche,
w,__.:
venti!at_"-J
jurlna
th_,
cleanln
: _-'vcle to he_'r:
I.
C!ea,ntneove,
.
it gets
Ov@n ra. Kb .,.)be Their o_ii[1@
aria be_ ,)me
harder
to sl_ae
guides
v. her. they
tJi%
.....
or,
;o stop the cleantng
blarte,,_
IL..
th@i_
are ;eft _n the o_er_
dunngt!,ecleanlngcycle
T.- mai-e
them slide easier
po!_sh the edges
cf
the racl,
ar_a rack
g',.J_cles
,A/Itb, q s_)];
steer w(. _I pad
nr%e well ar_,J _'_ ,e
:[}r.
!
t b'!r
": "/-_÷
[-'t
_,"]i
;
If the cleaning
cycle
doesn't
get the oven as
clean
as you
expected
the cycle
may not have been set
ibng enough
Set the
_leaning
time longer
for heavier
soir
.
so_le_
qven ta_<es .-)nq,i;r :1 r "!
results tn mar@ --"qok_
get rid c' n(br_qol Qe.:]'
odors a,d smOkG_
.
r_ef<re
heawly
cycle
after
it has
• Turq the Stop lime Knob clockwise
dntfl me hand po_nts to the right time
of day
f,,rr I the Oven Selector
and Oven
.
Ter'_perature
Control
to OFF
,, W_en the over] cools, move the Lock
Le,,er back to the left DO NOT FORCE
I
iT W_it
HOW
until
it moves
easily
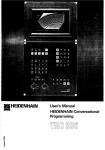
IT WORKS
Du ,ng the se!f cleaning
cycle
the oven gets mucq hotter than it does
torbc:klngorbrolitng..approxlmately875
_[468
C)This
heat breaks
up g,ease
and so_l and burns it off.
Th_:' graph shows approximate
temperatures
aria t_mes during a selfclea_ ,ing cycle set for two hours
SELF-CLEANING
CYCLE
[AplDroximafe
!0
_
_....
"-
"
....
jr
4[
2(.;
r-
_"
T
_ ......
r
F(468
T
•
CJ CLEANING
1/I
I
.d I I
'
,_560oF(293o01
-'LOCK LIGHTON-
/
•
START
T
_875
-TWO
I
I
" _ rtr
SETTING
x°
[
CYCLE.{,
T
J
I
_
hr _,
538
1
C
316 C
520_F127'l°C) .,,_'_
''
--LOCK LIGHI'OFF--
I
I
_ hr
HOUR
Temper.,-_tures cncl Times}
_"
J
!
2 hrs
NOtl_ @ tt,o the r,,e,:jrlng stop_ wr_,_._, ir_@ tW'. ')Oup _ettlng
Whlie i ,qqer for the oven to coo! do,,t,,_ enou:4r_ to ,unlock
204
_,
\
\
2_
hrs
ib ij_,, out that
C
93 C
STOP
If takes
a
19
CLEANING CHART
PART
W/'iAT
TO uSE
Aluminum
Warm,
soapy
soapy
water or
steel wool
pads
• Wash
Warm,
bristle
sudsy
brush
• Wash, rinse and
• Do not soak.
dry
well.
Control
Warm,
soapy
• Wash,
rinse and
dry
with
panel
Commercial
cleaner
• Follow
directions
Oven
racks
Self-Cleaning
Oven cycle
Warm, soapy
water or
soapy
steel wool pads
• Leave
in oven
Warm,
plastic
• Make certain
oven
well with soft cloth
broiler
pan
and grid
Control
Lower
knobs
o,., en
door glass and
outside
only of
microwc.ve
oven
Self-Cleaning
Oven
HOW TO CLEAN
water
• Do not
and
water
glass
For areas
Cleaning
glass
cleaner
outside
Self
area use warm,
soapy
water
,wool pads
or soapy
other
place
cooking
• Follow
utensils,
in Self-Cleaning
with
during
directions
Oven.
soft cloth.
cleaner.
Self-Cleaning
• Wash, rinse and dry
for stubborn
areas.
soapy
water or
scrubbing
pad
Commercial
with
Use soapy
is cool.
provided
Wash,
with
• Clean
before
using Self-Cleaning
prevent
burn-on
of soil.
steel
• Follow directions
Oven Self-Cleaning
Do not use foil to line the bottom
oven
wool
rinse
pads
and
17
'The
to
Lower
cleaners.
of your Self-Cleaning
Oven.
THE OPTIONAL ROTISSERIE
If you
_rom your
2O
would
dealer
like a rotisserie
The kit includes
for your oven, you can order
easy instatlahon
instructions
dry
cleaner
cycle
given
on page
Cycle"
• Do not use commercial
cycle
steel
a kit [Part
No.
261881
_
Ifyou need service or assistance,
we suggest you follow these four steps:
1. Before
calling
Performance
for assistance...
problems
i_ttle things you can find
out tools of any kind
often
and
result
from
fix yourself
wltq-
If nothing operates:
J Is the oven correctly
wired
into a live circuit
with the proper
voltage?
(See Installation
Instructions.)
• Have you checked
the main fuse or circuit
L)reaker
box?
If the microwave
oven will not run:
• is the timer set
_* Isthe Cook
Power set :_
5
If microwave
cooking
times seem too long:
• Is the electric
supply
to your home low or
lower than normal?
Your electric
company
can tell you if the line voltage
is low
• isthe Cook Power atthe
recommended
If the microwave
oven
end
Meal
Sensor
femperat_Jre
cook-
turns off too soon
not soon enough
when using
• Is at least ' _ of the probe
in
• is the probe
tip in the center
• Is the probe
touching
bone
• Have you allowed
roasts to
minutes
after cooking?
• Is the probe
plugged
tightly
• Is the Cook Power set where
• is the
when
Probe
youwant
or
the probe:
the food "_
of the food?
or fat?
stand for a few
into its socket?
it should
be?
Control
temperature
to a
setting?
If the Self-Cleanlng
cycle will not operate:
• Are the Oven Selector
and the Oven Temperature
Control
set to "CLEAN?"
• Does the Start lime Dial show the correct
time of day?
• Is the Stop lime Dial set ahead
to the time
you want the cleaning
cycle
to stop?
• Is the Lock Lever all the way to the right?
[The Clean
Light will come
on.]
• Is the door firmly closed
and latched?
• Did you push the START Button?
• Did you follow the directions
on pages
and 6 exactly?
setting?
• Are you allowing
for more time
_ng more food at one time?
If the lower oven will not operate:
• Is the Oven Selector
turned
to a setting
[BAKE or BROIL, but not TIMED BAKE)?
• Is the Oven Temperature
Control
turned
If cooking
results aren't
• Is the oven level?
what
you
expect:
• Are you using pans recommended
in the
Cooking
Guide?
• If baking,
have you allowed
1_2to 2 inches
(4-5 cm] on all sides of the pans for air
circulation?
• Does the oven temperature
seem too low or
too high? See page13,
"Adjusting
the oven
temperature
control."
• Have you preheated
the oven asthe
recipe
calls for?
• Are the pans the
recipe?
• Are you following
reliable
source?
size called
a tested
for in the
recipe
See the Cooking
Guide for more
on cooking
problems
and howto
from
a
information
solve them,
set atthe
o
Tmk
21
. If you need
assistance_
...
. If you need
service:_:...
Call the Whirlpool COOL-LINE _ service assistance telephone number. Dlal free from:
Continental U.S.........
(800) 253-1301
Mlchlgan ................
(800) 632-2243
Alaska & Hawaii ........
(800) 253-I 121
and talk _vith one of our trained
The Consultant
can instruct
you
tain satisfactory
ance
or, if service
qualified
service
Consultants
in how to oD
operahon
from your
applb
is necessary,
recommend
a
company
in your arec
Whirlpool
has a
nationwide
network of franchised
TECH-CARE"
Servtce
Companies
TECH-CARE service
technicians
are
trained
to fulfill the
T£_H-_,4R£
FRANCHISED
SERVICE
product
warranty
and provide
after,_.arrant?
serv,ce,
anywhere
in the United
STates To locate
TECH-CARE
service
in your
nrea
call
our COOL-LINE
service
assistance
telephone
telephone
AP_LIANCES-.
MAJOR
number
directory
(see Step 2) or look in your
Yellow Pages under:
HOUSEHOLD
SERVICE
& REPAIR
ELECTRICAL
MAJOR
APPLIANCES
--REPAIRING
& PARTS
OR
OR
WASHING
MACHINES.
DRYERS
& IRONERS
SERVICING
"i/'
4. If you
Call
our
have
,"
_ ,
,\fi,:\
L .
a problem
COOL-LINE
service
...
assistance
tele
phone
number
[see Step 2} and talk with one
_ our Consubants,
or if you prefer, write to:
Mr Guy Turner Vice President
Whirlpool
Corporation
Administrative
Center
2000 US-33 North
Ber_ton _iarbor
MI 49022
" you must cc_l or wnte
_ :_mber, serial number
,o complete
_n_ormation
spond
22
description
_s needed
to yoL;r request
please
provJde
model
date of purchase,
and
of the
in order
problem.
to better
for assistance
This
re-
Notes
23
FSP is a registered
quality
parts.
symbol
of quality
Look
trademark
for
this
whenever
af Whirlpool
Corporation
you
need
a replacement
for
your
Whirlpool
FSP replacement
will
fit right
made
to the
used
to build
and
work
same
righL
every
new
Part No. 312411
Appliances
they
are
specifications
Whirlpool
appliance
6enlon Harbor. Michigan. Aulomatic Washers, Clothes Dryers,
Freezers, Relrigerator-Freezers, Ice Makers, Dishwashers.
Built-in Ovens and Surface Llnils, Ranges, Microwave Ovens,
Compactors. Room Air Conditioners, DehumitHliers, Central
Heating and Air Condilioning Systems.
l ol*
_
parts
because
exacting
tar
part
appliance.
k,_-"_
L_.._
"__
j
Printed in U.S.A.