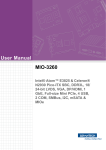
1
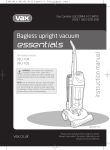
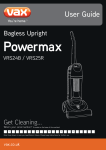
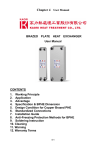
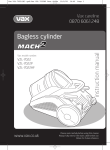
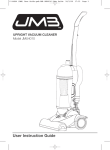
Vax careline
0870 6061248
Vax model number:
V-045
V-045S
V-045N
WARNING: This cleaner has a constantly
rotating brush bar which, when left in
contact with lino, parquet and other hard flooring
could potentially cause some damage to the floor
surface.
!
NOTE: Vax recommends that you raise the height
of the brush bar when using this cleaner on lino and
hard flooring. Vax cannot be held responsible for
damage to these surfaces if the customer fails to
take notice of this recommendation.
www.vax.co.uk
instruction manual
Bagless upright vacuum
Please read carefully before using this cleaner.
Always fully extend the mains cable before use.
Retain for future reference.
www.vax.co.uk
1. Diagram
V-045
13
12
11
1
2
3
14
4
15
5
16
6
7
17
8
18
9
19
10
Fig.1/1
1
2
3
4
5
6
7
8
9
10
Hand grip
Hand grip locking pin
Metal telescopic tube
Flexible hose
Dirt container lid
HEPA filter
Dirt container
Headlight
Carpet height adjuster !
Furniture protect strip
2 parts overview
11
12
13
14
15
16
17
18
19
20
20
Crevice tool
2-in-1 upholstery tool/dusting brush
Dirt container release button
Handle height adjust button
Hose clip
Telescopic tube release button
Hose holder
Handle release button
On/off button
One (1) screw
WARNING: This cleaner has a
constantly rotating brush bar which,
when left in contact with lino, parquet and
other hard flooring could potentially cause
some damage to the floor surface.
!
NOTE: Vax recommends that you raise the
height of the brush bar when using this
cleaner on lino and hard flooring. Vax
cannot be held responsible for damage to
these surfaces if the customer fails to take
notice of this recommendation.
Vax Careline 0870 606 1248
2. Safety Information
15. Do not vacuum up hard or sharp objects such as
glass, nails, screws, coins, etc.
For Household Use Only
16. Do not use without the filters in place.
When using the vacuum cleaner, basic safety precautions
should always be observed, including the following:
17. Take extra care when vacuuming stairs.
1.
Only use the vacuum cleaner indoors on dry
surfaces.
19. Store the vacuum cleaner indoors in a cool, dry area.
2.
Turn off the vacuum cleaner controls before
connecting or disconnecting from the mains supply.
3.
Always unplug the vacuum cleaner before
connecting or disconnecting the vacuum hose and
accessories.
4.
Children should be supervised to ensure that they
do not play with the appliance.
5.
The appliance is not intended for use by persons
(including children) with reduced physical, sensory or
mental capabilities, or lack of experience and
knowledge, unless they have been given
supervision or instruction concerning use of the
appliance by a person responsible for their safety.
6.
Use only as described in this manual.
Use only the manufacturer’s recommended
attachments.
7.
Do not use the vacuum cleaner if it has been
dropped, damaged, left outdoors or dropped into
water. Do not use the vacuum cleaner with a
damaged cord or plug. If the supply cord or plug is
damaged, return the vacuum cleaner to a Vax
Authorised Service Agent or suitably qualified
person for examination, repair or adjustment.
8.
9.
Do not pull or carry by the cord. Do not use the cord
as a handle, close a door on the cord or pull the cord
around sharp edges or corners. Do not run the
vacuum cleaner over the cord. Keep the cord away
from heated surfaces.
18. Keep vacuuming area well lit.
20. Turn off the on/off switch before unplugging the
vacuum cleaner.
21. Use only CE-approved 13 amp extension cords.
Non-approved extension cords may overheat. Care
should be taken to arrange the cord so that the cord
cannot be pulled or tripped over.
WARNING: Always switch off and unplug the
vacuum cleaner from the electrical outlet
before assembling, opening or emptying the dirt
container, or before connecting/disconnecting the
attachments.
!
CAUTION: The vacuum cleaner is a very
powerful unit. Before plugging the cord into
the electrical outlet, make sure the switch is in the
‘off’ position.
!
IMPORTANT: If the inlet, hose or telescopic
tube is blocked, switch off the vacuum cleaner
and remove the blockage(s) before re-starting the
vacuum cleaner.
!
IMPORTANT: Cleaning filters improves vacuum
performance. Make sure all the filters are
completely dry before inserting back into the vacuum
cleaner.
!
This vacuum cleaner is intended for household use only
and not for commercial or industrial use.
Do not handle the plug or vacuum cleaner with wet
hands. Do not use outdoors or on wet surfaces.
10. Do not put any objects into openings. Do not use
with any openings blocked and do not restrict air
flow. Keep all openings free of dust, lint, hair or
anything that may reduce airflow.
11. Keep hair, loose clothing, fingers and all parts of the
body away from openings and moving parts.
12. Do not pick up hot coals, cigarette butts, matches or
any hot, smoking or burning objects.
13. Do not pick up flammable or combustible materials
(lighter fluid, petrol, kerosene, etc) or use in the
presence of explosive liquids or vapours.
14. Do not vacuum up harmful or toxic material (chlorine
bleach, ammonia, drain cleaner, etc).
Motor Thermostat
IMPORTANT: The motor is equipped with a thermal
cut-out. If for any reason, the vacuum cleaner should
over-heat, the thermostat will automatically turn the
unit off. Should this occur, unplug the vacuum cleaner
from the electrical outlet and turn off the switch.
Remove the dirt container and empty. Clean the
filters. Allow the cleaner to cool for approximately one
(1) hour. To re-start, plug into an electrical outlet and
switch back on.
safety information
3
www.vax.co.uk
3. How to Assemble
IMPORTANT: Always remove the power plug
from the electrical outlet before assembling or
removing accessories.
!
Assembling the Vacuum Cleaner
Insert the telescopic tube into the hole on the top of the
unit. Make sure that the telescopic tube fits correctly into
the opening (Fig.3/1).
Fig.3/4
telescopic
tube
To raise the height of the handle, push down on the handle
height release button and lift handle to the desired height.
When the handle is at the desired height, release the
button and the handle will securely click into place
(Fig.3/5).
Fig.3/1
Insert the hand grip into the top opening of the telescopic
tube making sure that the hand grip locking pin is in place
(Fig.3/2).
hand grip
locking
pin
Fig.3/5
Hose Storage
Place the hose clip into the slot in the back of the vacuum
cleaner (Fig.3/6).
Fig.3/2
To remove the hand grip, press the hand grip locking pin
and pull the hand grip up (Fig.3/3).
Fig.3/6
Using a Phillips screwdriver and the screw provided, attach
the hose clip to the vacuum cleaner (Fig.3/7).
Fig.3/3
To remove the telescopic tube, press the handle release
button which is located on the back of the unit and lift the
telescopic tube up (Fig.3/4).
4 assembly
Vax Careline 0870 606 1248
4. How to Operate
Fully unwind the power cord. Plug the cord into an
electrical outlet. Turn the vacuum cleaner on by pressing
the on/off switch located on the lower right side of the
cleaner (Fig.4/1).
Fig.3/7
Cord Storage
This vacuum cleaner is equipped with a convenient cord
storage feature. The power cord winds around the two
cord holders at the side of the unit. The top cord holder has
a quick cord release feature. Turn the cord hook to the left
or the right to remove the power cord (Fig.3/8)
Fig.4/1
The cleaner can be turned off by pressing the on/off
switch again.
To release the handle, push the handle release button on
the lower left side of the cleaner (Fig.4/2).
Fig.3/8
Fig.4/2
Move the handle to the desired position. (A) for storage, (B)
for normal operation and (C) to clean under furniture
(Fig.4/3).
A
B
C
Fig.4/3
Carpet Height Adjuster
The front of the vacuum cleaner has a carpet height
adjuster (Fig.4/4) that raises and lowers the brushbar to
suit the type of carpet). With the cleaner NOT connected
assembly / operation
5
www.vax.co.uk
to the electrical outlet, set the adjustment to the
appropriate setting for maximum cleaning. If the cleaner is
difficult to move, push the adjuster to the next highest
setting until the cleaner is comfortable to push. The
brushbar must reach the carpet for effective cleaning.
5. Accessories
Upholstery tool: for carpet, upholstery, stairs etc.
Dusting brush: for delicate surfaces.
Crevice tool: for crevices, corners, cracks etc.
Attaching the Accessories
To attach the accessories to the hand grip, remove the
hand grip from the telescopic tube (Fig.3/3) and push in
the desired accessory (Fig.5/1).
high
low
Fig.4/4
IMPORTANT: When the vacuum cleaner is stood in
the upright position or when using the hose and
tools, the carpet height adjuster must be set to the
highest position.
!
WARNING: To avoid injury, keep loose clothing, hair,
fingers and all other parts of the body away from
any moving part (such as the brushbar). Turn off the
switch and unplug the cleaner before adjusting the
cleaner for the carpet height.
!
Fig.5/1
To attach the accessory to the telescopic tube for a
longer reach, remove the telescopic tube and push the
accessory on to the end of the tube (Fig.5/2).
CAUTION: The brushbar continues to rotate while
the hose is removed or in use, and at all times while
the vacuum cleaner is on. The vacuum cleaner must be in
the upright position to lift the rotating brushbar off the
carpet when using the accessories. Vax recommend that
the carpet height adjuster is at its highest setting.
!
WARNING: This cleaner has a constantly
rotating brush bar which, when left in contact
with lino, parquet and other hard flooring could
potentially cause some damage to the floor surface.
!
NOTE: Vax recommends that you raise the height of
the brush bar when using this cleaner on lino and hard
flooring. Vax cannot be held responsible for damage to
these surfaces if the customer fails to take notice of
this recommendation.
Fig.5/2
When using the attachments, always ensure that the
hose is inserted into the hose holder located at the
bottom of the unit, just behind the dirt container
(Fig.5/3). This will help to keep the cleaner from tipping
over.
Motor Thermostat
IMPORTANT: The motor is equipped with a thermal
cut-out. If, for any reason, the vacuum cleaner
should over-heat, the thermostat will automatically turn
the unit off. Should this occur, unplug the vacuum cleaner
from the wall outlet and turn off the switch. Remove the
dirt container and empty. Clean the filters. Allow the
cleaner to cool for approximately 1 hour. To re-start, plug
into a wall outlet and switch back on.
!
6 operation/ accesories
Fig.5/3
Vax Careline 0870 606 1248
6. Dirt Container & Filter:
Removal and Replacement
!
IMPORTANT: Always unplug the unit from the
electrical outlet before opening the dirt container.
!
IMPORTANT: Do NOT use the vacuum without the
HEPA filter in place.
To remove the dirt container, press the dirt container
release button and lift away from the vacuum cleaner (Fig
6/1).
Fig.6/3
Remove the HEPA filter from the dirt container (Fig.6/4).
Fig.6/1
Emptying the Dirt Container
Hold the dirt container by the handle over a waste bin.
Press release button on the back of the dirt container to
release the dirt (Fig.6/2).
Fig.6/2
Cleaning the HEPA Filter
!
IMPORTANT: Clean the HEPA filter after every use,
as described below.
Fig.6/4
Remove the HEPA filter from the filter frame by twisting
clockwise and lifting out (Fig.6/5).
Fig.6/5
Firmly tap clean the HEPA filter until no more dirt is
observed falling out (Fig 6.6)
Remove the dirt container from the vacuum cleaner.
To remove the dirt container lid, hold the dirt lid by the
handle, turn counter clockwise and lift the dirt container lid
off (Fig.6/3).
Fig.6/6
dirt container & filter
7
www.vax.co.uk
The HEPA filter may also be washed by running it under the
tap, allowing the water to run on the dirty side (Fig.6/7).
Cleaning the Exhaust Filter
To remove the exhaust filter, twist the pre-motor filter cover,
then remove the exhaust filter (Fig.6/10).
Fig.6/7
Vax recommends washing the HEPA filter once a month, or
when suction appears reduced.
Always allow the filter to air dry for 24 hours before
replacing into the cleaner.
NOTE: The white material in the HEPA filter will discolour
over time; this is NORMAL and will NOT affect the
performance of the filter.
WARNING: Always empty the dirt container and
! clean the HEPA filter and debris screen before each
use and after prolonged use. Never overfill the dirt
container.
Remove dirt and clean the HEPA filter and debris screen
each time the dirt container is emptied or after prolonged
use. Failure to do so may cause motor damage.
Cleaning the HEPA Filter Frame
Before replacing the HEPA filter in the HEPA filter frame,
rinse the frame in lukewarm (max 40ºC) water by running it
under the tap. This will remove any dirt on the frame
(Fig.6/8). Do NOT place in dishwasher.
Fig.6/10
To clean the pre-motor filter and exhaust filter, rinse in
lukewarm (max 40ºc) water and let air dry completely for 24
hours. Do not use a washing machine to rinse the filters. Do
not use a hair dryer to dry them. Air dry only. Never operate
the vacuum cleaner without all filters in place.
NOTE: Vax recommend washing the pre-motor filter when
washing the HEPA filter (Fig.6/11).
Fig.6/11
Fig.6/8
Ensure the filter frame is completely dry before replacing
into the dirt container. Always air dry for 24 hours.
Cleaning the Pre-Motor Filter
Located beneath the dirt container is a pre-motor filter,
which fits into the air inlet pipe. Lift out to remove (Fig.6/9).
Fig.6/9
8 dirt container & filter
Cleaning the Dirt Container
WARNING: To reduce the risk of electric shock, the
! power cord must be disconnected before removing the
dirt container or HEPA filter, or before changing the
filters or performing maintenance/ troubleshooting checks.
• The dirt container can be washed in lukewarm (max 40ºc)
water.
• Do not use strong detergents.
• Ensure the dirt container is fully dry before re-attaching to
the vacuum cleaner (Fig.6/12). Do not wash in dishwasher.
Fig.6/12
Vax Careline 0870 606 1248
7. Maintenance
Motor Thermostat
IMPORTANT: This unit is equipped with a motor
protection thermostat. If for some reason the
vacuum cleaner should overheat, the thermostat
will automatically turn the unit off. Should this occur:
!
• Push the on/off button once.
• Disconnect the plug from the power source.
• Check the source of overheating problem (i.e. clogged
hose or filter).
• If clogged hose or filter is found, unclog the hose and
replace the filters.
• Wait at least 45 minutes before attempting to reuse
the vacuum cleaner.
Fig.7/2
With the unit still lying down, turn the unit over and lift
the power head cover starting from the back of the
power head (Fig.7/3).
• After unit has cooled down for 45 minutes, plug in the
cleaner and push the on/off button. The vacuum should
start again.
• If the vacuum still does not start, contact Vax Care
0870 606 1248.
Cleaning & Changing the Belt
WARNING: To reduce the risk of electric shock, the
power cord must be disconnected before removing
the dirt container or HEPA filter, or before
changing the filters or performing maintenance/
troubleshooting checks. Occasionally, the power nozzle
drive belt will require changing (the frequency will depend
on the frequency of use).
!
Turn the vacuum cleaner off and unplug from the power
supply.
Turn the vacuum cleaner upside down on a flat, level
surface.
Fig.7/3
Remove the belt cover (Fig.7/4 A)
Lift the right side of the brushbar first, then lift the left
hand side (Fig.7/4 B).
Remove the brushbar from the power head (Fig.7/4 C)
A
B
Using a Phillips screw driver, remove the four (4) screws
that attach the base plate to the lower plate (Fig.7/1).
B
C
Fig.7/4
Carefully remove any belt residue that may be present in
the belt area before replacing with a new belt.
Fig.7/1
After removing the base plate, remove the remaining five
(5) screws from the lower plate using a Phillips
screwdriver (Fig.7/2).
Remove the worn or broken belt from the motor drive
shaft.
Loop the new belt first over the motor drive shaft then
over the agitator pulley.
Insert the right side of the brushbar in first, by placing
the end cap down into the slot, then do the same with
the left side.
maintenance
9
www.vax.co.uk
Press firmly to ensure each end is completely inserted.
Check to make sure the belt is centred on the agitator
pulley and that the brushbar turns.
Replace the belt cover.
Replace the power head cover and turn the unit over
carefully.
Replace the lower plate, screwing in all five (5) screws.
Replace the lower plate.
Once the lower plate is attached, replace the base plate
with the four (4) screws.
Changing the Headlight Bulb
WARNING: To reduce the risk of electric shock, the
! power cord must be disconnected before removing
the dirt container or HEPA filter or before changing
the filters or performing maintenance/troubleshooting
checks.
Turn the unit off and unplug from the power supply.
With a flat head screwdriver, carefully snap off the
headlight cover by pressing down on the two notches on
the lens cover (Fig.7/5)
9. Troubleshooting
!
WARNING: To reduce the risk of personal injury,
unplug the vacuum cleaner before performing
maintenance or troubleshooting checks.
PROBLEM: Vacuum cleaner won't run
Cause:
Not properly plugged into electrical outlet.
Solution: Plug in securely.
Cause:
No electricity in the electrical outlet.
Solution: Check fuse or breaker.
Cause:
On/off switch not turned on.
Solution: Push on/off switch to ‘on’.
Cause:
Motor thermostat has tripped.
Solution: Switch off and unplug the vacuum cleaner.
Leave for one (1) hour before switching the
vacuum cleaner back on.
Cause:
Blown fuse/tripped breaker.
Solution: Reset circuit breaker or replace fuse.
PROBLEM: Cleaner won’t pick up/loss of suction.
Cause:
Dirt container not installed properly.
Solution: Review dirt container replacement.
Cause:
Dirt container full or blocked.
Solution: Empty dirt container.
Cause:
Clogged filters.
Solution: Remove, clean and replace filters.
Fig.7/5
Lift off the headlight cover and remove the old bulb by
pulling it out carefully.
Replace the new bulb by pushing it in carefully.
Replace the headlight cover by pushing it in so that it
clicks back in place.
8. Storage
!
IMPORTANT: Always unplug the vacuum cleaner
from the electrical outlet and wrap the cord as
directed before storing.
NOTE: Always store the vacuum cleaner in the upright
position.
10 maintenance/ storage/ troubleshooting
PROBLEM: Accessories won’t pick up.
Cause:
Accessories are not attached correctly.
Solution: Refer to section 5.
Cause:
TurboBrush / TurboTool is clogged.
Solution: Refer to section 7.
Cause:
Hose / Stretch Hose is not installed correctly.
Solution: Refer to section 7.
PROBLEM: Dust escaping from the vacuum cleaner.
Cause:
Dirt container full.
Solution: Empty dirt container.
Cause:
Dirt container not installed correctly.
Solution: Review dirt container replacement.
Cause:
Hose / Stretch Hose (Model: V-112P only) is
not installed correctly.
Solution: Review installation.
Cause:
Filter not installed completely.
Solution: Remove, clean and replace filters.
Vax Careline 0870 606 1248
PROBLEM: Cleaner picks up moveable rugs or pushes
too hard
10. UK Service & Help
Cause:
Vax Care 0870 6061248
Wrong pile height setting.
Solution: Adjust setting on carpet height selector dial.
Monday-Friday 8.00am to 8.00pm
Saturday-Sunday 9.00am to 5.00pm
PROBLEM: Brushbar does not turn
Any queries or concerns about using the Vax, call the
Vax Careline. Calls are charged at the UK national rate.
Cause: Broken belt.
Solution: Replace belt.
Cause: Belt installed incorrectly.
Solution: Check belt changing and brushbar cleaning
Please make a note of the serial number and model
number of the carpet cleaner before calling. There are
over 400 approved Vax Service Agents in the UK. For the
nearest Service Agent, please call the Vax Careline.
www.vax.co.uk
PROBLEM: Air flow restricted with attachment use
Cause: Attachment use restricts air flow.
11. Technical Specification
Solution: Check attachment.
Cause: New carpet debris clogging air path.
Solution: Remove obstruction.
Voltage:
Wattage:
Capacity:
Filters:
230-240V ~50Hz
1400W
2.97 litres approx
Pre-filter
Post-motor filter
HEPA pleated paper filter
Cord length:
Weight:
7.5m approx
6.6kg
Subject to technical change without notice.
trobleshooting/ uk service & help / technical specification
11
-
EEC STATEMENT OF COMPLIANCE
Manufacturer/EEC importer: Vax Limited, hereby on our own responsibility, declare that
the V-045 Range is manufactured in compliance with the following Directives:
Safety: 2006/95/EC Low Voltage Directive
EMC: 2004/108/EC Electromagnetic Compatibility Directive
Waste electrical products should not be disposed of with household waste. Please recycle where
facilities exist. Check with your Local Authority or retailer for recycling advice.
Vax Ltd., Kingswood Road, Hampton Lovett, Droitwich, Worcestershire, WR9 OQH, UK
email: [email protected] - website: www.vax.co.uk