1
Note
Observe the manufacturer's recommendations. The journey may be resumed providing that the directions supplied by the
product manufacturer have been observed.
The tyre/wheel change should nonetheless
be carried out as soon as possible.
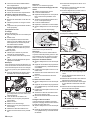
Î Raise slightly the waste container on
the appropriate side and pull it out.
Î Position vehicle jack at the appropriate
mounting point for the front or rear
wheel.
Î Raise machine using vehicle jack.
Î Remove the hexagonal screw (rear
wheel only).
Î Remove wheel.
Î Mount spare wheel.
Î Attach the hexagonal screw (rear wheel
only).
Î Lower machine using vehicle jack.
Î Push in the waste container and lock it.
Note
Use a suitable commercially available vehicle jack.
Checking the sweeping mirror of the
side-brushes
Î Check tyre pressure.
Î The side-brushes lift up.
Î Drive sweeper on to a smooth, even
surface covered with a visible layer of
dust or chalk.
Î Lower side-brushes and allow them to
briefly rotate.
Î The side-brushes lift up.
Î Drive machine backwards.
Î Park the sweeper on an even surface.
Î Check sweeping mirror.
Î Set programme switch to step 1 (driving). Side brushes lift up.
Î Turn main key to "0" and remove it.
Î Loosen 3 fastening screws on the underside.
Î Clip side brush on to driver and screw
on.
Checking roller brush
Î Park the sweeper on an even surface.
Î Set programme switch to step 1 (driving). Roller brush is raised.
Î Turn main key to "0" and remove it.
Î Secure the machine with wheel
chock(s) to prevent it from rolling away.
Î Remove belts or cords from roller
brush.
Replacing roller brush
Replacement is due if a visible deterioration in sweeping performance caused by
bristle wear is evident.
Î Park the sweeper on an even surface.
Î Set programme switch to step 1 (driving). Roller brush is raised.
Î Turn main key to "0" and remove it.
Î Secure the machine with wheel
chock(s) to prevent it from rolling away.
Î Raise slightly the waste container on
the left side and pull it out.
Î Loosen the fastening screw on the left
side-panel.
Î Remove side panel.
Î Unhook pull spring.
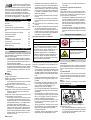
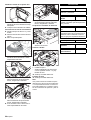
The width of the sweeping track should lie
between 1.6-2.0 in (40-50 mm).
Note
The side brush floating mounting adjusts
the sweeping track as the bristles wear
down. The side brush must be replaced if it
becomes too worn.
Replacing side brush
Î Park the sweeper on an even surface.
14 English
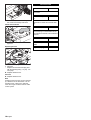
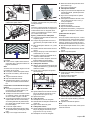
A Fastening screw of the under-pressure
can
B Fastening nut of the bulk waste flap
C Screw of the roller brush crank
Î Unscrew the fastening screws of the
vacuum socket and release the lever.
Î Turn the fastening nut of the bulk waste
flap and unhook the bulk waste flap.
Î Unscrew and withdraw bolt on the roller
brush swinging arm.
Î Push the roller brush cover backwards
and remove it.
Î Pull out roller brush.
Installation position of roller brush in direction of travel
Î Push new roller brush into the roller
brush housing and onto the drive pin.
Note
When installing the new roller brush, ensure correct positioning of the bristle assembly.
Î Position roller brush cover.
Î Fit the fastening screws and nuts.
Î Hook the draw spring in.
Î Screw on side panel.
Î Push in the waste containers on both
the sides and lock them.
Check the sweeping mirror of the
sweeping roller
Î Set programme switch to step 1 (driving). The side brush and roller brush are
raised.
Î Drive sweeper on to a smooth, even
surface covered with a visible layer of
dust or chalk.
Î Set programme switch to step 2. Roller
brush is lowered. Slightly press down
on the drive pedal and allow the sweep
brush to briefly rotate.
Î Raise roller brush.