1
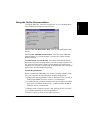
LBP-800 Laser Printer
Getting Started Guide
IMPORTANT:
Read this manual carefully before using your printer.
Save this manual for future reference.
Copyright
Copyright ©1999 Canon Inc. All Rights Reserved
All information in this manual is copyrighted. No part of this publication
may be reproduced, transmitted, transcribed, stored in a retrieval system,
or translated into any language or computer language, in any form or by
any means, electronic, mechanical, magnetic, optical, chemical, manual,
or otherwise, without prior written consent from Canon.
Notice
Canon makes no guarantees of any kind with regard to this manual.
Canon shall not be held liable for errors contained herein or for
consequential or incidental damages incurred as a result of acting on
information contained in the manual.
Trademarks
LBP, Canon, and the Canon Logo are trademarks of Canon Inc.
Microsoft¨, Windows¨, and Windows NT¨ are either registered
trademarks or trademarks of Microsoft Corporation in the United States
and/or in other countries.
Other brand and product names are trademarks or registered trademarks
of their respective companies.
In this manual, Microsoft¨, Microsoft¨ Windows¨, and Microsoft¨
Windows NT ¨ are referred to as Microsoft, Windows and Windows NT
respectively.
2
Using Your LBP-800 Documentation ...........................................
Using the Online Documentation ..............................................
Checking the Package Contents ....................................................
Identifying the Parts ......................................................................
Front View.................................................................................
Rear View..................................................................................
Selecting the Printer Location.......................................................
Carrying the Printer ...................................................................
Installing the EP-22 Cartridge.......................................................
Inserting/Removing the Paper Supports........................................
Connecting the Printer to Your Computer .....................................
Connecting to the Power Supply...................................................
Selecting Paper Delivery ...............................................................
Face-down Delivery ..................................................................
Face-up Delivery .......................................................................
Loading Paper into the MP Tray ...................................................
Installing the CAPT ......................................................................
Windows 95/98 CD-ROM Installation .....................................
Canon CAPT Tools Group ........................................................
Printing ......................................................................................
Contents
4
5
6
7
7
7
8
8
9
13
14
15
16
16
16
17
19
19
22
22
3
English
Contents
Using Your LBP-800 Documentation
Congratulations on your purchase of the Canon LBP-800 Laser Printer.
Your printer comes with the following documentation:
❏ The LBP-800 Getting Started Guide (This Guide)
Describes how to set up the printer and install the printing software
(CAPT). Read this manual first before operating your printer. The
Getting Started Guide is also available online (PDF).
❏ The LBP-800 User’s Guide (PDF)
Describes the printer’s features and its basic operation. The User’s
Guide is available online. Use this manual when you need a quick
reference help.
❏ Help
Provides help for the CAPT (Canon Advanced Printing Technology).
Use Help to get more information while operating the printer.
❏ CD-ROM Menu Help
Provides help for using the CD-ROM Menu.
❏ Readme File
Contains last-minute information about the Canon LBP-800 printer.
Conventions
This guide uses the following conventions:
CAUTION:
Indicates precautions that must be observed to prevent possible injury.
Indicates that neglecting the suggested procedure or practice could result
in damage to the printer.
Indicates notes and memos containing useful tips or detailed information.
4
Using Your LBP-800 Documentation
Using the Online Documentation
English
To read the PDF files, insert the compact disc in your CD-ROM drive.
The CD-ROM menu appears automatically.
To access the CD-ROM Menu Help, click the CD-ROM Menu Help
button.
To access the LBP-800 Documentation, click the Canon LBP-800
Manuals button. To read the manual, you must have Adobe Acrobat
Reader installed.
To install Adobe Acrobat Reader, click the Acrobat Reader Install
button, and select the language folder you want to install. Double-click
the .EXE file in that folder. Adobe Acrobat Reader will install in the
language you selected. For help using Acrobat Reader, select the Online
Guide in the Acrobat Reader Help menu.
System Requirements
Before installing the LBP-800 Laser Printer’s printing software, make
sure your computer has the following minimum configuration:
❏ Pentium PC running Windows 95/98 or Windows NT 4.0 or later. A
Pentium 200 MMX processor or faster is recommended.
❏ 16 MB of RAM (32 MB for Windows NT) and 15 MB of available
disk space (10 MB for Windows NT). 24 MB of RAM (48 MB for
Windows NT) is recommended.
❏ Monitor with a resolution of 640 x 480, showing at least 16 colors.
❏ A standard parallel port and a CD-ROM drive.
❏ Sound card (if you want to hear audio messages).
Using Your LBP-800 Documentation
5
Checking the Package Contents
As you unpack the printer, save the carton and packing materials in case
you want to move or ship the printer in the future.
Input paper support
LBP-800 Printer
Output paper support
EP-22 cartridge
CD-ROM disc
6
Power cord
(Example: 120V Model)
Documentation
(Getting Started Guide)
Checking the Package Contents
English
Identifying the Parts
Front View
Input paper support
Face-down output
paper support
Face-down
delivery slot
Front cover
Multi-purpose tray
(MP tray)
Paper guides
Manual feed slot
Face-up
delivery slot
Paper delivery
selector
Rear View
Power switch
Identifying the Parts
Parallel port
interface connector
Power socket
7
Selecting the Printer Location
When selecting a site for the printer, the location should provide ample
space for ventilation and easy servicing of the printer. Use the
dimensional diagrams below for space considerations.
(Dimensions are in millimeters.)
Top view
Side view
768
550
266
378
405
345
312
100
Carrying the Printer
CAUTION:
Do not carry the printer by holding the front panel, the face-up delivery
slot, or by holding it at the front and rear. This could result in damage to
the printer or personal injury if the printer is dropped.
8
Selecting the Printer Location
The EP-22 cartridge contains a photosensitive part called the “drum,”
which has characteristics similar to photo film. It also contains black
carbon powder called “toner.” The drum is extremely sensitive to light
and may deteriorate if exposed to light. Poor print quality can result if the
toner becomes caked or unevenly distributed inside the cartridge.
Follow the instructions below when handling the cartridge.
❏ Do not open the protective bag containing the cartridge until you are
ready to install it in the printer.
❏ Save the protective bag. You may need to repack and transport the
cartridge at a later date.
❏ Do not expose the cartridge to direct sunlight. Do not expose it to
bright light or room light for more than 5 minutes.
❏ Do not open the drum’s protective shutter on the cartridge. If the
shutter is open and the drum is damaged, print quality may deteriorate.
❏ Do not touch the drum’s protective shutter.
Correct handling
Installing the EP-22 Cartridge
Incorrect handling
9
English
Installing the EP-22 Cartridge
❏ Do not stand the cartridge on end, or turn it upside down. Toner could
become caked in the cartridge resulting in poor print quality.
❏ Keep the cartridge away from a monitor’s cathode ray tube (CRT),
disk drives, and floppy disks. The magnet inside the cartridge can
destroy the image data in the CRT, or data on the disks.
CAUTION:
Do not dispose of toner cartridges in fire. Toner powder is flammable.
1.
Remove the cartridge from its protective bag.
Save the protective bag. You may need to repack and transport the
cartridge at a later date.
2.
10
Gently rock the cartridge from side to side five or six times. This
evenly distributes the toner inside the cartridge. Uneven toner
distribution causes poor print quality.
Installing the EP-22 Cartridge
Place the cartridge on a sturdy surface. Snap the tab at the end of the
cartridge backwards and fold it back and forth until it is loose.
4.
While holding the cartridge firmly with one hand, pull the sealing
tape in the direction indicated in the illustration below.
English
3.
Pull in this direction
Pull within this angle
The tape may snap if pulled in a direction wider than the indicated angle.
5.
Grasp the top of the front cover on both sides, then gently pull until
the cover is fully open.
Installing the EP-22 Cartridge
11
6.
Insert the cartridge into the printer along the guides. Make sure that
the cartridge slides all the way inside the printer.
Do not touch the drum’s protective shutter.
7.
Always close the front cover immediately after inserting a cartridge.
Do not leave the front cover open. Exposure to light can damage the
cartridge’s drum.
12
Installing the EP-22 Cartridge
Insert the paper supports firmly into the slots at the front and back of the
printer. The slots have guides to ensure the correct support is in the
correct slot.
Slot
Guide
Supports should curve slightly towards the rear of the printer. Do not
insert a support so that it curves towards the front of the printer.
To remove the paper supports, lift them out of the slots.
Inserting/Removing the Paper Supports
13
English
Inserting/Removing the Paper Supports
Connecting the Printer to Your Computer
Before connecting the printer to your computer, make sure the power to
your computer is turned off.
1.
Connect one end of the interface cable to your printer. Secure the
cable by snapping the two wire clips on the printer into the cable
connector.
CAUTION:
Before connecting or disconnecting the interface cable, make sure that
the printer is turned off and that the power cord is unplugged from the
printer.
2.
Connect the other end of the interface cable to the computer.
You must use a bi-directional cable for proper operation of the printing
software (CAPT).
14
Connecting the Printer to Your Computer
English
Connecting to the Power Supply
Before inserting the plug, make sure that the rating indicated on the
printer matches the voltage of the AC outlet.
1.
Plug the power cord into the power socket.
2.
Connect the other end of the power cord to the AC outlet.
3.
Turn on the printer by pressing the I mark. Turn off the printer by
pressing the O mark.
On position
Off position
If the power does not turn on even when the printer is plugged into an AC
outlet, check the following items:
❏ Close the front cover if open.
❏ Make sure the EP-22 cartridge is installed.
❏ If the EP-22 cartridge is already installed, remove and reinstall it.
❏ To reset the printer, turn off the power using the power switch, and
unplug the power cord. Wait two seconds or more, then connect the
printer to the AC outlet again.
Connecting to the Power Supply
15
Selecting Paper Delivery
Use the paper delivery selector to choose face-up or face-down delivery.
Face-down
Face-up
Face-down Delivery
Use face-down delivery for plain paper only.
Face-up Delivery
Use face-up delivery for envelopes and transparencies, as well as other
special paper, including non-standard sized plain paper.
16
Selecting Paper Delivery
The MP (multi-purpose) tray can hold up to approximately 125 sheets of
75 g/m2 paper for high-volume printing. Acceptable paper sizes are
Legal, Letter, A4, Executive, and B5.
Follow the steps below to load a stack of paper.
Make sure that the input paper support is inserted into its slot in the
printer.
1.
Prepare a stack of paper and tap it on a flat surface to properly align
the edges.
2.
Align the stack of paper so that the side to be printed on faces the
front of the printer. The top edge of the paper should be toward the
bottom of the MP tray. Slide the stack in until it stops. Do not force
the paper into the printer.
Thi
will s side
prin be
ted
on.
Loading Paper into the MP Tray
17
English
Loading Paper into the MP Tray
3.
Adjust the paper guides to the width of the stack of paper. For
A4-size or Letter/Legal-size paper, align the paper guides with the
icons inside the MP tray.
Adjust the guides so that there is no space between each paper guide and
the edge of the stack of paper.
When reloading, be sure to remove the paper remaining in the MP tray.
Stack it together with the new sheets before loading.
The MP tray is now ready to supply paper.
18
Loading Paper into the MP Tray
English
Installing the CAPT
Before you can print with the LBP-800 printer, you must install the
CAPT (Canon Advanced Printing Technology).
Windows 95/98 CD-ROM Installation
Before you install the software, make sure you do the following:
❏ Connect the printer to your computer. (For details, see page 14.)
❏ Plug in the printer. (For details, see page 15.)
❏ Turn the printer on. (For details, see page 15.)
❏ Start Windows 95 or 98.
Click Cancel if the New Hardware Found (Add New Hardware
Wizard) dialog box appears.
For information on installing the CAPT in Windows NT or on a network
(or other Windows 95/98 installation methods), please see the online
User’s Guide.
1.
Insert the compact disc in your CD-ROM drive. The Canon LBP800 CD-ROM Menu appears automatically.
If the CD-ROM Menu does not appear automatically, start it
manually, and check Autorun CD-ROM Menu.
Installing the CAPT
19
2.
20
Click the Canon LBP-800 Install button. The Canon LBP-800
Install dialog appears. Click Yes to install the CAPT in the language
displayed. The Welcome screen appears.
Installing the CAPT
Click Next >. The Select printer connection port screen appears.
4.
Select a local port, such as LPT1:, then click Next >. The Install
program proceeds to copy files and creates the Canon CAPT Tools
group.
English
3.
When installation finishes, the Setup Complete dialog box appears.
5.
Installing the CAPT
Click Finish.
21
Canon CAPT Tools Group
After installing the CAPT you are ready to print. The Canon CAPT
Tools group gives you all the tools you need to communicate with your
printer.
Canon LBP-800 Help provides online help for the CAPT.
Canon LBP-800 Readme contains important user information.
Canon LBP-800 Status Window shows you the print job status.
Canon LBP-800 Trouble Shooter checks for system configuration
setting errors and, if possible, makes automatic corrections.
Canon LBP-800 Uninstallation removes the CAPT.
Printing
Print the Readme file using CAPT:
22
1.
Double-click the Canon LBP-800 Readme icon in the Canon CAPT
Tools group. Notepad opens the Readme file.
2.
From the File menu select Print. The Status Window appears
showing you the printer status and the progress of the print job.
3.
After you have printed it, read the Readme file.
Installing the CAPT