1
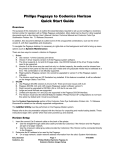
FX - 850/1050 DOT - MATRIX PRINTER
Paper feeding methods:
Friction
Push tractor
Cut sheet feeder (optional)
Pull tractor (optional)
Ribbon
Cartridge ribbon, available in black only:
#8750 (FX-850)
#8755(M) (FX-1050)
Life expectancy of ribbon:
Cross-head
d-
Ribbon cartridge
Y .: f
Platen knob
3 million characters (14 dots/character)
screwdriver
MCBF:
For all components excluding print head:
5 million lines
MTBF:
FX 850
4000 power-on hours
FX-1050 6000 power-on hours
Print head life:
100 million characters (14 dots/character)
Dimensions and weight:
Printer Specifications
Voltage:
Printing
Print method:
9-pin impact dot matrix
Print speed:
Pitch
10
12
10
12
Quality
Draft
NLQ
Characters/second/line
220
264
45
54
Printing direction:
Bidirectional logic-seeking for text
unidirectional for graphics
Line spacing:
1/6” or 1/8” or programmable in increments
of 1/216th of an inch
Paper feed speed:
Single sheet: 48 ms/line (3.6” per sec)
Continuous: 53 ms/line (3.0” per sec)
Printable columns:
Maximum printed characters
FX-850
FX-1050
80
136
137
233
96
163
160
272
Character pitch
10
10
12
12
pitch
pitch condensed
pitch
pitch condensed
Buffer:
8 Kbyte
FX-1050
5.9”
24.8”
14.2”
27.5 lbs
120 VAC ± 10%
Power consumption:
120 watts maximum
Frequency:
49.5 to 60.5 Hz
Insulation resistance:
10M ohms between AC power line and chassis
Dielectric strength (between AC line and chassis):
Can withstand 1.0 kV rms applied for one
minute or 1250 VAC rms applied for one
second.
Temperature:
Operation: 40°F to 95°F (5°C to 35°C)
Storage: -22°F to 140°F (-30°C to 60°C)
Characters:
96 standard ASCII character set
(including italic characters)
13 international character sets
Epson Extended Graphics characters set
Paper width:
Paper Sheet
Single Sheet
Continuous
Envelopes
Labels
FX-850
7.2 to 10.1" (182-257mm)
4 to 10" (101-254 mm)
6.5" or 9.5"
2.5" or 4.0*
Paper Length:
Printable area:
FX-1050
7.2 to 14.4"(162-366mm)
4 to 16" (101-406.4 mm)
6.5" or 9.5'
2.5" or 4.0"
Single sheet
7.2 to 14.3 inches (182 to 364 mm)
Single sheet
Continuous paper
8.5 mm (0.33") or more
Character fonts:
1 Interfaces
FX-850
5.9”
17.9”
14.2”
20.9 lbs
Height:
Width.
Depth:
Weight:
q-3
Draft
NLQ Epson Roman
Epson Sans Serif
1
The Epson interfaces that are compatible with the FX-850 and FX-1050
are listed below.
Interface
#8143
#8148
#8149
#8165
#8172
number
Name
RS-232 C/current loop interface
Intelligent serial interface
32Kbyte buffer serial interface
Intelligent IEEE-488 interface
32 Kbyte buffer parallel interface
I
22 mm (0.87") or more
Number of copies:
9 - Pin Printers
Up to 4 sheets including the original. Total
thickness must not exceed 0.012” (0.32 mm)
FX-850/1050-1
FX - 850/1050 DOT - MATRIX PRINTER
Epson Extended Graphics Character Table
Humidity:
Operation: 10% to 80% (without
condensation)
Storage: 5% to 85% (without condensation)
Shock:
Operation: Up to 1 G within 1 ms
Storage: Up to 2 G within 7 ms
Vibration:
I
Operation: Up to 0.25 G at up to 55 Hz
Storage: up to 0.50 G at up to 55 Hz
SelecType 1
I
You can use the SelecType control panel to choose fonts, pitches, and
condensed printing. The settings you select using the SelecType panel
remain valid even after the printer is turned off. reset, or initialized.
However, commands from your software application program
temporarily override the SelecType settings.
Character fonts
The FX-850 and FX-1050 have three built-in character fonts:
L
Italic Character Table
ROMAN
!“P#$%&‘()*+,-./0123456789:;<=>?@ABCDEFGHIJK
UlNOPQRSTUVWXYZC\l^-‘abcdefghijklmnopqrstuv
wxyzt: tWe've just seen your excellent ad for
miniature zebras in a recent back issue of
Trader Times. What is the price of these
items for quantities of more than one gross?
SANS SERIF
!“#~~%&‘0~+,-./012345t789:;<=>~~~BCDEFG~IJK
LMNOPORSTUVWXVZ[\]-_‘ a b c d e f g h i j k l m n o p q r s t u v
w x y z c : >’
We’ve just Seen your excellent ad for
miniature zebras in a recent back issue of
What is the price of these
items far quantities of more than one gross?
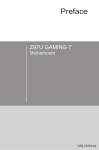
Interface timing
The figure below shows the timing for the parallel interface.
Default Settings
LWSY 4 +-&
ACKNL c i,
The table below shows the default conditions that become valid when
the printer is initialized.
Initialization
There are three ways that the printer can be initialized (returned to a
fixed set of conditions).
Hardware
initialization
Software initialization
FX - 850/1050 - 2
l
When the power is turned on
l
When the printer receives an INIT signal at
the parallel interface (pin 31 goes LOW).
l
Software sends the ESC @ (initialize the
printer) command.
12/12/88
In addition, the data buffer is cleared when the printer is initialized by
turning on the power or by an INIT signal.
Note: The user-defined character set is not cleared when the printer is
initialized.
9 - Pin Printers
FX - 850/1050 DOT - MATRIX PRINTER
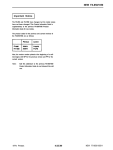
Cut sheet feeder mode
DIP Switch Functions
The tables below describe the DIP switch functions. The page numbers
refer you to the page on which each printer feature is described. The
shaded settings are the preset factory settings.
When DIP switch 2-2 is on, you can use your printer’s optional cut sheet
feeder. See Chapter 7 for more information on using a cut sheet feeder
with your printer.
Skip over perforation
When DIP switch 2-3 is on, a one-inch margin is provided between the
last line printed on one page and the first line printed on the next page.
When using continuous paper, this feature causes the printer to stop
printing, skip over the perforation, and then resume printing. If you
adjust your loading position correctly, you can get half of the margin at
the bottom of one page and half at the top of the next page. See the
section on adjusting the loading position later in this chapter.
DIP Switch I
Note: Most application programs take care of the top and bottom
margins. Only use skip over perforation if your program does not
provide these margins
‘SW
2-1
2-2
2-3
2-4
Description
ON
Page lenght
Cut sheet feeder
1-inch skip over perforation
Automatic line feed
International
12
On
On
, On
inch
OFF
11 inch
Off
Off
Off
Page
3-9
3-10
3-10
3-10
character sets
Automatic line feed
When DIP switch 2-4 is on. a carriage return code (CR! causes an
automatic line feed. When it is off, line feeds occur only when the printer
receives line feed codes (LF). Since some computers and application
programs automatically add line feeds to carriage returns, the setting you
use depends on your computer and application program.
Default character set
International Character Sets
Selecting an international character set provides you with the characters
used in other languages. To obtain the desired international character set,
set switches 1-6, 1-7, and 1-8 according to the DIP switch table on page
3-7. The following table shows the characters that differ in each
international character set.
International
character sets
When DIP switch 1-1 is on, the user-defined character set is the default.
User-defined characters are maintained in printer memory even when the
power is turned off, so the user-defined character set can be selected
simply by setting this switch to on. However, when this switch is on,
new user-defined characters cannot be defined. See Chapter 4 for more
information on user-defined characters. This switch is effective only in
the Epson ESC/P mode.
Zero character
When DIP switch 1-2 is on, the printer prints slashed zeroes (0). When
the DIP switch is off, the printer prints open zeroes (0). This is useful for
clearly distinguishing between uppercase O and zero when printing such
items as program lists.
Character table
liiizz
2 Germany
13 U K
4 Denmark I
5 Sweden
6 Italy
7 Spain I
8 Japan
9 Norway
10 Denmark II
11 Spain II
c 12 Latin America
n5
6i$
u5
lt
u
§
e
e
E
#
$
R$
#
$
u
II
#
$
#
$
#
$
@
@
@
e
E
8
5
When DIP switch 1-3 is on, the Epson Extended Graphics character table
is selected. When it is off, the italics character table is selected. The Epson
Extended Graphics character table contains international accented
characters, Greek characters, and character graphics for printing lines,
corners, and shaded areas. If you have an IBM@ computer or an IBM
compatible, select the Epson Extended Graphics table when you wish to
print the character graphics as they are displayed on the screen. Since the
character table setting affects only half of the character table, you can
The countries numbered 8 through 12 are available only through the
ESC R software command. See the Command Summary in Chapter 8.
Also, in IBM emulation mode (DIP switch 1-4 on), a character set
containing international characters (CG character table 2) is selected
whenever any one of DIP switches 14. 1-7, or 1-8 is set to off. If all three
switches are on, CG character table 1 is selected. See Appendix B.
Page length
When DIP switch 2-1 is on, the page length is set to 12 inches. When
it is off, the page length is 11 inches. Other page lengths can be set with
the ESC C and ESC C0 commands. See the Command Summary in
Chapter 8.
9 - Pin Printers
still print text if you have selected the Extended Graphics set. Also, you
can still print italics if you use the proper software command. If your
printer is in IBM emulation mode (DIP switch 1-4 on), the graphics
characters are available no matter which character table you select.
FX - 850/1050 - 3
FX - 850/1050 DOT - MATRIX PRINTER
Lights
POWER
On when the power switch is on and
power is supplied.
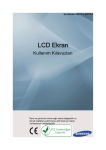
The printouts below show which characters are printed in each table.
Italics
“‘#$%& ( )*+.-./0123456789:
IJKLRNOPQRSTUVWXYZ[\]^_
qrstuvwxyz{:}
;<=>?@ABCDEFGH
abcdefghijklmnop
READY
On when the printer is ready to
accept input data. Flickers when
receiving data.
Epson Extended Graphics
PAPER OUT
On when the printer is out of paper
or when continuous paper is in the
standby position.
Note: You may need to use the ESC 6 command to print some of the
Extended Graphics characters. See Appendix 8.
ON LINE
On when the printer is on line and
ready to accept data. This light
flashes immediately after you load
paper or use short tear-off to Indicate
that micro-adjustment can be used.
Printer mode
When DIP switch 1-4 is on, the printer operates in the IBM emulation
mode. When it is off, the printer operates in the Epson ESC/P mode. In
the IBM emulation mode, DIP switch 1-3 controls the automatic carriage
return. When switch 1-3 is off, a carriage return is added to each line
feed. The functions of DIP switches 1-6, 1-7. and 1-8 are also different
when using the printer in the IBM emulation mode.
Other control panel features
The control panel of the FX also gives you access to several special
By holding down the FORM FEED or LINE FEED button
while you turn on the printer, you can start the
printer’s self test. This prints out the DIP switch
settings and the characters in the printer’s ROM (Read
Only Memory). See the section on the self test in
Chapter 1 for more information.
1 Software 1
Now that you've set up and tested the printer, you need to start using it
with your application programs.
Microadjustment
Most application programs let you specify the type of printer you’re
using so that the program can take full advantage of the printer’s
features. Many programs provide an installation or setup procedure that
present\ a list of printers to choose from. If your application program
has a printer selection menu. use the instructions below.
Data dump
Using printer selection menus
If your software has a printer selection menu, simply choose FX-850 or
FX-1050. If the menu does not list either of these printers, choose one of
the following. They are listed in order of preference.
FX-850
FX-86e
EX-800
FX-85
FX-80+
FX-80
FX
LX
MX
Epson printer
Draft printer
FX-1050
FX-286e
EX-1000
FX-286
FX-185
FX-100+
FX-100
FX
LX
MX
Epson printer
Draft printer
By holding down both the FORM FEED and LINE FEED
buttons while you turn on the printer, you can turn on
the data dump mode. This feature allows advanced
users to diagnose many problems. See the section on
the data dump mode in Chapter 6 for more
information
ON LINE
This button controls the printer’s on
line/off line status. When the printer
is on line, the printer can receive and
print data from the computer.
It-3
)Y
ROUl
If you plan to use the IBM emulation mode, choose IBM Proprinter (if
you have an FX-850). IBM Proprinter XL (if you have an FX-1050). IBM
Graphics printer, or IBM printer, in that order of preference.
The buttons on the control panel let you control many of the printer
settings. The control panel also has Indicator lights so you can check the
current status of the printer’s various settings.
FX - 850/1050 - 4
Buttons
By pressing the FORM FEED and LINE FEED buttons
immediately after loading paper or using short tearoff, you can make fine adjustments to the loading and
short tear-off positions. See the section on microadjustment in Chapter 2 for more information.
12/12/88
FORM FEED
When the printer is off line, press this
button to eject a single sheet of paper
or advance continuous paper to the
top of the next page. When the
printer is on line, you can use the
micro-adjustment feature by pressing
this button to advance the paper.
LINE FEED
When the printer is off line, press this
button to feed the paper one line. or
hold it down to feed the paper
continuously. When the printer is on
line, you can use the microadjustment feature by pressing this
button to reverse the paper.
LOAD/EJECT
When the printer is off line, press this
button to load paper if paper is not
loaded, or to elect it if paper is
loaded. (Single sheet paper is ejected
forward and continuous paper is
ejected backward.)
9 - Pin Printers
FX - 850/1050 DOT - MATRIX PRINTER
SelecType
The settings you select using the SelecType panel remain valid even after
you turn off, reset, or initialize the printer.
FONT
Press this button to select draft, near
letter quality Roman. or near letter
quality Sans Serif. The indicator light
shows which font has been selected.
CHARACTERS PER INCH
Press this button to select the
characters per inch (cpi). You can
choose 10 CPI. 12 CPI. or PS
(proportional spacing). The indicator
light shows the selected character
spacing.
CONDENSED
Press this button to select either
condensed or normal printing. The
light is on when the printer is in
condensed mode. In this mode, all
characters are approximately 60% of
their normal width.
Note: Proportional spacing and condensed mode cannot be combined.
If you select both, only proportional spacing works.
l
The column heading “Direction” refers to the direction of signal flow
as viewed from the printer.
.
“Return” denotes the twisted-pair return. to be connected at signal
ground level. For the interface wiring, be sure to use a twisted-pair
cable for each signal and to complete the connection on the return
side. These cables should be shielded and connected to the chassis of
the host computer and the printer.
l
All interface conditions are based on TTL level. Both the rise and the
fall times of each signal must be less than 0.2 microseconds.
l
Data transfer must be carried out by observing the ACKNLG or
BUSY signal. Data transfer to this printer can be carried out only
after receipt of the ACKNLG signal or when the level of the BUSY
signal is LOW.
1 Interface Specifications 1
Your printer is equipped with an &bit parallel interface. For specifications
for optional interfaces, see the manuals provided with the optional
interfaces.
Pin assignments for the parallel interface
Connector pin assignments and a description of their respective interface
signals are shown in the following table.
Signal
Return
Pin
Pin
1
DirecSignal
Description
tion
IN
19 STROBE
STROBE pulse lo read data in. Pulse
width must be more than 0.5
microseconds at the receiving terminal
These signals represent information of
the 1st to 8th bits of parallel data
respectively Each signal is at HIGH level
when data is logical 1 and LOW when it is
logical 0
IN
IN
IN
IN
IN
IN
1
I
I
The following table shows the relationship between printing being
enabled or disabled, the on line/off line status, and the receipt of the data
on/off control characters, DC1 or DC3.
ON LINE SLCT IN DC1/DC3 ERROR
(Indicator
BUSY
ACKNLG 1 Printing
(Disabled/
enabled)
on/off
control)
I
OUT About a 12-microsecond pulse LOW
indicates that data has been received
and that the printer is ready lo accept
more data
I
1
cond.)
i n t e r f a c e )
1:
I
Printing enabled/disabled signals and control conditions
on line
High
DC1
Recv’d
High
High/Low Pulsed
ea. char.
Enabled
on line
High
DC3
Recv’d
High
High/Low Pulsed
ea. char.
Disabled’
off line
High/Low DC1/DC3 Low
(no effect) (no effect)
High
Disabled
Not
generated
*While printing is disabled, character data is being received and
acknowledged so that the printer can look for another DC1 character,
which would allow it to resume printing.
9 - Pin Printers
12/12/88
FX-850/1050-5
FX - 850/1050 DOT - MATRIX PRINTER
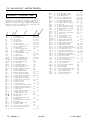
Commands in Numerical Order
This section lists all the FX commands, with their decimal and
hexadecimal values. The numbers in the columns on the right are the
page numbers in this chapter where a complete description of the
command can be found. If the Epson and IBM emulation mode page
numbers are the same, the command is the same in both modes and is
described only in the Epson mode section.
BEL
BS
HT
LF
VT
FF
CR
SO
SI
DC1
DC2
DC2
DC3
DC4
CAN
DEL
ESC SO
ESC SI
ESC EM
ESC SP
ESC !
ESC #
ESC $
ESC %
ESC &
ESC *
ESCESC/
ESC 0
ESC 1
ESC 2
ESC 2
ESC 3
ESC 4
ESC 4
ESC 5
ESC 5
ESC 6
ESC 6
ESC 7
ESC 7
ESC 8
ESC 9
ESC :
ESC :
ESC <
ESC =
ESC =
ESC >
ESC ?
ESC @
ESC A
ESC A
ESC B
7 07 Beeper
8 08 Backspace
9 09 Tab horizontally
10 0A Line feed
11 0B Tab vertically
12 0C Form feed
13 0 D Carriage return
14 0E Select double-wide (1 line)
15 0F Select condensed mode
17 11 Select printer
18 12 Cancel condensed mode
18 12 Cancel condensed/12 cpi prop.
19 13 Deselect printer
20 14 Cancel double-wide (1 line)
24 18 Cancel line
127 7F Delete character
14 0E Select double-wide (1 line)
15 0F Select condensed mode
25 19 Cut sheet feeder on/off
32 20 Set intercharacter space
33 21 Master Select
35 23 Cancel MSB control
36 24 Set absolute print position
37 25 Select user-defined set
38 26 Define user-defined characters
42 2A Select graphics mode
45 2D Turn underlining on/off
47 2F Select vertical tab channel
48 30 Select l/&inch line spacing
49 31 Select 7/72-inch line spacing
50 32 Select 1/6-inch line spacing
50 32 Programmable line spacing
51 33 Select n/216-inch line spacing
52 34 Select italic mode
52 34 Set top of form
53 35 Cancel italic mode
53 35 Turn automatic line feed on/off
54 36 Printable code area expansion
54 36 Select international character set
55 37 Cancel ESC 6
55 37 Select standard character set
56 38 Disable paper-out sensor
57 39 Enable paper-out sensor
58 3A Copy ROM into RAM
58 3A Select 12 cpi
60 3C Unidirectional mode (1 line)
61 3D Set MSB to 0
61 3D Define user-defined characters
62 3E Set MSB to 1
63 3F Reassign graphics mode
64 40 Initialize printer
65 41 Select n/72-inch line spacing
65 41 Set n/72-inch line spacing
66 42 Set vertical tabs
FX - 850/1050 - 6
8-12
8-20
8-22
8-15
8-18
8-14
8-13
8-27
8-26
8-8
8-26
8-12
8-20
8-22
8-15
8-18
8-14
8-13
8-27
8-26
8-8
8-47
8-9
8-27
8-13
8-13
8-27
8-26
8-11
8-32
8-24
8-12
8-21
8-36
8-35
8-39
8-31
8-19
8-16
8-16
8-16
8-27
8-13
8-27
8-26
8-31
8-16
8-16
ESC C
ESC C0
ESC D
ESC E
ESC F
ESC G
ESC H
ESC I
ESC I
ESC J
ESC K
ESC L
ESC M
ESC N
ESC O
ESC P
ESC P
ESC Q
ESC Q 3
ESC Q 2 2
ESC R
ESC R
ESC S O
ESC S1
ESC T
ESC U
ESC W
ESC X
ESC Y
ESC Z
ESC I@
ESC \
ESC \
ESC ^
ESC ^
ESC_
ESC a
ESC b
ESC k
ESC l
ESC p
ESC s
ESC t
ESC w
ESC x
67
67
68
69
70
71
72
73
73
74
75
76
77
78
79
80
80
81
81
81
82
82
83
83
84
85
87
88
89
90
91
92
92
94
94
95
97
98
107
108
112
115
116
119
120
43 Set page length in lines
43 Set page length in inches
44 Set horizontal tabs
45 Select emphasized mode
46 Cancel emphasized mode
47 Select double-strike mode
48 Cancel double-strike mode
49 Printable code area expansion
49 Select font
4A Perform n/216-inch line feed
4B Select single-density graphics
4C Select double-density graphics
4D Select 12 cpi
4E Set skip over perforation
4F Cancel skip over perforation
50 Select 10 cpi
50 Turn proportional on/off
51 Set right margin
51 Deselect printer (FX-850)
51 Deselect printer (FX-1050)
52 International character set
52 Restore default tab settings
53 Select superscript mode
53 Select subscript mode
54 Cancel superscript/subscript
55 Turn unidirectional mode on/off
57 Turn double-wide on/off
58 Set left and right margins
59 High-speed dbl-density graphics
5A Quadruple-density graphics
5B Double-high double-wide on/off
5C Set relative position
5C Print characters from symbol set
5E Select 9-pin graphics
5E Print 1 char. from symbol set
5F Turn overscore on/off
61 Select justification
62 Set vertical tabs in channels
6B Select NLQ font
6C Set left margin
70 Turn proportional mode on/off
73 Turn half-speed mode on/off
74 Select character table
77 Turn double-high on/off
78 Select NLQ or draft
8-14
8-14
8-22
8-29
8-29
8-29
8-30
8-37
8-17
8-38
8-38
8-25
8-15
8-15
8-24
814
8-14
8-45
8-29
8-29
8-29
8-30
8-46
8-43
8-38
8-38
8-15
8-15
8-47
8-20
8-42
8-42
8-34
8-45
8-30
8-30
8-31
8-10
8-28
8-44
8-38 8-38
8-39 8-39
8-48
8-21
8-49
8-40
8-50
8-48
8-32
8-18
8-23
8-19
8-25
8-9
8-33
8-28
8-23
8-30
8-30
8-31
8-10
8-28
8-43
8-17 8-17
8-33
8-43
8-34
8-44
8-36
8-49
8-37
8-49
8-10
8-10
8-35
8-46
8-9
8-11
8-50
8-12
8-40
8-8
8-17
8-42
8-18 8-18
12/12/88
9 - Pin Printers
FX - 850/1050 DOT - MATRIX PRINTER
I Installation/Support
Tips
Software
The type of printer installed on your system must be
identified for each software package. This is usually done
through a setup menu. If this printer is not listed in your
program, look in the printer User’s Manual for the next-best
model selection.
DIP Switch Settings
The default settings will usually work for most applications,
but they should be checked before using the printer This
will avoid unexpected results.
Serial Operation
The FX-850/1050 will be able to receive serial data with the
addition of an Epson 81XX series interface option.
Cut - Sheet Feeder Operation
The page length will have to be adjusted (shortened) to 61
lines per page if your software does not properly support
cut -sheet paper. There will be lines from the first page
printed at the top of the second page if the page length is
not set correctly.
Disabling the Buffer
An undocumented feature of the FX-850/1050 is the ability
to disable the buffer from the SelecType panel. To toggle
the buffer hold down the Load/Eject switch at power on.
Two beeps indicate that the 8K buffer is enabled, and one
beep indicates that the buffer is disabled. (Some spooler
applications won’t work correctly unless the buffer is
disabled.)
9 - Pin Printers
12/12/88
FX - 850/1050 - 7
FX - 850/1050 DOT - MATRIX PRINTER
I Information Reference List
Engineering Change Notices
FX-850/1050-001
10/11/88
To Version MP2286
ROM upgrade.
Product Support Bulletins
P - 0024
8/01/88
Undocumented buffer feature
Related Documentation
M-TM-FX8510
FX-850/1050 Technical Manual
M-PL-FX8510
FX-850/1050 Parts Price List
Y46199101003
FX-850/1050 User’s Manual
Technical Information Bulletins
FX-850/1050-001
7/1/88
Loading lever replacement
FX-850/1050-002
10/11/88
PEGX removal procedure caution
FX-850/1050 - 8
12/12/88
9 - Pin Printers