1
Owner’s Manual
Care and Operation
Pourdemanderunexemplaireen
françaisdeceManuel
dupropriétaire,visitezwww.
heatnglo.com/translations.
INSTALLER: Leave this manual with party responsible for use and operation.
OWNER: Retain this manual for future reference.
NOTICE: DO NOT discard this manual!
R
Model(s):
7100FP-Bk-B
7100FP-GD-B
7100FP-NL-B
Tested and
Listed by
O-T L
C
Portland
Oregon USA
US
OMNI-Test Laboratories, Inc.
WARNING: If the information in these
instructions is not followed exactly, a fire
or explosion may result causing property
damage, personal injury, or death.
• DO NOTstoreorusegasolineorotherflammablevaporsandliquidsinthevicinityofthis
oranyotherappliance.
• DO NOT overfire. Overfiring will void your
warranty.
• Complywithallminimumclearancestocombustiblesasspecified.Failuretocomplymay
causehousefire.
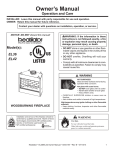
WARNING
HOT SURFACES!
Glassandothersurfacesarehotduring
operationANDcooldown.
Hot glass will cause burns.
• DO NOTtouchglassuntilitiscooled
• NEVERallowchildrentotouchglass
• Keepchildrenaway
• CAREFULLY SUPERVISE children in same room as
fireplace.
• Alertchildrenandadultstohazardsofhightemperatures.
EPA CERTIFIED WOODBURNING
FIREPLACE
Installationandserviceofthisfireplaceshouldbe
performedbyqualifiedpersonnel.Hearth&Home
TechnologiesrecommendsNFIcertifiedprofessionals,ortechnicianssupervisedbyan
NFIcertifiedprofessional.
High temperatures may ignite clothing or other flammable
materials.
• Keep clothing, furniture, draperies and other flammable
materialsaway.
WARNING
Fire Risk.
Forusewithsolidwoodfuelonly.
Otherfuelsmayoverfireandgenerate
poisonousgases(i.e.carbonmonoxide).
Quadra-Fire•7100FPOwner’sManual•433-3600•RevG•06/25/14
1
Safety Alert Key:
DANGER! Indicates a hazardous situation which, if not avoided will result in death or serious injury.
WARNING! Indicates a hazardous situation which, if not avoided could result in death or serious injury.
CAUTION! Indicates a hazardous situation which, if not avoided, could result in minor or moderate injury.
NOTICE: Indicates practices which may cause damage to the fireplace or to property.
•
•
•
•
Table of Contents
1Welcome
A. Congratulations
B. LIMITED LIFETIME WARRANTY
2 Product Specific Information
A. Fireplace Certification
B. BTU & Efficiency Specifications
C.Glass Specifications
3 Important Safety and Operating Information
A. Fireplace Safety
1. Clear Space
2. Firebrick
3. Baffle and Blanket
4. Over-Firing Your Fireplace
5. Chimney Fire
B. General Operating Parts
1. Automatic Combustion Control (ACC)
2. ACC Override
3. Auxiliary Convection Air System
4. Outside Air
5. Glass Doors
6. Convection Fan Operation
C.Fuel
1. Hardwood vs. Softwood
2. Moisture content
3. Seasoning
4. Storing Wood
5. Burning Process
6. Dirty Glass
7. Creosote Formation
8. Opacity
D.First Fire
E. Lighting Instructions
F. Heat Management
2
3
4
6
6
6
7
7
8
8
8
8
9
10
10
11
11
12
12
12
12
13
13
13
14
14
14
14
14
15
15
4 Maintenance and Service
A. Maintenance Tasks-Homeowners
1. Chimney Inspection
2. Creosote (Chimney) Cleaning
3. Care and Cleaning of Plated Surfaces
4. Glass Doors
5. Glass Cleaning
6. Door Gasket
7. Ash Removal
8. Baffle and Blanket
9. Firebrick
B. Replacement Maintenance
1. Glass Replacement
2. Tighten or Adjust Door Latch
3 Firebrick Replacement
4. Baffle Removal and Installation
5. Fan Replacement
6. Timer Assembly Replacement
7. Timer Removal & Replacement
16
16
17
18
18
18
18
18
18
18
19
19
19
20
21
21
22
24
5Troubleshooting
A. FAQs
B. Troubleshooting Table
26
28
6 Reference Materials
► A. Service Parts
B. Contact Information
Quadra-Fire • 7100 FP Owner’s Manual • 433-3600 • Rev G • 06/25/14
29
36
1
Welcome
A.Congratulations
Read this manual before installing or operating this fireplace.
Please retain this owner’s manual for future references.
Congratulations on selecting a Quadra-Fire wood burning
fireplace. The Quadra-Fire fireplace you have selected is
designed to provide the utmost in safety, reliability, and
efficiency.
As the owner of a new fireplace, you'll want to read and
carefully follow all of the instructions contained in this
Owner's Manual. Pay special attention to all Cautions and
Warnings.
This Owner's Manual should be retained for future reference. We suggest that you keep it with your other important documents and product manuals.
Your new Quadra-Fire wood burning fireplace will give you
years of durable use and trouble-free enjoyment. Welcome to the Quadra-Fire family of fireplace products!
Quadra-fire is a registered trademark of Hearth & Home
Technologies.
Local Dealer Information
Dealer: Fill in
your name, address,
phone and email
information here and
fireplace information
below.
Dealer Name: ________________________________________________________
Address: ____________________________________________________________
____________________________________________________________
Phone: _____________________________________________________________
Email: _____________________________________________________________
Fireplace Information:
Brand:_________________________________________________ Model Name:____________________________
Serial Number:___________________________________________ Date Installed:___________________________
Listing Label Information/Location
Tested and
Listed by
O-T L
C
The model information regarding your specific fireplace can be found on
the rating plate usually located in the control area of the fireplace.
Portland
Oregon USA
Model:
US
OMNI-Test Laboratories, Inc.
Report: 061-S-41-2
TESTED TO:
UL 127-1996, ULC-S610-M87
A brand of Hearth & Home Technologies
7571 - 215th Street West, Lakeville, MN. 55044
www.quadrafire.com
7100FP
EPA CERTIFIED FIREPLACE
LISTED FIREPLACE, SOLID FUEL TYPE, ALSO SUITABLE FOR MANUFACTURED
HOME INSTALLATION. (UM) 84 HUD. "For Use with Solid Wood Fuel Only."
Install and use only in accordance with manufacturer's installation, venting and operating instructions.
Any area incorporating warm or cold air ducts shall be enclosed in accordance with the manufacturer's
installation instructions.
Contact Your Local Building Or Fire Officials Or Authority Having Jurisdiction About Restrictions,
Installation Inspection And Permits Required In Your Area.
WARNING - For Manufactured Homes: Do not install in a sleeping room. An outside combustion air
inlet must be provided and unrestricted while unit is in use. The structural integrity of the manufactured
home floor, ceiling and walls must be maintained. The fireplace needs to be properly grounded to the
frame of the manufactured home.
Components required for installation: HTI SLSeries Pipe or Dura Plus System, Termination Cap, Hearth
Extension and required accessory Chimney Air Kit Part CAK4A.
Do not connect this unit to a chimney serving another appliance.
DANGER: Risk of electrical shock. Disconnect power supply before servicing.
Electrical Rating: 115 VAC <3.0 AMPS 60 Hz
Do not use grate or elevate fire. Build wood fire directly on firebrick.
Do not overfire. If heater or chimney connector glows, you are overfiring.
Do not use a fireplace insert or other products not specified for use with this product.
WARNING - THIS FIREPLACE HAS NOT BEEN TESTED WITH AN UNVENTED GAS LOG SET OR ANY LOG SET.
TO REDUCE RISK OF FIRE OR INJURY, DO NOT INSTALL AN UNVENTED GAS LOG SET OR ANY LOG SET
INTO FIREPLACE.
Must provide a source of air to prevent air starvation from combustion which could result of high levels
of carbon monoxide.
Replace glass only with 5mm ceramic available from your dealer.
Optional Fire Screen, Part SCR-433, may be used ONLY in USA
Serial No / Numéro De Série
009
Minimum Clearances To Combustible Material
Chimney sections at any level require a 2 inches (51mm)
minimum air space clearance between the framing and
chimney section.
WITHIN ENCLOSURE AREA
Appliance to backwall
1/2" (13mm)
Appliance to sidewall
1" (25mm)
Duct boots to framing
0" (0mm)
Top standoffs to header
0" (0mm")
EXPOSED SURFACES
Faceplate to sidewall
Remote outlet air grills to ceiling
MANTEL
Mantel from base of fireplace
Maximum mantel depth
Serial Number
Model Number
16" (406mm)
12" (305mm)
60" (1524mm)
12" (305mm)
FLOOR PROTECTION
Combustible flooring 20 inches (508mm) in front of and 8 inches
(203mm) to either side of the fuel opening must be insulated with
non-combustible floor protection with a minimum thickness of 1
inch (25mm) and ("k" value = 0.43, minimum R value = 2.06).
In Canada: The hearth extension must be installed according to
the installation instructions.
U.S. ENVIRONMENTAL PROTECTION AGENCY - Certified to comply with July 1990 particulate emission standards.
Mfg
by:
2013 2014 2015 Jan Feb Mar Apr May June July Aug Sept Oct. Nov. Dec.
DO NOT REMOVE THIS LABEL
Made in U.S.A. of US and imported parts
433-1400
Quadra-Fire • 7100 FP Owner’s Manual • 433-3600 • Rev G • 06/25/14
3
Hearth & Home Technologies
B.LIMITED LIFETIME WARRANTY
LIMITED LIFETIME WARRANTY
Hearth&HomeTechnologies,onbehalfofitshearthbrands(”HHT”),extendsthefollowingwarrantyforHHT
gas,wood,pellet,coalandelectrichearthappliancesthatarepurchasedfromanHHTauthorizeddealer.
WARRANTY COVERAGE:
HHTwarrantstotheoriginalowneroftheHHTapplianceatthesiteofinstallation,andtoanytransfereetakingownership
oftheapplianceatthesiteofinstallationwithintwoyearsfollowingthedateoforiginalpurchase,thattheHHTappliance
willbefreefromdefectsinmaterialsandworkmanshipatthetimeofmanufacture.Afterinstallation,ifcoveredcomponentsmanufacturedbyHHTarefoundtobedefectiveinmaterialsorworkmanshipduringtheapplicablewarrantyperiod,
HHTwill,atitsoption,repairorreplacethecoveredcomponents.HHT,atitsowndiscretion,mayfullydischargeallofits
obligationsundersuchwarrantiesbyreplacingtheproductitselforrefundingtheverifiedpurchasepriceoftheproduct
itself.Themaximumamountrecoverableunderthiswarrantyislimitedtothepurchasepriceoftheproduct.Thiswarranty
issubjecttoconditions,exclusionsandlimitationsasdescribedbelow.
WARRANTY PERIOD:
Warrantycoveragebeginsonthedateoforiginalpurchase.Inthecaseofnewhomeconstruction,warrantycoverage
beginsonthedateoffirstoccupancyofthedwellingorsixmonthsafterthesaleoftheproductbyanindependent,
authorizedHHTdealer/distributor,whicheveroccursearlier.Thewarrantyshallcommencenolaterthan24months
followingthedateofproductshipmentfromHHT,regardlessoftheinstallationoroccupancydate.Thewarrantyperiodfor
partsandlaborforcoveredcomponentsisproducedinthefollowingtable.
Theterm“LimitedLifetime”inthetablebelowisdefinedas:20yearsfromthebeginningdateofwarrantycoveragefor
gasappliances,and10yearsfromthebeginningdateofwarrantycoverageforwood,pellet,andcoalappliances.These
timeperiodsreflecttheminimumexpectedusefullivesofthedesignatedcomponentsundernormaloperatingconditions.
WarrantyPeriod
Parts
Labor
1Year
2years
HHTManufacturedAppliancesandVenting
Gas
X
X
Wood
X
X
X
3years
Pellet
EPA
Wood
Coal
X
X
X
X
X
X
X
X
X
ComponentsCovered
Electric Venting
X
X
Allpartsandmaterialexceptas
coveredbyConditions,
Exclusions,andLimitations
listed
Igniters,electroniccomponents,
and glass
Factory-installedblowers
Moldedrefractorypanels
X
Firepotsandburnpots
5years
1year
7years
3years
10
years
1year
X
Limited
3years
Lifetime
X
X
X
X
X
90Days
X
X
X
X
X
X
X
X
Castingsandbaffles
X
X
Manifoldtubes,
HHTchimneyandtermination
Burners,logsandrefractory
Fireboxandheatexchanger
X
X
Allreplacementparts
beyondwarrantyperiod
Seeconditions,exclusions,andlimitationsonnextpage.
4021-645F02-18-13
4
Page1of2
Quadra-Fire • 7100 FP Owner’s Manual • 433-3600 • Rev G • 06/25/14
WARRANTY CONDITIONS:
•
ThiswarrantyonlycoversHHTappliancesthatarepurchasedthroughanHHTauthorizeddealerordistributor.Alistof
HHTauthorizeddealersisavailableontheHHTbrandedwebsites.
• ThiswarrantyisonlyvalidwhiletheHHTapplianceremainsatthesiteoforiginalinstallation.
•ThiswarrantyisonlyvalidinthecountryinwhichtheHHTauthorizeddealerordistributorthatsoldtheappliance
resides.
• Contactyourinstallingdealerforwarrantyservice.Iftheinstallingdealerisunabletoprovidenecessaryparts,contact
thenearestHHTauthorizeddealerorsupplier.Additionalservicefeesmayapplyifyouareseekingwarrantyservice
fromadealerotherthanthedealerfromwhomyouoriginallypurchasedtheproduct.
• Checkwithyourdealerinadvanceforanycoststoyouwhenarrangingawarrantycall.Travelandshippingcharges
forpartsarenotcoveredbythiswarranty.
WARRANTY EXCLUSIONS:
Thiswarrantydoesnotcoverthefollowing:
• Changesinsurfacefinishesasaresultofnormaluse.Asaheatingappliance,somechangesincolorofinteriorand
exteriorsurfacefinishesmayoccur.Thisisnotaflawandisnotcoveredunderwarranty.
• Damagetoprinted,plated,orenameledsurfacescausedbyfingerprints,accidents,misuse,scratches,melteditems,
orotherexternalsourcesandresiduesleftontheplatedsurfacesfromtheuseofabrasivecleanersorpolishes.
• Repairorreplacementofpartsthataresubjecttonormalwearandtearduringthewarrantyperiod.Theseparts
include:paint,wood,pelletandcoalgaskets,firebricks,grates,flameguides,batteriesandthediscolorationofglass.
• Minorexpansion,contraction,ormovementofcertainpartscausingnoise.Theseconditionsarenormalandcomplaintsrelatedtothisnoisearenotcoveredbythiswarranty.
• Damagesresultingfrom:(1)failuretoinstall,operate,ormaintaintheapplianceinaccordancewiththeinstallation
instructions,operatinginstructions,andlistingagentidentificationlabelfurnishedwiththeappliance;(2)failureto
installtheapplianceinaccordancewithlocalbuildingcodes;(3)shippingorimproperhandling;(4)improperoperation,abuse,misuse,continuedoperationwithdamaged,corrodedorfailedcomponents,accident,orimproperly/
incorrectlyperformedrepairs;(5)environmentalconditions,inadequateventilation,negativepressure,ordrafting
causedbytightlysealedconstructions,insufficientmake-upairsupply,orhandlingdevicessuchasexhaustfansor
forcedairfurnacesorothersuchcauses;(6)useoffuelsotherthanthosespecifiedintheoperatinginstructions;(7)
installationoruseofcomponentsnotsuppliedwiththeapplianceoranyothercomponentsnotexpresslyauthorized
andapprovedbyHHT;(8)modificationoftheappliancenotexpresslyauthorizedandapprovedbyHHTinwriting;
and/or(9)interruptionsorfluctuationsofelectricalpowersupplytotheappliance.
• Non-HHTventingcomponents,hearthcomponentsorotheraccessoriesusedinconjunctionwiththeappliance.
• Anypartofapre-existingfireplacesysteminwhichaninsertoradecorativegasapplianceisinstalled.
• HHT’sobligationunderthiswarrantydoesnotextendtotheappliance’scapabilitytoheatthedesiredspace.Informationisprovidedtoassisttheconsumerandthedealerinselectingtheproperappliancefortheapplication.Considerationmustbegiventoappliancelocationandconfiguration,environmentalconditions,insulationandairtightnessof
thestructure.
This warranty is void if:
•
•
•
Theappliancehasbeenover-firedoroperatedinatmospherescontaminatedbychlorine,fluorine,orotherdamaging
chemicals.Over-firingcanbeidentifiedby,butnotlimitedto,warpedplatesortubes,rustcoloredcastiron,bubbling,
crackinganddiscolorationofsteelorenamelfinishes.
Theapplianceissubjectedtoprolongedperiodsofdampnessorcondensation.
Thereisanydamagetotheapplianceorothercomponentsduetowaterorweatherdamagewhichistheresultof,but
notlimitedto,improperchimneyorventinginstallation.
LIMITATIONS OF LIABILITY:
•
Theowner’sexclusiveremedyandHHT’ssoleobligationunderthiswarranty,underanyotherwarranty,expressor
implied,orincontract,tortorotherwise,shallbelimitedtoreplacement,repair,orrefund,asspecifiedabove.Inno
eventwillHHTbeliableforanyincidentalorconsequentialdamagescausedbydefectsintheappliance.Somestates
donotallowexclusionsorlimitationofincidentalorconsequentialdamages,sotheselimitationsmaynotapplytoyou.
Thiswarrantygivesyouspecificrights;youmayalsohaveotherrights,whichvaryfromstatetostate.EXCEPTTO
THEEXTENTPROVIDEDBYLAW,HHTMAKESNOEXPRESSWARRANTIESOTHERTHANTHEWARRANTY
SPECIFIEDHEREIN.THEDURATIONOFANYIMPLIEDWARRANTYISLIMITEDTODURATIONOFTHE
EXPRESSEDWARRANTYSPECIFIEDABOVE.
4021-645F02-18-13
Page2of2
Quadra-Fire • 7100 FP Owner’s Manual • 433-3600 • Rev G • 06/25/14
5
2
Product Specific Information
A.Fireplace Certification
Model:
7100FP EPA Certified
Woodburning Fireplace
Laboratory:
OMNI Test Laboratories, Inc.
Report No:
061-S-41-2
Type:
Wood Fireplace
Standard:
UL127 and ULC-S610-M87 and
(UM) 84-HUD, Manufactured
Home Approved.
Warning! Risk of Fire!
For use with solid wood fuel only.
Other fuels may overfire and generate
poisonous gases (i.e. carbon monoxide).
B.BTU & Efficiency Specifications
EPA# and Original Date:
#571 4-1-03
EPA Certified:
3.1 grams per hour
Efficiency:
up to 77%
BTU Output
with EPA test fuel:
58,000 / hr.
with Cord Wood:
90,000 / hr.
Heating Capacity:
up to 3,500 sq ft
Chimney Size:
8 inches
HHT
SL300 Series
DuraVent
DuraPlus
Max Wood Length:
24 inches
Fuel:
Cord Wood
Shipping Weight:
670 lbs
Firebox Size
3.4 cubic feet
C.Glass Specifications
This fireplace is equipped with 5mm ceramic glass. Replace glass only with 5mm ceramic glass. Please contact
your dealer for replacement glass.
6
Quadra-Fire • 7100 FP Owner’s Manual • 433-3600 • Rev G • 06/25/14
3
Important Safety and Operating Information
A. Fireplace Safety
1. Clear Space
Mostproblemsarecausedbyimproperinstallationandoperationofthefireplace.Toprovidereasonablefiresafety,
thefollowingshouldbegivenseriousconsideration:
• Thefireshouldbesupervisedwheneverthefireplaceis
inuse.
• An annual inspection should be performed on the
fireplacesystem.
• Installatleastonesmokedetectoroneachfloorofyour
hometoensureyoursafety.
• InstallaconvenientlylocatedClassAfireextinguisher
nearthefireplace.
• Deviseapracticedevacuationplan,consistingofatleast
twoescaperoutes.
• Deviseaplantodealwithachimneyfire:
- Closeallopeningsintothestove.
- Evacuate.
- Notifythefiredepartment.
WARNING! Risk of Fire! Hearth & Home Technologies
disclaims any responsibility for, and the warranty and
agencylistingwillbevoidedbythefollowingactions.
DO NOT:
• operatedamagedfireplace
• modifyfireplace
• overfire
• installanygaslogset
• installanycomponentnotapprovedbyHearth&Home
Technologies
• installpartsorcomponentsnotListedorapproved
• operate the fireplace without fully assembling all
components
Combustiblematerialsmustnotbestoredonthehearth
extension.Roomfurnishingssuchasdrapes,curtains,
chairs or other combustibles must be at least 4ft
(1219mm)fromtheopenfrontofthefireplace.
Combustible materials are materials made of or surfacedwithanyofthefollowingmaterials:
-
-
-
-
Wood
- Compressedpaper
Plantfibers
- Plastic
Plywood/OSB - Drywall
Anymaterialthatcanigniteandburn,flameproofed
ornot,plasteredorun-plastered.
Non-combustiblematerialsarematerialswhichwillnot
igniteandburn,composedofanycombinationofthe
following:
-
-
-
-
Steel
Brick
Concrete
Glass
-
-
-
-
Iron
Tile
Slate
Plasters
WARNING! Risk of Fire! Keep combustible materials,
gasolineandotherflammablevaporsandliquidsclearof
thefireplace.
DO NOT:
• storeflammablematerialsclosetothefireplace
• use gasoline, lantern fuel, kerosene, charcoal lighter
fluidorsimilarliquidstostartor“freshenup”afireinthis
fireplace.
Improper installation, adjustment, alteration, service or
maintenancecancauseinjuryorpropertydamage.
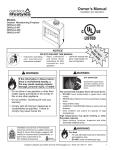
48 in. (1219 mm)
Clear Space
Front of Fireplace
Figure 3.1
60 in. (1524 mm)
Clear Space
Bottom of Fireplace to
Lower Edge of Mantel
or Trim
12 in. (305 mm)
Clear Space
Sides of Fireplace
(from the FP opening)
Clear Space
Quadra-Fire•7100FPOwner’sManual•433-3600•RevG•06/25/14
7
2.Firebrick
4. Over-Firing Your Fireplace
Your fireplace is lined with high quality firebrick, which has
exceptional insulating properties.
WARNING! Risk of Fire! Do not over-fire.
Do not operate the fireplace without bricks. Make sure
bricks are installed as shown in Section 5.
Over-firing may ignite creosote or will damage the
fireplace and chimney.
Do not use a grate; simply build a fire on the firebox floor.
To prevent over-firing your fireplace. DO NOT:
3. Baffle and Blanket
• use flammable liquids
• overload with wood
• burn trash or large amounts of scrap lumber
Ensure correct baffle and baffle protection channel placement; replace baffle components if damaged or missing.
(Please refer to Section 5.)
Notice: Firebox damage due to improper baffle placement
is not covered by warranty. Operate the wood burning
fireplace with the baffle in the correct position only. Not
doing so could result in:
•
•
•
•
reduced efficiency
overheating the chimney
overheating the rear of the firebox
poor performance
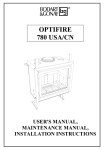
Ceramic Blanket
Back of Firebox
Baffle Protection
Channelinposition
BaffleBoard
Figure 3.2 Baffle and Blanket Placement
The baffle board must be in contact with the manifold at the back of the firebox. The ceramic blanket
should lay on top of the baffle board and manifold.
The baffle protection channel should be in position
and cover the front of the blanket and baffle board.
• permit too much air to the fire
Symptoms of over-firing may include one or more of the
following:
•
•
•
•
•
chimney connector or fireplace glowing
roaring, rumbling noises
loud cracking or banging sounds
metal warping
chimney fire
What to do if your fireplace is over-firing:
• Immediately close the door and air controls to reduce
air supply to the fire.
• If you suspect a chimney fire, call the fire department
and evacuate your house.
• Contact your local chimney professional and have
your fireplace and chimney inspected for any
damage.
• Do not use your fireplace until the chimney
professional informs you it is safe to do so.
• Hearth & Home Technologies WILL NOT warranty
fireplaces that exhibit evidence of over-firing.
Evidence of over-firing includes, but is not limited to:
- warped air tube
- deteriorated refractory brick
- deteriorated baffle and other interior components
5. Chimney Fire
In the event of a chimney fire
• Have the chimney and adjacent structure inspected by
qualified professionals. Hearth & Home Technologies
recommends that NFI or CSIA certified professionals,
or technicians under the direction of certified
professionals, conduct a minimum of an NFPA 211
Level 2 inspection of the chimney.
• Replace components of the chimney and fireplace
as specified by the professionals.
• Ensure all joints are properly engaged and the
chimney is properly secured.
Warning! Risk of Fire! A chimney fire can permanently damage your chimney system. Failure to replace damaged components and make proper repairs
can cause a structure fire.
8
Quadra-Fire • 7100 FP Owner’s Manual • 433-3600 • Rev G • 06/25/14
WARNING
HOT SURFACES!
GlassandothersurfacesarehotduringoperationANDcooldown.
Hot glass will cause burns.
• DO NOTtouchglassuntilitiscooled
• NEVERallowchildrentotouchglass
• Keepchildrenaway
• CAREFULLYSUPERVISEchildreninsameroomasfireplace.
• Alertchildrenandadultstohazardsofhightemperatures.
High temperatures may ignite clothing or other flammable materials.
• Keepclothing,furniture,draperiesandotherflammablematerialsaway.
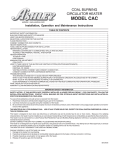
B. General Operating Parts
WARNING! DO NOT operatefireplacebeforereadingandunderstandingoperatinginstructions.Failuretooperatefireplaceaccordingtooperatinginstructionscouldcausefireorinjury.
Automatic
Combustion Air
Control Handle
Auxiliary
Convection
ACC Override Outside Air Control Handle
Air Lever
Lever
(Must be open during use)
Figure 3.3
General Operating Parts
Quadra-Fire•7100FPOwner’sManual•433-3600•RevG•06/25/14
9
1. Automatic Combustion Control (ACC)
The automatic combustion control system allows you to
set the fireplace to high (slide the combustion air control
all the way to the right), start the fire, and then move
the combustion air control to the desired burn level.
The fire will automatically go to that level once it is fully
established. This allows for less interaction with the fire
by the homeowner and more efficient use of fuel while
maintaining the desired heat output.
After the fireplace becomes hot, you may prefer to not
activate the ACC when reloading fuel. If you do not
slide the combustion air control all the way to the right,
the ACC will not be activated.
2. ACC Override
The lever located to the right of the combustion air control is the ACC OVERRIDE and may be used to override the setting of the automatic combustion air control.
If the ACC has been activated and burn rate needs to
be slowed, move the lever to the LEFT and position
combustion air control at the preferred setting. To close
the air supply for an over-fire situatution or to slow the
burn rate down immediately, slide the lever to the LEFT
and also slide the combustion air control all the way to
the left.
NOTICE: If reloading a bright, hot coal bed for longer
(low) burn time, setting the ACC may not be required.
Burn dry, well seasoned wood.
NOTICE: To establish your settings, always begin with
the air control all the way to the left to STOP and then
move it to the right for your desired setting.
IMPORTANT! As you move the combustion air control
to the RIGHT, you will feel resistance about threefourths of the way. You must move past that resistance
approximately 3/4 in. (19mm) to fully engage the
automatic combustion control (ACC) system.
ACC Override Control
Left - Close
Figure 3.5 ACC Override Control
Automatic Combustion Control (ACC)
Left - Close (low)
Right-Open (high)
Figure 3.4 Automatic Combustion Control (ACC)
10
Quadra-Fire • 7100 FP Owner’s Manual • 433-3600 • Rev G • 06/25/14
3. Auxiliary Convection Air System
If the auxiliary duct has been installed and the lever
lock was removed, moving the lever to the RIGHT will
bring air into the bottom of the fireplace from the duct
and put it into the room as heated air.
Moving the lever all the way to the LEFT will cause
the room air to be pulled into the bottom grille of the
fireplace and re-circulated into the room as heated air.
NOTICE: If you live in an area with very cold winter
months, you will want to use room air as opposed to
bringing in extremely cold air from outside of the home.
This will eliminate creating a draft of cold outside air
infiltrating your home. Definitely keep the lever to the
LEFT when not using the fireplace.
4. Outside Air
NOTICE: Use of outside air is required.
A source of air (oxygen) is required in order for combustion to take place.
Turning the outside air handle clockwise opens the outside air inlet; turning counterclockwise will close it. This
may be closed only when the fireplace is not in use to
prevent cold air infiltration.
Caution! Outside air control handle may be warm.
Adjust before lighting fire.
Outside Air Control
Handle
Clockwise
Open
Auxillary Convection Air Lever Control
Left - Close
Counterclockwise
Close
Figure 3.7 Outside Air Control Handle
Right-Open
Figure 3.6 Auxillary Convection Air Lever
Quadra-Fire • 7100 FP Owner’s Manual • 433-3600 • Rev G • 06/25/14
11
5. Glass Doors
This fireplace has been tested and is intended for use
with doors as supplied with this fireplace.
Warning! Risk of Fire and Smoke! Fireplace
should be operated only with doors fully open or doors
fully closed. If doors are left partly open, gas and
flame may be drawn out of the fireplace opening.
A firescreen (MESH-433) must be used to control
sparks if the homeowner choses to operate the fireplace with the doors open.
WARNING! Fire Risk!
• Use firescreen when burning fireplace with doors
open.
• Do not use firescreen or glass doors to hold burning
material in fireplace.
Firescreen controls sparks.
Glass may break or burning material may roll out.
An override switch and fan speed control have been
installed on the wall in close proximity to the fireplace.
The speed of the fan can be regulated by the speed
control knob.
If the fan is not coming on at the desired time, flip the
override switch to manual and operate the fan as described below:
• Initial (cold) Startup
Leave fan off until your fireplace is hot and a good
coal bed is established, approximately 30 minutes
after fuel is lit.
• High Burn Setting
The fan may be left on throughout the burn.
• Medium or Medium High Burn Setting
The fan should be left off until a good burn is
established, then turned on medium or high rate.
• Low Burn Setting
The fan tends to cool off the fireplace. Leave fan off
until the burn is well established; then, if you wish,
turn the fan on at a low rate.
Only the screen specifically tested and listed for use
with this fireplace model should be used.
C.Fuel
Warning! Risk of Fire! Do NOT install and or use
any component not approved by Hearth & Home Technologies.
Other fuels may overfire and generate poisonous gases (i.e.
carbon monoxide).
Always wear gloves when installing or removing the
screen as the screen may become extremely hot while
in use.
6. Convection Fan Operation
The fireplace is equipped with a temperature-senitive
snap disc that will turn the convection fan on and off
automatically, depending on the temperature of the fireplace.
High
Override Switch
Speed Control
Figure 3.8 Override Switch and Fan Speed Control
12
Low
Warning! For use with solid wood fuel only.
1. Hardwood vs. Softwood
Your fireplace’s performance depends on the quality of
the firewood you use. One species of wood varies very
little to the other in terms of energy content. All seasoned wood contains about 8,000 BTU’s per pound.
Hardwoods have a greater density than softwoods; a
piece of hardwood will contain about 60% more BTU’s
than an equal size piece of softwood. A cord of seasoned oak (hardwood) would contain about 60% more
potential energy than a cord of seasoned pine (softwood).
Most softwoods are coniferous. These are trees with
needle-like leaves that stay green all year and carry
their seeds exposed in a cone. Examples of coniferous trees are Douglas fir, pine, spruce and cedar. Softwoods, being more porous, require less time to dry,
burn faster and are easier to ignite than hardwoods.
Hardwoods are deciduous trees, broadleaf trees that
lose their leaves in the fall. Their seeds are usually
found within a protective pod or enclosure. Some examples of deciduous trees are oak, maple, apple, and
birch. However, it should be noted that there are some
Quadra-Fire • 7100 FP Owner’s Manual • 433-3600 • Rev G • 06/25/14
deciduous trees that are definitely not considered hardwoods such as poplar, aspen and alder. Hardwoods require more time to season, burn slower and are usually
harder to ignite than softwoods. Obviously, you will use
the type of wood that is most readily available in your
area. However, if at all possible the best arrangement
is to have a mix of softwood and hardwood. This way
you can use the softwood for starting the fire, giving off
quick heat to bring the fireplace up to operating temperature. Add the hardwood for slow, even heat and
longer burn time.
Warning! Risk of Fire!
• Do NOT burn wet or green wood.
• Wet, unseasoned wood can cause accumulation of
creosote.
Soft woods
Hard woods
•
•
•
•
•
•
•
•
•
•
•
Douglas Fir
Pine
Spruce
Cedar
Poplar
Aspen
Alder
Oak
Maple
Apple
Birch
2. Moisture content
The majority of the problems fireplace owners experience are caused by trying to burn wet, unseasoned
wood. Freshly cut wood can be as much water as it is
wood, having a moisture content of around 50%. Imagine a wooden bucket that weighs about 8 pounds. Fill it
with a gallon of water, put it in the firebox and try to burn
it. This sounds ridiculous but that is exactly what you
are doing if you burn unseasoned wood. Dead wood
lying on the forest floor should be considered wet, and
requires full seasoning time. Standing dead wood can
be considered to be about two-thirds seasoned, if cut at
the dry time of the year.
Burning wet, unseasoned wood will produce less heat
output because it requires energy in the form of heat
to evaporate the water trapped inside. This is wasted
energy that should be used for heating your home. This
moisture evaporates in the form of steam which has
a cooling effect in your firebox and chimney system.
When combined with tar and other organic vapors from
burning wood it will form creosote which condenses in
the relatively cool firebox and chimney.
3.Seasoning
Seasoned firewood is nothing more than wood that is
cut to size, split and air dried to a moisture content of
around 20%. The time it takes to season wood varies
from around nine months for soft woods to as long as
eighteen months for hardwoods. The key to seasoning
wood is to be sure it has been split, exposing the wet
interior and increasing the surface area of each piece.
A tree that was cut down a year ago and not split is
likely to have almost as high a moisture content now as
it did when it was cut.
To season wood:
•
•
•
Cut logs to size
Split to 6 in. (152 mm) or less
Air dry to a moisture content of around 20%
- Soft wood - about nine months
- Hard wood - about eighteen months
Notice: Seasoning time may vary depending on drying
conditions.
4. Storing Wood
Splitting wood before it is stored reduces drying time.
The following guideline will ensure properly seasoned
wood:
• Stack the wood to allow air to circulate freely around
and through the woodpile.
• Elevate the woodpile off the ground to allow air
circulation underneath.
• The smaller the pieces, the faster the drying process.
Any piece over 6 in. (152 mm) in diameter should be
split.
• Wood should be stacked so that both ends of each
piece are exposed to air, since more drying occurs
through the cut ends than the sides. This is true even
with wood that has been split.
• Store wood under cover, such as in a shed, or covered
with a tarp, plastic, tar paper, sheets of scrap plywood,
etc., as uncovered wood can absorb water from rain
or snow, delaying the seasoning process. Avoid
covering the sides and ends completely. Doing so
may trap moisture from the ground and impede air
circulation.
Even dry wood contains at least 15% moisture by
weight, and should be burned hot enough to keep the
chimney hot for as long as it takes to dry the wood out
- about one hour. To tell if wood is dry enough to burn,
check the ends of the logs. If there are cracks radiating
in all directions from the center, it is dry. If your wood
sizzles in the fire, even though the surface is dry, it may
not be fully cured.
Quadra-Fire • 7100 FP Owner’s Manual • 433-3600 • Rev G • 06/25/14
13
7. Creosote Formation
5. Burning Process
Fire requires fuel, air and heat. If heat is robbed from the
fireplace during the drying stage, the new load of wood
has reduced the chances for a good clean burn. Aways
burn dry, seasoned firewood.
• Kindling or 1st stage:
In this stage, the wood is heated to a temperature high
enough to evaporate the moisture which is present in
all wood. The wood will reach the boiling point of water (212°F) and will not get any hotter until the water
is evaporated. This process takes heat from coals and
tends to cool the fireplace.
• 2nd stage:
The secondary stage is when the wood gives off flammable gases which burn above the fuel with bright
flames. It is very important that the flames be maintained and not allowed to go out. This will ensure the
cleanest possible fire. You should close down the air
to control the point where you can still maintain some
flame. If the flames tend to go out, more air is necessary.
• Final stage:
The final stage of burning is the charcoal stage. This
occurs when the flammable gases have been mostly
burned and only charcoal remains. This is a naturally
clean portion of the burn. The coals burn with hot blue
flames.
It is very important to reload your fireplace while enough
lively hot coals remain in order to rekindle the next load
of wood.
6. Dirty Glass
A portion of the combustion air entering the firebox is
deflected down over the inside of the door glass. This
air flow “washes” the glass, helping to keep smoke
from adhering to its surface. When operated at a low
burn rate, less air will be flowing over the glass and the
smoky, relatively cool condition of a low fire will cause
the glass to become coated. Operating the fireplace
with the burn rate air control and start-up air control all
the way open for 15-20 minutes should remove the built
up coating.
14
When wood is burned slowly, it produces tar and other
organic vapors which combine with expelled moisture
to form creosote. The creosote vapors condense in
the relatively cool chimney flue of a newly-started or
a slow-burning fire. As a result, creosote residue accumulates on the flue lining.
When ignited, creosote creates an extremely hot fire
which may damage the chimney or even destroy the
house.
The chimney shall be inspected at least annually before lighting, or once every two months during heating
season.
When creosote has accumulated it shall be removed to
reduce the risk of a chimney fire.
8.Opacity
Opacity indicates how cleanly your fireplace is burning.
Opacity is measured in percent; 100% opacity is when
an object is totally obscured by the smoke column from
a chimney, and 0% opacity means that no smoke column can be seen. Periodically check the opacity and
burn your fireplace as nearly smoke-free as possible
(goal of 0% opacity).
D.First Fire
Before lighting your first fire in the fireplace, make certain
that:
• the baffle and ceramic blanket are correctly positioned,
resting against the rear support
• firebrick are in place
• all labels have been removed
• all plated surfaces have been cleaned
Notice: Oils can cause permanent markings on plating if
not removed before the first fire.
NOTICE: The first three or four fires should be of moderate
size to allow the oils and binders to be burned from the
fireplace and the refractory and paint to cure. You may
notice an industrial odor the first few fires. This is considered
normal.
Quadra-Fire • 7100 FP Owner’s Manual • 433-3600 • Rev G • 06/25/14
E. Lighting Instructions
To start a fire, light easily-ignitable tinder or paper, which
will ignite the fast burning kindling, which in turn will ignite
the slow-burning firewood.
• Open outside air by turning the knob clockwise.
• Fully open the combustion air control by moving the
Automatic Combustion Air Control (ACC) handle
completely to the right.
• Place several wads of crushed paper on the firebox floor.
Heating the flue with a burning, rolled up newspaper
before adding kindling keeps smoke spillage to a
minimum.
• Lay small dry sticks of kindling on top of the paper.
• Make sure that no matches or other combustibles are in
the immediate area of the fireplace. Be sure the room is
adequately ventilated and the flue unobstructed.
• Light the paper in the fireplace. NEVER light or rekindle
fireplace with kerosene, gasoline, or charcoal lighter
fluid; the results can be fatal.
• Once the kindling is burning quickly, add several fulllength logs 3 in. (76 mm) or 4 in. (102 mm) in diameter.
Be careful not to smother the fire. Stack the pieces of
wood carefully; near enough to keep each other hot, but
far enough away from each other to allow adequate air
flow between them.
• Adjust the combustion air control; the more you close
down the ACC handle, (sliding left) the lower and slower
the fire will eventually burn. The more you open the air
control, (sliding right) the more heat will be produced
and the faster the wood will burn.
• Refueling: Move the ACC to the right, allow an influx of air
to liven the coalbed. The door should be opened slowly to
prevent ash and smoke spillage into the room. Break up
any large chunks and distribute the coals so new wood
is laid evenly on hot coals. Add desired amount of fuel,
close the door.
NOTICE: Fireplace should be run full open for a minimum
of 30 minutes a day during heating season to keep air
passages clean.
Warning! Risk of Fire! Keep combustible materials,
gasoline and other flammable vapors and liquids clear of
the fireplace.
Do NOT:
• store flammable materials close to the fireplace
• use gasoline, lantern fuel, kerosene, charcoal lighter
fluid or similar liquids to start or “freshen up” a fire in this
fireplace.
Keep all flammable liquids well away from the fireplace while
it is in use. Combustible materials may ignite.
F. Heat Management
For maximum operating efficiency with the lowest emissions, follow these operating procedures:
• Regardless of desired heat output, when loading the
fireplace, burn your fireplace with the combustion air
control wide open (fully to the right) for a minimum of 5
to 15 minutes (refer to Figure 4.1).
• Regulate burn rate (heat output) by using the combustion
air control.
• Heat output settings: Follow the burn rate instructions
listed Table 4.1.
Table 4.1
Burn Rate
Low
Medium
Medium High
High
BTU / Hr
Below 10,000
10,000 - 15,000
15,000 - 30,000
Maximum Heat
*Combustion Air Control
Slide LEFT to Stop
Stop to 1/8 in. -1/2 in. open
Stop to 1/2 in. - 1-1/2 in. open
All the way to RIGHT
*These are approximate settings, and will vary with type
of wood or chimney draft.
Quadra-Fire • 7100 FP Owner’s Manual • 433-3600 • Rev G • 06/25/14
15
4
Maintenance and Service
Warning! Hot Surfaces!
Glass and other surfaces are hot during operation AND cool
down. DO NOT clean fireplace until it is cooled.
Task
Frequency To be completed by
1. Chimney Inspection
As needed Homeowner or Chimney Sweep
2. Chimney Cleaning
As needed Chimney Sweep
3. Plated Surfaces Cleaning
As needed Homeowner
4. Glass Doors
Seasonally
5. Glass Cleaning
As needed
6. Door Gasket
Seasonally
7. Ash Removal
As needed
8. Baffle/Blanket/Channel Protector Seasonally
9. Firebrick
Seasonally
A.Maintenance Tasks-Homeowners
Installation and repair should be done by a qualified service technician only. The fireplace should be inspected before use
and at least annually by a professional service person.
The following tasks may be performed annually by the homeowner. If you are uncomfortable performing any of the listed
tasks, please call your dealer for a service appointment.
1. Chimney Inspection
Frequency: As necessary; at least annually before lighting fireplace, or once every two months during heating season.
By: Homeowner/Chimney Sweep
• Confirm that termination cap remains clear and unobstructed.
• Inspect for blockages such as bird nests, leaves, etc.
• Inspect for corrosion or separation.
• Inspect for creosote and remove as needed, at least every two months during the heating season.
• Inspect the system at the fireplace connection and at the chimney top.
In the event of a chimney fire, Hearth & Home Technologies recommends replacement of the chimney and inspection of
the adjacent structure to the provisions of NFPA Level III inspection criteria.
WARNING! Risk of Asphyxiation and Fire! Annual inspection by qualified technician recommended.
Check:
• condition of doors, surrounds and fronts
• condition of glass and glass assembly
• obstructions of combustion and ventilation air
• obstructions of termination cap
Clean:
• glass
• air passageways, grilles
16
Quadra-Fire • 7100 FP Owner’s Manual • 433-3600 • Rev G • 06/25/14
2. Creosote (Chimney) Cleaning
Frequency: As needed; at least annually before lighting, or once every two months during heating season.
When creosote has accumulated it shall be removed
to reduce the risk of a chimney fire.
By: Chimney Sweep
Tools Needed: Brush, Phillips screwdriver
• When wood is burned slowly, it produces tar and
other organic vapors, which combine with expelled
moisture to form creosote. The creosote vapors
condense in the relatively cool chimney flue of a
slow-burnign fire. As a result, creosote residue
accumulates on the flue lining. When ignited, this
creosote makes an extremely hot fire.
• Remove all ash from the firebox and extinguish all
hot embers before disposal. Allow the fireplace to
cool completely.
• Remove baffle and ceramic blanket from fireplace
before cleaning chimney (refer to Section 5.C.3 Baffle
Removal and Installation).
• Close the door tightly.
• Remove the top of the termination cap as shown in
Figure 4.1 to clean the cap and chimney.
• The creosote or soot should be removed from the
chimney with a brush specifically designed for the
size of chimney in use.
• Reinstall termination cap.
• Clean out fallen debris from the firebox.
• Replace baffle and ceramic blanket.
Remove screws,
lift top cover.
Top Cover
Cap
Chimney
TR344/TR342
Round
Termination Cap
Remove 4 screws
and lift top pan off.
Cap
Slip
Section
ST375
Square
Termination Cap
1. Remove the 4 screws.
2. Remove the screen.
3. Remove the baffle.
Cap
Warning! Risk of Fire! Ignited creosote is extremely
HOT. Prevent creosote buildup.
Chase
TS345/TS345P
Square
Termination Caps
Remove 2 screws from
the front and back and
lift the top off.
TCT375
Terra Cotta
Termination Cap
Figure 4.1 Chimney & Termination Cap Cleaning
Quadra-Fire • 7100 FP Owner’s Manual • 433-3600 • Rev G • 06/25/14
17
3. Care and Cleaning of Plated Surfaces
7. Ash Removal
Frequency: Initially and as needed
By: Homeowner
Tools Needed: Vinegar or glass cleaner, soft towel
Frequency: As necessary
By: Homeowner
Tools Needed: Covered metal container, metal
shovel, fireplace broom
CAUTION! Do not use a polish with abrasives. It will
scratch plated surfaces.
• Use a glass cleaner or vinegar and towel to remove
the oils.
• Oils can cause permanent markings on plating if not
removed.
• After plating is cured, oils will not affect the finish.
4. Glass Doors
Frequency: As necessary
By: Homeowner
• Inspect glass panels for cracks. Replace if this
condition is present.
• Inspect glass gasket. Confirm glass does not move
around in glass frame.
5. Glass Cleaning
Frequency: As necessary
By: Homeowner
Tools Needed: Vinegar or glass cleaner, soft towel
• Clean glass with a non-abrasive glass cleaner. Use a
damp cloth dipped in wood ashes or a commercially
available oven cleaner. Remove any oven cleaner
residue with a glass cleaner or soap and water.
6. Door Gasket
Frequency: Seasonally
By: Homeowner
• Open door, place half a dollar bill inside and close
the door.
• Attempt to pull the bill out.
• If the bill gives good resistance or is not removable,
the gasket is adjusted correctly. If the bill is
easily removed, the gasket needs adjustment or
replacement to create an even seal all around door.
Warning! Risk of Fire! Do not remove ashes until
the fire is out and the fireplace is cold.
• Ashes should be placed in metal container with tight
fitting lid.
• The closed container of ashes should be placed
on a noncombustible floor or on the ground, well
away from all combustible materials, pending final
disposal.
• If the ashes are disposed of by burial in soil or
otherwise locally dispersed, they should be retained
in the closed container until all cinders have
thoroughly cooled.
8. Baffle and Blanket
Frequency: As necessary
By: Homeowner
Tools Needed:
• Ensure correct baffle and baffle protection channel
placement; replace baffle components if damaged
or missing.
• The ceramic blanket and baffle board MUST be in
contact with the back of the firebox and even with
each other in the front. The baffle protection channel
MUST be in position. Refer to Section 3.A.3.
9.Firebrick
Frequency:
By:
Tools Needed:
• Inspect condition of brick. Replace if crumbly or
otherwise deteriorated, or if cracks exceed 1/4 in.
(6 mm).
It may be necessary to adjust or tighten the door latch.
18
Quadra-Fire • 7100 FP Owner’s Manual • 433-3600 • Rev G • 06/25/14
B.Replacement Maintenance
1. Glass Replacement
• Ensure that the fire is out and the fireplace is cool to
the touch.
2. Tighten or Adjust Door Latch
Remove the lock nut holding latch cam and four spacing washers on the right hand door as shown in Figure
5.2. Move 1-3 spacing washers to the opposite side
of cam. Reinstall the cam and tighten locknut. At least
one spacing washer and the black washer must be left
in place.
• Protect a table or counter top with padding or towels.
• Remove door with broken glass from the fireplace
by lifting door up and off of the hinges.
• Lay door face down on table or counter making sure
handle and handle attachment knob hang over the
edge of the table top so door lays flat on the soft
surface.
• Remove screws from the top and bottom glass
frames (five on each door) using a #2 Phillips Head
screwdriver. Set frames aside and retain screws.
HINT: Soak screws in penetrating oil for easy removal.
• Remove the glass and discard.
• Position the new glass with edges evenly overlapping
the opening in the front door.
• Replace the glass frames.
• Start screws to secure glass frames to door, keeping
them loose for adjusting the glass. Then continue to
tighten each screw alternately, a few turns at a time,
until the glass panel is tightened snugly. DO NOT
OVERTIGHTEN OR CROSS THREAD SCREWS.
OR
Replace the gasket material. Wear or damage to the
gasket material can cause air leakage into the firebox
resulting in overfiring and loss of efficiency.
A replacement gasket is available from your dealer.
Hinge Pins &
Washers
Left Door
Right Door
Latch Cam
Spacing Washers
Fiber Handle
Locknut
Locking
Pin
Square
Key
Left Handle
Assembly is
stationary
Black Washer
DO NOT REMOVE
Door Handle Shaft
Figure 4.2 Door Handle Assembly
• Replace the door on the fireplace.
• After the first burn, recheck the tightness of the
screws.
NOTICE: Remove all labels from glass before lighting the
first fire in your fireplace.
Quadra-Fire • 7100 FP Owner’s Manual • 433-3600 • Rev G • 06/25/14
19
3 Firebrick Replacement
The firebox of your fireplace is lined with high quality
firebrick, which has exceptional insulating properties.
There is no need to use a grate; simply build a fire on
the firebox floor. Do not operate the fireplace without
bricks.
5
5
5
5
5
5
5
5
5
3
2
4
2
2
2
5
2
Figure 4.4 Fire Brick Installed
5
5
5
Back
Right Side
5
5
5
1
5
4
• Remove new brick set from box and lay out to
diagram shown in Figure 4.3.
• Lay bottom bricks in unit.
• Install rear bricks on the top of the bottom bricks.
Slide top of bricks under clip on back of firebox wall
and push bottom of brick back.
• Install side bricks. Slide top of brick under clips on
side of firebox and push the bottom of the brick until
it is flush with the side of the unit.
Left Side
5
1
5
3
5
After the coals are completely cooled, remove all old
firebrick and ash from unit and vacuum out firebox.
5
5
5
IMPORTANT: The bricks are very similar in size. Be
certain you have the proper brick in the correct location.
Measure the brick size for accuracy.
5
5
1
5
5
5
5
5
4
2
2
2
2
2
1
5
5
3
4
3
Floor
Figure 4.3 Fire Brick Configurations
#
1
2
3
4
5
20
Brick Size
9” x 3-1/4” x 1-1/4” Angled (see drawing)
6-1/4” x 4-1/2” x 1-1/4”
9” x 2” x 1-1/4”
6-1/4” x 3-1/2” x 1-1/4”
9” x 4.5” x 1-1/4”
Qty. In Set
2
5
2
2
16
9.0"
3-1/4"
1
Quadra-Fire • 7100 FP Owner’s Manual • 433-3600 • Rev G • 06/25/14
1-1/4"
4. Baffle Removal and Installation
Warning! Hot Surfaces!
Glass and other surfaces are hot during operation AND cool
down. DO NOT clean fireplace until it is cooled.
• Remove all ash from firebox and place into a metal
container.
• Remove the baffle protection channel by turning
it down and pulling it out of the firebox. See
Figure 4.5.
Figure 4.7 Removing Baffle (shown without ceramic blanket)
5. Fan Replacement
CAUTION! Risk of Shock! Disconnect power by turning off circuit breaker before servicing.
CAUTION! Risk of Shock!
• Do NOT remove grounding prong from plug.
• Plug directly into properly grounded three-prong
receptacle.
• Route cord away from fireplace.
• Do NOT route cord under or in front of fireplace.
Figure 4.5 Removing Baffle Protection Channel
• Remove ceramic blanket from above the baffle.
• With a 3/16 in. Allen wrench, remove the front
manifold tube retainer bolt on the air channel under
the end of the front tube. See Figure 4.6.
The 7100FP Fireplace comes equipped with two fans,
installed at the factory with electric access on the right
side of fireplace (as you face it).
• Fan Replacement Instructions
- Remove both doors, outside air knob, black knob
and fascia. Place fascia on protected surface.
- Remove the six center bricks from the bottom of
the fireplace.
- Remove the two screws from the access panel
in the firebox floor. See Figure 4.8. Pry up panel
with screwdriver and remove panel.
Figure 4.6 Removing Manifold Tube
NOTICE: Soak the bolt with penetrating oil for at least
15 minutes before trying to remove it.
• To remove manifold tube, slide the tube to one side
until one end is out of its hole. Then, while lifting
that end of the fiber board baffle, pull tube up over
the air channel and out of hole at the other end. It is
only necessary to remove the first tube in order to
remove the baffle.
• Slide fiber board baffle forward to front of fireplace
and straight out through door. See Figure 4.7.
• To install the fiber board baffle, repeat the 2nd
through 4th steps in reverse. Be sure the fiber board
baffle and ceramic blanket are pushed back fully and
the blanket is down and flat.
Screws
Screwdriver Slot
Figure 4.8 Accessing Fan Motor
Quadra-Fire • 7100 FP Owner’s Manual • 433-3600 • Rev G • 06/25/14
21
6. Timer Assembly Replacement
• Removing the fan
- Unplug the wire harness.
- Lift fan from locating pins and remove (Figure 4.9).
Repeat for second fan if necessary.
- Connect new fan wires to wire harness.
- Before installing the fan, make sure the grommets
are tightly in place. Insert the right fan and place
over the two locating pins. Repeat for other fan.
Figure 4.10
- Re-install bottom panel or firebox access panel
in reverse order as described above.
- Replace the brick that was removed.
- Re-install the fascia and both knobs.
- Re-install both doors and hinge pins.
- Reconnect the power.
CAUTION! Risk of Shock! Disconnect power by
turning off circuit breaker BEFORE servicing.
• Remove both doors, outside air knobs, fascia, and
brick.
• Remove two Phillips head screws and pry open
access door in the bottom of the fireplace with a flat
head screwdriver. See Figure 4.11.
Remove 2 screws and
pry open access door.
Figure 4.11 Open Access Door
• Remove two screws and take off access cover shown
in Figure 4.12.
Remove
nut and lift
out fan
Unplug wire
harness before
removing fan
Figure 4.9 Fan Motor
Figure 4.12 Access Cover
NOTICE: The timer assembly included in this kit comes
with the air chamber cover attached (Figure 4.13).
• You will need to disconnect air chamber cover from
timer assembly before installing in the fireplace. Set
screws aside for later use. See Figure 4.14 .
Air Chamber Cover is
attached to Timer Assembly
Figure 4.10 Installing Fans
22
Figure 4.13 Timer Assembly with Air Chamber Cover
(Linkage arm is not included in the kit)
Quadra-Fire • 7100 FP Owner’s Manual • 433-3600 • Rev G • 06/25/14
Remove 2
screws
Figure 4.17 Hand in Access Door
Figure 4.14 Disconnect Air Chamber Cover
- Remove two screws from timer linkage upper arm.
Be careful NOT TO DROP arm in bottom of fireplace.
See Figure 4.15
Move arm left
Arm must be in this position
when re-installing
Be careful not to
drop Linkage Arm
down into fireplace
Rotate assembly up and
out through access door
Figure 4.18 Removing Timer Assembly
Figure 4.15 Remove Upper Arm
• Remove two screws from timer mounting plate
(Figure 4.16). Place your hand into the access door
(Figure 4.17) in the floor of the fireplace. Let the timer
assembly and plate drop down and rotate it up through
the access door. You will be looking at the back side of
the assembly. See Figure 4.18.
Timer Plate
• Remove old air chamber cover. Place the cover under
the bottom of the firebox. Using a 7/16 wrench attach
the two 1/4-20 bolts as shown in Figure 4.19.
• If installing a new timer, skip to 4.B.7 Timer Removal
& Replacement, install timer, return to here.
• Insert the new timer assembly into the access door
with the back side towards you. Please note the
correct position of the linkage lower arm in Figure
4.18.
Firebox Bottom
Air Chamber Cover
Attach with 1/4-20 bolts
Figure 4.16 Remove Screws from Timer Mounting Plate
Figure 4.19 Install Control Box
Quadra-Fire • 7100 FP Owner’s Manual • 433-3600 • Rev G • 06/25/14
23
• After re-installing the timer assembly through the
firebox access door, re-attach the timer assembly to
the air chamber cover using a Phillips head screw
driver. See Figure 4.19.
• Attach the linkage upper arm to the lower linkage
arm.
• Install new timer using same two screws. It is very
important that the D cut side of the timer shaft is
facing the opposite side of the linkage timer arm.
See Figure 4.22.
D cut side of timer shaft must face
away from the Linkage Timer Arm
Figure 4.20 Timer Box Installed
Figure 4.22 D Cut on Shaft
7. Timer Removal & Replacement
• Loosen set screw on timer, remove two screws and
remove timer. See Figure 4.21.
• Place linkage control arm over timer shaft and tighten
set screw, Figure 4.23.
Remove
2 screws
Tighten set screw
Remove Timer
Loosen Set Screw
Figure 4.21 Timer
24
Figure 4.23 Linkage Control Arm Installed
• Rotate linkage control arm into final position and
re-attach to mounting plate. Note that the D cut is now
facing the linkage timer arm. Re-attach the linkage
timer arm, Figure 4.23.
• Retun to Timer Assembly Replacement, Section
4.B.6.
Quadra-Fire • 7100 FP Owner’s Manual • 433-3600 • Rev G • 06/25/14
5
5
4
4 3
2
1
3
10
7
8
9
6
Figure 4.24 Exploded View of Entire Assembly for Point of Reference only
Item
Description
Qty
1
Door Linkage
1
2
Linkage Control Arm
1
3
Bushing
2
4
Washer SAE #10
2
5
Screw 8-32 x 1/2 PH PHL TC
2
6
Linkage Timer Arm
1
7
Attachment Nut & Set Screw
1
8
Screw 6-32 x 1/4 PH PHL TC
2
9
Mounting Bracket
1
10
Timer, Mechanical, 12 hours
1
Quadra-Fire • 7100 FP Owner’s Manual • 433-3600 • Rev G • 06/25/14
25
5
Troubleshooting
A.FAQs
Hearth & Home Technologies assumes no responsibility for the improper performance of the fireplace system caused by inadequate draft due to environmental
conditions, down drafts, tight sealing construction of
the structure, or mechanical exhausting devices which
will create a negative air pressure within the structure
where the fireplace is located.
If smoke spillage occurs from a fireplace opening when
the door is open, there is either a leakage in the flue, a
blockage in the flue, or some condition is affecting draft
Understanding and differentiating the conditions which
can cause each of these kinds of spillage problems is
essential to their solution.
• Flue Leakage
Check for improperly connected flue joints or a
damaged flue joint in the chimney system. Such
leakage would reduce draft (air would be drawn in
through the leaks rather than through the fireplace).
The result might be difficult start-up and smoky
fires that might spill if other adverse draft conditions
accompany this problem.
• Flue Blockage
The damper should be open.
Check for objects that may have fallen down the
chimney.
Flue draft is measured as negative pressure in the
chimney. The amount of negative pressure determines
how strong the draft is. The draft is important because
it draws the combustion air into the fireplace and pulls
the smoke out of the chimney.
There are three basic criteria essential in establishing
and maintaining flue draft:
• availability of combustion air
• heat generated from the fire
• diameter and height of the flue system
These three factors work together as a system to create
the flue draft. Increasing or decreasing any one of them
will affect the other two and thus change the amount of
draft in the entire system.
erating instructions, “Starting a Fire”. Be sure your flue
system is installed correctly and that it is the proper diameter and height. Check for the following:
• All chimney sections are properly installed.
• The chimney is clean and free of creosote or soot
buildup.
• Make sure overhanging trees and branches are cut
back within ten feet of the top of the chimney and the
chimney is free of debris from animals.
• Ensure the chimney cap is clean and free of any
buildup of soot or creosote if cap is equipped with a
spark arrestor screen.
• Be sure the ceramic blanket (above the baffle) and
the baffle are in their proper positions
• The wood being used in dry and well seasoned.
If you still suspect you have a low draft problem it may
be necessary to increase the volume of air in your
flue system. Since the diameter of your flue system is
matched with the size of the flue collar and should not
be changed, then the height of the system must be increased. Add chimney sections one at a time until the
draft improves.
In some cases, regardless of what you do, it can still be
difficult to establish the proper flue draft. This is especially evident when using an exterior factory-built chimney or exterior masonry chimney. Try holding a burning
rolled up newspaper as close to the flue outlet as possible for a few minutes, then light the paper under the
kindling. The heat generated from the burning rolled up
newspaper should help get the draft established.
Still other factors can affect how well your flue system
performs. Neighboring structures, high winds, tall trees,
even hillsides can affect air currents around the chimney. Well designed chimney caps are available that can
help. Your fireplace dealer is the local expert in your
area. He can usually make suggestions or discover
problems that can be easily corrected allowing your
fireplace to operate correctly as it has been designed,
providing safe and economical heat for your home.
If the fire is hard to start and smoke spills out of the fireplace, or you find it difficult to establish and maintain a
moderately high burn rate, then the flue draft is too low
and corrective measures must be taken.
Be sure you have air available for combustion and that
your firewood is dry and well seasoned. Build your fires
properly and according to the instructions given in op-
26
Quadra-Fire • 7100 FP Owner’s Manual • 433-3600 • Rev G • 06/25/14
nd
ti
ina
m
r
e
t
y
e
chimn
?
on
Bird's nest
or leaves in
termination
cap?
ds
ar
ou
Overhanging
tree?
g
Stron
n
wi
Structural
changes in
chimney area?
Another appliance in
home also exhausting
air (furnace, fan,
Unsealed
dryer, etc.)?
can lights?
Overhead fan
operating?
Creosote buildup
in flue?
Air register from
furnace near
fireplace?
Doors opening
and closing?
Window closed
for start-up?
Figure 5.1
Combustion
air control
Outside air
closed?
Factory-built Fireplaces: Troubleshooting
Quadra-Fire•7100FPOwner’sManual•433-3600•RevG•06/25/14
27
B.Troubleshooting Table
Fire is difficult to start
• Refer to section 4.C. Lighting Instructions
• Open air controls
• Establish draft: Hold a lighted, rolled up newspaper
under the front of the baffle
• Place DRY kindling over wadded up newspaper; leave air
spaces between pieces of wood
• Light the paper, allow kindling to ignite and progress to a
lively burn
• Slowly add progressively larger pieces of dry wood until
the fire is well established
Smoke in the house at startup
•
•
•
•
•
Check and clean chimney if needed
Open air controls
Establish draft
Do not use exhaust fans during startup
Do not close doors until the fire is well-established
Smoke in the house during operation
• Check and clean chimney if needed
• Check door rope for seal
• Open air controls (ACC)
Smoke in the house during refueling
• Open air controls (ACC) to establish a lively coal bed
• Open doors SLOWLY
• Add progressively larger wood to establish a hot fire
Fuel burns too fast
• ACC not working properly
• Wood too dry, mix in less seasoned wood after the fire is
established
• User larger diameter wood
• Check baffle/ceramic blanket for propler placement
(Section 3.A.3)
• Close down ACC (refer to section 4.D. Heat
Management)
Glass doesn’t stay clean
• Establish a good, hot fire
• Use well-seasoned wood
Not enough or no heat
• Move combustion air control to fully open position
• Fan is not on
• Insufficient fuel for fire/heat required
Fan doesn’t come on
• No power
• Fireplace is not hot enough to activate snap disc
• Snap disc may be faulty
28
Quadra-Fire • 7100 FP Owner’s Manual • 433-3600 • Rev G • 06/25/14
6
Reference Materials
►A.Service Parts
7100 FP
Service Parts
Beginning Manufacturing Date: Mar 2005
Ending Manufacturing Date: Active
Woodburning Fireplace
7100FP-BK-B, 7100FP-GD-B, and 7100FP-NL-B (Aug 2006 - Active)
7100FP-BK, 7100FP-GD and 7100FP-NL (Mar 2005 -- July 2006)
1
18
17
2
16
3
4
5
15
14
6
13
7
8
9
10
11
12
MISSION HILL FASCIA
VALLEY FORGE FASCIA
Part number list on following page.
Quadra-Fire • 7100 FP Owner’s Manual • 433-3600 • Rev G • 06/25/14
01/14
29
7100 FP
Service Parts
Beginning Manufacturing Date: Mar 2005
Ending Manufacturing Date: Active
IMPORTANT:THISISDATEDINFORMATION.Partsmustbeorderedfromadealerordistributor.Hearth and
Home Technologies does not sell directly to consumers.Providemodelnumberandserialnumberwhen
requestingservicepartsfromyourdealerordistributor.
ITEM
DESCRIPTION
COMMENTS
PART NUMBER
Stocked
at Depot
1
StarterPlateAssembly
SL1
StarterSectionAssembly8”
22069B
2
HeaderShield
480-1130
3
CeramicFiberBlanket,1In.
433-0920
4
CeramicFiberboard
SRV433-0910
Y
5
ManifoldTubeSet
TUBES-433
Y
Pkgof4
832-0661
Y
UpgradeKit-Fan&TimerUpgradeKit
Pre0091577579
433-5730
Y
TimerAssembly-CompleteTimerAssembly
Post0091577579
SRV433-5080
Y
ManifoldClip/Screws
6
Y
ComponentPack
433-5700
Gasket,Timer
433-1290
TimerReplacement
SRV480-1940
Y
#7 Brick Set
7.5
9.0"
3-1/4"
7.1
7.5
7.5
1-1/4"
7.3
7
BrickAssembly-CompleteSet
7.5
7.5
7.5
7.5
7.5
7.5
7.5
7.5
7.5
7.5
7.5
7.5
7.1
7.1
7.4
7.5
7.2
7.2
7.2
7.2
7.2
7.4
Pkgof27
BRICK-433
7.1
Brick,9”x3.25”x1.25”Angled(seediagram)
Qty.2Req.
433-6080
7.2
Brick,6.25”x4.5”x1.25”
Qty.5Req.
433-6090
7.3
Brick,9”x2”x1.25”
Qty.2Req.
433-6110
7.4
Brick,6.25”x3.5”x1.25”
Qty.2Req.
433-6120
7.5
Brick,9”x4.5”x1.25”
Qty.16Req.
832-2370
Pkgof6
832-3030
Pre0071580458
DF-7100MH
BrickUncut,Clay
8
9
Fascia,MissionHill
Post0071580458
DF-7100MH-B
Screw,BHSH1/4-20x1.25BLK
Pkgof24
225-0630/24
Y
Screw,1/4-20x.5ButtonHead
Pkgof20
32328/20
Y
Nut,TinnermanCage1/4-20
Pkgof4
812-2980
Y
ComponentPack
433-5990
Knob,Chad,MissionHillFront
2005-193
Fascia,ValleyForge
Fascia,RollingMeadows
ComponentPack
Pre0071580458
DF-7100VF
Post0071580458
DF-7100VF-B
Post0071580458
DF-7100RM
Post0071580458
DF-7100RM-NL
433-5990
Additionalservicepartnumbersappearonfollowingpage.
30
7.3
Quadra-Fire • 7100 FP Owner’s Manual • 433-3600 • Rev G • 06/25/14
7100 FP
Service Parts
Beginning Manufacturing Date: Mar 2005
Ending Manufacturing Date: Active
IMPORTANT: THIS IS DATED INFORMATION. Parts must be ordered from a dealer or
distributor.Hearth and Home Technologies does not sell directly to consumers.Provide
Stocked
at Depot
modelnumberandserialnumberwhenrequestingservicepartsfromyourdealerordistributor.
ITEM
DESCRIPTION
COMMENTS
PART NUMBER
10
LouverAssembly,Top
433-5130
11
SideBarAsembly
433-5210
12
LouverAssembly,Bottom
433-5120
#13 Door, Glass and
Door Handle Assembly
13.1
13.2
13.3
13.4
13.5
13.9
13.6
13.7
13
DoorAssembly( A whole new door must be ordered to
change the color of the trim)
13.1
GlassFrame,Top
13.2
GlassFrame,Bottom
13.3
GlassAssembly
Gasket,Rope,1/4”,Black(Glass),FieldCuttoSize
13.4
HingePin
13.5
Washer,1/4Sae
13.10
13.8
Black
SRV433-5580
Gold
SRV433-5590
Nickel
SRV433-5600
433-1610
433-1620
Qty2req
433-5750
Y
10Ft
834-1460
Y
Gold
229-1240
Nickel
229-1250/10
Y
Pkgof24
28758/24
Y
HANDLES-433
Y
DoorHandleKit
13.6
Handle,Door,Left
433-2030
13.7
Handle,Door,Right
433-0770
13.8
FiberHandle
SRV433-1380
13.9
Key,CamLatch
430-1151
13.10
CamLatch
32084
DoorTrim,Left(Onlyusefordamagedasareplacementfor
damagedparts)
GoldTrim
433-7160
NickelTrim
433-7340
DoorTrim,Right(Onlyusefordamagedasareplacementfor
damagedparts)
GoldTrim
433-7150
NickelTrim
433-7330
Gasket,Door,Left&RightDoor
SRV433DRGASKET
Y
Y
Gasket,Lytherm,1/2x1/8,4.
4.17Ft
834-2590
Screw,FlatHeadPhilips8-32x1/2
Pkgof10
832-0860
Y
Washer,Sae,3/8
Pkgof3
832-0990
Y
Additionalservicepartnumbersappearonfollowingpage.
Quadra-Fire • 7100 FP Owner’s Manual • 433-3600 • Rev G • 06/25/14
31
7100 FP
Service Parts
Beginning Manufacturing Date: Mar 2005
Ending Manufacturing Date: Active
IMPORTANT: THIS IS DATED INFORMATION. Parts must be ordered from a dealer or
distributor.Hearth and Home Technologies does not sell directly to consumers.Provide
Stocked
at Depot
modelnumberandserialnumberwhenrequestingservicepartsfromyourdealerordistributor.
ITEM
DESCRIPTION
COMMENTS
PART NUMBER
14
AccessAssembly
433-6270
15
WireHarness
SRV480-0990
Y
UpgradeKit-Fan&TimerUpgradeKit
Pre0091577579
433-5730
Y
16
BlowerAssembly
Pre0091588198
812-4900
Y
BlowerAssemblyw/Bracket
Post0091588198 SRV433-5890
17
StandoffTop
480-1040
18
Plate,Cover,OuterCan
480-1300
#19 Protection Channel
Y
Front,lookingintounit
Side view
Ceramicblanket
Protection channel sits in
betweenfronttubeand
ceramicfiberboard.
CeramicFiberBoard
Thistabsitsbehindthefronttube
19
BaffleProtectionKit
AirShutOffKit
433-2720
Pre1575932
ASK-7100
7000-246
Y
SRV433-5860
Y
BypassLeverAssembly
SRV433-5850
Y
ChimneyAirKit
CAK4A
ControlKnob,OAHandle
BrickRetainerAssembly
OutsideAirShield
33271
Collar,Set,1/4
229-0750
ComponentPack(IncludesClampConnector,Knob,Owners
Manual,EpaLabel,SalesEfficiency,LightSwitch,LightSwitch
CoverPlate,FanSpeedControl,Touch-UpPaint&Quadra-Fire
WarrantyCard)
433-5180
Y
ControlArmAssembly
433-5880
FaceBoardAssembly,Non-combustibleboard
433-5720
Y
FanSpeedControl
SRV7000-143
Y
Flange,OuterCanLower
433-0970
HearthStrip
18320
Knob,ACCKnob
Pkgof2
32284/2
LightSwitch
480-1260
LightSwitchCoverPlate
480-1270
OutsideAirHood6”
4059-051
PaintTouch-Up
812-0910
OutsideAirTerminationCap,6In.
480-1160
UnitCollar
659-125
Additionalservicepartnumbersappearonfollowingpage.
32
Y
Quadra-Fire • 7100 FP Owner’s Manual • 433-3600 • Rev G • 06/25/14
Y
7100 FP
Service Parts
Beginning Manufacturing Date: Mar 2005
Ending Manufacturing Date: Active
IMPORTANT: THIS IS DATED INFORMATION. Parts must be ordered from a dealer or
distributor.Hearth and Home Technologies does not sell directly to consumers.Provide
modelnumberandserialnumberwhenrequestingservicepartsfromyourdealerordistributor.
ITEM
DESCRIPTION
COMMENTS
Stocked
at Depot
PART NUMBER
SnapDiscF220-160F
SRV480-1730
SnapDisc,F180F-150,(forusewithUninsulatedChases)
SRV4021-827
Latch,Magnet
229-0631
Y
ACCESSORIES
Firescreen
SCR-433
HeatZoneKit
HEAT-ZONE-WOOD
DvAdapter
7010-172
Fan,HeatZone
7015-003
ReturnAirGrille,12x6
7015-110
UnitCollar
659-125
LintelBar
LINTEL-433
Template,Metal
TMP-433
TRTopVentKit
TR-TVK
FASTENERS
AvkRivnutRepairKit-1/4-20&3/8-16RivnutTools
Nut,Capped,Push,1/4
Pkgof24
RIVNUT-REPAIR
Y
7000-157/24
Y
Nut,KepsLock,8-32
Pkgof40
226-0060/40
Y
Nut,SerFlangeSmall1/4-20
Pkgof24
226-0130/24
Y
Screw,PH8-32x1/2
Pkgof25
220-0030/25
Y
Screw,MachineScrew1/4-20X5/8
Pkgof24
220-0440/24
Y
Screw,PanHeadPhilips8-32X3/4
Pkgof24
229-1100/24
Y
Screw,PanHeadPhilips8-32X3/8
Pkgof40
225-0500/40
Y
Screw,SheetMetal#8X1/2S-Grip
Pkgof40
12460/40
Y
WingNutWF.8-32,RefractoryRetainer
Pkgof24
226-0160/24
Y
WingNutWF.1/4-20,forusewithfankits
Pkgof12
226-0110/12
Y
Quadra-Fire • 7100 FP Owner’s Manual • 433-3600 • Rev G • 06/25/14
33
This page intentionally left blank.
34
Quadra-Fire • 7100 FP Owner’s Manual • 433-3600 • Rev G • 06/25/14
This page intentionally left blank.
Quadra-Fire • 7100 FP Owner’s Manual • 433-3600 • Rev G • 06/25/14
35
B.Contact Information
R
Quadra-Fire, a brand of Hearth & Home Technologies
7571 215th Street West, Lakeville, MN 55044
Please contact your Quadra-Fire dealer with any questions or concerns.
For the number of your nearest Quadra-Fire dealer, please visit www.quadrafire.com.
– NOTES –
CAUTION
DO NOT DISCARD THIS MANUAL
• Important operating
and maintenance
instructions included.
• Read, understand and follow
these instructions for safe
installation and operation.
• Leave this manual with
party responsible for use
and operation.
This product may be covered by one or more of the following patents: (United States) 5000162, 5016609, 5076254, 5113843,
5191877, 5218953, 5263471, 5328356, 5341794, 5347983, 5413089, 5429495, 5452708, 5542407, 5890485, 5931661, 5941237,
5947112, 5996575, 6006743, 6019099, 6048195, 6053165, 6145502, 6170481, 6237588, 6296474, 6374822, 6413079, 6439226,
6484712, 6543698, 6550687, 6601579, 6672860, 6688302, 6688302B2, 6715724B2, 6729551, 6736133, 6748940, 6748942,
6769426, 6774802, 6796302, 6840261, 6848441, 6863064, 6866205, 6869278, 6875012, 6880275, 6908039, 6919884,7047962,
7216645, D320652, D445174, D462436; (Canada) 1297749, 2195264, 2225408, 2313972; (Australia) 780250, 780403, 1418504 or
other U.S. and foreign patents pending.
Printed in U.S.A. - Copyright 2012
36
Quadra-Fire • 7100 FP Owner’s Manual • 433-3600 • Rev G • 06/25/14