1
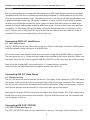
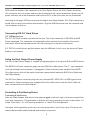
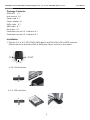
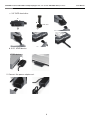
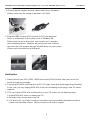
SATA/IDE to Detachable USB 2.0 Adapter
(Support 2.5", 3.5" & 5.25" IDE/SATA Drive)
RCW618
User Manual
SATA/IDE to Detachable USB 2.0 Adapter(Support 2.5", 3.5" & 5.25" IDE/SATA Drive) RCW618
User Manual
SATA/IDE to Detachable USB 2.0 Adapter
(Support 2.5", 3.5" & 5.25" IDE/SATA Drive)
Included in the Kit
The USB to SATA/IDE Cable Adapter Complete Kit includes the items listed below.
1. USB to SATA/IDE Cable Adapter
The Cable Adapter is powered from USB bus. It can connect to three different types of
drive mechanisms. SATA Drives connect to the small SATA patch cable. IDE Drives connect
through the 2.5” connector or the 3.5”, 5.25” connector.
2. Dual Output Drive Power Supply
The Dual Output Power provides standard 4 pin power output and new SATA power output
switched connectors. Plug the drive mechanism in and then turn the switched power
connector on.
3. AC Power Cable
Uses standard IDC connector connect to AC outlet. Generic international cables can be
substituted for 100-240v operation.
Cable Adapter Features
The USB Universal Cable Adapter provides three different drive connectors. The 7 pin connector
allows any SATA mechanism to be used. The 2.5” IDE connector works with all small laptop
mechanisms. The 3.5” or 5.25” large IDE connector provides connectivity to all IDE/ATA ATAPI
type mechanisms. These mechanisms should be set to (master without a slave) in order to
function properly. The USB 2.0 connector is backwards compatible with slower version 1.1
Power Supply Features
The Switched Dual Output Power Supply provides two switched power connectors. The first is
SATA Power for any SATA drive mechanism. The second is 4 Pin IDE Power which is used on all
3.5” and 5.25” drive mechanisms. Simply plug the connector into the drive mechanism and turn
the power on. The green LED indicates that the power is being supplied to the drive. The IEC
power cable provides easy connection to any AC outlet.
Connecting to the USB Bus
The Universal USB to SATA /IDE Cable Adapter connects to most USB1.1 or USB 2.0 ports. Since
USB is hot-pluggable you can connect to any port at any time, computer power on or power off
makes no difference in the operation.
SATA/IDE to Detachable USB 2.0 Adapter(Support 2.5", 3.5" & 5.25" IDE/SATA Drive) RCW618
User Manual
Many Operating Systems immediately indicate that the USB Cable Adapter and drive have been
recognized and if the drive is already formatted and partitioned in a compatible file structure the
drive will automatically mount itself. That being said, this is not true for all Operating Systems and
a good knowledge of how your OS works is needed. In some systems a drive utility is needed
to format or partition the mechanism and or mount the drive. New Mechanisms all need to go
through the format and partition routine in order to be used. Also note that drives from different
computers, i.e. (Macintosh to/from Windows) will not be recognized unless a third party utility is
used. Without such a utility the OS may think that the drive has no data on it and ask to be reformatted. This of course would destroy all the data on it.
Connecting SATA 3.5” Hard Drives
3.5” SATA Mechanisms
The 3.5” SATA drive has two connectors on the rear. The first and larger connector is SATA power
while the second smaller connector is for SATA Data.
First connect the Power Supply to the drive mechanism using the large SATA Power Connector.
The connector has an “L” shape to it that needs to be installed in the correct direction. Make sure
the power switches are in the off position and that the LED’s in the switch box are not illuminated.
Next install the smaller SATA Data cable to the “L” shaped smaller connector.
Lastly connect the USB Cable to the computer and turn the switch on.
Connecting IDE 3.5” Hard Drives
3.5” IDE Mechanisms
The 3.5” IDE drive has two connectors on the rear. The larger, 40 pin connector is IDE DATA while
the smaller, 4 pin connector is for Drive Power. Plug in the Drive Power connector. This connector
has cut corners and must be installed with the correct orientation. Make sure the power switches
are in the off position and that the LED’s in the switch box are not illuminated.
Next plug in the larger IDE Data connector located on the Cable Adapter. This 40 pin connector is
keyed and can only be inserted in one direction. Plug the USB Connector into the computer and
turn the power switch on.
Connecting IDE 5.25” CD/DVD
5.25” IDE CD/DVD Mechanisms
The 5.25” IDE CD/DVD drive has two connectors on the rear. The larger, 40 pin connector is IDE
SATA/IDE to Detachable USB 2.0 Adapter(Support 2.5", 3.5" & 5.25" IDE/SATA Drive) RCW618
User Manual
DATA while the smaller, 4 pin connector is for Drive Power. Plug in the Drive Power connector.
This connector has cut corners and must be installed with the correct orientation. Make sure the
power switches are in the off position and that the LED’s in the switch box are not illuminated.
Next plug in the larger IDE Data connector located on the Cable Adapter. This 40 pin connector is
keyed and can only be inserted in one direction. Plug the USB Connector into the computer and
turn the power switch on.
Connecting IDE 2.5” Hard Drives
2.5” IDE Mechanisms
The 2.5” IDE Drive has one connector on the rear. The 44 pin connector is IDE DATA and IDE
Power combined. This connector has a blocked socket and must be installed in the correct
orientation. Match the blocked socket with the missing pin on the drive mechanism.
2.5” IDE Drive mechanisms get their power from the USB port. In this case, the Universal Power
Supply is not needed.
Using the Dual Output Power Supply
The Dual Output Power Supply is capable of supplying power to all types of IDE and SATA drives.
The SATA Drive Power connector plugs into any SATA Drive Mechanism. The “L” type connector
must be oriented correctly before it is plugged in. Power should only be supplied to the SATA
Drive Mechanism after all the cables have been connected including the SATA Data Cable from
the Cable Adapter.
The IDE Drive Power connector plugs into any standard IDE, ATAPI, ATA, or SCSI type of drive
mechanism. Power should only be supplied to the Drive Mechanism after the Data Cable has
been connected to the Cable Adapter.
Formatting & Partitioning Drives
Formatting & Partitioning
After the Cable Adapter and drivers have been plugged in the next step is to format and partition
your drive mechanism. This procedure is different with every operating system. In Macintosh, it is
called “Disk Utility”. On a PC running windows it is called “Disk Management”.
No matter which operating system you are running the basics are still the same. The drives will
need to be formatted and partitioned before they can be used.
SATA/IDE to Detachable USB 2.0 Adapter(Support 2.5", 3.5" & 5.25" IDE/SATA Drive) RCW618
User Manual
After your finish this initialization process the drives will then be ready to use. Again, every system
is slightly different especially when it comes to RAID and RAID levels. Read the documentation
carefully before putting important data on your system.
Most operating systems include the necessary USB drivers that support hard drives, CD, DVD,
and Floppy Drives. These drivers must be installed for the Cable Adapter to work properly. If they
are not installed use the original installation disks to install the needed USB drivers. If you are
using USB 1.1 expect slow performance because of the limited speed of this bus.
Specifications
• Compliance with Gen1i of Serial ATA II Electrical Specification 1.0
• Support SATA Spread-Spectrum Clock
• Support SATA II Asynchronous Signal Recovery (Hot Plug) feature
• Compliance with USB 2.0 electrical specification
• Support USB High-Speed and Full-Speed Operation
• Compliance with USB Mass Storage Class, Bulk-Only Transport Specification
• Support ATA/ATAPI PACKET command set
• Support ATA/ATAPI LBA48 addressing mode
• Support 12MHz external crystal
• Support external NVRAM for Vender Specific VID/PID, Manufacture,
Product String of USB Device Controller
SATA/IDE to Detachable USB 2.0 Adapter(Support 2.5", 3.5" & 5.25" IDE/SATA Drive) RCW618
User Manual
Package Contents
RCW-618 X 1
User manual X 1
Power cord X 1
Power adapter X 1
SATA cable X 1
USB cable X 1
Driver disc X 1
Protection case for 2.5” hard drive X 1
Protection case for 3.5” hard drive X 1
Installation
1. Plug the 2.5” or 3.5” ATA/ ATAPI / SATA device to RCW-618 by IDE or SATA interface.
(Please notice the direction of IDE or SATA port) Please check a to d as below.
3.5", 5.25"
ATA/ ATAPI
2.5"
ATA
3.5" SATA
a. 3.5" ATA hard drive
b. 2.5" ATA hard drive
SATA/IDE to Detachable USB 2.0 Adapter(Support 2.5", 3.5" & 5.25" IDE/SATA Drive) RCW618
c. 3.5" SATA hard drive
SATA cable
d. 5.25" ATAPI device
ATAPI device
2. Connect the power adapter set.
User Manual
SATA/IDE to Detachable USB 2.0 Adapter(Support 2.5", 3.5" & 5.25" IDE/SATA Drive) RCW618
User Manual
3. Plug the power adapter to your ATA/ATAPI/SATA device. Please check a to d as below.
a. 3.5" ATA
b. 2.5" ATA
There is no additional power needed for 2.5” HD.
c. 3.5" SATA
d. 5.25" ATAPI
SATA/IDE to Detachable USB 2.0 Adapter(Support 2.5", 3.5" & 5.25" IDE/SATA Drive) RCW618
User Manual
4. Plug the power adapter to power source and turn on the power
(Please make sure the voltage is between 100~240V)
5. Plug the USB2.0 cable to PC and wait for PC auto-detection.
Driver is needed only in old system such as Windows 98.
Please inset the driver disk when your system can’t complete
the installation process. Windows will auto-install after it detects
the driver disk and choose the most suitable driver for your system.
(Please notice the direction of USB port)
Notification
1. Please take off your ATA / ATAPI / SATA device from RCW-618 only after you turn off the
power to avoid any damage.
2. If you plug RCW-618 and hard drive to PC, PC might freeze during the beginning of booting.
In this case, you may unplug RCW-618 at the start of booting and re-plug it after PC enters
windows.
3. If PC can’t detect RCW-618 and hard drive in your OS, please try the following steps.
1. Unplug RCW-618 and try to reboot the PC.
2. Re-plug it after system enters the OS.
3. If all above still can’t help, it might be caused by the incompatibility between hard drive,
system and controller chipset. Please contact us for furthur support.
SATA/IDE to Detachable USB 2.0 Adapter(Support 2.5", 3.5" & 5.25" IDE/SATA Drive) RCW618
User Manual
Trouble shooting
i. Q: I completed the installation by following the menu but MS Windows can’t detect any
hard drive.
A: The reason of the problems could be:
1. Hard drive has not completed the format or F-disk process.
* Solution: Format or F-disk your hard drive.
2. The hard drive failed.
* Solution: Replace a workable hard drive.
3. Bad USB connection.
*Solution: Unplug the USB connection and re-connect the USB again.
4. Check LED light on the adapter. If the red LED light on RCW-618 is not on after
connected with PC, this adapter is not working correctly.
*Solution: Please contact our RMA department for replacement.
ii. Q: After I installed RCW-618 to the hard drive, my hard drive will not run.
A: Four pin power connector is directional. If you plug in the four pin power connector in
reverse, your hard drive might be damaged.
*Solution: Please make sure the direction of 4 pin power connector is correct before you
plug it to your hard drive. The shape of the male 4 pin connector must fit the female
connector of your hard drive as pictures shown below.
iii. Q: Fail or slow system boot up when RCW-618 was connected with PC.
A: This issue is caused by the hardware confliction of the system scanning during boot
up.
*Solution:Please disconnect RCW-618 from your PC before system boot up.
Connect it to PC after the Windows complete boot up.
Thank you for purchasing a quality Rosewill Product.
Please register your product at : www.rosewill.com/
for complete warranty information and future support for your product.
If you have any question while using our products, please feel free to contact us at [email protected].
www.rosewill.com