1
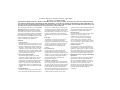
User’s Guide
Creative Live! Drive II
Information in this document is subject to change without notice and does not represent a commitment on the part of Creative Technology Ltd. No part of this
manual may be reproduced or transmitted in any form or by any means, electronic or mechanical, including photocopying and recording, for any purpose
without the written permission of Creative Technology Ltd. The software described in this document is furnished under a license agreement and may be used
or copied only in accordance with the terms of the license agreement. It is against the law to copy the software on any other medium except as specifically
allowed in the license agreement. The licensee may make one copy of the software for backup purposes.
Copyright © 2000 by Creative Technology Ltd. All rights reserved.
Version 1.0
June 2000
Sound Blaster and Blaster are registered trademarks, and the Sound Blaster Live! logo, the Sound Blaster PCI logo, EMU10K1, E-mu Environmental Modeling, Environmental
Audio, Creative Multi Speaker Surround, and DynaRAM are trademarks of Creative Technology Ltd. in the United States and/or other countries. E-Mu and SoundFont are
registered trademarks of E-mu Systems, Inc. PCWorks and FourPointSurround are trademarks of Cambridge SoundWorks, Inc. Microsoft, MS-DOS, and Windows are registered
trademarks of Microsoft Corporation. All other products are trademarks or registered trademarks of their respective owners.
This product is covered by one or more of the following U.S. patents:
4,506,579; 4,699,038; 4,987,600; 5,013,105; 5,072,645; 5,111,727; 5,144,676; 5,170,369; 5,248,845; 5,298,671; 5,303,309; 5,317,104; 5,342,990; 5,430,244;
5,524,074; 5,698,803; 5,698,807; 5,748,747; 5,763,800; 5,790,837.
C reat iv e E nd -U se r S oft wa re L ice ns e A gree m en t
Vers ion 2 . 3, Ja nu ar y 2 00 0
PLEASE READ THIS DOCUMENT CAREFULLY BEFORE INSTALLING THE SOFTWARE. BY INSTALLING AND USING THE SOFTWARE,
YOU AGREE TO BE BOUND BY THE TERMS OF THIS AGREEMENT. IF YOU DO NOT AGREE TO THE TERMS OF THIS AGREEMENT, DO
NOT INSTALL OR USE THE SOFTWARE. PROMPTLY RETURN, WITHIN 15 DAYS, THE SOFTWARE, ALL RELATED DOCUMENTATION AND
ACCOMPANYING ITEMS TO THE PLACE OF ACQUISITION FOR A FULL REFUND.
This is a legal agreement between you and Creative
Technology Ltd. and its subsidiaries (“Creative”).
This Agreement states the terms and conditions
upon which Creative offers to license the software
sealed in the disk package together with all related
documentation and accompanying items including,
but not limited to, the executable programs, drivers,
libraries and data files associated with such
programs (collectively, the “Software”).
LICENSE
1. Grant of License
The Software is licensed, not sold, to you for use
only under the terms of this Agreement. You own
the disk or other media on which the Software is
originally or subsequently recorded or fixed; but,
as between you and Creative (and, to the extent
applicable, its licensors), Creative retains all title
to and ownership of the Software and reserves all
rights not expressly granted to you.
2. For Use on a Single Computer
The Software may be used only on a single
computer by a single user at any time. You may
transfer the machine-readable portion of the
Software from one computer to another computer,
provided that (a) the Software (including any
portion or copy thereof) is erased from the first
computer and (b) there is no possibility that the
Software will be used on more than one computer
at a time.
3. Stand-Alone Basis
You may use the Software only on a stand-alone
basis, such that the Software and the functions it
provides are accessible only to persons who are
physically present at the location of the computer
on which the Software is loaded. You may not
allow the Software or its functions to be accessed
remotely, or transmit all or any portion of the
Software through any network or communication
line.
4. Copyright
The Software is owned by Creative and/or its
licensees and is protected by United States
copyright laws and international treaty provisions.
You may not remove the copyright notice from
any copy of the Software or any copy of the
written materials, if any, accompanying the
Software.
5. One Archival Copy
You may make one (1) archival copy of the
machine-readable portion of the Software for
backup purposes only in support of your use of the
Software on a single computer, provided that you
reproduce on the copy all copyright and other
proprietary rights notices included on the
originals of the Software.
6. No Merger or Integration
You may not merge any portion of the Software
into, or integrate any portion of the Software with,
any other program, except to the extent expressly
permitted by the laws of the jurisdiction where
you are located. Any portion of the Software
merged into or integrated with another program, if
any, will continue to be subject to the terms and
conditions of this Agreement, and you must
reproduce on the merged or integrated portion all
copyright and other proprietary rights notices
included in the originals of the Software.
7. Network Version
If you have purchased a “network” version of the
Software, this Agreement applies to the
installation of the Software on a single “file
server”. It may not be copied onto multiple
systems. Each “node” connected to the “file
server” must also have its own license of a “node
copy” of the Software, which becomes a license
only for that specific “node”.
8. Transfer of License
You may transfer your license of the Software,
provided that (a) you transfer all portions of the
Software or copies thereof, (b) you do not retain
any portion of the Software or any copy thereof,
and (c) the transferee reads and agrees to be bound
by the terms and conditions of this Agreement.
9. Limitations on Using, Copying, and Modifying
the Software
Except to the extent expressly permitted by this
Agreement or by the laws of the jurisdiction
where you acquired the Software, you may not
use, copy or modify the Software. Nor may you
sub-license any of your rights under this
Agreement. You may use the software for your
personal use only, and not for public performance
or for the creation of publicly displayed
videotapes.
10.Decompiling, Disassembling, or Reverse
Engineering
You acknowledge that the Software contains trade
secrets and other proprietary information of
Creative and its licensors. Except to the extent
expressly permitted by this Agreement or by the
laws of the jurisdiction where you are located, you
may not decompile, disassemble or otherwise
reverse engineer the Software, or engage in any
other activities to obtain underlying information
that is not visible to the user in connection with
normal use of the Software.
In particular, you agree not for any purpose to
transmit the Software or display the Software's
object code on any computer screen or to make
any hardcopy memory dumps of the Software's
object code. If you believe you require
information related to the interoperability of the
Software with other programs, you shall not
decompile or disassemble the Software to obtain
such information, and you agree to request such
information from Creative at the address listed
below. Upon receiving such a request, Creative
shall determine whether you require such
information for a legitimate purpose and, if so,
Creative will provide such information to you
within a reasonable time and on reasonable
conditions.
In any event, you will notify Creative of any
information derived from reverse engineering or
such other activities, and the results thereof will
constitute the confidential information of Creative
that may be used only in connection with the
Software.
TERMINATION
The license granted to you is effective until
terminated. You may terminate it at any time by
returning the Software (including any portions or
copies thereof) to Creative. The license will also
terminate automatically without any notice from
Creative if you fail to comply with any term or
condition of this Agreement. You agree upon such
termination to return the Software (including any
portions or copies thereof) to Creative. Upon
termination, Creative may also enforce any rights
provided by law. The provisions of this Agreement
that protect the proprietary rights of Creative will
continue in force after termination.
LIMITED WARRANTY
Creative warrants, as the sole warranty, that the
disks on which the Software is furnished will be free
of defects, as set forth in the Warranty Card or
printed manual included with the Software. No
distributor, dealer or any other entity or person is
authorized to expand or alter this warranty or any
other provisions of this Agreement. Any
representation, other than the warranties set forth in
this Agreement, will not bind Creative.
Creative does not warrant that the functions
contained in the Software will meet your
requirements or that the operation of the Software
will be uninterrupted, error-free or free from
malicious code. For purposes of this paragraph,
“malicious code” means any program code designed
to contaminate other computer programs or
computer data, consume computer resources,
modify, destroy, record, or transmit data, or in some
other fashion usurp the normal operation of the
computer, computer system, or computer network,
including viruses, Trojan horses, droppers, worms,
logic bombs, and the like. EXCEPT AS STATED
ABOVE IN THIS AGREEMENT, THE
SOFTWARE IS PROVIDED AS-IS WITHOUT
WARRANTY OF ANY KIND, EITHER
EXPRESS OR IMPLIED, INCLUDING, BUT
NOT LIMITED TO, ANY IMPLIED
WARRANTIES OF MERCHANTABILITY
AND FITNESS FOR A PARTICULAR
PURPOSE. CREATIVE IS NOT OBLIGATED
TO PROVIDE ANY UPDATES, UPGRADES
OR TECHNICAL SUPPORT FOR THE
SOFTWARE.
Further, Creative shall not be liable for the accuracy
of any information provided by Creative or third
party technical support personnel, or any damages
caused, either directly or indirectly, by acts taken or
omissions made by you as a result of such technical
support.
You assume full responsibility for the selection of
the Software to achieve your intended results, and
for the installation, use and results obtained from the
Software. You also assume the entire risk as it
applies to the quality and performance of the
Software. Should the Software prove defective, you
(and not Creative, or its distributors or dealers)
assume the entire cost of all necessary servicing,
repair or correction.
This warranty gives you specific legal rights, and
you may also have other rights which vary from
country/state to country/state. Some countries/states
do not allow the exclusion of implied warranties, so
the above exclusion may not apply to you. Creative
disclaims all warranties of any kind if the Software
was customized, repackaged or altered in any way
by any third party other than Creative.
LIMITATION OF REMEDIES AND
DAMAGES
THE ONLY REMEDY FOR BREACH OF
WARRANTY WILL BE THAT SET FORTH IN
THE WARRANTY CARD OR PRINTED
MANUAL INCLUDED WITH THE
SOFTWARE. IN NO EVENT WILL
CREATIVE OR ITS LICENSORS BE LIABLE
FOR ANY INDIRECT, INCIDENTAL,
SPECIAL OR CONSEQUENTIAL DAMAGES
OR FOR ANY LOST PROFITS, LOST
SAVINGS, LOST REVENUES OR LOST DATA
ARISING FROM OR RELATING TO THE
SOFTWARE OR THIS AGREEMENT, EVEN
IF CREATIVE OR ITS LICENSORS HAVE
BEEN ADVISED OF THE POSSIBILITY OF
SUCH DAMAGES. IN NO EVENT WILL
CREATIVE’S LIABILITY OR DAMAGES TO
YOU OR ANY OTHER PERSON EVER
EXCEED THE AMOUNT PAID BY YOU TO
USE THE SOFTWARE, REGARDLESS OF
THE FORM OF THE CLAIM.
Some countries/states do not allow the limitation or
exclusion of liability for incidental or consequential
damages, so the above limitation or exclusion may
not apply to you.
PRODUCT RETURNS
If you must ship the software to Creative or an
authorized Creative distributor or dealer, you must
prepay shipping and either insure the software or
assume all risk of loss or damage in transit.
U.S. GOVERNMENT RESTRICTED RIGHTS
All Software and related documentation are
provided with restricted rights. Use, duplication or
disclosure by the U.S. Government is subject to
restrictions as set forth in subdivision (b)(3)(ii) of
the Rights in Technical Data and Computer
Software Clause at 252.227-7013. If you are sublicensing or using the Software outside of the United
States, you will comply with the applicable local
laws of your country, U.S. export control law, and
the English version of this Agreement.
CONTRACTOR/MANUFACTURER
The Contractor/Manufacturer for the Software is:
Creative Technology Ltd
31, International Business Park
Creative Resource
Singapore 609921
GENERAL
This Agreement is binding on you as well as your
employees, employers, contractors and agents, and
on any successors and assignees. Neither the
Software nor any information derived therefrom
may be exported except in accordance with the laws
of the U.S. or other applicable provisions. This
Agreement is governed by the laws of the State of
California (except to the extent federal law governs
copyrights and federally registered trademarks).
This Agreement is the entire agreement between us
and supersedes any other understandings or
agreements, including, but not limited to,
advertising, with respect to the Software. If any
provision of this Agreement is deemed invalid or
unenforceable by any country or government agency
having jurisdiction, that particular provision will be
deemed modified to the extent necessary to make the
provision valid and enforceable, and the remaining
provisions will remain in full force and effect.
Microsoft Software files become part of the
ORIGINAL PRODUCT and are subject to the same
warranty and license terms and conditions as the
ORIGINAL PRODUCT. If you do not have a valid
license to use the ORIGINAL PRODUCT, you may
not use the Microsoft Software. Any other use of the
Microsoft Software is prohibited.
SPECIAL PROVISIONS APPLICABLE TO
THE EUROPEAN UNION
IF YOU ACQUIRED THE SOFTWARE IN THE
EUROPEAN UNION (EU), THE FOLLOWING
PROVISIONS ALSO APPLY TO YOU. IF THERE
IS ANY INCONSISTENCY BETWEEN THE
TERMS OF THE SOFTWARE LICENSE
AGREEMENT SET OUT EARLIER AND IN THE
FOLLOWING PROVISIONS, THE FOLLOWING
PROVISIONS SHALL TAKE PRECEDENCE.
IMPORTANT: By using the Microsoft software
files (the “Microsoft Software”) provided with this
Addendum, you are agreeing to be bound by the
following terms. If you do not agree to be bound by
these terms, you may not use the Microsoft
Software.
DECOMPILATION
You agree not for any purpose to transmit the
Software or display the Software’s object code on
any computer screen or to make any hard copy
memory dumps of the Software’s object code. If you
believe you require information related to the
interoperability of the Software with other
programs, you shall not decompile or disassemble
the Software to obtain such information, and you
agree to request such information from Creative at
the address listed earlier. Upon receiving such a
request, Creative shall determine whether you
require such information for a legitimate purpose
and, if so, Creative will provide such information to
you within a reasonable time and on reasonable
conditions.
The Microsoft Software is provided for the sole
purpose of replacing the corresponding files
provided with a previously licensed copy of the
Microsoft software product identified above
(“ORIGINAL PRODUCT”). Upon installation, the
LIMITED WARRANTY
EXCEPT AS STATED EARLIER IN THIS
AGREEMENT, AND AS PROVIDED UNDER
THE HEADING “STATUTORY RIGHTS”,
THE SOFTWARE IS PROVIDED AS-IS
For questions concerning this Agreement, please
contact Creative at the address stated above. For
questions on product or technical matters, contact
the Creative technical support center nearest you.
ADDENDUM TO THE MICROSOFT
SOFTWARE LICENSE AGREEMENT
(WINDOWS 95)
WITHOUT WARRANTY OF ANY KIND,
EITHER EXPRESS OR IMPLIED,
INCLUDING, BUT NOT LIMITED TO, ANY
IMPLIED WARRANTIES OR CONDITIONS
OF MERCHANTABILITY, QUALITY AND
FITNESS FOR A PARTICULAR PURPOSE.
LIMITATION OF REMEDY AND DAMAGES
THE LIMITATIONS OF REMEDIES AND
DAMAGES IN THE SOFTWARE LICENSE
AGREEMENT SHALL NOT APPLY TO
PERSONAL INJURY (INCLUDING DEATH)
TO ANY PERSON CAUSED BY CREATIVE’S
NEGLIGENCE AND ARE SUBJECT TO THE
PROVISION SET OUT UNDER THE
HEADING “STATUTORY RIGHTS”.
STATUTORY RIGHTS
Irish law provides that certain conditions and
warranties may be implied in contracts for the sale
of goods and in contracts for the supply of services.
Such conditions and warranties are hereby excluded,
to the extent such exclusion, in the context of this
transaction, is lawful under Irish law. Conversely,
such conditions and warranties, insofar as they may
not be lawfully excluded, shall apply.
Accordingly nothing in this Agreement shall
prejudice any rights that you may enjoy by virtue of
Sections 12, 13, 14 or 15 of the Irish Sale of Goods
Act 1893 (as amended).
GENERAL
This Agreement is governed by the laws of the
Republic of Ireland. The local language version of
this agreement shall apply to Software acquired in
the EU. This Agreement is the entire agreement
between us, and you agree that Creative will not
have any liability for any untrue statement or
representation made by it, its agents or anyone else
(whether innocently or negligently) upon which you
relied upon entering this Agreement, unless such
untrue statement or representation was made
fraudulently.
Safety Information
The following sections contain notices for
various countries:
CAUTION: This device is intended to be installed
by the user in a CSA/TUV/UL certified/listed IBM
AT or compatible personal computers in the
manufacturer’s defined operator access area. Check
the equipment operating/installation manual and/or
with the equipment manufacturer to verify/confirm
if your equipment is suitable for user-installed
application cards.
Modifications
Any changes or modifications not expressly
approved by the grantee of this device could void the
user’s authority to operate the device.
Compliance
This product conforms to the following Council
Directive:
❑
Directive 89/336/EEC, 92/31/EEC (EMC)
Contents
Introduction.................................................................................................................... 1
System Requirements .................................................................................................... 1
Your Live! Drive ............................................................................................................ 2
Switching Audio Input Sources.......................................................................... 3
Connecting Headphones..................................................................................... 4
Connecting Microphone ..................................................................................... 4
Adjusting Headphones Volume and Microphone Gain ...................................... 5
Installing Hardware........................................................................................................ 6
Step 1: Prepare the System for Hardware Installation........................................ 6
Step 2: Insert the Live! Drive into the System.................................................... 7
Step 3: Connect to the SB Live! Card ................................................................ 9
Step 4: (Optional) Install the Digital DIN Metal Bracket
(To connect to FPS2000 or DTT2500 speakers) ............................................ 10
Step 5: (Optional) Connect to the Digital I/O Card (Only if you have one) .... 10
Step 6: Complete the Installation ..................................................................... 10
Using Your Live! Drive................................................................................................ 10
Playing Games and Music ................................................................................ 11
Watching DVD Movies Using SoftPC-DVD ................................................... 11
Recording and Content Authoring.................................................................... 11
Installing Software ....................................................................................................... 14
Additional Features in Device Controls ........................................................... 14
General Specifications ................................................................................................. 15
Troubleshooting ........................................................................................................... 15
Introduction
Connect Live! Drive to your Sound Blaster Live! audio card, and you will have the best audio
solution available for your music, digital audio content creation, games, movies, CDs, MP3
songs and other Internet entertainment. The Live! Drive has a front panel, which allows you to
connect commonly used audio sources to external devices easily. It conveniently allows you to
plug in your microphone and headphones, and adjust the gain/volume from the front panel.
Live! Drive also provides MIDI, as well as, digital input and output connectors for your audio
recording and content authoring purposes.
System
Requirements
The minimum system requirements for Live! Drive are:
❑ An installed Sound Blaster Live! (with an AUD_EXT expansion header)
❑ An available 5¼" PC drive bay
❑ Genuine Intel® Pentium® class processor:
133 MHz for Windows 95/98, 200 MHz for Windows NT 4.0
❑ Intel or 100% compatible motherboard chipset
❑ Windows 95, 98 or Windows NT 4.0
❑ 16 MB RAM for Windows 95/98 (32 MB RAM recommended),
32 MB RAM for Windows NT 4.0
❑ 160 MB of free hard disk space
❑ Headphones or amplified speakers (available separately)
❑ CD-ROM drive required for software installation
Live Drive CT4860/CT4861 1
Your Live! Drive
The front panel of your Live! Drive has these jacks, connectors and controls:
(These two sets of connectors and jacks are available only on Live! Drive II.)
If a particular INPUT source (for
example, Line In 2) is supported
by the Live! Drive as well as the
Digital I/O card, only the input on
the Live! Drive will be enabled.
However, using the microphone
via the Line In 2/Mic In 2 input on
the Live! Drive will also disable
the Line In 2 input on the Digital
I/O card.
To connect to your existing
computer headphones and
microphone to the Live! Drive,
use the ¼" to 3.5mm adapter
provided.
Optical SPDIF In/Out connectors
Connects to digital audio devices
such as DAT and MiniDisc recorders,
via optical input/output.
RCA Auxiliary In jacks
Connects to consumer equipment
such as VCR, TV and CD player, via
RCA Auxiliary outputs.
MIDI In/Out connectors
Connects to MIDI devices.
RCA SPDIF In/Out jacks
Connects to digital audio
devices such as DAT and
MiniDisc recorders, via
RCA input/output.
¼" Headphones jack
Allows you to connect to a pair of
high-quality headphones. Your
speaker output will be muted when
you connect the headphones.
Headphones Volume Control
Controls the headphones
output volume.
Line In 2/Mic In 2 selector
(Microphone Gain Control)
To switch to Line In 2, turn the knob anticlockwise over the Line In 2/Mic In 2 mode
separator mark until a “click” sound is
heard. To switch back to Mic In 2, turn the
knob clockwise over the separator mark
until a “click” sound is heard. To control
the microphone gain, continue to turn
clockwise.
¼" Line In 2/Mic In 2 jack
Allows you to connect to a high-quality
dynamic microphone or audio device such
as an electric guitar, DAT, or MiniDisc player.
Line In 2/Mic In 2 mode
separator mark
Figure 1: Jacks, connectors and controls on the Live! Drive.
2 Live Drive CT4860/CT4861
Switching
Audio Input Sources
You need to install the software
first before you can switch audio
input sources.
However, if the SPDIF Bypass
feature and Aux In 2 are both
enabled, both the SPDIF In and
Aux In 2 channels will be
available.
For details on the SPDIF Bypass
feature, see “Digital I/O” on page
14.
On your Sound Blaster Live! and Live! Drive, two audio input sources may share a connection.
In such cases, only one of the input source can be enabled and used at any one time.
If your audio card has an I2S connector, you can use only either one of the following inputs at
any one time:
❑ I2 S
❑ Line In 2 or Line In 2/Mic In 2
To switch the audio input source:
1. Click Start -> Programs -> Creative -> Sound Blaster Live! -> Surround Mixer.
2. On the Mixer deck (lower portion of Surround Mixer), click any of the audio input source
icon, and then select either the I2S In or Line In 2/Microphone 2 icon.
3. Click the red plus sign above the I2S In or Line In 2/Mic In 2 icon.
4. In the Other Advanced Controls dialog box, select the Enable Line In 2/Mic In 2 check
box to enable the Line In 2/Mic In 2 input source. Clear the check box to enable I2S In.
If your Live! Drive has Aux In 2 connectors, you can use only either one of the following inputs
at any one time:
❑ Aux In 2
❑ SPDIF In (Coaxial or Optical)
To switch the audio input source:
1. Click Start -> Programs -> Creative -> Sound Blaster Live! -> Surround Mixer.
2. On the Mixer deck (lower portion of Surround Mixer), click any of the audio input source
icon, and then select either the SPDIF In or Auxiliary 2 icon.
3. Click the red plus sign above the SPDIF In or Auxiliary 2 icon.
4. In the Other Advanced Controls dialog box, select the Enable Auxiliary 2 check box to
enable the Auxiliary 2 input source. Clear the check box to enable SPDIF In.
Live Drive CT4860/CT4861 3
Connecting
Headphones
There are two types of headphones which you can connect to the Live! Drive:
❑ Home audio or professional audio headphones, which are usually fitted with a ¼" stereo plug.
❑ Personal stereo headphones, which are usually fitted with a 3.5mm stereo plug, such as those
used for portable audio players.
To listen to an analog source (e.g.
CD Audio) using headphones,
make sure that in Surround Mixer,
the recording source selected is
“What U Hear”. Otherwise, no
sound will be heard from the
headphones.
Connecting
Microphone
There are two types of microphone which you can connect to the Live! Drive:
❑ Dynamic microphone, which is usually fitted with a ¼" stereo plug, such as those used in
vocal performances.
❑ Condenser microphone, which is usually fitted with a 3.5mm stereo plug, such as the Telex
microphone bundled with Creative audio products.
By default, Live! Drive is set for use with a condenser microphone. To use a dynamic
microphone, you must place the shunt (jumper cap) onto Jumper C85 on the Live! Drive. See
Figure 4 on page 8 for the location of Jumper C85 on the Live! Drive.
Shunt
Shunt
To use a dynamic
microphone,
place the shunt
onto Jumper C85.
The shunt for Jumper C85 can be
found together with the packet of
screws provided.
4 Live Drive CT4860/CT4861
Jumper C85
To use a condenser
microphone,
remove the shunt
from Jumper C85
(default setting).
Figure 2: Microphone jumper settings.
Jumper C85
Adjusting
Headphones Volume
and Microphone Gain
If your headphones and microphone are attached to the Live! Drive, the headphones volume and
microphone gain can be adjusted in two ways.
Using the Live! Drive
Control Knobs
On the front panel of the Live! Drive, turn the respective control knob:
❑ Anti-clockwise to decrease the headphones volume or microphone gain.
❑ Clockwise to increase the headphones volume or microphone gain.
Using Creative Surround
Mixer
To adjust the headphones volume:
1. Click Start -> Programs -> Creative -> Sound Blaster Live! -> Surround Mixer.
2. On the Mixer deck (lower portion of Surround Mixer), if the button below the VOL slider is
not highlighted, click it to unmute the output sound.
3. Adjust the VOL slider.
It is recommended that you set the
headphones volume level and
microphone gain level to 75% in
Surround Mixer, and use the
control knobs on the Live! Drive
to make further adjustments.
To adjust the microphone gain:
1. Click Start -> Programs -> Creative -> Sound Blaster Live! -> Surround Mixer.
2. On the Mixer deck (lower portion of Surround Mixer), click any of the audio input source
icon, and then select the Line In 2/Microphone 2 icon.
3. If the button below the Line In 2/Microphone 2 slider is not highlighted, click it to unmute
the audio input source.
4. Adjust the slider under the Line In 2/Microphone 2 icon.
Even if you turn the control knob
on the Live! Drive to the
maximum, your headphones will
have no sound if you set the
headphones volume level to 0% or
mute it in Surround Mixer. The
same applies for your
microphone.
Live Drive CT4860/CT4861 5
Installing Hardware
Step 1:
Prepare the System
for Hardware
Installation
To install your Live! Drive, you need to perform the following:
❑ Step 1: Prepare the System for Hardware Installation
❑ Step 2: Insert the Live! Drive into the System
❑ Step 3: Connect to the SB Live! Card
❑ Step 4: (Optional) Install the Digital DIN Metal Bracket (To connect to FPS2000 or DTT2500
speakers)
❑ Step 5: (Optional) Connect to the Digital I/O Card (Only if you have one)
❑ Step 6: Complete the Installation
1. Switch off your system and all peripheral devices.
2. Touch a metal plate on your system to ground yourself
and to discharge any static electricity, and then unplug
the power cord from the wall outlet.
3. Remove the cover from your system.
4. Remove the front panel cover from one unused 5¼"
drive bay.
Front panel cover
Figure 3: Removing front panel cover.
Place your CD-ROM/DVD-ROM
drive above the Live! Drive to
prevent dangling cables from the
front panel blocking access to the
drive tray.
6 Live Drive CT4860/CT4861
Step 2:
Insert the Live! Drive
into the System
1. Pass the following cable ends from the inside of the casing through the vacant 5¼" drive bay,
and then leave the cables dangling halfway on the outside of the casing:
❑ Smaller end of the power splitter cable
❑ Dark grey flat cable end with a black circle near the connector
❑ (Optional) Any end of the light grey flat cable (if you want to connect to a Digital I/O
card from an earlier purchase)
❑ (Optional) Cable end of the Digital DIN metal bracket (if you want to connect to
FPS2000 or DTT2500 speakers)
Live Drive CT4860/CT4861 7
2. Connect the cables to the Live! Drive as shown in Figure 4.
To system
power supply unit
Power splitter cable
Live! Drive
Digital DIN
metal bracket
Orange-colored wire
Digital
DIN cable
J3
Connector for
future upgrades
J2
J1
Black circle on the
underside of the cable
C85
Red-colored wire
Red-colored wire
Jumper for microphone
type selection
Light grey
flat cable
Dark grey
flat cable
(Optical)
Digital I/O card
Sound Blaster Live! card
Figure 4: Connecting cables to the Live! Drive.
3. Slide the Live! Drive into the vacant 5¼" drive bay, and then secure its sides to the casing with
the screws provided.
8 Live Drive CT4860/CT4861
Step 3:
Connect to the
SB Live! Card
Do not force the audio card into
the slot. If it does not fit properly,
gently remove it and try again.
Connect the dark grey flat cable to Sound Blaster Live!’s AUD_EXT header.
If you have difficulty connecting to the AUD_EXT header:
1. Remove the Sound Blaster Live! card from its PCI slot.
2. Connect the dark grey flat cable to Sound Blaster Live!’s AUD_EXT header.
3. Align the Sound Blaster Live! card with the vacant PCI expansion slot. Press the card gently
and evenly into the slot as shown in Figure 5. Ensure that the card is seated firmly inside the
PCI expansion slot.
4. Secure the card to the expansion slot with a screw.
ii. Fasten the card
to the slot with a
screw.
Unused brackets
i. Gently press the
audio card into
the slot.
PCI slot
ISA slot
Figure 5: Securing the audio card to the PCI
expansion slot.
Live Drive CT4860/CT4861 9
Step 4: (Optional)
Install the Digital DIN
Metal Bracket
(To connect to
FPS2000 or DTT2500
speakers)
Step 5: (Optional)
Connect to the
Digital I/O Card
(Only if you have one)
1. Remove the metal plate from a vacant ISA or PCI expansion slot.
2. Align the Digital DIN metal bracket with the vacant expansion slot opening.
3. Secure the metal bracket to the system casing with a screw.
Connect the light grey flat cable to the Digital I/O card’s AUD_EXT header.
If you have difficulty connecting to the AUD_EXT header:
1. Remove the Digital I/O card from the system.
2. Connect the light grey flat cable to the Digital I/O card.
3. Place the metal bracket of the Digital I/O card into the vacant bracket on the system casing.
4. Secure the card to the system casing with a screw.
Step 6:
Complete the
Installation
1. Connect the power splitter cable to the system power supply unit.
2. Replace the cover onto your system.
3. Plug the power cord back into the wall outlet, and switch on the system.
Using Your
Live! Drive
The Live! Drive will most undoubtedly give you endless hours of listening pleasure. The
following information and diagrams on the next two pages show how you can connect to your
Live! Drive to optimize your enjoyment.
10 Live Drive CT4860/CT4861
Playing Games and
Music
❑ With FourPointSurround or DeskTop Theater 5.1 Digital Speaker System from Cambridge
SoundWorks, you can experience crystal clear gaming sequences or music from the Digital
DIN connection.
Watching DVD
Movies Using SoftPCDVD
❑ If you are using Creative SoftPC-DVD to watch DVD movies on your PC, connect from the
SPDIF Output of your Live! Drive to an external Dolby Digital (AC-3) decoder such as the
DeskTop Theater speaker systems.
Recording and
Content Authoring
FourPointSurround and DeskTop
Theater 5.1 speaker systems,
Digital I/O Module, Digital
Output Module and Digital I/O
card are available separately.
❑ The Live! Drive fits into the standard 5¼" drive bay of your computer and thus allows you
easy access to the following connectors from its front panel:
• Standard MIDI input/output connectors for connection to MIDI devices;
• A second analog Line In allows you to connect to an additional input device (e.g. a CD
player) for recording. Switchable to Microphone mode for a second microphone input,
with front panel volume control;
• A Headphones jack to connect to your headphones, with front panel volume control.
• A set of SPDIF (RCA) input/output jacks for recording to and from external digital
devices such as MiniDisc or DAT recorders
• A set of SPDIF Optical input/output jacks for recording to and from external digital
devices such as MiniDisc or DAT recorders via an optical connection.
(Available on Live! Drive II only.)
• A set of Auxiliary input jacks for recording from consumer equipment such as television,
video cassette recorder and CD players. (Available on Live! Drive II only.)
❑ A Digital DIN connector for connection to digital speakers such as the FourPointSurround or
DeskTop Theater 5.1 Digital Speaker Systems.
❑ The Headphones and Microphone connections utilizes ¼" jacks for high-quality connectivity.
Live Drive CT4860/CT4861 11
Playing Games and Music
with FourPointSurround Digital
Speaker System
FourPointSurround
Digital Speaker System
Sound Blaster Live! card
Digital
DIN
Digital DIN
Metal bracket
Recording and Content Authoring
with Live! Drive
SPDIF (RCA)
In
Out
Watching DVD Movies
with Creative SoftPC-DVD and
DeskTop Theater 5.1 Digital Speaker System
Digital device
(e.g., DAT)
MiniDisc
Note: The Optical and
AUX input jacks are
available only on Live!
Drive II.
AUX input from
an analog source
(e.g., CD player
or tape deck)
Live! Drive
DeskTop Theater 5.1 Digital Speaker System
Dolby Digital
(AC-3)
SPDIF In
Digital
DIN
Headphones
Figure 6: Connecting peripherals to the Live! Drive.
12 Live Drive CT4860/CT4861
Microphone /
Line In
MIDI devices
(e.g., MIDI keyboard)
If you have an Optical Digital I/O card (or Digital I/O card) from an earlier purchase, you can
connect it to your Live! Drive. The figure below shows an alternative method for audio
recording and content authoring using the Optical Digital I/O card.
When you cascade your existing
Digital I/O card to the Live! Drive,
please note the following:
• On the Digital I/O card, only
the SPDIF Outputs are
available.
The SPDIF Inputs and 2nd
Line Input are available on the
Live! Drive. The SPDIF
Outputs are also available on
the Live! Drive.
• You can connect two MIDI
devices simultaneously to the
MIDI Input of the Live! Drive
and Digital I/O card. However,
at any one time, you can only
use the MIDI Input on either
the Live! Drive or the Digital
I/O card.
The MIDI Output is available
on both the Digital I/O card
and the Live! Drive.
Recording and Content Authoring
with Optical Digital I/O card and
Digital I/O Module
SPDIF (RCA)
In
Digital device
(e.g., DAT)
SPDIF Out (RCA)
MiniDisc
Recorder
Recording to or from an
external digital device
supporting RCA SPDIF
input/output
Digital I/O Module
(RCA/Optical SPDIF In and Out)
Optical
Output
Optical
Input
To FourPointSurround
or DeskTop Theater 5.1
Digital Speaker Systems
Line In 2
Digital In/Out
Digital DIN
Connects to
Live! Drive
MIDI In
MIDI Out
MIDI devices
(e.g., MIDI keyboard)
Optical
Digital I/O
card
Figure 7: Connecting peripherals to an Optical Digital I/O card.
Live Drive CT4860/CT4861 13
Installing Software
Additional Features in
Device Controls
Digital I/O
1. Insert the installation disc into your CD-ROM drive.
The disc supports Windows AutoPlay mode and starts running automatically.If not, see
“Troubleshooting” on page 15.
2. Follow the instructions on the screen to complete the installation.
After you install the software for the Live! Drive, you will be able to enable the SPDIF Bypass
feature for your digital inputs and outputs, and mute your speakers when you plug your
headphones into Live! Drive. These two new features appears as two new tabbed pages in
Device Controls.
To enable the SPDIF Bypass feature:
•
On the Digital I/O tabbed page, select the Enable check
box to place a check mark in it.
SPDIF Bypass is required if you want audio signals
passing through SPDIF In to be routed directly to SPDIF
Out, without passing through the processor chip.
Live! Drive
To mute the speakers when using headphones:
•
14 Live Drive CT4860/CT4861
On the Live! Drive tabbed page, select the Mute
speakers when using headphones check box to place a
check mark in it.
General Specifications
Audio Inputs and Outputs
On Front Panel
❑ Two RCA jacks for coaxial SPDIF input and output
❑ One Headphone output with auto detection via ¼" stereo jack with volume control
❑ One shared line-level analog Line/Microphone input via ¼" stereo jack. Shared input
selectable via switch with gain (or level) control
❑ Two 5-pin standard DIN female connector for MIDI input and output
Additional Audio Inputs
and Outputs on Front
Panel
(For Live! Drive II)
❑ Two RCA jacks for left and right channel stereo Auxiliary inputs
❑ Two optical connectors for Optical SPDIF input and output
Interfaces
❑
❑
❑
❑
Digital DIN pin header (J3) for rear metal bracket Digital DIN
Power input connector to system power supply unit
One AUD_EXT (SB LIVE! CARD) 2x20 pin header (J1) for connection to SB Live! card
One DIGITAL I/O CARD 2x20 pin header (J2) for connection to Digital I/O card (see Figure
4 on page -8)
Troubleshooting
Problems Installing Software
In Windows 95/98, the installation does not start automatically after the CD-ROM is
inserted.
Cause
The AutoPlay feature in your Windows 95/98 system may not be enabled.
Solution
To start the installation program through the My Computer shortcut menu:
1. Double-click the My Computer icon on your Windows desktop.
2. In the My Computer window, right-click the CD-ROM drive icon.
3. On the shortcut menu, click AutoPlay and follow the instructions on the screen.
Live Drive CT4860/CT4861 15
Problems with Sound
No sound from the headphones.
Cause
The headphones may not be connected or configured properly.
Solution
Check the following:
❑ The headphones are connected to the Headphones jack.
❑ Under the Speaker view in the Main deck of Surround Mixer, make sure that the Speaker
selected is “Headphones”.
❑ In the Mixer deck of Surround Mixer, the recording source selected is “What U Hear”.
No sound from the speakers.
Cause
The speakers may not be connected properly, the mixer settings may not be
configured properly, or the headphones are connected to the Live! Drive.
Solution
Check the following:
❑ The speakers are connected to your card's output.
❑ The correct source has been selected in the Mixer deck.
❑ If the above conditions have been met and you still do not get any sound, click the red plus
sign above the VOL control and check whether the Digital Output Only check box is
selected. If it is, you are in the Digital Output Only mode and so must connect to digital
speakers to hear the sound from your audio card. See the section on Digital Output Only in
Surround Mixer’s online help for more information.
❑ If your headphones and/or the ¼" to 3.5mm adapter are connected to the Live! Drive,
disconnect them. Alternatively, open the Device Controls applet in AudioHQ, click the Live!
Drive tab, and then clear the Mute speakers when using headphones check box.
16 Live Drive CT4860/CT4861