1
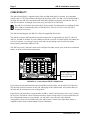
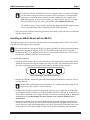
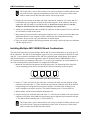
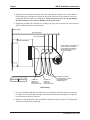
AM-90
Installation Instructions
PDI-00090-00, Rev. A02
© 1998
ALPHA MICROSYSTEMS
FIRST EDITION: March 1998
To re-order this document, request part number PDI-00090-00
FCC Notice
This equipment has been tested and found to comply with the limits for a Class A digital device,
pursuant to Part 15 of the FCC Rules. These limits are designed to provide reasonable protection against
harmful interference when the equipment is operated in a commercial environment. This equipment
generates, uses and can radiate radio frequency energy and, if not installed and used in accordance with
the instruction manual, may cause harmful interference to radio communications. Operation of this
equipment in a residential area is likely to cause harmful interference in which case the user will be
required to correct the interference at his own expense.
Canadian Department of Communications Compliance Statement
This equipment does not exceed Class A limits per radio noise emissions for digital apparatus set out in
the Radio Interference Regulations of the Canadian Department of Communications. Operation in a
residential area may cause unacceptable interference to radio and TV reception requiring the owner or
operator to take whatever steps are necessary to correct the interference.
Avis de Conformité aux Normes du Ministère des Communications du Canada
Cet équipment ne depasse pas les limits de Classe A d'émission de bruits radioélectriques pour les
appareils numeriques tels que prescrites par le Règlement sur le brouillage radioélectrique établi par le
ministère des Communications du Canada. L'exploitation faite en milleu résidential peur entrainer le
brouillage des réceptions radio et tele, ce qui obligerait le propriétaire ou l'opératour à pendre les
dispositions nécessaires pour en éliminer les causes.
Electrical Warning
This equipment contains components that can be damaged by static electricity. Follow all electronic
discharge precautions when handling the equipment. For example, touch the metal back panel of the
CPU or peripheral chassis to dissipate any electrical charge before touching the circuit boards or
equipment within the chassis. After turning off power, before you open your computer chassis, unplug
the cord from the electrical outlet to guard against electrical shock.
This document may contain references to products covered under the following U.S. Patent Number(s):
4,530,048
ALPHA MICROSYSTEMS
2722 Fairview Street
P.O. Box 25059
Santa Ana, CA 92704
Table of Contents
INTRODUCTION
About the AM-90 Board
AM-90 Board Layout
COMPATIBILITY
ELECTRONIC EQUIPMENT HANDLING PRECAUTIONS
PREPARING YOUR COMPUTER
INSTALLING THE AM-90 BOARD
Installing AM-90 Board(s) in an Eagle 100 or Eagle 100LC
Installing an AM-90 Board with an AM-314
Installing Two AM-90 Boards with an AM-318
Installing Multiple AM-318/AM-90 Board Combinations
PDI-00090-00, Rev. A02
1
1
1
2
3
3
4
4
5
6
7
INTRODUCTION
The AM-90 Lightning Board is a compact circuit card assembly that provides four RJ-45 ports and builtin protection against lightning damage for the Eagle family of systems. It gets its name from its built-in
surge protection feature. An array of transient absorption zener diodes mounted on the board guards
against voltage surges caused by lightning strikes and other damaging transient electrical fluctuations.
The AM-90 mounts between your current I/O board (AM-314, AM-318, or AM-137) and your
computer’s back panel, and provides four serial ports with RJ-45 connectors, eliminating the need for
cluster cables.
About the AM-90 Board
The AM-90 is a compact circuit board assembly approximately 3¼” wide, 2½” deep, and ¾” high
(83mm x 64mm x 20mm) that mounts on your computer’s back panel. It provides:
• Built-in surge protection implemented by an on-board array of transient absorption diodes
(TAZD). If an over-voltage condition occurs (voltages above 27 volts at up to 600 watts), these
diodes divert the flow of current away from sensitive I/O circuitry. With an AM-90 board, a
properly grounded system should withstand power surges without damage.
• Four RS-232 serial ports with 8-wire RJ-45 connectors compatible with the pinouts on the AM359 board and Super Eagle system, thus standardizing the RS-232 pinouts for all Alpha Micro
I/O boards. This interconnect board protects all modem and flow control signals (except when
connected to an AM-318 I/O board, which does not support full modem control).
AM-90 Board Layout
RJ-45 PORTS
J1
D13
D19
D8
D14
D20
D3
D9
D15
D21
D4
D10
D16
D22
D5
D11
D17
D23
D6
D12
D18
D24
PLUG IN FROM AM-137,
AM-138, AM-301, AM-314,
OR AM-318-10 HERE.
AM314
AM137
AM138
AM318-00
P1
PIN 1
P2
3
PLUG IN FROM AM-318-00 HERE
(present only on -02 thru -04 versions)
2
1
1
RR
3
2
0
PORT #
PIN 1
AM-90 Lightning Board
PDI-00090-00, Rev. A02
DWB-00090-
D7
D2
AM318-10
D1
Page 2
AM-90 Installation Instructions
COMPATIBILITY
The AM-90 board family is supported in the Eagle and AM-6060 family of systems. It is compatible
with the AM-137 CPU board found in the Eagle 100 and Eagle 100LC, the AM-138 CPU board found in
the Eagle 450, the AM-301 board found in the AM-6060 network based system, and with the AM-314,
AM-318-00 (AM-90 -02 through -04 versions only), and AM-318-10 I/O boards.
The AM-90 is included as part of the AM-318-10 assembly. For information on installing the AM318-10/AM-90 combination, please see PDI-00318-10, AM-318-10 8-Port Serial I/O Board
Installation Instructions.
The AM-90 board supports only RS-232; it does not support RS-422 circuits.
The AM-90 revision A and B boards do not allow remote reset as supported by the AM-137, AM-138,
AM-301, and AM-314 boards. If you are adding an AM-90 revision A or B board which will contain port
0 of your computer, you can keep a remote reset ability by purchasing a special cable from Alpha
Microsystems, part number PDB-10323-00.
The AM-90 revision C and later boards can be configured to enable remote reset on the above mentioned
boards, as shown in the following illustration.
=
Solder jumper wire
between bottom and
center pad at JP1
AM-90 Rev C or later Remote RESET Modification
If you want to use the AM-90 board with existing DB-9 terminal cables, use the AM-359-50 Cable Set.
The cable has an RJ-45 connector on one end, which plugs to the AM-90 board, and a female DB-9 on
the other end, for connection to your existing cables.
Eagle chassis rear panels have varying numbers of DB-9 (“small”) and Centronics-style (“long”) cutouts
for I/O ports. The AM-90’s RJ-45 connector assembly requires a long cutout. If your rear panel does not
have enough long cutouts to accept AM-90s, you can order a new rear panel with a different
configuration (if one was not included with your AM-90 order). Contact your Alpha Micro dealer or
Alpha Micro Sales Order Administration for more information.
PDI-00090-00, Rev. A02
AM-90 Installation Instructions
Page 3
ELECTRONIC EQUIPMENT HANDLING PRECAUTIONS
With the AC power cord unplugged and the top cover removed, the components inside your computer
are vulnerable to damage caused by static discharge. Your body and clothing can store an electrical
charge that can damage or destroy unprotected electronic components. Before handling any computer
hardware, make sure your work area is properly protected against static discharge. There are a number of
commercially available static protection devices, like the wrist strap shown below, designed specifically
to protect your equipment from harmful static discharge.
Static Protection Wrist Strap
PREPARING YOUR COMPUTER
1. Ensure your work area is protected against static discharge, as outlined above.
2. Follow the instructions for accessing your computer as outlined in the Eagle Series Technical
Manual, DSS-10517-00.
3. Remove the six screws that attach the rear panel to the chassis. Remove the rear panel and lay it
down flat.
4. Unplug the existing I/O cable(s) from the CPU or system I/O board, and from the rear panel. Set
aside.
5. If you are replacing the rear panel as part of this installation, remove all the cables from the old
rear panel and attach them to the new rear panel.
PDI-00090-00, Rev. A02
Page 4
AM-90 Installation Instructions
INSTALLING THE AM-90 BOARD
The exact installation procedure differs depending on the type of I/O board you’re attaching the AM-90
to. Please turn to the section that applies to your system. There are four sets of instructions:
• Installing with an AM-137 CPU board (Eagle 100 and Eagle 100LC)
• Installing with an AM-314 board
• Installing with an AM-318 board
• Installing multiple AM-318/AM-90 board combinations
The AM-90 boards are included in both the Eagle 450 and AM-6060 as standard configurations, and are
described in the corresponding manuals for those systems.
Installing AM-90 Board(s) in an Eagle 100 or Eagle 100LC
This section describes how to install an AM-90 board in a system equipped with an AM-137 CPU board.
There are two such systems: the Eagle 100 and the Eagle 100LC. The Eagle 100LC supports a total of
four serial ports and takes only one AM-90 board; the Eagle 100 supports eight serial ports attached to
the AM-137 and can be upgraded with two AM-90 boards. To complete the installation:
1. Attach the first AM-90 board to the bottom rear panel slot with the two star-washered screws
provided in the kit. The ports are numbered from left to right; port 0 is at the left as you look at
the outside of the back panel. The illustration below shows the correct orientation for the fourport RJ-45 connector assembly on the rear panel.
Correct Orientation of the RJ-45 Connectors
2. Plug the 40-conductor ribbon cable provided with the AM-90 board into the connector at P1 on
the AM-90 board.
All the cables mentioned have keyed connectors. It is vital that you always align the red
stripe on the cable with pin 1 on the connector.
3. Fold the cable 90 degrees under itself, keeping the red stripe on the cable to your right. A double
fold is needed to get proper pin-1 orientation. Plug the connector at the other end of the cable
into the connector at J4 on the AM-137 board. This AM-90 board contains serial ports 1 - 3.
4. If you are installing a second AM-90 board, repeat steps 1 through 3 with the other AM-90
board. Attach the board to the next rear panel slot up, and use the connector at J5 on the AM-137
board. This AM-90 board contains ports 4 - 7.
5. Attach your terminal/printer cables to the RJ-45 connectors on the rear panel. Port 0 is at the left,
as seen from the outside of the system.
6. Boot and test your system before replacing the computer's cover, in case you need to make some
adjustments. Refer to your computer’s owner’s manual for more information on testing
procedures. Be sure to test every port attached to an AM-90 board.
PDI-00090-00, Rev. A02
AM-90 Installation Instructions
Page 5
For AM-90 revision A or B boards, if you were using the AM-137’s remote reset feature,
you must either remove the remote reset jumper at W2 on the AM-137 board to disable
remote reset, or install the special remote reset cable, PDB-10323-00, available from
Alpha Microsystems. If you leave the remote reset jumper in place, port 0 is on an AM90 board, and the remote reset cable is not installed, your computer will not boot.
For AM-90 revision C or later boards, configure the appropriate board to support remote
reset per the instructions in the Compatibility section of this document.
7. Once your system completes the testing procedures successfully, replace the top cover and fasten
with the original screws.
Installing an AM-90 Board with an AM-314
This section describes how to install an AM-90 board in a system equipped with an AM-314 I/O board.
The AM-314 board supports four serial ports.
The AM-90 board does not support RS-422; it supports only RS-232. Before proceeding with the
installation, insure that the jumpers at W0, W1, W2 and W3 on the AM-314 I/O board are
configured for RS-232, as shipped from the factory. See Installation Instructions: AM-314 FourPort I/O Board, PDI-00314-00, for more information.
To complete the installation:
1. Attach the AM-90 board to the rear panel with the two star-washered screws provided in the kit.
Attach the four ports to the lowest available slot in the rear panel. The illustration below shows
the correct orientation for the four-port RJ-45 connector assembly on the rear panel.
Correct Orientation of the RJ-45 Connectors
2. Plug the 40-conductor ribbon cable provided with the AM-90 board into the connector at P1 on
the AM-90 board.
All the cables mentioned have keyed connectors. It is vital that you always align the red
stripe on the cable with pin 1 on the connector.
3. Fold the cable 90 degrees under itself, keeping the red stripe on your right, then stand the cable
up with the red stripe up. Plug the connector at the other end of the cable into the connector at J1
on the AM-314 board. Be sure to support the AM-314 board as you plug the cable in. Do not use
excessive force or you may damage the AM-314 board or the connector holding it to the
system board.
4. Repeat steps 1 through 4 above to install additional AM-90 boards, attaching each RJ-45 port
assembly to the next slot up. You can install an AM-90 board with each AM-314 board in your
system. Each new cable wraps around the previous cable. If necessary, roll the cables in to make
room for the next cable on the outside. See the picture of cable routing later in this document.
PDI-00090-00, Rev. A02
Page 6
AM-90 Installation Instructions
5. Attach your terminal/printer cables to the RJ-45 connectors on the rear panel. Port 0 is at the left,
as seen from the outside of the system.
6. Boot and test your system before replacing the computer's cover, in case you need to make some
adjustments. Refer to your computer’s owner’s manual for more information on testing
procedures. Be sure to test every port attached to an AM-90 board.
For AM-90 revision A or B boards, if you were using the AM-314’s remote reset feature,
you must either remove the remote reset jumper from the system board (W3 on the AM319-10 or W7 on the AM-319-00) or install the special remote reset cable, PDB-1032300, available from Alpha Microsystems. If you leave the remote reset jumper in place,
port 0 is on an AM-90 board, and the remote reset cable is not installed, your computer
will not boot.
For AM-90 revision C or later boards, configure the appropriate board to support remote
reset per the instructions in the Compatibility section of this document.
7. Once your system completes the testing procedures successfully, replace the top cover and fasten
with the original screws.
Installing Two AM-90 Boards with an AM-318
This section describes how to install an AM-90 board in a system equipped with an AM-318 I/O board.
Note that the AM-90 board must be a version that supports the AM-318-00 board, namely DWB-0009002,-03,or -04. The AM-318 board supports eight serial ports; you must install two AM-90s for each AM318. Your kit includes a 50-conductor cable with a “Y” to two 26-pin connectors.
To complete the installation:
1. Attach the AM-90 board (which supports ports 0 through 3) to the lowest available slot on the
rear panel with the two star-washered screws provided in the kit. The illustration below shows
the correct orientation for the four-port RJ-45 connector assembly on the rear panel.
Correct Orientation of the RJ-45 Connectors
2. On the “Y” cable, one of the 26-pin cables has a red stripe; the other does not. Plug the 26-pin
connector at the end of the “Y” cable with the red stripe into the connector at P2 on the AM-90
board, making sure to align this keyed connector with pin 1. Fold the cable 90 degrees over
itself, keeping the red stripe to your left.
3. Attach the second AM-90 board (which supports ports 4 through 7) to the next slot up.
4. Plug the 26-pin connector at the end of the “Y” cable without a red stripe into the connector at
P2 on the second AM-90 board, making sure to align the keyed connector with pin 1.
PDI-00090-00, Rev. A02
AM-90 Installation Instructions
Page 7
The 50-pin cable is split so the two halves can overlap each other. Fold this cable the same
way as the first one, wrapping it around the previous cable. If necessary, roll the cables
inside to make room for the next cable outside. See the next section.
5. Plug the 50-pin connector at the other end of the cable into the connector at J1 on the AM-318
board. Make sure you align the red stripe on this cable with pin 1 on the connector. Be sure to
support the AM-318 board as you plug the cable in. Do not use excessive force or you may
damage the AM-318 board or the connector holding it to the system board.
6. Attach your terminal/printer cables to the RJ-45 connectors on the rear panel. Port 0 is at the left,
as seen from the outside of the system.
7. Boot and test your system before replacing the computer's cover, in case you need to make some
adjustments. Refer to your computer’s owner’s manual for more information on testing
procedures. Be sure to test every port attached to an AM-90 board.
8. Once your system completes the testing procedures successfully, replace the top cover and fasten
with the original screws.
Installing Multiple AM-318/AM-90 Board Combinations
This section describes how to install multiple AM-90/AM-318 board combinations, to provide up to 32
RJ-45 connectors. The AM-318 board supports eight serial ports; you must install two AM-90s for each
AM-318. You can install a maximum of four AM-318 boards and eight AM-90 boards. Note that the
AM-90 board must be a version that supports the AM-318-00 board, namely DWB-00090-02,-03,or 04.Your kit includes a 50-conductor cable with a “Y” to two 26-pin connectors for each combination of
one AM-318 board and two AM-90 boards. To complete the installation:
1. Mount the first AM-90 in the bottom slot of the back panel. The illustration below shows the
correct mounting position for the four-port RJ-45 connector assembly on the rear panel.
Correct Orientation of the RJ-45 Connectors
2. On the “Y” cable, one of the 26-pin cables has a red stripe; the other does not. Plug the 26-pin
connector at the end of the “Y” cable with the red stripe into the connector at P2 on the AM-90
board, making sure to align this keyed connector with pin 1. Fold the cable 90 degrees over
itself, keeping the red stripe to your left. This AM-90 contains ports 0-3 for this AM-318.
3. Mount another AM-90 in the next higher back-panel slot.
4. Plug the other 26-pin connector at the end of the “Y” cable (the one without a red stripe) into the
connector at P2 on the second AM-90 board, making sure to align the keyed connector with pin
1. This AM-90 board contains ports 4-7 for this AM-318.
The 50-pin cable is split so the two halves can overlap each other. Fold this cable the same
way as the first one, wrapping it around the previous cable. If necessary, roll the cables
inside to make room for the next cable outside.
PDI-00090-00, Rev. A02
Page 8
AM-90 Installation Instructions
5. Plug the 50-pin connector at the other end of the cable into the connector at J1 on the AM-318
board. Make sure you align the red stripe on this cable with pin 1 on the connector. Be sure to
support the AM-318 board as you plug the in. Do not use excessive force or you may damage
the AM-318 board or the connector holding it to the system board.
6. Repeat this procedure for each AM-318, working your way up the rear panel for each successive
AM-318. Route the cables as shown below:
REAR PANEL
AM-319 BOARD
AM-318 BOARDS
AM-90 BOARDS
FOR PORTS 30-33 AND 34-37,
TWIST CABLE COUNTERCLOCKWISE AND ROUTE
OVER THE TOP OF THE
AM-318 BOARDS.
CABLE TO
PORTS 0-3
GOES INTO
BOTTOM AM-90
CABLE TO
PORTS 4-7
GOES TO
SECOND AM-90
CABLES TO PORTS
10 THROUGH 27. EACH
GOES INTO NEXT
HIGHER AM-90.
Cable Routing
7. If you are installing eight AM-90 boards (to be used with four AM-318 boards), route the last
two cables over the top of the card cage, as shown in the illustration, making sure to align the
keyed connectors properly with pin 1.
8. Attach your terminal/printer cables to the RJ-45 connectors on the rear panel. This illustration
shows the back panel port numbering:
PDI-00090-00, Rev. A02
AM-90 Installation Instructions
Page 9
ENET
BOOT
MAIN
ALT
ETHERNET
PARALLEL 0
PARALLEL 1
34
35
36
37
30
31
32
33
24
25
26
27
20
21
22
23
14
15
16
17
10
11
12
13
4
5
6
7
0
1
2
3
Rear Panel with 32 RJ-45 ports
10. Boot and test your system before replacing the computer's cover, in case you need to make some
adjustments. Refer to your computer’s owner’s manual for more information on testing
procedures. Be sure to test every port attached to an AM-90 board.
PDI-00090-00, Rev. A02