1
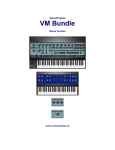
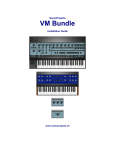
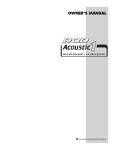
OWNER'S MANUAL
GUITAR EFFECTS
PROCESSOR/PREAMP
A Harman International Company
SAFETY INSTRUCTIONS (EUROPEAN)
CAUTION
RISK OF ELECTRIC SHOCK
DO NOT OPEN
A T T E N T I O N : RISQUE DE CHOC ELECTRIQUE - NE PAS OUVRIR
W A R N I N G : TO REDUCE THE RISK OF FIRE OR ELECTRIC
SHOCK DO NOT EXPOSE THIS EQUIPMENT TO RAIN OR MOISTURE
The symbols shown at left are internationally accepted symbols that warn of
potential hazards with electrical products. The lightning flash with arrowpoint in
an equilateral triangle means that there are dangerous voltages present within
the unit. The exclamation point in an equilateral triangle indicates that it is necessary for the user to refer to the owner’s manual.
These symbols warn that there are no user serviceable parts inside the unit.
Do not open the unit. Do not attempt to service the unit yourself. Refer all servicing to qualified personnel. Opening the chassis for any reason will void the
manufacturer’s warranty. Do not get the unit wet. If liquid is spilled on the unit,
shut it off immediately and take it to a dealer for service. Disconnect the unit
during storms to prevent damage.
NOTICE FOR CUSTOMERS IF YOUR UNIT IS EQUIPPED WITH A POWER
CORD.
WARNING: THIS APPLIANCE MUST BE EARTHED.
The cores in the mains lead are coloured in accordance with the following code:
GREEN and YELLOW - Earth
BLUE - Neutral
BROWN - Live
As colours of the cores in the mains lead of this appliance may not correspond
with the coloured markings identifying the terminals in your plug, proceed as follows:
• The core which is coloured green and yellow must be connected to the
terminal in the plug marked with the letter E, or with the earth symbol, or
coloured green, or green and yellow.
• The core which is coloured blue must be connected to the terminal
marked N or coloured black.
• The core which is coloured brown must be connected to the terminal
marked L or coloured red.
The power cord is terminated in a CEE7/7 plug (Continental Europe). The
green/yellow wire is connected directly to the unit's chassis. If you need to
change the plug, and if you are qualified to do so, refer to the table below.
U.K. MAINS PLUG WARNING
A moulded mains plug that has been cut off from the cord is unsafe. Discard the
mains plug at a suitable disposal facility. NEVER UNDER ANY CIRCUMSTANCES SHOULD YOU INSERT A DAMAGED OR CUT MAINS PLUG INTO
A 13 AMP POWER SOCKET. Do not use the mains plug without the fuse cover
in place. Replacement fuse covers can be obtained from your local retailer.
Replacement fuses are 13 amps and MUST be ASTA approved to BS1362.
CONDUCTOR
WIRE COLOR
Normal
Alt
BLACK
L
LIVE
BROWN
N
NEUTRAL
BLUE
E EARTH GND GREEN/YEL
WHITE
GREEN
WARNING: If the ground is defeated, certain fault conditions in the unit or in the
system to which it is connected can result in full line voltage between chassis
and earth ground. Severe injury or death can then result if the chassis and
earth ground are touched simultaneously.
IMPORTANT!
FOR YOUR PROTECTION, PLEASE READ THE FOLLOWING:
WATER AND MOISTURE: Appliance should not be used near water (e.g. near
a bathtub, washbowl, kitchen sink, laundry tub, in a wet basement, or near a
swimming pool, etc). Care should be taken so that objects do not fall and liquids are not spilled into the enclosure through openings.
POWER SOURCES: The appliance should be connected to a power supply
only of the type described in the operating instructions or as marked on the
appliance.
GROUNDING OR POLARIZATION: Precautions should be taken so that the
grounding or polarization means of an appliance is not defeated.
POWER CORD PROTECTION: Power supply cords should be routed so that
they are not likely to be walked on or pinched by items placed upon or against
them, paying particular attention to cords at plugs, convenience receptacles,
and the point where they exit from the appliance.
SERVICING: The user should not attempt to service the appliance beyond that
described in the operating instructions. All other servicing should be referred to
qualified service personnel.
FUSING: If your unit is equipped with a fuse receptacle, replace with only
same type fuse. Refer to replacement text on the unit for correct fuse type.
signal processing
Introduction .........................................................................................................2
About the Pictorial Guide Indicators................................................................2
Warranty.........................................................................................................2
SECTION 1 - GETTING STARTED..........................................................................4
Supplying Power ..................................................................................................4
Front Panel Controls ............................................................................................5
PROGRAM AND BANK SELECTOR FOOTSWITCHES ........................................5
EFFECT SELECTOR BUTTONS (DIGITAL FX) .....................................................5
EFFECT GROUPS .............................................................................................5
EFFECT SELECTOR BUTTONS (PREAMP)..........................................................5
STORE BUTTON..............................................................................................5
DISPLAY .........................................................................................................6
DATA WHEEL...................................................................................................6
CLIP LED .........................................................................................................6
OUTPUT KNOB ...............................................................................................6
INPUT KNOB ..................................................................................................6
Rear Panel Connections .......................................................................................6
INSTRUMENT INPUT ......................................................................................6
JAM-A-LONG™ INPUT ....................................................................................6
HEADPHONE OUTPUT ....................................................................................6
LEFT / MONO OUT.........................................................................................6
RIGHT OUT .....................................................................................................6
VOLUME/WAH CONTROLLER INPUT ..............................................................6
AC POWER INPUT...........................................................................................6
POWER CORD STRAIN RELIEF .........................................................................7
Hooking Up .........................................................................................................7
SECTION 2 - PROGRAMMING THE FX7...............................................................8
Navigating The FX7 .............................................................................................8
Using The Footswitches .......................................................................................8
Editing Programs .................................................................................................9
Storing Programs .................................................................................................10
Bypassing .........................................................................................................10
A Word About Mono Operation..........................................................................11
Using A Controller With The FX7 ........................................................................11
About the FX7's Effects ........................................................................................12
EQUALIZERS....................................................................................................12
CHORUSES .....................................................................................................12
FLANGERS.......................................................................................................12
PHASERS .........................................................................................................12
MONO DELAYS...............................................................................................13
PONG DELAYS ................................................................................................13
TAP DELAYS ....................................................................................................13
Factory Program List............................................................................................14
Specifications .......................................................................................................14
FX7 Block Diagram...............................................................................................15
FX7 owner's manual
1
signal processing
Introduction
Welcome to the world of the DOD FX7! You have purchased the finest
guitar signal processor and preamp of its kind; hardly a surprise when
it comes from DOD. The FX7 gives you both functional flexibility and
tonal excellence, driven by our proven effects processing technology.
The FX7's palette of effects gives you compression, two distortions,
noise gate, 2-band EQ, wah, chorus, flanger, phaser, pitch shifter,
tremolo, detuner, mono delay, stereo 2-tap delay, and reverb.
With 30 factory Programs and 30 user Programs, you'll always have a
good starting point for creating any sound you want, and plenty of
space to store your own custom configurations.
About the Pictorial Guide Indicators
This manual can be used in two ways: you can read the text on the
right side of the page, or you can follow the pictorial guides in the left
margin. The pictorial guides show you how to get through each procedure without reading a lot of text. There are a few steps that
require reading but they will be indicated. Following is a key that
describes the pictorial guide symbols:
......This symbol means you need to read the indicated
item
DATA
..............Turn the Data wheel
......Press the indicated button
Warranty
1. The warranty registration card must be mailed within ten days after
purchase date to validate this warranty.
2. DOD warrants this product, when used solely within the U.S., to be
free from defects in materials and workmanship under normal use
and service.
3. DOD liability under this warranty is limited to repairing or replacing
defective materials that show evidence of defect, provided the
product is returned to DOD WITH RETURN AUTHORIZATION,
where all parts and labor will be covered up to a period of two
years. A Return Authorization number may be obtained from DOD
by telephone. The company shall not be liable for any consequential damage as a result of the product’s use in any circuit or assembly.
4. Proof-of-purchase is considered to be the burden of the consumer.
5. DOD reserves the right to make changes in design or make additions to or improvements upon this product without incurring any
obligation to install the same on products previously manufactured.
2
FX7 owner's manual
signal processing
6. The foregoing is in lieu of all other warranties, expressed or
implied, and DOD neither assumes nor authorizes any person to
assume for it any obligation or liability in connection with the sale
of this product. In no event shall DOD or its dealers be liable for
special or consequential damages or from any delay in the performance of this warranty due to causes beyond their control.
DOD™ and FX7 are registered trademarks of DOD Electronics
Corporation.
The information contained in this manual is subject to change at any
time without notification. Some information contained in this manual
may also be inaccurate due to undocumented changes in the product
or operating system since this version of the manual was completed.
The information contained in this version of the owner's manual supersedes all previous versions.
FX7 owner's manual
3
signal processing
SECTION 1 - GETTING STARTED
Supplying Power
The FX7, like any piece of computer hardware, is sensitive to voltage
drops, spikes, and surges. Interference such as lightning or power
"brownouts" can seriously, and in extreme cases, permanently damage
the circuitry inside the unit. Here are a few tips that will help you get
the best possible performance out of your FX7 while avoiding damage:
• Always make sure you have a "clean" power source for connecting to the FX7. This means that the AC power line you connect
to the FX7 should be as free from voltage fluctuations and RF
interference as possible. In recording environments, "clean"
power is also important in preventing AC hum or buzz from getting to tape.
• Use a good quality spike / surge suppressor (also called a power
strip). This is an inexpensive solution to all but the most severe
AC line conditions. A good quality power strip can save you a
lot of money in repair bills because they prevent large spikes and
surges from reaching your equipment. Also in this category (but
more expensive) are rackmount power supplies. Some of these,
like the DOD 828, have retractable light tubes and RF filtering.
• Although more expensive, AC line conditioners offer the best
protection from improper line voltages. Line conditioners constantly monitor the AC line for excessively high or low voltages
and instantaneously compensate to deliver a consistent voltage
to the connected equipment.
• Always make sure that your audio lines are as far as possible
from power cables. This will further prevent noise, hum, and
stray magnetic fields from entering your signal path. If audio
and power lines must run close to each other, try to avoid running them parallel to one another.
4
FX7 owner's manual
signal processing
Front Panel Controls
1
2
3
4 5 6
7
8
9
Clip
Detune/Pitch
01-02 5 cents
03-04 10 cents
05-06 15 cents
07 octabass
08 oct
09 6th
10 6th
Delay
11-19
21-29
31-39
41-49
51-59
61-69
71-79
Master Level
00-99 Level
Reverb
01-03 Room
04-06 Hall
07-09 Arena
Mono 100ms
Mono 200ms
Mono 250ms
Mono 300ms
Mono 350ms
Mono 400ms
Mono 500ms
Pong 100/200ms
Pong 150/300ms
Pong 200/400ms
Pong 250/500ms
Taps 100/300ms
Taps 200/300ms
Taps 300/400ms
Taps 400/500ms
FX
1
BANK
PGM#
Input
Pha/Trem/Wah
Multi Delay
11-19
21-29
31-39
41-49
51-59
61-69
71-79
81-89
11 5th
12 4th
13 3rd
14 3rd
15 4th
16 5th
17 oct
01-04
05-08
09-12
13-15
16-18
19-21
22-24
Phase Slow
Phase Medium
Phase Fast
Tremolo Slow
Tremolo Medium
Tremolo Fast
Wah
User
Data
Gate
Chorus/Flange
01-04
05-08
09-12
13-16
17-20
21-24
EQ
01-08 Gate Threshold
09-11 Fast Swell
12-14 Slow Swell
Chorus Slow
Chorus Medium
Chorus Fast
Flange Slow
Flange Medium
Flange Fast
FX
2
Store
PREAMP
01-03
04-06
07-09
10-15
Distortion
Low Boost
Mid Boost
High Boost
Mid Cut
01-08 Overdrive
09-15 Grunge
Output
Compressor
01 Low
02 Medium
03 High
PREAMP
3
BANK
The front panel of the FX7 is laid out in a simple and straightforward
way to make programming as easy as possible. Functions of each section are:
1) PROGRAM AND BANK SELECTOR FOOTSWITCHES- These
footswitches give you access to the User Programs in the FX7
and allow you to change User Banks.
2) EFFECT SELECTOR BUTTONS (DIGITAL FX)- This row of buttons lets you select an effect group for editing, or to bypass
the group completely. This group includes Master Level,
Reverb, Delay, Detune, Pitch Shift, Phase, Tremolo, Wah,
Chorus, and Flange.
3) EFFECT GROUPS - The FX7's effects are divided into 11
groups and labeled on the front panel. When lit, the LED in
each group indicates that an effect in the group is active.
\
4) EFFECT SELECTOR BUTTONS (PREAMP) - This row of four
buttons lets you change your basic preamp section settings.
The preamp section consists of the Gate, EQ, Distortion, and
Compressor groups.
5) STORE BUTTON - Stores your custom Programs in the User
memory location you select.
FX7 owner's manual
5
signal processing
6) DISPLAY - The LED display in Program mode, shows which
Bank and Program is currently selected. In Edit mode, it shows
the number and/or status of the selected effect.
7) DATA WHEEL - In Program mode, use the Data wheel to scroll
through Programs. In Edit mode, use it to change the setting
of effect groups.
8) CLIP LED - The red Clip LED lights when clipping occurs at the
input of the FX7. To eliminate clipping, reduce the setting of
the Input Level control or the Master Level parameter.
9) OUTPUT KNOB - Controls the overall output level of both the
Left and Right outputs and the Headphone output.
10) INPUT KNOB - Controls the level of the signal at the FX7's
input stage.
Rear Panel Connections
1
2
3
4
5
6
LEFT/MONO OUT
RIGHT OUT
VOLUME/WAH
7
8
Manufactured in the USA by
A Harman International Company
INPUT
JAM-A-LONG
HEADPHONE OUT
POWER INPUT
9V
500 mA
The FX7's rear panel is even simpler than the front, and that means
faster hookup times for you. The rear panel has:
1) INSTRUMENT INPUT - Plug your instrument in here.
2) JAM-A-LONG™ INPUT - This stereo mini jack lets you connect
your tape deck or CD player headphone output to the FX7 for
personal jam sessions. The Jam-A-Long™ signal is mixed with
your instrument signal at both the main and headphone outputs so you can play along with your favorite tunes.
3) HEADPHONE OUTPUT - This stereo mini phone plug is for
your headphones. The overall headphone level is controlled by
the Output level knob.
4) LEFT / MONO OUT - For stereo applications, this is the Left
main output. Use this jack for mono applications.
5) RIGHT OUT - For stereo applications, this is the Right main
output. For mono applications, leave this jack unconnected.
6) VOLUME/WAH CONTROLLER INPUT - This 1/4" connector is
used to connect most volume pedals or 0/+5v controller pedal
to the FX7 for real-time control of wah and volume functions.
7) AC POWER INPUT - Connect the supplied AC power adapter
to this jack. Use only the adapter supplied with the FX7. Use
of any other adapter may damage the unit.
8) POWER CORD STRAIN RELIEF - This clip prevents the AC
power cord from being accidentally pulled out.
6
FX7 owner's manual
signal processing
Hooking Up
DO NOT APPLY POWER TO THE FX7 UNTIL INSTRUCTED.
1)
STEREO: Connect the Left and Right outputs to a pair of guitar
amplifiers, or the inputs of a mixing console. If you're using guitar
amps, set the tone controls flat (no boost or cut) and balance the
levels between them. If you're using a console, pan the FX7 input
channels hard left and right, and turn down the high frequency
EQ for best results.
MONO: Connect the Left output to a guitar amplifier or input of a
mixing console.
FX7 owner's manual
2)
Connect your instrument to the input of the FX7.
3)
OPTIONAL: Connect a volume type or 0/+5v controller pedal to
the Controller input of the FX7. Make sure the pedal is connected
before you apply power to the FX7.
4)
Power up the FX7 by connecting the supplied AC adapter
between the FX7 and a power outlet.
5)
Play your instrument and watch the Clip LED on the FX7 carefully
as you set the Input knob. Turn up the input level until the Clip
LED begins to light, and reduce the input level slightly. When the
Input knob is set properly, the Clip LED should not flicker on the
loudest passages.
6)
Set the output level as desired.
7
signal processing
SECTION 2 - PROGRAMMING THE FX7
Navigating The FX7
The FX7 is designed to be both easy to program and flexible. The
structure of an FX7 Program is logical, and it doesn't require a lot of
time to master.
To select Programs in the FX7:
DATA
1) After you power up, use the Data wheel to scroll through the
Programs. As you scroll, the effect group and footswitch LEDs
turn on and off. These LEDs indicate which effects are used in
each Program, and which Program in the Bank is selected.
There are 11 effect groupings printed on the front panel of the FX7.
Seven are digital effect groups (delay, reverb, etc.) , and four cover the
preamp section (compression, distortion, gate, EQ). Each group has
its own LED that indicates the status of each group.
If the Status LED is lit continuously, an effect in the indicated group is
active. If the LED is not lit, no effects in the group are active. If the
LED is flashing, edit mode is active, and effects in the group can be
selected using the Data wheel.
Directly below each vertical group are the Effect Selector buttons.
These buttons allow you to select and/or bypass effects in the FX7.
The following things happen when you use the Effect Selector buttons:
• When you select a bypassed effect, its group LED begins flashing
and the display shows two dashes, indicating that the effect is
selected but bypassed. (Pressing the Select button again activates the effect.)
• When you select an active effect, its group LED begins flashing
and the display shows the number of the currently selected
effect. (Pressing the button again bypasses the effect.)
When lit, the User LED below the display indicates that the current
Program is a User Program. When the LED is not lit, the current
Program is a permanent Factory Program.
Using The Footswitches
The FX7's pedalboard consists of four footswitches: the far right
footswitch is the Bank selector, and the remaining three are Program
selectors.
A Bank is a group of three Programs. There are 10 User Banks in the
FX7, each with 3 Programs for a total of 30 User Programs. There are
also 30 Factory Programs that can be selected using the Data wheel
only. User Programs in any of the Banks can be recalled in one of two
ways:
• by pressing the Bank select footswitch followed by footswitch 1,
2, or 3.
• by turning the Data wheel in Program mode.
To select Programs using the footswitches:
8
FX7 owner's manual
signal processing
1) After you power up, the FX7 defaults to Program mode. Select
a Bank by pressing the Bank selector footswitch. The display
shows the selected bank number on the left side of the display
and a dash on the right. The display might look something like
this:
BANK
2-_
1
2
or
3
2) Press footswitch 1, 2, or 3. The dash in the display changes to
show the number of the Program you selected. The display
might look something like this:
23
NOTE: If a new Program number is not selected within 5 seconds
after pressing the Bank select button, the display returns to its previous setting.
Editing Programs
As you become more familiar with the FX7, you may find that you
need to modify certain Programs to better fit your needs. Fortunately,
the FX7 is flexible enough to give you everything you need without
being difficult to program.
The following procedure is an example of how to modify your
Programs. Suppose that Program 33 (which has a 100 ms mono
delay, a medium chorus, noise gate, EQ, distortion, and compression)
sounds close to what you want, but you want a 300 ms delay with low
feedback instead. Here's how to change it:
1) Use the Data wheel, or the Bank and Program selector
footswitches to select Program 33.
DATA
2) Press the Delay effect group button. The Delay group Status
LED begins flashing and the display reads:
11
Delay
11-19
21-29
31-39
41-49
51-59
61-69
71-79
Mono 100ms
Mono 200ms
Mono 250ms
Mono 300ms
Mono 350ms
Mono 400ms
Mono 500ms
DATA
3) Look at the front panel Delay groupings to locate the effect you
want. In this case, you'll see that the 300 ms mono delays can
be found between 41 and 49 in the Delay (not Multi-Delay)
Group.
4) Use the Data wheel to scroll until the the display reads:
41
.
FX7 owner's manual
9
signal processing
NOTE: When you change the selected Parameter from the stored
value, a decimal point appears in the bottom right corner of the
display and the Store LED lights.
That's it! You can manipulate any effect setting in the FX7 by pressing
the associated Effect selector button on the front panel and turning
the Data wheel. The Effect Group buttons also toggle the effects on
and off with each successive press of the button.
When you're editing Programs, be sure to pay attention to the flashing
Status LEDs. This helps you keep track of where you are in the menus.
IMPORTANT: If you want to store your custom Program so you
can use it later, follow the procedure below.
Storing Programs
The FX7 helps you remember whether or not you've stored the
Program you're working on by lighting the Store LED under the bottom right corner of the display when the selected Program has been
edited.
Remember that if you change any settings in a Program, you have to
store the Program into a User memory location. Otherwise, all your
changes will be lost.
To store a Program into a memory location:
User
Store
2) Use the Data wheel to select the User location where you want
to store the Program.
DATA
User
1) Press the Store button. The Store LED begins flashing and the
User LED lights (if not lit already).
Store
3) Press the Store button again to store the Program in the location you selected.
After the storing procedure is complete, the FX7 returns to normal
operation at the new Program location.
NOTE: Factory Programs can't be overwritten. When you modify
a factory Program and store it in memory, the Program is stored in
the corresponding number location in the User Program section.
Bypassing
The FX7's bypass functions are very simple.
To bypass individual effects:
1) From Program mode, decide which effect you want to bypass
and press its Select button twice. The display reads:
-.
10
FX7 owner's manual
signal processing
Press the effect Select button to toggle the effect in and out of bypass
mode.
REMEMBER: The decimal point indicates that the value shown in
the display is not the stored value.
To bypass the selected Program:
1) Press the currently selected Program footswitch on the pedalboard. The footswitch's Status LED flashes and the display
reads:
bp
The Program selector footswitch toggles the FX7 in and out of bypass
mode.
A Word About Mono Operation
The FX7 can operate in either stereo or mono. It is important to
remember that the way you connect your cables to the outputs can
affect the output mode. Here's a simple way to remember how it
works:
• If only one output cable is connected, the FX7 switches to mono
mode. Otherwise, it operates in stereo.
Using A Controller With The FX7
The FX7 is able to respond to most volume pedal outputs or 0/+5v
controller pedals to control the wah and volume effects in real time.
To set up the FX7 for this application:
1) Disconnect the power to the FX7.
2) Connect the output or the 0/+5v control output of a volumetype controller pedal (such as the DOD FX17) to the Volume /
Wah controller input on the rear panel of the FX7.
3) Sweep the pedal through its entire range a few times to calibrate the pedal.
If the Wah is active in any Program, the controller becomes a wah
pedal. Otherwise, it acts as a volume control.
REMEMBER: If you want to use a controller pedal with the FX7,
make sure the pedal is connected to the FX7 before you apply
power. It is also important to note that the controller's pedal position affects all Programs, even after you change Programs. If a
Program doesn't sound the way you saved it, check the position of
the controller pedal.
FX7 owner's manual
11
signal processing
About the FX7's Effects
The FX7 has a large library of effects that covers virtually every possible need.
Because they are so numerous, we have designed the following charts to give
you as much relevant information as possible while omitting tedious or obvious
details about each module's setting. For example, Distortions, Tremolos,
Detuners, and Pitch Shifters are not shown because their Module names are relatively self explanatory. The Fast Swell and Slow Swell Gates have attack times
of 500 ms and 1000 ms respectively.
The FX7 effects include:
EQUALIZERS
EQ#
1
2
Name
Frq1/Gain1 F2/G2
F1/G1
F2/G2
F1/G1
F2/G2
F1/G1
F2/G2
F1/G1
F2/G2
F1/G1
Low Boost
Mid Boost
High Boost
Mid Cut
100/8
800/8
1.6k/-3
250/6
175/8
1.25k/2
1.9k/-3
500/6
6.3k/0
8k/0
4.7k/10
4k/6
275/8
2.2k/8
2.2k/-5
800/6
6.3k/0
8k/0
8.5k/15
6.3k/9
150/9
2.5k/4
250/6
4k/8
400/6 5k/9
6.3k/0
8k/0
3.4k/8
2.5k/4
3
4
5
6
CHORUSES
Chorus #
1
2
3
4
Name
Speed/Level
Speed/Level
Speed/Level
Speed/Level
Slow
Medium
Fast
0.1/25
.25/25
2.0/25
0.15/25
.35/25
3.5/25
0.1/50
.25/50
2.0/50
0.15/50
.30/50
3.5/50
Flanger #
1
2
3
4
Name
Speed/Fback
Speed/Fback
Speed/Fback
Speed/Fback
Slow
Medium
Fast
.1/40
.3/50
.7/60
.15/40
.35/50
.8/60
.15/50
.40/60
1.0/75
.2/50
.40/60
1.0/80
Phaser #
1
2
3
4
Name
Speed/Fback
Speed/Fback
Speed/Fback
Speed/Fback
Slow
Medium
Fast
.1/60
.25/60
.9/40
.1/70
.25/70
1.0/50
.15/80
.45/70
1.5/50
.15/80
.45/80
2.0/60
FLANGERS
PHASERS
12
FX7 owner's manual
F2/G2
signal processing
MONO DELAYS
Delay #
1
2
3
4
5
6
7
8
9
Name
fback/level
fback/level
fback/level
fback/level
fback/level
fback/level
fback/level
fback/level
fback/level
100
200
250
300
350
400
500
0/15
0/15
0/15
0/15
0/15
0/15
0/15
0/30
0/30
0/30
0/30
0/30
0/30
0/30
0/50
0/50
0/50
0/50
0/50
0/50
0/50
15/15
15/15
15/15
15/15
15/15
15/15
15/15
15/30
15/30
15/30
15/30
15/30
15/30
15/30
15/50
15/50
15/50
15/50
15/50
15/50
15/50
30/15
30/15
30/15
30/15
30/15
30/15
30/15
30/30
30/30
30/30
30/30
30/30
30/30
30/30
30/50
30/50
30/50
30/50
30/50
30/50
30/50
Delay #
1
2
3
4
5
6
7
8
9
Name
fback/level
fback/level
fback/level
fback/level
fback/level
fback/level
fback/level
fback/level
fback/level
100/200
150/300
200/400
250/500
0/15
0/15
0/15
0/15
0/30
0/30
0/30
0/30
0/50
0/50
0/50
0/50
15/15
15/15
15/15
15/15
15/30
15/30
15/30
15/30
15/50
15/50
15/50
15/50
30/15
30/15
30/15
30/15
30/30
30/30
30/30
30/30
30/50
30/50
30/50
30/50
Delay #
1
2
3
4
5
6
7
8
9
Name
fback/level
fback/level
fback/level
fback/level
fback/level
fback/level
fback/level
fback/level
fback/level
100/200
200/300
300/400
400/500
0/15
0/15
0/15
0/15
0/30
0/30
0/30
0/30
0/50
0/50
0/50
0/50
15/15
15/15
15/15
15/15
15/30
15/30
15/30
15/30
15/50
15/50
15/50
15/50
30/15
30/15
30/15
30/15
30/30
30/30
30/30
30/30
30/50
30/50
30/50
30/50
PONG DELAYS
TAP DELAYS
FX7 owner's manual
13
signal processing
Factory Program List
Following is a list of the factory Programs available in the FX7. They are divided
into Banks with a suggested application for each sound. As always, don't be
afraid to experiment.
PROGRAM #
PERFORMANCE TIPS
01- Big Solo Guitar
02- Heavy Crunch
03- Comp Clean
Solo Distortion w/ Chorus, Delay, and Reverb
Heavy Rhythm Distortion w/ Reverb
Compressed Clean w/ Chorus, Delay, and Reverb
11- Dist/Pitch
12- Dirt Rhythm
13- Super Phaser
Distortion with Pitch Shift 1 Octave down
Light Distortion for Rhythm Guitar
Distortion w/ Phaser, Delay, and Reverb
21- Razor Rhythm
22- Detune Clean
23- Grunge Solo
Heavy Rhythm Distortion w/ Detune
Bright Clean w/ Detune, Delay, and Reverb
Solo Distortion w/ Delay and Reverb
31- Octave Crunch
32- Rock Rhythm
33- Rhythm Grit
Distortion w/ Pitch Shift, Slap Delay, and Reverb
Rhythm Distortion w/ Hall Reverb
Light Overdrive w/ Slap Delay
41- Clean Flange
42- Anarchy
43- Modulator
Clean Tone w/ Flange and Delay
Punk Distortion
Heavy Modulating Chorus w/ Delay and Reverb
51- Old West
52- Pedal Steel
53- Country Swell
Clean Tremolo
Pedal Steel Guitar w/ Pitch Shift
Country Style Steel Guitar
61- Dirty Wah
62- Bright Rhythm
63- Edge
Distortion w/ Wah
Distortion w/ Light Chorus and Slap Delay
Rhythm Distortion w/ Detune and Reverb
71- Slap Rhythm
72- Dark Bite
73- Clean Room
Overdrive w/ Chorus, Slap Delay, and Reverb
Dark Rhythm w/ Delay and Reverb
Clean Tone w/ Chorus and Room Reverb
81- Bright Overdrive Rhythm Tone w/ Room Reverb
82- Rhythm 3rds
Distortion w/ Pitch Shift 3rd up and Reverb
83- Clean Swell
Clean Volume Swell w/ Chorus, Delay, and Reverb
91- Mega Phase
92- Spring Room
93- Synth Guitar
Heavy Distortion w/ Phaser and Reverb
Clean Spring Style Reverb Tone
Volume Swell Distortion w/Pitch, Delay, and Reverb
Specifications
A/D Resolution: 18 Bit
D/A Resolution: 16 Bit
DSP: 24 bit
Frequency Response: 20Hz to 16kHz
Signal to Noise Ratio: -87dB
Power Supply: DOD PS750, 9 VAC @ 750 ma
14
FX7 owner's manual
Input
Input
Buffer
FX7 owner's manual
µ Pot
Distortion
Compressor
Multiplex
Attn
PreEmphasis
LEDs
A/D
D/A
Switches
Micro
Controller
DSP
RAM
DeEmphasis
Jam-A-Long
Head
Phone
Output
Right
Out
Left
Out
signal processing
FX7 Block Diagram
15
DOD Electronics Corporation
8760 South Sandy Parkway
Sandy, Utah, 84070
Telephone (801) 566-8800
FAX (801) 566-7005
International Distribution: 3 Overlook
Drive, Unit 4
Amherst, New Hampshire 03031 U.S.A.
FAX (603) 672-4246
FX7™ is a registered trademark of DOD
Electronics Corporation
Copyright © 1996
DOD Electronics Corporation
Printed In U.S.A. 2/96
Manufactured in the U.S.A.
FX7 18-0514-B
OS V1.0
A Harman International Company