1
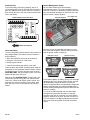
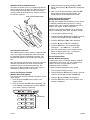
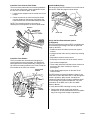
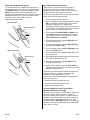
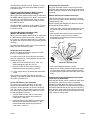
Service Bulletin
Applies To:
10-023
August 4, 2010
2011 MDX – ALL
2011 MDX: TQI and New Model Service Information
This service bulletin explains many of the procedures
needed to do a TQI on the 2011 MDX. It also describes
some of the new model service information that is
unique to the MDX. A complete list of items to check
and other steps required for the TQI are in the vehicle’s
maintenance journal. For more new model information,
refer to training module MM134, 2010 Acura MDX
Technical Information Guide.
• Check the Adaptive Cruise Control (ACC)
(Models With Advance Package)
NOTE: To complete the TQI on a MDX with a
navigation system, refer to Service Bulletin 09-045,
2010–11 MDX: TQI of the Navigation System.
• Do the CKP-Pattern Learn Procedure
The 2011 MDX comes in these models:
• Complete the Personalized Settings Check Sheet
(To Be Done by Sales Staff)
• Check the Collision Mitigation Braking System
(CMBS) (Models With Advance Package)
• Check the Blind Spot Information
(Models With Advance Package)
• Do the Idle Learn Procedure
• Check/Clean the Front Grille
• Remove the Exterior Protective Coverings
• MDX Base
• MDX With Technology Package
• MDX With Advance Package
This bulletin includes this new model service
information:
• MDX With Technology and Entertainment Packages
• New Automatic Transmission Fluid
• MDX With Advance and Entertainment Packages
• New AWD Differential Fluid
This bulletin includes these TQI procedures:
• Install the Fuse
WARRANTY CLAIM INFORMATION
• Check the Battery
None. The information is this service buletin is
considered part of the TQI.
• Battery Management System
• Install the Shift Lock Release Cover
TQI PROCEDURES
• Enter the Anti-Theft Code
NOTE: Before doing the TQI, review these items:
• Perfect Delivery documents, especially the
information on battery maintenance and tire
pressures
• Set the Clock and the Calendar
(Models Without Navigation)
• Check the Compass Calibration
(Models Without Navigation)
• Set the Compass Zone (Models Without Navigation)
• Check the Clock Time (Models With Navigation)
• New model information in the 2010 Acura MDX
Technical Information Guide
• TQI checklist in the maintenance journal
• Remove the Interior Protective Coverings
Also, make sure you record the TQI on the appropriate
pages of the maintenance journal. The TQI is not
finished until the procedures in this service bulletin and
the maintenance journal checklist are completed.
• Install the Floor Mats
• Set the Tire Pressures
• Install the Front License Plate Holder
• Install the Front Strakes
• Install the Body Plugs
• Set Up the Rear Entertainment System (If Equipped)
• Check the Moonroof One-Touch Feature
• Check/Refresh the XM® Radio Dealer Demo Service
(All Except Alaska and Hawaii Models)
• Check the HandsFreeLink System
• Reset the AcuraLink Control Unit
© 2010 American Honda Motor Co., Inc. – All Rights Reserved
BTB 44559 (1008)
1 of 10
CLIENT INFORMATION: The information in this bulletin is intended for use only by skilled technicians who have the proper tools, equipment, and
training to correctly and safely maintain your vehicle. These procedures should not be attempted by “do-it-yourselfers,” and you should not assume this
bulletin applies to your vehicle, or that your vehicle has the condition described. To determine whether this information applies, contact an authorized
Acura automobile dealer.
Install the Fuse
To prevent battery drain during shipping, the No. 4
(40 A, Backup/ACC) fuse is removed and stored in the
glove box. Make sure the ignition switch is in LOCK (0),
then reinstall the fuse in the main under-hood fuse box
next to the battery.
MAIN UNDER-HOOD FUSE BOX
Battery Management System
All 2011 MDX models come with a battery
management system. The system includes a sensor
with a 2P connector on the battery negative cable and
four possible MID messages the client may see if the
system detects a battery problem.
BATTERY SENSOR
2P CONNECTOR
BACKUP/ACC
FRONT OF VEHICLE
Check the Battery
To ensure long battery life and that the client receives a
fully charged battery, the battery must be checked in
these instances:
• When the vehicle first arrives at the dealership
Here are the four possible MID messages you may
see, three with the ignition switch in ON (II), and one
with the ignition switch in LOCK (0):
IGNITION in ON (II)
IGNITION in ON (II)
IGNITION in ON (II)
IGNITION in LOCK (O)
• During the TQI (if done at a later time)
• During regular intervals
• Just before delivering the vehicle to the client
Test the battery with the ED-18 battery tester using the
instructions in Service Bulletin 88-016, Battery Testing
and Replacement. If the ED-18 tester does not show
GOOD BATTERY, charge the battery (refer to Service
Bulletin 89-006), then recheck it.
Write down the GOOD BATTERY 10-digit code in the
maintenance journal: During the TQI, write down the
code in the “Under Hood (Engine Cold)” section, and
then when the vehicle is delivered to the client, write
down the code in the “Final Inspection (At Delivery)”
section.
If the Replace Battery or Battery Charge Low message
appears at the TQI or during vehicle storage, connect
the GR8 Battery Diagnostic Station, and use the
Station’s Diagnostic Mode; it automatically charges the
battery and determines its condition. Do not use the
vehicle's Battery Management System to determine the
battery’s condition.
To turn off the MID message and reset the battery
management system after the battery is charged,
disconnect the gray 2P connector next to the battery
negative cable for 10 seconds, and then reconnect it.
For more details on the Battery Management System,
refer to the 2010 Acura MDX Technical Information
Guide.
2 of 10
10-023
Install the Shift Lock Release Cover
The shift lock release cover is in a plastic bag with the
owner’s manual kit in the glove box. Remove the cover
from the bag, and install it into the shift lock release
opening on the left of the shift lever, with the notch on
the left side of the slot.
SHIFT LOCK RELEASE COVER
3. Select the desired mode by pressing the SET
button, then press the S or T button to change the
setting.
4. After you set the day information, press the SET
button again to cancel the setting mode. The
display now shows the adjusted information.
Check the Compass Calibration
(Models Without Navigation)
Although the compass is self-calibrating, it may need to
be manually calibrated after exposure to a strong
magnetic field. If the compass is blinking and CAL is
shown in the display, do this to calibrate it:
NOTE: Do the compass calibration in an open area,
away from buildings, power lines, and other vehicles.
1. Turn the ignition switch to ON (II).
2. Press and hold the SET button for about 5 seconds
(until the clock display changes to ZON ? N).
3. Press the SET button; CAL ? N is displayed.
4. Press the S button; CAL ? Y is displayed.
5. Press the SET button. The compass display
changes to - -, and CAL and '' '' are shown.
Enter the Anti-Theft Code
After installing the No. 4 fuse, enter the 5-digit anti-theft
code. This 5-digit code allows the audio system and
the navigation system (if equipped) to operate. The
anti-theft code labels are in a small bag in the glove
box.
After you enter the anti-theft code, attach one set of the
anti-theft code labels for the audio system and the
navigation system onto the appropriate card. The
second set of labels should be given to the client for
safekeeping, rather than left in the vehicle.
6. Drive the vehicle slowly, in two complete circles.
When the display goes from - - to an actual
heading, calibration is completed.
Set the Compass Zone
(Models Without Navigation)
In most areas, there is a variation between magnetic
north and true north. At the TQI, the compass zone
needs to be set to your geographic zone to
compensate for this variation.
To set the compass geographic zone, do this:
1. Turn the ignition switch to ON (II).
Set the Clock and the Calendar
(Models Without Navigation)
You can see the clock and calendar information on the
upper display.
2. Press and hold the SET button for about 5 seconds
(until the clock display changes to ZON ? N).
1. Press and hold the SET button until the clock
begins to blink.
4. Press the SET button; the current compass zone
number is displayed.
3. Press the T button; ZON ? Y is displayed.
2. Press and release the SET button repeatedly. The
mode switches to setting hours, minutes, AM/PM,
year, month, and day, in that order.
SET BUTTON
10-023
3 of 10
5. Find your zone number in the map below.
ZONE MAP
Install the Floor Mats
Install the floor mats during the TQI, and be sure to
place the eyelets in the driver’s and the front
passenger’s mats over the anchor hooks on the floor.
Also, place the eyelets in the second row floor mat over
the anchor hooks on the floor under the front seats.
NOTE: Models with the Entertainment Package include
a third row floor mat.
ANCHOR HOOKS
ANCHOR HOOKS
6. If the current zone number is not your zone, press
the S or T button to change the display to your
zone, then press the SET button to select your
zone.
7. To exit the zone selection and return the display to
normal, press and hold the SET button for about 5
seconds.
Check the Clock Time (Models With Navigation)
If the clock time is not correct on a vehicle with
navigation, refer to Service Bulletin 09-045, 2010-11
MDX: TQI of the Navigation System. Any changes to
the clock on models with navigation must be done with
the MID Memory Position Link set to ON. Refer to the
owner’s manual for details.
Remove the Interior Protective Coverings
There are several protective coverings on the interior
trim pieces and some areas of the carpet. Carefully
remove all of them. Remove the coverings with clean
hands so you don’t soil the fabric. If any of the interior
is dirty, clean it with mild soap or an Acura cleaning
product such as Leather & Vinyl Cleaner
(P/N 08700-9214A) or Carpet Spot Remover
(P/N 08700-9215A).
4 of 10
Set the Tire Pressures
To prevent flat spots during shipping and storage, the
tires are inflated to over 40 psi. If the vehicle is going
into dealer storage, leave its tire pressures at 40 psi
until it is sold, as per the Perfect Delivery Action Plan. If
the vehicle is moved to the sales lot or is sold, adjust
the tire pressures to the cold inflation pressures listed
on the driver's doorjamb label. If you are in a cold
climate region, make sure the tires are at the outside
ambient temperature before adjusting the pressures;
otherwise, the TPMS low tire pressure indicator may
show low tire pressure in cold weather. Be sure to also
check the pressure in the spare tire.
NOTE: The spare tire does not have a TPMS sensor.
The low tire pressure indicator does not come on if the
pressure in the spare tire is low.
10-023
Install the Front License Plate Holder
The front license plate holder and mounting hardware
are in the rear cargo area. If state regulations require
the use of a front license plate, do this:
Install the Body Plugs
Two body plugs must be installed, one on each side of
the vehicle. Install the plugs as shown below.
1. Locate the two dimples near the middle of the front
bumper.
2. Center the holes in the front license plate holder
over the dimples on the bumper, then attach the
holder with the two round-headed Phillips screws.
NOTE: The remaining screws in the kit are for
attaching the license plate to the license plate holder.
DIMPLES
REAR TIRE
BODY PLUG
Set Up the Rear Entertainment System
(If Equipped)
The rear entertainment system (RES) is available with
the Entertainment Package. Here are the parts that
make up the RES:
• Dashboard audio unit with front and rear system
controls
• Ceiling-mounted video screen, powered by inserting
a DVD.
Install the Front Strakes
The front strakes are removed before shipping to
prevent them from being damaged. The strakes are
packaged with the license plate holder. Using the six
clip-nuts and screws provided in the TQI kit, install the
front strakes to the front inner fenders.
FRONT INNER
FENDER
• Removable, wireless remote control
• DVD player in the lower slot of the center console
• Two wireless headphones
• Three audio jacks with individual volume controls on
the back of the center console (for third-row
passengers)
• Video game/equipment jack on the back of the
center console
The RES allows front seat occupants to listen to one
audio source (radio XM, HDD, AUX, or CD) through the
vehicle’s speakers, while second- and third-row
passengers watch a DVD or listen to a different audio
source through the wireless headphones. For more
information on the RES, refer to the 2011 MDX
Owner’s Manual.
To verify that the RES is working correctly, do this:
FRONT
STRAKE
CLIP-NUTS
10-023
1. Remove the remote control, both wireless
headphones, and the AAA batteries from the plastic
bag in the cargo area storage compartment.
SCREWS
5 of 10
2. Install the batteries into the headphones. Each
headphone uses one AAA battery that you insert
under the cover of the left earpiece. To remove the
battery cover, place a coin in the slot, and twist it
slightly. The remote uses three BR3032 batteries
that are already installed.
3. To use the headphones, pivot the ear pieces
outward to turn them on. When you remove the
headphones, the ear pieces pivot inward, and the
headphones turn off. Store the headphones in the
flat (off) position.
4. Turn the ignition switch to ACC (I) or ON (II), then
insert a DVD into the DVD player. The screen
opens automatically, and its tilt angle is adjustable
with the remote.
5. Adjust the volume with the dial on the headphone
earpiece.
6. While the DVD is playing, test the remote control
functions.
7. Repeat steps 4 thru 6 with the second wireless
headphones.
NOTE: The wireless headphones work in the
second and third row seats only; they do not work
in the front seats or outside the vehicle. Clients can
order additional wireless headphones from your
parts department.
8. After you verify that the RES is working correctly,
remove the DVD, insert the remote control in the
ceiling unit, and store both headphones in the front
seat-back pockets.
Check the Moonroof One-Touch Feature
Make sure the moonroof one-touch feature works like
this:
• When you firmly slide the moonroof switch backward
and release it, the moonroof opens fully.
• When you firmly slide the switch forward and release
it, the moonroof closes fully.
• When you push up on the switch and release it, the
moonroof tilts.
If the moonroof doesn’t work this way, do this to reset
its control unit:
1. Turn the ignition switch to LOCK (0).
2. While pressing and holding the tilt switch, turn the
ignition switch to ON (II).
3. Release the tilt switch, and turn the ignition switch
to LOCK (0).
4. Repeat steps 2 and 3 four times.
5. Press and hold the moonroof open switch for
3 seconds after the moonroof is fully opened.
6. Press and hold the moonroof close switch for
3 seconds after the moonroof is fully closed (tilted).
7. Confirm that the moonroof control unit is reset by
using the moonroof AUTO OPEN and AUTO
CLOSE functions.
6 of 10
For more information, refer to the Body Electrical
section of the 2010-11 MDX Service Manual.
NOTE: The moonroof auto-reverse feature does not
require initialization, and disconnecting the battery
does not require initialization of the AUTO function.
The moonroof can also be opened with the remote
transmitter.
Check/Refresh the XM Radio Dealer Demo Service
(All Except Alaska and Hawaii Models)
The XM Radio comes from the factory activated with
the dealer demo service. Once you install the No. 4
fuse, the XM radio will receive the full range of
available XM channels. Make sure this service is
activated by checking if the radio is getting channels
000, 001, 007, 009, 047, 122, 174, and 247. If it is not,
do a rapid refresh on the iN (Interactive Network).
Without the dealer demo service activated, the XM
radio only displays channels 000, 001, 174, and 247.
To check for the dealer demo service, do this:
1. Turn the ignition switch to ON (II).
2. Turn on the radio, enter the 5-digit navigation antitheft code (if not already done), and press the XM
button.
3. Make sure the radio is in CHANNEL MODE, not
CATEGORY MODE. Press and hold the DISP
MODE button until the mode changes (without
navigation), or go to the Audio menu and select CH
(with navigation) to switch between modes.
4. Tune to channel 001 (the XM preview channel) to
make sure you are receiving the XM signal. If you
do not get a clear signal, park the vehicle outside
where there is a clear view of the southern sky.
5. Look at the audio unit display, and turn the TUNE
knob.
• If you can tune to channels 000, 001, 007, 009,
047, 122, 174, and 247, the dealer demo service
is activated. Tune to channel 001, and leave the
radio on for 7 minutes to refresh the dealer demo
service. No further action is needed.
• If you cannot tune to channels 000, 001, 007,
009, 047, 122, 174, and 247, the dealer demo
service is not yet activated, and an activation
refresh needs to be done. Go to step 6.
6. Tune to 000, then write down the 8-digit XM radio
ID you see in the audio unit display. You need this
ID, your dealer number, and the VIN to do an
activation refresh of the dealer demo service. Go to
step 7.
NOTE:
• If you cannot tune to channel 000, you are in
CATEGORY MODE. See step 3 above to switch
from CATEGORY MODE to CHANNEL MODE.
• Check the ID code carefully. The letters I, O, S,
and F are not used.
10-023
7. Go to an iN workstation.
NOTE: If you don’t have access to the iN, call
XM Satellite Radio at 800-852-9696. When you
hear the automated menu, enter priority code 9466
to route your call to an XM agent. When the agent
answers, ask them to review the account status
and make any necessary corrections. Once the
account status has been determined, ask for a
rapid dealer activation refresh, then go to step 10.
8. From the iN main menu, click on SERVICE, click on
Service Bay, and then click on XM Radio. This
brings up the DEALER ACTIVATION REFRESH
screen.
NOTE: If you cannot bring up this display, call the
iN Support Center at 800-245-4343.
9. Enter the 8-digit XM radio ID you wrote down in
step 6, then click on Submit. You will see the
ACTIVATION REFRESH screen once the ID is
recognized.
NOTE: If you enter the ID incorrectly, or if it is not
recognized, you will see an error display. If this
happens, follow the instructions on the display.
10. Tune to 001 to make sure you are receiving the XM
signal. If you do not get a clear signal, park the
vehicle outside where there is a clear view of the
southern sky, then go to step 11.
11. Leave the radio on for at least 10 minutes, then go
to step 12.
12. Look at the audio unit display, and turn the TUNE
knob:
• If you can tune to channels 000, 001, 007, 009,
047, 122, 174, and 247, the dealer demo service
is activated. No further action is needed.
• If you can only tune to channels 000, 001, 174,
and 247, the dealer demo service is not yet
activated. Repeat steps 7 thru 12.
NOTE:
• The dealer demo service lasts for 7 months or until
the vehicle’s RDR (retail delivery registration) is
submitted.
• After the vehicle is registered, the dealer demo
service converts to a client account. The client gets a
3-month trial service of all available non-premium
XM channels. If the client decides to end the service
after that time, the XM radio reverts to preview
mode. Normal AM and FM radio reception is not
affected by ending the service.
• The XM radio receives digital programming
broadcasts from two fixed-orbit satellites near the
equator along with a network of ground antennas
(repeaters). You will get the strongest signal if you
move the vehicle where there is a clear view of the
southern sky.
• The XM radio may lose reception when you are
driving through a tunnel, under an overpass, inside a
parking garage, or near the northern face of a
canyon or a mountain.
• To cut down on reception loss, XM radio uses a
buffer. If the reception loss lasts longer than the
buffering period, the signal goes silent.
• Because the XM radio signal is digital, any reception
loss makes the signal go silent; the signal usually
does not fade like it does with an AM/FM radio.
• If you ever need to replace the XM radio receiver,
call XM Satellite Radio at 800-852-9696. Be
prepared to give them your dealer number, the VIN,
and the XM radio ID from the printed label on the
side of the old and the new receiver units.
• Your client’s XM radio presets will be lost if you
disconnect the battery or if it goes dead. Always
write down the XM radio presets before you
disconnect the battery.
• If, after 2 hours, you can only tune to channels
000, 001, 174, and 247, call XM Satellite Radio
at 800-852-9696. When you hear the automated
menu, enter priority code 9466 to route your call
to an XM agent. When the agent answers, ask
them to review the account status and make any
necessary corrections. If the account status is
correct for the vehicle, replace the XM receiver.
10-023
7 of 10
Check the HandsFreeLink System
To confirm that the HFL (HandsFreeLink) system is
working and ready to use, start the engine, and hold
the HANG-UP button (models with navigation) or the
BACK button (models without navigation) for 10
seconds. You should hear this HFL message: “America
handsfree system is OK.” If you don’t hear the HFL
message, refer to the service manual for
troubleshooting information.
With Navigation
HANG-UP BUTTON
Reset the AcuraLink Control Unit
When the No. 4 fuse is removed during vehicle
shipment, the AcuraLink control unit sets DTCs
(diagnostic trouble codes). These DTCs need to be
cleared during the TQI using this procedure:
NOTE: After you install the No. 4 fuse, wait at least 30
seconds before doing this procedure.
1. Turn the ignition switch to ON (II).
2. On the navigation system disclaimer screen, select
OK by pressing the interface dial. (The interface
dial is the large knob at the middle of the
dashboard. It has two parts: an outer knob and an
inner selector. The interface dial is used to control
several functions, including AcuraLink.)
3. Press and hold the MAP-GUIDE, the MENU, and
the CANCEL buttons at the same time, until the
main diagnostic screen is displayed. Then select
Detail Information and Setting.
4. Turn the interface dial to highlight XM (HIP), then
press the interface dial.
5. Turn the interface dial to highlight XM (HIP) Diag,
then press the Cancel button.
6. Turn the interface dial to highlight Data Reset, then
press the Cancel button.
Without Navigation
7. Turn the interface dial to highlight Yes, then press
the interface dial.
BACK BUTTON
8. Select OK by pressing the interface dial, then push
the interface dial once to the left.
9. Turn the interface dial to highlight Return, then
press the interface dial.
10. Again, turn the interface dial to highlight Return,
then press the interface dial. This returns you to the
navigation system screen.
If the above procedure does not work, disconnect the
negative cable from the battery for 30 seconds,
reconnect it, then repeat steps 1 thru 10.
NOTE: After reconnecting the battery, wait at least 30
seconds, then do this:
• Reenter the audio unit anti-theft code.
• Reenter the navigation system code.
• Do the idle learn procedure.
Check the Adaptive Cruise Control (ACC)
(Models With Advance Package)
When you turn the ignition switch to ON (II), make sure
the ACC indicator comes on yellow for about 5
seconds, and then turns to green. To switch between
the ACC mode and normal cruise control, make sure
the MAIN switch on the steering wheel is on, then
press and hold the DISTANCE switch on the steering
wheel for 1 second. The MID shows the current system
mode, ACC or Cruise.
8 of 10
10-023
The MDX ACC is similar to the RL system. For more
information, refer to the 2010 Acura MDX Technical
Information Guide.
Check the Collision Mitigation Braking System
(CMBS) (Models With Advance Package)
When you turn the ignition switch to ON (II), make sure
the CMBS indicator comes on for about 1 second, and
then goes off. If the CMBS indicator stays on, make
sure the system has not been turned off by pressing
the CMBS off switch.
The MDX CMBS is similar to the RL system. For more
information, refer to the 2010 Acura MDX Technical
Information Guide.
Check the Blind Spot Information (BSI)
(Models With Advance Package)
When you turn the ignition switch to ON (II), make sure
the BSI indicator comes on for about 1 second, and
then goes off. If the BSI indicator stays on, make sure
the system has not been turned off by pressing the BSI
off button.
For more information on BSI, refer to the 2010 Acura
MDX Technical Information Guide.
Check/Clean the Front Grille
The upper and lower shields on the front grille have
dark silver satin plating. Remove fingerprints and other
residue using only a common spray-on glass cleaner or
mild soap.
Remove the Exterior Protective Coverings
Carefully remove all the exterior protective coverings
(refer to Service Bulletin 96-009, Removal of Protective
Coatings During TQI).
Before removing the Rapgard from the hood, remove
the windshield washer nozzles:
• Using your finger, push the nozzle toward the front of
the vehicle until the nozzle tab releases from the
hood.
• Slide a plastic card under the back of the nozzle,
then push back on the front of the nozzle to
disengage its front locking tab. Remove the other
nozzle the same way.
RAPGARD
Do the Idle Learn Procedure
NOTE: Idle speed adjustment is done by the PCM;
there is no adjustment screw.
To avoid an erratic idle, do the idle learn procedure
after you install the No. 4 fuse and after you reset the
AcuraLink control unit.
1. Make sure all electrical items (A/C, radio, rear
window defogger, lights, etc.) are off.
2. Start the engine, and let it reach operating
temperature (the cooling fans cycle twice).
3. Let the engine idle for 10 minutes with the throttle
closed.
The idle learn procedure must also be done after
updating or replacing the PCM. It does not need to be
done after you clear DTCs.
Do the CKP-Pattern Learn Procedure
To ensure proper engine operation, do the CKPpattern learn procedure after doing the idle learn
procedure. Do this procedure on a level road during
your TQI road test. The procedure consists of a lowrpm and a high-rpm pattern learn. Make sure you do
the low-rpm pattern learn first.
1. Low-rpm Pattern Learn: Shift to 2 or D3, and
decelerate with the throttle fully closed from
2,500 rpm to 1,000 rpm.
Push back.
WINDSHIELD WASHER NOZZLE
• Peel off the Rapgard under the nozzles.
• Make sure the nozzle gaskets and the nozzle supply
line tubes aren't pinched, then reinstall the nozzles
by pressing them in place until their tabs catch on the
hood.
Complete the Personalized Settings Check Sheet
(To Be Done by Sales Staff)
Sales staff will ask the client to complete a check sheet
specifying their preferences for the personalized
settings in the MID. While the client is in the finance
and insurance department, the sales staff will program
the features that will likely be set only once; when the
sales staff are ready to deliver the vehicle to the client,
they will then review and program the features that the
client is likely to change often.
2. High-rpm Pattern Learn: With the transmission in
the sequential sportshift mode, shift to 1, and
decelerate with the throttle fully closed from
5,000 rpm to 3,000 rpm.
10-023
9 of 10
NEW MODEL INFORMATION
New Automatic Transmission Fluid
A new automatic transmission fluid is used starting in
2011 models. ATF DW-1 is the new automatic
transmission fluid that helps improve low temperature
performance. Do not use any other transmission fluid
in 2011 models.
New AWD Differential Fluid
A new differential fluid is used in all 2011 SH-AWD
models. Acura All-Wheel Drive Fluid (DPSF)
replaces ATF-Z1 as the recommended rear differential
fluid. Acura All-Wheel Drive Fluid is designed
specifically for the tough conditions in the AWD
assembly.
Acura All-Wheel Drive Fluid (DPSF) is a caramel color,
not pink like the previously used A/T fluid. The rear
differential case is also stamped with the letters DPSF,
not ATF.
NOTE: The stamping was a running change and some
early production vehicles have ATF stamped on the
case. Use only Acura All-Wheel Drive Fluid (DPSF) in
these vehicles.
10 of 10
10-023