1
MAINTENANCE
AND CLEANING
SERViCiNG POLE TRIMMER
BLADE REPLACEMENT
.
A
The Pole Trimmer is a double-insulated tool
and contains some parts that can only be replaced with original parts by an Authorized
Service Center. For service, please call the
Customer Support Department to obtain
a list of authorized service dealers
near you. Call 1-866-206-2707 (in Canada,
call 1-877-696-5533).
WARNING:To prevent serious
personal injury, wear gloves when
removing and installing the cutter blades. Do not place fingers
or hands between blades where
they could get cut.
l.
2.
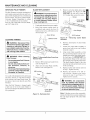
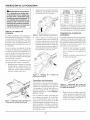
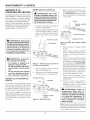
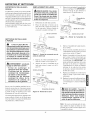
Remove screw that holds down cutter
blade assembly (see Figure 19). IMPORTANT" Be sure not to loose the
8-32 locknut that secures this screw.
.....Screw
z Cutter Blade
Assembly
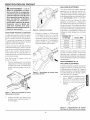
Unplug pole trimmer from power supply.
Place pole trimmer upside down on
workbench and remove the four (4)
bottom cover screws. Lift bottom cover
off (see Figure 17).
Cam Flange
8=32Locknut
Cover Screw
@ ooo-
Bottom
,'LEANING TRIMMER
_1_ WARNING:
Cover
Disconnect Pole
Trimmerfrom power suppiybefore
cleaning or servicing. Severe in=
juryor death could occur from fire,
electrical shock, or body contact
with moving cutter blades.
4Bk WARNING:
Pole Trimmer:
When cleaning
• Do not submerse PoleTrimmer
in any liquids
• Do not use products that con=
tain Ammonia, Chlorine, or
abrasives
• Do not usechlorinated cleaning
solvents, Carbon Tetrachloride,
Kerosene, or Gasoline.
Figure 17 - Removing Bottom
Trimmer Head
3.
Remove M5 locknut and washer from
cam (see Figure 18).
4.
Align cam and cutter blade assemby.
Remove cam. (see Figure 18).
M5 Locknut
Cutter
Blade
6.
Remove and dispose of cutter blade
assembly.
7.
Attach new cutter blade assembly to
power head with screw and locknut
removed in step 5.
8.
Align cutter blade assembly so that
the cam will fit properly into the ovalshaped lobes of the cutter blade assembly (see Figure 19). IMPORTAN7? The
large diameter flange of the cam must
face upward away from the power head.
The small diameter flange of the cam
must line up with and sit directly on top
of the cam flange.
9.
Replace washer and locknut removed
in step 3. Tighten securely.
Cover from
10. Replace the bottom cover and secure with the 4 bottom cover screws
removed in step 2 (see Figure 17).
Tighten screws securely.
Use a soft cloth dampened with a mild soap
and water mixture to wipe Pole Trimmer
pole, housing, and cutter blades clean. Do
not spray or pour water directly onto Pole
Trimmer.
Once the Pole Trimmer is cleaned, apply
a light coat of oil to the cutter blades to
prevent rust and provide lubrication (motor
oil is preferred).
Figure
19 - Removing
Assembly
Cutter Blade
Assembly
Figure 18 - Removing
11
Cam
_, WARNING: All components
must be installed and securely
fastened before plugging pole trimmet into power supply. Failure to
do so may cause product damage
or serious personal injury.
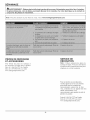
Note: If binding occurs after reassembly,
repeat all of the previous steps making sure
that cam aligns properly with cutter blade
assembly.