1
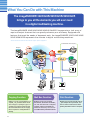
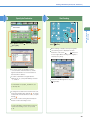
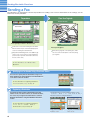
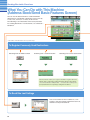
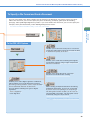
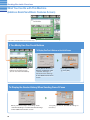
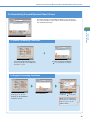
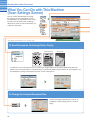
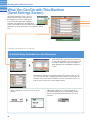
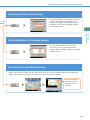
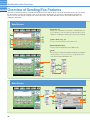
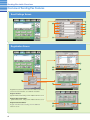
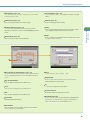
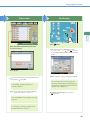
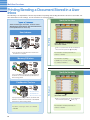
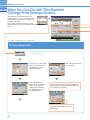
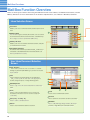
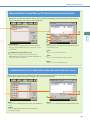
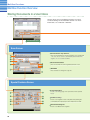
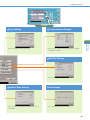
Easy
Operation
Guide
CONTENTS
Preface
Manuals for the Machine............................. 1
What You Can Do with This Machine .......... 3
The Control Panel ....................................... 5
Copying Functions
Operating the Express Copy Basic
Features Screen ................................ 7
Making a Copy............................................. 9
What You Can Do with This Machine
(Regular Copy Basic Features
Screen) ............................................ 11
What You Can Do with This Machine
(Special Features Screen) .............. 13
Over view of Copy Features....................... 21
Sending /Facsimile Functions
Sending a Document (E-mail, I-fax, File
Ser ver) ............................................ 23
Sending a Fax ........................................... 25
What You Can Do with This Machine
(Address Book/Send Basic
Features Screen)............................. 27
What You Can Do with This Machine
(Scan Settings Screen) ................... 31
What You Can Do with This Machine
(Send Settings Screen)................... 33
Over view of Sending /Fax Features .......... 35
Mail Box Functions
Storing Originals in an Inbox ................... 39
Printing /Sending a Document Stored
in a User Inbox ................................ 41
What You Can Do with This Machine
(Scan Screen) ................................. 43
What You Can Do with This Machine
(Change Print Settings Screen) ...... 45
Mail Box Function Over view ..................... 47
Canceling jobs
How to Cancel a Job ................................. 53
Additional Functions
Store this guide next to the machine for future reference.
Additional Functions ................................ 55
Manuals for the Machine
The manuals for the machine are divided as follows. Please read them accordingly to make full use of the machine.
* Indicates that this guide is a printed manual and is also included in the e-Manual.
Learning About the Useful Functions of the Machine
Tutorial CD
A tutorial that enables you to learn examples of how to use functions, and try out
actual procedures with a simulator. The administrator of the machine can use the
Tutorial CD to explain the machine’s functions and operating procedures to several
users simultaneously through e-Learning.
Setup and Maintenance after Installing the Machine
Getting Started
Read this section for operations and settings required for the functions you want to
use after installing the machine.
Network Settings
Before Using the Fax Function
Before Printing from Computers
Before Sending Faxes from Computers
Managing the Machine from a Computer
How to Use the Machine and Function Overview (This Document)
Easy Operation Guide
Read this manual to learn the basic operations of the machine, grasp a basic
knowledge of what the machine can do, or find out what kind of useful functions it
has. Keep it next to the machine for future reference.
The Control Panel
Making a Copy
Sending Faxes
Sending Files
Storing to Inboxes
Printing/Sending from Inboxes
Using the Copy Function
Using the Send/Fax Function
Using the Mail Box Function
Other Useful Information
Cautions for Using this Machine
Troubleshooting
Read this section for cautionary information and basic operations for using the
machine.
Before Using the Machine
Operating the Touch Panel Display
Replacing Toner Cartridges
Removing a Paper Jam
1
Loading Paper
Specifications
System Manager Settings
Manuals for the Machine
Handling and Operating the Machine
e-Manual
You can view the following information, included on the enclosed Manual CDROM, using your computer.
Describes what you should know before using the machine.
• How to Use This Manual
Describes how to use the manuals and the system requirements
for the manuals.
Describes the features of the machine, and the useful functions
and operations you can perform with it.
Describes the basic operations of the machine.
• What This Machine Can Do
• Basic Operations
• Optional Equipment
• Additional Functions
Preface
Before You Start
• Before You Start Using This
Machine
Describes the optional equipment you can attach to the
machine.
Describes the Additional Functions screen, which you can set
according to your needs.
Help
• Problem Solving
• Maintenance
Copy
Send/Fax
Mail Box
Print
Describes the procedures for dealing with paper jams and
displayed error messages.
Describes how to load paper, replace consumables, and regular
maintenance.
Web Access
Netwrok
Remote UI
MEAP/SSO
Security
Software
Learning How to Install the Drivers for the Machine
These manuals are on the User Software CD-ROM or Fax Driver Software CDROM. For instructions on selecting drivers and displaying the manuals, see
Chapters 10 through 12 in Getting Started.
User Software CD-ROM:
• Printer Driver Installation Guide
• Mac UFR II Driver Guide
• Mac PS Driver Guide
Fax Driver Software CD-ROM::
• Fax Driver Installation Guide
User Software CD-ROM:
• Network ScanGear Installation Guide
Read this section to learn how to install the drivers required to print from a
computer.
Read this section to learn how to install the driver required to send faxes from a
computer. (Windows only.)
Read this section to learn how to install the driver required to scan documents to a
computer from the machine. (Windows only.)
2
What You Can Do with This Machine
The imageRUNNER 3245/3245i/3235/3235i/3230/3225
brings to you all the elements you will ever need
in a digital multitasking machine.
The imageRUNNER 3245/3245i /3235/3235i /3230 /3225 incorporates a rich array of
input and output features that can greatly enhance your efficiency. Equipped with
features that meet the needs of document work, the imageRUNNER 3245/3245i /3235/
3235i /3230 /3225 represents the ultimate in digital multitasking machines.
*Some functions described in this manual require optional equipment.
Send Outside the Company
Fax
Original
Color
Color
olo
l S
Sc
Scan
Sca
n
Func
Funct
Functi
Functio
Function
unc n
x
Func n
Funct
Functi
Functio
Function
1
2
3
I-Fax
4
Sen
Se
end
Func on
Funct
Functi
Functio
Function
n
Co
Cop
op
py
py
Funct
Functi
Functio
Function
unc
unct
nc n
E-Mail
Pri
Pr
rin
i nt
Func
Funct
Functi
Functio
Function
unc
nc n
Copy/Print
1
2
Remot
Remot
Remote
emot UI
U
Funct
Functi
Functio
Function
unc
unct
nc n
3
4
In-Company
Computer
3
File Server
E-Mail
Copying Function
Mail Box Function
Print Function
Enables you to save costs with features such
as printing a single sided document on both
sides of the paper, or printing two pages of a
document on each sheet of paper. Also with
the Collate and Booklet modes, the Copying
function is perfect for creating materials for
meetings.
Enables you to save scanned
documents, documents received by
fax, and data sent from a computer,
and then send or print them out
whenever necessary. You can also
use USB memory with the machine.
Enables you to print on both sides of
paper, output sets of printouts, and
various other useful features when
printing documents from a computer.
What You Can Do with This Machine
Refer to this manual for examples of the useful
ways in which you can use your machine.
To Enlarge/Reduce an Image to Copy
to a Different Size Paper ...............................................P.11
To Staple Sets of Output Together ..........................................P.11
Fax Function
To Copy onto Irregular Sized Paper ........................................P.12
To Make Two-Sided Copies.....................................................P.12
To Copy Different Size Originals Together .............................P.13
Copying Functions
Enables you to fax not only scanned documents, but
also documents temporarily saved in a User Inbox,
or data sent from a computer. You can also send to
multiple destinations, and forward received faxes as
well.
To Copy Facing Pages in a Book.............................................P.13
To Copy Multiple Originals onto One Sheet of Paper .............P.14
To Make a Booklet ...................................................................P.14
To Erase the Dark Border when Copying a Book....................P.15
To Add a Margin.......................................................................P.15
To Add a Cover ........................................................................P.16
To Recall Commonly Used Settings........................................P.16
To Scan Batches of Originals ..................................................P.17
To Add Page Numbers to Copies ............................................P.18
Sending Function
To Add a Watermark to Copies................................................P.18
To Store Scanned Originals with Copy Settings .....................P.19
To Embed Hidden Text in the Background ..............................P.19
Enables you to send scanned document data and data
saved in a User Inbox not only by fax, but also by e-mail
and I-fax. You can also convert originals to JPEG, TIFF,
PDF, or XPS file formats and send them as an attached
file.
To Combine Multiple Batches of Originals
with Different Copy Settings ........................................ P.20
To Register Commonly Used Destinations............................. P.27
Remote UI Function
Enables you to operate the machine and its jobs and
print document data stored in inboxes from the Web
browser on a computer.
Sending/Facsimile Functions
To Recall the Last Settings..................................................... P.27
To Specify a File Format and Send a Document.................... P.28
If You Mainly Use One-Touch Buttons.................................... P.29
To Display the Sender History
When Sending Faxes/I-Faxes ..................................... P.29
To Automatically Forward Received
Faxes/I-Faxes .............................................................. P.30
To Send Documents Containing Photos Clearly .................... P.31
To Change the Scanned Document Size ............................... P.31
To Automatically Change the Zoom Ratio
According to a Specified Record Size ......................... P.32
To Send Fine Text and Images Clearly................................... P.32
To Send Separately Scanned Documents At Once ............... P.32
To Add the Reply Destination to a Sent Document................ P.33
To Specify the Time to Start Sending..................................... P.34
To Send Notification of Completed Sending .......................... P.34
MEAP Function
Enables you to add new functions to your machine,
by installing applications that support the MEAP
application platform included in the machine.
Mail Box Functions
To Confirm a Document Before Sending................................ P.34
To Add a Name to a Document and Save It ........................... P.43
To Scan a Two-Sided Document ............................................ P.43
To Print a Sample Print ........................................................... P.45
To Automatically Delete Document Data After Printing ......... P.46
To Print Multiple Documents Together ................................... P.46
To Output Print Documents in Sets ........................................ P.46
To View Documents Stored in a User Inbox........................... P.46
4
Preface
To Interrupt a Long Copy Job to Make Priority Copies ...........P.12
The Control Panel
To Switch Functions
Use these keys to swich functions
The control panel consists of a touch panel display,
for setting the various functions, and physical
keys, such as the Start key, Stop key, and the
Control Panel Power Switch. The following is an
explanation of the keys used in this manual. For
more information, see Chapter 1, “Before You Start
Using This Machine,” in Troubleshooting.
Press the keys on the upper part of the
touch panel display to switch functions
Reset Key
Press to restore the standard settings of
the machine.
Touch Panel Display
Displays the settings screen for each
function.
USB Port
Use to connect memory media to the
machine via USB.
Edit Pen
Use when operating the touch panel
display.
To Confirm or Edit the Job Status
Press [System Monitor]
to display the screen
on the left, enabling
you to confirm the job
status and cancel print
jobs. You can also
see the status of the
machine, such as the
amount of remaining
paper.
System Monitor Screen
5
Help Key
Press to display explanations of functions and
how to specify settings.
The Control Panel
If the Touch Panel Display is Turned Off
Preface
If nothing is displayed on the touch
panel display even when the main
power switch is turned ON, press
the control panel power switch.
Ex. Send Basic Features Screen
Control Panel Power Switch
Press to turn the control panel turned ON or OFF.
Counter Check Key
Press to display the copy and print count totals on the
touch panel display.
Press to stop a job in progress, such as a scan job or
copy job.
Start Key
Press to start an operation.
Clear Key
Press to clear entered values and characters.
Additional Functions Key
Press to specify additional functions.
Numeric Keys
Press to enter numeric values.
Fax Volume Adjustment Key
Press to display the screen for
adjusting settings such as the
transmission volume and fax sending/
receiving alarm volume.
Log In/Out Key
Press when setting or enabling Department ID
Management.
Brightness Adjustment Dial
Use to adjust the brightness of the touch panel
display.
6
Copying Functions
Operating the Express Copy Basic Features
Screen
This machine includes an Express Copy function. The Express Copy function is useful for advanced users, as it allows
you to set the various copying modes with fewer steps than the Regular Copy function. It also enables you to quickly
set the Special Features of the machine.
Express Copy Ba
Copy Ratio
You can set the machine to adjust the copy
ratio automatically, or you can specify the copy
ratio manually.
Copy Exposure/Auto Density
You can make the copy exposure lighter or
darker. You can also adjust the exposure
automatically.
Original Type Selection
You can select the original type that is the best
match for the quality of your originals.
You can set the Special Features of the machine.
Scan Originals
Book/Page Edit/Shift
Process/Layout
You can make various settings for
the scanning originals.
You can process original images and
change the layout of the originals.
• 2-Page Separation
You can make booklets, add page
numbers, and set finishing modes for
scanned images.
• Different Size Originals
• Front Cover/Back Cover
• Form Composition
• Job Build
• Paper Insertion
• Secure Watermark
• Scan Image Check
• Booklet
• Image Repeat
• Page Numbering
• Frame Erase
• Copy Set Numbering
• Transparency Interleaving
• Watermark
• Nega/Posi
• Print Date
• Mirror Image
• Shift
• Margin
7
• Image Combination
Operating the Express Copy Basic Features Screen
Switching between the Copy and Express Copy Basic Features Screen
Copying
Functions
You can press [Copy]
or [Express Copy],
located on the top of
the Basic Features
screen, to switch
between the Regular
Copy Basic Features
screen and the
Express Copy Basic
Features Screen.
asic Features Screen
Paper Selection
You can set the machine to select the paper size.
2-Sided Copying
This mode enables you to make two-sided copies from one-sided
or two-sided originals, or make one-sided copies from two-sided
originals.
Collating Copies
The Finishing modes can be selected to collate copies in various
ways, either by pages or copy sets.
Standard Key Settings
You can register copy modes that you have specified as Standard
Keys. This key is a shortcut key to Standard Key Settings.
Interrupt Mode
This mode enables you to interrupt a reserved or current job to make
priority copies.
Sample Set
This mode enables you to check the copy result before making
multiple copies.
Image Adjustment
Others
sharpness and exposure.
You can set other Special Features
of the machine.
• Sharpness
• Job Block Combination
• Image Qual. Adjustment
• Store in User Inbox
• Job Done Notice
8
Copying Functions
Making a Copy
The following is an explanation of the basic procedure for copying a document. For more detailed procedures, see the
references in each procedure.
Preparations
Place Your Originals
Placed in the feeder
Regular Copy Basic Features screen
Press [Copy] to switch to the Copy function.
If the following screen is displayed, enter the
[Department ID] and [Password]
press
(Log In/Out) on the touch panel.
Placed on the platen glass
Place your originals.
If you have placed your originals on the platen glass,
close the feeder/platen cover after placing your
originals.
If necessary, set copy modes on the Regular Copy
Basic Features screen.
For more information on the copy modes you can
set on the Regular Copy Basic Features screen,
see p. 21 and p. 22.
To set the various copy modes, press [Special
Features].
For more information on the copy modes you can
set on the Special Features screen, see p. 21 and
p. 22.
If Department ID Management or the SSO-H login
service is set, it is necessary to enter and ID and
password. (If an optional card reader is attached,
insert a control card.)
For more information, see e-Manual > Basic
Operations.
9
You can also place paper in the stack bypass to
copy. (For more information, see e-Manual > Basic
Operations.)
Making a Copy
Start Copying
Copying
Functions
Specify the Number of Copies
Enter the desired number of copies (1 to 999)
with the numeric keys.
If you make a mistake when entering values, press
(Clear)
enter the correct values.
The number of copies you specify is displayed on
the right side of the Regular Copy Basic Features
screen.
Press
(Start).
When copying is complete, remove your originals.
If the following screen is displayed, follow the
instructions on the screen and press
(Start) once
for each original. When scanning of the originals is
complete, press [Done].
If Department ID Management is set, press
(Log In/Out).
To cancel, interrupt, or continue copying
To cancel copying
Press
(Stop).
To make another copy while
printing
Press [Done].
To interrupt copying.
Press [Interrupt].
(See e-Manual > Copy.)
Place the next original.
Press
(Start).
10
Copying Functions
What You Can Do with This Machine
(Regular Copy Basic Features Screen)
The following is an explanation of the features often
used when copying a document. For more information,
see e-Manual > Copy.
To use more convenient functions (Special Features),
press [Special Features] to access the Special Features
screen.
Regular Copy Basic Features screen
* The numbers in the illustrations refer to operation steps.
To Enlarge/Reduce an Image to Copy to a Different Size Paper
Useful when enlarging or reducing an original of one
standard paper size to another, such as enlarging
an LTR sized original to 11" x 17" size, or reducing
11" x 17" to LTR size. Simply select the desired
paper size from the displayed keys to automatically
set the optimal zoom ratio.
Original
Copy
1
1
2
To Staple Sets of Output Together
Select the Staple mode to collate copies as in
the diagram on the right. Collated copies are
stapled in the position you set. This is useful for
distributing materials copied for a meeting, etc.
Original
3 copies
set
1
Copy
p 1
Copy 2
Copy 3
1
2
3
4
1
2
3
4
5
11
After you set the stapling position, it
is important to place your originals
with the correct orientation.
For information on the relation
between original orientation, paper
orientation, and stapling position,
see Chapter 4, “Appendix,” in
Troubleshooting.
What You Can Do with This Machine (Regular Copy Basic Features Screen)
To Interrupt a Long Copy Job to Make Priority Copies
Copying
Functions
This mode enables you to interrupt the current job or reserved job to make priority copies.
After you finish making your priority copy, the paused print job automatically resumes.
This mode is useful if you need to make an urgent copy during a long copy job.
To Copy onto Irregular Sized Paper
To copy onto non-standard size paper, simply set the size
and type (such as Plain, Heavy) of the paper, and load it
into the stack bypass.
Stack Bypass Tray
Direction to
load the paper
2
1
4
3
5
To Make Two-Sided Copies
When copying many single sided originals, printing on both the front and
back sides of paper can help you save half of the paper costs.
Original
1
Copy
If you press [Option] on the screen
on the left, you can select to make
the front and back sides of the
copies have the same top-bottom
orientation. This makes it easier
to see when stapling copies like a
calendar.
2
3
For information on Special Features, see p. 13 to p. 20.
12
Copying Functions
What You Can Do with This Machine
(Special Features Screen)
The following is an explanation of the
features often used when copying a
document. For more information, see
e-Manual > Copy. The Special Features
screen is divided into two screens. Press
[ ] / [ ] on the lower left of the screen to switch the
screens.
Special Features screen (1/2)
* The numbers in the illustrations refer to operation steps.
To Copy Different Size Originals Together
This mode enables you to copy a mix of different size originals in the feeder
together.
11" x 17" Original
LTR Original
Direction to load
the paper
1
2
To Copy Facing Pages in a Book
It is not necessary to reset originals when copying facing pages from a book or
bound original, if you use this mode to copy the facing pages onto two separate
sheets of papers.
Original
1
13
Copy
1
What You Can Do with This Machine (Special Features Screen)
To Copy Multiple Originals onto One Sheet of Paper
Copy
This mode enables you to reduce
multiple originals or two-sided
originals to fit onto one sheet of
paper. This is useful for arranging
a variety of originals on one sheet
of paper for easy viewing and for
saving paper and space when
storing printouts.
1
or
2
3
Copying
Functions
Original
4
2 On 1
(two pages on one sheet of paper)
1
Copy
1
2
1
2
3
4
4 On 1
(four pages on one sheet of paper)
1
5
3
2
4
6
To Make a Booklet
This mode enables you to copy multiple originals in such
a way that the copies are made into a booklet. This is
useful for arranging materials for distribution in an easily
viewable format.
Original
Copy
7
2
1
8
5
2
1
1
6
5
7
4
6
8
1
3
8
4
3
3
6
3
5
2
6
4
14
Copying Functions
What You Can Do with This Machine (Special Features Screen)
Special Features screen (1/2)
Special Features screen (2/2)
* The numbers in the illustrations refer to operation steps.
To Erase the Dark Border when Copying a Book
This enables you to erase the dark border, as well as center and contour lines that appear if you are copying
facing pages in a book or bound original onto a single sheet of paper.
With
Frame
Erase
Copy
Original
Copy
1
4
2
3
Without
Frame Erase
5
To Add a Margin
This enables you to add a margin to the output. The location of the margin can
be selected from the left, right, top, and bottom of the document. You can also
specify the width of the margin.
Left Margin
1
2
3
15
Right Margin
Top Margin
Bottom Margin
What You Can Do with This Machine (Special Features Screen)
To Add a Cover
Copying
Functions
This enables you to load paper different to the copies in the stack bypass, to be used as a cover. You can also
add a back cover, sheet insertions, and chapter pages.
Original
Copy
Printed Front Cover
1
2
3
6
5
7
4
To Recall Commonly Used Settings
Commonly used combinations of modes can
be stored in Mode Memory to be recalled
with the touch of a button. You can also use
Mode Memory in combination with Standard
Key 1 and 2 for extra convenience.
1
To recall stored settings, display the
screen you used to store them, select
the key in which the settings are
stored
press [OK].
2
1
3
2
16
Copying Functions
What You Can Do with This Machine (Special Features Screen)
Special Features screen (1/2)
Special Features screen (2/2)
* The numbers in the illustrations refer to operation steps.
To Scan Batches of Originals
This enables you to scan originals when there
are too many to be placed at once, by dividing
them into multiple batches. Copies can be
made after all of the originals have been
scanned. This is also useful when using both
the feeder and platen glass to scan originals.
After placing the next
original, press
(Start).
17
Copy
What You Can Do with This Machine (Special Features Screen)
To Add Page Numbers to Copies
This enables you to add page numbers to copies.
Copy
Copying
Functions
Original
1
5
2
7
3
4
8
6
To Add a Watermark to Copies
This enables you to add a watermark to copies.
Original
Copy
CONFIDENTIAL
1
4
6
2
3
5
7
18
Copying Functions
What You Can Do with This Machine (Special Features Screen)
Special Features screen (1/2)
Special Features screen (2/2)
* The numbers in the illustrations refer to operation steps.
To Store Scanned Originals with Copy Settings
This mode enables you to store scanned originals in
a User Inbox from the Regular Copy Basic Features
screen. The copy settings are stored with the
document.
You can add a document
name to the stored document.
1
You can also make copies of
the scanned originals while
storing them in the User
Inbox.
2
To Embed Hidden Text in the Background
This mode enables you to embed hidden text, such as
“CONFIDENTIAL,” in the background of copies/prints.
The embedded text appears when the copies are
copied.
Copy B
(Copy of Copy A)
Y OP Y OP Y OP Y OP Y OP
Y OP Y OP Y OP Y OP Y O
OP
Y OP Y OP Y O
OP Y OP Y OP
Y OP
Y OP
Y OP
Y OP
YO
YO
YO
Y
Y
Y
Y
Y
Y
Y OP
Y OP
Y OP
Y OP
Y OP
Y OP
Y OP
Y OP
YO
YO
YO
YO
YO
YO
YO
YO
3
1
2
19
Original
Copy A
(Secure Watermark
is Selected)
4
YO
Y OP
Y OP
Y OP
Y OP
Y OP
Y OP
P
Y OP
Y
OP Y OP
OP
OP
O
P Y OP
Y
OP Y OP
O
Y
OP Y OP
O
Y
OP Y OP
O
YO
OP
P YO
OP Y OP
Y OP Y OP Y OP
Y OP Y OP Y OP
What You Can Do with This Machine (Special Features Screen)
To Combine Multiple Batches of Originals with Different Copy Settings
Copying
Functions
This mode enables you to scan multiple batches of originals with different copy
settings and print them as one document.
Example) · Combined document: Staple Mode (Double)
· Batches: Shift, 1 2-Sided, 2-Page Separation, Image
Combination (4 on 1) modes
· Cover/Sheet Insertion: Cover
1
Batch
Copy
2
Specify the settings for the combined document.
First Batch:
The Shift Mode Is Selected
3
First Batch
Second Batch
Third Batch
Fourth Batch
Second Batch:
The 1 2-Sided Mode Is Selected
Specify the copy settings for
each batch of originals.
1
Third Batch:
The 2-Page Separation Mode Is Selected
1
2
1
2
3
Scan your originals using the
feeder or platen glass.
4
Fourth Batch:
The Image Combination Mode (4 on 1) Is Selected
7
4
6
5
8
To scan the next batch of originals, press [Next
Block] and repeat the procedure from 3 . When
you have finished scanning all of your originals,
press [Conf./Combine All Blocks].
You can also make a sample print
of a selected batch of originals or
the combined document.
To use the Cover/Sheet Insertion mode for the
combined document, press [Cover/Sheet Insertion].
Select the batches of originals in the order in which you
want to combine them
press [Start Print].
20
Copying Functions
Overview of Copy Features
Use the Regular Copy Basic Features screen and the Special Features screen to set the various copy modes. There
are two Special Features screens, “1/2” and “2/2”. For more information, see e-Manual > Copy.
Regular Copy Basic Features Screen
Direct
6
1
Press to return the copy ratio to 100%.
Copy Ratio (see p. 11)
7
Press to reduce or enlarge the copy size.
2
3
4
8
9
Finishing (see p. 11)
10
Press to select or cancel the Collate, Group, or Staple mode.
5
Special Features screen (1/2)
2-Page Separation (see p. 13)
Press to copy facing pages of an opened book onto separate copy
sheets.
1
8
2
3
9
10
4
11
Press to add covers, sheet insertions, or chapter pages between
specified pages.
5
6
12
13
Press to make copies of several originals to form a booklet.
Cover/Sheet Insertion (see p. 16)
Booklet (see p. 14)
7
Transparency Interleaving
Press to insert a sheet between each transparency when copying
transparencies.
Special Features screen (2/2)
Image Creation
You can arrange the image of an original.
1
2
3
4
5
6
7
8
9
10
11
2
Form Composition
Press to superimpose an image stored in memory onto the original
image for copying.
3
Secure Watermark (see p. 19)
Press to embed hidden text in the background.
4
Mode Memory (see p. 16)
Press to store or recall copy modes.
21
Overview of Copy Features
2-Sided (see p. 12)
Adjust Contrast
Press to make two-sided copies.
Press to manually control the copy exposure. Press [A] to select or
cancel the automatic exposure control.
Press to interrupt a copy job to make priority copies.
Original Type Selection
Press to change the original type when the originals include photos,
etc.
Select Output Device
Displayed when a remote copy printer is connected to a network.
Press to select the printing destination for remote and cascade
copying.
Special Features
Press to select a Special Features mode.
Paper Select (see p. 12)
Press to select the paper size/type and the paper source.
Different Size Originals (see p. 13)
Margin (see p. 15)
Press to make copies feeding different size originals together in
one group, by placing them in the feeder.
Press to create margins along the sides of a copy sheet.
Job Build
Job Done Notice
Press to divide the originals into several parts, scan them, and
then print them all together.
Press to have the machine notify the user through e-mail when
the copy job is done.
Special Features Screen Switch
Press to switch between Special Features 1/2 and Special
Features 2/2.
8
12
Frame Erase (see p. 15)
Press to eliminate dark border areas and lines that appear around
original images or shadows from binding holes.
Shift
Press to shift the position of the original image on the copy sheet.
13
9
Image Combination (see p. 14)
Press to automatically reduce two, four, or eight originals to fit
onto a one-sided or two-sided copy sheet.
5
Recall
9
Press to recall previously set copy modes.
6
Sharpness
10
You can remove the background of an original.
8
Store In User Inbox (see p. 19)
Press to store originals scanned from the Regular Copy Basic
Features screen as a document in a User Inbox.
11
Image Qual. Adjustment
Pg/Copy Set Numbering (see p. 18)
Press to include page and copy set numbering on copies.
Press to sharpen or soften the image of the original in the copy.
7
Scan Image Check
You can check each image you scan when scanning from the
platen glass.
Job Block Combination (see p. 20)
Press to scan multiple batches of originals with different copy
settings and print them as one document.
Watermark/Print Date (see p. 18)
Press to include the watermark and date on copies.
22
Copying
Functions
Interrupt (see p. 12)
Sending/Facsimile Functions
Sending a Document (E-mail, I-fax, File Server)
The following is an explanation of the basic procedure for sending a document. For more detailed procedures, see the
references in each procedure.
Preparations
Place Your Originals
Placed in the feeder
Press [Send] to switch to the Send function.
Placed on the platen glass
The function key for the sending and fax functions
differs according to the installed options. It may be
displayed as [Send] or [Fax]. For more information,
see e-Manual > Basic Operations.
If the Department ID Management screen is
displayed, enter the [Department ID] and [Password].
(Log In/Out) on the
After entering them, press
touch panel.
Place your originals.
When placing originals on the platen glass, make
sure to close the feeder/platen cover after placing
your originals.
If Department ID Management or the SSO-H login
service is set, it is necessary to enter and ID and
password. (If an optional card reader is attached,
insert a control card.)
For more information, see e-Manual > Basic
Operations.
Registering Destinations
In order to be able to select a destination using the
address book, one-touch buttons, or favorites buttons,
it is necessary to register the destination in advance.
Register destinations using the Additional Functions
screen.
The Register button on the Send Basic Features screen
and the Address Book screen is a shortcut to the Additional
Functions screen for storing destinations.
For more information on registering destinations
in the address book, one-touch buttons, or
favorites buttons, see p. 37 and p. 38.
[Reg.] on the Send Basic
Features screen
23
[Register] on the Address
Book screen
Sending a Document (E-mail, I-fax, File Server)
Specify the Destination
Start Sending
Sending/Facsimile
Functions
1
2
Press [Address Book]
press [OK].
select a destination
Press
(Start).
When sending is complete, remove your originals.
If the following screen is displayed, follow the
instructions on the screen
press
(Start) once
for each original. When scanning of the originals is
complete, press [Done].
You can also specify the destination using a
one-touch button or favorites button if you have
registered a destination in a one-touch button or
favorites button in advance.
To send to a destination not registered in the
address book, etc., press [New Address] and enter
the destination.
If Department ID Management is set, press
(Log In/Out).
For information on specifying destinations, see
p. 35 and p. 36.
To change the resolution of the document to be sent,
use the Scan Settings drop-down list ( 1 ). To change
the file format of the document to be sent, press [File
Format] ( 2 ).
You can also set the scanning mode and Special
Features on the Scan Settings screen.
For more information on the features you can set
from the Scan Settings screen, see p. 35 and
p. 36.
24
Sending/Facsimile Functions
Sending a Fax
The following is an explanation of the basic procedure for sending a fax. For more information on the settings, see the
references in each procedure.
Preparations
Place Your Originals
Placed in the feeder
Press [Send] to switch to the fax mode.
In the above screen, start entering the fax number
with the numeric keys to automatically display the
screen for entering the fax destination.
If Department ID Management or the SSO-H login
service is set, it is necessary to enter and ID and
password. (If an optional card reader is attached,
insert a control card.)
Placed in the platen glass
Place your originals.
When placing originals on the platen glass, make
sure to close the feeder/platen cover after placing
your originals.
For more information, see e-Manual > Basic
Operations.
Specifying the Fax Number Using a One-touch Button
You can also specify the fax destination using a onetouch button if you have registered a fax destination in
a one-touch button in advance.
For more information on registering destinations
in one-touch buttons, see p. 37 and p. 38.
Registering a Destination
In order to be able to select a destination using the
address book, one-touch buttons, or favorites buttons,
it is necessary to register the destination in advance.
Register destinations using the Additional Functions
screen.
The Register button on the Send Basic Features screen
and the Address Book screen is a shortcut to the Additional
Functions screen for storing destinations.
For more information on registering destinations
in the address book, one-touch buttons, or
favorites buttons, see p. 37 and p. 38.
[Reg.] on the Send Basic
Features screen
25
[Register] on the Address
Book screen
Sending a Fax
Start Sending the Fax
Sending/Facsimile
Functions
Enter the Fax Number
Enter the fax number.
Press
To send a fax to multiple destinations, press
the [Next] key after entering the first and each
subsequent destination, or specify the destinations
using the address book.
(Start).
When faxing is complete, remove your originals.
You can set to display a preview of the fax before
sending. You can also confirm the number of pages
which will be sent on the preview screen.
You can also specify destinations using one-touch
buttons or favorites buttons you have registered in
advance.
For more information on registering fax
destinations, see p. 37 and p. 38.
To send a clear fax, set a high resolution. You can
set the resolution from the Scan Settings drop-down
list.
1
2
For information on useful fax features, see p. 31
to p. 38.
If you press the fax volume adjustment key, a screen
for adjusting the transmission volume and fax
sending alarm volume is displayed.
26
Sending/Facsimile Functions
What You Can Do with This Machine
(Address Book/Send Basic Features Screen)
You can use the Send function to send handwritten
documents to a destination. Documents can be sent by
e-mail, I-fax, and fax, in a variety of file formats.
The following is an introduction of the basic procedure
for sending documents. For information, see e-Manual >
Send/Fax.
Send Basic Features screen
* The numbers in the illustrations refer to operation steps.
To Register Commonly Used Destinations
Selecting from the Address Book
Selecting from a Favorites button
Selecting from a One-touch button
Favorites buttons enable you to register a destination together with other
settings. This is useful when sending documents with the same settings
to the same destinatioin multiple times. One-touch buttons enable you to
specify destinations more quickly by setting them in advance.
To Recall the Last Settings
You can recall the last three addresses, scan
settings, and send settings which have been set,
and then send your documents.
1
2
27
What You Can Do with This Machine (Address Book/Send Basic Features Screen)
To Specify a File Format and Send a Document
You can select JPEG, TIFF, PDF, or XPS as the file format for the document you want to send. If you select
PDF as the file format, you can also specify the [Trace & Smooth], [Compact], [OCR (Text Searchable)],
[Encrypt], and/or [Add Digital Signatures] modes. If you select XPS as the file format, you can also specify the
Compact, OCR (Text Searchable), and/or Add Digital Signatures modes.
* You cannot select the file format when sending to a fax, I-fax, or User Inbox.
Sending/Facsimile
Functions
1
2
To Set PDF, XPS Options
Enables you to convert the text parts of a scanned
image into outline data and overlay it inside the PDF
to maintain the quality of the text.
1
Enables you to send files containing text originals
or text/photo originals using a higher compression
ratio than normal files.
2
Enables you to make the text of a scanned
document searchable before sending.
Enables you to add a digital signature to PDF data,
which enables you to send documents clearly by
preventing security problems such as impersonation
and unauthorized alteration of documents.
You can add the following two types of digital
signatures:
• Device Signature
• User Signature
When sending an important document containing
confidential information, you can set a password
to prevent users from printing it out or opening it.
The Encryption function enables you to create an
encrypted PDF and send it. The encryption can be
removed by using the set password.
* [Trace & Smooth] and [Encrypt] can only be specified for PDF
documents.
28
Sending/Facsimile Functions
What You Can Do with This Machine
(Address Book/Send Basic Features Screen)
Send Basic Features screen
* The numbers in the illustrations refer to operation steps.
If You Mainly Use One-Touch Buttons
To Display One-Touch Buttons on the Initial Screen
1
2
3
If you set to display one-touch
buttons on the initial screen,
you can use them immediately.
Select [Default Screen for
Send] in TX Settings under
<Common Settings> in
Communications Settings
on the Additional Functions
screen.
Select [One-touch Buttons]
press [OK].
To Display the Sender History When Sending Faxes/I-Faxes
3
1
2
4
Select [TX Terminal ID] in TX Settings under
<Common Settings> in Communications Settings
on the Additional Functions screen.
29
Press [On]. Set the TX Terminal ID settings as
necessary.
What You Can Do with This Machine (Address Book/Send Basic Features Screen)
To Automatically Forward Received Faxes/I-Faxes
Sending/Facsimile
Functions
By simply turning on forwarding conditions set in advance to
‘On’, received faxes/I-faxes can be automatically forwarded to
the specified destination.
To Enable Forwarding Conditions
1
2
Press [Forwarding Settings] from
System Settings on the Additional
Functions screen.
Set the forwarding Conditions
press [Validate/Invalidate].
To Register Forwarding Conditions
3
1
2
4
Press [Forwarding
Settings] from System
Settings on the Additional
Functions screen.
Press [Register].
Set the forwarding
conditions
press [OK].
Make sure to register the
destination for forwarding
faxes/I-faxes to in the
address book.
30
Sending/Facsimile Functions
What You Can Do with This Machine
(Scan Settings Screen)
You can set the Scan Settings to change
the appearance of the document to send.
The following is an explanation of the useful
functions you can utilize when scanning a
document to send. For more information, see
e-Manual > Send/Fax.
Scan Settings screen
* The numbers in the illustrations refer to operation steps.
To Send Documents Containing Photos Clearly
Text/Photo Mode
Photo Mode
If originals are not scanned correctly, try selecting the original type from the Image Quality drop-down list.
Photos can be scanned clearly. If a shimmering, wavy pattern (the Moiré effect) appears on your originals, use
the [Sharpness] setting in the Special Features screen to decrease it.
2
1
3
To Change the Scanned Document Size
If text on the edge of documents is cut off, try
setting the scanned image size to a size one
larger.
1
2
31
What You Can Do with This Machine (Scan Settings Screen)
To Automatically Change the Zoom Ratio According to a Specified Record Size
This enables you to automatically change the vertical/horizontal zoom ratio based on the
size of the original and the selected record size. The zoom ratio is set between 50 and
200%.
2
Sending/Facsimile
Functions
* You can only set the machine to automatically change the
zoom ratio when you have set the resolution to 300 x 300
dpi or 600 x 600 dpi.
1
3
To Send Fine Text and Images Clearly
*You cannot use color options for fax and I-fax.
You can send fine text in
documents more clearly
by changing from a 200
x 200 dpi resolution to a
high resolution of 300 x
300 dpi or 400 x 400 dpi.
Note, however, that the
file size increases as you
increase the resolution.
When sending a color
document, select [AutoColor Select] or [Full
Color].
To Register a Scanning Mode
1
You can also select the
resolution from the Scanning
Mode drop-down list. This
is convenient for storing
commonly used resolutions.
Select where to register the
mode
press [Store].
2
To Send Separately Scanned Documents At Once
Press
(Start) to display
the screen for scanning your
originals. Press
(Start) to scan
another original. When scanning
of the originals is complete, press
[Done].
32
Sending/Facsimile Functions
What You Can Do with This Machine
(Send Settings Screen)
On the Send Settings screen, you can
specify when to send a document and
the settings to use when sending, and
set to send notification when sending is
complete. The following is an explanation
of the useful functions you can utilize when sending a
document. For more information, see e-Manual > Send/
Fax.
Send Settings screen
* The numbers in the illustrations refer to operation steps.
To Add the Reply Destination to a Sent Document
Press [Reply-to], and select the name to set
as the reply destination. It is necessary to set
the reply-to address in advance in Address
Book Settings from the Additional Functions
screen.
2
1
3
Depending on whether the sending method to be used is e-mail, fax, or
I-fax, you can also add a sending name or the subject to the name of the
attached file. You can confirm whether a certain send setting can be set
with the icons to the left of each sending method.
When sending an e-mail, you can also set its
priority.
33
When [PDF (OCR)] is set as the file format, set
[DocName OCR] to ‘On’ to automatically extract
the first text block in the document for use as its
filename.
What You Can Do with This Machine (Send Settings Screen)
To Specify the Time to Start Sending
1
2
Sending/Facsimile
Functions
To specify the time to start sending a document,
to send a document the first thing the next
morning, for example, use Delayed Send. The
document is sent at the specified time simply
by entering that time.
To Send Notification of Completed Sending
Use the Job Done Notice feature to notify
yourself if you want to confirm that a job is
complete. When sending is complete, you will be
notified via e-mail.
1
2
To Confirm a Document Before Sending
Set Preview to ‘On’ to display a preview of the document to be sent. The preview is displayed after pressing
[Done]. This enables you to delete any unnecessary blank pages before sending.
You can also confirm
the number of pages
of the document to
send here.
34
Sending/Facsimile Functions
Overview of Sending/Fax Features
The various send/fax functions are used from the Send screen and the Scan screen. On the Send screen, you can specify
the destination to send to and settings such as the file format and whether to scan a two-sided original. On the Scan
screen, you can also specify settings such as the zoom ratio, and utilize Special Features. For more information, see
e-Manual > Send/Fax.
Send Screen
1
Destination List
Displays a list of destinations. A maximum of 256 destinations can
be specified at the same time. (Out of the 256 destinations, 64 new
addresses, including those obtained via a server, can be specified.)
1
7
2
8
3
4
5
2
9
Address Book (see p. 27)
Press to select a destination from the address book.
3
6
Network Address Book
Press to search for a destination from an LDAP server.
4
Details
Press to check or change the destination information selected from
the destination list. You can also check or change addresses that
were entered using the New Address tab.
10
15
11
16
12
13
14
Scan Screen
1
6
2
7
3
35
4
8
9
5
10
Overview of Sending/Fax Features
New Address
12
6
Favorites Buttons/One-touch Buttons (see p. 27)
Press to switch to favorites buttons or one-touch buttons. Favorites
buttons or one-touch buttons must be registered in advance.
7
13
Send Settings (see p. 33 and p. 34)
Press to select features on the Send Settings screen.
Cc Bcc
Press to set multiple e-mail address destinations for the Cc and
Bcc addresses.
9
If you select XPS as the file format, you can also specify the
Compact, OCR (Text Searchable), and/or Add Digital Signatures
modes.
Recall (see p. 27)
Press to recall up to the last three addresses, scan settings, and
Send settings that have been set and then send the documents.
8
File Format (see p. 28)
Press to select the file format of the document to send when
sending to a destination such as an e-mail or file server
destination. If you select PDF as the file format, you can also
specify the Trace & Smooth, Compact, OCR (Text Searchable),
Encrypt, and/or Add Digital Signatures modes.
Press to specify the destination (such as a fax, e-mail, I-fax, file
server, user inbox, or yourself) to send a document to when the
addresses are not stored in the Address Book.
Sending/Facsimile
Functions
5
14
Register
Press to register a destination in a favorites button, one-touch
button, or the address book. This button is a shortcut to the
Additional Functions screen for storing destinations.
Erase
Press to erase the destination displayed in the destination list.
15
10
Option (see p. 31 and p. 32)
Press to select a feature from the Scan Settings screen.
2-Sided Original
Press to scan both sides of an original.
16
11
Different Size Originals
Press to scan different size originals together.
1
Color Selection drop-down list (see p. 32)
Press to select whether to scan the original in color or black-andwhite. You can also select to automatically detect whether the
original is in color or black-and-white.
2
6
Resolution drop-down list (see p. 32)
Press to specify the resolution for the document to be sent.
7
Document Size Select (see p. 31)
Press to select the size of the document to scan.
Direct
Press to return the copy ratio to 100%.
3
Scan Settings drop-down list
Press to select a stored scan mode and resolution. The scanning
modes are set by default, but you can edit these settings.
8
Adjust Contrast
Press to manually control the copy exposure. Press [A] to select or
cancel the automatic exposure control.
Copy Ratio (see p. 32)
Press to reduce or enlarge the scan size.
9
4
Scanning Mode drop-down list (see p. 32)
Press to select the scanning mode. The scanning modes are set
by default, but you can edit these settings.
5
Store/Erase
Press to store or erase a scan mode.
Original Type drop-down list (see p. 31)
Press to manually select the original type according to the type of
image that you are scanning.
10
Special Features (see p. 32)
Press to select a Special Features mode.
36
Sending/Facsimile Functions
Overview of Sending/Fax Features
Send Settings Screen
3
1
4
5
6
7
8
2
Registration Screen
4
2
3
5
6
7
Register Favorites Button:
8
10
Register in Communications Settings, from the Additional
Functions screen.
9
1
Registration can also be performed from the Additional Functions
screen. For more information, see e-Manual > Send/Fax.
Register Address:
Register in Address Book Settings, from the Additional Functions screen.
Register One-touch Button:
Register in Address Book Settings, from the Additional Functions screen.
37
Overview of Sending/Fax Features
Send Settings (see p. 33)
5
Enable you to set a subject, reply destination, and sender name
for the document to send.
2
E-mail Priority (see p. 33)
6
DocName OCR (see p. 28, p. 33)
7
Press to use text extracted from the file as the name for the
document to send, when you have selected [PDF(OCR)] as the file
format.
Stamp
Press to stamp originals which have been scanned. This enables
you to distinguish originals which have been scanned.
8
4
Preview (see p. 34)
Press to verify images before sending.
Press to change the priority of an e-mail message.
3
Job Done Notice (see p. 34)
Press to send notification of job completion to the specified e-mail
address.
Delayed Send (see p. 34)
Sending/Facsimile
Functions
1
Direct
Press to send the document with the Direct Sending mode, instead
of using the memory of the fax.
Press to send the document at a specified time.
11
1
Where to Register the Destination (see p. 27)
Select where to register the destination. These buttons are links to
the corresponding registration screen in the Additional Functions
screen.
2
7
Erase
Press to erase a registered one-touch button.
8
Register/Edit
Press to register a favorites button. Select a favorites button
before pressing this to edit it instead.
Register New Address
Press to register a destination in the address book.
9
3
Erase
Erase
Press to erase a registered favorites button.
Press to erase a destination from the address book.
10
4
Edit
Display Comment
Press ‘On’ to display the registered comments.
Press to edit a destination from the address book.
11
5
Incremental
Refining Displayed Destinations.
6
New Destination Type
Press to select the type of the new destination (sending method).
The items you can enter depend on the type of destination you
select. In the above screen, a fax destination is set.
Register/Edit
Press to register a one-touch button. Select a one-touch button
before pressing this to edit it instead.
38
Mail Box Functions
Storing Originals in an Inbox
There are several ways to store image data in an inbox. This section describes the procedure for scanning originals
placed in the feeder or on the platen glass. For more information on the settings, see the references in each procedure.
Preparations
Place Your Originals
Placed in the feeder
Inbox Selection Screen
Placed on the platen glass
function.
If a screen prompting you to enter a department
ID and password is displayed, enter the ID and
(ID) on the control panel.
password, and press
Place your originals.
If you have placed your originals on the platen glass,
close the feeder/platen cover after placing your
originals.
If Department ID Management or the SSO-H login
service is set, it is necessary to enter and ID and
password. (If an optional card reader is attached,
insert a control card.)
For more information, see e-Manual > Basic
Operations.
What is the Mail Box Function?
The Mail Box function is a function that enables you
to temporarily store originals scanned using the
machine and data sent from a computer. Documents
(data) stored in inboxes can be printed or sent
when required. You can also save data stored in
inboxes to USB memory. For more information on
USB memory, see e-Manual > Mail Box.
Print
Send
Store
NETWORK
USB Memory
39
Storing Originals in an Inbox
Start Scanning
Mail Box
Functions
Select an Inbox
Inbox Selection Screen
Press the number of the inbox to store the
scanned document.
Press
(Start).
If the following screen is displayed, follow the
instructions on the screen
press
(Start) once
for each original. When scanning is complete, press
[Done].
Press [Scan].
When scanning is complete, remove your originals.
If you select a User Inbox set with a password, enter
the password
press [OK].
For information on inbox passwords, see
e-Manual > Mail Box.
If you press [Scan], the Scan screen is displayed,
and you can set the required scan modes.
The stored data will be automatically deleted
after 3 days (default setting). This setting can be
deactivated, or changed to any time period. (See
e-Manual > Basic Operations.)
If Department ID Management is set, press
(Log In/Out).
For more information on scan settings, see p. 49
and p. 50.
For information on the Memory RX Inbox and
Confidential Fax Inbox, see p. 48.
40
Mail Box Functions
Printing/Sending a Document Stored in a User
Inbox
The following is an explanation of the basic procedure for printing and sending documents stored in a User Inbox. For
more information on the settings, see the references in each procedures.
Specify the User Inbox
1
There are three types of inboxes, and each stores
different types of documents. The stored documents
can be printed/sent as necessary.
2
Print
Send
d
To Print
User Inboxes
Press [Mail Box]
select the desired
User Inbox number.
If there is a password set for the selected User
Inbox, enter the password
press [OK].
NETWORK
Stores documents scanned from the machine and
data sent from a computer.
For information on inbox passwords, see
e-Manual > Mail Box.
Memory RX Inbox
For information on printing
a USB Memory-stored document,
Print
see e-Manual > Mail Box.
Send
Specify the User Inbox
If you set the Memory Lock mode, received fax/I-fax
documents are stored in the Memory RX Inbox first,
without being printed.
1
2
Confidential Fax box
* Documents in the
Confidential Fax
Inbox cannot be sent.
If you specify forwarding conditions, documents that
match the conditions are forwarded to a Confidential
Fax Inbox first, without being printed.
For details on each type of inbox, see e-Manual
> Mail Box.
41
To Send
Print
Press [Mail Box]
select the desired
User Inbox number.
If there is a password set for the selected User
Inbox, enter the password
press [OK].
For information on inbox passwords, see
e-Manual > Mail Box.
Printing/Sending a Document Stored in a User Inbox
Specify the Documents to Print
Start Printing
Mail Box
Functions
1
2
Print screen
Select the documents in the order you want to
print them
press [Print].
You can also set print modes on the Print screen or
the Change Pr. Settings screen as necessary.
Press [Initial Settings] on the Change Pr. Settings
screen to cancel all the print modes you have set.
For more information on the features you can set
from the Print screen and Change Pr. Settings
screen, see p. 51 and p. 52.
Change Pr. Settings screen
Press [Start Print].
Start Sending
Specify Documents to Send
1
1
2
2
Select the User Inbox in which the documents
you want to send are located
select the
documents in the order you want to send them
press [Send].
Specify the destinations
Send].
press [Start
You can select the file format for the document to
send by pressing [File Format].
For more information on the Send function
settings, see e-Manual > Send /Fax.
42
Mail Box Functions
What You Can Do with This Machine
(Scan Screen)
The following is an explanation of
the basic procedure for scanning
documents into User Inboxes. For more
information, see e-Manual > Mail Box.
To use more convenient modes, press
[Special Features] to access the Special features
screen.
Scan screen
* The numbers in the illustrations refer to operation steps.
To Add a Name to a Document and Save It
1
2
When you want to arrange documents so that
you know what each is, it is useful to give the
documents names. This also makes it easy to tell
which document you are printing. You can also
change the name of a document easily at a later
date.
To Scan a Two-Sided Document
1
2
Select the type of original.
in the feeder when scanning
them.
43
What You Can Do with This Machine (Scan Screen)
About Document Icons
The icon displayed on the left of each document indicate the way in
which the document was stored. Checking these icons enables you to
determine how a document was stored.
‘Black’
CMYK
‘Color’ or ‘Mixed’
CMYK
Mail Box
Functions
Documents without Print Settings
A document which was scanned from the Mail Box function’s Scan screen or the Send Basic
Features screen, and stored in a User Inbox. If you store print settings on the Change Pr.
Settings screen, this icon changes to the Documents with Print Settings icon.
‘Black’ or ‘Black ‘Color’ or ‘Mixed’
and White’
RGB
‘Black’
CMYK
‘Color’ or ‘Mixed’
CMYK
Documents with Print Settings
A document which was stored in a User Inbox using the copying function, or from a computer.
If you change the print settings of the “Documents without Print Settings” on the Change Pr.
Settings screen, this icon changes to the Documents with Print Settings icon.
‘Black’ or ‘Black ‘Color’ or ‘Mixed’
and White’
RGB
Fax RX Document
A fax document which has been forwarded or received in the Memory RX Inbox or Confidential
Fax Inbox of the machine. Saved as a “Fax RX Document”.
I-Fax RX Document
An I-fax document which has been forwarded or received in the Memory RX Inbox or
Confidential Fax Inbox of the machine. Saved as an “I-Fax RX Document”.
44
Mail Box Functions
What You Can Do with This Machine
(Change Print Settings Screen)
The following is an explanation of the
useful features you can use when printing
out documents. For more information, see
e-Manual > Mail Box.
To use more convenient functions, press
[Special Features] to access the Special Features
screen.
Change Pr. Settings screen
* The numbers in the illustrations refer to operation steps.
To Print a Sample Print
* When setting [Sample Print] to print a sample before printing multiple documents, make sure
to set [Merge Documents].
To print one set, press [All
Pages]. To print only the
specified pages, press
[Specified Pages].
1
4
After editing the settings,
press [Done].
2
3
5
Press [Start Print] to
print one set or specified
pages. To change the
settings after checking
the sample print, press
[Change Settings].
To print another sample, press [Sample Print].
This enables you to confirm the changes you
have made to the settings.
6
To print the remaining sets, press
[Start Print].
45
What You Can Do with This Machine (Change Print Settings Screen)
To Automatically Delete Document Data After Printing
[Erase Doc. After Print.] enables you to make sure that important document data does
not remain in the machine, by automatically deleting it after it is printed.
This enables you to print multiple
documents as one document
even if they have been created
with different applications. You
can also set the document layout
when printing on both sides of
the paper.
Select [Merge
Documents].
2
1
Press [2-Sided
Printing].
Mail Box
Functions
To Print Multiple Documents Together
3
To Output Print Documents in Sets
When distributing materials to multiple people for presentations, etc., you can set the
machine to automatically output multiple page documents in sets. You can also use the
Staple mode to staple these sets together automatically.
To staple the sets, press
[Staple], and select
the type of stapling to
perform.
1
3
4
2
5
To View Documents Stored in a User Inbox
2
1
3
This enables you to view documents stored in
a User Inbox. When a document consists of
multiple pages, you can view it page by page. To
view small text, use
to magnify the image.
You can also use the Remote UI of the machine
to view documents stored in User Inboxes.
46
Mail Box Functions
Mail Box Function Overview
There are three types of boxes when using the Mail Box function: User Inboxes, Confidential Fax Inboxes, and the
Memory RX Inbox. For more information on the features explained here, see e-Manual > Mail Box, Send Fax.
Inbox Selection Screen
1
User Inbox
Enables you to store scanned documents, and then print or send
them.
2
1
Memory Media
2
You can store images scanned by the machine, such as scanned
documents and documents stored in the inbox, on USB memory.
Those images can also be printed from USB memory.
3
3
4
Memory RX Inbox
Enables you to store received fax and I-fax documents, and print
or send them when necessary.
4
Confidential Fax Inbox
Documents which match the specified forwarding conditions are
forwarded to a Confidential Fax Inbox. Stored documents can
then be printed when necessary.
User Inbox Document Selection
Screen
1
Clear Selection
Press to cancel your selection and select another document.
Changes to [Select All (Max 100 doc.)] if you have not selected
any documents.
2
3
6
Print
Press to print the selected document. Use the Change Pr.
Settings screen to print onto both sides of the paper, print a
booklet, change the layout, or change finishing options.
1
7
8
2
9
Move/Duplicate
3
Press to copy or move the selected document to another User
Inbox.
4
4
Scan
Press to scan a document and store it. You can also use
the features on the Scan screen to scan more easily and
conveniently.
7
Erase
Press to erase an unwanted document.
8
5
5
Send (see p. 41 and p. 42)
Print List
Press to print a list of documents stored in a User Inbox.
Press to send a scanned document.
9
6
Details
Press to check information about the document.
47
Edit Menu
Press to edit (View Page, Merge and Save, Document
Insertion, or Page Erase) the selected document.
Mail Box Function Overview
Memory RX Inbox Screen/Memory RX Inbox Document Selection Screen
Documents received when Memory Lock is set are stored in the Memory RX Inbox. Documents which could
not be sent because of an error are also stored here.
5
6
Mail Box
Functions
1
2
3
4
1
Clear Selection
3
Press to cancel your selection and select another document.
Changes to [Select All (Max 32 doc.)] if you have not selected
any documents.
4
2
Send
Press to send a received document.
I-Fax Memory Lock/Fax Memory Lock
Press to store received fax and I-fax documents in the
Memory RX Inbox. You can also set separate settings (Memory
Lock) for fax and I-fax documents.
Print
Press to print the received documents. Printed documents are
automatically erased.
5
Details
Press to check information about the document.
6
Erase
Press to erase an unwanted document.
Confidential Fax Inbox/Confidential Fax Inbox Document Selection Screen
When you have specified a Confidential Fax Inbox in the forwarding conditions, received faxes which match
the conditions will be forwarded and stored in that Confidential Fax Inbox.
2
3
1
1
Print
Press to print a forwarded document stored in a Confidential Fax
Inbox.
2
3
Erase
Press to erase a document stored in a Confidential Fax Inbox.
Details
Press to check information about a document stored in a
Confidential Fax Inbox.
48
Mail Box Functions
Mail Box Function Overview
Storing Documents in a User Inbox
Use the Scan screen and Special Features screen to
set Scan Settings for the Mail Box function. For more
information, see e-Manual > Mail Box.
Document Select screen
Scan Screen
1
1
2
3
4
2
5
Color Selection drop-down list
Press to select whether to scan the original in color or black-andwhite. You can also select to automatically detect whether the
original is in color or black-and-white.
7
8
9
Document Size Select
Press to select the size of the original document to scan.
3
6
Press to reduce or enlarge the copy size.
10
Special Features Screen
1
1
6
2
7
8
3
4
5
2-Page Separation
Press to scan facing pages of an opened book onto separate
sheets.
2
Booklet Scanning
Press to scan originals in such a way that, when printing the
scanned data, the output paper can be made into a booklet.
9
10
3
Different Size Originals
Press to scan different size originals.
49
Mail Box Function Overview
Send Screen
Mail Box
Functions
There are several types of stored documents: documents
which are scanned from the platen glass or feeder,
documents which are stored from the Send screen, and
documents which are sent from computers.
You can select JPEG, TIFF, PDF or XPS as the file format
for the document you want to send. If you select PDF
as the file format, you can also specify the OCR (Text
Searchable), Encrypt, and/or Add Digital Signatures
modes.
* Documents stored in a User Inbox with a resolution other than 600
x 600 dpi cannot be sent if there is a fax address included in the
destination.
4
Direct
8
5
Original Type drop-down list
Press to manually select the original type according to the type of
image that you are scanning.
Press to return the copy ratio to 100%.
2-Sided Original (see p. 43)
Press to scan two-sided originals.
6
Special Features
Document Name (see p. 43)
Press to select a Special Features mode.
Press to add a name to a document to store. Enter the document
name using the touch panel display.
7
Adjust Contrast
10
Press to manually control the scan exposure. Press [A] to select or
cancel the automatic exposure control.
4
Job Build
Initial Settings
Press to cancel all settings at once. The machine restores the
Standard Local Print Settings.
7
Press to scan originals when there are too many to be placed at
once, by dividing them into multiple batches. The originals are
stored as one document, after all the batches have been scanned.
Image Combination
Press to automatically reduce two, four, or eight originals to fit onto
a one-sided or two-sided sheet.
8
Sharpness
Press to scan original images with a sharper or softer contrast.
5
Mode Memory
Press to store or recall scan modes.
9
Nega/Posi
Press to record the original image by inverting the black and white
areas.
6
Frame Erase
Press to eliminate dark border areas and lines that appear around
original images or shadows from binding holes.
10
Image Qual. Adjustment
Press to make copies by erasing the background color of the
original.
50
Mail Box Functions
Mail Box Function Overview
Printing Documents Stored in a User Inbox
Use the Print screen, Change Print Settings screen, and
Special Features screen when printing documents stored
in a User Inbox. For more information, see e-Manual >
Mail Box.
Document Selection screen
Change Print Settings Screen
1
1
2
6
7
Sample Print (see p. 45)
Press to print a sample set before printing multiple sets of
documents.
2
8
Paper Select
Press to select the paper size.
3
4
5
9
3
10
Finishing (see p. 46)
Press to select the Collate, Group, or Staple mode.
Special Features screen
1
1
2
3
4
5
51
6
7
8
9
Cover/Sheet Insertion
Press to add covers, sheet insertions, or chapter pages between
specified pages. Displayed as [Cover/Sheet Insertion] when only
one document is selected.
Booklet
Press to make copies of several originals to form a booklet.
Mail Box Function Overview
Print Screen
Mail Box
Functions
On the Print screen, you can set to make a sample
print, print sets, or automatically erase a document
after it is printed. Press [Change Pr. Settings] to
display the Change Print Settings screen. Use the
Change Print Settings screen when you want to
change the layout of prints.
4
2-Sided Printing (see p. 46)
8
5
Merge Documents (see p. 46)
Press to print multiple documents as one document. You can also
use this mode with the 2-Sided Printing and Cover/Sheet Insertion
modes.
Press to print on both sides of the paper.
Store Pr. Settings
Press to register print settings for a document.
9
6
Original Settings
Press to return to the Print screen. All settings are also canceled.
7
Erase Doc. After Print (see p. 46)
10
Form Composition
6
Press to superimpose an image stored in memory onto the original
image for printing.
Shift
Press to shift the entire image to a position that you specify using
the numeric keys. You can also select the shift direction for the
front and back sides of documents separately.
Secure Watermark
Press to embed hidden text in the background of prints.
8
5
Margin
Press to create margins along the sides of a print.
7
4
Special Features
Press to select a Special Features mode.
Press to automatically erase the document after printing.
3
Initial Settings
Press to cancel all settings. The machine returns to the Standard
Printing mode.
Watermark/Print Date
Press to include the watermark and date on prints.
Mode Memory
Press to store or recall copy modes.
9
Pg/Copy Set Numbering
Press to include page and copy set numbering on prints.
52
Canceling Jobs
How to Cancel a Job
Types of jobs printed from the machine include copy
data, data from computers, inbox data, received fax/Ifax documents, and reports. Cancel these jobs from the
screen displayed when you press [System Monitor]. You
can also cancel sending/receiving jobs from that screen.
Print jobs can also be canceled by pressing [Print] on
top of the touch panel display.
* The number in the illustrations refer to operation steps.
To Cancel Jobs That Are Being Printed/Waiting to Be Printed ([System Monitor])
To cancel a job that is being printed/waiting to be printed, select
[Copy] or [Print] from the keys at the bottom of the System
Monitor screen, and then press [Job Status].
2
For a copy job, you can cancel
scanning or printing by selecting
[Copy].
1
Select the job to cancel, and press [Cancel].
3
* You cannot select several jobs at the same time to cancel. Cancel jobs one at
a time.
4
For more information on canceling jobs from the
System Monitor screen, see e-Manual > Basic
Operations.
53
How to Cancel a Job
To Cancel Jobs That Are Printing/Waiting to Print ([Print])
If you are using a login service, [My
Job Status] is displayed.
2
1
3
Canceling
jobs
You can also cancel jobs that are printing or waiting to print by
pressing [Print] on the touch panel display. Press [Job Status],
and select the type of job to cancel from the drop-down list.
4
For more information on canceling jobs from the
[Print] screen, see e-Manual > Print.
To Cancel Jobs That Are Being Sent/Received
To cancel jobs that are being sent/received, select [Send] or [Fax]
from the keys on the bottom of the System Monitor screen.
For a fax job, press [Send Job Status]
or [Received Job Status]. For a send
job, press [Job Status].
2
3
4
1
* Select the job to cancel, and press [Cancel]. You cannot select several jobs at
the same time to cancel. Cancel jobs one at a time.
If a job is being sent to multiple destinations, check the
destinations after pressing [Cancel], and then select [Cancel
All] or [Cancel Single]. If you select [Cancel Single], the jobs
currently being sent is canceled.
5
For more information on canceling jobs being
sent/received, see e-Manual > Send/Fax.
54
Additional Functions
Press (Additional Functions) on the control panel to display the Additional Functions screen. The Additional Functions
screen enables you to customize the various settings of the machine. For details on the settings described here, see
the e-Manual. Also note that the Additional Functions screen is divided into several screens. Switch between the
screens using the [ ] and [ ] buttons.
2
Timer Settings
Press to make various timer related settings for the machine,
such as the time it takes for the machine to enter into the Sleep
mode.
3
1
Common Settings
Press to specify the settings that are common to the Copy, Mail
Box, Send, and Fax functions.
Adjustment/Cleaning
Press to make fine adjustments to the zoom, adjust the
contrast, or perform cleaning for the machine.
4
Report Settings
Press to set the print conditions for printing a Send TX Report
and Activity Report, or you can print the contents of the
Address Book or Additional Functions.
55
5
System Settings
Press to set System Settings, Department ID Management
settings, Network Settings, and other system settings.
Additional Functions
Control Panel
Copy Settings
Press to edit settings for the Copy function.
7
Communications Settings
Additional
Functions
6
Press to register or edit the default Communications Settings
according to your needs.
8
Mail Box Settings
Press to edit settings for the Mail Box function.
9
Address Book Settings
Press to register or edit settings for the Address Book or onetouch buttons.
Printer Settings
Press to edit settings for the Printer function.
56
57
CANON INC.
30-2, Shimomaruko 3-chome, Ohta-ku, Tokyo 146-8501, Japan
CANON U.S.A., INC.
One Canon Plaza, Lake Success, NY 11042, U.S.A.
CANON CANADA INC.
6390 Dixie Road Mississauga, Ontario L5T 1P7, Canada
CANON EUROPA N.V.
Bovenkerkerweg 59-61 1185 XB Amstelveen, The Netherlands
(See http://www.canon-europe.com/ for details on your regional dealer)
CANON LATIN AMERICA, INC.
703 Waterford Way Suite 400 Miami, Florida 33126 U.S.A.
CANON AUSTRALIA PTY. LTD
1 Thomas Holt Drive, North Ryde, Sydney, N.S.W. 2113, Australia
CANON CHINA CO., LTD
15F Jinbao Building No.89 Jinbao Street, Dongcheng District, Beijing 100005, China
CANON SINGAPORE PTE. LTD.
1 HarbourFront Avenue #04-01 Keppel Bay Tower, Singapore 098632
CANON HONGKONG CO., LTD
19/F., The Metropolis Tower, 10 Metropolis Drive, Hunghom, Kowloon, Hong Kong
FT5-1743 (000)
XXXXXXXXX
© CANON INC. 2008
PRINTED IN CHINA