1
C30, C70 & XC90
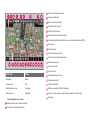
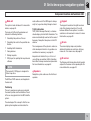
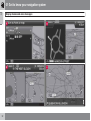
ROAD AND TRAFFIC INFORMATION SYSTEM - RTI
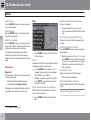
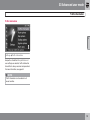
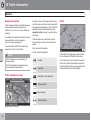
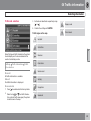
L:7:9>I>DC
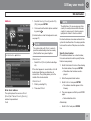
Event at next guidance point
Itinerary destination
Name of next road/street
Excluded area for route
Facility (petrol station)
Estimated distance to destination
Estimated travel time to destination or estimated time of arrival (ETA)
Map scale
Planned route
Current road/street name
G032524
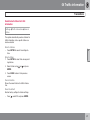
Planned route interim destinations
Next guidance point
Known landmark
Position of car
Road type
Colour
Completed planned route
Motorway
Green
Planned route start
Primary road
Red
Traffic information
Smaller primary road
Dark grey
Section covered by traffic information
Ordinary road
Light grey
Arrow on outer compass ring indicates direction to destination
Text and symbols on screen
Stored location (any symbol and text)
Distance to next guidance point
Compass
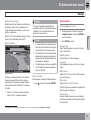
ROAD AND TRAFFIC INFORMATION - RTI
Volvo's navigation system is a traffic information and road navigation
system developed by Volvo. The system guides you to a destination
and gives information along the route. It informs of situations that can
affect the drive, such as accidents, road works and shows alternative
routes.
It is possible to create an itinerary, search for facilities along the route,
store special places etc. The system displays the car's exact position
and in event of a wrong turning always corrects to guide you to the
destination.
You will see just how intuitive it is to use. Try it out. In order to get
along with the system we recommend that you familiarise yourself
with the information in this manual.
By facilitating accessibility and shortening driving distances, Volvo's
navigation system contributes to a better environment.
License agreement NAVTEQ DATABASE
For information for the end user - see page 78.
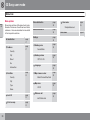
Table of contents
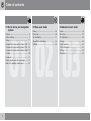
01 02 03
01 Get to know your navigation
system
Manual........................................................ 8
Before starting............................................ 9
Menus....................................................... 11
Component location and functions C30... 14
Component location and functions C70... 16
Component location and functions XC90. 18
Controls.................................................... 20
Keyboard................................................... 21
Display modes and voice messages........ 22
Main unit, updating, maintenance............ 24
2
02 Easy user mode
Menus.......................................................
Menu tree..................................................
Set destination..........................................
Show/Delete destination...........................
Settings.....................................................
03 Advanced user mode
28
30
31
34
35
Menus.......................................................
Menu tree..................................................
Set destination..........................................
Itinerary.....................................................
Current position........................................
Traffic information.....................................
Settings.....................................................
Simulation.................................................
38
42
44
49
52
53
54
59
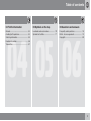
Table of contents
04 05 06
04 Traffic information
General......................................................
Avoiding traffic problems..........................
Selecting information................................
Reading information..................................
Transmitters..............................................
62
63
65
66
67
05 Symbols on the map
06 Questions and answers
Landmarks and road numbers.................. 70
Symbols for facilities................................. 71
Frequently asked questions...................... 76
EULA - License agreement....................... 78
Copyright.................................................. 80
3
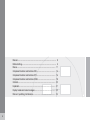
Table of contents
07
07 Alphabetical Index
Alphabetical Index.................................... 82
4
Table of contents
5
6
G028780
Manual...................................................................................................... 8
Before starting.......................................................................................... 9
Menus..................................................................................................... 11
Component location and functions C30................................................. 14
Component location and functions C70................................................. 16
Component location and functions XC90............................................... 18
Controls................................................................................................... 20
Keyboard................................................................................................. 21
Display modes and voice messages...................................................... 22
Main unit, updating, maintenance........................................................... 24
GET TO KNOW YOUR NAVIGATION SYSTEM
01 Get to know your navigation system
Manual
01
General information on the manual
Changes in the manual
The manual describes general functions for all
markets, but market specific information may
also be included.
The specifications, design features and illustrations in this owner's manual are not binding.
Like the system, the manual is divided into
Easy and Advanced user settings.
Menu options/Search paths
All options that can be selected on the display
are marked in the manual with slightly larger
and grey-shaded text, e.g. Set destination.
Search paths in the menu tree are stated as,
e.g.:
Set destination
Address
City
Special text
NOTE
Texts marked with NOTE provide advice or
tips to facilitate use of e.g. features and
functions.
Footnote
There is information in the manual that is added
as a footnote at the bottom of the page or in
direct association with a table. This information
is a supplement to the text to which it refers via
the footnote number.
8
We reserve the right to make modifications
without prior notice.
© Volvo Car Corporation
01 Get to know your navigation system
Before starting
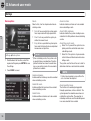
General
Map position
The navigation system can be used without a
destination being selected. The map with the
position of the car is shown on the screen and
the car is shown with a blue triangle.
After Startup, the Main menu is displayed
briefly until the screen switches to Map mode.
At this point, the current map covers the entire
screen.
The system is updated continuously and could
therefore contain functions not described in
this manual.
• Press BACK to activate the Main menu,
The system content may vary slightly from
country to country and some menu options are
not available to all countries for technical reasons.
Startup
see page 28.
• Press ENTER to activate the Quick menu,
see page 28.
01
On/Off
On
The system is switched on automatically when
the ignition key/starter knob1 is turned to position I or II.
If the system has been switched off manually,
it must also be switched on manually as follows:
1. Press the navigation button to activate
Scroll mode, in order to view parts of the
map that are outside of the screen for
example.
1. The ignition key/starter knob must be in
position I or II (see the instruction manual
for the car).
2. In this mode ENTER activates the Scroll
menu, see page 28.
3. The screen is activated.
2. Press ENTER or BACK.
The system may need a few seconds in order
to detect the position and movement of the car.
Settings
The system is supplied with default settings,
but starts with the settings last made.
If a setting has been changed and the factory
setting is required again then only the current
function is affected.
The system starts by displaying a screen where
you have to confirm the text content by pressing ENTER after selecting Easy (Easy mode)
or Advanced (Advanced mode).
1
There is no function that resets all settings
simultaneously.
Off
The system is switched off automatically when
the ignition key is turned to position 0.
The system can be switched off manually so
that it does not start automatically the next time
the ignition key is turned to position I, as follows:
1. Press BACK to reach the Main menu.
Used instead of an ignition key in cars fitted with the Keyless system.
``
9
01 Get to know your navigation system
01
Before starting
2. Scroll to Shut down with the navigation
button.
3. Press ENTER.
4. The screen is powered down.
NOTE
The system is also available with the engine
switched off. For this reason, remember that
frequent use of the navigation system with
the engine switched off can drain the battery.
Refer to the following page to see which menus
differ between the two options.
Demo (simulated guidance)
Specify a destination in order to obtain an overview of how guidance works. Guidance to the
specified destination can be simulated when
the car is stationary.
Simple/Advanced setting
This function is available only in mode
Advanced.
When the navigation system starts up the
required user settings are selected.
For more information on Demo, see
page 59.
• Easy
Only the most important menus are available in
this mode. Suitable for simply travelling from
point A to B.
• Advanced
All settings and functions are available in this
mode.
Switching between settings
It is possible to switch between Easy and
Advanced settings under Settings.
10
Settings made in Easy mode do not transfer
over to Advanced mode and vice versa, but
instead are stored in each respective mode.
01 Get to know your navigation system
Menus
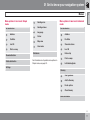
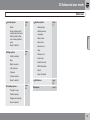
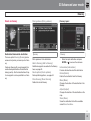
Menu options in two levels Simple
mode
Set destination
Guiding voice
Guiding volume
01
Menu options in two levels Advanced
mode
Set destination
Language
Address
Address
Colour
Facilities
Facilities
Map view
Last 20
Stored locations
User mode
Point on map
Last 20
Shut down
Show destination
Delete destination
For information on all possible menu options in
Simple mode, see page 30.
Return trip
Point on map
Latitude/longitude
Settings
Itinerary
Start guidance
Add to itinerary
Route options
Clear itinerary
Next destination
``
11
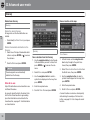
01 Get to know your navigation system
01
Menus
Address
Current position
Settings
Traffic information
Route options
Map options
Guiding options
System options
Start demo
Shut down
For information on all possible menu options in
Advanced mode, see page 42.
12
01 Get to know your navigation system
Menus
01
13
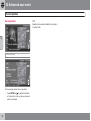
01 Get to know your navigation system
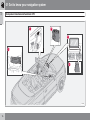
Component location and functions C30
G019631
01
14
01 Get to know your navigation system
Component location and functions C30
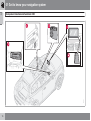
Main unit
The system is hard disk based. For more information, see page 24.
The main unit is fitted in the glovebox and
includes the following functions:
• Calculating the position of the car
• Calculating the route to the specified destination
•
•
•
•
Handling traffic information
Voice guidance
Storing map data
DVD player; for updating the map data and
software.
route outline even if the GPS signal is temporarily lost, e.g. when driving through a tunnel.
Traffic information
TMC (Traffic Message Channel) is a standardised coding system for traffic information. The
receiver automatically searches for the correct
frequency. Reception takes place via the FM
antenna.
The coverage area of the system is under constant development which is why updates can
sometimes be necessary, see page 24.
Irrespective of whether Easy or Advanced
user settings are selected, traffic information
transmitted is always received and presented.
For more information, see page 62.
NOTE
The main unit's DVD player is designed for
Volvo's map discs.
01
Keypad
The keypad is located on the right-hand rear
side of the steering wheel. Use it to scroll
between different menu options, to confirm
selections or to move back in menus. For more
information, see page 20.
Screen
The screen displays maps and provides
detailed information on route type, distance,
menus etc. For screen care, see page 24
IR receiver
The IR receiver for the remote control is located
adjacent to the screen on the speaker grille. For
more information, see page 20.
Speakers
Navigation system audio uses the front loudspeakers.
The GPS and TMC receivers are integrated in
the main unit.
Positioning
The car's speed sensor and a gyro calculate
the current position and the direction of travel
of the car using signals from the GPS satellite
system.
The advantage of this concept is that the navigation system registers and calculates the
15
01 Get to know your navigation system
01
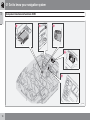
Component location and functions C70
2
3
4
1
5
*
16
01 Get to know your navigation system
Component location and functions C70
Main unit
The system is hard disk based. For more information, see page 24.
The main unit is fitted in the glovebox and
includes the following functions:
• Calculating the position of the car
• Calculating the route to the specified destination
•
•
•
•
Handling traffic information
Voice guidance
Storing map data
DVD player; for updating the map data and
software.
route outline even if the GPS signal is temporarily lost, e.g. when driving through a tunnel.
Traffic information
TMC (Traffic Message Channel) is a standardised coding system for traffic information. The
receiver automatically searches for the correct
frequency. Reception takes place via the FM
antenna.
The coverage area of the system is under constant development which is why updates can
sometimes be necessary, see page 24.
Irrespective of whether Easy or Advanced
user settings are selected, traffic information
transmitted is always received and presented.
For more information, see page 62.
NOTE
The main unit's DVD player is designed for
Volvo's map discs.
01
Keypad
The keypad is located on the right-hand rear
side of the steering wheel. Use it to scroll
between different menu options, to confirm
selections or to move back in menus. For more
information, see page 20.
Screen
The screen displays maps and provides
detailed information on route type, distance,
menus etc. For screen care, see page 24
IR receiver
The IR receiver for the remote control is located
adjacent to the screen on the speaker grille. For
more information, see page 20.
Speakers
Navigation system audio uses the front loudspeakers.
The GPS and TMC receivers are integrated in
the main unit.
Positioning
The car's speed sensor and a gyro calculate
the current position and the direction of travel
of the car using signals from the GPS satellite
system.
The advantage of this concept is that the navigation system registers and calculates the
17
01 Get to know your navigation system
01
Component location and functions XC90
*
18
01 Get to know your navigation system
Component location and functions XC90
Main unit
The system is hard disk based. For more information, see page 24.
The main unit is fitted under the driver's seat
and includes the following functions:
• Calculating the position of the car
• Calculating the route to the specified destination
•
•
•
•
Handling traffic information
Voice guidance
Storing map data
DVD player; for updating the map data and
software.
route outline even if the GPS signal is temporarily lost, e.g. when driving through a tunnel.
Traffic information
TMC (Traffic Message Channel) is a standardised coding system for traffic information. The
receiver automatically searches for the correct
frequency. Reception takes place via the FM
antenna.
The coverage area of the system is under constant development which is why updates can
sometimes be necessary, see page 24.
Irrespective of whether Easy or Advanced
user settings are selected, traffic information
transmitted is always received and presented.
For more information, see page 62.
NOTE
The main unit's DVD player is designed for
Volvo's map discs.
01
Keypad
The keypad is located on the right-hand rear
side of the steering wheel. Use it to scroll
between different menu options, to confirm
selections or to move back in menus. For more
information, see page 20.
Screen
The screen displays maps and provides
detailed information on route type, distance,
menus etc. For screen care, see page 24.
IR receiver
The IR receiver for the remote control is located
in the audio system's control panel. For more
information, see page 20.
Speakers
Navigation system audio uses the front loudspeakers.
The GPS and TMC receivers are integrated in
the main unit.
Positioning
The car's speed sensor and a gyro calculate
the current position and the direction of travel
of the car using signals from the GPS satellite
system.
The advantage of this concept is that the navigation system registers and calculates the
19
01 Get to know your navigation system
01
Controls
Keypad location and IR receiver
Keypad, steering wheel/remote
control
BACK
Undoes the most recent selection or goes back
in the menu structure.
G019916
"Do not disturb"
The navigation system is controlled with the
steering wheel's keypad or the remote control.
The keypad is located on the right-hand rear
side of the steering wheel.
Aim the remote control towards the IR receiver
located on the loudspeaker grille adjacent to
the screen or in the audio system's control
panel (XC90 only).
NOTE
The remote control contains AAA or R03
batteries. Try changing to new batteries first
if the remote control does not work.
The steering wheel keypad and the keypad on
the remote control have the same functions.
Use the keypad to scroll through different
menu options, confirm selections or move
back in menus.
The design may vary for different models.
Navigation button
Scroll between different menu options using
the navigation button –, the keypad's locating
,
pin or the remote control's arrow keys ,
and
–. The navigation button also moves
the cursor (hairline cross) on the map.
ENTER
Confirms or activates selections.
20
In some situations, the system requires a few
extra seconds to make a calculation. A symbol
is then displayed on screen.
NOTE
When the calculation symbol appears, the
system is unable to accept any commands
from the navigation, ENTER or BACK buttons.
01 Get to know your navigation system
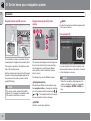
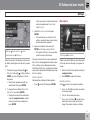
Keyboard
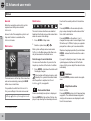
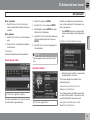
Entering and selecting options
01
The scroll bar on the right-hand side of the list
shows that there are more alternatives in the
list than those shown on the screen. The number (110) indicates the number of options.
1. Return to the character chart from the list
of alternatives using BACK.
2. Delete the input letters entered one at a
time using BACK.
General search
The keyboard is used in many places within the
menus for entering specific information, e.g.
type of facility, country, city, street address,
street or post code.
1. Select the letters using the navigation button and press ENTER.
> When there are no further alternatives
the remaining letters in the name are
entered automatically.
The list at the bottom of the screen
shows the first three possible alternatives matching the letter input.
2. It is also possible to scroll down using
to directly access alternative names on the
list.
The search function is always available and
always works in the same way irrespective of
menu status when a location is entered.
If ENTER is pressed during an input then all
reply combinations are shown for each respective alternative: City, street, facility etc.
For example, if a search is made for a name
such as London Airport then all London combinations will be shown when LO is input. The
more letters you input the more specific the
reply.
A search for LO also provides reply alternatives
such as Restaurant Lou Trivalou for example,
as alternatives containing several words separated by spaces are included in the search.
3. Select the alternative and press ENTER.
21
01 Get to know your navigation system
01
22
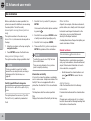
Display modes and voice messages
01 Get to know your navigation system
Display modes and voice messages
Different display mode appearances
Voice messages
The appearance of the screen image depends
on geographic position and the settings made,
e.g. map scale, symbols selected for display
etc.
After a destination has been set, Guidance is
activated and when a junction or exit is
approaching the system generates a voice
message stating distance and type of manoeuvre. At the same time a detailed map of the
junction is displayed. The voice message is
repeated closer to the junction.
Explanations for the text, signs and symbols
that may appear on the screen are available on
the inside of the cover.
Facilities along the motorway. This function is available even if a destination has
not been entered. Only shown when driving on the section of motorway in question.
Press ENTER on the symbol for Facilities
on the far right on the Quick menu, see
page 39.
Detailed junction map. The left-hand section of the screen enlarges the navigation
at the next junction. (Alternative navigation
options are only shown for major roads.)
The situation is always supplemented by a
voice message.
Two maps can be selected as display
mode. The screen shows the same map
image but in two different scales. Shown
following ENTER on the symbol for Map/
Route outline in the Quick menu, see
page 38.
Guidance with voice messages can be
obtained at any moment using ENTER on the
Quick menu's symbol for Guidance, see page
28 and 38.
NOTE
In some cases, e.g. for calls on the car
phone, the voice message is replaced with
a ping.
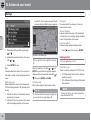
Toll roads
01
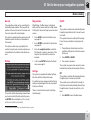
Compass
The map image can show the
compass in two different
ways:
- With the compass direction
north always facing up.
- With the direction of travel
always facing up.
The red tip of the compass needle points north
on the map and the white tip points south.
The grey destination arrow in the outer ring of
the compass points in the direction of the
selected destination.
Go to Settings Map options Map
orientation to select how the map direction is
to be displayed and to Compass to select how
the compass is to be displayed, see
page 56.
Some areas include toll roads. When a toll
booth is approaching, a voice message indicates this.
A destination must be input in order to receive
the message.
Scroll mode, see page 28 and 40.
23
01 Get to know your navigation system
01
Main unit, updating, maintenance
Contents in main unit
Screen care
All map information is pre-installed on the main
unit hard disk. There is no DVD disc in the unit
at delivery. A DVD disc is not used until a map
data update, refer to the package's instructions.
Clean the screen with a soft, lint-free rag, lightly
moistened with clean water or mild window
cleaning agent.
DVD discs with updated and additional information are issued regularly. Contact a Volvo
dealer for the latest issue.
See also www.volvocars.com/navi for further
information on maps etc.
If you encounter any errors or other issues with
your maps, we recommend that you contact
map supplier NavTeq directly: see
www.navteq.com.
NOTE
The main unit's DVD player is designed for
Volvo's map discs.
Care of DVD discs
Handle DVD discs with care. When they are not
in use they must be stored in their packaging.
Avoid storing them in damp, excess heat,
direct sunlight or dusty surroundings.
Updating with DVD disc
NOTE
Make sure that the car's electricity supply is
secure because an update can take up to
about 2 hours.
If the DVD disc, apart from new map discs,
contains new software then this part starts first.
The car can be driven while map information is
being updated but the system cannot be used
while the update is in progress.
1. Switch on the system.
2. Eject any DVD disc that is loaded in the
unit.
24
3. Load the DVD update disc. If there are several discs then load them in numerical
order.
4. The system now updates automatically.
The information shown indicates progress
achieved.
5. After the update the DVD disc with the latest update must remain in the unit. If there
is more than one disc then disc no. 1 must
be used. If the disc is removed from the
main unit then the system ceases to function.
If the system is switched off while the update
is in progress then it continues automatically
next time the system is activated.
In some cases map information updates can
add new functions to the system.
When the update is finished the start screen is
displayed.
Interrupted update
If an update is interrupted then it can be
resumed. During the subsequent start-up,
select the Resume map update option in the
Navigation menu.
The update then resumes, not from the start,
but from where the system detects that the
update was interrupted.
01 Get to know your navigation system
01
25
26
28
30
31
34
35
G029194
Menus.....................................................................................................
Menu tree................................................................................................
Set destination........................................................................................
Show/Delete destination.........................................................................
Settings...................................................................................................
EASY USER MODE
02 Easy user mode
Menus
General
02
Quick menu
Traffic information1
When the navigation system starts up the
required user settings are selected Easy.
In Easy mode, only the most important menus
containing the most common functions are
accessible.
G029190
The most common functions are collected
together in the Quick menu, which makes them
easier to access while driving.
Scroll menu
1. Press ENTER in Map mode.
Main menu
2. Select a symbol using
or
Irrespective of whether Easy or Advanced
user settings are selected, traffic information
transmitted is always received and presented.
For more information, see page 53 or 62.
.
Most system settings can be made under
Settings in the Main menu while others can
only be accessed via the Quick menu.
G028755
– Map scale
A menu containing two options is displayed.
The main menu is at the top of the menu tree
and can be reached by pressing the BACK key
several times.
It is possible to switch from Easy to
Advanced user settings in the main menu
under: Settings System options User
mode.
Pressing ENTER on the options (+) or (-)
changes the map scale in various stages, from
50 metres up to 100 km, to give you a greater
perspective or allow you to see more details.
Stepless changing is possible if you hold down
ENTER - release the button when the scale is
suitable.
G028755
– Guidance
Pressing ENTER provides current voice guidance.
Map scroll
In Scroll mode, a hairline cross is manoeuvred
over the map image.
–
The longer you hold down the button, the faster
the hairline cross moves across the map.
Menu
–
1
28
Does not apply to all areas/countries.
Activate Scroll mode (Scroll menu) by
scrolling with the navigation button.
Press ENTER in Map scroll mode to view
the Scroll menu.
02 Easy user mode
Menus
Scale
Changes the size of the map image to provide
a larger perspective or more detail.
02
Pressing ENTER on the options (+) or (-)
changes the map scale in various stages, from
50 metres up to 100 km.
Stepless changing is possible if you hold down
ENTER - release the button when the scale is
suitable.
Set as destination (Set as destination)
Selects the location marked by the hairline
cross as a destination by pressing ENTER.
Guidance starts immediately.
29
02 Easy user mode
Menu tree
02
Menu options
Show destination
Shown here are three of the menu tree's levels.
Several of the menus at level three have further
submenus - these are described in more detail
in their respective sections.
page
34
Delete destination
page
34
Set destination
page
31
Address
page
31
Country
City
Settings
Guiding voice
Female/Male
Guiding volume
Street
Off/1/2/3/4/5
page
35
page
35
page
35
No.
Intersection
Facilities
Country
page
32
Language
page
35
Map & menu colour
page
35
Black/Chrome/Blue/Dark
City
Map view
Type
2D/3D
Name
Last 20
Point on map
30
page
32
page
33
Distance unit
km/Statute mile
page
35
page
35
User mode
Simple/Advanced
Shut down
page
35
page 9
02 Easy user mode
Set destination
Address
1. Scroll to Country (Country) and/or City
(City) and press ENTER.
NOTE
The definition of city or area may vary from
country to country and even within the same
country. In some cases, it refers to a municipality and in others it refers to a district.
2. Or choose from the latest options selected
by pressing
.
(For information on how the keyboard is used,
see page 21.)
NOTE
Set destination
Address
The system starts with Street in order to
avoid misunderstanding when two nearby
cities/localities have grown together.
Alternatives 1
– Select Street (Street) without selecting a
city.
If the street appears in several cities, a list will
be displayed offering you alternatives to
choose from. The system guides you to the
middle of the street selected.
Alternatives 2
1. Start by selecting City
2. Then select Street.
Enter street address
The system places the cursor on Street
(Street) first. The last Country (Country)
selected is preselected.
If not:
02
No street addresses have been entered in the
system for small locations. It is always possible
to choose the centre of the place as a destination.
Specify street number
If the selected address has a street number,
this can be entered in order to specify the destination more precisely.
1. Scroll to the line for Number after entering
the street address, then press ENTER.
> Alternative street numbers are displayed.
2. Enter the required street number.
3. Scroll to Select and press ENTER.
> The address selected appears in the
itinerary.
4. The cursor appears on Start - press ENTER
again.
> Route indication starts.
Alternatively:
–
Scroll to Start and press ENTER.
31
02 Easy user mode
Set destination
> Route indication starts immediately.
02
If the street number is not specified then the
system guides to the middle of the selected
street.
5. Scroll to Start guidance for guidance to
the destination.
NOTE
This also applies when searching for facilities.
Select
Confirms input number.
Cancel
Search by facilities
Go back to previous screen.
Enter a junction
Facilities is a collective name for petrol stations, hotels, restaurants, Volvo dealers, hospitals, car parks etc.
Start guidance
– Scroll to Start guidance to start the guid-
–
ance.
Search by post code
Set destination
Address
–
Set destination
Facilities
Enter and select country and press
ENTER.
City (City)
1. Select City and press ENTER.
–
2. Scroll to Post code and press ENTER.
Type (Type)
3. Select digits and press ENTER, or select
from the list of alternatives.
4. Scroll to Street to choose from addresses
with the selected postcode, then press
ENTER.
32
Country (Country)
City
Instead of searching in a city, you can choose
to search within a postcode area.
Press ENTER to access a submenu with
different search options in order to set a
facility.
–
Enter and select city and press ENTER.
Enter and select type of facility and press
ENTER.
Name (Name)
–
Enter the name of a facility, or select from
among the alternatives in the menu.
The list only displays the facilities in the
selected city/selected area.
02 Easy user mode
Set destination
Select from among the last 20
Set destination
Last 20
02
A list of the twenty most recent destinations is
displayed.
–
Scroll to the desired destination using
or ENTER to access the submenu.
Set as destination
Adds the destination to the itinerary.
Delete location
Deletes the location from the list Last 20.
Location on map
Set destination
Location on map
1. Use the navigation button to move the
hairline cross to the required destination
and press ENTER to access the Scroll
menu, see page 28.
2. Scroll to Set as destination and press
ENTER.
NOTE
It is also possible to search for a location on
the map directly with the crosshair by using
the navigation button in Map mode.
33
02 Easy user mode
Show/Delete destination
Show destination on map
02
Show destination
–
Press ENTER to obtain a map overview of
the area you set as final destination.
Delete destination
Remove destination
1. Press ENTER to reach the destination to
be deleted.
2. Press ENTER again to delete the destination.
34
02 Easy user mode
Settings
Guiding voice
Settings
Guiding voice
Set female or male guiding voice1.
Map view
Settings
Map view
02
The map can be displayed in 2D (from directly
above) or 3D (obliquely from above).
Guiding volume
Settings
Guiding volume
Distance Unit
Settings
Select the volume of voice messages, or switch
them off completely.
Distance Unit
Select whether distance should be shown in
km or UK-mile.
Language
Settings
Language
User mode
Settings
Set language for menus, text and voice messages.
User mode
Switch between Easy and Advanced user settings.
Colour
Settings
Colour
There are four screen display settings - select
the one that suits you best.
1
Not applicable to the Netherlands. Instead there is the choice of language between Nederlands and Belgisch.
35
36
38
42
44
49
52
53
54
59
G029196
Menus.....................................................................................................
Menu tree................................................................................................
Set destination........................................................................................
Itinerary...................................................................................................
Current position......................................................................................
Traffic information...................................................................................
Settings...................................................................................................
Simulation...............................................................................................
ADVANCED USER MODE
03 Advanced user mode
Menus
General
03
line1 from the current position to the destination.
Quick menu
When the navigation system starts up the
required user settings are selected
Advanced.
Access to all of the navigation system's settings and functions is available in the
Advanced mode.
G029190
The most common functions are collected
together in the Quick menu, which makes them
easier to access while driving.
1. Press ENTER in Map mode.
2. Select a symbol using
Main menu
or
.
Pressing ENTER on the second option displays a map showing the entire route outline1
from start to destination.
Pressing ENTER on the options (+) or (-)
changes the map scale in various stages, from
50 metres up to 100 km, to give you a greater
perspective or allow you to see more details.
Most system settings can be made under
Settings in the Main menu while others can
only be accessed via the Quick menu.
Stepless changing is possible if you hold down
ENTER - release the button when the scale is
suitable.
Fast storage of current location
If you opt to display two maps, the map scale
symbol appears at either end of the Quick
menu so that you can adjust the relevant scale
individually.
You can save the location of your car to the
map at any one time at the touch of a button.
• Press ENTER - hold down the button until
the display changes.
The main menu is at the top of the menu tree
and can be reached by pressing the BACK
button one or more times.
Your location will then be stored, as indicated by this symbol. Information linked
with the position is adjusted via Stored
location Edit, see page 46.
G028755
G028755
It is possible to switch from Advanced to
Easy user settings in the main menu under:
Settings
1
38
System options
A route must be selected.
User mode
G028755
- Route outline/Scale
A menu containing four options is displayed.
Pressing ENTER on the option at the top displays a map showing the remaining route out-
– Guidance
Pressing ENTER provides current voice guidance.
– Map/Route outline
Route outline
Pressing ENTER displays a list of approaching
waypoints. The distance between waypoints
and type of manoeuvre are displayed in addition to the road name.
03 Advanced user mode
Menus
on page 54.
Surveillance2
3. If several streets/roads are to be avoided,
start by scrolling using
to the first street/
road in the group to be avoided, then press
ENTER. Then scroll to the last street/road
in the group to be avoided and press
ENTER.
Allows you to save map views of three different
monitoring areas, e.g. roads with high traffic
densities that are often subject to traffic problems.
The system then calculates, as far as possible,
a new route outline which leads back to the
original route outline only once the specified
stretches have been avoided and passed.
A change in the scale affects the number of
messages shown, see page 66.
Select Surveillan.1, 2 or 3. To view previously
set surveillances, see page 40.
Avoid stretch within 1-80 km
One map/Two maps
Pressing ENTER displays one large or two
smaller map images of the current area. Different scales may be input for the respective
maps.
G028755
– Diversion
Displays a menu with Avoid and the options
1-5-10-20-40-80 km.
Avoid streets/roads
This function deselects an entire area in the
original itinerary so that you do not have to
drive through a densely populated area in rush
hour, for example.
–
Select an option from the diversion menu
1-80 km and press ENTER.
This function deselects streets or roads from
an itinerary set up so that you do not have to
drive through a known roadworks area, for
example.
The system then calculates, as far as possible,
a new route outline which leads back to the
original route outline only once the specified
area has been avoided and passed.
1. Select Avoid in the Diversion menu and
press ENTER. A list of streets/roads
included in the route outline is shown.
It is also possible to avoid an area by marking
a square area directly on the map, see Avoid
specified areas under
2. Scroll to the street/road to be avoided and
press ENTER.
2
3
G028755
Route options
03
Read message
Pressing ENTER allows you to scroll through
the traffic messages displayed on screen.
Show all
Pressing ENTER displays all messages.
Hide all
Pressing ENTER hides all messages.
Show selected
Pressing ENTER allows you to select the type
of traffic messages to be displayed in the map.
Irrespective of whether Easy or Advanced
user settings are selected, traffic information
transmitted is always received and presented.
For more information, see page 62.
G028755
Settings
– Traffic information3
Displays a menu containing different options
for viewing information on traffic problems
within the area displayed on screen.
– Facilities
Displays a menu containing various options for
searching for a facility.
Only in areas that can receive traffic information.
Does not apply to all areas/countries.
``
39
03 Advanced user mode
Menus
Around the car
Menu
• Choose between the Last 5 and All
Along the route
03
types to search for facilities within the local
area.
Pressing ENTER allows you to search along
the route. See page 45
Read traffic msg. (Read traffic msg.)
Along the motorway
Searches for current traffic messages within
the area.
Pressing ENTER allows you to search for rest
areas, petrol stations and restaurants that are
readily accessible along the motorway.
If a calculated route extends over several
motorways then the system only searches
along the section of motorway currently being
used.
Scroll menu
Map scroll
In Scroll mode, a hairline cross is manoeuvred
over the map image.
–
Activate Scroll mode (Scroll menu) by
scrolling with the navigation button.
The longer you hold down the button, the faster
the hairline cross moves across the map.
Surveillance (Set for surveill.)3
–
Press ENTER in Map scroll mode to view
the Scroll menu.
Scale
Changes the size of the map image to provide
a larger perspective or more detail.
• Pressing ENTER on the options (+) or (-)
changes the map scale in various stages,
from 50 metres up to 100 km.
• Stepless changing is possible if you hold
down ENTER - release the button when
the scale is suitable.
Set as destination (Set as destination)
Selects the location marked by the hairline
cross as the destination.
• Press ENTER. Guidance starts immediately.
3
40
Does not apply to all areas/countries.
Facilities around (Facilities around)
A menu is displayed.
Pressing ENTER allows you to search around
the car. See page 45
Pressing ENTER displays a menu containing
various options.
• Select between Surveillance 1, 2 or 3 and
press ENTER to store a map view you want
to save as a surveillance area, e.g. heavily
trafficked roads that are often subject to
traffic problems.
Activating the map
Selects map options in the Quick menu.
• Select required surveillance.
Store location (Store location)
Saves a selected location, which then appears
under:
Set destination
Stored locations
03 Advanced user mode
Menus
Follow route in itinerary
To be able to easily follow a set route in the
itinerary, there is a built-in "magnet function"
where - regardless of how the route outline
turns and changes compass direction - the
hairline cross follows the route outline automatically by simply holding down a button.
One of the lines on the hairline cross indicates
which button is to be selected - it appears "fatter" than the other one.
03
The route outline is followed automatically using
or
.
button
If no "magnet function" is required, the "fat"
hairline cross line disappears when you scroll
the hairline cross a few millimetres off the
selected itinerary. The scroll function then
returns to normal.
The route outline is followed automatically using
or
.
button
41
03 Advanced user mode
Menu tree
Menu options
Stored locations
Shown here are three of the menu tree's levels.
Several of the menus at level three have further
submenus - these are described in more detail
in their respective sections.
Add to itinerary/Information/Sorting/Delete location
page
46
Route options
View Route options
under Settings
Clear itinerary
03
Set destination
page
44
Address
page
44
Country
Last 20
Add to itinerary/Information/Delete location/Del.
all
View Itinerary
Street
No.
Facility by name
Around the car
Along the route
page
32
page
44
Current position
page
52
Latitude/longitude
page
48
Settings
page
53
Itinerary
page
49
Traffic information
Dynamic route guidance
Start guidance
page
44
Traffic-info. selection
Add to itinerary
page
49
Reset to default
View Address under Set
destination
42
View Address under Set
destination
page
44
page
47
Around point on map
Along a street
page
47
page
49
Point on map
Intersection
Facilities
Next destination
Address
Return trip
City
page
47
page
54
Search stations
page
53
03 Advanced user mode
Menu tree
Route options
Route
page
54
System options
Guiding voice
Avoid motorways/toll
roads/ferries/car trains/
traffic problems/timerestr. roads/specified
areas
Guiding volume
Reset to default
Screen saver
Map options
Facility selection
Language
Map colour
page
55
Help
Distance unit
User mode
Date & time info
Right map view
GPS information
Left map view
About
Compass
Reset to default
Current location
Reset to default
Time/dist. to go
03
Menu colour
Map
Guiding options
page
57
Start demo
page
56
Shut down
page
59
page 9
Facility warning
Charge area warning
Reset to default
43
03 Advanced user mode
Set destination
Address
1. Scroll to Country (Country) and/or City
(City) and press ENTER.
NOTE
The definition of city or area may vary from
country to country and even within the same
country. In some cases, it refers to a municipality and in others it refers to a district.
2. Or choose from the latest options selected
.
by pressing
(For information on how the keyboard is used,
see page 21.)
03
NOTE
Set destination
Address
The system starts with Street in order to
avoid misunderstanding when two nearby
cities/localities have grown together.
Alternatives 1
– Select Street (Street) without selecting a
city.
If the selected address has a street number,
this can be entered in order to specify the destination more precisely.
–
Scroll to the line for Number after entering
the street address, then press ENTER.
If the street number is not specified then the
system guides to the middle of the selected
street.
Alternatives 2
Alternatively:
2. Then select Street.
44
Specify street number
If the street appears in several cities, a list will
be displayed offering you alternatives to
choose from. The system guides you to the
middle of the street selected.
1. Start by selecting City.
Enter street address
No street addresses have been entered in the
system for small locations. It is always possible
to choose the centre of the place as a destination.
1. Enter the required street number.
> Alternative street numbers are displayed.
The system places the cursor on Street
(Street) first. The last Country (Country)
selected is preselected.
2. Scroll to Select and press ENTER.
If not:
Go back to previous screen.
Cancel
03 Advanced user mode
Set destination
Enter a junction
– Scroll to Intersection (Junction) and
select a street which intersects the street
selected.
Start guidance
1. Scroll to Start guidance to start the guidance.
2. Scroll to Select to add the input address
to the itinerary.
1. Select City and press ENTER.
2. Scroll to Post code and press ENTER.
Facilities is a collective name for petrol stations, hotels, restaurants, Volvo dealers, hospitals, car parks etc.
3. Select digits and press ENTER, or select
from the list of alternatives.
–
4. Scroll to Street to choose from addresses
with the selected postcode, then press
ENTER.
Facility by name (Facility by name)
Press ENTER to access a submenu with
various search options for specifying facilities.
03
5. Scroll to Start guidance for guidance to
the destination.
Information
Provides information about the destination.
NOTE
This also applies when searching for facilities.
Search by post code
Search by facilities
–
Enter the name of a facility, or choose from
the alternatives in the menu.
The list only displays the facilities in the
selected city/area.
Around the car (Around the car)
Search Last 5 or All types.
Set destination
Address
The system searches for facilities around the
car (max. 100 km radius). The search is stopped after 40 facilities have been found.
City
Instead of searching in a city, you can choose
to search within a postcode area.
Set destination
Facilities
Along the route (Along the route)
Search Last 5 or All types.
45
03 Advanced user mode
Set destination
When a destination has been specified, the
system can search for facilities in an area along
the route (within 1 km of the route).
Around point on map (Around point on
map)
03
1. Scroll to Country and/or City and press
ENTER.
Or choose from the latest options selected
by pressing
.
Airports, for example, often have restaurants,
petrol stations, etc. directly next to the airport.
Instead of searching on Restaurants in the
main menu, you can select Restaurants
directly for the Airport selected.
The system searches in the same way as
Around the car, but around a chosen point on
the map.
2. Scroll to Name and press ENTER to enter
a facility name without specifying a city.
3. Scroll to Select and press ENTER.
Avoiding alternatives off-airport simplifies your
search and makes it faster.
1. Move the crosshairs on the map using the
navigation button.
4. Then scroll to Start guidance and press
ENTER for guidance to the destination.
Stored locations
2. Press ENTERto access the Scroll menu.
NOTE
Along a street (Along a street)
The system searches along a specified street.
NOTE
It is also possible to search for facilities
around the car, along the route, or along a
motorway via the Quick menu, see
page 28.
Facility types/Different categories
Set destination
name
Facilities
Facility by
The system places the cursor on Type first.
The last Country selected is preselected.
If not:
46
Other facilities
To refine the search, select City first and
then scroll to Name.
There are sub-categories for e.g. restaurants to simplify searching.
Information on facility
Information shows the address, coordinates
and - in some cases - telephone number of the
facility. If the car is equipped with built-in
phone then the function Call is also activated.
Set destination
Stored locations
Stored location is a destination saved previously, e.g. home address, favourite restaurant,
airport, Volvo dealer. Information on how to
store a location, see page 50.
–
Scroll between the stored locations and
or ENTER to access the subpress
menu.
Add to itinerary
Adds the stored location to the itinerary.
Call
Information
The telephone dials the number specified.
Provides information about the stored location.
Map
Edit
Displays the location of the facility on the map.
Change name, add sound, etc. for a stored
location. See under the following heading, Add
information on stored location.
03 Advanced user mode
Set destination
•
•
•
•
•
•
Sorting
Sort stored locations according to icon or
name.
Delete location
Deletes a stored location.
Delete all
Deletes all stored locations.
Move the position of a stored location
1. Select Edit, scroll with
to Adjust and
press ENTER in order to specify a new
position on the map for the stored location.
2. Move the crosshairs to the new position
using the navigation button, then press
ENTER.
3. Then select Store location and press
ENTER to save the location.
Add information on stored location
– Select Edit,, scroll with
to Add info.
and press ENTER to add further information on the stored location.
Every stored location can be provided with
the following information:
• Alarm On/Off (...to notify the driver of
Address
Return trip
City
Set destination
Return trip
Country
Tel.
–
E-mail
The system then starts guidance back to the
location where Start guidance was last
selected.
URL
Select Start guidance and press ENTER.
03
Choose from the last 20
Set destination
Last 20
Search via point on map
Set destination
A list of the twenty most recent destinations is
displayed.
–
Scroll to the desired destination using
or ENTER to access the submenu.
Location on map
1. Use the navigation button to move the
crosshairs to the required destination, then
press ENTER to access the Scroll menu.
2. Select Set as destination, see page 40.
Add to itinerary
Adds the destination to the itinerary.
Information
Provides information about the destination.
Delete location
NOTE
It is also possible to search for a location on
the map directly with the crosshair by using
the navigation button in Map mode.
Deletes the location from the list Last 20.
Delete all
Deletes all addresses from the list Last 20.
his/her approach to the location)
• Icon
• Name
47
03 Advanced user mode
Set destination
Search via latitude/longitude
Set destination
Latitude/longitude
1. Select a destination by entering the coordinates for the destination.
03
2. Enter a latitude using the navigation button: select N for north or S for south.
NOTE
London is at longitude 0 (zero). Points west
of London's longitude are indicated by W
(West) and points east of it are indicated by
E (East).
3. Scroll to the next line and specify longitude: select E for easterly or W for westerly.
Press OK
> Shows the location of the specified
coordinates on the map.
4. Press ENTER to reach the Scroll menu.
5. Scroll to Set as destination and press
ENTER to select the location as a destination.
6. Press BACK to return to coordinate input.
Cancel
Return to previous screen.
48
03 Advanced user mode
Itinerary
Create an itinerary
Start guidance (Start guidance)
Itinerary layout
03
Destination/intermediate destination
The menu option Itinerary (Itinerary)can be
accessed only when you have input an itinerary.
Create an itinerary with several waypoints to
avoid entering destination after destination
during your trip. One final destination with up
to six waypoints can be specified in an itinerary.
Itinerary
Starts guidance to the destination.
Add to itinerary (Add to itinerary)
Itinerary
–
Select an input destination and press
ENTER or
to access the submenu.
Additional waypoints are added to the itinerary
here, see page 44.
Information (Information)
Route options (Route options)
Delete (Delete)
Route prioritising options, see page 54.
Clear itinerary (Clear itinerary)
Deletes the whole itinerary.
Provides information about the destination.
Deletes the destination from the itinerary.
Move (Move)
Changes the location of the destination in the
itinerary.
Adjust (Adjust)
Changes the location of the destination on the
map.
Store (Store)
Saves the destination that will be available
under Stored locations.
``
49
03 Advanced user mode
Itinerary
Delete from itinerary
Save a location on the map
Itinerary
Delete the whole itinerary
All waypoints and the final destination are
deleted.
03
–
Scroll directly to Clear itinerary and press
ENTER.
Delete intermediate destination in the
itinerary
1. Select one of the input intermediate destinations and press ENTER or
to access
the submenu.
2. Scroll to Delete and press ENTER.
NOTE
Passed waypoints are automatically
deleted from the itinerary.
Store for re-use
Up to 250 destinations can be stored for re-use
in different itineraries.
An acoustic signal that alerts the driver to the
fact that the stored location is approaching,
plus other information can be linked to the
stored location, see page 47 - Add information
on stored location.
50
Itinerary
Scroll menu
Save a location from the itinerary
1. Use the navigation button to step through
to the destination you want to store, then
press ENTER or
to access the submenu.
1. In Scroll mode, use the navigation button to step through to the point to be
stored, then press ENTER.
2. Select Store and press ENTER.
2. Select Store location Sore location from
the Scroll menu, then press ENTER.
3. Use the navigation button to select a
symbol to be displayed on the map, then
press ENTER.
3. Use the navigation button to select a
symbol to be displayed on the map, then
press ENTER.
4. Enter the required name.
4. Enter the required name.
5. Scroll to Store Storeand press ENTER.
5. Scroll to Store and press ENTER.
A current location can also be stored quickly
while driving, for example, at the touch of a
button, see page 38 - Fast storage of current
location.
03 Advanced user mode
Itinerary
Next destination in itinerary
2. Press ENTER if several destinations are
presented in order to view information and
see them on the map.
3. Step through to MapMap and press
ENTER to view the map of the area.
03
Next destination
The map image shows the next destination.
1. Press ENTER or
to view information on
the destination such as the name, time to
destination or distance from current position to destination.
51
03 Advanced user mode
Current position
Current position
GPS
Specifies the number of satellites the system is
in contact with.
03
Current position
The map image shows the car's position.
–
52
to obtain information
Press ENTER or
on the location, such as name and coordinates for example.
03 Advanced user mode
Traffic information
Traffic information
03
Settings
Traffic information
Irrespective of whether Easy or Advanced
user settings are selected, traffic information
transmitted is always received and presented.
For more information, see page 62.
NOTE
Traffic information is not available in all
areas/countries.
53
03 Advanced user mode
Settings
Route options
Route
Avoid car train
Select a fast, short or simple route when calculating a route.
Indicate whether car trains are to be avoided
when calculating a route.
• Fast: As far as possible the system priori-
Avoid traffic problems
tises major roads with high speed limits.
• Short: As far as possible the system pri-
03
oritises the nearest road.
• Easy: As far as possible the system prioritises roads that do not involve complicated
manoeuvres and junctions.
Settings
Route options
1. Scroll between the functions, select the
required setting and press ENTER to save
the settings.
2. Press BACK to cancel.
NOTE
When calculating a route, the system as far
as possible takes consideration of the alternatives the driver has chosen to avoid. However, an exception is made if no reasonable
alternative is available.
Avoid time-restr. roads
• Select Yes if you want the system to completely avoid time-restricted roads when
calculating a route.
• Select No if the system is to give consideration to time-restricted roads when calculating a route.
The system uses the time in the car's clock to
determine whether a road should be avoided.
NOTE
Avoid motorways
Indicate whether motorways are to be avoided
when calculating a route.
Avoid toll roads
Indicate whether toll roads are to be avoided
when calculating a route.
Avoid ferries
Indicate whether car ferries are to be avoided
when calculating a route.
54
Indicate whether the system should give consideration to traffic problems when calculating
a route.
If a time zone boundary is crossed then the
car's clock must be adjusted.
Avoid specified areas
The function is for avoiding being guided
through special areas, cities or districts. The
system ignores the selected areas when calculating the route outline. The exception is
motorways which are used for calculating even
in an area selected to be avoided.
03 Advanced user mode
Settings
In the same way, the marker field mode
can be changed under Adjust area
(Adjust area).
Map options
3. Select Set area to avoid and press
ENTER.
> The selected area is saved to a list in
which a number of areas can be stored
and activated when required.
Settings Route options Avoid
specified areas Selected
Select the area that the itinerary should avoid
by directly selecting on the map with a square
field.
1. Call up the map by clicking with
on
Selected, click with
on Map and then
ENTER on one of the options in the list
displayed.
> Scroll to the required area with the
marker field, then press ENTER.
2. To change the size: Select Adjust size
(Adjust size) and press ENTER.
> Change the shape of the marker field
using the navigation button so that it
covers the area to be avoided, then
press ENTER.
4. Agree to avoidance of the area with
ENTER on OK and a cross in the list.
> The system will then, as far as possible,
avoid this area in the itinerary.
03
Settings
Map otions
The areas stored in the list can be adjusted in
terms of size and geographical location under
Edit, and they can be deleted permanently
from the list with Delete. A number of activated
areas can be deactivated simultaneously using
the None option.
Select here what facilities are to be displayed
in the map and how the map is to appear on
screen.
Reset to default
2. Press ENTER to open the function.
Restore factory settings for Route options.
–
Press
, select OK and press ENTER.
1. Select a function to be adjusted using the
navigation button.
Facility selection
Press
to access the submenu's options.
• Show all: All facilities symbols are shown
on the map image.
• Hide all: No symbols are shown.
• Show selected: Press to view all symbols which can be shown on the map
image. Then select symbols as follows:
``
55
03 Advanced user mode
Settings
and the 2D North option provides 2D with
compass direction North always upwards.
Compass
Choose whether the compass is to be displayed on the screen.
Current location
Indicate whether the name of the street/road
on which the car is currently driving should be
shown at the bottom of the screen.
03
Reset to default
Restore factory settings for Map options.
1. Scroll through the symbols by pressing
or
.
2. Activate the required symbols with a cross
or
.
with
3. Press ENTER to save.
Map
Choose between the options Show and Hide.
If the map is hidden, the system guides with an
arrow.
Selection of elevation angle.
Settings
3D
Map options
After the selection of 3D with
or
and
ENTER the control for the elevation angle is
displayed. Select the desired angle with
or
followed by ENTER and BACK.
Left map view
Select whether the map is to be displayed in
2D (from directly above) or 3D (obliquely from
above).
See the description in the previous section.
upwards on the screen.
• With the 2D Heading option, 2D is shown
with the heading upwards on the screen
Press
, select OK and press ENTER.
Guiding options
Map view
Right map view
• With the 3D option, the heading is always
56
–
NOTE
If 3D is selected for the map on the right, the
map on the left can only display 2D.
Settings
Guiding options
Time/dist. to go
Select one of the alternatives RTA/ETA/Hide.
• RTA (Remaining Time to Arrival): Remaining time to arrival.
• ETA (Estimated Time of Arrival): Estimated
time of arrival.
NOTE
The time set on the car's clock controls the
time indicated for ETA.
03 Advanced user mode
Settings
Charge zone warning
System options
NOTE
Besides road tolls with barriers or other blocking systems, there are also charge routes/
zones without physical barriers, such as congestion charge areas.
The type of information permissible for
inclusion on the map is stipulated in national
legislation. For current information, see
www.volvocars.com/navi.
Select YesOn if you require warnings of these
types of road, otherwise select NoOff.
NOTE
Facility warning
•
•
•
In certain regions the maximum permissible speed is not stated on the map in
combination with a camera warning.
Pay attention that the posted maximum
permissible speed may sometimes be
changed and accordingly deviate from
the navigator's database.
The driver always has the responsibility
that the traffic and speed regulations in
force are followed.
1. Scroll between the functions using the
navigation button, then press ENTER to
save the settings.
Select the guiding voice you want as the setting: Female/Male1.
Guiding volume
Set the volume for voice messages.
Language
Sets language for menus, text and voice messages.
Menu colour
Select Black, Chrome or Blue for the appearance of the menus.
Restore factory settings for Guiding options.
Map colour
Select Bright 1, Bright 2 or Dark.
–
Press
03
Guiding voice
Reset to default
, select OK and press ENTER.
• Select Yes to hear an acoustic warning
signal, or No if no signal is required.
1
System options
2. Press BACK to cancel.
Safety camera.
The driver is alerted by means of an acoustic
signal and a symbol that a safety camera is
approaching. The symbol is orange if vehicle
speed exceeds the permitted limit - otherwise
it is white.
Settings
The light colours are intended for daylight and
dark for night or in darkness.
Screen saver
Indicate whether the screen saver should be
used (the screen goes out 30 seconds after the
last keystroke).
Not applicable to the Netherlands. Instead there is the choice of language between Nederlands and Belgisch.
57
03 Advanced user mode
Settings
Help
NOTE
Indicate whether help texts should be displayed at bottom of the screen.
Information on height is displayed in increments of 10 m. All heights below 50 m ASL
are displayed as <50 m.
Distance Unit
03
Select the unit to be displayed for distance km or statute mile.
About
User settings
Shows system and map information.
Switch between Easy and Advanced mode.
Reset to default
Date & time info
Restore factory settings for System options.
Select how the date and time are to be displayed.
–
GPS information
The car's position and height above sea level
(Altitude).
Press
to see coordinates and height above
sea level for the car's position, as well as the
number of satellites the system is in contact
with.
58
Press
, select OK and press ENTER.
03 Advanced user mode
Simulation
Start demo (simulation)
Settings
Start demo
Demo demonstrates the system when the car
is stationary by simulating a journey to a specified destination.
03
It is also possible to make settings during the
demonstration.
Stop demo stops the simulation.
NOTE
A destination must be entered in order for
the demo to work.
59
60
62
63
65
66
67
G029197
General....................................................................................................
Avoiding traffic problems........................................................................
Selecting information..............................................................................
Reading information................................................................................
Transmitters............................................................................................
TRAFFIC INFORMATION
04 Traffic information
General
Display and reception
Traffic information that is transmitted is always
received and presented, irrespective of
whether Easy or Advanced user settings are
selected.
The settings for how traffic information should
be presented can only be changed in
Advanced mode, see page 38.
04
The presentation of traffic information also
depends on how it is transmitted.
A symbol is shown in the upper left-hand corner of the map when there is at least one traffic
message along the itinerary's route. The traffic
problem can be scrolled forward using the
navigation button in order to see its position
and nature.
Traffic problems are marked with symbols,
lines and frames. These are coloured red or
yellow.
Red - Important information.
Yellow - General information.
NOTE
Traffic information is not available in all
areas/countries.
The traffic information transmission areas
are constantly being expanded.
Traffic symbols on the map
Accident
Slow traffic
Slow traffic in both directions
Stationary traffic
Area message
Other information
Symbol for traffic message.
62
Extent
Certain traffic messages also contain information on the extent of the traffic obstruction.
On all scales up to 5 km the extent is marked
with a red or yellow line along the route affected. The length of the line is corresponds to the
extent (distance) of the traffic problem.
04 Traffic information
Avoiding traffic problems
Settings
Route options
During the journey
Settings Traffic information
Dynamic route guidance
In connection with entering a new itinerary in
the navigator: Select whether or not the system
should take into consideration traffic problems
when the Start guidancefunction is activated,
see page 49.
The system proposes another route if there is
a suitable alternative, e.g. if a traffic message
states that there is a traffic problem on the
original itinerary.
1. Set Avoid traffic problems.
Man/Sem-aut/Auto/Off
2. Choose between Yes and No.
Choose how the system is to display an alternative route by selecting Male/Sem-aut/
Auto, or shut down the function by selecting
Off.
Yes
The system attempts as far as possible to
avoid roads with traffic problems when the itinerary is activated.
No
The system does not avoid any roads with traffic problems when the itinerary is activated.
NOTE
When starting up the system it can take up
to 15 minutes before all traffic information
for the area has been loaded.
The system does not display or calculate alternatives for better routes.
Messages along the route
One of the Male Sem-aut alternatives is
selected in the preceding section and a traffic
problem arises along the route:
04
G037262
Before guidance is started
• Manual
Another route is suggested, regardless of
whether it is better or worse - select/accept the
suggested route, then a new itinerary will be
used.
• Semi-auto
Another route is suggested, but only if it is better - select/accept the suggested route, then a
new itinerary will be used.
• Auto
The system calculates and uses a new itinerary
automatically if a better route exists.
•
Off
If there is another route past the problem, the
display shows the difference in distance and
driving time:
Changed traffic situation, New route?:
600 m longer, 00h 09m faster.
(Changed traffic situation. Use new route?:
600m longer, 00h 09m faster).
• Select Yes or No.
Yes (Yes)
A new route is used - around and past the
problem.
63
04 Traffic information
Avoiding traffic problems
No (No)
Guides up to and through the problem.
Show new route (Show new route)
Shows map with the new route highlighted.
04
64
04 Traffic information
Selecting information
Traffic-info. selection
3. Activate and deactivate respectively using
or
.
Slippery road
4. Confirm the settings with ENTER.
Traffic signs on the map
Other hazard
Accident
Contraflow
04
Select the type of traffic information the system
should display and to be considered in the
event of calculating a route.
Settings Traffic information
info. selection
Traffic
Diversion
Information
Narrow road
Show all
All traffic information is available.
Parking
Hide all
No traffic information is displayed.
Show selected
1. Press
Congestion
to enable selection from symbols.
2. Select using
or
the traffic information symbols (traffic messages) the system
should show on the map.
Roadwork
65
04 Traffic information
Reading information
Read traffic message
4. Press BACK to enable browsing between
current messages again.
The traffic messages relevant to the map area
are indicated on the screen.
Detailed information on the traffic problem is
also shown. The extent of the problem is
shown at the top. If the traffic problem is
located along the selected route then the distance to it is specified.
04
G028868
Detailed traffic information.
• duration
• restrictions on speed, vehicle width and
Read traffic msg.
A traffic message is indicated by a symbol on
screen. To read a traffic message:
1. Press ENTER to call up the Quick menu:
G029190
2.
Scroll to
using
or
, then
press ENTER, see page 38 and 39.
> Current messages are marked with a
red or yellow frame.
G028755
3. Browse forward or back using
or
and press ENTER for detailed traffic information (the illustration shows an example).
66
If details are available, the following are also
displayed:
height
• roads affected.
Scale
The scale of the map determines how great a
quantity of traffic information can be shown the larger the map area shown on the screen,
the more information is provided. For more
information, see page 28.
04 Traffic information
Transmitters
Search/select station for traffic
information
Settings
station
Traffic information
Search
The system automatically searches stations for
traffic information, but a specific station can
also be selected.
Search stations
–
Press ENTER to search for existing stations.
04
Select station
1. Press ENTER to select from among existing stations.
2. Select station using
ENTER.
or
and press
3. Press BACK to return to the previous
screen.
Current station
Shows the current station for traffic information.
Reset to default
Restore factory settings for station settings.
–
Press
, select OK and press ENTER.
67
68
G028760
Landmarks and road numbers................................................................ 70
Symbols for facilities............................................................................... 71
SYMBOLS ON THE MAP
05 Symbols on the map
Landmarks and road numbers
Landmarks
Many countries/cities have well known landmarks that can be used as target points.
When the map scale is set to 1 km or lower then
a selection of landmarks is shown e.g.
churches and castles.
NOTE
Landmarks are only available for Europe.
05
Road numbers
Local road numbers and international numbers
are shown on the map.
Mountain peaks
Mountain peaks shown on the map scale are
set at 5 km or lower (only applies to particular
areas).
70
Facilities
Facilities
selection
Map options
Facility
Select facilities to be shown on map.
05 Symbols on the map
Symbols for facilities
Select whether all or no facilities should appear
on the map or specify which should be shown.
1. With Facility selection (Facility
– a menu
selection) selected, press
opens.
2. Select Show selected (Show selected)
- a new menu opens.
and press
3. Facilities marked with a cross are displayed on the map - scroll through the list
and uncheck the
the symbols not to be
displayed.
4. Finish with ENTER when all selections
have been made - exit the menus with
BACK.
NOTE
The symbol for a facility may vary between
different countries.
The following symbols for the different facilities
can be chosen to appear on the display screen.
Petrol station
Library
Automobile club
Car hire
Car workshop
Cinema
Book store
05
Bowling
Fire brigade
Bus station
Embassy
(Settings
selection)
Map options
Facility
Settings
selection
Map options
Facility
City centre
Pharmacy
Court house
Bathing beach
Airport
Bank
71
05 Symbols on the map
Symbols for facilities
05
72
Recreation area
Casino
Convention/exhibition centre
Recreation area
Dry cleaners
Night life/music club
Ferry terminal
Civic/community centre
Compressed natural gas
Liquid petroleum gas
Concert hall
Amusement park
Golf course
Art museum
Public sport airport
Sacred edifice
County council
Accident site
Historical monument
Grocery shop
Parking
Hotel
Doctor
Parking garage
Sports complex
Medical service
Park & ride
Industrial zone
Hamlet
Commuter train station
Ice skating
Monument
Guest house
Train station
Museum
Police station
Coffee shop
Authority
Post office
05 Symbols on the map
Symbols for facilities
Rest area
Tourist attraction
Restaurant
Tourist information
Town hall
Railway station
Shopping centre
University/college
Swimming baths
Vantage point
Hospital
Bank machine
Ski resort
Winery
School
Volvo dealer
Yacht harbour/Marina
Toll booth
City hall
Zoo
05
Major companies
Safety camera
Theatre/opera
73
74
G028784
Frequently asked questions.................................................................... 76
EULA - License agreement..................................................................... 78
Copyright................................................................................................ 80
QUESTIONS AND ANSWERS
06 Questions and answers
Frequently asked questions
The position of the car on the map is
wrong
The GPS system shows the position of the car
with an accuracy of about 20 metres.
There is a greater chance of error when driving
on roads lying parallel to another road, on
winding roads, on roads on several levels and
after driving a long distance without making
any distinctive turns.
High mountains, buildings, tunnels, viaducts,
over/underpasses etc. also have a negative
affect on the reception of GPS signals, which
means that accuracy in calculating the position
of the car may decrease.
The system does not always calculate
the fastest/shortest route
06
When calculating a route, distance, width of
road, type of road, number of right or left turns,
roundabouts etc. are all taken into account in
order to produce the best theoretical route. A
more efficient selection of route may be possible based on experience and knowledge of the
area.
The system uses toll roads, motorways
and ferries even though I chose to avoid
them
For technical reasons, the system can only use
larger roads when calculating a route extending over a long distance.
76
If No is selected for toll roads and motorways,
then they are avoided to the greatest possible
extent and are only used if there is no other
reasonable alternative available.
The position of the car on the map is
incorrect after transportation
If the car is transported, for example by ferry or
train, or in such a way as to impede the reception of GPS signals, it can take up to 5 minutes
before the position of the car is correctly calculated.
The position of the car on the map is
incorrect after the car battery has been
disconnected
If power has been cut from the GPS antenna,
it can take more than 5 minutes for the GPS
signals to be received correctly and the position of the car to be calculated.
The car symbol on screen behaves erratically
after a tyre change
a number of kilometres including several significant turns.
The map image does not correspond
with the real situation
Factors such as the constant expansion and
rebuilding of the road network, new traffic regulations constantly being introduced etc. mean
that the digital map database is not always
complete. The information stored in the maps
is constantly being developed and updated.
Your Volvo Dealer can provide further information.
See also www.volvocars.com/navi for further
information on maps etc.
The scale of the map sometimes
changes
There is no detailed map information in certain
areas. The system then automatically changes
the degree of magnification.
The expected menu option is missing
In addition to the GPS receiver, the car's speed
sensor and a gyro assist in calculating the current position and direction of travel of the car.
After fitting the spare wheel or changing from
summer to winter tyres the system needs to
"learn" the size of the new wheels.
Check the settings that have been made.
Select Return to basic settings for the function in order to restore the original settings.
To achieve the optimum functionality of the
system it may therefore be necessary to drive
The system cannot find a good alternative to
the current route when I selected Calculate
new or Diversion.
The system shows the route I am already
on
06 Questions and answers
Frequently asked questions
The car symbol on screen jumps
forwards or spins
The system may need a few seconds to sense
the position and movement of the car before
driving off. Switch off both the system and the
engine. Start again, but remain stationary for a
while before starting to drive.
I'm going to make a long journey but do
not want to specify a special destination
to the cities I am thinking of travelling
through. How do I most easily create an
itinerary?
Specify the destination directly on the map
using the hairline cross. The system automatically guides you to the final destination even
though you are driving beside the intermediate
destinations.
Why do I not always receive traffic
messages?
06
The function is not accessible, fully developed
or not available in all markets. Check also that
the correct settings are made under Route
options.
My map information is not up-to-date
Contact your Volvo Dealer regarding the
updating of map data.
See also www.volvocars.com/navi
77
06 Questions and answers
EULA - License agreement
06
Notice to the user
LICENSE GRANT
PLEASE READ THIS END USER LICENSE
AGREEMENT CAREFULLY BEFORE USING
THE NAVTEQ DATABASE.
NAVTEQ grants you a non-exclusive license to
use the Database for your personal use or, if
applicable, for use in your business' internal
operations. This license does not include the
right to grant sub-licenses.
THIS IS A LICENSE AGREEMENT - AND NOT
AN AGREEMENT FOR SALE – BETWEEN YOU
AND NAVTEQ EUROPE B.V. FOR YOUR
COPY OF THE NAVTEQ NAVIGABLE MAP
DATABASE, INCLUDING ASSOCIATED COMPUTER SOFTWARE, MEDIA AND EXPLANATORY PRINTED DOCUMENTATION PUBLISHED BY NAVTEQ (JOINTLY "THE DATABASE"). BY USING THE DATABASE, YOU
ACCEPT AND AGREE TO ALL TERMS AND
CONDITIONS OF THIS END USER LICENSE
AGREEMENT ("AGREEMENT"). IF YOU DO
NOT AGREE TO THE TERMS OF THIS AGREEMENT, PROMPTLY RETURN THE DATABASE,
ALONG WITH ALL OTHER ACCOMPANYING
ITEMS, TO YOUR SUPPLIER FOR A REFUND.
OWNERSHIP
The Database and the copyrights and intellectual property or neighbouring rights therein are
owned by NAVTEQ or its licensors. Ownership
of the media on which the Database is contained is retained by NAVTEQ and/or your supplier until after you have paid in full any
amounts due to NAVTEQ and/or your supplier
pursuant to this Agreement or similar agreement(s) under which goods are provided to
you.
78
LIMITATIONS ON USE
The Database is restricted for use in the specific system for which it was created. Except to
the extent explicitly permitted by mandatory
laws (e.g. national laws based on the European
Software Directive (91/250) and the Database
Directive (96/9)), you may not extract or reutilise substantial parts of the contents of the
Database nor reproduce, copy, modify, adapt,
translate, disassemble, decompile, reverse
engineer any portion of the Database. If you
wish to obtain interoperability information as
meant in (the national laws based on) the European Software Directive, you shall grant NAVTEQ reasonable opportunity to provide said
information on reasonable terms, including
costs, to be determined by NAVTEQ.
TRANSFER OF LICENSE
You may not transfer the Database to third parties, except when installed in the system for
which it was created or when you do not retain
any copy of the Database, and provided that
the transferee agrees to all terms and conditions of this Agreement and confirms this in
writing to NAVTEQ. Multi-disc sets may only be
transferred or sold as a complete set as provided by NAVTEQ and not as subset thereof.
LIMITED WARRANTY
NAVTEQ warrants that, subject to the warnings
set out below, for a period of 12 months after
acquisition of your copy of the Database, it will
perform substantially in accordance with NAVTEQ's Criteria for Accuracy and Completeness
existing on the date you acquired the Database; these criteria are available from NAVTEQ at your request. If the Database does not
perform in accordance with this limited warranty, NAVTEQ will use reasonable efforts to
repair or replace your non-conforming copy of
the Database. If these efforts do not lead to
performance of the Database in accordance
with the warranties set out herein, you will have
the option to either receive a reasonable refund
of the price you paid for the Database or to
rescind this Agreement. This shall be NAVTEQ's entire liability and your sole remedy
against NAVTEQ. Except as expressly provided in this section, NAVTEQ does not warrant
nor make any representations regarding the
use of results of the use of the Database in
terms of its correctness, accuracy, reliability, or
otherwise. NAVTEQ does not warrant that the
Database is or will be error free. No oral or written information or advice provided by NAVTEQ, your supplier or any other person shall
06 Questions and answers
EULA - License agreement
create a warranty or in any way increase the
scope of the limited warranty described above.
The limited warranty set forth in this Agreement
does not affect or prejudice any statutory legal
rights that you may have under the legal warranty against hidden defects.
If you did not acquire the Database from NAVTEQ directly, you may have statutory rights
against the person from whom you have
acquired the Database in addition to the rights
granted by NAVTEQ hereunder according to
the law of your jurisdiction. The above warranty
of NAVTEQ shall not affect such statutory
rights and you may assert such rights in addition to the warranty rights granted herein.
LIMITATION OF LIABILITY
The price of the Database does not include any
consideration for assumption of risk of consequential, indirect or unlimited direct damages
which may arise in connection with your use of
the Database. Accordingly, in no event shall
NAVTEQ be liable for any consequential or
indirect damages, including without limitation,
loss of revenue, data, or use, incurred by you
or any third party arising out of your use of the
Database, whether in an action in contract or
tort or based on a warranty, even if NAVTEQ
has been advised of the possibility of such
damages. In any event NAVTEQ's liability for
direct damages is limited to the price of your
copy of the Database.
THE LIMITED WARRANTY AND LIMITATION
OF LIABILITY, SET FORTH IN THIS AGREEMENT, DO NOT AFFECT OR PREJUDICE
YOUR STATUTORY RIGHTS WHERE YOU
HAVE ACQUIRED THE DATABASE OTHERWISE THAN IN THE COURSE OF A BUSINESS.
WARNINGS
The database may include incorrect or incomplete information due to changes over time,
changes of circumstances, the quality of the
sources used and the process used for collection of extensive geographical data. All of these
situations may lead to erroneous results. The
Database does not include or reflect information on - inter alia - neighbourhood safety; law
enforcement; emergency assistance; construction work; road or lane closures; vehicle
or speed restrictions; road slope or grade;
bridge height, weight or other limits; road or
traffic conditions; special events; traffic congestion; or travel time.
within the European Union or Switzerland
where you acquired the Database shall apply.
In all other cases, or if the jurisdiction where
you acquired the Database cannot be defined,
the laws of the Netherlands shall apply. The
courts competent at your place of residence at
the time you acquired the Database shall have
jurisdiction over any dispute arising out of, or
relating to this Agreement, without prejudice to
NAVTEQ's right to bring claims at your then
current place of residence.
06
GOVERNING LAW
This Agreement shall be governed by the laws
of the jurisdiction, in which you reside at the
date of acquisition of the Database. Should you
at that moment reside outside the European
Union or Switzerland, the law of the jurisdiction
79
06 Questions and answers
Copyright
Austria
Portugal
© Bundesamt für Eich- und Vermessungswesen.
Source: IgeoE - Portugal.
France
Spain
Información geográfica propiedad del CNIG.
Source Géoroute® IGN France & BD Carto®
IGN France.
Sweden
Germany
Based upon electronic data © National Land
Survey Sweden.
Die Grundlagendaten wurden mit Genehmigung der zuständigen Behörden entnommen.
Switzerland
Great Britain
Topografische Grundlage: © Bundesamt für
Landestopographie.
© Based upon Crown Copyright material.
© 2005-2009 NAVTEQ All rights reserved.
Greece
Copyright Geomatics Ltd.
Hungary
Copyright © 2003; Top-Map Ltd.
06
Italy
La Banca Dati Italiana è stata prodotta usando
quale riferimento anche cartografia numerica
ed al tratto prodotta e fornita dalla Regione
Toscana.
Norway
Copyright © 2000; Norwegian Mapping
Authority.
Poland
© EuroGeographics.
80
NOTE
Australia is not covered by this agreement;
see special information.
06 Questions and answers
06
81
07 Alphabetical Index
1, 2, 3 ...
B
D
2D or 3D............................................... 35, 56
Basic settings.............................................. 9
Delete destination...................................... 34
Battery
deactivation.......................................... 76
remote control...................................... 20
Delete in itinerary....................................... 50
A
About
information on the map disc................. 58
Acoustic signal
camera.................................................. 57
Stored location..................................... 47
Camera
acoustic signal...................................... 57
Detour
quick menu........................................... 39
Address
enter................................................ 31, 44
camera (Audible signal).............................. 57
Distance unit.............................................. 35
ETA....................................................... 56
Change between settings.......................... 28
Do not disturb - symbol............................. 20
Arrow keys................................................. 20
Changes in the manual................................ 8
Drop-down menu
advanced mode.................................... 40
simple mode......................................... 28
Audible signal
road camera......................................... 57
stored location...................................... 47
07
C
Demo................................................... 10, 59
Destination................................................. 49
last 20............................................. 33, 47
set................................................... 31, 44
Avoid
ferries....................................................
motorways............................................
specified areas.....................................
time-restr. roads...................................
toll roads...............................................
traffic problems.....................................
Compass............................................. 23, 56
Component location and functions C30.... 14
Component location and functions C70.... 16
54
54
54
54
54
54
Component location and functions XC90.. 18
DVD disc
care....................................................... 24
changing............................................... 24
Controls..................................................... 20
Coordinates
search................................................... 48
E
Copyright................................................... 80
Elevation angle in 3D................................. 56
Current position......................................... 52
ENTER....................................................... 20
Enter an itinerary........................................ 49
82
07 Alphabetical Index
F
I
M
Facilities
quick menu........................................... 39
Symbols................................................ 71
IR receiver and remote control.................. 20
Main menu Advanced................................ 38
Itinerary...................................................... 49
next destination.................................... 51
Main menu Simple..................................... 28
K
Main unit C30
location................................................. 15
Keypad
location................................................. 20
Main unit C70
location................................................. 17
Facility as destination.......................... 32, 45
Factory settings........................................... 9
G
Main unit XC90
location................................................. 19
GPS information........................................ 58
Guidance
start................................................. 32, 45
L
Guiding options......................................... 56
Landmarks................................................. 70
Guiding voice............................................. 35
Language............................................. 35, 57
Guiding volume.......................................... 35
Last 20 destinations............................ 33, 47
H
Level differences
mark on map......................................... 70
Latitude and longitude............................... 48
Hill and level differences............................ 70
Main unit
contents................................................ 24
Map............................................................ 38
2D or 3D............................................... 56
colour on screen............................. 35, 57
direction................................................ 56
point on................................................. 33
show/hide............................................. 56
Map colour................................................. 35
License agreement.................................... 78
Map disc
care....................................................... 24
changing............................................... 24
Longitude and latitude............................... 48
Map image................................................. 23
07
Map mode................................................... 9
Map options............................................... 55
83
07 Alphabetical Index
Map scale/Current route in quick menu 28, 38
Map scrolling
advanced mode.................................... 40
simple mode......................................... 28
Map view................................................... 35
P
S
Point on map....................................... 33, 47
Safety camera............................................ 57
Post code
search................................................... 45
Save a location.......................................... 50
Menu tree
advanced.............................................. 42
simple................................................... 30
Scale/current route in quick menu....... 28, 38
Screensaver............................................... 57
Menu options......................................... 8, 42
Q
Quick menu................................................ 38
Screen settings
colour of map....................................... 35
Language.............................................. 35
Scroll menu................................................ 40
Return to default settings.................... 55, 58
Search paths described in the manual........ 8
Return trip.................................................. 47
Set destination..................................... 31, 44
R
Navigation button...................................... 20
REAR......................................................... 20
Next destination in itinerary....................... 51
O
On/Off.......................................................... 9
07
Remote control and IR receiver................. 20
Search
general..................................................
post code..............................................
via coordinates.....................................
via point on map...................................
N
21
45
48
47
Road number............................................. 70
Set for surveill...................................... 39, 40
Route......................................................... 38
Settings
route..................................................... 54
Route options............................................ 54
Show destination....................................... 34
Simple user settings.................................. 28
Simulation.................................................. 59
Speakers........................................ 15, 17, 19
84
07 Alphabetical Index
Start guidance..................................... 32, 45
Store a location.......................................... 50
Stored location
Acoustic signal..................................... 47
V
Voice guidance.......................................... 23
quick menu..................................... 28, 38
Stored locations......................................... 46
Symbols
facilities................................................. 71
W
System options.......................................... 57
Waypoint.................................................... 49
System settings........................................... 9
T
Toll roads................................................... 57
Traffic information...................................... 28
quick menu........................................... 39
Transport of car......................................... 76
TV screen
care....................................................... 24
07
U
User settings
change between............................. 10, 35
85
07 Alphabetical Index
07
86
Kdakd8Vg8dgedgVi^dc51&OHMJTI
"51SJOUFEJO4XFEFO(zUFCPSH$PQZSJHIU©7PMWP$BS$PSQPSBUJPO