1
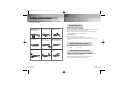
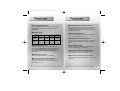
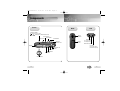
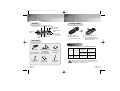
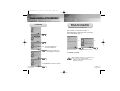
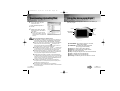
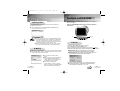
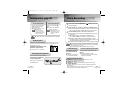
Cover-H200-America
4/11/03
1:48 PM
Page 2
http://www.samsungyepp.com
Samsung Electronics America Inc.
105 Challenger Road, Ridgefield Park, N.J. 07660
SERVICE DIVISION
400 Valley Road, Suite 201
Mount Arlington, NJ 07856
TEL: 1-800-SAMSUNG (1-800-726-7864)
AH68-01224G (Rev 1.0)
●
●
●
●
●
●
●
●
●
MP3 File Playback
Voice Recording (Max 27 hrs)
Voice Operating Record (V.O.R)
3 COLOR LCD Support
External Input Monitoring
Microphone/Recording Mode Selection
Use as a removable Disk
Voice Editing & E-mailing
Play Speed Control [± 60%]
H200-America
4/11/03
2:15 PM
Page 2
Contents
Preparations
Safety Instructions ........................................................4
Features....................................................................6
Components ............................................................8
Connections
Using with a PC ......................................................12
Manual Installation of the USB Driver ....................16
Downloading/Uploading files ..................................18
Using the Voice yepp Player ..................................19
Functions in VOICE MODE ....................................21
Functions in CAM MODE ........................................23
Usage
Turning Voice yepp On ............................................24
Voice Recording ......................................................25
Playing a File ..........................................................26
Deleting a File..........................................................28
Recording with an External Microphone..................29
Menu Setup (when a MP3 folder is selected) ..................30
2
Customizing Options (when a MP3 folder is selected) ............31
● EQ Mode ........................................................................31
● RPT Mode ......................................................................32
● Intro Scan Function ........................................................33
● LCD LIGHT ....................................................................34
● BEEP Mode ....................................................................35
Menu Setup (when a voice recording folder is selected) ............36
Customizing Options (when a recording folder is selected) ............37
● Voice Recording Mode ....................................................37
● Microphone Mode ..........................................................38
● VOR Function..................................................................39
● External Device Connection............................................40
● Monitoring Function ........................................................41
● Book Mark Function ........................................................42
Loop Repeat Setup..................................................43
Customer Support
Troubleshooting ......................................................44
Product Specifications ............................................46
Safety Information ..................................................48
Warranty ..................................................................50
3
H200-America
4/11/03
2:16 PM
Page 4
Safety Instructions
Read and understand all the instructions to avoid injury to yourself and
damage to the equipment.
Using Earphones
Do not expose to extreme
temperatures (above 95°F
or below 23°F). Do not
expose to moisture.
Do not apply excessive
pressure to the device.
Do not let any foreign
matter spill into the
device.
Follow Traffic Safety Instructions
● Do not use the earphones while driving an automobile or riding a bicycle.
It’s not only dangerous, but also against the law.
● To avoid injury, do not listen at high volumes when walking down the
street, especially when crossing intersections.
Protect your ears
● Do not turn up the volume too high.
Doctors warn against prolonged exposure to high volume.
Do not place heavy objects
on top of the device.
Do not expose to
chemicals such as
benzene and thinners.
Remove batteries when
the device is left unused
for a long period of time.
● Stop using the device or turn the volume down if you have ringing in your
ears.
Ambient operating conditions
● Ambient temperature: 5°C ~ 35°C (41°F ~ 95°F)
Humidity
: 10 ~ 75%
Do not expose to direct
sunlight or heat sources.
Do not store in dusty
areas.
Do not try to disassemble
and repair the device
yourself.
Environmental Information
● Follow local guidelines for waste disposal when discarding packages,
batteries, and old electronic appliances.
● The packaging materials consist of PS and PVC. No other
unnecessary material is used for the packaging.
4
5
H200-America
4/11/03
2:16 PM
Page 6
What is a Digital Recorder?
■ Output Monitoring of External Devices
It is a compact sized device that can record and save
large amounts of music on a memory chip without
using a tape.
When you connect your Voice yepp to an external device,
you can monitor the output of the device and select a
specific track for recording at an accurate level by setting
up the Monitor function.
■ Long Recording
■ Auto Power-Off Function
Model
LP
(Long Play)
SP
HQ
SHQ (Super(Standard Play) (High Quality) High Quality)
The power is automatically turned off when the product is
not in use for longer than one minute.
VY-H200 T
(32MB)
13 hours and
35 minutes
11 hours and
15 minutes
2 hours and
10 minutes
1 hour and
25 minutes
■ Management of Recording Folders
VY-H200 S
(64MB)
27 hours and
10 minutes
22 hours and 4 hours and
30 minutes 25 minutes
2 hours and
55 minutes
You can record in five separate folders (A, B, C, D and E).
MP3 files can only be played when saved in the MP3
folder.
Mode
■ File Download Into a PC
■ INTRO SCAN Function
You can download not only voice and MP3 files to your
Voice yepp, but all files saved in your PC as well. You can
use it as a removable disk drive, as all files saved in your
Voice yepp (other than MP3 files) can be uploaded to
another PC.
You can quickly search through many recordings by
scanning each recording for 10 seconds.
■ Voice Editing and E-mailing Functions
When connected to a PC you can edit recordings and
send using the Voice yepp player program.
■ Repeated Play Function
You can select specific tracks for repeated play.
■ VOR (Voice Operating Record) Function
■ Microphone/Recording Mode Selection
You can set the product to activate when a sound or voice
is detected.
You can select the input level of the microphone,
depending on the distance to the sound source and the
surrounding noise levels.
6
7
H200-America
4/11/03
2:16 PM
Page 8
Components
Front
Rear
Left
Play/Pause Button
: Power-On, Play, Pause
: Speed Search, Rewind/Fast Forward
Built-In
Speaker
Record Switch
Speed Button
Hold Switch
Delete Button
USB Cable
Connection Port
Record
Hold
Speed
Repeat
Delete
Menu
Folder
OFF
Display
Stop/Power-Off
Button
Folder Button
Battery
Cover
Output Port
(to connect with
the earphones)
Built-In Microphone
Input Port
(to connect with an
external microphone)
Repeat Button
Menu Button
Volume
Volume Button
8
9
H200-America
4/11/03
2:16 PM
Page 10
Display
Inserting a Battery
VOR Recording indicator
Book Mark indicator
Recording Folder indicator
Remaining Battery
Power indicator
Recording Number
indicator
Repeated Play
indicator
Recording Time or
Play Time indicator
(hour, minute, second)
Loop Repeat Recording indicator
indicator
open the
1 Push
battery cover in the
up the battery cover,
2 Lift
insert the battery with its
direction of the arrow.
poles in the correct position
and close the cover.
Accessories
Battery Life
The battery life is based on the AA/LR6 alkaline battery
USB Cable
H200 S: AH39-00471A
H200 T: AH39-00471B
Earphones / External
Microphone
H200 S: AH30-00053A
H200 T: AH30-00053B
Installation CD
Mode
AH80-00047B
Life
AA/LR6 Battery x 1
4301-000101
10
User Manual
Hand Strap
AH68-01224G
AH61-01283A
Recording
(SP mode)
7 hours and
30 minutes
Voice Recording
Mode
MP3 Mode
Earphone Play
Earphone Play
(based on VOL 10) (based on VOL 10)
10hrs
10hrs
● Recordings will not be deleted when changing batteries.
● Battery life may significantly vary depending on the type
and duration of play and volume.
11
H200-America
4/11/03
2:16 PM
Page 12
Using with a PC
You can copy recordings from your Voice yepp to a PC or vice
versa by using the Voice yepp program and installing a USB driver.
You can also record, play and edit recordings on these devices and
transmit voice files attached to e-mails.
Software Installation
When the installation CD is inserted in the CD-ROM drive, the
CD will run automatically and the following display will appear.
Connecting Voice yepp to a PC
Connect Voice yepp to a PC as shown in the picture using the USB cable.
USB Connection Port
When the CD does not run automatically:
● Open ‘My Computer’ in the desktop
window, open the CD-ROM drive,
and double click on Setup.exe.
USB Cable
Sound Card Input Port
Connect it when recording
using the Voice yepp
program on your PC.
Voice yepp
USB Connection
Port
External
Microphone
System Requirements
● Computer: IBM compatible with Pentium or greater that
supports the USB port
● Memory: 64MB or greater
● O/S: Windows 98 / 98 SE / 2000 / Me / XP
● Remaining Hard Memory; 100MB or greater
● Sound Card
● Microphone (for recording), speaker (for playback)
12
● Connect it using the correct ends of the USB cable.
● The installation of Voice yepp will be finished.
➤ To delete the Voice yepp program:
● The ‘Delete’ window will automatically appear when the
program CD is inserted in the CD-ROM drive.
13
H200-America
4/11/03
2:16 PM
Page 14
To C h e c k t h e U S B D r i v e r
Connecting to a PC Using the USB Cable
● Windows 98/ME:
1 Connect the USB cable to the USB port on your PC.
the opposite end of the USB cable to the USB
2 Connect
cable port at the top of your Voice yepp.
● The Power of yepp will automatically turn on.
Controller ➔ System ➔ Device Manager ➔ Universal Serial Bus
Controller ➔ SAMSUNG VY-H200, YEPP USB Mass Storage Device
● Windows 2000 (Professional version):
Controller ➔ System ➔ Hardware ➔ Device Manager ➔ Universal
Serial Bus Controller ➔ USB Mass Storage Device
● Windows XP (Professional version):
message ‘Searching for new device’ indicates the USB
3 The
driver will be installed. The window showing the installation
Controller ➔ System ➔ Hardware ➔ Device Manager ➔ Universal
Serial Bus Controller ➔ USB Mass Storage Device
status may not appear. Check the ‘Device Manager’ to see if
the installation has been completed correctly.
USB Cable
(Windows XP version)
Record
Hold
Speed
4
Repeat
Delete
Menu
Folder
OFF
Upon installation of the USB driver ‘USB Mass
Storage Device’ will appear in the ‘Device Manager’.
refer to ‘Manual Installation of the USB Driver’ if
5 Please
the USB driver has not been installed as above.
● For WinXP, the following window will appear whenever
you connect the USB cable to your Voice yepp.
● Connect it using the correct ends of the USB cable.
● Click [Cancel] to use the
Voice yepp.
14
15
H200-America
4/11/03
2:16 PM
Page 16
Manual Installation of the USB driver
Turn the power on , connect it to a PC and install as instructed below:
When an error occurs during
installation of the USB driver:
For Win 98
Reinstall the driver in the following ways:
Start ➔ Setup ➔ Controller ➔ System ➔
Device Manager ➔ Select the Driver (or Device)
in error and double click. ➔
➔
➔
Insert the installation CD
into the CD-ROM drive
Location of the USB driver
[CD ROM]D:Driver for win98
(Windows 98 version)
(Windows 98 version)
Click [Next] ➔ [Finish].
● The installation method may vary depending on
the type of PC or operating system.
Contact your PC dealer or service center for
installation information.
➤ Click [Finish] and restart the system.
16
17
H200-America
4/11/03
2:16 PM
Page 18
Downloading/Uploading files
1
Turn on the Voice yepp and
connect it to a PC
2
Open Windows Explorer on
the PC.
3
Select a file to save, then drag
and drop the file in the folder of
your choice.
Double click the Voice yepp player 2003 icon on the desktop to
open the program.
Minimize
Close
Help
Volume
VOICE MODE
● To save in Voice yepp, drag and
drop the file in folder A, B, C, D, E
or MP3 inside the ‘removable disk
directory’.
Open
Save
E-mailing
CAM MODE
Notes for Downloading or Uploading Files
● “USB WRITING” is displayed on the main body during uploading or
downloading. When complete, “USB STAND-BY” will be displayed.
Disconnect the USB cable when “USB STAND-BY” is displayed.
● When your Voice yepp is connected to a PC that runs with Windows
2000 or later, the icon to delete a drive (
) will appear in the
lower part of the task bar. For Windows 2000 or later versions, run
this program before you disconnect the USB cable.
● Name files using the format: ‘Voice01’, ‘Voice02’, • • • ‘Voice99’ when
you download a voice file into folders A, B, C, D or E in Voice yepp,
as Voice yepp can only recognize files using this name format.
● Download only files with the .VY extension in folders A, B, C, D or
E in Voice yepp, and files with the .mp3 extension in the MP3 folder.
Voice yepp cannot recognize files with other extensions.
● Sort files before downloading, if possible, as the downloaded files
are automatically re-sorted and saved when you disconnect the USB
cable from your Voice yepp after downloading .VY files. (e.g. files
named ‘Voice02’, ‘Voice03’, ‘Voice10’ will be automatically saved as
‘Voice01’, ‘Voice02’, and ‘Voice03’ respectively.)
● It is illegal to upload MP3 files. Voice yepp has a built-in MP3
encryption function. You will experience poor sound quality from a
MP3 file that is uploaded to your PC.
● The maximum number of MP3 files to be recognized for
downloading is 250. Any more than this number can be downloaded
but cannot be played.
*
*
18
Using the Voice yepp player
(Voice yepp player Main Window)
● VOICE MODE: for recording, playing of voice files,
editing and e-mailing
● CAM MODE: for viewing and editing image files
(.bmp or .jpg extension files)
● Volume: for volume control during file play
● Minimize: for downsizing the program window
● Close: for ending the program
● Help: to display the player version and web site address
● Open: to display the list of selected files
● Save: for saving the list of selected files
● E-mailing: for attaching saved voice files to an e-mail
19
H200-America
4/11/03
2:16 PM
Page 20
Functions in VOICE MODE
Opening a File
Press the Open button in the main window and the File Open dialog box
will appear as shown below.
Double click the Voice yepp player 2003 icon on the desktop to
open the program.
Click the VOICE MODE button and a picture will appear as
shown below.
● You are automatically moved to VOICE MODE or CAM MODE when
you click to open a voice or cam file.
Play
● You can use this product as an additional storage device
in Windows Explorer as it is recognized as a removable
disk. You can therefore save any file as well as voice or
music files in this product, just as you would save them in
a removable disk, and use the files on a PC.
● When you formatted Voice yepp in your PC, please re-format
Voice yepp in itself. (Please refer to page 45 for formatting)
E-Mailing
● Select a voice file to attach to the e-mail by pressing the Open button.
● After selecting a file, press the E-mailing button in the main window.
A window will appear as shown below.
● To send the mail, click the Send
button.
● When emails are not successfully sent,
check if the default email setup on
Internet Explorer is the Internet email
program that you have usually.
● To check the mailing setup:
Internet Explorer ➔ Tools ➔ Internet
Options ➔ Program ➔ E-Mail(Microsoft
Outlook, Outlook Express, Hotmail)
20
Record
Pause Stop Delete
To Delete
1. Press the Open button to select a voice file.
2. The selected file will automatically play.
3. After the desired track has been played, press the Pause ( ) button.
4. Click the Delete button and a picture will appear as shown below.
● Delete Back All: All recorded tracks prior to the point
where you pressed the pause button will be deleted.
● Delete Next All: All recorded tracks after the point where
you pressed the pause button will be deleted.
5. To save, press the Save button in the Save As dialog box.
● All tracks selected for deletion will be deleted and the
remainder will be saved as a .VY file.
*
21
H200-America
4/11/03
2:16 PM
Page 22
Functions in CAM MODE
Double click the Voice yepp player 2003 icon on the desktop to
open the program.
Recording
Click the Record button and the record mode window will appear
as shown below.
Start Recording
Click the CAM MODE button and a picture will appear as
shown below.
Long Play
Standard Play
High Quality Sound
Super High Quality Sound
Stop Recording
Send a Voice Mail
Edit (Text)
Print
Cancel
The top 4 buttons are used for different recording modes.
After recording you can play or send voice mails.
▲
) button.
1. Select the recording mode and click the Start Recording (
● Recording will commence.
2. To stop recording, click the Stop Recording ( ■ ) button.
● To save after recording, click the Save button in the main
window. Select a folder, type in the file name, and press the
Save button to complete. .VY1, .VY2, .VY3 etc. are the names
of voice recording files.
● To send mail, click the SEND VOICE MAIL button.
● To check the mailing setup:
Internet Explorer ➔ Tools ➔ Internet Options ➔ Program ➔ E-Mail
● Connect a microphone to the PC before recording.
● When there is no sound while playing after having recorded
with the Voice yepp player, check the “Recording Control”
setup and correct if necessary.
● Please refer to Windows Help for more information about
“Recording Control”.
22
Edit (Cut)
Preview
Fit in Window
● Select an image file using the Open button.
You can select bmp and jpg extended image files.
● To Write: Click the Text button, click at the place to write,
and the Text Edit dialog box will appear. Type in letters, select
font, size and color, and press the OK button to save the writing
on the image.
● To Cut : Click the Cut button, select the passage to save,
and press the Cut button again. The selected passage will
remain but the rest will be deleted.
● To Cancel : To cancel during editing, press the Cancel Edit
button.
● Fit in Window : Double click the image in the main window, or
click the Fit in Window button to view the image in actual size.
● To Print an Image File: When the image file of your choice
appears in the main window, click the Print button in the menu
window to print. To view the image to be printed, click the
Preview button to preview, and confirm to print.
23
H200-America
4/11/03
2:16 PM
Page 24
Turning Voice yepp On
Voice Recording
You can record voices by using the built-in microphone or an external microphone.
To Turn the Power On
Press and hold the Play/Pause
(
) button with the Hold
function deselected.
● The power will be turned on.
● Recording can
To Turn the Power Off
Press and hold the OFF ( ■ )
Button.
● The power will be turned off.
commence while the
power is off by pushing
the Record switch in the
direction of the arrow.
● The power will be
automatically turned off
when the Voice yepp is
left idle for longer than
1 minute.
● Turning the power on will not illuminate the LCD light.
Hold Function
Slide the Hold switch in the
direction of the arrow.
● The product is in Lock Mode.
Listening with Earphones
You can listen by using earphones.
Connect the earphones
to the output port.
Adjust the sound volume with
the Volume button.
24
Hold
This function will disable all buttons while maintaining the current
operation. However, the recording function will operate when the
Hold function is in use.
and hold the Play/Pause (
) button to turn on
1 Press
the Voice yepp.
a folder for recording by pressing the Folder button.
2 Select
● The folders will appear in the order of A B C D E MP3, each
➔ ➔ ➔ ➔ ➔
time you press the button. Select a folder among A, B, C, D and E.
the Record switch in the direction of the arrow.
3 Slide
● The recording number and time will appear and recording will
commence.
● The recording numbers are assigned in sequential order
(i.e. SHQ#O1, SHQ#02). Each folder can save up to 99 files.
● Recording within the MP3 folder will automatically move the
recording to Folder A. If there are 99 files already in Folder A, the
recording will automatically move to Folder B.
● Point the microphone toward the source of sound when recording.
● All functions other than Hold will be disabled during recording.
● By connecting the earphones during recording, you can listen
to the recording as it occurs.
● The Volume button will be disabled during recording.
To Stop Recording
Slide the Record switch in
the opposite direction for
recording.
● Recording will stop and
be saved automatically.
To view the remaining recording time
Press and hold the Folder button when
stopped.
● The time available for further
recording within the current recording
mode will be displayed.
Displayed During Recording
● INDEX FULL: 99 files are saved in all folders from A to E.
● MEMORY NO SPACE: memory is full.
● WRITING: the voice file is currently being saved in the memory.
● CODE#1 WARNING :
- Fractions of files remain in Voice yepp due to frequent file upload
and download.
- Back-up all files saved in your Voice yepp, and then delete
all the files using the ALL-DIR delete function.
25
H200-America
4/11/03
2:16 PM
Page 26
Playing a File
and hold the Play/Pause (
1 Press
the Voice yepp.
) button to turn on
a folder for playing by pressing the Folder button.
2 Select
● The folders will appear in the order of A B C D E MP3,
➔ ➔ ➔ ➔ ➔
each time you press the button. Select the folder of your choice.
switch.
3 Select a file to play using the
the Play/Pause (
) button.
4 Press
● Play will commence and the playing time will be displayed.
5 ● The playing will stop.
To stop playing, press the Stop ( ■ ) button.
Adjusting the Speed of Play
This can only be enabled when a voice file is selected.
a voice file for speed control, and press the
1 Select
Speed button.
the speed of play using the
switch.
2 Select
● The speed of play can be adjusted by 5% increments from
the basic speed (00%) up to -60% ~ +60%.
● The higher the number, the faster the speed of play, and
the lower the number, the slower the speed of play.
To Pause the Playing
Press the Play/Pause (
) button.
● The playing will be paused.
● When the power is turned off in the Pause mode, switch the
) button to play from the
power on and press the Play/Pause (
point where the unit had been turned off.
● The speed of play will automatically be set to
normal when the power is turned off or the
battery is replaced.
To Play a Specific Track
● Press and hold the
switch during play to move to the next
or previous track. Release the switch to return to normal play.
● The longer you press the
button the faster the search
speed.
26
27
H200-America
4/11/03
2:16 PM
Page 28
Deleting a File
To Delete a Music or Voice File:
and hold the Play/Pause (
) button to turn
1 Press
on the Voice yepp.
the folder containing the files to be deleted by
2 Select
pressing the Folder button.
3 Press the Delete button once.
Total Number of Files
The Current File Number
the file to be deleted by pressing the
4 Select
switch.
and hold the Delete button.
5 Press
● The selected file will be deleted and the files remaining in
the folder will be automatically rearranged.
● Files previously book-marked will not be deleted.
● Files can also be deleted in Windows Explorer on PC.
To Delete All Files Within a Folder
To Delete All Files Saved in Voice yepp
Press the Delete button
1 three
times.
and hold the Delete
2 Press
button once more.
● All files will be deleted.
● You will be returned to Stop Mode
if you briefly press the Delete button
once more.
● If "CODE#1 WARNING" is displayed on
the Voice yepp, delete all files using this
function.
Recording with an External Microphone
You can record voices while in motion by using an external
microphone.
Connect the microphone as shown in the following picture.
Follow the steps provided under ‘Voice Recording’ for
recording.
the Delete button twice.
1 Press
● Select the folder to be deleted using the
● By pressing the
switch.
switch, the total number of files will be displayed.
and hold the Delete button.
2 Press
● All files in the selected folder will be
External Microphone
deleted.
28
29
H200-America
4/11/03
2:16 PM
Page 30
Menu Setup (when a MP3 folder is selected)
and hold the Play/Pause (
) button to turn
1 Press
on the Voice yepp.
2 Select a MP3 folder by pressing the Folder button.
the Menu button, and use the Play/Pause (
)
3 Press
button to move to the desired function.
● You can select any function while in Stop Mode.
Customizing Options (when a MP3 folder is selected)
EQ Mode
the Menu button, and select the EQ MODE by
1 Press
) button.
using the Play/Pause (
to the desired mode by using the
2 Move
button.
● You will toggle between NORMAL, CLASS, LIVE, POP
and ROCK mode, each time you press the button.
● Only EQ MODE, RPT MODE and INTRO SCAN
functions are enabled while in Play Mode.
Press the Menu button once more to select a function
4 and
then you will be returned to the previous screen.
3 Press the Menu button to save the setup.
● After selecting a menu, press Play/Pause (
) to move
to the next menu. By doing so, you can set other menus.
●
●
●
●
●
EQ MODE: to activate the equalizer function
RPT MODE: to play all files within a folder once or repeatedly
INTROSCAN: to quickly search for a saved file
LCD LIGHT: to select a color for the LCD display
BEEP MODE: to select a beeping sound for pressed buttons
30
● In Stop Mode, the Menu Mode will close
if no buttons are pressed within 15 seconds.
● In the Play mode, the Menu Mode will close
if no buttons are pressed within 5 seconds.
31
H200-America
4/11/03
2:16 PM
Page 32
Intro Scan Function
RPT Mode
You can play all music files saved in the MP3 folder once or
repeatedly.
You can easily search voice or music files by scanning each file
for 10 seconds.
the Menu button, and select RPT MODE by
1 Press
) button.
using the Play/Pause (
the Menu button, and select INTROSCAN by
1 Press
) button.
using the Play/Pause (
2 Select ONCE or ALL by using the
2 Select OFF or ON by using the
button.
● RPT ONCE: Plays all music files saved in the
MP3 folder once.
● RPT ALL: Plays all music files saved in the
MP3 folder repeatedly.
3 Press the Menu button to save the setup.
32
button.
● INTROSCAN OFF:
All saved music files will play normally.
● INTROSCAN ON:
Each music file will play for 10 seconds.
3 Press the Menu button to save the setup.
33
H200-America
4/11/03
2:16 PM
Page 34
LCD LIGHT
BEEP Mode
You can enjoy the LCD in three different colors.
You can set the buttons to beep when they are pressed.
the Menu button, and select LCD LIGHT by
1 Press
) button.
using the Play/Pause (
the Menu button, and select BEEP MODE by
1 Press
) button.
using the Play/Pause (
2 Select a color by using the
2 Select OFF or ON by using the
●
●
●
●
button.
button.
● BEEP OFF: disables the beeping
● BEEP ON: enables the beeping, each time a
button is pressed
GREEN: green LCD
ORANGE: orange LCD
BLUE: blue LCD
OFF: The LCD light will not illuminate
3 Press the Menu button to save the setup.
3 Press the Menu button to save the setup.
● The LCD light will not illuminate during voice
recording.
34
35
H200-America
4/11/03
2:16 PM
Page 36
Menu Setup (when a voice recording folder is selected)
and hold the Play/Pause (
) button to turn
1 Press
on the Voice yepp.
a folder for recording from folder A, B, C, D or E
2 Select
by pressing the Folder button.
the Menu button, and use the Play/Pause (
)
3 Press
button to move to the desired function.
● You can select any function while in Stop Mode.
● Only RPT MODE and INTRO SCAN functions are
enabled while in Play Mode.
Press the Menu button once more to select a function
4 and
then you will be returned to the previous screen.
● After selecting a menu, press the Play/Pause (
) to
move to the next menu. By doing so, you can set other
menus.
Customizing Options
(when a voice recording folder is selected)
Voice Recording Mode
the Menu button, and select REC MODE by
1 Press
) button.
using the Play/Pause (
2 Select a Recording mode by using the
●
●
●
●
button.
SHQ mode: records in Super High Quality mode
HQ mode: records in High Quality mode
SP mode: records in Standard Play mode
LP mode: records in Long Play mode
3 Press the Menu button to save the setup.
● Please refer to ‘Customizing Options (when a MP3
folder is selected)’ for information on INTRO SCAN,
LCD LIGHT, BEEP MODE and RPT MODE functions.
● In Stop mode, the Menu Mode will close if no buttons
are pressed within 15 seconds.
● In Play mode, the Menu Mode will close if no buttons
are pressed within 5 seconds.
36
37
H200-America
4/11/03
2:16 PM
Page 38
Microphone Mode
VOR Function
What is VOR (Voice Operating Record)?
It is a voice activated recording function where recording is
activated when there is a sound, and pauses when there is no
sound.
You can adjust the input volume of the microphone
depending on the distance to the sound source and
surrounding noise levels.
Press the Menu button, and select MIC MODE by
1 using
) button.
the Play/Pause (
Press the Menu button, and select VOR MODE by
1 using
) button.
the Play/Pause (
2 Select HIGH or LOW by using the
2 Select OFF or ON by using the
button.
● HIGH: Select when there is a long distance to the
sound source or there is no surrounding
noise.
● LOW: Select when there is a short distance to the
sound source or there is a lot of
surrounding noise.
3 Press the Menu button to save the setup.
38
button.
● VOR OFF: to continue recording when there is no
sound during recording.
● VOR ON: to pause recording automatically when
there is no sound during recording.
3 Press the Menu button to save the setup.
39
H200-America
4/11/03
2:16 PM
Page 40
Monitoring Function
External Device Connection
the Menu button, and select EXT.LINE by
1 Press
) button.
using the Play/Pause (
2 Select an external device by using the
● You can select a specific track to record with an external
device as this function enables you to determine the
starting point for recording.
● You can monitor the recording only with earphones when
the Monitoring function is selected.
button.
Press the Menu button, and select MONITOR by
1 using
) button.
the Play/Pause (
2 Select OFF or ON by using the
button.
● EXTMIC: to record with an external microphone
● LINE: to record with an external audio device
● To record with an external device, first connect the
Line Out port of the external device (such as a
PC, Audio or Stereo device) to the Line In port of
Voice yepp.
3 Press the Menu button to save the setup.
● Normal recording will be disabled when recording
with an external audio device in the external
Microphone mode (EXTMIC mode).
40
● Pressing any button (except Volume and Hold) will
disable the Monitoring function.
41
H200-America
4/11/03
2:16 PM
Page 42
Loop Repeat Setup
Loop Repeat
Book Mark Function
The Beginning of the Loop:
You can mark a voice file that contains an important message.
to the voice file to be marked within folder
1 Move
A, B, C, D or E.
2 Select BOOK MARK by pressing the Menu button.
button.
3 Select OFF or ON by using the
Press the Repeat button at the
beginning of the loop you want to set
while the music or voice file is playing.
"
" will appear on the display.
The End of the Loop:
Press the Repeat button once more at
the end of the loop you want to set.
"
" will appear on the display.
The selected loop will be played repeatedly.
● To disable the Loop Repeat function, press the
Repeat button once more.
● When BOOK MARK ON is selected:
" " will be displayed on the selected voice file.
● To disable the function, select BOOK MARK OFF.
To Play a File Repeatedly
the Repeat button when the product is in
1 Press
Stop Mode.
4 Press the Menu button to save the setup.
● ‘ALL-DIR delete’ will delete files even if they have been
‘Bookmarked’.
● Select the file to be repeated and the file will play
repeatedly while displaying “RPT1”.
and hold the Repeat button while playing.
2 Press
● The file currently playing will play repeatedly while
displaying “RPT1”.
3
42
To disable the Repeat function, press the Repeat
button while in Stop mode, or press and hold the
Repeat button while in the Play mode.
43
H200-America
4/11/03
2:16 PM
Page 44
Troubleshooting
No display
on the LCD.
Check
point 1 Is the battery dead?
➤ Replace the battery.
Check Are the battery
point 2 poles positioned
➤ Insert the battery with
its poles in the correct
position.
correctly?
Recording is
disabled.
Check Are the recording
point 1
numbers all used up or is
recording memory full?
Check Is the battery dead?
point 2
Playing is
disabled.
➤ Delete
unnecessary files.
➤ Release the Hold
switch.
Check Is there anything
point 2 to record?
➤ Check the recording
number.
Check
point 3 Is the battery dead? ➤ Replace the battery.
Is a MP3 file saved
Check in a voice folder or a
point 4
None of the
buttons work.
Cannot
connect the
unit to a PC.
Check Is the backlight
point 1 illuminated on the LCD?
➤ Plug-in the
earphones
correctly.
➤ Remove and reinsert the battery.
All saved files will be deleted
and the product will be initialized
when the Play/Pause button is
pressed and held while holding the
Folder button with the Voice yepp
power off. Do not repeat this action
in vain as it may cause a break down.
Check Have you connected
point 1
the USB cable in the
correct way?
➤ Disconnect the
USB cable and
re-connect. If the
problem persists,
re-boot the PC.
Formatting (You will lose all data in the Voice yepp.)
● Re-Format the Voice yepp if the defect was caused by an
external impact.
Check Is the volume set to ‘0’? ➤Adjust the volume.
point 1
Check Are the earphones
point 2 plugged-in to the
Check Are the earphones
point 2 correctly plugged-in
➤ Save the file in the
correct folder.
voice file saved in a
MP3 folder?
No sound is
heard from
the speaker.
Check Is the volume set to ‘0’? ➤ Adjust the volume.
point 1
to the product?
➤ Replace the
battery.
Check Is the product in
point 1
Hold mode?
No sound is
heard from the
earphones.
➤ Unplug the
earphones.
➔ Turn the power off of Voice yepp. Press and hold the
Play/Pause button while holding the Folder button.
Your Voice yepp is now initialized.
product?
44
45
H200-America
4/11/03
2:16 PM
Page 46
Product Specifications
Model Name
Product Dimensions
VY-H200 T/VY-H200 S
1.42(W) ✕ 4.45(H) ✕ 0.73(D)inches
Weight
2.6 oz. (inc. battery)
Power
AA/LR6 1.5V ✕ 1EA
Recording Media
FLASH MEMORY (32MB/64MB)
Maximum Number of
Recordings in Memory
495 Recordings
Maximum Operation
Output
4mW (EARPHONE)
Frequency Range
Input
Output
Conditions for
Operation
46
Memo
400Hz ~ 3.5KHz
Built-in Non-directional Electric Condenser
Microphone (mono)
Plug-in Power Microphone
(mini plug/mono) less than 3KΩ IMP
Earphones (mini plug/stereo)
more than 16Ω IMP
23mm Dia, 8Ω Speaker
Temperature Range 41°F ~ 95°F
47
H200-America
4/11/03
2:16 PM
Page 48
Safety Information
FCC Part 15: This equipment has been tested and found to comply
with the limits for a Class B digital device, pursuant to Part 15 of the
FCC Rules. These limits are designed to provide reasonable protection
against harmful interference in a residential installation.
This equipment generates, uses, and can radiate radio frequency
energy and, if not installed and used in accordance with the
instructions, may cause harmful interference to radio communications.
However, this notice is not a guarantee that interference will not occur
in a particular installaion. If this equipment does cause harmful
interference to radio or television reception, which can be detemined
by turning the equipment off and on, the user is encouraged to try one
or more of the following measures:
● Reorient or relocate the receiving antenna.
● Increase the distance between the equipment and receiver.
● Connect the equipment to an outlet on a circuit different from
that to which the receiver is connected.
● Consult the dealer or an experienced radio/TV technician.
Modifications
Any changes or modifications not expressly approved by
the grantee of this device could void the user’s authority
to operate the device.
Declaration of Conformity
Name: Samsung Electronics Co., Ltd
Address: 416, Maetan-3Dong, Paldal-Gu, Suwon City, Kyungki-Do,
Korea 442-742
declares under its sole responsibility that the product
Trade Name: Samsung Electronics Co., Ltd
Model Number: VY-H200
has been tested according to the FCC/CISPR22/95 requirements for
Class B devices and found compliant with the following standards
EMI/EMC: AnSI C63.4 1992, FCC Part 15 Subpart B
This device complies with part 15 of the FCC Rules.
Operation is subject to the following two conditions:
1. This device may not cause harmful interference, and
2. This device must accept any interference received, including
interference that may cause undesirable operation.
Party Responsible for Product Compliance
Samsung Electronics America
QA Lab.
3351 Michelson Dr. Suite #290
Irvine, CA92612
Compliance
This product conforms to the following Council
Directive:
● Directive 89/336/EEC, 92/31/EEC(EMC)
48
49
H200-America
4/11/03
2:16 PM
Page 50
Warranty
Samsung warrants this product as free of defects in material, design
and workmanship for the period of twelve(12) months from the
original date of purchase.
If during the period of warranty this product proves defective under normal
use and service, you should return the product to the retailer from whom it
was originally purchased. The liability of Samsung and its appointed
maintenance company is limited to the cost of repair and/or replacement
of the unit under warranty.
Return of the product for defective reasons should be to the original
purchaser, however Samsung Authorized Dealers and Authorized Service
Centers will comply with the warranty on the terms issued to purchasers in
the country concerned, for further information relating to the Authorized
Service Centers contact.
1-800-SAMSUNG (1-800-726-7864)
www.samsungyepp.com
WARRANTY CONDITIONS:
1. The warranty is only valid when the warranty card is properly completed,
and upon presentation of the proof of purchase consisting of original
invoice or sales slip confirmation, indicating the date of purchase, dealers
name, model, serial No. and product number. Samsung reserves the right
to refuse warranty service if this information has been removed or changed
after the original purchase of the product from the dealer.
2. Samsung's obligations are to the repair of the defective part, and at its
discretion, replacement of the product (service exchange unit).
5. The warranty is not applicable in cases other than defects in material,
design and workmanship. The warranty does not cover the following:
◆ Periodic checks, maintenance, repair and replacement of parts due to
normal wear and tear.
◆ Abuse or misuse, including but not solely limited to the failure to use this
product for its normal purposed or in accordance with Samsung's
instructions usage and maintenance.
◆ The product has been used in conjunction with accessories not approved
by Samsung for use with this product.
◆ Failure of the product arising from incorrect installation or use not
consistent with technical or safety standards in current force, or failure to
comply with product manual instructions.
◆ Accidents, Acts of God or any cause beyond the control of Samsung
caused by lightning, water, fire, public disturbances and improper
ventilation.
◆ Unauthorized modifications carried out for the product to comply with local or
national technical standards in countries for which the Samsung product was not
originally designed.
◆ Repairs performed by non-authorized service centers such as opening of the
product by a non-authorized person.
◆ The model, serial No. and product number on the product has been altered,
deleted, removed or made illegible.
6. This warranty does not affect the consumers statutory rights nor the consumers
rights against the dealer from their purchase/sales agreement.
3.Warranty repairs must be carried out by an Authorized Samsung
Dealer/Service Center. No reimbursement will be made for repairs carried
out by non Samsung Centers, and warranty coverage will not be valid for
any repairs or damage caused by such repairs.
4. Repair or replacement under the terms of this warranty does not give right
to extension to or a new starting of the period of warranty. Repair or direct
replacement under the terms of this warranty may be fulfilled with
functionally equivalent service exchange units.
50
51
H200-America
4/11/03
2:16 PM
Page 52
THERE ARE NO EXPRESS WARRANTIES OTHER THAN THOSE
LISTED AND DESCRIBED ABOVE, AND NO WARRANTIES WHETHER
EXPRESS OR IMPLIED,INCLUDING, BUT NOT LIMITED TO, ANY
IMPLIED WARRANTIES OF MERCHANTABILITY OR FITNESS FOR A
PARTICULAR PURPOSE, SHALL APPLY AFTER THE EXPRESS
WARRANTY PERIODS STATED ABOVE, AND NO OTHER EXPRESS
WARRANTY OR GUARANTY GIVEN BY ANY PERSON, FIRM OR
CORPORATION WITH RESPECT TO THIS PRODUCT SHALL BE
BINDING ON SAMSUNG, SAMSUNG SHALL NOT BE LIABLE FOR
LOSS OF REVENUE OR PROFITS,FAILURE TO REALIZE SAVINGS OR
OTHER BENEFITS, OR ANY OTHER SPECIAL, INCIDENTAL OR
CONSEQUENTIAL DAMAGES CAUSED BY THE USE, MISUSE OR
INABILITY TO USE THIS PRODUCT, REGARDLESS OF THE LEGAL
THEORY ON WHICH THE CLAIM IS BASED, AND EVEN IF SAMSUNG
HAS BEEN ADVISED OF THE POSSIBILITY OF SUCH DAMAGES. NOR
SHALL RECOVERY OF ANY KIND AGAINST SAMSUNG BE GREATER
IN AMOUNT THAN THE PURCHASE PRICE OF THE PRODUCT SOLD
BY SAMSUNG AND CAUSING THE ALLEGED DAMAGE. WITHOUT
LIMITING THE FOREGOING, PURCHASER ASSUMES ALL RISK AND
LIABILITY FOR LOSS, DAMAGE OR INJURY TO PURCHASER AND
PURCHASER’S PROPERTY AND TO OTHERS AND THEIR PROPERTY
ARISING OUT OF THE USE, MISUSE OR INABILITY TO USE THIS PRODUCT
SOLD BY SAMSUNG NOT CAUSED DIRECTLY BY THE NEGLIGENCE OF
SAMSUNG. THIS LIMITED WARRANTY SHALL NOT EXTEND TO ANYONE
OTHER THAN THE ORIGINAL PURCHASER OF THIS PRODUCT, IS
NONTRANSFERABLE AND STATES YOUR EXCLUSIVE REMEDY.
To obtain warranty service, please contact SAMSUNG at:
Samsung Electronics America, Inc.
400 Valley Road, Suite 201 Mount Arlington, NJ 07856
Tel: (973) 601-6000, Fax: (973) 601-6001
1-800-SAMSUNG (1-800-726-7864)
www.samsungyepp.com
081299
Some states do not allow limitations on how long an implied warranty
lasts, or the exclusion or limitation of incidental or consequential
damages, so the above limitations or exclusions may not apply to you.
This warranty gives you specific legal rights, and you may also have other
rights which vary from state to state.
This product is for personal use only, and is only for use in compliance
with the limitations of copyright and other laws.
52
53