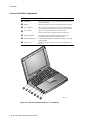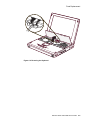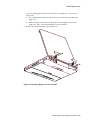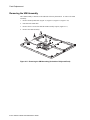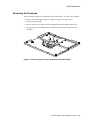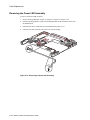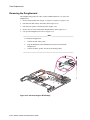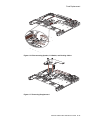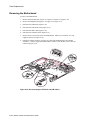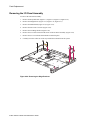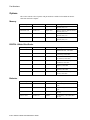
1
DIGITAL HiNote Ultra 2000
Service Guide
Part Number:
ER-PF1WW-SM. A01
Digital Equipment Corporation
Maynard, Massachusetts
May 1997
The information in this document is subject to change without notice and should not be construed as a commitment
by Digital Equipment Corporation.
Digital Equipment Corporation assumes no responsibility for any errors that might appear in this document.
The software described in this document is furnished under a license and may be used or copied only in accordance
with the terms of such license. No responsibility is assumed for the use or reliability of software or equipment that is
not supplied by Digital Equipment Corporation or its affiliated companies.
Restricted Rights: Use, duplication, or disclosure by the U.S. Government is subject to restrictions as set forth in
subparagraph (c) (1) (ii) of the Rights in Technical Data and Computer Software clause at DFARS 252.227-7013.
© Digital Equipment Corporation 1997. All Rights Reserved.
DEC, HiNote, ThinWire, and the DIGITAL logo are trademarks of Digital Equipment Corporation.
ESS is a registered trademark of ESS Corp.
Pentium is a registered trademark of Intel Corporation.
Microsoft, MS-DOS and Windows are registered trademarks of Microsoft Corporation.
All other trademarks and registered trademarks are the property of their respective holders.
The FCC wants you to know...
This equipment has been tested and found to comply with the limits for a Class B digital
device, pursuant to Part 15 of the FCC rules. These limits are designed to provide reasonable
protection against harmful interference in a residential installation.
Any changes or modifications made to this equipment may void the user's authority to operate
this equipment.
This equipment generates, uses, and can radiate radio frequency energy and, if not installed and
used in accordance with the instructions, may cause harmful interference to radio
communications. However, there is no guarantee that interference will not occur in a particular
installation. If this equipment does cause harmful interference to radio or television reception,
which can be determined by turning the equipment Off and On, the user is encouraged to try to
correct the interference by one or more of the following measures:
•
Reorient or relocate the receiving antenna.
•
Increase the separation between the equipment and receiver.
•
Connect the equipment into an outlet on a circuit different from that to which the receiver
is connected.
•
Consult the dealer or an experienced radio/TV technician for help.
All external cables connecting to this basic unit must be shielded. For cables connecting to
PCMCIA cards, see the option manual or installation instructions.
Table of Contents
1 Overview
System Overview .......................................................................................................................................... 1–1
CPU........................................................................................................................................................ 1–1
Chip Set.................................................................................................................................................. 1–2
Memory.................................................................................................................................................. 1–2
BIOS ...................................................................................................................................................... 1–2
PCI Bus Devices .................................................................................................................................... 1–3
Cardbus Controller.......................................................................................................................... 1–3
Video Controller Chip..................................................................................................................... 1–3
PCI-IDE Controller......................................................................................................................... 1–3
ISA Bus Devices .................................................................................................................................... 1–4
Audio .............................................................................................................................................. 1–4
BIOS ............................................................................................................................................... 1–4
System Command Processor........................................................................................................... 1–4
Super I/O......................................................................................................................................... 1–4
UMI Controller ............................................................................................................................... 1–5
Docking Options .................................................................................................................................... 1–5
DIGITAL HiNote Ultra Multimedia Dock ..................................................................................... 1–5
DIGITAL HiNote Ultra Enhanced Port Replicator......................................................................... 1–6
Components, Controls, and Indicators .......................................................................................................... 1–6
Front and Right Side Components ......................................................................................................... 1–6
Front and Left Side Components ........................................................................................................... 1–8
Back Components .................................................................................................................................. 1–9
Bottom Components ............................................................................................................................ 1–10
LCD Status Display.............................................................................................................................. 1–11
Keyboard Hot Keys..................................................................................................................................... 1–12
System Power.............................................................................................................................................. 1–13
Controlling Power ................................................................................................................................ 1–13
LiIon Battery ........................................................................................................................................ 1–14
Smart Battery Operation ...................................................................................................................... 1–15
Power Management Modes.................................................................................................................. 1–15
Standby Mode ............................................................................................................................... 1–16
Suspend Mode............................................................................................................................... 1–16
Related Information .................................................................................................................................... 1–17
Documentation ..................................................................................................................................... 1–17
World Wide Web ................................................................................................................................. 1–17
Bulletin Boards .................................................................................................................................... 1–17
v
2 System BIOS
Running System Setup........................................................................................................... ........................2–1
System Setup Utility ........................................................................................................... ....................2–1
Updating Your Notebook Computer's Configuration ................................................................................ ....2–2
Helpful Hints ..........................................................................................................................................2–2
Power Features...............................................................................................................................................2–3
Advanced Power Features .............................................................................................................................2–4
System Features .............................................................................................................................................2–5
Device Features .............................................................................................................................................2–6
Security Features ...........................................................................................................................................2–7
Notebook Computer Security .................................................................................................................2–8
User Password ........................................................................................................................................2–8
Setting/Changing the User Password...............................................................................................2–8
Deleting the User Password.............................................................................................................2–9
Supervisor Password...............................................................................................................................2–9
Setting/Changing the Supervisor Password...................................................................................2–10
Deleting the Supervisor Password.................................................................................................2–10
Dock Security .......................................................................................................................................2–10
Default Features...........................................................................................................................................2–11
Exit Features ................................................................................................................................................2–11
Restoring the Flash BIOS ............................................................................................................................2–11
3 Troubleshooting
Beep Codes ....................................................................................................................................................3–1
Troubleshooting Tips.....................................................................................................................................3–2
System Start Failure................................................................................................................................3–2
Power Supply Failure .............................................................................................................................3–3
Boot-up Failure.......................................................................................................................................3–4
POST Failure ..........................................................................................................................................3–4
Cardbus Failure.......................................................................................................................................3–5
LCD Panel Failure ..................................................................................................................................3–5
CRT Failure ............................................................................................................................................3–6
Notebook Computer Keyboard Failure ..................................................................................................3–6
External Keyboard or PS/2 Mouse Failure .............................................................................................3–7
HDD Failure ...........................................................................................................................................3–7
FDD Failure............................................................................................................................................3–8
CD-ROM Failure ....................................................................................................................................3–8
Battery Failure ........................................................................................................................................3–9
Touchpad Failure....................................................................................................................................3–9
Internal Modem (UMI) Failure...............................................................................................................3–9
External Audio Failure .........................................................................................................................3–10
4 Parts Replacement
Required Tools................................................................................................................. ..............................4–1
Removing the Battery ........................................................................................................... .........................4–2
Removing the CD-ROM/FDD Module................................................................................................. .........4–3
Removing the Keyboard ................................................................................................................................4–4
Removing the HDD Assembly ......................................................................................................................4–6
Removing the Keyboard Deck and LCD Assembly ......................................................................................4–8
Removing the UMI Assembly .....................................................................................................................4–12
Removing the Touchpad..............................................................................................................................4–13
vi
Removing the Power LED Assembly ......................................................................................................... 4–14
Removing the Lid Switch............................................................................................................................ 4–15
Removing the Daughtercard........................................................................................................................ 4–16
Removing the Motherboard ........................................................................................................................ 4–18
Removing the Cardbus Assembly ............................................................................................................... 4–20
Removing the Audio Connector Assembly................................................................................................. 4–21
Removing the RTC and Bridge Batteries.................................................................................................... 4–22
Removing the DC-to-DC Converter............................................................................................................ 4–23
Removing the I/O Panel Assembly ............................................................................................................. 4–24
Removing the LCD Display Bezel .............................................................................................................. 4–26
12.1 inch LCD Display Bezel .............................................................................................................. 4–26
14.1 inch Display Bezel ....................................................................................................................... 4–28
Removing the LCD Display ........................................................................................................................ 4–30
12.1 Inch LCD Display ........................................................................................................................ 4–30
LCD Panel..................................................................................................................................... 4–30
Status Display ............................................................................................................................... 4–31
Backlight Inverter ......................................................................................................................... 4–32
14.1 Inch LCD Display ........................................................................................................................ 4–33
LCD Panel..................................................................................................................................... 4–33
Status Display ............................................................................................................................... 4–35
Backlight Inverter ......................................................................................................................... 4–35
5 Part Numbers
Spare Parts Listing ........................................................................................................................................ 5–1
Display Bezels........................................................................................................................................ 5–1
Housings ................................................................................................................................................ 5–1
Mounting Assemblies............................................................................................................................. 5–1
Inverter Boards....................................................................................................................................... 5–1
LCD Panels ............................................................................................................................................ 5–2
Motherboards ......................................................................................................................................... 5–2
Daughtercard.......................................................................................................................................... 5–2
DC-to-DC Converter.............................................................................................................................. 5–2
Miscellaneous......................................................................................................................................... 5–2
Modem Cards......................................................................................................................................... 5–3
Cables..................................................................................................................................................... 5–4
Keyboards .............................................................................................................................................. 5–4
Hard Drives ............................................................................................................................................ 5–4
Batteries ................................................................................................................................................. 5–4
Power Cords........................................................................................................................................... 5–5
Parts Identification ........................................................................................................................................ 5–6
Options ........................................................................................................................................................ 5–10
Memory................................................................................................................................................ 5–10
DIGITAL HiNote Ultra Docks ............................................................................................................ 5–10
Batteries ............................................................................................................................................... 5–10
Power Adapters .................................................................................................................................... 5–11
Hard Drives .......................................................................................................................................... 5–11
Internal Modems .................................................................................................................................. 5–11
vii
A Specifications
System Specifications ....................................................................................................................................A-1
Environment ..................................................................................................................................................A-2
B Device Mapping
Memory Map .................................................................................................................................................B-1
DMA Channel Assignments ..........................................................................................................................B-1
Notebook Computer Interrupt Levels ............................................................................................................B-2
I/O Address Map............................................................................................................................................B-3
viii
Figures
Figure 1-1 Front and Right Side View (12.1” Display) ............................................................................... 1–7
Figure 1-2 Front and Left Side View (12.1” TFT Display) ......................................................................... 1–8
Figure 1-3 Back View .................................................................................................................................. 1–9
Figure 4-1 Removing the Battery................................................................................................................. 4–2
Figure 4-2 Removing the CD/FDD Module................................................................................................. 4–3
Figure 4-3 Releasing the Keyboard.............................................................................................................. 4–4
Figure 4-4 Removing the Keyboard............................................................................................................. 4–5
Figure 4-5 Releasing the Hard Drive ........................................................................................................... 4–6
Figure 4-6 Removing the Hard Drive .......................................................................................................... 4–7
Figure 4-7 Removing UMI Slot Cover......................................................................................................... 4–8
Figure 4-8 Removing Hinge Covers and Screws ......................................................................................... 4–9
Figure 4-9 Removing Keyboard Deck Screws........................................................................................... 4–10
Figure 4-10 Removing LCD Assembly Hinge Screws .............................................................................. 4–11
Figure 4-11 Removing the UMI Assembly (Underside of Keyboard Deck) ............................................. 4–12
Figure 4-12 Removing the Touchpad (Underside of Keyboard Deck) ...................................................... 4–13
Figure 4-13 Removing the Power LED Assembly..................................................................................... 4–14
Figure 4-14 Removing the Lid Switch ....................................................................................................... 4–15
Figure 4-15 Disconnecting the RTC Battery.............................................................................................. 4–16
Figure 4-16 Disconnecting Speaker, Lid Switch, and Docking Cables ..................................................... 4–17
Figure 4-17 Removing Daughtercard......................................................................................................... 4–17
Figure 4-18 Disconnecting the I/O Panel and UMI Cables........................................................................ 4–18
Figure 4-19 Removing the Motherboard.................................................................................................... 4–19
Figure 4-20 Disconnecting PC Card Assembly Cable ............................................................................... 4–20
Figure 4-21 Removing PC Card Assembly ................................................................................................ 4–21
Figure 4-22 Removing the Audio Connector Assembly ............................................................................ 4–21
Figure 4-23 Removing the Battery Clamp ................................................................................................. 4–22
Figure 4-24 Disconnecting the Bridge Battery........................................................................................... 4–22
Figure 4-25 Removing the DC-to-DC Converter....................................................................................... 4–23
Figure 4-26 Removing the Hinge Brackets ................................................................................................ 4–24
Figure 4-27 Removing the I/O Panel ......................................................................................................... 4–25
Figure 4-28 Removing the 12.1 Inch Display Bezel .................................................................................. 4–27
Figure 4-29 Removing the 14.1 Inch LCD Bezel ...................................................................................... 4–29
Figure 4-30 Removing the 12.1 Inch LCD Panel....................................................................................... 4–30
Figure 4-31 Removing the 12.1 Inch LCD Cable and Status Display ....................................................... 4–31
Figure 4-32 Removing the 12.1 Inch LCD Panel Inverter ......................................................................... 4–32
Figure 4-33 Removing the 14.1 Inch LCD Display Panel ......................................................................... 4–34
Figure 5-1 System Unit (1 of 2) ................................................................................................................... 5–6
Figure 5-2 System Unit (2 of 2) ................................................................................................................... 5–8
Figure 5-3 12.1 Inch Display ....................................................................................................................... 5–9
ix
Preface
This guide describes how to test, troubleshoot, and remove and replace the DIGITAL HiNote
Ultra 2000 notebook computer Field Replaceable Units (FRUs).
Audience
This service guide is written specifically for service engineers.
Organization
This guide contains the following:
•
Chapter 1: Overview – This chapter introduces the DIGITAL HiNote Ultra 2000 notebook
computer. It provides a system overview and describes the controls, indicators, and hot
keys.
•
Chapter 2: System BIOS – This chapter provides information related to the system BIOS,
its Setup program, Crisis Recovery, and Password override.
•
Chapter 3: Troubleshooting – This chapter provides a systematic method of isolating
problems with the DIGITAL HiNote Ultra 2000 notebook computer.
•
Chapter 5: Parts Replacement – This chapter provides detailed procedures for replacing
the DIGITAL HiNote Ultra 2000 notebook computer Field Replaceable Units (FRUs).
•
Chapter 6: Part Numbers – This chapter provides a list of the Field Replaceable Units
(FRUs) and parts numbers for the DIGITAL HiNote Ultra 2000 notebook computer.
•
Appendix A: Specifications – This appendix lists the notebook computer’s specifications.
•
Appendix B: Device Mapping – This appendix contains tables listing the default settings
for of the notebook computer’s memory map, I/O address map, interrupt map, and DMA
map.
DIGITAL HiNote Ultra 2000 Service Guide 1–11
1
Overview
This chapter introduces the DIGITAL HiNote Ultra 2000 notebook computer. It provides a
system overview and describes the controls, indicators, and hot keys.
System Overview
The DIGITAL HiNote Ultra 2000 notebook computer is a high-performance portable computer
designed for the mobile professional.
CPU
The DIGITAL HiNote Ultra 2000 notebook computer supports the notebook version of the
following Intel Pentium processors:
•
P54CSLM 133MHz @ 2.9V with 16k of L1 cache.
•
P55C 150MHz and 166MHz @ 2.5V with 32k of L1 cache.
The following is a list of the general features of these processors:
•
Full System Management Interrupt (SMI) support.
•
Fully static - support Stop Grant and Stop Clock states.
•
32-bit address bus.
•
64-bit data bus.
•
16KB internal write-back cache (P54 processor).
•
32KB internal write-back cache (P55 processor).
•
Capable of executing two instructions per clock cycle using two pipelined integer units.
•
Multimedia extension (MMX) register set for the P55 processor.
DIGITAL HiNote Ultra 2000 Service Guide 1–1
Overview
Chip Set
The PicoPower Vesuvius chip set is used to implement the core functions of the
system.
•
•
The V1 and V2 chips provide the core system functions.
−
Support for all Intel Pentium processors.
−
Support for write-through secondary (L2) cache.
−
Eight level write post buffer to DRAM (2-1-1-1 writes @ 66MHz).
−
32/64-bit DRAM interface.
−
DRAM timing, bus width, and type programmable DRAM interface on a bank by
bank basis.
−
PCI bus arbiter.
−
Hot docking support for PCI/ISA docks.
−
Advanced Power Management features.
−
The V2 chip provides the PCI bus interface and the interface between the V1 and
memory.
The V3 chip provides the PCI to ISA bridge interface.
−
PCI-to-ISA bridge.
−
Full ISA bus support in positive decode and subtractive mode.
−
Distributed DMA protocol support.
−
Serialized IRQ protocol support.
Memory
The system comes with 16MB of on-board EDO DRAM for system memory and 512KB of L2
cache memory.
System memory can be upgraded to a total of 144MB. The upgrade is performed by installing
8MB, 16MB, 32MB or 64MB EDO SO-DIMMs. There are two slots for additional memory.
Memory can be upgraded one module at a time. Either slot can be populated first.
BIOS
The system has an Intel 28F002BX-T 2MB Boot block Flash ROM for system BIOS. BIOS
provides support for the following:
•
Suspend to RAM.
•
Full APM 1.2 supported.
•
Password protection (System and Docking options).
•
Auto-configured with docking options.
•
Windows 95 ready with PnP.
•
Various hot-keys for system control.
1–2 DIGITAL HiNote Ultra 2000 Service Guide
Overview
PCI Bus Devices
The internal PCI bus and PCI components operate at 3.3V. The PCI bus is also available to
supported docking options. These options contain their own PCI bridge.
Cardbus Controller
Cardbus support is provided by the TI1131 controller. This chip provides the following
functions:
•
Support for Zoomed Video.
•
Support for two PC Card/Cardbus slots with hot removal/insertion.
•
Uses burst transfers to maximize data throughput on the PCI/Cardbus bus.
•
Support for serialized ISA IRQs.
•
Support for 16-bit distributed DMA.
•
Support for Ring Indicate.
Video Controller Chip
Video support is provided by the C&T 65554 Controller Chip. This chip provides the
following functions:
•
64-bit memory interface.
•
2MB 3.3V 60ns EDO Video DRAM.
•
Support for Zoomed Video.
•
DDC 2B support for external monitors.
•
Advanced power management features minimize power consumption during:
−
Normal operation
−
Standby mode
−
Panel-off
PCI-IDE Controller
IDE support is provided by the CMD 643 PCI-IDE controller. This chip provides the
following functions:
•
PCI bus Master device.
•
Supports up to mode 5 timing.
•
Supports DMA capable drives.
•
Supports two IDE controllers (only one used).
DIGITAL HiNote Ultra 2000 Service Guide 1–3
Overview
ISA Bus Devices
The ISA bus interface is provided by the PicoPower V3 chip.
Audio
Audio support is provided by the ES1878 chip. This chip provides the following functions:
•
Monophonic full-duplex operation using two DMA channels.
•
I S interface to internal stereo D/A for external Zoomed Video port.
•
Complete general interrupt mapping including the sharing of all interrupts.
•
Support for 16-bit Stereo, FM Synthesizer, MPU-401, and MIDI.
•
Self-timed joystick port.
•
Hot docking 6-pin interface to expansion audio mixer (ES978).
2
BIOS
The system BIOS is implemented using the Intel 28F002BX-T 2MB Boot block Flash ROM.
System Command Processor
The System Command Processor is implemented using the Hitachi H8 IKAP II processor.
This processor provides the following functions:
•
Simultaneous support of two external PS/2 ports and the internal Touch pad.
•
I C bus master for communication to:
2
−
Status LCD
−
EEPROM
−
Docking interface components
•
Hot Key interface.
•
Secure password protection.
•
System power plane control and power sequencing.
•
Battery management interface for charging and the Smart battery information.
•
Status LCD and device monitoring interface.
•
Active thermal interface for CPU thermal management.
•
Internal keyboard scanning.
Super I/O
I/O support is provided by the National Semiconductor PC87338 chip. This chip supports the
following functions:
•
Floppy disk controller with Japanese floppy support.
•
IEEE 1284 Parallel port.
•
Serial infrared support – IrDa 1.1 (115Kbps and 4Mbps).
•
16550 UARTs.
•
Full Plug-and-Play support.
1–4 DIGITAL HiNote Ultra 2000 Service Guide
Overview
UMI Controller
The DIGITAL HiNote Ultra 2000 notebook computer has an internal type II PCMCIA slot that
is available as an UMI slot. This feature provides a flexible method for the support of an
internal modem that minimizes the impact of multi-national modem approvals. This slot
supports only DIGITAL approved modem cards. The UMI interface is provided by the Cirrus
Logic CL-PD6722 dual slot PCMCIA controller (Only one slot is used.) This chip provides the
following features and functions:
•
PCMCIA 2.1 and JEIDA 4.1 compliant.
•
Automatic low power mode (improved power consumption).
•
Direct connection to the ISA bus and PCMCIA socket.
•
Five programmable memory windows and two I/O windows.
•
DMA support.
Docking Options
The DIGITAL HiNote Ultra 2000 notebook computer supports docking options. Active
docking options are required to have a NILE PCI-PCI bridge.
DIGITAL HiNote Ultra Multimedia Dock
The DIGITAL HiNote Ultra Multimedia Dock has the following features:
•
Three speakers: two tweeters and one sub-woofer.
•
Super I/O duplication for port replication the DIGITAL HiNote Ultra Enhanced Port
Replicator.
•
Nile I PCI-PCI bridge.
•
PicoPower V3 PCI-ISA bridge.
•
Two Type II or one Type III Cardbus slot.
•
Line-in and speaker out support.
•
MIDI/Joystick port.
•
3D Sound (ESS398).
•
CD-ROM/FDD Module Bay.
•
NTSC/PAL video output (switch selectable).
−
Composite video using RCA jack
−
S-Video
•
USB controller and USB port.
•
Expansion audio mixer support (ES978).
DIGITAL HiNote Ultra 2000 Service Guide 1–5
Overview
DIGITAL HiNote Ultra Enhanced Port Replicator
The DIGITAL HiNote Ultra Enhanced Port Replicator has the following features:
•
Battery charger
•
Parallel port
•
Serial port
•
VGA/CRT port
•
Two PS/2 connections for keyboard and mouse
•
USB port (pass-through from DIGITAL HiNote Ultra Multimedia Dock)
Components, Controls, and Indicators
This section shows the locations and provides a description of the different components,
controls, and indicators on your DIGITAL HiNote Ultra 2000 notebook computer.
Front and Right Side Components
Component
Description
➊
Power LED
Battery Charging LED
The green Power LED (lower) lights when the notebook is On.
The amber Battery Charging LED (upper) lights when the
battery is charging.
➋
Lid Release
One of two lid releases. Push in both releases at the same time
to open the LCD panel.
➌
Speaker
Right stereo speaker used to hear sound files and system
sounds.
➍
CD-ROM/Diskette
Drive Bay
Supports a CD-ROM drive or a Diskette Drive module.
➎
Microphone In
Input connection for external microphone.
➏
Audio Out
Connection for headphones or external speakers.
➐
Suspend/Resume
Button
Turns the notebook computer On, and Suspends or Resumes
the system. Press and hold the [fn] + [Suspend/Resume] for
four seconds to turn the notebook Off.
➑
➒
➓
Internal Microphone
Used to record voice, music, and sound files.
Status Display
Provides system operating status.
Contrast Control
(ASTN only)
Controls the contrast of the LCD display.
Reset button
Resets the notebook computer. All unsaved data will be lost.
Refer to Figure 6-3 for instructions on how to lift the keyboard
to gain access to the reset button.
1–6 DIGITAL HiNote Ultra 2000 Service Guide
Overview
DEC01156
Figure 1-1 Front and Right Side View (12.1” Display)
DIGITAL HiNote Ultra 2000 Service Guide 1–7
Overview
Front and Left Side Components
Component
Description
➊
Lid Release
One of two lid releases. Push in both releases at the same time to
open the LCD panel.
➋
➌
Speaker
Left stereo speaker used to hear sound files and system sounds.
PC Card Ejectors
Ejects a PC Card. Top button releases a PC Card from the top
slot; the bottom button releases a PC Card from the bottom slot.
➍
PC Card Slots
Support two Type I or II cards or one Type III card.
Zoomed Video cards are supported in the lower slot only.
➎
Keyboard Releases
These latches release the keyboard to allow access to the
removable hard drive and the system Reset button.
➏
Removable Hard Drive
Located under the keyboard, the hard drive is easily removable
and upgradeable.
➐
Security Lock
Attach a security locking device , such as a Kensington lock, to
this port.
DEC01154
Figure 1-2 Front and Left Side View (12.1” TFT Display)
1–8 DIGITAL HiNote Ultra 2000 Service Guide
Overview
Back Components
Component
Description
➊
AC In
The universal AC adapter connects to this port.
➋
External Keyboard/
Mouse Port
An external keyboard or PS/2 mouse connects to
this port.
➌
RJ11 Modem Port
An analog telephone line connects to this port
(modem functionality on selected models only).
➍
Serial Port
A serial device connects to this port.
➎
Parallel Port
A parallel device, such as a printer, connects to
this port.
➏
Video Port
An external monitor connects to this port.
➐
I/O Connector Cover
and Keyboard Support
Covers I/O connectors. Can be flipped down to
support the keyboard at a comfortable typing
angle.
➑
Fast IR Port
Fast IR interface allows wireless data transfer
between the notebook and another device with an
IR interface.
DEC01151
Figure 1-3 Back View
DIGITAL HiNote Ultra 2000 Service Guide 1–9
Overview
Bottom Components
Component
Description
➊
Battery Release
Releases the LiIon battery from the notebook computer for
removal.
➋
➌
LiIon Battery
Provides power to your notebook computer.
CD-ROM/Diskette
Drive Module Release
Releases either a diskette or CD-ROM Drive module from the
Diskette/CD-ROM Drive Bay.
➍
➎
Memory Door
Provides access to notebook computer’s memory.
Docking Connector
Door
Provides access to the docking connector when using the
DIGITAL HiNote Ultra Multimedia Dock or the DIGITAL
HiNote Ultra Enhanced Port Replicator.
DEC01152
Figure 1-4 Bottom View
1–10 DIGITAL HiNote Ultra 2000 Service Guide
Overview
LCD Status Display
Indicator
Shows...
AC Power – The computer is connected to and operating from its external AC
power supply.
Standby – The computer is in Standby Mode. Any system activity such as, pressing
a key on the keyboard, touch pad, mouse, or other system activity resumes normal
operation.
Hard Drive/CD-ROM Activity – The hard drive or CD-ROM is being accessed.
A
The Caps Lock function is enabled..
NUM Lock – The NUM Lock function is enabled.
Monitor/Scroll Lock – The external monitor port is enabled and/or the Scroll Lock
function is enabled.
– External Monitor port enabled
– Scroll Lock function enabled
– External monitor and Scroll Lock enabled
Embedded Numeric Key pad – The keyboard’s embedded key pad is enabled by a
keyboard hot-key.
DIGITAL HiNote Ultra 2000 Service Guide 1–11
Overview
Keyboard Hot Keys
The hot keys are used to set up and control the computer. These keys are activated by holding
down the [fn] key and pressing the desired function key. The function for a hot key is indicated
in yellow. The following table shows each hot key sequence and describes its function:
fn
+
Function
esc
Places the computer in Standby Mode.
F1
Sets the computer’s operating mode to maximize battery life. A single beep is
emitted when the computer switches to this operating mode. If you
Suspend/Resume or Reboot the system, the system returns to the settings contained
in the system BIOS.
F2
Sets the computer’s operating mode to maximize performance. Two beeps are
emitted when the computer switches to this operating mode. If you
Suspend/Resume or Reboot the system, the system returns to the settings contained
in the system BIOS.
F3
Used during Power Up Self-Test (POST) to enter the System setup program.
F4
Enables and disables the computers external display port and the LCD display.
There are three display modes:
1.
LCD Display
2.
LCD Display and External Monitor (simulscan)
3.
External Monitor only
Each time you press this hot key, the computer changes to the next display setting.
The display mode for the External Monitor is shown on the LCD Status display.
Turns the battery display information On and Off.
Reserved for future use.
F7
Toggles the system sound between mute and unmute.
F8
Enables and disables the keyboard’s embedded key pad. The state of this key is
shown in the LCD status display. This hot key is used in conjunction with the [F9]
hot key to control the embedded key pad.
F9
Toggles NUM Lock On and Off. The state of NUM Lock is shown in the LCD
Status Display. This hot key is used in conjunction with the [F8] hot key to control
the embedded key pad.
num lock
F10
scroll lock
Toggles Scroll Lock On and Off. The state of Scroll Lock is shown in the LCD
Status Display.
Depress repeatedly to increase the audio volume.
Depress repeatedly to decrease the audio volume.
Depress repeatedly to decrease the LCD screen brightness.
Depress repeatedly to increase the LCD screen brightness.
1–12 DIGITAL HiNote Ultra 2000 Service Guide
Overview
System Power
Controlling Power
Unique to DIGITAL’s notebooks, the Suspend/Resume button not only enables you to take
advantage of the built-in power saving features but also turns the notebook On and Off.
Topic
Action
On
Press this button to turn the system On from the Off state.
Suspend
Press this button to place your system in Suspend mode, if it is On.
Resume
Press this button to resume normal operation from the Suspend mode.
Off
Press and hold [fn] + [Suspend/Resume] button for four seconds to
completely shut Off your notebook computer from any state.
fn
+
Lid Switch
Close the LCD panel to place the system into Suspend mode. If Desktop
mode is enabled in the System Setup, closing the LCD panel will not place
the notebook into Suspend mode. This allows the notebook to function as a
desktop computer (notebook LCD panel closed) using an external monitor,
keyboard, and mouse.
_____________________________Caution__________________________
Always make sure you save and close all open files before you turn
Off your notebook computer. If you turn the notebook computer Off
without saving and closing all open files, you could lose some or all of
your work.
______________________________________________________________
DIGITAL HiNote Ultra 2000 Service Guide 1–13
Overview
LiIon Battery
All batteries have a limited life span. A battery’s life span is measured by the number of
charging and draining cycles it can undergo before it can no longer be charged. The amount of
time that your system can be operated by battery power before the battery is drained is referred
to as battery run time.
Lithium-ion batteries have an average life span than of approximately 1,000 complete
charge/discharge cycles. In actual use, the number is larger due to the fact that most users will
not fully discharge the battery during daily usage. Unlike the nickel-metal hydride battery,
there is no need to be concerned with fully discharging the battery before charging it again
since lithium-ion technology is not susceptible to memory effect.
If your system will not be in use for more than 30 days, DIGITAL recommends that the LiIon
Battery Pack be removed from the system. When a lithium-ion battery is removed from the
system, it has a shelf life of approximately 90 days before a charge cycle is required.
___________________________ WARNING _________________________
To prevent risk of fire and exposure to hazardous energy, do not c
puncture, incinerate, or disassemble the battery.
Do not expose to fire or heat above 60 degrees Celsius. The
battery is designed for use with HiNote Ultra 2000 series
notebook personal computer and accessories
______________________________________________________________
____________________________CAUTION _________________________
There is a danger of explosion if a lithium battery is incorrectly
replaced. Lithium batteries must be replaced with the same or
equivalent type recommended. Replace the main system battery
only with DIGITAL HiNote Ultra 2000 series of rechargeable
Lithium Ion battery packs.
______________________________________________________________
__________________ Battery Recycling and Disposal ________________
Recycle or dispose of batteries contained in this product properly, in
accordance with local regulations for battery type as marked on the
battery. Prior to disposal or recycling, protect batteries against
accidental short circuiting by affixing non-conductive tape across
battery terminals and conductive surfaces.
______________________________________________________________
1–14 DIGITAL HiNote Ultra 2000 Service Guide
Overview
____________________________WARNING_________________________
When transporting the battery pack, make sure that the metal
terminals on the battery pack do not come in contact with other
metal surfaces (such as loose coins, paper clips, etc.). An
electrical discharge can occur which may cause injury or
damage.
______________________________________________________________
Smart Battery Operation
Your DIGITAL HiNote Ultra 2000 uses a Smart Battery. The battery has circuitry that reports
the amount of charge in the battery to the system.
Initial Use – To properly initialize the circuitry that reports the state of the battery charge, you
should:
1.
Fully charge the battery.
2.
Fully discharge the battery. To fully discharge the battery, use the notebook computer on
battery power until the computer enters suspend mode because of a critically low battery
state.
3.
Fully charge the battery.
Regular Use – To help maintain the accuracy of the circuitry that reports the state of the
battery charge, it is recommended that you allow the battery to go through a full charge and
discharge cycle at periodic intervals.
Power Management Modes
Your notebook computer is factory-configured with preset power management values. If you
are not an advanced user, start by using the factory-configured power management settings. If
you find that the factory settings do not fit your specific needs, enter the System Setup Program
and make the needed changes. The System setup program is entered by pressing the [fn] +
[F3] keys, when prompted, during system bootup.
If you choose to set your own power saving features, you should understand how it affects
battery run time and system performance before changing a setting.
The power management features are designed to conserve as much power as possible by
putting the notebook’s components into a low power consumption mode as often as possible.
These low power modes are referred to as Standby and Suspend.
For additional information on power management, refer to the on-line documentation that came
with your notebook computer.
DIGITAL HiNote Ultra 2000 Service Guide 1–15
Overview
Standby Mode
In this mode, components such as the HDD, Diskette or CD-ROM drive and the LCD display
are powered off and the CPU clock is stopped. Other components, transparent to the user, are
put in their lowest active states.
Standby Mode is entered:
•
Automatically when the system remains idle for the specified time set in the Standby
Time-out field of the System Setup Program.
•
Manually by pressing the [fn] + [esc] key combination.
Standby Mode is exited by any of the following actions:
•
Pressing any key on the keyboard
•
Touch pad or externally connected mouse activity
•
Serial or parallel port activity
•
PC Card activity
•
Incoming modem call
Suspend Mode
Suspend Mode saves power by removing power from all system functions except RAM
memory.
Suspend Mode is entered as follows:
• Press the Suspend/Resume button.
• Close the LCD display lid (unless in Desktop Mode).
• When the specified time in the Suspend Time-out field in the BIOS is reached.
• When the battery reaches a critically low power level.
• In Windows 95 or Windows NT 4.0, click on the Suspend option on the Taskbar, if enabled.
Suspend Mode is exited to On as follows:
• Press the Suspend/Resume button.
• Opening lid if suspended from lid switch.
Suspend Mode is exited to Off as follows:
• [fn] + [Suspend/Resume] (make sure all data is saved and files/software programs are
closed).
1–16 DIGITAL HiNote Ultra 2000 Service Guide
Overview
Related Information
Documentation
DIGITAL HiNote Ultra 2000 User’s Guide
ER-PB1WW-UA
Quick Setup Guide
ER-PB1WW-IM
World Wide Web
Information such as drivers, BIOS updates, and on-line documentation is available from
DIGITAL’s World Wide Web Site. The URL for the site is:
HTTP://WWW.PC.DIGITAL.COM/
Bulletin Boards
DIGITAL maintains a BBS for its customers. This BBS has information such as drivers, BIOS
updates, and on-line documentation. The BBS number in the U.S. is: (508)496-8800.
DIGITAL HiNote Ultra 2000 Service Guide 1–17
2
System BIOS
This chapter provides information related to the System BIOS and the System Setup utility.
Running System Setup
The System Setup utility enables you to select and store information about the notebook
computer’s hardware configuration, boot sequence, security, and power management features.
This information is stored in the computer’s battery backed-up CMOS RAM.
The System Setup utility also allows you to save and load user specific settings or load the
factory default settings to the CMOS RAM.
System Setup Utility
To run System Setup:
1.
Turn On or reboot your notebook computer.
2.
During system boot, press [fn] + [F3] when prompted. After the prompt appears you have
two to three seconds to press [fn] + [F3] and enter System Setup.
DIGITAL HiNote Ultra 2000 Service Guide 2–1
System BIOS
Updating Your Notebook Computer's Configuration
There are number of hardware features that can be configured on your notebook
computer.
Feature
Selections
Power
Disabled
Maximum Battery Life
Maximum Performance
Advanced
Lid Switch
Suspend Beep
System
Date/Time
CD-ROM Boot
Floppy Boot
Quick Boot
NUM Lock
Device
Serial Port
Infrared Port
Parallel Port
Parallel Port Mode
Audio
Joystick
Security
Set User Password
Set Supervisor Password
Modify Password Mode
Dock Security
Defaults
Save User Default Settings
Load User Default Settings
Load Factory Default Settings
Exit
Save
Quit
About
Helpful Hints
When updating your computer’s setup information there are several keyboard keys assigned to
help you select menus and sub-menus, options, and to change option values.
Key
Function
→
←
Cursor keys move the cursor to the right and left
↑
↓
Cursor keys move the cursor up and down
Tab
Moves the cursor between menu items
Esc
Closes the current menu
Enter
Accepts the current selection
Space bar
Selects the current option or enables (check mark) or disables (no check
mark) the option
Alt
Moves the cursor to the menu bar at the top of the screen
2–2 DIGITAL HiNote Ultra 2000 Service Guide
System BIOS
Power Features
Your notebook computer is factory-configured with preset power management values. If you
are not an advanced user, start by using the default factory-configured power management
settings. If you find that the factory settings do not fit your specific needs, enter the System
Setup Program and make the needed changes.
Feature
Settings
Comments
Disabled
Disables the power management features supported by
the system. Power management features of the
operating system are still available.
Maximum
Battery Life
Use Maximum Battery Life when you want to
maximize the time between battery charges.
Maximum *
Performance
Use Maximum Performance when you want to
maximize the performance of your notebook computer
while retaining some power savings for extending the
life of the battery.
Advanced
Use Advanced when you want to set your own power
saving features. Use this option only if you have a
good understanding of the effects the various settings
have on both battery life and system performance.
Refer to Advanced Power Management for a
description of the available settings.
Lid Switch
Suspend/Resume*
Desktop Mode
Suspend
Beep
Disabled*
(No Check Mark)
This option allows you to configure the way the
notebook computer responds when opening and
closing the LCD display panel. When
Suspend/Resume is selected, the system enters
Suspend Mode when the lid is closed and Resumes
operation when the lid is opened. When Desktop
mode is selected, the external video port is enabled
when the lid is closed.
This allows you to enable or disable the notebook
computer’s suspend beep feature. When enabled, the
notebook computer emits two quick beeps before
entering Suspend mode.
*Factory default setting
DIGITAL HiNote Ultra 2000 Service Guide 2–3
System BIOS
Advanced Power Features
These features are accessed by selecting the Advanced field in Power Features.
Field
Settings
Comments
Hard Disk
Timer
• Disabled
• Selected times
This option allows you to specify a period of time the
hard disk drive must be inactive before it spins down.
There are separate timer entries for AC Power and
Battery Power. Press the “Tab” key to move between
the AC Power block and Battery Power block.
Display
Timer
• Disabled
• Selected times
This options allows you to specify a period of time the
system must be inactive before the LCD backlight is
turned off. There are separate timer entries for AC
Power and Battery Power. Press the “Tab” key to
move between the AC Power block and Battery Power
block.
Standby
Timer
• Disabled
• Selected times
This option allows you to specify a period of time the
system must be inactive before Standby mode is
entered. There are separate timer entries for AC
Power and Battery Power. Press the “Tab” key to
move between the AC Power block and Battery Power
block.
Standby mode shuts down power to the LCD and
backlight, hard drive, Diskette Drive, and external
devices.
Note: The selected period for inactivity is measured
from the last monitored system activity. For example,
a keystroke, mouse movement, or hard disk activity
will reset the timer.
Suspend
Timer
• Disabled
• Selected times
This options allows you to specify a period of time the
system is in Standby mode before entering Suspend
mode. There are separate timer entries for AC Power
and Battery Power. Press the “Tab” key to move
between the AC Power block and Battery Power
block.
Suspend mode is similar to Standby mode except all
devices are powered down with the exception of
DRAM. To resume operation from Suspend mode
press the Suspend/Resume button.
*Factory default setting
2–4 DIGITAL HiNote Ultra 2000 Service Guide
System BIOS
System Features
Feature
Settings
Comments
Date/Time
Current Date/Time
Sets your notebook computer to a specified date and
time.
CD-ROM
Boot
• Enabled
• Disabled*
This option enables or disables the ability to boot
from a CD-ROM installed in the notebook computer.
(No Check Mark)
Floppy Boot
• Enabled*
(Check Mark)
• Disabled
Quick Boot
• Enabled
• Disabled*
NUM Lock
• Enabled
• Disabled*
(No Check Mark)
When enabled, the CD-ROM is the first device in the
boot sequence.
This option enables or disables the ability to boot
from the Diskette Drive.
When enabled, the Diskette Drive is the second
device in the boot sequence if CD-ROM Boot is
enabled. If CD-ROM Boot is disabled the Diskette
Drive is the first device in the boot sequence.
This option enables or disables a faster boot
sequence. When enabled certain diagnostic tests are
skipped to speed up system boot.
This option turns the embedded numeric key pad On
or Off every time the system is booted.
(No Check Mark)
*Factory default setting
______________________________ Note ___________________________
If both the CD-ROM (if enabled) and hard disk drive boot devices are not found at
system boot, the Diskette Drive is enabled as the boot device for the current boot
sequence.
______________________________________________________________
DIGITAL HiNote Ultra 2000 Service Guide 2–5
System BIOS
Device Features
Feature
Serial Port
InfraRed
Port
Parallel
Port
Parallel
Port Mode
Audio
Joystick
Settings
• Disabled
• Auto*
Comments
Disables the onboard Serial Port.
Enables and automatically configures
the port.
• Manual
Enables and allows you to manually
configure the I/O address and
Interrupt Request (IRQ) line for the
port.
• Disabled*
• Auto
Disables the onboard Infrared Port.
• Manual
Enables and allows you to manually
configure the I/O address and
Interrupt Request (IRQ) line for the
port.
• Disabled
Enables or disables the onboard
Parallel Port.
• Auto*
Enables and automatically configures
the port.
• Manual
Enables and allows you to manually
configure the I/O address and
Interrupt Request (IRQ) line for the
port.
•
•
•
•
•
•
Standard
Bi-directional (PS/2)*
Enhanced Parallel Port (EPP)
Extended Capabilities Port (ECP)
Selects proper mode required by your
printer or other parallel port device.
See your device User’s Guide for
details.
Disabled
Disables the onboard Stereo Audio.
Auto*
Enables and automatically configures
the onboard audio.
• Manual
Enables and allows you to manually
configure the I/O addresses, Interrupt
Request (IRQ) line, and DMA
channel for the onboard audio.
• Disabled
Enables or disables the Joystick Port
on the DIGITAL HiNote Ultra
Multimedia Dock.
• Auto*
Enables and automatically configures
the port.
• Manual
Enables and allows you to manually
configure the I/O address for the port.
Enables and automatically configures
the port.
*Factory default setting
______________________________Note ___________________________
It is highly recommended that you use the Auto configure setting. If you must
manually configure a device, it is recommended that you use the “System”
application located in the Windows “Control Panel.”
______________________________________________________________
2–6 DIGITAL HiNote Ultra 2000 Service Guide
System BIOS
Security Features
Feature
Settings
Comments
Set User
Password
Enter a password of up
to eight alphanumeric
characters.
This option allows you to set a User
Password that will be required during:
System Boot, Resume, and Undock
operations if selected. The Dock Security
and Modify Password Mode features are
used to select the operations that will
require a password.
Caution: Be sure to write the password
down and store it in a safe place.
Set
Supervisor
Password
Enter a password of up
to eight alphanumeric
characters.
This option allows you to set a Supervisor
Password that will be required to enter the
System Setup. This password can also be
used in place of the User Password.
Caution: Be sure to write the password
down and store it in a safe place.
Modify
Password
Mode
Dock
Security
This option allows you to change the way
the system uses the Password.
Password on Boot Only
When set, you will be prompted for a
password on each system boot.
Password on Boot and
Resume
When set, you will be prompted for a
password each time the system boots or
resumes operation from Suspend mode.
Enabled
(Requires a User
password to be set.)
This option allows you to enable password
protection for the undocking mechanism
on docked options. When enabled and a
User Password is set, the option cannot be
undocked unless the system is powered on
and the User or Supervisor Password is
supplied.
Disabled*
If the system is not powered on, the option
cannot be undocked when Dock Security
is enabled.
*Factory default setting
DIGITAL HiNote Ultra 2000 Service Guide 2–7
System BIOS
Notebook Computer Security
Notebook Computer Security is important to avoid theft or accidental loss of your computer
software and hardware. The DIGITAL HiNote Ultra 2000 provides the following levels of
protection:
•
User Password – Used to prevent unauthorized access to files on your notebook computer
and unauthorized removal of a docked option.
•
Supervisor Password – Used to prevent unauthorized access to your notebook computer’s
System Setup.
•
Dock Security – Utilizes the User or Supervisor password to allow a docked device to be
undocked. Requires a User password be set.
____________________________ Caution __________________________
It is important that you remember your User and Supervisor Password
after you have set one on your notebook computer. If you forget the
password and want to have it reset, you must send the notebook
computer along with proof of ownership to a DIGITAL Service Center
for service.
______________________________________________________________
User Password
Your notebook computer has a User password that you can set to prevent unauthorized access
to your notebook computer files and unauthorized removal of a docked option.
Setting/Changing the User Password
Perform the following steps to set or change the User password:
1.
Turn On your notebook computer.
2.
After POST successfully completes, press [fn] + [F3] to access System Setup.
The System Setup main menu appears on the screen.
3.
Highlight the Security Setup menu and press [Enter].
4.
Highlight the Set User Password field and press [Enter].
2–8 DIGITAL HiNote Ultra 2000 Service Guide
System BIOS
5.
Type in up to an eight character User password and press [Enter].
To confirm, type in your User password a second time and press [Enter].
______________________________ Note ___________________________
If a password already exists, you will be prompted to enter the old password before
a new one can be set.
______________________________________________________________
6.
Select the Exit menu and choose Save to save your new settings and exit System Setup.
Depending on the settings of the Password Mode and Dock Security features, your
notebook computer will prompt you for a password each time it powers on, resumes
operation, or when you request to remove a docked option.
Deleting the User Password
To delete a previously set User password and disable the feature:
1.
Open the User password dialog box.
2.
With the cursor in the “Enter new password” field, press [Enter].
3.
The cursor will move to the “Re-enter new password” field. Press [Enter].
4.
When the Notice dialog box appears notifying you that changes have been saved, press
[Enter].
5.
Select the Exit menu and choose Save to save your new settings and exit System Setup.
Supervisor Password
Your notebook computer has a Supervisor password option that you can set to prevent
unauthorized access to the System Setup. If you set a Supervisor password, you need to enter it
each time you want to access the System Setup.
______________________________ Note ___________________________
The Supervisor password can be used in place of the User password.
______________________________________________________________
DIGITAL HiNote Ultra 2000 Service Guide 2–9
System BIOS
Setting/Changing the Supervisor Password
Perform the following steps to set or change the Supervisor password:
1.
Turn On your notebook computer.
2.
After Power On Self-Test (POST) successfully completes, press [fn] + [F3] to access
System Setup.
The System Setup main menu appears on the screen.
3.
Highlight the Security Setup menu and press [Enter].
4.
Highlight the Set Supervisor Password field and press [Enter].
5.
Type in up to an eight character Supervisor password and press [Enter].
To confirm, type in your Supervisor password a second time and press [Enter].
______________________________Note ___________________________
If a password already exists, you will be prompted to enter the old password before
a new one can be set.
______________________________________________________________
6.
Select the Exit menu and choose Save to save your new settings and exit System Setup.
When you access System Setup, you are prompted for the Supervisor password.
Deleting the Supervisor Password
To delete a previously set Supervisor password and disable the feature:
1.
Open the Supervisor Password dialog box.
2.
With the cursor in the “Enter new password” field, press [Enter].
3.
The cursor will move to the “Re-enter new password” field. Press [Enter].
4.
When the Notice dialog box appears notifying you that changes have been saved, press
[Enter].
5.
Select the Exit menu and choose Save to save your new settings and exit System Setup.
Dock Security
Setting a User password and enabling Dock Security password protects the undocking of
options from the system. When a request is made to undock an option such as the DIGITAL
HiNote Ultra Multimedia Dock, you will be prompted for a password. Enter either the User or
Supervisor password (if set) to complete the undock request and undock the option.
2–10 DIGITAL HiNote Ultra 2000 Service Guide
System BIOS
Default Features
Feature
Settings
Comments
Save User Default
Settings
Stores the current Setup values as the user default
values in non-volatile memory.
Load User Default
Settings
Loads all values stored under User Defaults as the
new system values.
Load Factory
Default Settings
Loads all values to their Factory Default Settings.
Exit Features
Feature
Settings
Comments
Save
Saves all Setup values and exit Setup.
Quit
Ignores all changes to Setup values and exits Setup.
About
Supplies some BIOS and system version
information.
Restoring the Flash BIOS
To restore a corrupted Flash BIOS a Crisis Recovery diskette is required.
To restore the Flash BIOS:
1.
Turn the computer Off by pressing [fn] + Standby/Resume button.
2.
Make sure the Diskette Drive Module is installed in the computer.
3.
Enable Crisis Recovery mode by placing a jumper across resistor R744. This resistor is
located in the expansion memory compartment on the bottom of the unit. To locate the
resistor:
a)
Place the unit in front of you with the bottom up and the battery closest to you.
b) Remove the cover on the memory compartment.
c)
The resistor is located in the lower left corner of the memory compartment.
4.
Place the Crisis Recovery disk in the drive.
5.
Turn On the system. When the BIOS is restored, turn Off the system by pressing [fn] +
Suspend/Resume button.
6.
Remove the jumper across resistor R744.
DIGITAL HiNote Ultra 2000 Service Guide 2–11
3
Troubleshooting
This chapter provides a systematic method of isolating problems with the DIGITAL HiNote
Ultra 2000 notebook computer. It is assumed that you have a basic understanding of DOSbased computer systems as well as a knowledge of standard troubleshooting procedures. This
manual is written under the assumption that the problems are indeed related to the notebook
computer itself. The improper usage of the system and application software problems are
excluded in this chapter.
The system BIOS power on self-tests (POST) are integral to the system and detect certain
errors with the system board. They use a series of beep codes to identify certain system board
problems.
The troubleshooting procedures, when followed step by step, can help isolate system problems.
Beep Codes
The power on self-tests will issue a sequence of short and long beeps to indicate that an error
has occurred. The following is a list of the beep code sequences and the error condition.
Beep Code Sequence
Error Condition
s,s,s,s
No RAM detected
s,s,s,l
RAM test failed
s,s,l,s
BIOS is not shadowed
s,l,s,s
BIOS Checksum bad
l,s,l,s
No CR code or CR is bad
s,s,s,s,s,s,s,s l,l,l,l l,l,l,l,
Crisis Recovery required
s = short beep
l = long beep
DIGITAL HiNote Ultra 2000 Service Guide 3–1
Troubleshooting
Troubleshooting Tips
In general, troubleshooting involves an organized system of approach to problem solving. Try
to isolate the problem and identify the defective device (hardware) or improper setting
(software). When you have a problem, you should do a thorough visual inspection of the
notebook computer.
•
If none of the indicators are lit and you cannot hear the HDD spinning, then the notebook
computer is probably not receiving power.
•
Make sure the power cord is plugged in, and the AC adapter is securely connected. The
LEDs on the AC adapter and the system should be on when connected to a working AC
source.
•
If you are using a power strip or surge protector, ensure that these devices are turned on.
•
When powering the system by battery, make sure the battery is charged.
Often problems are caused by improperly connected cables.
•
If you are using peripherals such as the mouse or keyboard, make sure they are properly
connected to their respective ports. Ensure that none of the connector pins are bent or
broken.
•
Check all cables connected to the notebook computer. If any are cut, frayed, or damaged
in any way, replace them right away. Never use a damaged cable. A damaged cable is not
only a fire hazard, it may also cause a short circuit, resulting in irreparable damage to the
notebook computer.
•
Check all internal connections to ensure that they are secure. Often problems can occur
because a connection is loose or backwards.
Verify that all test equipment works before using it to test a malfunctioning component.
Verify that a component is the only malfunctioning part of the computer by replacing the
malfunctioning component with a properly functioning one, and then try to run the system. For
example, if you have tested an FDD in a test computer and found it to be bad, you should also
try a good FDD in the malfunctioning FDD’s computer to be sure that another component
(such as the FDD controller) is not bad as well.
As with assembly and disassembly, make sure you have adequate lighting, the right tools, and a
stable clean working environment.
The examples that follow provide useful tips and information that will help isolate and solve
some of the more common problems that may be encountered.
System Start Failure
When you turn On the computer, the system hangs before completing or starting the POST
(power on self-test). A power supply failure, POST failure, or boot-up failure can result in a
system start failure. Reset the system by pressing the reset button located under the keyboard
next to the hard drive (Figure 1-1) and restart the system.
3–2 DIGITAL HiNote Ultra 2000 Service Guide
Troubleshooting
Power Supply Failure
Problem
Troubleshooting Procedure
You turn On the power switch and the following
conditions apply:
If you are operating the notebook computer using
the battery:
•
There is no panel display
•
•
There is no noise coming from the HDD
The system could be in suspend. Press the
Suspend/Resume button.
•
The power indicator light is off (AC
operation).
•
The battery connection is loose. Remove
and reinstall the battery.
•
The battery power is depleted. Plug in the
AC adapter, or replace the battery.
•
The system could be experiencing a hang.
Press the reset button located under the
keyboard (Figure 1-1).
If you are operating the notebook computer using
the AC adapter:
•
Check that the AC adapter is plugged into an
operational power supply.
•
Check that the AC adapter is connected
securely to the notebook computer’s AC
adapter socket.
•
Check to see if the Power LED on the
computer is lit. If not lit, then the AC
adapter may be bad. Replace the AC
adapter, and test the notebook computer
again.
•
Press the Suspend/Resume button.
•
Press the system "Reset Button" under the
keyboard (Figure 1-1).
If the above items do not solve the problem,
replace the DC-to-DC Converter (Figure 4-25).
DIGITAL HiNote Ultra 2000 Service Guide 3–3
Troubleshooting
Boot-up Failure
Problem
Troubleshooting Procedure
You turn On the notebook computer and the
following conditions apply:
•
System in Suspend Mode. Press the
Suspend/Resume button.
•
System possibly hung after using a screen
saver. Press the Reset button located under
the keyboard (Figure 1-1).
•
Check the DRAM connections to be sure
that they are secure.
•
Check the LCD connections.
•
Check the system board power circuit.
•
The notebook computer’s power is on.
(Green power LED is lit.)
•
There is no screen display.
POST Failure
Problem
Troubleshooting Procedure
You turn On the computer and the following
happens:
•
•
There is power to the system and the HDD
seems to be spinning.
•
The notebook computer emits a series of
beeps.
3–4 DIGITAL HiNote Ultra 2000 Service Guide
A POST failure usually indicates a memory,
BIOS, or HDD failure. Refer to the table at
the beginning of this chapter for a list of
Beep Codes.
Troubleshooting
Cardbus Failure
Problem
Troubleshooting Procedure
The Cardbus slots do not work.
•
Reseat the Cardbus assembly cable (Figure
4-20).
•
Replace the Cardbus Assembly (Figure 420, Figure 4-21).
•
Replace the Motherboard (Figure 4-18,
Figure 4-19).
LCD Panel Failure
Problem
Troubleshooting Procedure
You turn On the computer and one of the
following conditions apply:
•
If using the AC Adapter, make sure the
green power indicator is on.
•
Verify video operation by connecting an
external monitor to the system. Press [fn] +
[F4] to enable the external VGA port.
•
Make sure that the LCD cables are properly
seated and securely connected to the
Motherboard and Daughtercard.
•
Make sure that the LCD cable is securely
connected to the inverter. The backlight
inverter cable may be bad. Change the
backlight inverter cable (Figure 5-3 Callout
7).
•
Replace the backlight inverter.
•
Replace the Daughtercard. Possible bad
BIOS chip.
•
Replace the Moterboard. Possible bad VGA
chip.
•
Replace the LCD panel.
•
The system is working, but there is no LCD
panel display.
•
The system is working, but the LCD panel
displays vertical or horizontal lines.
•
The backlight comes on, but there is no
display.
•
There is a display, but there are unwanted
lines on the screen.
DIGITAL HiNote Ultra 2000 Service Guide 3–5
Troubleshooting
CRT Failure
Problem
Troubleshooting Procedure
The notebook computer has power, the notebook
computer’s LCD panel is working and one of the
following conditions apply:
•
Make sure the CRT output is enabled. Press
[fn] + [F4] to enable/disable the external
video port.
•
The notebook computer’s LCD panel is
working.
•
•
Make sure that the CRT’s power is on and
the power cables are securely connected.
There is no display on the CRT.
•
•
The color of the CRT display is wrong.
•
There is a display, but the display is not
stable.
Make sure that the CRT to notebook
computer cable connection is secure. Check
the CRT port on the notebook computer to
make sure the connection is secure, and that
there are no damaged pins or connectors.
•
Make sure the settings in the operating
system’s Control Panel Display icon are
supported by the monitor.
•
If the CRT still doesn’t work, change to a
different CRT and try again.
•
If the color is bad, adjust the Monitor’s color
controls (if any).
Notebook Computer Keyboard Failure
Problem
Troubleshooting Procedure
The notebook computer is powered-on.
However, when pressing any of the keys on the
keyboard, one of the following events occurs:
•
Make sure that the keyboard cables are
securely connected.
•
Replace the keyboard and check again.
•
Press the Rest button located under the
keyboard (Figure 1-1).
•
Make sure you have the correct language
variant of the keyboard.
•
Replace the Motherboard.
•
Pressing on the key doesn’t have any effect.
•
Incorrect characters are displayed on the
screen.
•
One stroke of a key produces too many
characters on the screen.
3–6 DIGITAL HiNote Ultra 2000 Service Guide
Troubleshooting
External Keyboard or PS/2 Mouse Failure
Problem
Troubleshooting Procedure
The notebook computer’s power is on, and the
keyboard is working. One of the following
conditions occur:
•
Make sure that the external mouse or
keyboard’s connection to the notebook
computer’s PS/2 mini-DIN connector is
secure.
•
Make sure the mouse trackball and postion
sensors are clean and free of dust.
•
Replace the external mouse or keyboard and
try again.
•
If the system still doesn’t work, reseat the
I/O panel connector on the Motherboard
(Figure 4-18)
•
Replace the I/O Panel (Figure 4-27).
•
Pressing keys on the external keyboard has
no effect.
•
Pressing keys on the external keyboard give
incorrect characters.
•
The mouse cursor on the screen doesn’t
move in conjunction with the external
mouse.
HDD Failure
Problem
Troubleshooting Procedure
When you try to access the HDD, one of the
following conditions occur:
•
Check to make sure that the BIOS settings
are correct. Refer to Chapter 2 for BIOS
information.
•
Make sure that the HDD connection is
secure.
•
Try a known good hard drive.
•
Install the HDD into another HiNote Ultra
2000 notebook computer to test it.
•
If the HDD works in a test notebook
computer, the HDD controller on the
Motherboard is probably bad. Test the
Motherboard.
•
There is a message indicating that the HDD
doesn’t exist.
•
You can’t read from the HDD.
•
You can’t write to the HDD.
DIGITAL HiNote Ultra 2000 Service Guide 3–7
Troubleshooting
FDD Failure
Problem
Troubleshooting Procedure
The notebook computer’s power is on. The HDD
is functioning correctly. When you try to access
the FDD, one of the following conditions occurs:
•
Check the BIOS settings for the FDD. Refer
to Chapter 2.
•
Make sure the CD-ROM/FDD module is
properly seated.
•
Make sure only one FDD is installed in a
system with a multimedia dock attached.
The system supports only one FDD.
•
Try a different diskette in the drive. Make
sure that the diskette isn’t write protected.
•
Clean the FDD’s heads.
•
Change the FDD module and test again.
•
If the drive still does not work, replace the
main board.
•
You can’t read from the FDD.
•
You can’t write to the FDD.
•
You can’t hear the FDD motor spinning, and
the LED indicator light isn’t on.
CD-ROM Failure
Problem
Troubleshooting Procedure
The notebook computer’s power is on. The HDD
is functioning correctly. When you try to access
the CD-ROM, one of the following conditions
occurs:
•
Check the BIOS settings for the CD-ROM.
Refer to Chapter 2.
•
Make sure the CD-ROM module is properly
seated.
•
Make sure only one CD-ROM is installed in
a system with a multimedia dock attached.
•
Switch to a different CD-ROM drive and try
again.
•
Clean the CD-ROM’s lens.
•
Change the CD-ROM module and test again.
•
If the CD-ROM still does not work, replace
the Motherboard.
•
You can’t read from the CD-ROM.
•
You can’t hear the CD-ROM motor
spinning, and the LED indicator light isn’t
on.
3–8 DIGITAL HiNote Ultra 2000 Service Guide
Troubleshooting
Battery Failure
Problem
Troubleshooting Procedure
The notebook computer’s AC power works.
When trying to use battery power, the notebook
computer doesn’t operate. However, when the
AC Adapter is connected, the battery charge
indicator flashes.
•
Make sure that the battery contacts are in
good condition.
•
Make sure that the battery terminals are
clean. If necessary, clean the terminals with
contact cleaner.
•
Change the battery and try again.
•
Check to make sure that the AC power
supply (the AC adapter and AC adapter
cord) are OK. If they are not supplying the
correct voltage, it could damage the system.
Touchpad Failure
Problem
Troubleshooting Procedure
The notebook computer’s Touchpad does not
work.
•
Check the BIOS settings for the Touchpad.
Refer to Chapter 2.
•
Check the Toucpad settings in the operating
system’s Control Panel.
•
Make sure the UMI cable connection to the
Daughtercard is properly seated. This
connector is located under the Keyboard
Deck behind the Touchpad. Note: If both
the Touchpad and modem do not work, this
cable is most likely not connected.
•
Make sure the Touchpad cable is properly
seated.
Internal Modem (UMI) Failure
Problem
Troubleshooting Procedure
The internal modem (if installed) does not work.
You cannot make a connection to a phone line.
•
Make sure the Modem Card, UMI adapter
are properly seated.
•
Make sure the modem software is properly
configured.
•
Verify that the modem port is enabled. This
is done using the System icon in the Control
Panel of the operating system.
•
Make sure the UMI cable is properly
connected to the Daughtercard. This
connector is located under the Keyboard
Deck behind the Touchpad. Note: If both
the Touchpad and modem do not work, this
cable is most likely not connected.
DIGITAL HiNote Ultra 2000 Service Guide 3–9
Troubleshooting
External Audio Failure
Problem
Troubleshooting Procedure
No sound from external speakers connected to
external audio port.
•
Make sure the connections are properly
seated.
•
Make sure power is applied to the speakers
(if necessary).
•
Reseat the Audio Connector cable on the
Daughtercard. Note: If this cable is not
connected the internal speakers will not
work.
3–10 DIGITAL HiNote Ultra 2000 Service Guide
4
Parts Replacement
This chapter provides detailed procedures for replacing the DIGITAL HiNote Ultra 2000
notebook computer Field Replaceable Units (FRUs). Unless otherwise noted the replacement
procedures for the FRUs are the reverse of the removal procedures.
Required Tools
You will need the following tools to remove and replace the DIGITAL HiNote Ultra 2000
FRUs:
•
#0 and #1 Phillips-head Screwdrivers
•
3/16 inch Nut Driver
•
Tweezers
DIGITAL HiNote Ultra 2000 Service Guide 4–1
Parts Replacement
Removing the Battery
The battery is located on the bottom of the system unit (Figure 4-1).
To remove the battery:
1.
Close any open applications and shutdown the operating system.
2.
Power Off the computer by pressing [fn] + Standby/Resume button.
3.
Press down on the battery in front of the latch and slide the latch in the direction shown
(Figure 4-1).
4.
Remove the battery by lifting it up and away from the system unit (Figure 4-1).
Figure 4-1 Removing the Battery
4–2 DIGITAL HiNote Ultra 2000 Service Guide
Parts Replacement
Removing the CD-ROM/FDD Module
To remove the CD-ROM or FDD module:
1.
Press in on the CD-ROM/FDD module and slide the latch in the direction shown
(Figure 4-2).
2.
Slide the module out of the system unit.
Figure 4-2 Removing the CD/FDD Module
DIGITAL HiNote Ultra 2000 Service Guide 4–3
Parts Replacement
Removing the Keyboard
To remove the keyboard:
1.
Unlatch the keyboard by sliding the Keyboard latches toward the LCD display
(Figure 4-3).
2.
Carefully lift the keyboard up and rotate it toward the LCD display (Figure 4-4).
____________________________ Caution __________________________
Be careful not to damage the flat cables that connect the keyboard to
the notebook computer (Figure 4-4).
______________________________________________________________
3.
Release the keyboard cables from the connectors and slide the cables out of the connectors
(Figure 4-4).
Figure 4-3 Releasing the Keyboard
4–4 DIGITAL HiNote Ultra 2000 Service Guide
Parts Replacement
Figure 4-4 Removing the Keyboard
DIGITAL HiNote Ultra 2000 Service Guide 4–5
Parts Replacement
Removing the HDD Assembly
To remove the HDD:
1.
Remove the keyboard (Figure 4-3, Figure 4-4).
2.
Slide the latch that holds the hard drive in place to the unlocked position (Figure 4-5).
3.
Pull up on the attached ribbon loop to disconnect the drive and remove the drive from the
system (Figure 4-6).
Figure 4-5 Releasing the Hard Drive
4–6 DIGITAL HiNote Ultra 2000 Service Guide
Parts Replacement
Figure 4-6 Removing the Hard Drive
DIGITAL HiNote Ultra 2000 Service Guide 4–7
Parts Replacement
Removing the Keyboard Deck and LCD Assembly
1.
To remove the keyboard deck and LCD Assembly:
2.
Remove the Battery (Figure 4-1).
3.
Remove the CD-ROM/FDD Module (Figure 4-2).
4.
Remove the Keyboard (Figure 4-3, Figure 4-4).
5.
Remove the HDD (Figure 4-5, Figure 4-6).
6.
Remove the UMI slot cover (Figure 4-7).
Figure 4-7 Removing UMI Slot Cover
4–8 DIGITAL HiNote Ultra 2000 Service Guide
Parts Replacement
7.
Close the LCD Display and remove the two hinge covers (Figure 4-8). To remove the
hinge covers:
a)
Use a small pointed tool such as a pair of tweezers to release the inside edge of the
hinge cover.
b) With your fingers, release the rest of the hinge cover and wiggle it to remove the
hinge cover. Note: The left and right hinge covers are different.
8.
Remove the four flat-head hinge screws (Figure 4-8).
Figure 4-8 Removing Hinge Covers and Screws
DIGITAL HiNote Ultra 2000 Service Guide 4–9
Parts Replacement
9.
Turn the system unit over so the bottom is up. Remove the two rubber feet and seven
screws (Figure 4-9). Note: one screw is located in the battery compartment.
10. Turn the system unit over so the top is up and open the LCD Display.
11. Remove the eight screws that hold the keyboard deck and LCD and Audio cables in place
(Figure 4-9). Note: the LCD and Audio cables are secured to the top of the DC-to-DC
Converter.
12. Disconnect the two LCD cables from the Motherboard and the Daughtercard.
Figure 4-9 Removing Keyboard Deck Screws
4–10 DIGITAL HiNote Ultra 2000 Service Guide
Parts Replacement
13. Remove the four hinge screws at the back of the Keyboard Deck (Figure 4-10).
14. Grasp behind the Touchpad and pull up on the Keyboard Deck to release the UMI
connector.
______________________________ Note ___________________________
1.
When reassembling the system, connect the UMI cable to Daughtercard
before replacing the Keyboard Deck.
2.
Reconnect the two LCD cables.
3.
Before replacing the Keyboard Deck screws, attach the AC adapter and
verify that the system powers up.
4.
Make a visual inspection of the connections before replacing the screws.
______________________________________________________________
15. Flip the PC Card ejectors out and lift the LCD Display and Keyboard Deck up and away
from the rest of the system unit.
16. To separate the Keyboard Deck and LCD Display, carefully maneuver each cable through
its the opening in the Keyboard Deck.
_____________________________Caution__________________________
Be careful not to crease the cable when you fold it over.
______________________________________________________________
Figure 4-10 Removing LCD Assembly Hinge Screws
DIGITAL HiNote Ultra 2000 Service Guide 4–11
Parts Replacement
Removing the UMI Assembly
The UMI Assembly is attached to the underside of the Keyboard Deck. To remove the UMI
Assembly:
1.
Remove the Keyboard Deck (Figure 4-7, Figure 4-8, Figure 4-9, Figure 4-10).
2.
Disconnect the UMI cable.
3.
Remove the five screws that hold the UMI Assembly in place (Figure 4-11).
4.
Remove the UMI Assembly.
Figure 4-11 Removing the UMI Assembly (Underside of Keyboard Deck)
4–12 DIGITAL HiNote Ultra 2000 Service Guide
Parts Replacement
Removing the Touchpad
The Touch Pad is mounted to the underside of the Keyboard Deck. To remove the Touchpad:
1.
Remove the Keyboard Deck (Figure 4-7, Figure 4-8, Figure 4-9, Figure 4-10).
2.
Disconnect the UMI cable.
3.
Remove the four screws that secure the Touchpad to the Keyboard Deck (Figure 4-12).
4.
Carefully release the Touchpad from the catches that hold it in place and lift up on the
Touchpad.
Figure 4-12 Removing the Touchpad (Underside of Keyboard Deck)
DIGITAL HiNote Ultra 2000 Service Guide 4–13
Parts Replacement
Removing the Power LED Assembly
To remove the Power LED Assembly:
1.
Remove the Keyboard Deck (Figure 4-7, Figure 4-8, Figure 4-9, Figure 4-10).
2.
Disonnect the Right Speaker cable from the Daughtercard and the Lid Switch cable from
the Motherboard.
3.
Disconnect the Power LED cable from the Motherboard (Figure 4-13).
4.
Lift the Power LED Assembly out of the lower system housing.
Figure 4-13 Removing the Power LED Assembly
4–14 DIGITAL HiNote Ultra 2000 Service Guide
Parts Replacement
Removing the Lid Switch
To remove the Lid Switch:
1.
Remove the Keyboard Deck (Figure 4-7, Figure 4-8, Figure 4-9, Figure 4-10).
2.
Disconnect the Lid Switch cable from the Motherboard (Figure 4-14).
3.
Remove the screw that holds the Lid Switch in place.
4.
Press in on the lid release button and lift the Lid Switch out the system base (Figure 4-14).
Figure 4-14 Removing the Lid Switch
DIGITAL HiNote Ultra 2000 Service Guide 4–15
Parts Replacement
Removing the Daughtercard
The Daughtercard provides the Video, Audio, and BIOS functions. To remove the
Daughtercard:
1.
Remove the Keyboard Deck (Figure 4-7, Figure 4-8, Figure 4-9, Figure 4-10).
2.
Disconnect the RTC battery and Audio cables (Figure 4-15).
3.
Disconnect the speaker, and docking cables (Figure 4-16).
4.
Remove the two screws that hold the Daughtercard in place (Figure 4-17).
5.
Lift up on the Daughtercard to remove (Figure 4-17).
______________________________Note ___________________________
To install the Daughtercard:
1.
Connect the RTC battery cable
2.
Align the Daughtercard and Motherboard connector and install the
Daughtercard.
3.
Connect the audio, speaker, lid switch, and docking cables.
______________________________________________________________
Figure 4-15 Disconnecting the RTC Battery
4–16 DIGITAL HiNote Ultra 2000 Service Guide
Parts Replacement
Figure 4-16 Disconnecting Speaker, Lid Switch, and Docking Cables
Figure 4-17 Removing Daughtercard
DIGITAL HiNote Ultra 2000 Service Guide 4–17
Parts Replacement
Removing the Motherboard
To remove the Motherboard:
1.
Remove the Keyboard Deck (Figure 4-7, Figure 4-8, Figure 4-9, Figure 4-10).
2.
Remove the Daughtercard (Figure 4-15, Figure 4-16, Figure 4-17).
3.
Disconnect the LED cable (Figure 4-18).
4.
Disconnect the Lid Switch cable (Figure 4-18).
5.
Disconnect the RJ11 cable (Figure 4-18).
6.
Disconnect the I/O Panel cable (Figure 4-18).
7.
Remove the five screws that secure the Motherboard. Make note of location, size, and
length of each screw (Figure 4-19).
8.
Hold the I/O Panel connector out of the way and lift the Motherboard by the Cardbus
Assembly. Carefully wiggle the Motherboard to release if form the DC-to-DC Converter
connector (Figure 4-19).
Figure 4-18 Disconnecting the I/O Panel and UMI Cables
4–18 DIGITAL HiNote Ultra 2000 Service Guide
Parts Replacement
Figure 4-19 Removing the Motherboard
DIGITAL HiNote Ultra 2000 Service Guide 4–19
Parts Replacement
Removing the Cardbus Assembly
To remove the Cardbus Assembly:
1.
Remove the Keyboard Deck (Figure 4-7, Figure 4-8, Figure 4-9, Figure 4-10).
2.
Remove the Daughtercard (Figure 4-15, Figure 4-16, Figure 4-17).
3.
Remove the Motherboard (Figure 4-18, Figure 4-19).
4.
Disconnect the Cardbus Assembly cable form the Motherboard (Figure 4-20).
5.
Remove the two screws that hold the Cardbus Assembly to the Motherboard (Figure 4-21).
6.
Remove the Cardbus Assembly from the Motherboard.
Figure 4-20 Disconnecting PC Card Assembly Cable
4–20 DIGITAL HiNote Ultra 2000 Service Guide
Parts Replacement
Figure 4-21 Removing PC Card Assembly
Removing the Audio Connector Assembly
To remove the Audio Connector Assembly:
1.
Remove the Keyboard Deck (Figure 4-7, Figure 4-8, Figure 4-9, Figure 4-10).
2.
Disconnect the Audio Cable from the Daughtercard.
3.
Slide the Audio Connector Assembly out of the system (Figure 4-22).
Figure 4-22 Removing the Audio Connector Assembly
DIGITAL HiNote Ultra 2000 Service Guide 4–21
Parts Replacement
Removing the RTC and Bridge Batteries
To remove the RTC battery:
1.
Remove the Keyboard Deck (Figure 4-7, Figure 4-8, Figure 4-9, Figure 4-10).
2.
Disconnect Audio Cable.
3.
Disconnect the RTC battery cable from the Daughtercard (Figure 4-15).
4.
Remove one screw from the battery clamp and remove the clamp (Figure 4-23).
5.
Disconnect the Bridge battery cable from the DC-to-DC Converter (Figure 4-24).
6.
Remove the batteries.
Figure 4-23 Removing the Battery Clamp
Figure 4-24 Disconnecting the Bridge Battery
4–22 DIGITAL HiNote Ultra 2000 Service Guide
Parts Replacement
Removing the DC-to-DC Converter
To remove the DC-to-DC Converter:
1.
Remove the Keyboard Deck (Figure 4-7, Figure 4-8, Figure 4-9, Figure 4-10).
2.
Remove the Daughtercard (Figure 4-15, Figure 4-16, Figure 4-17).
3.
Remove the Audio Connector Assembly (Figure 4-22).
4.
Remove the Motherboard (Figure 4-18, Figure 4-19).
5.
Remove the RTC and Bridge batteries (Figure 4-23, Figure 4-24).
6.
Remove the two screws that secure the DC-to-DC Converter cover and remove the cover
(Figure 4-25).
7.
Remove the three screws that hold the right hinge bracket in place and remove the hinge
bracket (Figure 4-26).
8.
Remove the DC-to-DC Converter (Figure 4-25).
Figure 4-25 Removing the DC-to-DC Converter
DIGITAL HiNote Ultra 2000 Service Guide 4–23
Parts Replacement
Removing the I/O Panel Assembly
To remove the I/O Panel Assembly:
1.
Remove the Keyboard Deck (Figure 4-7, Figure 4-8, Figure 4-9, Figure 4-10).
2.
Remove the Daughtercard (Figure 4-15, Figure 4-16, Figure 4-17).
3.
Remove the Motherboard (Figure 4-18, Figure 4-19).
4.
Remove the DC-to-DC Converter (Figure 4-25).
5.
Remove the Left Hinge bracket (Figure 4-26).
6.
Remove the screw that secures the IR section of the I/O Panel Assembly (Figure 4-27).
7.
Remove the six 3/16 inch nuts that hold the I/O Panel in place.
8.
Carefully move the cables out of the way and lift the I/O Panel from the system.
Figure 4-26 Removing the Hinge Brackets
4–24 DIGITAL HiNote Ultra 2000 Service Guide
Parts Replacement
Figure 4-27 Removing the I/O Panel
DIGITAL HiNote Ultra 2000 Service Guide 4–25
Parts Replacement
Removing the LCD Display Bezel
The disassembly of the Display Bezels for the 12.1 inch and 14.1 inch LCD displays is
different.
12.1 inch LCD Display Bezel
To remove the 12.1 inch LCD Display Bezel:
1.
Remove the LCD Display and the Keyboard Deck (Figure 4-7, Figure 4-8, Figure 4-9,
Figure 4-10).
2.
Remove the two rubber fillers on the LCD Display Bezel (Figure 4-28).
3.
Remove the two screws that secure the LCD Display Bezel to the housing.
4.
Grasp the inside of the bezel and carefully pull towards the outside to release the catches.
Separate the bezel from the housing (Figure 4-28).
4–26 DIGITAL HiNote Ultra 2000 Service Guide
Parts Replacement
Figure 4-28 Removing the 12.1 Inch Display Bezel
DIGITAL HiNote Ultra 2000 Service Guide 4–27
Parts Replacement
14.1 inch Display Bezel
To remove the 14.1 inch LCD Display Bezel:
1.
Remove the LCD Display and the Keyboard Deck (Figure 4-7, Figure 4-8, Figure 4-9,
Figure 4-10).
2.
Remove the two rubber fillers on the lower section of the LCD Display Bezel
(Figure 4-29).
3.
Remove the two screws that secure the LCD Display Bezel to the LCD housing.
4.
Grasp the bottom of bezel from the inside edge and carefully pull towards the outside to
release the catches. Carefully separate the bezel from the housing (Figure 4-29).
a)
Release the lower right corner of the bezel.
b) Release the lower left corner of the bezel.
c)
Carefully separate the rest of the bezel by working your fingers around the inside
of the bezel.
____________________________ Caution __________________________
Be careful when removing the bezel. Excessive pressure can cause the
bezel to crack.
______________________________________________________________
4–28 DIGITAL HiNote Ultra 2000 Service Guide
Parts Replacement
Figure 4-29 Removing the 14.1 Inch LCD Bezel
DIGITAL HiNote Ultra 2000 Service Guide 4–29
Parts Replacement
Removing the LCD Display
The disassembly instructions for the 12.1 inch and 14.1 inch LCD displays are different.
12.1 Inch LCD Display
LCD Panel
To remove the 12.1 inch LCD Panel:
1.
Remove the Keyboard Deck and LCD Assembly (Figure 4-7, Figure 4-8, Figure 4-9,
Figure 4-10).
2.
Remove the LCD Bezel (Figure 4-28).
3.
Remove the four screws the hold the LCD Panel in place (Figure 4-30).
4.
Disconnect the inverter cable and display cable.
5.
Remove the two screws that hold the LCD display cable (by left hinge) in place and
disconnect the cable (Figure 4-31).
6.
Remove the LCD Panel.
Figure 4-30 Removing the 12.1 Inch LCD Panel
4–30 DIGITAL HiNote Ultra 2000 Service Guide
Parts Replacement
Status Display
To remove the Status Display:
1.
Remove the LCD Panel (Figure 4-30).
2.
Remove the three screws that hold the Status Display and cable in place (Figure 4-31).
3.
Remove the Status Display and cable.
Figure 4-31 Removing the 12.1 Inch LCD Cable and Status Display
DIGITAL HiNote Ultra 2000 Service Guide 4–31
Parts Replacement
Backlight Inverter
To remove the backlight inverter:
1.
Remove the LCD Panel (Figure 4-30).
2.
Remove the three screws from the right bracket and remove the bracket (Figure 4-32).
3.
Remove the screw that holds the cable in place (Figure 4-31).
4.
Remove the Inverter Assembly.
Figure 4-32 Removing the 12.1 Inch LCD Panel Inverter
4–32 DIGITAL HiNote Ultra 2000 Service Guide
Parts Replacement
14.1 Inch LCD Display
LCD Panel
To remove the 14.1 inch LCD Panel:
1.
Remove the Keyboard Deck and LCD Assembly (Figure 4-7, Figure 4-8, Figure 4-9,
Figure 4-10).
2.
Remove the LCD Bezel (Figure 4-29).
3.
Remove the filler strips located on the left and right side of the LCD Display. These strips
cover the screws that hold the LCD Panel in place.
______________________________ Note ___________________________
Remove each filler strip slowly so the adhesive does not come off the filler strip.
______________________________________________________________
4.
Remove the four screws (two on each side) the hold the LCD Panel in place (Figure 4-33).
5.
Remove the screw located in the lower right hand corner of the LCD Assembly (Figure 433).
6.
Disconnect the inverter cable (located to the right of the Status Display) and display cable
(Figure 4-33).
7.
Remove the screw that holds the LCD display cable Assembly in place (located to the left
of the Status Display, Figure 4-33).
8.
Disconnect the LCD display cable.
9.
Remove the LCD Panel.
______________________________ Note ___________________________
When reinstalling the 14.1 inch LCD Panel:
1.
Be careful not to pinch the cable that goes from from the inverter to the
backlight.
2.
Make sure you secure the flat backlight cable under screw to hold it in place.
______________________________________________________________
DIGITAL HiNote Ultra 2000 Service Guide 4–33
Parts Replacement
Figure 4-33 Removing the 14.1 Inch LCD Display Panel
4–34 DIGITAL HiNote Ultra 2000 Service Guide
Parts Replacement
Status Display
To remove the Status Display:
1.
Remove the Display Bezel (Figure 4-29).
2.
Disconnect the Status Display cable from the Status Display.
3.
Remove the screw in the lower right corner of the Status Display.
4.
Remove the Status Display.
Backlight Inverter
To remove the backlight inverter:
1.
Remove the Display Bezel (Figure 4-29).
2.
Remove the Status Display.
3.
Remove the screw located in the lower left corner of the inverter.
4.
Remove the Inverter Assembly.
5.
Disconnect the two cables connected to the invert and remove the inverter.
DIGITAL HiNote Ultra 2000 Service Guide 4–35
5
Part Numbers
This chapter contains a listing of the orderable parts and options for the DIGITAL HiNote
Ultra 2000 notebook computer.
Spare Parts Listing
This section contains a listing of orderable spare parts.
Display Bezels
Orderable Spare Part
LG Elect P/N
Description
30-48345-01
3111BZ1003A
LCD Display Bezel, Optrex
30-48346-01
3111BZ9005A
LCD Display Bezel, 12.1"
30-48347-01
3111BZ9006A
LCD Display Bezel, 14.1"
Orderable Spare Part
LG Elect P/N
Description
30-48319-01
3111BZ1004A
Assy, Housing Display Cover, 12.1
30-48320-01
3111BZ9007A
Assy, Housing Display Cover, 14.1
30-48317-01
3111BZ1001A
Assy, Keyboard Deck
30-48318-01
3111BZ1002A
Assy, Lower Logic
Housings
Mounting Assemblies
Orderable Spare Part
LG Elect P/N
Description
22-14485-01
4811BZ3001A
HDD Assembly Kit (w/BKT, Cable, Screw)
22-14486-01
6851B67036A
PCMCIA Assembly Kit (w/BKT, Cable, Screw)
Orderable Spare Part
LG Elect P/N
Description
30-48323-01
6708BI0004A
Assy, Inverter Board, Optrex
30-48324-01
6708BI0001A
Assy, Inverter Board, 12.1, XGA
30-48370-01
6708BI0002A
Assy, Inverter Board, 12.1, SVGA
30-48325-01
6708BI0003A
Assy, Inverter Board, 14.1
Inverter Boards
DIGITAL HiNote Ultra 2000 Service Guide 5–1
Part Numbers
LCD Panels
Orderable Spare Part
LG Elect P/N
Description
30-48348-01
6305BCR102A
LCD Panel, 12.1, Optrex
30-48349-01
6304BTFA1AB
LCD Panel, 12.1, LG/XGA
30-48350-01
6304BTFA1AA
LCD Panel, 12.1, LG/SVGA
30-48351-01
6304BTFB2AA
LCD Panel, 14.1, LG/XGA
Orderable Spare Part
LG Elect P/N
Description
30-48328-01
6872B9643A1
Assy, MLB 133MHz/Intel/MMX, 256K Cache
30-48330-01
6871B9643A5
Assy, MLB 166MHz/Intel/MMX, 512K Cache
Motherboards
Daughtercard
Orderable Spare Part
LG Elect P/N
Description
30-48331-01
6871B9643A2
System Daughtercard
Orderable Spare Part
LG Elect P/N
Description
30-48314-01
6708BA0001A
Assy, DC/DC Converter
30-48315-01
4810BP2027A
Assy, DC/DC Shield
Orderable Spare Part
LG Elect P/N
Description
30-48332-01
4410BD3001A
Heatsink, Main System (MLB/DC)
30-48333-01
4410BD3002A
Heatsink, Lower Logic
30-48334-01
6620BX52103
Card Bus Socket
30-48343-01
3580BM3006A
Card Bus Door, Top
DC-to-DC Converter
Miscellaneous
30-48344-01
3580BM3007A
Card Bus Door, Bottom
90-11453-01
4970BW4059A
Card Bus Door Spring, Lower
90-11454-01
4970BW4060A
Card Bus Door Spring, Upper
30-48362-01
6911B00003A
Assy, RTC Battery (CR1220, 1 Cell)
30-48363-01
6911B00002A
Assy, Bridge Battery (3.6V)
30-48338-01
6305BCH001A
Status LCD
30-48339-01
3680BM3009A
LED Lens
30-48340-01
6870B9633A1
Microphone Board
30-48341-01
6870B9657A1
Audio Board w/Cable
30-48342-01
6851B67009A
UMI Adapter Connector (Cable, connector…)
30-48316-01
3580BM3004A
I/O Port Door
5–2 DIGITAL HiNote Ultra 2000 Service Guide
Part Numbers
Orderable Spare Part
LG Elect P/N
Description
74-52466-01
4370BA4066A
I/O Port Door Shaft
90-11455-01
4970BW4058A
I/O Port Door Spring
74-52292-01
3610BZ4004A
Foot, Rubber, Front
74-52468-01
5006BZ4001A
Cap, Rubber, Front 12.1” SVGA/XGA
74-52569-01
5006BZ4002A
Cap, Rubber, Front 14.1” ASTN/XGA
74-52293-01
3301BZ3010A
Battery Latch
74-52294-01
3550BM3054A
PCI Docking Cover
74-52467-01
3580BM4001A
PCI Docking Door
74-52295-01
3580BM3005A
Memory Door
74-52646-02
3300BZ4014A
Plate, Display Side 14.1”
74-52296-01
3580BM2004A
Door, UMI & PCMCIA
30-48309-01
4027BZ3003A
Assy, Display Latch, R
30-48310-01
4027BX3002A
Assy, Display Latch, L
30-48311-01
6870B9656A1
Assy, Touchpad w/Holder, Cables, Screw
30-48312-01
6860BX0009A
Assy, Speaker/Cable, R
30-48313-01
6860BX0008A
Assy, Speaker/Cable, L
30-48326-01
4774BD3002A
Assy, Hinge, R
30-48327-01
4774BD3001A
Assy, Hinge, L
30-48352-01
5006BM3006A
Cover, Hinge, R
30-48353-01
5006M3005A
Cover, Hinge, L
30-48321-01
6743B00006A
Assy, Floppy Disk Drive
30-48322-01
6735B00007A
Assy, CD ROM, 11X, Toshiba (XM-1502B)
Orderable Spare Part
LG Elect P/N
Description
30-48360-01
6871B9653A1
RJ11 Modem Card, US Robotics
Modem Cards
DIGITAL HiNote Ultra 2000 Service Guide 5–3
Part Numbers
Cables
Orderable Spare Part
LG Elect P/N
Description
30-48354-01
6851B67004A
Cable, LCD/MLB w/guide ASTN
30-48335-01
6851B67034A
Cable, LCD/MLB w/guide SVGA/XGA
30-48336-01
6851B00264A
Cable, LCD/MLB w/guide 14.1 XGA
30-48355-01
6850B10005A
Cable, INV/MIC/DB 12.1 SVGA/XGA
30-48337-01
6850B10006A
Cable, INV/MIC/DB ASTN/XGA (12.1, 14.1)
30-48356-01
6851B67003A
Cable, PCMCIA (UMI) FPCB
30-48357-01
6851B67002A
Cable, I/O Assembly
30-48358-01
6851B00251A
Cable, LED Lens
30-48359-01
6851B67009A
Cable, UMI/RJ11/RJ45
30-48589-01
Cable, RJ11/RJ11
Keyboards
Orderable Spare Part
LG Elect P/N
Description
30-48372-01
3823B32202A
Keyboard, US/American, Ultra 2000
30-48373-01
3823B32203A
Keyboard, UK/British, Ultra 2000
30-48374-01
3823B32207A
Keyboard, Japanese, Ultra 2000
30-48375-01
3823B32204A
Keyboard, French, Ultra 2000
30-48376-01
3823B32205A
Keyboard, German, Ultra 2000
30-48377-01
3823B32208A
Keyboard, Italian, Ultra 2000
30-48378-01
3823B32206A
Keyboard, Spanish, Ultra 2000
30-48379-01
3823B32209A
Keyboard, Swed/Finn (Suomi), Ultra 2000
30-48380-01
3823B32210A
Keyboard, Swiss, Ultra 2000
30-48423-01
3823B32211A
Keyboard, Denmark, Ultra 2000
30-48424-01
3823B32212A
Keyboard, Norway, Ultra 2000
30-48793-01
Keyboard, FR/Canadian, Ultra 2000
30-48685-01
n/a
Keyboard, Blank, Ultra 2000
Orderable Spare Part
LG Elect P/N
Description
30-48529-01
6744B144203
HDD, 1.44Gb, 2.5” x .5” H (Toshiba - MK1401MAV)
30-46539-01
6744B144202
HDD, 1.44Gb, 2.5” x .5” H (IBM - DSOA-21440)
30-48166-01
6744B144204
HDD, 1.44Gb, 2.5” x .5” H (Hitachi - DK224A-14)
30-48531-01
6744B216201
HDD, 2.1Gb, 2.5” x .5” H (IBM - DTNA-22160)
30-48530-01
6744B216202
HDD, 2.1Gb, 2.5” x .5” H (Toshiba - MK2103MAV)
Orderable Spare Part
LG Elect P/N
Description
30-48364-01
6911B00005A
Li-Ion Battery Pack, 8C, Sony
30-48365-01
6911G00004A
Li-Ion Battery Pack, 12C, Sony
Hard Drives
Batteries
30-48586-01
Li-Ion Battery Pack, 8C, Moli
30-48587-01
Li-Ion Battery Pack, 12C, Moli
5–4 DIGITAL HiNote Ultra 2000 Service Guide
Part Numbers
Power Cords
Orderable Spare Part
LG Elect P/N
Description
17-04105-01
Power Cord, US/American
17-04105-02
Power Cord, Central European
17-04105-03
Power Cord, UK/British
17-04105-06
Power Cord, Japanese
17-04105-07
Power Cord, Australian/New Zealand
DIGITAL HiNote Ultra 2000 Service Guide 5–5
Part Numbers
Parts Identification
The following figures and tables identify the major FRUs and provide the order number for the
part. For a listing of all FRUs, refer the the “Spare Parts Listing” section of this chapter.
Figure 5-1 System Unit (1 of 2)
5–6 DIGITAL HiNote Ultra 2000 Service Guide
Part Numbers
Ref
Orderable Spare Part
LG Elect P/N
Description
1
30-48317-01
3111BZ1001A
Assy, Keyboard Deck
2
30-48358-01
6851B00251A
Cable, LED Lens
3
30-48313-01
6860BX0009A
Assy, Speaker/Cable, L
4
30-48312-01
6860BX0008A
Assy, Speaker/Cable, R
5
30-48310-01
4027BX3002A
Assy, Display Latch, L
6
30-48309-01
4027BX3003A
Assy, Display Latch, R
7
30-48341-01
69870B9657A1
Audio Board w/Cable
8
30-48331-01
6871B9643A2
System Daughtercard
9
30-48334-01
6620BX52103
Card Bus Socket
10
30-48328-01
6872B9643A1
Assy, MLB 133MHz/Intel/MMX,
256K Cache
30-48330-01
6871B9643A5
Assy, MLB 166MHz/Intel/MMX,
512K Cache
11
30-48332-01
4410BD3001A
Heatsink, Main System (MLB/DC)
12
30-48333-01
4410BD3002A
Heatsink, Lower Logic
13
30-48318-01
3111BZ1002A
Assy, Lower Logic
DIGITAL HiNote Ultra 2000 Service Guide 5–7
Part Numbers
Figure 5-2 System Unit (2 of 2)
Ref.
Orderable Spare Part
LG Elect P/N
Description
1
30-48327-01
4774BD3001A
Assy, Hinge, L
2
30-48326-01
4774BD3002A
Assy, Hinge, R
3
30-48315-01
4810BP2027A
Assy, DC/DC Shield
4
30-48314-01
6708BA0001A
Assy, DC/DC Converter
5
30-48357-01
6851B67002A
Cable, I/O Assembly
6
74-52294-01
3550BM3054A
PCI Docking Cover
74-52467-01
3580BM4001A
PCI Docking Door
7
30-48333-01
4410BD3002A
Heatsink, Lower Logic
8
30-48318-01
3111BZ1002A
Assy, Lower Logic
5–8 DIGITAL HiNote Ultra 2000 Service Guide
Part Numbers
Figure 5-3 12.1 Inch Display
Ref.
Orderable Spare Part
LG Elect P/N
Description
1
30-48348-01
6305BCR102A
LCD Panel, 12.1, Optrex
30-48349-01
6304BTFA1AB
LCD Panel, 12.1, LG/XGA
30-48350-01
6304BTFA1AA
LCD Panel, 12.1, LG/SVGA
2
3
Rigth Bracket
30-48323-01
6708BI0004A
Assy, Inverter Board, Optrex
30-48324-01
6708BI0001A
Assy, Inverter Board, 12.1, XGA
30-48370-01
6708BI0002A
Assy, Inverter Board, 12.1, SVGA
4
5
Left Bracket
30-48354-01
6851B67004A
Cable, LCD/MLB w/guide ASTN
30-48335-01
6851B67034A
Cable, LCD/MLB w/guide
SVGA/XGA
6
30-48338-01
6305BCH001A
Status LCD
78
30-48337-01
6850B10006A
Cable, INV/MIC/DB ASTN/XGA
(12.1, 14.1)
DIGITAL HiNote Ultra 2000 Service Guide 5–9
Part Numbers
Options
This section contains a list of options with part numbers available for the DIGITAL HiNote
Ultra 2000 notebook computer.
Memory
DIGITAL Opt P/N
DIGITAL FRU P/N
Vendor
Description
FR-PCPMF-AA
30-48536-01
Simple Tech
Memory Module 8MB SO-Dimm
144 Pin, EDO, 3.3v
FR-PCPMF-AB
30-48537-01
Simple Tech
Memory Module 16MB SO-Dimm
144 Pin, EDO, 3.3v
FR-PCPMF-AC
30-48538-01
Simple Tech
Memory Module 32MB SO-Dimm
144 Pin, EDO, 3.3v
FR-PCPMF-AD
30-48539-01
Simple Tech
Memory Module 64MB SO-Dimm
144 Pin, EDO, 3.3v
DIGITAL HiNote Ultra Docks
DIGITAL Opt P/N
DIGITAL FRU P/N
Vendor
Description
FR-PCP8D-WX
30-48572-01
LG Electronic
DIGITAL HiNote Ultra
Multimedia Dock, Ultra 2000
FR-PCPEF-AB
30-48566-01
LG Electronic
Ultra Enchanged Port Replicator,
Cent Europe, Ultra 2000
FR-PCPEF-AC
30-48567-01
LG Electronic
Ultra Enchanced Port Replicator,
N. American, Ultra 2000
FR-PCPEF-AE
30-48568-01
LG Electronic
Ultra Enchanced Port Replicator,
UK/British, Ultra 2000
FR-PCPEF-AJ
30-48569-01
LG Electronic
Ultra Enchanced Port Replicator,
Japanese, Ultra 2000
FR-PCPEF-AZ
30-48570-01
LG Electronic
Ultra Enchanced Port Replicator,
Aust/NZ, Ultra 2000
FR-PCPEF-BW
30-48563-01
LG Electronic
Ultra Enchanced Port Replicator,
w/o PC, Ultra 2000
DIGITAL Opt P/N
DIGITAL FRU P/N
Vendor
Description
FR-PCPXF-AA
30-48364-01
ASTEC
Li-Ion Battery, Ultra 2000 (Sony 8
cell)
same as above
30-48586-01
ASTEC
Li-Ion Battery, Ultra 2000 (Moli 8
cell)
FR-PCPXF-AB
30-48365-01
ASTEC
Li-Ion Battery, Ultra 2000 (Sony
12 cell)
same as above
30-48587-01
ASTEC
Li-Ion Battery, Ultra 2000 (Moli
12 cell)
Batteries
5–10 DIGITAL HiNote Ultra 2000 Service Guide
Part Numbers
Power Adapters
DIGITAL Opt P/N
DIGITAL FRU P/N
Vendor
Description
FR-PCPDF-AB
30-48566-01
LG Electronic
AC Adapter, Cent. Europe, Ultra
2000
FR-PCPDF-AC
30-48567-01
LG Electronic
AC Adapter, North American,
Ultra 2000
FR-PCPDF-AE
30-48568-01
LG Electronic
AC Adapter, UK/British, Ultra
2000
FR-PCPDF-AJ
30-48569-01
LG Electronic
AC Adapter, Japanese, Ultra 2000
FR-PCPDF-AZ
30-48570-01
LG Electronic
AC Adapter, Austr/New Zealand,
Ultra 2000
FR-PCPDF-BW
30-48571-01
LG Electronic
AC Adapter, without Power Cord,
Ultra 2000
FR-PCPDF-AA
30-48565-01
LG Electronic
Car Adapter, Ultra 2000
DIGITAL Opt P/N
DIGITAL FRU P/N
Vendor
Description
FR-PCPRF-AA
30-48573-01
LG Electronic
2.1Gb Removable HDD, Ultra
2000
DIGITAL FRU P/N
Vendor
Description
Hard Drives
Internal Modems
DIGITAL Opt P/N
FR-PCPFX-AA
30-48586-01
US Robotics
Modem, 56Kbps, N. America
FR-PCPFX-AP
30-48587-01
US Robotics
Modem, 56Kbps, France
FR-PCPFX-AG
30-48588-01
US Robotics
Modem, 56Kbps, Germany
FR-PCPFX-AS
30-48589-01
US Robotics
Modem, 56Kbps, Spain
FR-PCPFX-AI
30-48590-01
US Robotics
Modem, 56Kbps, Italy
FR-PCPFX-AH
30-48591-01
US Robotics
Modem, 56Kbps, Netherlands
FR-PCPFX-AN
30-48592-01
US Robotics
Modem, 56Kbps, Norway
FR-PCPFX-AM
30-48593-01
US Robotics
Modem, 56Kbps, Sweden
FR-PCPFX-AK
30-48594-01
US Robotics
Modem, 56Kbps, Switzerland
FR-PCPFX-AD
30-48595-01
US Robotics
Modem, 56Kbps, Denmark
FR-PCPFX-AJ
30-48596-01
US Robotics
Modem, 56Kbps, Japan
FR-PCPFX-AE
30-48597-01
US Robotics
Modem, 56Kbps, UK/British
DIGITAL HiNote Ultra 2000 Service Guide 5–11
A
Specifications
System Specifications
System
Model
Feature
VTX5166M 2.1GB - 12.1”
GTX5166M 2.1GB - 14.1”
CPU Intel Pentium
166 MHz MMX
166 MHz MMX
LCD
12.1" XGA TFT
14.1" XGA TFT
HDD
2.1 GB
2.1 GB
Upgradeable HDD
Yes
Yes
L2 Cache
512KB
512KB
Base RAM
32MB – EDO 3.3v
32MB – EDO 3.3v
Maximum RAM
96MB
144MB
RAM Expansion
Single 144 pin SO–DIMM
3.3v self-refresh
Dual 144 pin SO–DIMM
3.3v self-refresh
Battery
LiIon – 8 cell 36Whrs
LiIon – 12 cell 54Whrs
Audio
Yes
Yes
CardBus/Zoomed Video
Supported
Supported
Fast IR (4 Mbps)
Yes
Yes
Integrated CD-ROM
20X
20X
Integrated Modem
Optional*
USR 56kps
Pointing Device
Touch pad
Touch pad
DIGITAL HiNote Ultra Enhanced
Port Replicator
Optional
Optional
DIGITAL HiNote Ultra Multimedia
Dock
Optional
Optional
Size
9.7" x 12" x 1.25"
9.7" x 12" x 1.4"
Weight (no FDD or CD-ROM in bay)
5.2 lbs. (approximate)
6.2 lbs. (approximate)
Weight (FDD in bay)
5.6 lbs. (approximate)
6.6 lbs. (approximate)
Weight (CD-ROM in bay)
5.85 lbs. (approximate)
6.85 lbs. (approximate)
Operating System
Windows 95 or
Windows NT 4.0
Windows 95 or
Windows NT 4.0
Warranty
3 years
3 years
* Available separately as a customer installable option.
DIGITAL HiNote Ultra 2000 Service Guide A–1
Specifications
Environment
Temperature
Operating
0° C to 35° C (32° F to 95° F)
Nonoperating
-20° C to 60° C (-4° F to 140° F)
Operating Humdity (noncondensing)
Operating
0% to 80%, Max wet bulb 35° C
Nonoperating
5% to 95%, Max wet bulb 35° C
Altitude
Operating
Sea level to 3,040m (8,000 ft)
Nonoperating
Sea level to 12,160m (40,000 ft)
Vibration
Operating
Minimum of 35mm or 1.0 G (0 to peak), 5 - 500 Hz,
per IEC-68-2-6
Nonoperating
Minimum of 50mm or 1.5 G (0 to peak), 5 - 500 Hz,
per IEC-68-2-6
Shock
Operating
10G for 11ms half sine
Nonoperating
100G for 11ms half sine
Acoustic noise (A weighted sound power level Lwa, per ISO 7779)
Idle mode:
HHD operating:
Keyboard operating:
3.8 Bels
3.9 Bels
5.0 Bels
High Frequency Tones < (25 + 5(f - 14))
(f = frequency in khz)
A–2 DIGITAL HiNote Ultra 2000 Service Guide
B
Device Mapping
Memory Map
Range
Name
Function
0h to 9FFFFh
640KB System Memory
System Memory Space
A0000h to BFFFFh
128K Video Memory
Graphics Display Memory Buffer
C0000h to CAFFFh
44KB Video BIOS ROM
Shadow BIOS of VGA
CC000h to CD7FFh
6K CD Boot ROM
CD Boot
CD800h to CDFFFh
2K EPP Bios
Enhance Parallel Port
E8000h to FFFFFh
96KB PCI, PnP, and System
ROM
BIOS of System
100000h to 8FFFFFFh
Additional Memory Space
Extended Memory Space, Size
from 8MB up to 144MB
DMA Channel Assignments
Channel
Controller
Function
0
1
Parallel Port ECP (if enabled)
1
1
Sound
2
1
Diskette controller
3
1
Serial IR (if enabled)
4
2
Cascade DMA
5
2
Not used
6
2
Not used
7
2
Not used
DIGITAL HiNote Ultra 2000 Service Guide B–1
Device Mapping
Notebook Computer Interrupt Levels
IRQ
Normal Assignments (FIS)
0
System Timer
1
Keyboard
2
Programmable Interrupt Controller
3
Serial Port Com2
4
Serial Port Com1
5
Audio
6
Floppy Disk Controller
7
Parallel Port LPT1
8
Real time clock
9
PCI Cardbus Controller
10
PCI Cardbus Controller
11
USB and Cardbus Controller (Multimedia dock)
12
Track Pad, PS/2 Mouse
13
Numeric data processor
14
Hard disk controller
15
Secondary Hard Disk Controller and Cardbus
(Multimedia dock)
B–2 DIGITAL HiNote Ultra 2000 Service Guide
Device Mapping
I/O Address Map
Range
(hexadecimal)
Function
000 - 00F
DMA controller A
020 - 021
Master interrupt controller
024
Index register - system board
026
Data register - system board
040 - 043
Interval timer
060 - 06F
Keyboard controller
070 - 07F
Real-time clock (RTC), NMI
080 - 08F
DMA page register
0A0 - 0A1
Slave interrupt controller
0C0 - 0CF
DMA controller B
0F0
Clear math coprocessor
0F1
Reset math coprocessor
0F8 - 0FF
Math coprocessor
150 - 157
ESS 1878 control interface
170 - 177
Secondary IDE controller
1F0 - 1F7
IDE controller
201
MIDI/Joystick
220-22F
278 - 27F
On-board Audio (ESS 1878)
*
2E8 - 2EF
2F8 - 2FF
LPT2
*
COM4
*
COM2
330-331
378 - 37F
MPU 401 Audio
*
LPT1
388 -38B
FM synthesizer Audio
3B0 - 3BB
Mono VGA registers
*
3BC - 3BE
LPT3
3C0 - 3CF
VGA registers
3D0 - 3DF
Color VGA registers
3E0 - 3E1
PCMCIA controller
3E8 - 3EF
*
COM 3
3F0 - 3F7
*
Diskette controller
3F6 - 3F7
*
IDE controller (alt status, device address)
3F8 - 3FF
*
CF8 - CFF
COM1
Cardbus PCI port interface
*Enabled and disabled using the Setup Utility or Windows 95
DIGITAL HiNote Ultra 2000 Service Guide B–3
Index
LCD Display, 4–30
12.1 inch LCD Display Bezel, 4–26
12.1" LCD Display
Backlight Inverter, 4–32
Status Display, 4–31
14.1 inch Display Bezel, 4–28
14.1 Inch LCD Display, 4–33
Backlight Inverter, 4–35
LCD Panel, 4–33
Status Display, 4–35
A
AC input
description, 1–9
Addresses, I/O Address Map, 3
Audio, 1–4
stereo audio output jack, 1–6
Audio Connector Assembly
Removing, 4–21
Audio Failure, 3–10
B
Backlight Inverter, 4–32, 4–35
12.1" Display, 4–32
Battery
Removing, 4–2
Battery, 1–14, 1–15, 1–16, 3–3, 3–9
charge indicator, 1–6
initial use, 1–15
maximizing battery life (key), 1–12
memory, 1–14
regular use, 1–15
run time, 1–14
smart battery operation, 1–15
Battery release
description, 1–10
Battery run time, 1–15
Beep Codes, 3–1
BIOS, 1–2, 1–4
Restoring, 2–11
Bridge Battery
Removing, 4–22
Bulletin Boards, 1–17
C
Caps lock, 1–11
Cardbus Assembly
Removing, 4–20
Cardbus Controller, 1–3
CD-ROM, 1–16, 3–8
drive bay, 1–6
Removing, 4–3
CD-ROM release
description, 1–10
Chip Set, 1–2
Computer
security, 2–8
Contrast control
description, 1–6
Controls and indicators, 1–6
CPU, 1–1
D
Daughtercard
Removing, 4–16
DC -to-DC Converter
Removing, 4–23
Device mapping
DMA channel assignments, B-1
I/O address, B-3
interrupt levels, B-2
memory map, B-1
Disk, 3–7, 3–8
Diskette, 1–16
drivebay, 1–6
Diskette release
description, 1–10
Display
contrast control description, 1–6
Docking
security, 2–7
Docking connector
description, 1–10
Docking Options, 1–5
Docking Security, 2–10
DIGITAL HiNote Ultra 2000 Service Guide Index-1
Index
Docks
Multimedia, 1–5
Port Replicator, 1–6
Documentation, 1–17
E
Embedded numeric keypad
LCD status display, 1–11
Environment, A-2
External display port
enabling/disabling (key), 1–12
F
Fast IR port
description, 1–9
FDD
Removing, 4–3
Field Replacable Units. See FRU
Floppy Disk, 3–8
Floppy drive. See Diskette
FRU, 4–1
Functional Description, 1–1
Audio, 1–4
BIOS, 1–2, 1–4
Cardbus Controller, 1–3
ISA Bus Devices, 1–4
Memory, 1–2
PCI-IDE Controller, 1–3
System Command Processor, 1–4
UMI Controller, 1–5
Video, 1–3
Functionl Description
Chip Set, 1–2
CPU, 1–1
I/O Ports, 1–4
PCI Bus Devices, 1–3
H
Hard Disk, 3–7
Hard disk drive
LCD status display, 1–11
timer parameters, 2–4
Hard drive
location, 1–8
HDD, 1–16
HDD Assembly
Removing, 4–6
Headphones
stereo audio output jack, 1–6
Hot Keys. See Keyboard Keys
I
I/O Panel
Removing, 4–24
I/O Ports, 1–4
Indicators
control and indicators, 1–6
Index-2 DIGITAL HiNote Ultra 2000 Service Guide
LCD status display, 1–11
Infrared
transmitter/receiver port, 1–6
Internal Modem, 3–9
Internal Modem Assembly
Removing, 4–12
Interrupts
levels, 2
ISA Bus Devices, 1–4
K
Keyboard, 3–6
external keyboard connector, 1–6
Removing, 4–4
Keyboard Deck
Removing, 4–8
Keyboard keys
controlling LCD display brightness, 1–12
enabling/disabling display port/LCD display, 1–12
enabling/disabling speakers, 1–12
escape key, 1–12
function keys, 1–12
hot keys, 1–12
maximizing battery life, 1–12
maximizing performance, 1–12
placing computer in setup mode, 1–12
placing computer in standby mode, 1–12
toggling on and off NUM lock, 1–12
toggling on and off scroll lock, 1–12
Keyboard port
description, 1–9
Keyboard release
description, 1–8
Keypad
LCD status display, 1–11
L
LCD Assembly
Removing, 4–8
LCD display
12.1 Inch, 4–30
AC power, 1–11
Battery Power, 1–11
Caps lock, 1–11
displaying operating status, 1–6
Embedded numeric keypad, 1–11
enabling/disabling (key), 1–12
Hard disk activity, 1–11
Monitor/Scroll lock, 1–11
NUM lock, 1–11
Removing, 4–30
Standby mode, 1–11
status display, 1–11, 4–31
LCD Display Bezel, 4–26
12.1 inch, 4–26
14.1 inch, 4–28
LCD display brightness
controlling, 1–12
Index
LCD Panel, 3–5, 4–33
Lid release, 1–6
description, 1–8
Lid switch
controlling power, 1–13
Removing, 4–15
M
Mapping
device memory mapping, B-1
I/O address map, B-3
Memory, 1–2
Memory door
description, 1–10
Memory mapping
device memory mapping, 1
Modules, 1–5
Monitor/scroll lock
LCD status display, 1–11
Motherboard
Removing, 4–18
Mouse
external mouse connector, 1–6
Mouse port
description, 1–9
Multimedia, 1–5
N
Security
notebook computer, 2–8
Notebook computer
security, 2–8
NUM lock
LCD status display, 1–11
toggling on and off, 1–12
Numeric, embedded keypad
LCD status display, 1–11
O
On-Line Information, 1–17
Options, 1–5, 5–10
P
Parallel port, 1–16
Part Numbers, 5–1
Parts Identification, 5–6
Passwords, 2–7, 2–8
PC Card, 1–16
PC Card ejectors
description, 1–8
PC Card slots
description, 1–8
PCI Bus Devices, 1–3
PCI-IDE Controller, 1–3
Performance
maximizing performance (key), 1–12
Port Replicator, 1–6
Ports
AC input description, 1–9
Fast IR port description, 1–9
Infrared transmitter/receiver port, 1–6
Keyboard port description, 1–9
Mouse port description, 1–9
security lock description, 1–8
Serial port description, 1–9
Video port description, 1–9
Power
AC power status, 1–11
external power connector, 1–6
setting your own power saving features, 2–3
turning off the computer, 1–13, 4–28
Power LED Assembly
Removing, 4–14
Power Management
modes, 1–15
standby mode, 1–16
suspend mode, 1–16
Power Supply Failure, 3–3
R
RAM, 1–16
Release
battery, 1–10
CD-ROM, 1–10
diskette, 1–10
Removable Hard Drive. See Hard drive
Reset button
description, 1–6
location, 1–6
Restoring the Flash BIOS, 2–11
RTC Battery
Removing, 4–22
Running Setup
tips, 2–2
S
Screen
controlling screen display brightness, 1–6
Scroll lock
toggling on and off scrolling (key), 1–12
Scroll/monitor lock
LCD status display, 1–11
Security
docking, 2–10
supervisor password, 2–9, 2–10
user password, 2–8, 2–9
Security lock
description, 1–8
Serial Port
description, 1–9
DIGITAL HiNote Ultra 2000 Service Guide Index-3
Index
Setup features
defaults, 2–11
device, 2–6
exit, 2–11
I/O, 2–6
power, 2–3
security, 2–7
system, 2–5
Setup menus
advanced power management, 2–4
Setup mode, entering (key), 1–12
Smart Battery, 1–15
Spare Parts Listing, 5–1
Speakers
enabling/disabling speakers, 1–12
stereo audio output jack, 1–6
Specifications, A-1
Environment, A-2
Standby, 1–15, 1–16
Standby mode
escape key, 1–12
LCD status display, 1–11
timer parameters, 2–4
Status
displaying operating status, 1–6
Status Display, 4–31, 4–35. See LCD Display
Supervisor password, 2–9
deleting, 2–10
setting/changing, 2–10
Suspend, 1–13, 1–15, 1–16
Suspend mode
timer parameters, 2–4
Suspend Time-out, 1–16
suspend/resume, 1–13, 1–16
Suspend/Resume Button
controlling power, 1–13
location, 1–6
System Command Processor, 1–4
System Setup, 2–1
features, 2–2
running, 2–1
System Setup Program, 1–15, 1–16, 2–3
System Specifications, A-1
Index-4 DIGITAL HiNote Ultra 2000 Service Guide
System Start Failure, 3–2
T
Touch pad, 1–16
Touchpad, 3–9
Removing, 4–13
Trobleshooting
Touchpad Failure, 3–9
Troubleshooting, 3–1, 3–2
Audio Failure, 3–10
Battery, 3–9
Beep Codes, 3–1
Boot Failure, 3–4
Cardbus Failure, 3–5
CD-ROM, 3–8
Disk, 3–7
External Keyboard/Mouse, 3–7
Floppy Disk, 3–8
Internal Modem, UMI, 3–9
Keyboard, 3–6
LCD Panel, 3–5
Monitor, 3–6
Post Failure, 3–4
Power Supply, 3–3
System Start Failure, 3–2
Tips, 3–2
Turning off your computer, 1–13, 4–28
U
UMI, 3–9
UMI Assembly
Removing, 4–12
UMI Controller, 1–5
User password, 2–8
deleting, 2–9
setting/changing, 2–8
V
Video, 1–3
Video port
description, 1–9