1
TAIL ASSEMBLY
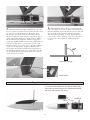
5. Lightly coat epoxy on all sides of the other half of
the wing joiner (exposed part) and the exposed balsa
inner edges of both wing panels (called the wing root).
Slide the wing halves together, ensuring that they are
accurately aligned. Firmly press the halves together and
wipe off any excess epoxy. Let the epoxy cure while
holding the wing together in proper alignment.
1.
Trial fit the stabilizer in place on the fuselage.
Center it on the fuselage; the elevator control horn
should be aligned with the centerline of the fuselage.
Use a felt-tip pen to trace where the fuselage sides meet
the bottom of the stabilizer.
6.
Attach the plastic wing protector onto the center of
the top of the wing, flush with the rear edge (trailing
edge). Use either epoxy or thin double sided tape to hold
it in place.
2.
Remove the tail and VERY carefully use a sharp
hobby knife to cut the covering on the bottom of the
stabilizer about 1/16” on the INSIDE of the lines you just
traced onto the tail. Just score the covering film. DO
NOT cut into the wood or you will weaken the structure.
Carefully peel away the covering material in this area.
7. Find the decal sheet and cut off a strip of material
where indicated. Dress up the three wing joints by
covering them with this material.
5