1
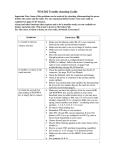
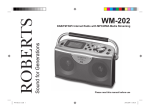
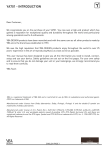
WA202 USER MANUAL
DESIGN
Welcome
Dear YBA owner,
We thank you for the purchase of your YBA DESIGN WA202 receiver. We
are confident that it will provide you with many years of listening pleasure.
YBA DESIGN products have been manufactured with the same proud and
care as all other products we've made since our creation in 1981. Your
new WA202 enables you to get the very best audio quality from your
sources.
This user manual has been designed to give you all the information you
need to install, connect, setup and use your device. For your own safety
and to ensure that you do not damage your unit or your belongings, we
strongly recommend you to read the safety guidelines carefully.
YBA Team
Disclaimer: All the information contained in this manual was correct at the time of publication. However, as our engineers are always updating and improving our products, your device may have slightly different appearance, performance, or modified functionality than
presented in this manual. YBA is a registered trademark of YBA SAS and is restricted for
use by YBA, its subsidiaries and authorized agents. All other brands and product names
quoted in this manual are registered trademarks and the property of their respective owners.
DESIGN
Warnings and precautions
CAUTION: To reduce the risk of electric shock, do not try to open the device. No user serviceable parts inside.
Refer servicing to qualified service personnel only.
The lightning flash with an arrowhead symbol within an equilateral triangle is intended to alert the user to the
presence of un-insulated dangerous voltage within the product's enclosure that maybe of sufficient magnitude
to constitute a risk of electric shock.
The exclamation point within an equilateral triangle is intended to alert the user to the presence of important
operating and maintenance (servicing) instructions in the literature accompanying the product.
WARNING: To reduce the risk of fire or electric shock, do not expose this apparatus to rain or moisture.
This product is designed and manufactured to meet strict quality and safety standards. However, you should be aware
of the following installation and operation precautions:
Warnings and instructions
You should read all the safety and operating instructions before operating this appliance. Retain this handbook for
future reference and adhere to all warnings in the handbook or on the appliance.
Water and moisture
The presence of electricity near water can be dangerous. Do not use the appliance outdoor or near any source of water
for example next to a bathtub, washbowl, kitchen sink, in a wet basement or near a swimming pool, etc.
Object or liquid entry
Take care that objects do not fall and liquids are not spilled into the enclosure through any openings. Liquid filled
objects such as vases should not be placed on the equipment.
Ventilation
Do not place the equipment on a bed, sofa, rug or similar soft surface, or in an enclosed bookcase or cabinet, since
ventilation may be impeded. We recommend a minimum distance of 100 mm (4 inches) around all sides and top of the
appliance to provide adequate ventilation. Be sure that the ventilation holes below and on the top cover of your device
are neither covered nor obscured by any object or dust. Your YS201 is equipped with 3 fans: 1 above, 1 inside and 1 on
the top. Regularly check that all fans are properly working.
Climate
The appliance has been designed for use in moderate climates. Do not use when the room temperature is below 10
degrees C (50 degrees F) or above 40 degrees C (100 degrees F).
Heat
Locate the appliance away from naked flames or heat producing equipment such as radiators, stoves or other appliances (including other electronic devices) that produce heat. This device is likely to produce heat so you are advised to
DESIGN
locate it away from any flammable material or any object which may react to heat.
Racks and stands
Only use a rack or stand that is recommended for use with audio equipment. If the equipment is on a portable rack it
should be moved with great care, to avoid overturning the combination.
Cleaning
Unplug the unit from the mains supply before cleaning. The case should normally only require a wipe with a soft, damp,
lint-free cloth. Do not use paint thinners or other chemical solvents for cleaning or furniture cleaning sprays or polishes
as they can cause indelible white marks
Power and grounding
Only connect the appliance to a power supply of the type described in the operating instructions or as marked on the
appliance. Be sure to respect the voltage indicated on your device. Power supply cords should be routed so that they are
not likely to be walked on or pinched by items placed upon or against them. Only use power supply cord supplied with your
device. Always check your power supply cord before plugging it. This device must be grounded. Ensure that the grounding
means of the appliance is not defeated.
NonNon- use periods
If the unit is in standby function, a small amount of current will continue to flow into the equipment in this mode. Unplug
the power cord or switch it off from the back if left unused for a long period of time.
Abnormal smell
If an abnormal smell or smoke is detected from the appliance, turn the power off immediately and unplug the unit from
the wall outlet. Contact your dealer immediately.
Servicing
You should not attempt to service the appliance beyond that described in this handbook. All other servicing should be
referred to qualified service personnel. The only fuse used in this device is on the AC socket. Always use exactly the same
fuse as the one provided with your unit.
Damage requiring service
The appliance should be serviced by qualified service personnel when:
A.
the power supply cord or the plug has been damaged, or
B.
objects have fallen, or liquid has spilled into the appliance, or
C.
the appliance has been exposed to rain, or
D.
the appliance does not appear to operate normally or exhibits a marked change in performance, or
E.
the appliance has been dropped or the enclosure damaged.
Safety compliance
This product has been designed to meet the IEC 60065 international electrical safety standard as well as CE and RoHs
regulations. The pictogram "crossed-bin" means the equipment must not be thrown with ordinary wastes but must be
collected for reuse, recycling and other forms of recovery. Thus your device must be deposited in an appropriate collection
point or brought back to a distributor.
DESIGN
Warranty information
Manufacturer information:
information YBA SAS (RCS Evry 339 630 790) - 5, avenue du 1 Mai - 91120 PALAISEAU - France
Tel: (33)-1 - 60 12 51 00 Fax: (33)-1 - 60 12 50 60 http://www.ybadesign.com - [email protected]
What is covered (extracts from the limited warranty contract):
YBA warrants this product to be free from defects in materials and workmanship subject to the terms set forth below. YBA
will repair or replace (at YBA's sole option) this product or any defective parts in this product. Repairs or replacements as
provided under this warranty are the exclusive remedy of the consumer. YBA shall not be liable for any incidental or
consequential damages for breach of any express or implied warranty in this product. Except to the extent prohibited by
law, this warranty is exclusive and in lieu of all other express and implied warranties whatsoever including, but not limited
to, the warranty of merchantability and fitness for a practical purpose. Some countries or US states do not allow the
exclusion or limitation of incidental or consequential damages or implied warranties so the above exclusions may not
apply to you. This warranty gives you specific legal rights, and you may have other statutory rights.
Duration, validity of warranty and procedure:
Warranty period may vary from country to country and according to local regulations. Consult your dealer or distributor to
know the warranty duration in your country. Always ensure that you retain a valid proof of purchase. To benefit from this
limited warranty you must send back a proof of purchase and the warranty card enclosed in your product within fourteen
days after the purchase. To obtain warranty service, please contact the YBA authorized dealer from which you purchased
this product. If your dealer is not equipped to perform the repair of your YBA product, it can be returned by your dealer to
YBA or an authorized YBA service agent. You will need to ship at your cost, in either its original packaging or packaging
affording an equal degree of protection. Proof of purchase in the form of a bill of sale or receipted invoice, which is evidence that this product is within the warranty period, must be presented to obtain warranty service. This warranty is
invalid if (a) the factory-applied serial number has been modified, altered or removed from this product or (b) this product
was not purchased from a YBA authorized dealer or (c) the product shows any evidence of repair or attempt to repair not
performed by a YBA authorized service centre. You may call YBA or your local country YBA authorized distributor to confirm that you have an unaltered serial number and/or you purchased from a YBA authorized dealer.
What is excluded from the warranty coverage:
maintenance and service or replacement of parts due to normal wear and tear
faults due to extreme situations (such as damage due to lightning, floods, moisture, fire...)
problems that arise due to misuse of the product or use of this product for non-domestic use
faults caused by other devices or accessories such as power cords, power filters, loudspeakers
faults caused by shock or drops
faults due to opening or tampering with the unit
damages due to repairs, modifications or cleaning by non-approved technicians or due to the use of non-YBA
parts
damage or defects caused by the use of inadequate packing during return to an authorized service center this
product
any damage to the outer chassis due to normal or abnormal wear and tear
any complete or partial loss of data/files
faults caused by a short-circuit on the loudspeaker outputs
...
DESIGN
Discovering your WA202: Front view
ON/OFF switch: Use this key to switch ON or switch OFF your
WA202.
DISPLAY and IR sensor: Any information concerning your WM202
will be indicated here. Point the remote control to this zone to control your WA202 from a distance.
SOURCE selector: Use this key to cycle between all the inputs of
your WA202 (CD Video Aux iPod Tuner CD ...).
FUNCTION: When TUNER is the active source, use this key to cycle
between the tuner functions (PRESET SEEK TUNE AUTOSET
RDS VOLUME PRESET ...). When another source is active, the
FUNCTION key has no action.
DESIGN
and
: The + and - keys have 2 functions according to the
WA202 state:
1. Volume control:
control Press - to decrease and + to increase the
volume.
2. When TUNER is the active source and one FUNCTION is selected by pressing the F key , the + and the - allow you to modify
the tuner settings:
If the PRESET function is selected, + will go to next memory slot while - will go to previous memory slot.
If the SEEK function is selected, + will seek for next radio
station while - will seek for previous radio station.
If the TUNE function is selected, + and - will allow you to
manually search the frequency band, knowing + will increase frequency value while - will decrease frequency.
If the AUTOSET function is selected, press the + and - to
begin the automatic search and store program through
available radio stations. Note: all previously stored stations will be erased and replaced by the new ones.
If the RDS function is selected, the + and - will allow you to
select the RDS display mode (text or frequency).
DESIGN
Discovering your WA202: Back view
CAUTION:
Before connecting or disconnecting any input or output:
Always make sure your WA202 is in OFF position. If you
have any doubt, unplug the AC cable from the power inlet.
Make sure all components connected to it are all set to off.
Neatly arrange and organize wiring to and from your
WA202 and to and from all your components. Separate AC
wires from audio cables to prevent hum or other unwanted
noise from being introduced into the system.
Power inlet: Connect here provided mains cable. Be sure your
WA202 switch is in OFF position before plugging or unplugging the
mains cable.
DESIGN
Right and Left speaker output: Connect your speakers here. Be
sure to respect the polarity: the + of your speaker must be connected to the + of the WA202. Connect your RIGHT speaker to the R
(red) output of your WA202 and the LEFT speaker to the L (black)
output of your WA202. We recommend the use of banana plugs to
prevent short-circuit. This device was designed to be used with 8 or
4 ohms speakers. It was not designed to handle speakers with a less
than 4 ohms impedance.
AM and FM antenna connectors: Connect here an AM and a FM (75
) antennas or roof aerial to enjoy AM and FM radio.
RCA Audio inputs: Connect the RCA outputs of your source to the
RCA inputs of your WA202. Be sure to connect the RIGHT output of
your source to the R input (red) of your amplifier and the LEFT output to the L input (white) of your amplifier. Note: Your WA202 allows
the connection of 4 external, line level sources. If you want to connect a turntable, you may need to use a phono MM (or MC according
to your cartridge model) to line transformer before you can connect
it to your WA202.
0UT: Pre-amplified output. If you want to use a subwoofer, a
PRE 0UT
separate power amplifier or some active speakers, connect them
here.
iPod POWER USB connector: This USB type B port allow you to
DESIGN
connect a YBA iPod dock so the battery of your iPod can be charged.
This port is only for charging your iPod/iPhone and shall not be
used to connect a computer or any other USB device. If you want to
listen to the content of your iPod note that your iPod must also be
connected to any of the WA202 RCA inputs, such as the input named
"iPod" input. Note: If you do not have a YBA iPod dock and still want
to charge your iPod, you can also connect here the original white
USB cable provided with your iPod/iPhone.
IR input & output: Connect here an infrared receiver (R: 5V / L: IR
signal) if the IR sensor located on the front panel is not visible (for
example your WM202 stays in a closed rack) or if you want to control
it from another room or when used in a custom-installation system.
Upgrade port: For service and future improvements. Not for use by
end-users.
DESIGN
Using YBA DESIGN remote control
Point your remote control to the IR receiver located in the
display window of your WA202.
Select the device you want to control between AMP, CD
and AUX. To control the WA202, you need to select AMP .
Note: AMP will remain the active function until you select
another device.
DESIGN
Note: PRESS means a short press on a key while HOLD means
to keep the key pressed for more than 3 seconds.
Source selector: Press SOURCE key to cycle between the 5 inputs
of your WA202 (CD VIDEO AUX IPOD TUNER CD...).
Volume control keys: Press VOLUME key to change the volume:
Press - to decrease the output level and press + to increase it.
VIEW:
VIEW
Hold ( 3 seconds) to switch ON/OFF the display (dimmer).
Press, when TUNER is the active source to change the RDS
display information. Your WA202 can display several information including broadcasting station name, clock or text messages. RDS will only work if current broadcasting station have
RDS transmission and the signal is strong enough. Display
information varies according to broadcasting stations.
ARROWS: When TUNER is the active source, press the
UP & DOWN ARROWS
UP or DOWN arrows to manually tune the frequency.
LEFT & RIGHT ARROWS: When TUNER is the active source, press
the LEFT or RIGHT arrows to skip to previous or next memory slot.
MENU: When TUNER is the active source, press to toggle between
FM and AM frequency band.
DESIGN
FCT:
Hold ( 3 seconds) to store current volume level.
Press, when TUNER is the active source, to cycle between the
tuner functions (PRESET SEEK TUNE AUTOSET RDS
VOLUME PRESET ...).
OK: Hold, when TUNER is the active source, to store current frequency in one of the memory slots (see FAQ on next page).
AUDIO: Press to resume to the stored volume level.
AUDIO
MUTE: Press to mute the output. Press again to exit mute.
Using the TUNER (FAQ)
About RDS.
RDS is a method for the transmission of additional information from local
radio stations. It is only available in FM mode and optional: RDS will only
work if the local broadcasting stations have RDS transmission and the
signal is strong enough. We thus strongly recommend the use of a proper
FM aerial to increase the chance to receive RDS information.
RDS information varies from one broadcasting station to the other and
may include PS (Present Station name), RT (Radio Text, information like
DESIGN
current playlist or news) and CT (Clock Time).
Your WA202 will automatically display any RT information. If not available
it will display any PS information. If not available it will display the frequency. Press VIEW to change displayed information between PS, RT, CT
and Frequency.
How to store a radio station.
AUTOSTORE
1.
First select tuner as the active source
2.
Press F on the front panel to select AUTOSET function
3.
Press + or - to start. Note that all previously stored stations will be
erased.
MANUAL STORE
1.
First select tuner as the active source
2.
Set the tuner to the desired radio frequency using the SEEK or
TUNE functions (use F on the front panel or FCT on the remote to
select corresponding function)
3.
Hold the OK key (more than 3 seconds). The display will start blinking.
4.
Use ARROWS to select the memory slot. Your WA202 has 40 memory slots in FM and additional 40 memory slots in AM.
5.
Once you reach desired memory slot, press OK to store current
radio station.
DESIGN
WA202 SPECIFICATIONS
AUDIO OUTPUTS
1 pair of speaker outputs, 1 preout (RCA)
POWER OUTPUT (8 )
50W per channel
SNR
FREQUENCY RESPONSE
THD+N (20Hz-20kHz)
90dB
20Hz-20kHz
0.01%
INPUTS
4 RCA inputs
TUNER BANDS
AM, FM
TUNER MEMORIES
40 in FM, 40 in AM
USB POWER SUPPLY
Type B, 5V, 600 mA maximum
POWER SUPPLY
Linear power supply with high performance EI type
transformer. 160 VA
CUSTOM INSTALLATION
IR IN, IR OUT
CONSTRUCTION
Single frame aluminium
DIMENSIONS
320mmx280mmx110mm
WEIGHT
10 kg
DESIGN
NEED MORE INFORMATION?
WWW.YBADESIGN.COM
[email protected]
280mm
280mm
110mm
DESIGN