1
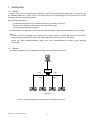
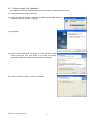
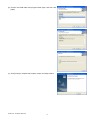
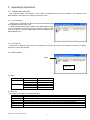
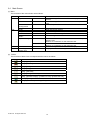
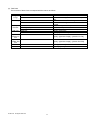
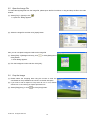
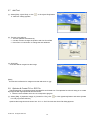
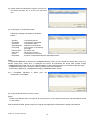
3M™ Digital Projector Projector Image Tool Guide Version 3.2 For Models: X21i / X26i / X30n / X31/ X31i / X35n / X36 / X36i / WX36 / WX36i / X46 / X46i / X56 / X62w / X64w / X70 / X75 / X80 / X90 / X90K / X90W / X95 / X95i Revision History Revision Date 4/2010 6/2010 12/2011 3/2012 8/2012 Description of Change First edition released. 2nd edition adds models X31, X36, X46 Add model X56 Add model X21i / X26i Add models X31i / X36i / X46i / WX36i Intended Use The 3M™ Digital Projectors are designed, built, and tested for use indoors, using 3M lamps, 3M ceiling mount hardware, and common line voltages (100V to 240V AC, 50/60 Hz).The use of other replacement lamps, outdoor operation, or different voltages has not been tested and could damage the projector, peripheral equipment and/or create a potentially unsafe operating condition. 3M Digital Projectors are designed to operate in a normal office environment. • 100V - 240V AC, 50/60 Hz • 16° to 29° C (60° to 85° F) • 10-80% RH (without condensation) • 0-1828m (0-6000 feet) above sea level The ambient operating environment should be free of airborne smoke, grease, oil and other contaminates that can effect the operation or performance of the projector. The 3M logo and 3M are trademarks of the 3M Company. Other trademarks used herein are the properties of their respective owners. Important Notice All statements, technical information, and recommendations related to 3M’s products are based on information believed to be reliable, but the accuracy or completeness is not guaranteed. Before using this product, you must evaluate it and determine if it is suitable for your intended application. You assume all risks and liability associated with such use. Any statements related to the product which are not contained in 3M’s current publications, or any contrary statements contained on your purchase order shall have no force or effect unless expressly agreed upon, in writing, by an authorized officer of 3M. Warranty and Limited Remedy 3M warrants that when the 3M Product is used according to 3M’s Intended Use Statement (www.3M.com/meetings), it will perform satisfactorily for the warranted durability period as stated in the applicable 3M Product Manual in effect at the time of purchase. The warranties stated in the applicable 3M Product Manuals are exclusive and are made in place of any and all express or implied warranties or conditions, including any implied warranty of merchantability or fitness for a particular purpose, or any industry practice or custom or trade usage. Failure to follow the instructions contained in the appropriate 3M Product Manual or to use the 3M Product in accordance with 3M’s Intended Use Statement will void all warranties and limited remedies. EXCEPT AS SPECIFICALLY STATED IN THE APPLICABLE 3M PRODUCT MANUAL, 3M SHALL NOT BE LIABLE FOR ANY INDIRECT, INCIDENTAL, SPECIAL OR CONSEQUENTIAL DAMAGES (INCLUDING, BUT NOT LIMITED TO, LOSS OF PROFITS, REVENUE OR BUSINESS) RESULTING FROM, OR IN ANY WAY RELATED TO PERFORMANCE, USE OR INABILITY TO USE ANY OF THE 3M PRODUCT. This limitation applies regardless of the legal theory upon which damages are sought. If 3M Product is defective within the applicable warranty period, your exclusive remedy shall be, at 3M’s option, to replace or repair the 3M Product or to refund the purchase price of the 3M Product. All replaced parts or products become property of 3M. If the 3M Product is repaired, 3M will repair the defective part(s) with a new or used part(s). If the 3M Product is replaced, 3M will replace the product with the same or equivalent model and with a new or refurbished product. In the case of an approved warranty claim, the replacement 3M Product will carry only the remaining term of the original 3M Product’s warranty period as stated in the applicable 3M Product Manual. For warranty service, you must provide proof of the date of the original purchase, otherwise the manufacturing code date will be used to establish the start date of the warranty. 3M Product Manuals include durability statements and may include limitations specific to the product(s) being used or its intended applications, which take precedence over any statement made here. Warranty terms, limitations and exclusions may differ outside the United States of America. 3M Mobile Interactive Solutions Division 6801 River Place Boulevard Tel: 1-800-328-1371 Austin, Texas 78726-9000 © 3M 2012. All Rights Reserved. 78-6971-1543-0 [Aug. 2012] www.3m.com/meetings Contents 1 2 3 4 INTRODUCTION .......................................................................................................................................... 3 1.1 OUTLINE ................................................................................................................................................. 3 1.2 SYSTEM.................................................................................................................................................. 3 INSTALLATION ........................................................................................................................................... 4 2.1 SYSTEM REQUIREMENTS ......................................................................................................................... 4 2.2 PROJECTOR IMAGE TOOL INSTALLATION.................................................................................................. 5 OPERATING INSTRUCTIONS .................................................................................................................... 7 3.1 CREATE LOGIN ACCOUNTS ...................................................................................................................... 7 3.2 START APPLICATION ............................................................................................................................... 9 3.3 QUIT APPLICATION.................................................................................................................................. 9 3.4 MAIN SCREEN ....................................................................................................................................... 10 3.5 OPEN THE IMAGE FILE ........................................................................................................................... 12 3.6 CROP THE IMAGE .................................................................................................................................. 12 3.7 ADD TEXT ............................................................................................................................................ 13 3.8 OPTIMIZE & CREATE PJ1 OR JPG FILE ................................................................................................. 13 3.9 SAVE FILE ............................................................................................................................................ 14 3.10 UNDO ................................................................................................................................................... 14 3.11 SENDING MYIMAGE FILE ........................................................................................................................ 15 3.12 ABOUT THIS APPLICATION ..................................................................................................................... 17 LIMITATIONS ............................................................................................................................................ 18 ・ Microsoft and Windows is the registered trademark of Microsoft Corporation in the US and other countries. ・ Pentium is the registered trademark of Intel Corporation in the US and other countries. ・ All other trademarks are the property of their respected owners. Warning ・ This software is free. The manufacturer has no responsibility for any errors that may occur while using this software. ・ This software, or any product used with this software may not be used for any act which obstructs the Maintenance of the International Peace and Safety. © 3M 2012. All Rights Reserved. 2 1 Introduction 1.1 Outline Projector Image Tool (PJImg) provides the ability to create a proprietary formatted MyImage (or e-Shot) file from any standard image file or typing the text. The PJImg will help to create MyImage file and send the file over the network for testing or verification purpose. PJImg provides the ability to: ✗ Create MyImage file from any standard image file (jpeg, bitmap, gif and etc) ✗ Create Text message on plain background or add on the image ✗ Send the MyImage file to a projector After verification of MyImage file, you can deploy the MyImage file(s) using Projector Management Tool (PJMan). [Note] In order to send the MyImage to the projector, the computer needs to connect the network and be able to communicate with the projector. Please see ‘User’s Manual-Network Functions’ for the details. Please see ‘User’s Manual-Operating Guide’ and ‘User’s Manual-Network Functions’ about MyImage functionality. 1.2 System The following diagram shows a typical network diagram for the Projector Image Tool. LAN HUB LAN LAN LAN LAN Projectors Use a UTP cable category 5 or higher for a Local Area Network cable. © 3M 2012. All Rights Reserved. 3 2 Installation 2.1 System Requirements The following are the minimum system requirements of hardware and software to use the Projector Image Tool. (1) Operating System Windows 2000 Professional Windows XP Home Edition (32-bit) Windows XP Home Professional (32-bit) Windows Vista Home Basic (32-bit) Windows Vista Home Premium (32-bit) Windows Vista Business (32-bit) Windows Vista Ultimate (32-bit) Windows Vista Enterprise (32-bit) Windows 7 Starter (32-bit) Windows 7 Home Basic (32-bit) Windows 7 Home Premium (32-bit) Windows 7 Professional (32-bit) Windows 7 Ultimate (32-bit) Windows 7 Enterprise (32-bit) (2) CPU Pentium3 500MHz or higher (3) Memory 128MB or higher (4) Hard Disc Minimum 20MB free space for installation. (5) Local Area Network port (RJ-45) © 3M 2012. All Rights Reserved. 4 2.2 Projector Image Tool Installation The installation process of Projector Image Tool is shown below. Please follow each step. (1) Double click the file “InstForPJImg.exe”. (2) Select the language (English, Japanese or Chinese [Simplified]) during the installation process. And then click [OK]. (3) Click [Next] (4) Read “License Agreement” and select “I accept the terms of the license agreement” and click [Next] if you agree the license agreement. Otherwise, click [Cancel] and stop the installation. (5) Confirm the program folder, and then click [Next]. © 3M 2012. All Rights Reserved. 5 (6) Confirm the install folder and program folder again, and then click [Next]. (7) Click [Finish] to complete the Projector Image Tool setup wizard. © 3M 2012. All Rights Reserved. 6 3 Operating Instructions 3.1 Create login accounts The Projector Image Tool requires a login name and password to launch the software. The Projector User Administration Tool helps you to create new user accounts. 3.1.1 How to launch Double Click “PJUsrEdit.exe” that is located on same folder that you installed Projector Image Tool. It automatically launches the Projector User Administration Tool, if no user accounts are created yet. Also Projector Image Tool has a short cut [File] [User Configuration] to launch Projector User Administration Tool. 3.1.2 How to exit Select [File] [Exit] from the menu or click [x] button of the top right corner. If the changes are made, you will be required to confirm the changes. 3.1.3 Main Window Menu User List (1) Menu Menu File Edit Sub Menu Save Exit Add New User Change User Delete User Description Save user data Exit Create new user Edit user account Delete user account (2) User List The status in the User List is described below. Row name Description User Name Username (ID) Description Comment Man “●” shows that the user can access to the PJMan (Projector Management Application). Ctrl “●” shows that the user can access to the PJCtrl (Projector Control Application). Img ”●” shows that the user can access to the PJImg (Projector Image Tool). FTP ”●” shows that the user can access to the PJTransfer (Projector File Transfer Tool). © 3M 2012. All Rights Reserved. 7 3.1.4 Creating new user account Select [Edit] [Add New User] or right click on the user list and select [Add New User]. The following dialog window appears. User Description User Rights Select All UnSel All --- Define user name, up to 20 characters --- Add comments, up to 50 characters --- Define accessibility. It defines the accessibility for the application software by each user account. The user can use allocation only marked application software. --- Select all application software. --- Unselect all application software. Press [OK] button after entering user name. The [Change Password] dialog appears. Enter new password and confirm entered password. The password is up to 20 characters and case sensitive. 3.1.5 Edit user account Double click a username on the user list or select [Edit] [Change User] after choosing user to open edit dialog. You can edit username, description and accessibility (user rights). Click the button to change password. Enter old and new password, and re-enter new password to confirm. 3.1.6 Delete user account Select [Edit] [Delete User] or right click on the user list and select [Delete User]. The confirmation window will popup. 3.1.7 Save user account Select [File] [Save]. The date is stored in the file, \UserList”. © 3M 2012. All Rights Reserved. “C:\Program Files\Common Files\Projector Tools\config 8 3.2 Start Application Select Windows [Start] [Program] [Projector Tools] [Projector Image Tool]. The login window is appeared. Enter the username and password that is created by “Projector User Administration Tool”. After logged in, a following window is appeared. Menu Tool Bar Task Pain 3.3 Quit Application Select [File] - [Exit] to quit. It is also possible to quit this software by clicking [x] on the top right corner of the window. When the confirmation dialog appears, select [OK] to finish. © 3M 2012. All Rights Reserved. 9 3.4 Main Screen (1) Menu The functions of the main window are as follows. Menu File Edit Sub-Menu Open - Save As - User Configuration Exit Undo Crop Add Text Background Color Optimize Image - Function Load the image file from the PC and display it on Main Screen. Save the image file on Main Screen as a Projector GIF type. Launch Projector User Administration Tool. - Quit Application. Undo a previous change. Crop the image on Main Screen. Add the text on the Image file. Fill the background selected color. Create PJ1 File Resize to the maximum size, and convert to a Projector GIF(PJ1) file. Refer to “4 Limitations” for the maximum size. Resize to the maximum size, and convert to a JPG file. Refer to “4 Limitations” for the maximum size. Send the image file on Main Screen to the projector. Display the version of this application. Create JPG File Send Help Send About Projector Image Tool - (2) Toolbar The functions of these icons correspond with the menus as follows: Icon Menu [File]−[Open] [File]−[Save As] [Edit]−[Undo] [Edit]−[Crop] [Edit]−[Add Text] [Edit]−[Background Color] [Edit]−[Optimize Image] – [Create PJ1 File] / [Create JPG File] [Send]−[Send] [Help]−[About Projector Image Tool] © 3M 2012. All Rights Reserved. 10 (3) Task Pane The functions of these icons correspond with the menus as follows: Menu Original Image Sub Menu File Name Size New Image File Name Size Crop Handles Add Text Optimize & Create PJ1 File Optimize & Create JPG File Save As Send Function Show Name of the opened file. Show Width/ Height information of the opened file. Show Name of the Edited image. Show Width/ Height information of the Edited image. Show the Aspect of Crop area. Show the Crop area. [Edit] - [Crop] [Edit] – [Add Text] [Edit] – [BackGround] Aspect Left, Right, Top, bottom Crop Add Text BackGround - © 3M 2012. All Rights Reserved. [Edit] – [Optimize Image] – [Create PJ1 File] [Edit] – [Optimize Image] – [Create JPG File] - [File]−[Save As] [Send]−[Send] 11 3.5 Open the Image File To create the MyImage file from the image file, please open the file from Menu or drag and drop the file to the main window. (1) Select [File] [Open]or click “Open File” dialog appears: : (2) Select the image file and then click [Open] button. Also you can use plain background without the image file (1) Select [Edit] [Background Color], click Color] Button. Color dialog appears. , or Click [Background (2) Pick the background color and then click [OK]... 3.6 Crop the Image (1) Please select the Cropping area using the mouse or enter the coordinates of Crop Handles that is shown on the left side pane. (2) If you want to set an aspect of Crop area at 4:3 or 16:9, Please choose 4:3 or 16:9 among an Aspect pull-down box. (3) Select [Edit]-[Crop], or click © 3M 2012. All Rights Reserved. or Click [Crop] button. 12 3.7 Add Text (1) Select [Edit] [Add Text], or click ”Add Text” Dialog appears. , or Click [Add Text] Button. (2) The text in the edit box. The text updates simultaneously. Use the mouse to change the position and size of text field Press Font or Color button to change the text attributes (3) Click [OK]. The text will be merged into the image. [Note] This function is effective for images more than 8bit such as “jpg”. 3.8 Optimize & Create PJ1 or JPG File The MyImage file is required propriety formatted file and limited size. The Optimize function will help you to create MyImage file with appropriate file format and size. There are some models which do not correspond to jpeg file. (1) Select [Edit] [Optimize Image] [Create PJ1 File], click PJ1 File] or [Create JPG File] or Click [Optimize] Button and select [Create Optimize the Image size and convert into “PJ1” or “JPG” file. And then Save File dialog appears. © 3M 2012. All Rights Reserved. 13 3.9 Save File (1) Select [File] [Save As] or click Save File dialog appears : (2) Select the folder to save and enter the file name o, and then Click [Save]. The file is converted to a transmittable form and saved in the folder, and the screen is closed. 3.10 Undo This function will undo any previous change that you made. Click the the previous change. button or select [Edit] [Undo] to undo [NOTE] This function will work until the three times that you change. It would not go back further. © 3M 2012. All Rights Reserved. 14 3.11 Sending MyImage file In order to display MyImage file on the projector, you need to send the file and store in the projector. The projector can store up to 4 images. Projector Image Tool only support sending a file to the single projector for verification purpose. If you need to deploy the MyImage file to multiple projectors, Please use Projector Management Software (PJMan). (1) Select [Projector]-[Send], or click “Confirm” dialog appears. : (2) Click [OK] It will display projectors that are founded by discovery function on the network When the connected projector is not found, please click the Find button. The projector is searched again. If the image file that you try to send is JPEG, projectors that do not correspond to JPEG will not be displayed. When a password is set in a projector, it is necessary for even application software to set a password. Please click [Authentification]. “Authentication” screen appears. Please enter Password. In spite of Discovery function it will not display projectors, Please click [Add Projector]. “Input Connection Information” screen appears. Please enter the IP address that you want to add. When a password is set in a projector, it is necessary to enter the Password. Click [OK] to complete. © 3M 2012. All Rights Reserved. 15 (3) Please select the Destination Projector from the list, and select the Store No. (1~4) from the left below box. (4) Click [Send] Transmission starts. Following messages can appear in the Status column: Sending Completed Send error Illegal Request Processing : : : : : File Size Over Other error Cancel Illegal data : : : : Transmitting the file Transmission succeeded Transmission failed Request is unauthorized The projector is processing the image. File size is over Other Error Occurred Transmission is canceled Projector’s set authentication but application doesn’t. [Note] If “NETWORK BRIDGE” is selected as “COMMUNICATION TYPE” set up in X30N and X35N, when user try to transfer image data, “Send error” is displayed and cannot be transferred the image data. Please change “COMMUNICATION TYPE” set up from “Network Bridge” to other setting and then try to transfer image data again. “COMMUNICATION TYPE” set up is located in projector OSD menu as follows. [OPTION] - [SERVICE] - [COMMUNICATION] - [COMMUNICATION TYPE] (5) If “Completed” appeared transmission is completed. in Status term, the (6) Click [Close] and finish the “Send” screen. [Note] Please put a different name on image file for every Store No. If the names are the same, the transmission will fail in some cases. If file transmission failed, please confirm the projector and application’s authentication setting and password. © 3M 2012. All Rights Reserved. 16 3.12 About this Application To show the software version, please select [Help] [About Projector Image Tool], or click © 3M 2012. All Rights Reserved. 17 . 4 Limitations ・ The maximum file size is shown as follows. PJ1 file : Less than equal 130,816byte JPG file : Less than equal 262,144byte There are some models which do not correspond to jpeg file. ・ In some case the Projector Menu moves slowly during the Image Transmission. ・ The time for the Transmission complete differs according the Projector’s processing situation. © 3M 2012. All Rights Reserved. 18