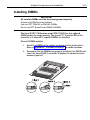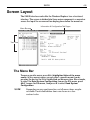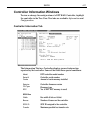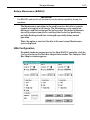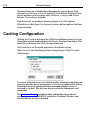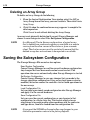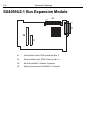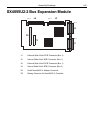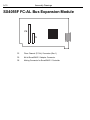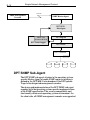
1
U SER’S M ANUAL DO-0975-005 SmartRAID V User’s Manual Copyright © 1998, 1999 Distributed Processing Technology Corporation All Rights Reserved – Printed in U.S.A. Storage Manager is a trademark of Distributed Processing Technology Corporation. SmartCache, SmartRAID, RAIDstation and DPT are registered trademarks of Distributed Processing Technology Corporation. Microsoft, MS-DOS, Windows NT, Windows, and the Windows logo are either registered trademarks or trademarks of Microsoft Corporation in the United States and/or other countries. NetWare is a trademark of Novell Corporation. OpenServer, UnixWare and SCO are trademarks of The Santa Cruz Operation. YES, IT RUNS WITH UNIXWARE mark – developer tested only. SCO makes no warranties with respect to this product. I2O is a registered trademark of Intel Corporation. All other trademarks are property of their respective owners. ii SmartRAID V User’s Manual FCC Statement Warning: Changes or modifications to this unit not expressly approved by the party responsible for compliance could void the user’s authority to operate the equipment. This equipment has been tested and found to comply with the limits for a Class B digital device, pursuant to Part 15 of the FCC Rules. These limits are designed to provide reasonable protection against harmful interference in a residential installation. This equipment generates, uses, and can radiate radio frequency energy and, if not installed and used in accordance with the instructions, may cause harmful interference to radio communications. However, there is no guarantee that interference will not occur in a particular installation. If this equipment does cause harmful interference to radio or television reception, which can be determined by turning the equipment off and on, the user is encouraged to try to correct the interference by one or more of the following measures: • Reorient or relocate the receiving antenna. • Increase the separation between the equipment and receiver. • Connect the equipment into an outlet on a circuit different from that to which the receiver is connected. • Consult the dealer or an experienced radio TV technician for help. This device complies with Part 15 of the FCC Rules. Operation is subject to the following two conditions: (1) this device may not cause harmful interference, and (2) this device must accept any interference received, including interference that may cause undesired operation. NOTE: If the SX4055F Fibre Channel Expansion Module is used, the DPT controller will not meet Class B limits. A DPT controller with an SX4055F module does comply with the limits for a Class A digital device. VCCI Statement This is a Class B product based on the standard of the Voluntary Control Council for Interference from Information Technology Equipment (VCCI). If this is used near a radio or television receiver in a domestic environment, it may cause radio interference. Install and use the equipment according to the instruction manual. iii SmartRAID V User’s Manual Distributed Processing Technology Limited Product Warranty PROOF OF PURCHASE MAY BE REQUIRED. YOU MAY REGISTER YOUR PURCHASE BY RETURNING THE ENCLOSED WARRANTY CARD WITHIN 30 DAYS OF PURCHASE. Distributed Processing Technology Corporation (“DPT”) warrants to the purchaser of this product that it will be free from defects in material and workmanship for the period as set forth below: PRODUCT TYPE WARRANTY (Years from date of purchase) Hard disks 5 years RAID/SCSI Controllers 3 years Cache, Memory, SCSI Expansion and RAID /Caching Modules 3 years Storage Array Cabinets (Tower and Rackmount) 3 years Battery Module 1 year FIRMWARE IS NOT COVERED BY ANY WARRANTY. SOFTWARE IS PROVIDED “AS IS”. DPT DOES NOT WARRANT THAT THE SOFTWARE WILL MEET YOUR REQUIREMENTS OR THAT ITS USE WILL BE ERROR-FREE OR UNINTERRUPTED. DPT does warrant that the diskette(s) on which the program is furnished will be free from defects in materials and workmanship under normal use for a period of 90 days from the date of purchase. If Distributor or Distributor’s customer notifies DPT of a defect in the product within the applicable warranty period, DPT shall, at its sole option, either (i) repair the defective product (ii) replace the defective product or (iii) refund the purchase price paid by the Distributor. Replacement parts or products may be new or reconditioned. Product which fails to function upon proper installation shall be deemed dead on arrival (“DOA”), subject to verification by DPT. DOA product shall be replaced by DPT provided that DPT has been notified of the DOA within forty-five (45) days of the date of purchase by Distributor or Distributor’s customer. Product returned for any warranty service will not be accepted by DPT unless (i) a return material authorization (RMA) number has been received from DPT along with instructions for returning the product prior to the return, (ii) returned product is in its original or equivalent packaging (to ensure product is not damaged in shipment) and (iii) the product has been returned to DPT within 15 days of issuance of the RMA number. DPT will not be responsible for damage to product during the return shipment to DPT. DPT reserves the right to (i) charge a $20 re-box fee or (ii) reject any returned product not shipped in the original or equivalent packaging. Freight charges associated with improperly packed product rejected by DPT will be the responsibility of the customer. At its option, DPT may require proof of purchase. Distributor or Distributor’s customer shall be responsible for all costs of shipping products for warranty service unless the product is DOA, in which event DPT shall be responsible for the cost of return shipment to the customer. If DPT determines that the product is not defective within the terms of the warranty, customer shall pay the cost of repair at DPT’s then prevailing rate. This limited warranty is contingent upon proper use of the product and does not cover product which has been modified, or subjected to unusual physical or electrical stress, unauthorized service, or failure to perform preventative maintenance. Replaced parts or products become the property of DPT. DPT MAKES NO OTHER EXPRESS OR IMPLIED WARRANTY INCLUDING THE WARRANTIES OF MERCHANTABILITY OR FITNESS FOR A PARTICULAR PURPOSE. IN NO EVENT WILL DPT BE LIABLE TO YOU FOR ANY DAMAGES, INCLUDING LOST PROFITS, LOSS OF DATA OR OTHER INCIDENTAL OR CONSEQUENTIAL DAMAGES. DPT’s LIABILITY FOR BREACH OF WARRANTY IS LIMITED EXCLUSIVELY TO REPAIR OR REPLACEMENT OF PRODUCTS. Some states do not allow the exclusion of implied warranties or limitations of liability for incidental or consequential damages, so the above exclusions may not apply to you. This warranty gives you specific legal rights. You may have other rights, which vary from state to state. Distributed Processing Technology 140 Candace Drive Maitland, Florida • 32751 • USA Phone (407) 830-5522 • Fax (407) 260-5366 World Wide Web: http://www.dpt.com iv SmartRAID V User’s Manual Distributed Processing Technology End-User Software License Agreement You may (i) use the software on a single machine; (ii) make only one copy of the software into any machine-readable or printed form for backup purposes; (iii) merge the software into other software for your use on the single machine (provided that any portion of the software merged into other software will continue to be subject to the terms and conditions of this license); (iv) transfer the software and this license to another party if the other party agrees to accept the terms and conditions of this license; and (v) not make copies of any written materials. If you transfer the software you must either transfer all copies of the software and accompanying materials to the same party or destroy any copies not transferred. You may not attempt to defeat any protection method implemented by DPT to prevent unauthorized use of the software, and you may not modify, adapt, translate, reverse engineer, decompile or disassemble either software or written materials nor create derivative works based upon the software or written materials. This license is effective until terminated by you by destroying the software together with all copies. This license shall terminate automatically if you fail to comply with any term or condition of this license. This agreement is governed by the laws of the State of Florida. U.S. Government Restricted Rights: The software and any manuals are provided with restricted rights. If the software and manuals are acquired under the terms of a DOD Contract, use, duplication or disclosure by the Government is subject to restrictions as set forth in subparagraph (c)(I)(ii) of the Rights in Technical Data and Computer Software Clause at 252.227-7013. If acquired under the terms of a civilian agency contract, use, reproduction or disclosure is subject to 52.227-19(a) through (d). v SmartRAID V User’s Manual Release Notes To review release notes and documentation errata associated with the SmartRAID V products, select Help–View README Information in Storage Manager or view the READ.ME file in the DPT install directory for the latest information. Check the DPT web site for availability of an updated version of this manual (SmartRAID V User’s Manual) in Adobe Acrobat PDF format. The current SmartRAID V Quick Install Guide is also available for download from the DPT web site in PDF format. The Quick Install Guide contains text in English, French, German, Italian, Polish and Spanish. Technical Support Our technical support staff is available Monday – Friday between 6 am and 6 pm Eastern time. Between 6 pm and 8 pm, you can leave a callback message. You can contact us by fax or e-mail 24 hours a day. Telephone: Fax: Internet: 407-830-5522 (Press 6 and follow the prompts.) 407-830-4793 http://www.dpt.com/techsup/supporthelp.html DPT offers priority Technical Support as a fee-based option. If you choose this option your call is given priority over all other support calls. 900-555-4378 at the rate of $1.35 per minute 407-830-5522 Press 6 and select the Priority Technical Support option. The rate is $30 for the first hour and $1.00 per minute after the first hour. Product information and the latest versions of DPT drivers and utilities can be obtained at no charge from the DPT FTP site (ftp.dpt.com) or from the Technical Support section of our World Wide Web site 24 hours a day. vi SmartRAID V User’s Manual Table of Contents FCC Statement ................................................................................................................. iii VCCI Statement ................................................................................................................ iii Limited Product Warranty ................................................................................................. iv End-User Software License Agreement ............................................................................. v Release Notes .................................................................................................................. vi Technical Support ............................................................................................................. vi Read This First! ..................................................................................... 1-1 About the Documentation .............................................................................................. User’s Manual ............................................................................................................ Storage Manager Help System .................................................................................. Installation Roadmap ..................................................................................................... What’s In the Box? ........................................................................................................ System Requirements ................................................................................................... Safety Information ......................................................................................................... Working with Electricity ................................................................................................. Preventing Electrostatic Discharge ................................................................................ 1-2 1-2 1-3 1-3 1-5 1-5 1-6 1-7 1-8 About Your New Controller .................................................................. 2-1 Introduction ................................................................................................................... 2-2 Product List ................................................................................................................... 2-3 Product Feature Overview ............................................................................................. 2-4 SmartRAID V Millennium Features ............................................................................ 2-5 SmartRAID V Decade and Century Features ............................................................ 2-7 SX405x Bus Expansion Module Features .................................................................. 2-8 RA4050 RAID Accelerator Features .......................................................................... 2-9 BB4050 Battery Module Features ............................................................................ 2-10 SmartRAID V Controller LEDs .................................................................................... 2-11 LED Display During Power-Up ................................................................................. 2-11 LED Display During Controller Idle .......................................................................... 2-11 LED Display During Controller Active ....................................................................... 2-12 Cache Status LEDs .................................................................................................. 2-12 BB4050 LED Indicators ............................................................................................ 2-13 Audible Alarm .............................................................................................................. 2-13 Configuration and Installation............................................................. 3-1 Installation Overview ..................................................................................................... Configuration ................................................................................................................. Narrow and Wide SCSI .............................................................................................. Configuring Cables ..................................................................................................... Configuring SCSI Termination .................................................................................... 3-2 3-3 3-3 3-3 3-4 vii SmartRAID V User’s Manual Configuring Device IDs .............................................................................................. 3-6 SCSI ....................................................................................................................... 3-6 Fibre Channel ......................................................................................................... 3-6 Installation ..................................................................................................................... 3-7 Installing the RA4050 RAID Accelerator .................................................................... 3-8 Installing an SX405x Bus Expansion Module ............................................................. 3-9 Installing SIMMs ....................................................................................................... 3-11 Installing DIMMs ...................................................................................................... 3-13 Installing the BB4050 Battery Backup Module ......................................................... 3-14 Installing the Controller ............................................................................................ 3-15 Determining the Booting Controller ....................................................................... 3-16 Controller IRQ and Address .................................................................................. 3-16 NVRAM Reset ...................................................................................................... 3-17 Using Microsoft Cluster Server ................................................................................... 3-18 System Requirements .............................................................................................. 3-19 How SmartRAID V Works with MSCS ...................................................................... 3-20 Storage Manager on ROM ................................................................... 4-1 Overview ....................................................................................................................... 4-2 Keyboard Reference ...................................................................................................... 4-3 Menu Reference ............................................................................................................ 4-4 Icon Reference .............................................................................................................. 4-4 Screen Layout ............................................................................................................... 4-5 The Menu Bar ............................................................................................................ 4-5 The Left Pane – Tree View ......................................................................................... 4-6 The Right Pane – Information View ............................................................................ 4-6 Running SMOR ............................................................................................................. 4-8 Information/Configuration Windows ............................................................................... 4-9 DPT I2O BIOS Settings .............................................................................................. 4-9 Controller Information Windows ............................................................................... 4-11 Controller Information Tab ..................................................................................... 4-11 HBA Configuration Tab .......................................................................................... 4-13 Device Information ................................................................................................... 4-15 Array and Array Group Information .......................................................................... 4-17 Setting the Configuration ............................................................................................. 4-19 Array Operations ......................................................................................................... 4-20 Creating an Array ..................................................................................................... 4-20 Creating a Parity Group ........................................................................................... 4-22 Deleting an Array ..................................................................................................... 4-23 Hot Spares ............................................................................................................... 4-23 Rebuilding a Failed Array ......................................................................................... 4-24 Formatting a Drive ....................................................................................................... 4-24 Managing Controller Firmware .................................................................................... 4-25 Upgrading Firmware .................................................................................................... 4-25 viii SmartRAID V User’s Manual Saving Controller Firmware to a Disk Image ............................................................... 4-27 Creating a Firmware Disk Image .............................................................................. 4-28 Restoring Firmware from a Disk Image ................................................................... 4-28 Software Installation ............................................................................ 5-1 Windows NT 4.0 ............................................................................................................ 5-2 Installing a New System ............................................................................................. 5-3 Upgrading an Existing System ................................................................................... 5-5 Adding to an Existing System .................................................................................... 5-5 Adding to an Existing System (Microsoft OSM) ......................................................................................................... 5-6 Windows 95/98 .............................................................................................................. 5-7 Installing Windows 98 (Full Install Version) ................................................................ 5-7 Installing Windows 95 (OEM SR2 – Version 950b) ........................................................................................ 5-9 Installing Windows 95 (Retail Upgrade – Version 950a) .............................................................................. 5-11 Adding SmartRAID V to an Existing Windows 95/98 Configuration ......................... 5-11 Upgrading to Windows 98 from Windows 95 (Upgrade Version) .................................................................................................... 5-12 Installing Storage Manager for Windows ..................................................................... 5-13 SCO UNIX ................................................................................................................... 5-14 Installing SCO UNIX 3.2V4.2 or OpenServer 5 ........................................................ 5-14 Adding to an Existing SCO UNIX 3.2V4.2 or OpenServer 5 System ....................... 5-15 SCO UnixWare 7 ......................................................................................................... 5-15 Novell NetWare ........................................................................................................... 5-17 NetWare 4.11 – Boot Controller ............................................................................... 5-18 NetWare 4.11 – Secondary Controller ..................................................................... 5-19 NetWare 4.2 – Boot Controller ................................................................................. 5-20 NetWare 4.2 – Secondary Controller ....................................................................... 5-21 NetWare 5.0 – Boot Controller ................................................................................. 5-22 NetWare 5.0 – Secondary Controller ....................................................................... 5-23 Installing Remote Communication Support .............................................................. 5-24 Red Hat Linux .............................................................................................................. 5-24 Red Hat Linux 5.2 and 6.0 ....................................................................................... 5-25 Red Hat Linux 6.1 .................................................................................................... 5-25 Installing Storage Manager for Linux ........................................................................ 5-26 Storage Manager .................................................................................. 6-1 Introduction ................................................................................................................... System Requirements ................................................................................................... Running Storage Manager ............................................................................................ Using Storage Manager Locally ................................................................................. 6-2 6-2 6-3 6-3 ix SmartRAID V User’s Manual Using Storage Manager Remotely ............................................................................. 6-3 Storage Manager on ROM ......................................................................................... 6-4 Physical Configuration View .......................................................................................... 6-4 Logical Configuration View ............................................................................................ 6-6 Logical Device Address ................................................................................................. 6-7 Status ............................................................................................................................ 6-8 Information Windows ................................................................................................... 6-10 Host Bus Adapter Information Window .................................................................... 6-10 Battery Backup Configuration ............................................................................... 6-11 HBA Configuration ................................................................................................ 6-13 Flash Configuration ............................................................................................... 6-15 Controller Caching for Windows NT ...................................................................... 6-16 Device Information Window ...................................................................................... 6-17 Caching Configuration ................................................................................................. 6-18 Array Groups ............................................................................................................... 6-19 Creating an Array Group .......................................................................................... 6-22 Naming an Array Group ........................................................................................... 6-24 Dynamic Array Expansion ........................................................................................ 6-24 Requirements and Restrictions ............................................................................. 6-25 Expanding an Array Group ................................................................................... 6-26 Reconfiguring Windows NT After Array Expansion ............................................... 6-27 Deleting an Array Group .......................................................................................... 6-28 Saving the Subsystem Configuration .......................................................................... 6-28 Events ......................................................................................................................... 6-29 Event Logging .......................................................................................................... 6-30 Event Notification ..................................................................................................... 6-31 Pager Event Messaging ........................................................................................... 6-33 Broadcasters ............................................................................................................... 6-34 Broadcaster for NetWare .......................................................................................... 6-34 Installing the Broadcaster ..................................................................................... 6-34 Stopping/Restarting the Broadcaster .................................................................... 6-34 Viewing Events ..................................................................................................... 6-34 Broadcaster for SCO UNIX Systems ....................................................................... 6-35 Installing the Broadcaster ..................................................................................... 6-35 Stopping/Restarting the Broadcaster .................................................................... 6-35 Viewing Events ..................................................................................................... 6-35 Broadcaster for Windows NT ................................................................................... 6-36 Installing the Broadcaster ..................................................................................... 6-36 Stopping/Restarting the Broadcaster .................................................................... 6-36 Viewing Events ..................................................................................................... 6-36 Formatting Drives ........................................................................................................ 6-38 Drive Failures .............................................................................................................. 6-39 Audible Alarm ........................................................................................................... 6-39 Rebuilding a Degraded Array ................................................................................... 6-40 x SmartRAID V User’s Manual Hot Spares ............................................................................................................... Verify ........................................................................................................................... Background Task Priority ............................................................................................. I/O Statistics ................................................................................................................ Controller I/O Statistics ............................................................................................ Device I/O Statistics ................................................................................................. Remote Communication .............................................................................................. Communicating Across a Network ........................................................................... Installation and Configuration ................................................................................... Editing the Configuration File ................................................................................ Setting up the Server ............................................................................................ Connecting Servers and Workstations .................................................................. Connecting to Remote Systems ............................................................................... Making a Manual Connection ............................................................................... Using the Phonebook ............................................................................................ Using a Custom Connection ................................................................................. 6-41 6-42 6-43 6-44 6-44 6-45 6-48 6-49 6-49 6-50 6-51 6-52 6-53 6-54 6-55 6-56 Theory of Operation ............................................................................. 7-1 Intelligent RAID Controllers ........................................................................................... 7-2 Intelligent I/O .............................................................................................................. 7-3 Benefits ...................................................................................................................... 7-3 I2O and Intelligent RAID Controllers .......................................................................... 7-4 Pipelined Parallel Processing (P3) ................................................................................ 7-5 Disk Caching ................................................................................................................. 7-6 Software and Hardware Caching ............................................................................... 7-7 Elevator Sorting .......................................................................................................... 7-8 Caching ...................................................................................................................... 7-9 Write-back and Write-through Algorithm ................................................................. 7-9 Flush Strategy ....................................................................................................... 7-10 Predictive Caching Algorithms ................................................................................. 7-10 Virtual Cache ........................................................................................................ 7-10 Read Ahead .......................................................................................................... 7-10 Pre-Fetch .............................................................................................................. 7-11 Predictive Caching in Multi-user Systems ................................................................ 7-11 Caching Host Reads ................................................................................................ 7-12 Optimizing Operating System Cache Size ............................................................... 7-12 Optimizing Controller Cache Size ............................................................................ 7-12 RAID ............................................................................................................................ 7-13 Disk Striping ............................................................................................................. 7-13 Definition of RAID Levels ......................................................................................... 7-14 Dual-Level RAID ...................................................................................................... 7-18 Creating Data Redundancy ...................................................................................... 7-19 Handling I/O Errors .................................................................................................. 7-20 Degraded Mode ....................................................................................................... 7-21 Rebuilding a Failed Hard Drive ................................................................................. 7-21 xi SmartRAID V User’s Manual SmartRAID V Architecture ........................................................................................... 7-22 ASPI Protocol ........................................................................................................... 7-22 I2O Messaging Protocol ........................................................................................... 7-22 Command Processing .......................................................................................... 7-23 Command Overlapping ......................................................................................... 7-23 Command Queuing ............................................................................................... 7-24 Auto Request Sense ............................................................................................. 7-24 Byte/Word Alignment ............................................................................................ 7-24 Scatter/Gather ...................................................................................................... 7-24 PCI Data Transfer and Bus Mastering ......................................................................... 7-25 On-Board Microprocessor ........................................................................................... 7-26 SCSI Interface ............................................................................................................. 7-26 SCSI Device IDs ...................................................................................................... 7-26 Logical Unit Numbers (LUN) .................................................................................... 7-27 Bridge Controllers .................................................................................................... 7-27 Commands and Messages ..................................................................................... 7-27 Disconnect/Reconnect ............................................................................................. 7-27 Transfer Padding and Residue Reporting ................................................................ 7-28 Single-Ended and Differential SCSI ......................................................................... 7-28 Multi-Mode SCSI ...................................................................................................... 7-29 Wide SCSI ............................................................................................................... 7-29 SCSI Transfer Rate .................................................................................................. 7-29 Cabling Single-Ended SCSI ..................................................................................... 7-30 Cabling Ultra2 (LVD) SCSI ....................................................................................... 7-32 SCSI Termination ..................................................................................................... 7-33 TERMPWR .............................................................................................................. 7-34 Fibre Channel Arbitrated Loop (FC-AL) ....................................................................... 7-35 DPT I2O BIOS ............................................................................................................. 7-36 Assembly Drawings ............................................................................. A-1 PM3755F ....................................................................................................................... A-2 PM3755U2B .................................................................................................................. A-3 PM3754U2 .................................................................................................................... A-4 PM1554U2, PM2554U2 and PM2654U2 ....................................................................... A-5 SX4054U2-1 Bus Expansion Module ............................................................................ A-6 SX4054U2-2 Bus Expansion Module ............................................................................ A-7 SX4055U2-1 Bus Expansion Module ............................................................................ A-8 SX4055U2-2 Bus Expansion Module ............................................................................ A-9 SX4055F FC-AL Bus Expansion Module .................................................................... A-10 RA4050 RAID Accelerator ........................................................................................... A-11 BB4050 Battery Module .............................................................................................. A-12 Troubleshooting ................................................................................... B-1 xii SmartRAID V User’s Manual Specifications ....................................................................................... C-1 DC Power Requirements ............................................................................................... C-2 Environmental Specifications ........................................................................................ C-3 Memory ......................................................................................................................... C-3 Capacities .................................................................................................................. C-3 SIMMs ........................................................................................................................ C-3 DIMMs ........................................................................................................................ C-4 Battery ........................................................................................................................... C-4 SNMP ..................................................................................................... D-1 Introduction ................................................................................................................... D-2 Simple Network Management Protocol ...................................................................... D-2 Management Information Base .................................................................................. D-2 Management Console ................................................................................................ D-3 DPT MIB Information .................................................................................................. D-3 What’s Included ............................................................................................................. D-6 System Requirements ................................................................................................... D-6 Hardware Support ...................................................................................................... D-6 Management Consoles .............................................................................................. D-6 Operating System Support ......................................................................................... D-7 Installation of DPT SNMP Software ............................................................................... D-7 Installing DPT SNMP Support .................................................................................... D-7 Installing SNMP for Microsoft Windows 95 ................................................................. D-8 Installing SNMP for Microsoft Windows 98 ................................................................. D-8 Operation ...................................................................................................................... D-9 SNMP Software Overview ............................................................................................. D-9 DPT SNMP Sub-Agent ............................................................................................. D-10 DPT SNMP Trap Broadcaster Module ...................................................................... D-11 Glossary ............................................................................................... G-1 Index ....................................................................................................... I-1 xiii SmartRAID V User’s Manual xiv CHAPTER 1: Read This First! Before you begin installing your new DPT controller, please take the time to read this chapter. This chapter is an important guide to the rest of the documentation and provides a summary of the installation process. The term RAID controller used throughout this document applies to all SmartRAID V products. SmartRAID V Documentation A chapter-by-chapter tour of the documentation set. This includes the User’s Manual you are reading, a Quick Install Guide and the Storage Manager Help Files. Installation Roadmap The SmartRAID V installation process at a glance, with crossreferences to specific chapters in this manual. What’s in the Box A list of parts and accessories you received with your new controller. System Requirements What type of host system you need to successfully install and use a DPT SmartRAID V controller. Safety Information Notices regarding electrical safety and electrostatic discharge protection. 1-1 1-2 Read This First! About the Documentation The complete documentation set for the SmartRAID V product line consists of three parts: • The User’s Manual (this book), which contains information that helps you to configure and install your SmartRAID V product and using the Storage Manager software. This document also contains information about using the DPT storage subsystem utility – Storage Manager on ROM; background information about the peripheral bus, SCSI, RAID, and caching; system specifications; troubleshooting tips; a glossary of terms; and other topics of interest to SmartRAID V users. • The Quick Install Guide, a brief version of installation steps designed for the experienced user. This document contains instructions in English, French, German, Italian, Polish and Spanish. • The Storage Manager Help System, which contains information about using the Storage Manager software, using SCSI devices and creating disk arrays. NOTE An updated version of this manual (in Adobe Acrobat PDF format) may be available for download on the DPT web site (www.dpt.com). SmartRAID V Quick Install Guides are also available for download from the DPT web site. User’s Manual The User’s Manual contains seven chapters and 4 appendices. Chapter 1, Read This First – This chapter provides an overview of the rest of the documentation, and a roadmap of the installation process. Chapter 2, About Your New SmartRAID V Controller – This chapter describes the features of the various SmartRAID V controllers, and the add-on modules that you can use with your controller. Chapter 3, Configuration and Installation – This chapter provides instructions about setting up device IDs and termination, assembling the main board, plug-in modules and SIMM or DIMM memory modules, selecting the proper cables, and installing the controller into your PC. Chapter 4, Storage Manager on ROM – This chapter provides instructions for using the Storage Manager on ROM (SMOR) utility. SMOR is a DPT storage management utility that is part of the controller ROM and is available during boot. You can use SMOR to configure your controller and create disk arrays before installing an operating system on your computer. Read This First! 1-3 Chapter 5, Software Installation – This chapter provides instructions for installing DPT drivers and Storage Manager for all supported operating systems. After the hardware is configured and the disk arrays created, you can install the operating system, SmartRAID V drivers and the full, OS-specific version of Storage Manager. Chapter 6, Storage Manager – This chapter provides information about using DPT’s Storage Manager software. Storage Manager is a utility that lets you access the full feature set of your SmartRAID V controller and manage your storage subsystem. Chapter 7, Theory of Operations – This chapter provides an overview of the technology used in the SmartRAID V series of controllers: caching, RAID, DPT controller architecture, I2O, PCI, SCSI, Fibre Channel and other related topics. Appendix A, Assembly Drawings – This appendix provides outline drawings of the SmartRAID V circuit boards. These drawings assist you in locating the various components on the boards. Appendix B, Troubleshooting – This appendix is a list of common problems and suggested solutions. Appendix C, Specifications – This appendix provides electrical and environmental specifications for the SmartRAID V product line. Appendix D, SNMP – This appendix describes the DPT implementation of the Simple Network Management Protocol feature for SmartRAID V hardware. Glossary – The Glossary provides definitions of terms and acronyms used throughout the documentation. Storage Manager Help System The Storage Manager online help information contains both topical and pop-up helps for Storage Manager, DPT products and RAID concepts. Installation Roadmap The figure on the following page provides an overview of the installation process, and refers to specific chapters in the documentation that provide information about each step. 1-4 Read This First! Using RAIDstation? YES NO Configure Cabinet Refer to: Storage Cabinets and Devices manual Fibre Channel? NO Set SCSI ID Configure Termination See Chapter 3, Configuration and Installation YES YES Add-on Modules? NO Plug in RA4050 / SX405x Plug in cache memory Plug in BB4050 See Chapter 3, Configuration and Installation Install the controller Attach cables See Chapter 3, Configuration and Installation Power on system Run SMOR (Storage Manager on ROM) Set termination option Verify hardware Configure disk array See Chapter 4, Storage Manager on ROM YES New System? NO Install operating system Install drivers See Chapter 5, Software Installation Install drivers See Chapter 5, Software Installation Install Storage Manager Read This First! 1-5 What’s In the Box? All SmartRAID V controller kits include a controller, utility diskettes (containing drivers and the Storage Manager software for supported operating systems), and documentation. The documentation set consists of this User’s Manual, a Quick Install Guide, and the Storage Manager online help system. NOTE SmartRAID V Ultra2 SCSI controllers include the following additional items: • One internal Ultra/Ultra2 4-device Wide SCSI cable. • A multimode, Ultra2 terminator (installed on the end of the included cable). System Requirements The DPT Storage Manager software and device drivers require approximately 2MB of disk space. See Chapter 5, “Software Installation” for information about supported operating systems. All SmartRAID V controllers are PCI 2.2 compliant and are designed to operate in host systems that comply with revision 2.2 of the PCI specification. SmartRAID V Decade and Century controllers are multifunction PCI devices. The host system must be able to properly configure multifunction PCI devices, where one of the devices is a bridge. SmartRAID V Millennium controllers include a PCI bridge. The host system must be able to properly configure PCI bridges and any devices located behind the bridge. Refer to the file READ.ME in the DPT install directory for more information about computer systems and motherboards that DPT has tested for compatibility with SmartRAID V controllers. You can also select Help–View README Information in Storage Manager to see this information. 1-6 Read This First! Safety Information Throughout this manual are various notices that indicate procedures or practices that can result in loss of data, damage to equipment or personal injury. Be sure to read the following sections for additional information regarding electrical shock hazards and preventing damage from electrostatic discharge. The following symbol will accompany IMPORTANT and CAUTION notices that can result in damage to equipment or loss of data. ! These notices can be identified as shown by the following examples: NOTE This type of notice is used to emphasize important information or procedures that should be followed but if ignored would not result in permanent damage to equipment or software. IMPORTANT This type of notice is used to emphasize a procedure that, if not followed, can cause malfunction of the equipment or software or result in loss of data. CAUTION This type of notice is used to indicate hazards or unsafe practices which could result in personal injury or product-property damage. ! Read This First! 1-7 Working with Electricity Any device that uses electricity must be treated with caution. Follow these guidelines to ensure general safety. • Keep the chassis area clear and dust-free during and after installation. • Do not perform any action that creates a potential hazard to people or makes the equipment unsafe. • Before working on the system, unplug the power cord. • Disconnect all power before doing the following: – Installing or removing a chassis – Working near power supplies • Do not work alone when potentially hazardous conditions exist. • Never assume that power has been disconnected from a circuit. Always check. • Look carefully for possible hazards in your work area, such as moist floors, ungrounded power extension cables, or missing safety grounds. Notices in this manual with the following symbol indicate a potential electric shock hazard to personnel or equipment. 1-8 Read This First! Preventing Electrostatic Discharge CAUTION Electrostatic discharge (ESD) can damage electronic components and equipment. ESD occurs when electronic components are improperly handled and can result in complete or intermittent failures. Always follow ESDprevention procedures when removing and replacing components. Use the following guidelines to prevent ESD damage: • Always use an ESD wrist or ankle strap and ensure that it makes skin contact. • Connect the equipment end of the strap to an unpainted metal chassis surface. • If no wrist strap is available, ground yourself by touching the metal chassis. • When installing a component, use any available ejector levers or captive installation screws to properly seat the bus connectors in the backplane or card slot. These devices prevent accidental removal, provide proper grounding for the system, and help to ensure that bus connectors are properly seated. • When removing a component, use any available ejector levers or captive installation screws to release the bus connectors from the backplane or card slot. • Handle adapter cards by available handles or edges only. Avoid touching the printed circuit boards or connectors. • Place a removed component board-side-up on an antistatic surface or in an approved antistatic container. • If you plan to return the component to DPT, immediately place it in a static shielding container. • Avoid contact between printed circuit boards and clothing. The wrist strap only protects components from ESD voltages on the body; ESD voltages on clothing can still cause damage. CHAPTER 2: About Your New Controller This chapter presents the features of DPT SmartRAID V SCSI and Fibre Channel controllers, along with the Bus Expansion, RAID Accelerator and Battery Backup modules. Feature Overview A look at the features common to SmartRAID V hardware. Millennium Specific features of our high performance RAID controller. Decade and Century What makes our low cost RAID controllers so powerful, and how you can upgrade them to meet your growing needs. SX405x and RA4050 Expansion Modules SX405x modules add additional SCSI or Fibre Channel busses. An RA4050 module upgrades your Decade or Century controller to hardware RAID and a maximum 64MB of cache. BB4050 Battery Module The BB4050 provides up to 72 hours of battery backup safety for your data cache when using a PM3755U2B controller. LEDs and Audible Alarm Information about LED indicators and the audible alarm feature. 2-1 2-2 About Your New SmartRAID V Controller Introduction DPT SmartRAID V products incorporate the latest intelligent controller technology to deliver optimum performance for desktop systems, file servers or multi-user host systems. NOTE ECC-protected cache is available when you use DPT SM4050 or DM4050/DM4060 memory modules. PM3755U2 controllers require DPT DM4050 or DM4060 memory modules. Non-DPT DIMM modules are not supported. € Millennium controllers support RAID 0, 1, 5 and multilevel RAID (0+1 and 0+5). Millennium controllers support a maximum of 256MB of onboard cache. • Century controllers support RAID 0 and RAID 1. You can upgrade to hardware RAID 5 support and up to 64MB of onboard cache by adding an RA4050 RAID Accelerator module. Century PM2654U2 controllers support RAID 0, RAID 1 and RAID 5 with a pre-installed RA4050 RAID Accelerator. You can have a maximum of 64MB of cache on the RA4050 module. • Decade controllers support RAID 0, 1 and 5 and include 4MB of onboard cache. You can upgrade a Decade controller by adding an RA4050 RAID Accelerator module to support hardware XOR for RAID 5 and a maximum of 64MB of onboard cache. • SX405x Bus Expansion Modules add extra SCSI channels or a Fibre Channel port to SmartRAID V controllers. You can use a Fibre Channel expansion module to provide both SCSI and Fibre Channel connections on a SmartRAID V SCSI controller. • The RA4050 RAID Accelerator provides up to 64 MB of cache and adds hardware RAID 5 capability to a Century controller or adds hardware XOR and up to 64MB of cache to a Decade controller. • The BB4050 Battery Module provides battery backup for the onboard cache on a Millennium PM3755U2B controller. About Your New SmartRAID V Controller 2-3 Product List The following SmartRAID V products and accessories are documented in this manual: Model PM3755F PM3755U2B PM3754U2 Description 64-bit PCI to Fibre Channel RAID Controller 64-bit PCI to Ultra2 Wide SCSI RAID Controller (w/battery backup capability) 32-bit PCI to Ultra2 Wide SCSI RAID Controller PM2654U2-R1 PM2554U2 PM1554U2 32-bit PCI to Ultra2 Wide SCSI RAID Controller 32-bit PCI to Ultra2 Wide SCSI RAID Controller 32-bit PCI to Ultra2 Wide SCSI RAID Controller SX4055F 64-bit Fibre Channel Single Bus Expansion Module SX4055U2-1 64-bit Ultra2 Wide SCSI Single Bus Expansion Module SX4055U2-2 64-bit Ultra2 Wide SCSI Dual Bus Expansion Module RA4050 RAID Accelerator Module BB4050 Battery Backup Module SM4050-16 SM4050-64 16MB ECC SIMM 64MB ECC SIMM DM4050-162 DM4050-642 DM4060-162 DM4060-642 16MB ECC DIMM 64MB ECC DIMM 16MB ECC DIMM 64MB ECC DIMM 1. PM2654U2 controllers are shipped with an RA4050 RAID Accelerator preinstalled. 2. PM3755U2B controllers use DIMMs for cache memory. 2-4 About Your New SmartRAID V Controller Product Feature Overview All SmartRAID V controllers include: • Support for I2O OSMs provided by major operating system vendors; DPT provides drivers for some operating systems. See Chapter 5, “Software Installation” for a list of drivers supplied by DPT. • Certifications for major operating systems, including Novell NetWare and Windows NT. • Support for a variety of SCSI and Fibre Channel devices, including hard disk, tape, CD-Recordable, CD-ROM, Magneto-Optical drives, jukeboxes and scanners. • Local and remote configuration, array status and I/O monitoring using DPT Storage Manager software. • Operating system independent configuration and RAID creation using the Storage Manager on ROM (SMOR) utility. • Support for SCSI-1, SCSI-2 and SCSI-3 with active termination. • ASPI protocol support for third-party applications and utilities. • Flash ROM for easy upgrades of controller firmware, I2O BIOS and SMOR. • Event logging and broadcasting, including messaging for alphanumeric pagers. • Dynamic Array Expansion, which lets you increase your storage capacity under Windows NT by adding one or more drives to a RAID 0 or RAID 5 array while your system remains online. See Dynamic Array Expansion in Chapter 6, “Storage Manager” for information on using this feature. • Predictive caching which analyzes disk read requests made by the host to determine whether they are part of a pattern. If a pattern is detected, the controller uses the pattern to predict which data the host is likely to request in the near future, then reads this data into the cache. • Intelligent Hot Spare. A hot spare drive automatically replaces a failed drive. When multiple hot spares are available on a controller, the intelligent hot spare algorithm picks the best one based on capacity and bus location. RAID 1 and RAID 5 arrays are rebuilt automatically using the new drive. About Your New SmartRAID V Controller 2-5 SmartRAID V Millennium Features SmartRAID V Millennium products are high-performance RAID controllers for host computers with a PCI expansion bus. Key features of the Millennium include: • High-performance RISC processor (80 MIPs) • Hardware RAID 0, 1, and 5 • Support for striping multiple arrays as a single logical drive (RAID 0+1 and RAID 0+5) • Hardware XOR • Up to 256MB of cache per controller • 32-bit PCI and 64-bit PCI bus models Conforms to revision 2.2 of the PCI specification. PCI clock speeds up to 33 MHz are supported. • One Ultra2 SCSI (PM375xU2) or Fibre Channel (PM3755F) bus • Intelligent Hot Spare capability • ECC protection for the data cache (using DPT ECC-capable memory modules) • Real-time monitoring of controller temperature and voltage • Optional battery backup capability for DM4050/DM4060 controller cache The following Millennium controllers are available: Type Host Bus Host/Internal Transfer Rate I/O Transfer Rate1 Type Host Bus Host/Internal Transfer Rate I/O Transfer Rate1 Battery Backup 1. Maximum per channel burst rate 2. Using a single 16MB DIMM PM3754U2 Ultra2 Wide 32-bit PCI 132 MB/sec 80 MB/sec PM3755U2B Ultra2 Wide 64-bit PCI 264 MB/sec 80 MB/sec 72 hours2 PM3755F Fibre Channel 64-bit PCI 264 MB/sec 100 MB/sec 2-6 About Your New SmartRAID V Controller You can use an SX405x Bus Expansion Module to expand a Millennium controller with one or two additional SCSI channels or with one Fibre Channel Arbitrated Loop (FC-AL) port. Millennium Fibre Channel controllers can be expanded with one additional FC-AL port. By using an SX4055F Bus Expansion Module, Fibre Channel and SCSI buses can coexist on the same SCSI controller (PM375xU2 models only). SX405x Bus Expansion Modules are daughter cards that attach to the SmartRAID V controller and do not require an additional card slot in the host system. The PM3755U2B controller can be upgraded to include a battery-backed cache by adding a BB4050 battery module. • For controlling DPT RAIDstation storage cabinets or other manufacturers’ cabinets, Millennium SCSI controllers provide a Very High Density Cable Interconnect (VHDCI) 0.8 mm external connector. • To simultaneously control SCSI devices mounted in the host system, Millennium SCSI controllers provide an internal, high-density 68-pin connector. • The Millennium Fibre Channel controller provides a single High Speed Serial Data Connector (HSSDC) for external connections. Dual loop redundancy is available by adding an SX4055F Expansion Module. The memory sockets on a Millennium controller accept up to 256MB of cache for maximum performance. For maximum data protection, use the DPT ECC SIMMs or DIMMs listed below: Model NOTE Description SM4050-16 16 MB ECC SIMM SM4050-64 64 MB ECC SIMM DM4050-16 16 MB ECC DIMM DM4050-64 64 MB ECC DIMM DM4060-16 16 MB ECC DIMM DM4060-64 64 MB ECC DIMM The PM3755U2B controller only accepts DM4050 or DM4060 modules. Do not use non-DPT DIMMs for this controller. The PM3754U2 controller can use either standard 32- or 36-bit1 singlesided, low-profile 60ns (or faster) EDO SIMMs. However, standard EDO SIMMs do not provide ECC data protection. The PM3754U2 data cache is protected by ECC only when DPT SM4050 memory modules are installed. The green ECC Enabled LED is lit when DPT memory is installed. Refer to Appendix A, “Assembly Drawings” for the location of this LED. 1 The parity bit is not used on 36-bit EDO SIMMs. However, the SIMMs will function in the controller as non-parity memory. About Your New SmartRAID V Controller 2-7 SmartRAID V Decade and Century Features SmartRAID V Decade and Century controllers are designed to provide high performance solutions for workstations and servers in environments where cost is a factor. The following Decade and Century controllers are available: PM1554U2 / PM2554U2 / PM2654U2 Ultra2 Wide Type 32-bit PCI Host Bus Host/Internal Transfer Rate I/O Transfer Rate 1 132 MB/sec 80 MB/sec 1. Maximum transfer rate per channel The Decade (PM1554U2 ) controller features include: • Onboard I/O processor (31 MIPs) • Hardware RAID 0, 1, 5, 0+1 and 0+5 • Firmware XOR • 4MB of onboard cache RAM • Intelligent Hot Spare capability • Conforms to revision 2.2 of the PCI specification NOTE If an RA4050 module is attached to a PM1554U2 controller, the controller’s onboard cache is disabled and only the cache on the RA4050 cache is used (64MB maximum). The RA4050 also adds hardware XOR capability which enhances RAID 5 performance. Century controller features include: • Onboard I/O processor PM2554U2 (31 MIPs) PM2654U2-R (40 MIPs) • Hardware RAID 0, 1 and 0+1 • RAID 5 and 0+5 when using an RA4050 RAID Accelerator • Up to 64MB of cache when using an RA4050 RAID Accelerator • Intelligent Hot Spare capability • Conforms to revision 2.2 of the PCI specification. 2-8 About Your New SmartRAID V Controller The Century controller provides a single Ultra2 SCSI channel and supports up to two additional channels with an SX405x Bus Expansion Module. The SX405x is available in three models, providing either one or two additional SCSI channels or one Fibre Channel Arbitrated Loop (FC-AL) port. By using an SX4055F Bus Expansion Module both Ultra2 SCSI and Fibre Channel can coexist on the same controller. Both the RA4050 RAID Accelerator and the SX405x Bus Expansion Module are daughter cards that attach to the controller and do not require an additional card slot in the host system. PM2654U2 controllers are shipped with RA4050 and/or SX405x expansion modules already installed. SX405x Bus Expansion Module Features SX405x Bus Expansion Modules provide additional channels for SmartRAID V controllers. The SX4055F Bus Expansion Module, can be used to add a FC-AL port to a SmartRAID V Ultra2 SCSI controller or a second Fibre Channel bus to a SmartRAID V Fibre Channel controller. NOTE SX405xU2 modules are not compatible with SmartRAID Fibre Channel controllers. The SX4055U2 Bus Expansion Module is not compatible with SmartRAID V controllers that have a 32-bit connector. The following DPT Bus Expansion Modules are available: SX4054U2-1 (-2) SX4055U2-1 (-2) SX4055F Type Ultra2 Wide Ultra2 Wide Fibre Channel Channels Single (Dual) Single (Dual) Single 1 I/O Transfer Rate 80 MB/sec 80 MB/sec 100 MB/sec Width 32-bit 64-bit 64-bit Internal PCI Transfer Rate 132 MB/sec 264 MB/sec 264 MB/sec 1. Maximum burst rate per channel About Your New SmartRAID V Controller 2-9 SX405x modules attach to the SmartRAID V controller and do not require an additional slot in the host system: • A single channel SX405xU2-1 Ultra2 SCSI Bus Expansion Module adds one SCSI channel and provides one external Very High Density Cable Interconnect (VHDCI) 0.8 mm connection and one internal highdensity 68 pin-connection. • A dual channel SX405xU2-2 Ultra2 SCSI Bus Expansion Module adds two SCSI channels and provides two external VHDCI 0.8 mm connections and two internal high-density 68-pin connections. • A Fibre Channel SX4055F Bus Expansion Module adds a single FC-AL bus with a High Speed Serial Data Connector (HSSDC). Using this module with a Fibre Channel controller provides dual-loop redundancy. RA4050 RAID Accelerator Features The RA4050 RAID Accelerator module adds up to 64 MB of cache hardware RAID 5 and 0+5 to a Century controller or additional cache and hardware XOR to a Decade controller. The RA4050 connects to the end of the controller and does not require an additional slot in the host system. The RA4050 hardware cache can provide a substantial performance improvement in systems with heavy disk I/O load, such as CAD workstations, and in network servers running operating systems such as Windows NT, Novell NetWare or UNIX. The RA4050 supports up to 64 MB of cache using four SIMM sockets. Each socket accepts either a 16MB or 64MB standard 32- or 36-bit2 single-sided, low-profile 60ns (or faster) EDO SIMM, or one of the DPT ECC SIMMs listed below: Model Description SM4050-16 16 MB ECC SIMM SM4050-64 64 MB ECC SIMM DPT SM4050 SIMMs are recommended for systems where data integrity is critical. Although, standard EDO memory modules can be used to provide RAM for the cache, SM4050 SIMMs protect the cache with ECC capability. The green ECC Enabled LED is lit when DPT memory is installed. Refer to Appendix A, “Assembly Drawings” for the location of this LED. 2 The parity bit is not used on 36-bit EDO SIMMs, however, the SIMMs will function in the controller as non-parity memory. 2-10 About Your New SmartRAID V Controller BB4050 Battery Module Features The BB4050 Battery Module adds battery backup for the data cache on a SmartRAID V PM3755U2B controller using DPT DM4050 or DM4060 memory modules. The following features of the BB4050 provide additional data security for high-reliability servers: • Nickel Metal Hydride battery pack provides a backup time of 72 hours (using a single 16MB memory module). Actual backup time depends on the amount of cache used and is calculated by the controller firmware. • On board intelligence for power crossover and charge management. • The battery status and backup capacity can be monitored using Storage Manager. • Fast recharge (five hours). • Battery life of 300 charge/discharge cycles. • A user initiated discharge/recharge cycle is available to prevent loss of battery capacity through voltage depression by performing periodic deep-discharging and recharging of the battery. • Operating temperature range of 10ºC to 40ºC. ! CAUTION ! Danger of explosion if battery is incorrectly replaced. Replace only with the same or equivalent type recommended by the manufacturer. Dispose of used batteries according to the manufacturer’s instructions. About Your New SmartRAID V Controller 2-11 SmartRAID V Controller LEDs SmartRAID V controllers provide nine LEDs that let you visually monitor controller activity. Several different controller states are indicated by the LED as outlined in the following sections. Two additional LEDs indicate the status of the cache memory on the controller. See Appendix A, “Assembly Drawings” for the location of the LEDs on your controller. LED Display During Power-Up During its power-up sequence, the controller passes through the following states in sequence, as indicated by the LEDs: NOTE Memory Mapped I/O LEDs 6 and 7 and LEDs 5 and 8 flash alternately while the controller waits for the host computer to initialize the address translation unit (ATU) on the PCI bus. Bridge LEDs 5 and 7 and LEDs 6 and 8 flash alternately while the controller waits for the host computer to initialize its PCI-to-PCI bridge. Fast Idle The controller enters a fast idle pattern while waiting for the I2O initialization commands after the address translation unit (ATU) and PCI bridge have been enabled. The ATU, PCI bridge and cache module (if installed) must be configured and enabled before the I2O initialization can be completed. If any one of these components are not configured or become disabled during the Fast Idle phase, the pattern will return to the respective wait pattern for the affected component. LED Display During Controller Idle When no commands are in progress and all bus activity has ceased, the controller enters the Idle state. This is indicated by a rotating pattern in LEDs 1 through 8. 2-12 About Your New SmartRAID V Controller LED Display During Controller Active When the power-up sequence is complete, viewing the LEDs can help you determine the operating status of the controller. These LED patterns are also useful for troubleshooting. Refer to Appendix B, “Troubleshooting” for more information on interpreting LED patterns. LED Function 1 Heartbeat. Indicates that controller interrupts are enabled and that the controller is alive. During controller activity, this LED flashes four times a second. 2 Indicates the occurrence of a non-maskable interrupt (NMI) to the I/O processor on the controller. 3 Indicates the controller’s internal operating system is in its idle loop. 4 Indicates that the controller’s internal operating system is processing an interrupt. 5 Reserved for future use. 6 Indicates that the cache controller is using DMA to perform a data transfer. 7 Indicates the controller is generating parity information for a RAID 5 array (hardware XOR). 8 Indicates that there is a command on the SCSI or Fibre bus. IRQ Lit only when the controller activates an interrupt on the host PCI bus. Cache Status LEDs Two LEDs on the SmartRAID V controller indicate the status of the onboard cache RAM. Refer to Appendix A, “Assembly Drawings” for the location of the LEDs on your controller. • The green ECC Enabled LED is lit when all installed SIMMs or DIMMs are DPT ECC memory modules. This indicates that the controller data cache is ECC protected. • The red ECC Error LED, is lit when a correctable or non-correctable error has been detected in one of the ECC SIMMs or DIMMs. The LED will stay lit, even after the error has been corrected, until the controller is powered-down. Cache failure information is recorded in the controller error log and can be viewed using the Event Log window in Storage Manager. About Your New SmartRAID V Controller 2-13 BB4050 LED Indicators The BB4050 module has two LED indicators labeled CHARGE and TRICKLE. These LEDs indicate the following conditions: Status TRICKLE LED CHARGE LED Momentary flash On Fast Charge Off On Trickle Charging On Off Charge inhibit Off Off Flashing On On On 1 Initial Powerup Discharge Battery not installed 1. If battery voltage and the ambient temperature are acceptable, the Trickle LED will not remain lit. Use the Battery Configuration dialog in Storage Manager to view the current status of the BB4050 module. Audible Alarm DPT controllers with caching capability (Millennium models or Decade/ Century models using an RA4050 module) have an audible alarm. The failure of a drive which is a member of an array attached to the controller causes the audible alarm to sound. The alarm stops automatically (after the initial system scan) when you start Storage Manager or SMOR. 2-14 About Your New SmartRAID V Controller CHAPTER 3: Configuration and Installation Your new DPT SmartRAID V controller is the center of a complete system consisting of the controller, disk drives and other peripherals, and the connecting cables. This chapter discusses configuring these components. Configure Devices This chapter includes information on using SmartRAID V controllers in a Microsoft Cluster Server (MSCS) configuration. Attach Modules Prepare your SCSI peripherals for use by setting their SCSI IDs and termination. Fibre Channel disks and peripherals will configure themselves automatically during boot. Assemble the various parts of your DPT controller, which can include the base controller, a RAID Accelerator, Bus Expansion Module and one or more memory modules. The PM3755U2B controller can also use the battery backup module. Install in your System Mount the assembled controller in your computer system. Configure the Software Use our SMOR utility to set your system parameters, install the operating system and you are ready to use your system. Microsoft Cluster Server How to use a SmartRAID V controller in a Microsoft Cluster Server configuration. 3-1 3-2 Adapter Configuration and Installation Installation Overview The process of installing a SmartRAID V controller consists of the following steps: 1. If you are using a RAIDstation storage cabinet, configure it as described in the RAIDstation User’s Manual. 2. Configure device IDs, cables and termination for SCSI devices in the host system. Fibre Channel controllers and devices will automatically configure themselves during boot. 3. If you are using a RAID Accelerator, adding a Bus Expansion Module, expanding your cache memory or using a battery module, plug the appropriate modules onto the controller. NOTE SmartRAID V Millennium controllers or Century and Decade controllers with an RA4050 module must have cache installed. DPT recommends that SmartRAID V controllers have at least 16MB of cache installed. 4. Install the controller and storage devices in the appropriate enclosures. Attach all cables between the controller and the storage devices. 5. Run Storage Manager on ROM (SMOR) by pressing Ctrl+D during system boot to configure the controller’s SCSI termination and verify proper hardware configuration. You can also use SMOR to configure your storage subsystem and disk arrays. (Refer to Chapter 4, “Storage Manager on ROM”.) 6. If you are setting up the computer system for the first time, install the operating system on one of the controller’s disk drives or arrays. During this process, you should also install any driver updates for your DPT controller. Refer to Chapter 5, “Software Installation” for specific instructions. 7. Install any required operating system drivers and Storage Manager. Refer to Chapter 5, “Software Installation” for additional information. Storage Manager for Microsoft Windows is on the DPT Windows NT, Windows 95/98 diskette. Storage Manager for SCO UNIX (Motif version) is on the SCO UNIX diskette. Adapter Configuration and Installation 3-3 Configuration DPT Fibre Channel controllers and attached Fibre Channel devices are plug-and-play and will configure themselves automatically during boot. SCSI devices in the system must be configured prior to use. This configuration includes enabling SCSI termination for the devices and setting the SCSI IDs for each device. Narrow and Wide SCSI The SCSI devices you will be installing can be either Narrow (8-bit) or Wide (16-bit) SCSI devices. Wide SCSI disk drives allow data to be transferred at twice the rate of older 8-bit devices. However, some SCSI devices such as tape and CD-ROM drives still use an 8-bit interface. This is not a problem because the Wide SCSI bus is backward compatible with Narrow SCSI devices, allowing both types of SCSI devices to be used on the same controller. NOTE You can mix Narrow and Wide devices on a single 16-bit SCSI cable. However, any Narrow devices must be attached to the bus ahead of any Wide devices. This ensures that the 16-bit signals are correctly terminated. Configuring Cables SmartRAID V SCSI controllers contain a single Wide SCSI bus with one internal and one external SCSI connector. Each SmartRAID V SCSI controller kit contains a Wide, 68-conductor SCSI cable. This cable is for connections internal to the computer cabinet only. SmartRAID V Fibre Channel controllers contain one Fibre Channel port with a single Fibre Channel connector. The SmartRAID V Fibre Channel controller requires a High Speed Serial Data Connector (HSSDC) cable. If you do not have an HSSDC cable, this cable is available from DPT or a cable supplier of your choice. NOTE Internal and external, Narrow and Wide SCSI cables, Fibre Channel cables, connector adapters and terminators can be purchased directly from DPT (you can use our online web store at www.dpt.com) or from a supplier of your choice. 3-4 Adapter Configuration and Installation Configuring SCSI Termination The devices on each physical end of a SCSI cable must be terminated. Depending upon how you configure your system, you will either terminate two SCSI devices, or the SCSI controller and one peripheral SCSI device. NOTE The SCSI cable supplied with your DPT controller has a factory-installed active terminator on the end of the cable. If you are using multiple SCSI busses on a single controller, each separate bus must be terminated. SCSI termination for SmartRAID V controllers is configured through the SMOR utility or from the Configure Host Bus Adapter window in Storage Manager. The controller has four possible termination settings: Auto The default setting. This can be used for all cabling conditions except where a Narrow (8-bit) cable is attached to the controller. For this case use High Only. Disabled Turns off controller termination unconditionally. Enabled Turns on controller termination unconditionally. High Only Terminates only the additional signals that are used on Wide SCSI devices. This allows Wide and Narrow cables to be simultaneously attached to the controller. By using a 68-pin to 50-pin SCSI cable adapter, an 8-bit SCSI device can be attached to a Wide SCSI cable along with Wide SCSI devices. However, the device at the end of the cable must be a Wide SCSI device so that all SCSI signals are terminated. For internal and external cables where one cable is an 8-bit (Narrow) SCSI cable, set the controller termination to High Only. 3-5 Adapter Configuration and Installation The following illustrations show various SCSI cabling examples. Terminate your SCSI devices as shown in the examples, ensuring that only the devices at the ends of the cables are terminated. Internal Narrow SCSI Internal Wide SCSI T T External Narrow SCSI External Wide SCSI T T SmartRAID V Termination = High Only SmartRAID V Termination = Auto Internal Narrow SCSI T Internal Wide SCSI T External Wide SCSI T T Internal Wide SCSI External Wide SCSI T T T SmartRAID V Termination = Auto External Narrow SCSI T SmartRAID V Termination = High Only T = Terminated 3-6 Adapter Configuration and Installation Configuring Device IDs The SCSI specification allows up to 7 SCSI devices (and a controller) to be connected to a single 8-bit SCSI bus. A Wide SCSI bus can support up to 15 devices (and a controller). Up to 126 devices can be attached to a single Fibre Channel loop. SCSI All SCSI devices, including the controller, must be assigned a unique SCSI ID. SCSI IDs, which are typically set using jumpers or switches on peripheral devices, can be assigned any number from 0 to 7 for 8-bit SCSI devices or 0 to 15 for Wide SCSI devices. For more information on SCSI IDs, see Chapter 7, “Theory of Operation.” Set the SCSI ID of each SCSI device attached to the controller to a unique ID number between 0 and 6. The SmartRAID V controller is set to ID 7 by default (most SCSI controllers use ID 7.) Wide SCSI devices can also use SCSI IDs 8 through 15. SCSI IDs can be duplicated on the same controller if the devices using the same ID are not attached to the same bus. If necessary, the SmartRAID controller ID can be changed to any ID 0 – 7 by using SMOR or from the Configure Host Bus Adapter window in Storage Manager. NOTE Changing the controller ID is not recommended. You should leave the SmartRAID V controller at SCSI ID 7. Fibre Channel DPT Fibre Channel controllers and their attached Fibre Channel devices are configured automatically during boot. Device IDs are assigned within the range 0 – 126 and cannot be changed manually. Adapter Configuration and Installation 3-7 Installation NOTE SmartRAID V Millennium controllers and Century or Decade controllers with an RA4050 module should have at least 16MB of cache installed. Several optional modules are available to upgrade the performance of your SmartRAID V controller: • RA4050 RAID Accelerator – adds RAID 5, hardware XOR and cache memory capacity to the Decade and Century controllers. • SX4054U2 Bus Expansion Module – adds SCSI channels to a SmartRAID V Decade or Century controller. • SX4055U2 Bus Expansion Module – adds SCSI channels to a 64-bit SmartRAID V controller. • SX4055F Bus Expansion Module – adds one Fibre Channel port to a SmartRAID V controller. • SM4050-16 (-64) ECC SIMM – adds 16 or 64 MB of cache memory to SmartRAID V Millennium non-battery backup controllers or to SmartRAID V controllers using the RA4050 RAID Accelerator. • DM4050-16 (-64) or DM4060-16 (-64) ECC DIMM – adds 16 or 64 MB of cache memory to SmartRAID V PM3755U2B controllers. • BB4050 – adds battery-backed cache capability to a PM3755U2B controller. The battery-backed cache must be DPT DM4050 or DM4060 memory modules. Non-DPT DIMMs are not compatible with the BB4050. 3-8 Adapter Configuration and Installation Installing the RA4050 RAID Accelerator SmartRAID V Century controllers can be upgraded to support RAID 5, 0+5 and data caching by installing the RA4050 RAID Accelerator module. A Decade (PM1554U2) controller has built-in RAID 5 and 0+5 support without an RA4050 module. Adding an RA4050 module to a Decade controller provides up to 64MB of cache and hardware XOR performance for RAID 5 operation. NOTE Century or Decade controllers with an RA4050 module must have at least one memory module installed on the RA4050. To install the RA4050 module: 1. Install the SIMMs in the SIMM sockets of the module. Refer to the section, “Installing SIMMs” in this chapter. 2. Attach the RA4050 module to the controller as shown in the diagram below. The plastic docking guides should lock into place. To remove the module, squeeze the plastic docking guides together and separate the module from the controller. 3. To confirm that the RA4050 and SIMMs have been properly installed, start SMOR and select the controller. The Information window should indicate the RA4050 is attached and display the amount of cache memory. Adapter Configuration and Installation 3-9 Installing an SX405x Bus Expansion Module SmartRAID V controllers accept the following Bus Expansion Modules: Model Description SX4054U2-1 Single Ultra2 SCSI Bus, 32-bit Expansion Module. Adds one SCSI bus with one internal and one external connector. SX4054U2-2 Dual Ultra2 SCSI Bus, 32-bit Expansion Module. Adds two SCSI buses with two internal and two external connectors. SX4055U2-1 Single Ultra2 SCSI Bus, 64-bit Expansion Module. Adds one SCSI bus with one internal and one external connector. SX4055U2-2 Dual Ultra2 SCSI Bus, 64-bit Expansion Module. Adds two SCSI buses with two internal and two external connectors. SX4055F Single Fibre Channel-Arbitrated Loop, 64-bit Expansion Module. Adds one external Fibre Channel port (HSSDC). SX4054 Bus Expansion Modules are intended for use with Decade or Century controllers. For a 64-bit Millennium controller, use an SX4055x Bus Expansion Module. Up to 15 devices may be attached to each SCSI bus. Up to 125 devices can be attached to the SX4055F Fibre Channel Bus Expansion Module. Additional information about Ultra2 SCSI and Fibre Channel can be found in Chapter 7, “Theory of Operations.” NOTE If the SX4054/SX4055 has been properly installed, it will be listed by SMOR when the controller is selected. See Chapter 4, “Storage Manger on ROM” for additional information. 3-10 Adapter Configuration and Installation To install an SX4054/SX4055 module: 1. Remove the module mounting bracket from the end of the module. Keep the bracket screws. 2. Attach the module to the controller, connecting P5 on the SX405x to J7 on the controller. Refer to Appendix A, “Assembly Drawings” for connector locations. NOTE SX4055 modules have two connectors (J7 and J8) that must align correctly when installing the expansion module on a Millennium 64-bit controller. 3. Install the new module mounting bracket (with additional holes for the added external connectors) and secure with the screws from Step 1 above. 4. Install the card in an available PCI slot and attach the mounting bracket to the slot opening in the host system. Adapter Configuration and Installation 3-11 Installing SIMMs SmartRAID V PM3754U2 and PM3755F Millennium controllers support up to 256MB of cache using four onboard SIMM sockets. One to four memory modules of the same type and capacity can be installed. SmartRAID V Decade and Century controllers can use up to 64MB of cache provided by the SIMM sockets on an RA4050 module. One to four SIMMs of the same type and capacity can be installed. IMPORTANT All installed SIMMs must be the same type and capacity. Do not mix SM4050 ECC SIMMs and non-DPT SIMMs. Do not use DPT SmartCorrect SM4000 SIMMs. NOTE PM1554U2 controllers have 4MB of onboard cache. RA4050 maximum cache memory can be a single 64MB SIMM, or four 16MB SIMMs. You can use less than 64MB of memory; however, you must install at least one 16MB SIMM. ECC protected cache requires DPT SM4050 SIMMs. The ECC Enabled LED on the controller is lit when DPT SIMMs are installed. 3-12 Adapter Configuration and Installation To install SIMM modules: 1. Install the SIMMs in the sockets as shown starting with socket 1. Refer to Appendix A, “Assembly Drawings” for socket locations. Be sure the SIMM is fully seated and locked in the socket. Although standard 32- or 36-bit 16MB or 64MB low-profile singlesided 60ns EDO SIMMs can be used, DPT recommends that you use DPT SM4050-16 or -64 ECC SIMMs for maximum data integrity. 2. To confirm that the SIMMs have been properly installed, use SMOR to view the amount of cache memory reported when the SmartRAID V controller is selected. Adapter Configuration and Installation 3-13 Installing DIMMs IMPORTANT All installed DIMMs must be the same type and capacity. At least one DIMM must be installed. Use only DPT DM4050 or DM4060 DIMMs. Do not use DPT SmartCorrect DM4000 DIMMs. The SmartRAID V Millennium model PM3755U2B has four onboard DIMM sockets for cache memory. The green ECC Enabled LED on the controller is lit when ECC-capable DIMMs are installed. To install DIMM modules: 1. Install the DIMMs in the sockets as shown starting with socket 1. Refer to Appendix A, “Assembly Drawings” for socket locations. 2. To confirm that the DIMMs are properly installed, start SMOR and select the SmartRAID V controller to display the amount of cache memory reported. 3-14 Adapter Configuration and Installation Installing the BB4050 Battery Backup Module The BB4050 Battery Backup Module is used only on a PM3755U2B Millennium controller. To install the BB4050 Module: 1. Before installing the BB4050 module, be sure the battery pack electrical connector is plugged in the socket on the BB4050 board. 2. Align the Battery Backup Module and the Millennium controller as shown in the illustration. 3. Install the three fasteners through the appropriate holes in the Millennium controller and into the matching posts in the Battery Module. Tighten the fasteners. IMPORTANT Do not overtighten the fasteners; it can damage the circuit board. Adapter Configuration and Installation 3-15 Installing the Controller 1. Connect the computer’s disk activity LED cable to connector P6 on the controller. See Appendix A, “Assembly Drawings” for the location of this connector. Pins 1 and 3 of P6 are connected to +5V and pins 2 and 4 are connected to GND. Ensure that the positive lead of the LED cable (usually a red wire or marked with a red stripe) is attached to pin 1 or 3 and the negative lead (usually a black wire) is attached to pin 2 or 4. 2. If you are using the internal SCSI cable, connect this cable to the controller. 3. Install the controller in an available 32- or 64-bit PCI bus slot and secure the controller bracket to the host system cabinet with the screw provided. In a system with multiple controllers, the controller that has the lowest BIOS ROM address (typically, the lowest numbered PCI slot) will become the booting controller. Refer to the “Determining the Booting Controller” section for more information. 4. NOTE Connect any external cables to the controller. If you have disk drives attached to a SCSI controller with a Symbios chipset, use SMOR to set the Bootable Devices option to Disable. 3-16 Adapter Configuration and Installation Determining the Booting Controller The controller whose BIOS has the lowest address will take control over the boot process and that controller will become the booting controller. Therefore, in a system with multiple controllers, you must ensure that the DPT I2O BIOS occupies the lowest address if you want the DPT controller to be the booting controller. • In systems with multiple DPT SmartRAID V controllers, the DPT controller in the lowest PCI slot number will be assigned the lowest BIOS address, and will be the booting controller. • In systems with both SmartRAID IV and SmartRAID V controllers BIOS addresses are assigned in a system dependent manner. In this case, the booting controller can be determined by observing the system messages during the boot process. If your system contains multiple DPT controllers, you can confirm which controller has been chosen as the booting controller by running SMOR. This utility will display a list of all DPT controllers, starting with the booting controller. Controller IRQ and Address During the host system boot process, the host system BIOS should automatically configure the DPT I 2O BIOS interrupt level (IRQ) and memory location for all DPT PCI controllers in the system. If problems occur, refer to Appendix B, “Troubleshooting” for additional help. Adapter Configuration and Installation 3-17 NVRAM Reset SmartRAID V controllers retain their setup parameters even when powered off. These parameters are stored on the controller in an area of nonvolatile memory (NVRAM). There is a possibility that, through improper configuration, the controller can be put into a state where it hangs the system during boot. If this happens, the parameters stored in the NVRAM can be restored to their default settings by the following procedure: 1. Turn off power to the system. 2. Place a shorting jumper across pins 1 and 2 of P4 on the controller. Refer to Appendix A, “Assembly Drawings for the location of P4 on your controller. 3. Power on the system and wait until LEDs 3, 5, 7 and 8 on the controller begin flashing. 4. Turn off power to the system and remove the jumper. 5. Restart the host system. If the system restarts normally, the controller can now be configured using SMOR or Storage Manager. If the system fails to boot, refer to Appendix B, “Troubleshooting” for additional information. 3-18 Adapter Configuration and Installation Using Microsoft Cluster Server The information presented in this section is intended to help you configure SmartRAID V controllers and a storage subsystem for host systems that use Microsoft Cluster Server (MSCS) to provide fault-tolerant network server resources. For specific information about installing and configuring MSCS support on your Windows NT server, refer to the Microsoft Cluster Server Administrator’s Guide. MSCS lets you create a server cluster, that is two servers sharing a common storage subsystem. Both servers can provide resources to clients. However, they cannot both provide the same resources. If one server should fail, the other server can take over the resources of the failed server. This is called failover. The MSCS software on both servers manages the switchover if one server should experience a system failure. The storage subsystem controller in each server must also be able to respond to the switchover and transfer the responsibility for I/O requests from the failed server to the remaining server. Clients do not see the individual servers in a cluster. They are presented with a virtual server that contains the specific resources they require. MSCS provides the following advantages for network servers: • Availability MSCS automatically detects the failure of an application or server and restarts its resources on the other server. Users will experience only a brief interruption in service. In some cases it might be necessary for users to log on again when the standby server assumes control. Refer to the Microsoft Cluster Server Administrator’s Guide for additional information. • Manageability MSCS lets administrators view the status of cluster resources and move the server workload onto different servers within the cluster as necessary. This allows an administrator to perform manual load balancing or rolling updates on the servers without taking data storage or applications offline. Adapter Configuration and Installation 3-19 System Requirements DPT SmartRAID V controllers include support for MSCS host configurations. To use Microsoft Cluster Server with a SmartRAID V controller you need to do the following: • Use host systems that conform to the Microsoft Hardware Compatibility List for MSCS. • Install Windows NT Advanced Server Enterprise Edition 4.0 (with Service Pack 5 or later) or Windows 2000 Advanced Server on both server systems. Windows NT Workstation 4.0 does not support MSCS. • Install and configure Microsoft Cluster Server software on both host systems. • Connect the servers using a TCP/IP network. This connection is used by MSCS software to monitor the server operation and detect failures. A static IP address is required for each server in the cluster. You cannot use DHCP address assignment with MSCS unless you use the DHCP server to assign the static IP addresses for MSCS resources. You can use WINS or DNS to provide computer name to IP address conversion. Refer to the Microsoft Cluster Server Administrator’s Guide for additional information. • Create a server cluster with two host systems that have SmartRAID V controllers that are connected to a common storage subsystem. The shared storage must use the NTFS file system. NOTE Only one server can control the storage subsystem under MSCS. Any changes to the storage subsystem must be made from the console for the server that currently owns the subsystem. Do not install the server operating system on the storage that uses the shared SCSI bus. • Enable Microsoft Cluster Server support on both SmartRAID V controllers. See Chapter 4, “Storage Manager on ROM” for information about activating SmartRAID V support for MSCS. NOTE Because the storage subsystem and controllers are on a common SCSI bus, both controllers must have a unique SCSI ID. To ensure they receive the highest priority for SCSI bus access, use SCSI ID 7 (the default) for one controller and SCSI ID 6 for the other controller. You can use SMOR to change the SCSI ID assigned to a controller. 3-20 Adapter Configuration and Installation How SmartRAID V Works with MSCS When MSCS is operating on a server cluster, the servers continuously send a heartbeat to each other across the private network connection. When a server does not receive this signal for a preset interval, it automatically begins the failover process of providing the resources of the failed server and takes control of the storage subsystem. When the transfer is complete, the failed server remains offline until the problem that caused the failure is corrected. When the failed server is restored, MSCS can initiate a failback operation so that the second server releases its control of the other server’s resources and the previously failed server begins servicing client requests for its assigned resources. A logical array that is deleted can continue to appear as available in a Storage Manager remote session from the other server in the cluster or from a remote client. The cluster servers must be restarted to ensure that the deleted array does not continue to be reported as available. NOTE Both SmartRAID V controllers must be connected to the shared storage subsystem using special cables that include passthrough termination. These cables can be purchased from DPT. Public Network Private Network Shared SCSI bus* Server 1 Server 2 *Cables must use pass-through termination. Shared Storage CHAPTER 4: Storage Manager on ROM Storage Manager on ROM (SMOR) is a BIOS-based setup utility that lets you configure your DPT SmartRAID V controller without starting an operating system and using Storage Manager. You can also use SMOR to perform basic array configuration. SMOR makes the initial setup of your SmartRAID V controller and RAID storage easier and faster. Run SMOR Run SMOR by pressing Ctrl+D during system boot. Configure your Controller Use SMOR to set the hardware options on your controller. You can view the configuration of the storage subsystems, low-level format disk drives, and configure the DPT I2O BIOS on your SmartRAID V controller. Create Disk Arrays Use SMOR to create disk arrays; install your operating system and your SmartRAID V system is ready to use. 4-1 SMOR 4-2 Overview To configure your hardware and create disk arrays when Storage Manager is not available, run Storage Manager on ROM (SMOR) during the system boot. This is especially useful for a new system where you need to create disk arrays before you install the operating system. After your storage subsystem is configured, install your operating system according to the appropriate procedure in Chapter 5, “Software Installation”. For access to all of the advanced features of your controller, install the version of Storage Manager specific to your operating system. Follow these steps to run SMOR and configure a new system: 1. Press Ctrl+D when the DPT BIOS message appears during boot to start SMOR. 2. Inspect the hardware configuration as shown by SMOR. a. Verify that all peripheral devices and controllers are shown. If any devices are missing from the display, exit SMOR and check your hardware connections. b. View the Information window for each controller to verify that all installed expansion and memory modules are shown. Note the IRQ and Address displayed in the Configuration window. The IRQ and Address values may be required during installation of your operating system. 3. Create disk arrays (see Array Operations in this chapter). Array Groups can be created or modified at any time after system installation. However, if the boot device will be an array, that array must be created before the operating system is installed. 4. Exit SMOR when you are finished with the configuration tasks. Arrays that were created or modified start building at this time. For large arrays, this process may take several hours. You can perform other activities on the system while the build operation continues. The array groups being built can be accessed while the build is in progress. However, access time will be slower until the build is complete. If you have exited SMOR and you want to monitor the progress of the build operation, you can view the Array Group Information window for the array in Storage Manger. See Chapter 6, “Storage Manager” for additional information. SMOR Keyboard Reference The navigation keys work in a similar fashion to those of Windows Explorer. Use these keys to move around in SMOR: Menu Control Alt + (Menu Highlight) Select the corresponding menu or menu item. Enter Initiate an action. Up/Down Arrows Move between menu choices. Esc Return to Tree View. Left Pane - Tree View Control Up/Down Arrows Move between elements within the tree. Left/Right Arrows Scroll the tree left and right. + Expand the current branch, showing the devices attached to it. The element must be preceded by +. – Collapse the current branch. The element must be preceded by –. Tab Move to the right pane — Information View. Right Pane – Information View Control Alt + (tab highlight) Select and go to the corresponding Tab Page within the Information View. Tab Move to the next field in the window. Shift-Tab Move to the previous field in the window. Space Select or deselect an item (check-boxes or radio buttons). Up/Down Arrows Change a combo-box (indicated by ) value. Esc Return to Tree View. 4-3 SMOR 4-4 Menu Reference The SMOR Main Menu changes dynamically depending on what is selected in the tree view. The following is a complete list of possible selections: FILE Read System Config Set System Config Exit Rescan the system – unsaved configuration changes are lost. Save and enable configuration changes. Quit SMOR. RAID Create… Delete Rebuild Stop Build Create a new array. Delete the currently selected array. Rebuild a RAID 1, 5, 0+1 or 0+5 array. Stop building or rebuilding an array. ACTION Make Hotspare Remove Hotspare Format Drive Flash HBA Save Firmware Designate the currently selected drive as a Hot Spare. Make the currently selected Hot Spare available for use by the operating system. Low-level format a currently selected drive. Update the firmware, I2O BIOS or SMOR image in controller ROM. Save the controller BIOS, firmware and SMOR images to a bootable diskette. HELP About… Help Display information about SMOR. Display basic help information. Icon Reference SMOR uses the following icons in Tree View: Controller Disk CD-ROM Array Tape Other Device SMOR 4-5 Screen Layout The SMOR interface works like the Windows Explorer tree-structured interface. The screen is divided into three major components: a menu bar across the top of the screen and two display panes below the menu bar. Information & Configuration Tab Pages Menu Bar Tree View The Menu Bar To open a specific menu, press Alt+(highlighted letter of the menu name). After a menu is open, you can select a specific menu item by pressing the key for the letter highlighted on the menu item. For example, to select the Read System Configuration item on the File menu, press Alt+F to open the File menu, then press R to select Read System Configuration. NOTE Depending on your configuration, not all menu items may be available. Unavailable menu items are shown in a lowcontrast color. 4-6 SMOR The Left Pane – Tree View The Tree View, displayed in the left pane, is the central control for SMOR. This view displays a tree structure that represents the organization of the DPT storage subsystem. This includes DPT controllers, storage devices and arrays detected by SMOR. By moving the highlight with the up and down arrows, you can select items you want to view or configure. As items are highlighted, the associated information on the item is displayed in the Information View (display pane on the right side). If an item in the Tree View is preceded by +, pressing the Enter or + key expands the tree, showing the devices associated with or attached to that item. If an item is preceded by –, pressing the Enter or – key will collapse that portion of the tree, hiding the devices under that item. If the text for an item is larger than the width of the Tree View pane, you can scroll the pane horizontally by using the left and right arrow keys. The Right Pane – Information View To the right of the component tree is the Information View pane. This view displays information related to the currently selected item in the tree. The specific information displayed in the Information View varies depending on the item selected. When there are separate types of information available for the selected item, the Information View is separated into Tab Pages. Tab Pages are generally information or configuration parameters that are related to the selected item. To select a specific Tab Page within the Information View, press Alt+(the highlighted letter on the tab). For example, to change to a controller’s Configuration tab, press Alt+C. You can also press the Tab key when in the Tree View to move over to the currently displayed Information View tab page. On a tab page within the Information View, you can move between the items with the Tab or Shift+Tab keys. See the Keyboard Reference section in this chapter for additional details on changing between the Tree and Information Views, using the menu bar, and navigating within the SMOR interface. SMOR 4-7 Within the Information View, you select an item to configure by using the Tab or Shift+Tab keys to move the highlight to the item. Items that cannot be selected are shown in black. The way in which you change an item depends on the type of control associated with it. Check-boxes are toggled by using the Spacebar. List-box items (for example, SCSI Transfer Rate) are changed using the up and down arrow keys. List-box items can be recognized by the downward pointing arrow at the right of the item. To leave the Information pane and return to the Tree View, press Esc. If you have changed the configuration, you are prompted: Save changes?. Press Tab to select Yes or No and press Enter. NOTE The items shown in the Information View, and the settings for those items, will vary depending on the particular type of controller, device or array selected in the Tree View. SMOR 4-8 Running SMOR Start SMOR by pressing Ctrl+D when the DPT I 2O BIOS message appears on the screen during the boot sequence. The letters that appear during the initial device scan process are: C CD-ROM D Disk drive E Scanner, SAF-TE or intelligent RAID enclosure, or a second controller (MSCS). H Hot spare drives T Tape device 0, 1, 5 Physical arrays identified by the RAID level The position of a letter corresponds to the SCSI ID assigned to that device. SMOR 4-9 Information/Configuration Windows When you highlight an item within the Tree View, the corresponding Information View is displayed. DPT I2O BIOS Settings The example above is the default Information View when SMOR starts. The settings in this view affect the DPT I2O BIOS and all the DPT controllers in your system. To view or change these settings, highlight DPT Configuration in the tree. Controller Parameter Default Optional Settings Bootable Devices Normal Disable Enable Bootable CD-ROMs Disabled Enabled Write Through Write Back 1 second 1, 10, 20, 30 seconds EBDA Relocation Disabled Enabled Enable Extended Int13 Enabled Disabled DOS/Windows 3.1 Cache Setting Scan Delay Smart ROM Options: SMOR 4-10 Bootable Devices These settings let you modify the system boot process for host systems with multiple peripheral controllers in cases where the DPT I 2O BIOS does not provide effective or appropriate default operation. The default setting causes the system to follow the order described in the Determining the Booting Controller section of Chapter 3. If you select Disabled, DPT controllers are not used as boot devices. If you select Enable Bootable CD-ROMs, the DPT controller attempts to detect a bootable CD-ROM that uses the El-Torito format. NOTE This option is disabled by default, because some bootable CD-ROMs contain device-specific boot code that will not work with DPT controllers. DOS/Windows 3.1 Cache Setting This parameter determines how the controller responds to Int13 write commands under DOS, Windows 3.1 and certain operating system installation programs. The default is Write Through to avoid problems that can occur during operating system installation if Write Back caching is enabled. After the operating system is installed, you can change to Write Back caching for improved performance. Change this setting back to Write Through during future operating system installs or upgrades to avoid problems. NOTE The cache setting has no effect on controller cache operation under Windows NT, UNIX or NetWare. Scan Delay Some SCSI devices require a time interval between power on and SCSI bus reset and scan or they do not respond correctly. If devices are not displayed in the Tree View after power on, set the delay to a longer interval. EBDA Relocation This setting determines the way that SmartRAID V controllers handle Extended BIOS Data Area (EBDA) relocation. You can enable this feature to help avoid conflicts with other adapter cards if the controller is installed in a host system with other adapters that follow standard EBDA relocation rules. Enable Extended Int13 This setting enables extended logical block addressing (LBA) for disk devices. Logical block addressing enables operating system access to disks larger than 8.6GB. You should not change this setting. SMOR 4-11 Controller Information Windows To view or change the configuration of a DPT RAID Controller, highlight the controller in the Tree View. Two tabs are available: Information and Configuration. Controller Information Tab The Information Tab for a Controller displays general information reported by that controller. Some of the fields have special conditions: Model Serial # Cache DPT controller model number Controller serial number Amount of cache memory installed Revision FW Type ECC Controller firmware version Firmware type Yes (if DPT ECC memory is used) SCSI Bus: Width Bus width (8-bits or 16-bits) Busses Number of busses on the controller SCSI ID SCSI ID assigned to the controller Transfer Maximum possible bus transfer rate SMOR 4-12 Host Bus: Bus Type Always PCI for SmartRAIDV Transfer Host PCI bus transfer rate. 132 MB/sec for 32-bit PCI bus 264 MB/sec for 64-bit PCI bus Attached Modules: Identifies the expansion modules and cache memory modules installed. Attached Modules can be reported as: SX405xU2-1, SX405xU2-2 SX405xF RA4050 BB4050 SCSI Expansion Module* Fibre Expansion Module* RAID Accelerator Battery Backup Module *Bus Expansion Modules are always reported as either SX405xU2 or SX405xF. SMOR is not able to determine which specific model is attached. Memory modules are reported as: Bank n: nnMB ECC Starting with Bank 0. ECC is displayed only when ECC memory is used. SMOR 4-13 HBA Configuration Tab To modify the hardware parameters for the highlighted SmartRAID controller, press Alt+C to display the Configuration tab. Select Default to reset the parameters on this tab to their default values. NOTE Depending on the specific hardware, some items displayed in the Configuration tab may be read-only. The settings are subdivided according to which parameters relate to the individual peripheral bus and which parameters relate to the entire controller. Controller Parameter Default Optional Settings N/A 0, 1, 2 7 0 – 6 (SCSI) 0 – 126 (Fibre)* TERMPWR Enabled Disabled Termination: Auto On, Off, High Only SCSI Xfer Rate (in MHz) Auto 80, 40, 20, 10, 8, 5, Asynchronous Bus ID * Fibre Channel IDs are display only. They cannot be changed. Bus Each peripheral bus on a controller is assigned a number starting at 0. SMOR 4-14 SCSI ID SmartRAID V controllers are configured by default at SCSI ID 7. This value should not be changed unless required for special configurations. NOTE Fibre Channel IDs can be 0 – 126. However, these IDs are configured dynamically and cannot be changed using SMOR or Storage Manager. TERMPWR By default SmartRAID V controllers supply termination power for other SCSI devices through the TERMPWR line on the SCSI cable. If you want to change this setting, refer to the TERMPWR section in Chapter 7, “Theory of Operation” for more information. Termination This setting controls the SCSI termination for the controller and bus. The default value (Auto) should not be changed, unless both internal and external cables are attached to the controller or you are using an 8-bit (Narrow) cable. Refer to the Configuring SCSI Termination section in Chapter 3, “Configuration and Installation” for information on setting this parameter. NOTE Termination is not used for Fibre Channel controllers. SCSI Xfer Rate DPT controllers automatically negotiate with each SCSI device at powerup or reset to set the maximum SCSI transfer rate. This parameter limits the SCSI transfer rate to the value selected. This setting should not be changed except when you are troubleshooting SCSI bus errors. NOTE If setting this parameter to 5MHz eliminates SCSI bus data errors, this is usually an indication that the SCSI bus is too long or that the bus is not terminated correctly. PCI Xfer Rate Mem Address IRQ These are display only fields for information purposes. The values in the Mem Address and IRQ fields may be needed when you configure your operating system. Cluster Server Enable This option enables or disables support for Microsoft Cluster Server configurations using the selected controller. Do not enable this option unless you are creating a cluster server configuration. SMOR 4-15 Device Information Individual devices are listed in the Tree View under the controller to which they are connected. Highlight a device to view its configuration information. The Device Information view displays general device information and hardware configuration. This view is divided into three parts: Identification, Capabilities and Status. Progress shows a numeric percentage of completion for active tasks. Identification The Identification section displays a general description of the highlighted device: Description The manufacturer name and model number as reported by the device, followed by the icon for the device. Revision The device firmware revision. Address The address of the device, in the form HBA n, Channel n, ID n, LUN n. Capacity The capacity of the device in megabytes. For removable media disk devices, the capacity reported is for the currently inserted media, or No Media Inserted if no media is inserted. Tape drives do not report media insertions. Removable Read Only As reported by the device Block Size Block size reported by the device. Negotiated Bus speed negotiated between the device and controller. Transfer Rate Maximum transfer rate for the negotiated bus speed and data path. SMOR 4-16 SCSI Capabilities The capabilities section is a list of the capabilities defined in the SCSI specifications. A checkmark indicates that the device supports that SCSI function. Status The following status conditions can be indicated for attached devices: Dead The device failed to respond to controller commands. If the device becomes available it will only change status after the system configuration is read or the host is restarted. Failed A drive failure has occurred. Impacted An operation is being performed that results in performance degradation in response to server I/O requests. Missing The drive is physically missing or will not respond to commands on the device bus. Optimal The device is fully functional. Uninitialized The drive is operational but has not been initialized as a member of an array. Verify A Verify operation is being performed on the array. I/O performance will be affected. Warning This status indicates that failure may be imminent on a device with S.M.A.R.T. failure prediction. SMOR 4-17 Array and Array Group Information SmartRAID V controllers implement RAID 0, 1 or 5 disk arrays in hardware. RAID 0 arrays are composed of any combination of individual drives. RAID 1 arrays are always composed of two drives. RAID 5 arrays contain three or more drives. After the arrays have been created, one or more arrays of the same RAID level can be combined into a Parity Group (see the Creating a Parity Group section). Arrays are striped into Parity Groups by the controller firmware. All the drives in an array or Parity Group must be attached to the same controller, and appear to the host as a single Logical Storage Unit (LSU). The Information window for any array may be viewed by highlighting that array. NOTE Arrays do not start building until a Set System Configuration action has been performed. The Array Information window displays general array information and hardware configuration. It is divided into three parts: identification, SCSI Capabilities and Status. SMOR 4-18 Identification The identification section displays a general description of the highlighted array: Description The RAID level used for the array. Revision The firmware revision of the controller to which the array is attached. Address The address of the array, in the form HBA n, Channel n, ID n, LUN n. Arrays are always assigned the lowest logical address of any device in the array. This field displays as much information as is necessary to unambiguously define the address of the array. Capacity The usable capacity of the array in megabytes. The available capacity of an array depends on the RAID level of that array. Removable As reported by the devices in the array. Block Size Displays the sector (block) size for the selected device in bytes. For disk drives, this value should be 512. If the value is not 512, use SMOR to perform a low-level format and create 512 byte sectors. Stripe Size Displays the stripe size used to create the array. SCSI Capabilities This section displays the SCSI capabilities of the array, as reported to the operating system. The capabilities reported depend on the devices that were used to create the array. Status This field displays the current status of the array. A progress indicator (a numeric percentage of completion) can also appear if the array is Building or Rebuilding. See the following table for array status definitions. SMOR Building The array is being built. Created The array or device is defined but not initialized. Dead A write-back cache to the array command failed. This is an unrecoverable failure. Degraded A single drive in the array has failed; array performance is affected. Impacted A verification is being performed on the array; I/O performance is affected. Missing A drive is physically missing or will not respond to commands on the device bus. Optimal The array is fully functional. Pending The array has been created and the build is queued on the controller, but is not yet started. Rebuilding Data is being rebuilt onto a drive in the array. Warning This status indicates that a drive in a fault tolerant array has failed and the next drive failure will cause loss of the array. 4-19 Setting the Configuration There are two configuration options on the File menu: Read System Config Causes SMOR to rescan to detect any changes in hardware configuration or status. Any changes that have been made and not saved are lost. This operation is run automatically when SMOR is started. Set System Config Causes SMOR to save changes that have been made to the storage subsystem configuration in the controller memory. If any array groups or parity groups have been created or modified, this operation causes the controller to initiate a build operation on the new groups. SMOR 4-20 Array Operations You can use SMOR to create or manage disk arrays. The following sections describe how to use SMOR to create arrays and parity groups, delete arrays, assign hot spare drives, and rebuild an array. Refer to the Chapter 7, “Theory of Operation” for a complete discussion of RAID levels and disk arrays. Creating an Array To create an array: 1. Select RAID–Create. 2. When the RAID Type dialog appears, select the RAID level you want to use. The Stripe size is selected automatically; however you can select a different stripe size value by highlighting the field and using the up and down arrow keys to change the stripe size. NOTE Although you can change the stripe size, DPT recommends using the default value. This value has been selected for optimum performance based on the type of disk array you want to create. When you are ready to proceed, select OK. The Eligible Devices list will appear. Devices on this screen can be either individual disk drives or previously created array groups. Array groups appear in the list when you select RAID 0 and eligible array groups exist. 3. Select the devices you want to include in the array: a. To add devices to the array, highlight the device and press the Spacebar. A checkmark appears next to the device to indicate that it has been selected. You might need to scroll the display down to view all eligible devices. SMOR 4-21 b. To remove a previously selected device from the array, highlight the device and press the Spacebar. 4. When you are finished selecting drives for the new array, select Done. 5. If you are creating a RAID 1 array, the RAID-1 Build Option dialog appears. RAID 1 arrays are built by copying the existing data from one device to the other. Select the direction for the copy, then select OK. 6. Select File–Set System Config to start the build process. The array you have created will begin building at this time. If you have created multiple arrays, they are built serially in the order they were defined. Alternatively, you can exit SMOR. You will be prompted to save the configuration changes. If you choose to save the configuration and have defined arrays, the build process will begin. For large redundant arrays, the build process can take several hours to complete. You can exit SMOR and perform other activities on the system while the build continues. An array being built can be accessed during the build process. If you exit SMOR and you want to monitor the progress of the build operation, you can use the Array Group Information window for the array in Storage Manger. See Chapter 6, “Storage Manager” for additional information. SMOR 4-22 Creating a Parity Group Creating a parity group (RAID 0+1 or 0+5) is similar to creating a normal RAID 1 or RAID 5 array group. Do the following to create a RAID 0+1 or RAID 0+5 parity group: 1. Create and build your array groups as described in the preceding section (Creating an Array). Do not initiate the build process on any arrays that you intend to use in a parity group. 2. After your initial array groups are created, select RAID–Create again. 3. Select RAID 0 for the RAID type and click on OK. 4. Select two or more arrays of the same type from the Eligible Devices list and click on Done. NOTE You cannot combine arrays that use different RAID levels. 5. Select File–Set System Config to begin the build process for the parity group. The Tree View will display the parity group LSU as: (x,x,x,x) FW RAID-0 with the array groups that were striped together listed where disk drives would normally be listed. Selecting an array group component will branch to the disk drives for that array group. The LSU address will be the lowest address of the array logical addresses that make up the parity group. SMOR 4-23 Deleting an Array To delete an array, follow the steps below: 1. In the left pane, highlight the array that you want to remove, then select RAID–Delete. 2. You will be warned that all data will be lost. Choose Yes or No. The array configuration for the devices is not deleted until you select File–Set System Configuration or exit SMOR and choose to save your changes. Hot Spares Any disk drive not assigned to an array or in use by the operating system can be designated as a Hot Spare. Hot Spares automatically replace failed drives in RAID 1 or RAID 5 arrays and are not accessible by the operating system for other use. A Hot Spare can protect drives of equal or lesser capacity attached to any peripheral bus on the same controller. To assign a drive as a Hot Spare: 1. Highlight the drive you want to use in the left pane. 2. Select Action–Make Hotspare. Selecting Action–Remove Hotspare will cause the selected Hot Spare drive to be reassigned as a normal disk drive which is accessible by the operating system. Refer to Hot Spares in Chapter 6, “Storage Manager” for additional information. SMOR 4-24 Rebuilding a Failed Array If a drive in a RAID 1 or RAID 5 array fails and the drive is not protected by a Hot Spare, use the following procedure to replace the failed drive. 1. Remove and replace the failed drive according the procedures in your hardware documentation. 2. When the failed drive has been replaced, choose RAID–Rebuild Array to start the rebuild process. The status of the array will change to Rebuilding (view the Information window for that array). When the rebuild is complete, the array status will change to Optimal. NOTE A DPT RAIDstation enclosure will automatically detect the replacement of a failed drive and initiate a rebuild operation as soon as the new drive is online. Formatting a Drive Formatting SCSI hard drives is not normally required. However, if you have a drive that was previously formatted with a sector size other than 512 bytes you must change the format to 512-byte sectors before you can use the drive with a SmartRAID V controller. You can use SMOR to start a low-level format operation and create a 512 byte/sector format. IMPORTANT Do not remove power from the drive until the format operation is completed. Doing so can cause some drives to be left in an indeterminate state that will require return to the manufacturer for repair or replacement. Low-level formatting large capacity drives can take considerable time. Do the following to start a low-level format for a disk drive: 1. Highlight the drive to be formatted. 2. Select Action–Format Drive. 3. Select OK and confirm. To determine if the format has completed, view the Information window for that drive. SMOR 4-25 Managing Controller Firmware SMOR includes several features that let you upgrade, save and restore the firmware on your SmartRAID V controller. These options are listed on the Action menu when a controller is selected in the Tree View. The Flash HBA feature lets you install the latest DPT controller firmware, I2O BIOS and SMOR utility software. The Save Firmware feature lets you save the current controller firmware, I2O BIOS and SMOR software along with the NVRAM settings to a floppy disk. This disk can be used to restore the controller or copy the firmware, I2O BIOS, SMOR and NVRAM to another controller. Upgrading Firmware The SmartRAID V controller firmware, DPT I2O BIOS and SMOR utility are contained in flash ROM and can be upgraded by using SMOR. Each component must be upgraded as a separate operation. • Firmware image upgrades are contained in a xxxxxxxx.FWI file, where the 8-character file name consists of the 4-digit controller model and a 4-digit release number. • DPT I 2O BIOS images are contained in a file named I2OBIOS.xxx (where, xxx is the version number). • SMOR updates are contained in a file named SMORyyyy.xxx. Where, yyyy is the build number and the file extension (xxx) is the version number. • The default NVRAM settings are contained in the file DPTV1_0.NVR. DPT periodically releases updated firmware, I2O BIOS and SMOR software. You can obtain the latest files by contacting DPT Technical Support or from our FTP site at ftp.dpt.com. NOTE It is much easier to perform the following procedure if the image files are placed in the root directory of a diskette. SMOR 4-26 Do the following to upgrade controller NVRAM, firmware, I2O BIOS, or SMOR utility: 1. Place the diskette containing the image files in the diskette drive of the system where the controller is installed. 2. In the Tree View, select the controller that you want to update. 3. Select Action–Flash HBA. The source file browser will appear. 4. Select the diskette drive in the source file browser window and press Enter to expand the drive listing. 5. Highlight the image file you want to use and select OK to update the controller flash ROM. After the controller reads the image, it will display the version number of the component you selected. Select Yes to confirm. 6. A progress indicator will appear showing the progress of the different stages of the flash operation. If the operation does not complete successfully, refer to the procedures for recovering from an incomplete or failed flash ROM upgrade in Appendix B, “Troubleshooting”. SMOR 4-27 Saving Controller Firmware to a Disk Image This feature provides you with a way to save the current ROM software and NVRAM settings for your controller to a bootable diskette. The resulting diskette is a bootable disk and contains a copy of the three controller software components: firmware, I2O BIOS and SMOR. The utility also saves the current and default NVRAM settings. The diskette will contain the following files: SMORbbbb.vvv Where bbbb is the build number and vvv is the version. I2OBIOS.vvv Where vvv is the version. ffffvvbb.FWI Where ffff is the adapter firmware type (ffff can be "3754" or "2554"). vv is the version and bb is the build. CURRENT.NVR The current NVRAM settings for this controller. DEFAULT.NVR or vvvvvvvv.NVR Default NVRAM settings. vvvvvvvv is the specific version of the default NVRAM settings if previously named. SMORSbbb.vvv This file is used to guarantee that the diskette will boot if there is no current SMOR image available on the controller. (Where bbb is the build number and vvv is the version of the in-memory copy of SMOR.) The build and version may or may not be identical to the SMOR image copied from the flash memory of the controller. SMOR 4-28 Creating a Firmware Disk Image To create the firmware backup diskette: 1. Press Ctrl+D when the DPT I2O BIOS banner appears during system startup to start SMOR. 2. Move the highlight to the controller that you want to backup. 3. Insert a blank, formatted diskette into the host diskette drive. NOTE This operation overwrites the entire diskette. Any existing data is erased. 4. Press Alt+A to select the Action drop-down menu. 5. Select Save Firmware. Press Tab to highlight Yes when prompted. Press Enter to begin the flash update. The operation starts immediately. SMOR displays a progress bar and numerical percentage of completion. When the operation is complete you can exit SMOR and start the system normally. Restoring Firmware from a Disk Image To use the firmware backup: 1. Insert the diskette with the backup images into your diskette drive. 2. Power on or restart your system. The system will boot from the diskette and start SMOR automatically. 3. Highlight the controller that you want to update. 4. Press Alt+A to open the Action menu and select Flash HBA. 5. Highlight the diskette drive and press Enter. SMOR will display a list of valid files on the diskette. 6. Highlight the software image you want to use and press Tab to highlight OK. Press Enter to start the flash update operation. SMOR will read the file and verify that it is a valid flash image. 7. Press Tab to highlight Yes and press Enter to begin the flash update. 8. Press Enter when you see the confirmation prompt 9. When the flash update is complete you must restart the system to enable the new software. CHAPTER 5: Software Installation Your new SmartRAID V controller uses I 2O drivers that may be supplied by DPT or your operating system vendor. This chapter discusses driver and operating system installation when using SmartRAID V controllers. After you install the operating system, you can install Storage Manager. Storage Manager is available for: Windows NT 4.0 A DPT I2O driver is supplied with your controller. Windows 95/98 A DPT I2O driver is supplied with your controller. SCO UNIX 3.2V4.2, ODT 3.0, and OpenServer 5 Microsoft Windows 95/98 SmartRAID V controllers include a SCO BTLD diskette with a DPT I2O driver. SCO UNIX 3.2v4.2 SCO UnixWare 7 SCO OpenServer 5 An I2O driver for UnixWare 7 is available from SCO. Microsoft Windows NT 4.0 SCO UnixWare 7 Red Hat Linux 6.x NOTE If a device driver for your operating system is not supplied on the DPT diskettes or is not available from the DPT web site, contact the manufacturer of your operating system to obtain an I2O OSM for your system. NetWare 4.11, 4.2 and 5.0 A DPT-qualified I2O driver from Novell (for NetWare 4.2 and 5.0) is supplied with your controller. The driver for NetWare 4.11 is available for download from the DPT web site. Red Hat Linux 5.2, 6.0 and 6.1 Diskette images are available from DPT (www.dpt.com). These drivers support Linux kernel versions 2.0.36 and 2.2.5. BSD/OS 4.1 and FreeBSD Diskette images are available from DPT (www.dpt.com). 5-1 Software Installation 5-2 Windows NT 4.0 The DPT SmartRAID V driver for Windows NT 4.0 provides support for both disk drives and other SCSI devices, such as CD-ROMs and scanners. NOTES • Windows NT must be updated with Service Pack 4 or later. • If you choose the Microsoft I2O OSM in place of the DPT class or miniport driver, you will not be able to use Storage Manager. • The Windows NT 4.0 OSM is not compatible with Windows 2000. If you have a SmartRAID V controller installed under Windows 2000, use the DPT miniport driver instead of an OSM. • If you are installing Windows NT from an IDE CD-ROM, press F6 as soon as the NT Detect screen appears during the installation process. This will cause the installation program to prompt for installation of a mass storage driver earlier in the install process and ensure that the disk drives attached to the controller are available when required. • The DPT class driver is installed and enabled automatically. The class driver provides enhanced performance and reduced CPU utilization during disk accesses. This driver will load before the Windows NT disk class driver and acquire all disks attached to DPT controllers. If you want to use the DPT miniport driver, do the following after you complete the initial installation: Open the Control Panel. Double click the Devices icon. Disable the entry for DPT DISK. Restart the system. Software Installation 5-3 There are three driver installation scenarios for Windows NT 4.0: • Installing the SmartRAID V controller into a new system, then installing Windows NT 4.0 • Upgrading an existing Windows NT 4.0 system • Adding a SmartRAID V controller into an existing Windows NT 4.0 system, to be used in addition to a currently installed SmartRAID IV or SmartCache IV controller Each of these cases requires a slightly different procedure. Be sure you select the correct procedure and follow the procedure carefully. If you need additional assistance, contact DPT Technical Support. Installing a New System This procedure describes how to install a SmartRAID V controller and Windows NT 4.0 on a new system. If Windows NT is to coexist with another operating system, that operating system must be installed before you install Windows NT. During the Windows NT installation, you will need one blank high-density diskette to create an Emergency Repair Diskette. To install a SmartRAID V controller and Windows NT 4.0 into a new computer system, follow the steps below: 1. Install the SmartRAID V controllers and storage devices according to the instructions in Chapter 3, “Configuration and Installation”. 2. Boot your system and run SMOR to verify your configuration. Create your disk arrays now. Each array will appear to the operating system as a single logical drive. 3. Ensure that the Windows NT CD-ROM is in the CD-ROM drive. Boot the system from the Windows NT setup diskette 1. 4. Insert the additional setup diskettes when prompted. 5. Press S to skip Setup’s mass storage detection. Press S to Specify Additional Devices. Select Other, then insert the DPT diskette for Windows NT. 6. Select DPT I2O SCSI Adapter Driver for NT 4.0 and greater. 7. Press Enter and continue with the installation as described in the Windows NT documentation. Software Installation 5-4 NOTE If a SmartRAID IV or SmartCache IV controller is installed, Windows NT mass storage detection routines will load an older DPT driver for that device from the Windows NT diskette or CD-ROM. After Windows NT installation completes, update the driver using the version contained on the DPT diskette that was supplied with your SmartRAID IV or SmartCache IV controller. Alternatively, if you have a controller from another manufacturer or other hardware that requires the use of Windows NT mass storage detection, follow the steps below: 1. Install the SmartRAID V controllers and storage devices according to the instructions in Chapter 3, “Configuration and Installation”. 2. Boot your system and run SMOR to verify your configuration. Create your disk arrays now. Each array will appear to the operating system as a single logical drive. 3. Ensure that the Windows NT CD-ROM is in the CD-ROM drive. Boot the system from the Windows NT Setup Disk 1. 4. Insert additional Windows NT setup diskettes when prompted. 5. Press Enter to perform Setup’s mass storage detection. 6. After Windows NT detects any controllers for which it has built-in drivers, you are prompted to either press S to specify additional controllers or press Enter to continue Windows NT installation without specifying additional controllers. 7. Press S to Specify Additional Devices. Select Other, then insert the DPT Windows NT diskette. 8. Select DPT I2O SCSI Adapter Driver for NT 4.0 and greater. 9. Press Enter and continue with the installation according to the instructions in the Windows NT documentation. Software Installation 5-5 Upgrading an Existing System NOTE If you have already installed a SmartRAID V controller into your system and want to change drivers, refer to the Adding to an Existing System section instead of this procedure. To upgrade an existing Windows NT 4.0 system to a SmartRAID V controller, follow the steps below: 1. From the Control Panel, select the SCSI Adapters icon. Then select the Drivers tab and click Add. 2. Insert the DPT Windows NT diskette, then click Have Disk. 3. Select DPT I2O SCSI Adapter Driver for NT 4.0 and greater. 4. After the driver is loaded, shut down the system. Replace the existing controller with the DPT SmartRAID V controller. 5. Boot the system. 6. If you are removing the old DPT controller, you should also remove the old driver. Adding to an Existing System To add a DPT SmartRAID V controller to an existing Windows NT 4.0 system, do the following: 1. From Control Panel, select the SCSI Adapters icon. Then select the Drivers tab and click Add. 2. Insert the DPT I2O drivers diskette, then click Have Disk. 3. Select DPT I2O SCSI Adapter Driver for NT 4.0 and greater. 4. After the driver is loaded, shut down the system. Install the new DPT SmartRAID V controller into the system, leaving the existing controller installed. 5. Boot the system. Software Installation 5-6 Adding to an Existing System (Microsoft OSM) NOTE If you use the Microsoft I 2O OSM in place of the DPT miniport driver, you will not be able to run Storage Manager. To add a DPT SmartRAID V controller to an existing Windows NT 4.0 system using the Microsoft Windows NT OSM, do the following: 1. Obtain a copy of the self-extracting file for the Microsoft I 2O drivers and extract the drivers to a directory or diskette. 2. From Control Panel, select the SCSI Adapters icon. Then select the Drivers tab and click Add. 3. When the Install Driver dialog box appears, select Have Disk. 4. Insert the Microsoft Windows NT OSM I 2O driver diskette or type the path to the directory to which you unzipped the driver files. 5. Select Microsoft I20 Drivers. 6. After the driver is loaded, shut down the system. Add the new DPT SmartRAID V controller to the system, leaving the existing controller installed. 7. Boot the system. The Microsoft I 2O OSM driver supports only disk drives. If you want CD-ROM, tape, scanner, or other SCSI device support on your SmartRAID V controller under Windows NT, you must to use the DPT Windows NT 4.0 miniport driver. Additionally, the Microsoft I 2O OSM driver for Windows NT does not inherently support bootable controllers. If you want to boot the SmartRAID V controller with the Microsoft I 2O OSM, do the following: 1. Install Windows NT 4.0 with the DPT Windows NT 4.0 miniport driver. 2. After Windows NT is installed, remove the DPT Windows NT 4.0 miniport driver from the SCSI Adapters list. 3. Install the Microsoft Windows NT OSM I2O driver. The I 2O BIOS ROM on the SmartRAID V controller will manage the Windows NT 4.0 boot process up to the point where the Microsoft I 2O OSM loads. Software Installation 5-7 Windows 95/98 The DPT SmartRAID V driver for Windows 95/98 provides support for both disk drives and other devices, such as CD-ROMs and scanners. There are several driver installation scenarios under Windows 95/98: • Installing the SmartRAID V controller into a new system, then installing Windows 98 • Installing a SmartRAID V controller into a new system, then installing Windows 95 • Upgrading an existing Windows 95 system to Windows 98 • Adding a SmartRAID V controller to an existing Windows 95/98 system • Upgrading Windows 3.1 to Windows 95 and installing a SmartRAID V controller Each of these cases requires a slightly different procedure. Installing Windows 98 (Full Install Version) This section describes the steps to install Windows 98 (Full Installation Version) on one disk drive or array group using a SmartRAID V host controller. Ensure that your hard drives, arrays, CD-ROM drive, and any other SCSI device attached to the host controller are recognized by SMOR before proceeding. Do the following to install Windows 98 (Full Installation Version): 1. Boot the system from a bootable DOS diskette. 2. Run FDISK and create a Primary DOS Partition of an appropriate size. 3. Mark the Primary DOS Partition Active. 4. Reboot the system from the DOS diskette. 5. Perform a system format (FORMAT C: /S). 6. Run the SETUPCD.EXE program on the DPT Windows NT diskette. This program creates an AUTOEXEC.BAT file and CONFIG.SYS file with support for your CD-ROM drive. 7. Ensure that the MSCDEX.EXE program is in your boot path or the root directory of the C: drive. Software Installation 5-8 8. Remove the boot diskette from the floppy disk drive and reboot the system from the C: drive. 9. Insert the Windows 98 Full Installation CD in the CD-ROM drive. 10. Enter the drive letter assigned to the CD-ROM and run SETUP (for example, D:\SETUP). 11. Follow the Windows 98 installation prompts. 12. During one of the device detection boot processes, Windows 98 will identify PCI Card and/or Memory Controller devices. Click Next and display the list of drivers from a specific location. NOTE If you are not prompted for a PCI Card or Memory Controller Driver or the Device Manager shows PCI Card with a yellow exclamation mark in the Other Devices list, you might need a patch for your motherboard chipset to recognize multifunction bridge controllers. Contact your motherboard vendor and apply the patch. After the patch is installed and the system is restarted, Windows 98 will repeat the device discovery process. If you are installing the operating system, go back to step 12 and continue the procedure. If you are adding a SmartRAID V to an existing configuration, go to step 3 on page 5-12 and continue with the procedure. 13. Select Have Disk and insert the DPT Windows 95/98 diskette when prompted. The system will then reboot back into Windows 98. NOTE If more than one DPT SmartRAID V controller is installed in the computer, repeat steps 12 and 13 for each controller. Device Manager (in Control Panel/System) should now show a DPT I2O SCSI Host Adapter in the SCSI Controllers section. You can use a text editor to remove the following entries from your CONFIG.SYS file: DEVICE=I2ODDL.SYS DEVICE=DPTCDROM.SYS You can also use a text editor to remove the MSCDEX entry from your AUTOEXEC.BAT file. When you complete the installation procedure these CONFIG.SYS and AUTOEXEC.BAT file entries are no longer needed. Software Installation 5-9 Installing Windows 95 (OEM SR2 – Version 950b) This section describes the steps to install Windows 95 (OEM SR2 Version) on one disk drive or array group using a SmartRAID V controller. Ensure that your disk drives, arrays, CD-ROM drive, and any other SCSI devices attached to the controller are recognized by SMOR before proceeding. Do the following to install Windows 95 (OEM SR2 Version) with a SmartRAID V controller: 1. Boot DOS from a bootable DOS diskette. 2. Run FDISK and create a Primary DOS Partition of an appropriate size. 3. Mark the Primary DOS Partition Active. 4. Reboot the system from the DOS diskette. 5. Perform a system format (FORMAT C: /S). 6. Run the SETUPCD.EXE program on the DPT diskette. This program will create an AUTOEXEC.BAT and CONFIG.SYS to support your CD-ROM drive. 7. Ensure that the MSCDEX.EXE program is in your boot path or the root directory of the C: drive. 8. Reboot the system from the C: drive. 9. Insert the Windows 95 OEM SR2 CD in the CD-ROM drive. 10. Enter the drive letter assigned to the CD-ROM and run SETUP (for example, D:\SETUP). 11. Follow the Windows 95 installation prompts. 12. When Windows 95 is fully installed, start Device Manager (in Control Panel – System) and look for a PCI Card entry under the Other Devices category. There may be multiple entries if you have multiple SmartRAID V host controllers installed. There may also be an entry for PCI Memory Controller. 13. Select PCI Card and choose Update Driver from the Driver tab. NOTE If you are not prompted for a PCI Card or Memory Controller Driver or if the Device Manager shows PCI Card with a yellow exclamation mark in the Other Devices list, you might need a patch for your motherboard chipset to recognize multifunction bridge controllers. 5-10 Software Installation Contact your motherboard vendor and apply the patch. After the patch is installed and the system is restarted, Windows 95 will repeat the device discovery process. If you are installing the operating system, go back to step 12 and continue the procedure. If you are adding a SmartRAID V to an existing configuration, go to step 3 on page 5-12 and continue the procedure. 14. Insert the DPT Disk 1 diskette into the floppy drive and let Windows search for the drivers. 15. Windows should identify the PCI Card as DPT I2O SCSI Host Adapter. Select Finish. At this point, you might need to force Windows 95 to copy the driver from A: rather than the CD-ROM drive. 16. Select Cancel for testing the Device ROM. 17. If the Other Devices category shows a PCI Memory Controller, select it and choose Update Driver from the Driver tab. 18. Let Windows search for the drivers on the DPT Windows 95/98 diskette. 19. Windows should now identify the PCI Memory Controller as DPT I2O Memory Controller. Select Finish. At this point, you might need to force Windows 95 to copy the driver from A: rather than the CD-ROM drive. 20. If there are multiple SmartRAID V controllers, repeat steps 12 through 19 for each SmartRAID V controller in the computer. The system should ask you to reboot when this action is completed. 21. Device Manager should now show a DPT I2O SCSI Host Adapter in the SCSI Controllers section. You can use a text editor to remove the following entries from your CONFIG.SYS file: DEVICE=I2ODDL.SYS DEVICE=DPTCDROM.SYS You can also use a text editor to remove the MSCDEX entry from your AUTOEXEC.BAT file. When you complete the installation procedure these CONFIG.SYS and AUTOEXEC.BAT file entries are no longer needed. Software Installation 5-11 Installing Windows 95 (Retail Upgrade – Version 950a) SmartRAID V controllers are not supported by Windows 3.1, therefore an upgrade process from Windows 3.1 to Windows 95 does not apply. However, the Retail Upgrade Version (950a) can be installed like a new operating system if you have your original Windows 3.1 diskettes. Follow the installation instructions in the Installing Windows 95 (OEM SR2 950b) section of this chapter. During the first phase of the installation the Windows 95 installation program will prompt you to insert your original Windows 3.1 disk to verify your eligibility for the upgrade. After the upgrade is authenticated , the process continues as a normal installation on a new system. Adding SmartRAID V to an Existing Windows 95/ 98 Configuration This section describes the steps to install a SmartRAID V controller to an existing Windows 95/98 configuration. Ensure that your hard drives, arrays, CD-ROM drive, and any other SCSI device attached to the controller are recognized by SMOR before proceeding. Do the following to install a SmartRAID V controller in an existing Windows 95/98 system: NOTE 1. Install the SmartRAID V controller in the system and start Windows 95/98. If Windows prompts for a driver to support a PCI Card or Memory Controller), go to step 7. 2. If Windows did not discover the devices during boot, start Device Manager (Control Panel – System) and look for a PCI Card entry in the Other Devices category. There may be multiple entries if you have multiple SmartRAID V controllers installed. There may also be an entry for PCI Memory Controller. If you are not prompted for a PCI Card or Memory Controller Driver, open the Device Manager. If Device Manager displays PCI Card with a yellow exclamation mark in the Other Devices list, you might need a patch for your motherboard chipset to recognize multifunction bridge controllers. Software Installation 5-12 Contact your motherboard vendor and apply the patch. After the patch is installed and the system is restarted, Windows 95 will repeat the device discovery process. If you are installing the operating system, go to step 12 on page 9 and continue the procedure. If you are adding a SmartRAID V to an existing configuration, go to step 3 and continue the procedure. 3. Select PCI Card and choose Update Driver from the Driver tab. Insert the DPT Windows 95/98 diskette into the floppy drive and let Windows search for the drivers. 4. Windows should now identify the PCI Card as DPT I2O SCSI Host Adapter. Select Finish. At this point, you might need to force Windows 95 to copy the driver from A: rather than the CD-ROM drive. 5. Select Cancel for testing the Device ROM. 6. If the Other Devices category shows a PCI Memory Controller, select it and choose Update Driver from the Driver tab. 7. Let Windows search for the drivers from the DPT Windows NT/95/ 98 driver diskette. 8. Windows should now identify the PCI Memory Controller as DPT I2O Memory Controller. Select Finish. At this point, you may need to force Windows 95 to copy the driver from A: rather than the CDROM drive. 9. If there are multiple SmartRAID V controllers in the computer, repeat steps 3 through 10 for each SmartRAID V controller. You may be asked to reboot when this action is completed. 10. Device Manager should now show a DPT I2O SCSI Host Adapter in the SCSI Controllers section. Upgrading to Windows 98 from Windows 95 (Upgrade Version) If the SmartRAID V controller is properly installed and recognized under Windows 95 before starting the Windows 98 upgrade, no further configuration is necessary. Perform the Windows 98 upgrade and the functionality of the SmartRAID V controller will be retained. If the controller is being added in addition to the upgrade, follow the procedure in the Installing Windows 98 (Full Installation Version) section. Software Installation 5-13 Installing Storage Manager for Windows When the SmartRAID V controllers are properly recognized by Windows, run SETUP.EXE from the DPT Windows 95/98 diskette and follow the on-screen prompts to install the Storage Manager software. The installation program detects which version of Windows you are using and installs the appropriate Storage Manager files for your operating system. If you will use remote communication, be sure to select the Communication Server install option. If you are using Windows NT 4.0, do the following after Storage Manager is installed to ensure optimum performance: NOTE 1. Start Storage Manager and double click on the controller icon to display the Host Bus Adapter Info window. 2. Select Configure to display the Configure Host Bus Adapter window. 3. Select Caching. When the HBA Caching Configuration dialog appears, change the settings from Mandatory to Advisory. 4. Select OK to exit the dialog and save the changes. 5. Reboot the host system to enable the new settings. If you reset the NVRAM on the controller, the changes to your cache settings return to the factory default. Software Installation 5-14 SCO UNIX A diskette for SCO UNIX 3.2V4.2 and SCO UNIX OpenServer 5 (3.2V5.x) is included with your SmartRAID V controller. The DPT diskette for SCO contains the drivers for both versions of SCO. A second diskette contains a Motif version of DPT Storage Manager for each version of SCO UNIX. NOTE When assigning numbers to controllers, SCO starts with zero. Storage Manager numbers controllers starting with one. Installing SCO UNIX 3.2V4.2 or OpenServer 5 This section describes the steps to install SCO UNIX 3.2V4.2 and up (including ODT 3.x) and SCO UNIX 3.2V5.0.x (OpenServer 5) on a single drive or array group. These SCO operating systems are configured to support one SCSI hard drive or array group at ID 0, one tape drive at ID 2, and one CD-ROM at ID 5. If these devices are to be installed at this time, make sure that their IDs have been set accordingly. To install SCO, follow the steps below: 1. If installing SCO UNIX 3.2V4.2 or ODT 3.0, boot the system with the N1 diskette. Enter the following string at the boot prompt : defbootstr link=dpti4 If installing SCO UNIX 3.2V5.0.x, boot the system with the Boot Disk. Enter the following string at the boot prompt: defbootstr ahslink=dpti5 For SCO UNIX 3.2V5.04 or later the command is: defbootstr link=dpti5 2. When prompted for the SCO BTLD diskette (DPT volume), insert the DPT BTLD diskette into the floppy drive. 3. Insert the N1 or Boot disk again when prompted. 4. If installing SCO 3.2V4.2 or ODT3.0, insert the N2 diskette when prompted. During the Hardware Roster, the following line should appear: % adapter type=dpti ha=0 id=7 channel=0, PCI If you are installing SCO UNIX 3.2V5.0.x., during the Hardware Roster, the following line should appear: % adapter type=dpti ha=0 id=7, PCI Software Installation 5. NOTE 5-15 Continue the installation according to the SCO documentation. If you are installing from tape or CD-ROM, SCO UNIX 3.2V4.2 expects to find the tape at Controller 0, SCSI ID 2, LUN 0 and the CD-ROM at Controller 0, SCSI ID 5, LUN 0. SCO OpenServer 5 will locate the tape or CD-ROM at any valid SCSI address. Adding to an Existing SCO UNIX 3.2V4.2 or OpenServer 5 System When adding a DPT controller to an existing SCO UNIX configuration, perform the following steps. 1. Install the DPT controller. 2. Boot SCO UNIX. 3. After SCO UNIX has booted, place the DPT SCO driver diskette in the floppy drive. 4. Run the installpkg utility. SCO UNIX will read the diskette and prompt you to enter the package name to be installed. Enter dpti4 for SCO UNIX 3.2V4.2 or ODT 3.0, and dpti5 for SCO OpenServer 5. 5. Rebuild the kernel after the package is installed. Shutdown and reboot the system to install the new kernel and add devices on the controller. SCO UnixWare 7 1. Install the SmartRAID V controller as in Chapter 3, “Controller Configuration and Installation”. 2. Obtain the latest I2O supplement for UnixWare 7 from SCO (it should be PTF7067E or higher). 3. Copy or download the ptf file to the /tmp directory. Use the pkgadd utility to install the I2O supplement by entering the command: pkgadd –d /tmp/ptf7067e.s 4. Follow the on-screen prompts to install the SCO UnixWare I2O supplement. 5. Shutdown and reboot the system. Software Installation 5-16 NOTE When you reboot several WARNING messages may appear and scroll off the screen quickly. These will not occur after “diskadd” is run and can be ignored. 6. Use the diskadd utility to add drives or arrays that are attached to a SmartRAID V controller. Run the sdiconfig –l utility in a terminal window or non-GUI screen. This will list all controllers recognized by the operating system and any attached devices. Use this listing to determine the proper ID to use for the diskadd utility. The diskadd command to add devices on a secondary controller is: diskadd cCbBtTdD Where: C specifies the ID for the controller in the system. B is the controller bus number (from 0 – 7) to which the disks are attached. T is the target controller number (ID). The value of T can be 0 – 31. D is the Logical Unit Number (LUN) of the disk device, from 0 – 31. See the diskadd(1M) man page for more information. For example, if a new drive or array is on the DPT controller, on channel 0, with an ID of 0, the command would be: diskadd c1b0t0d0 Software Installation 5-17 Novell NetWare You must follow the procedures in the following sections to installing a SmartRAID VI controller for Novell NetWare, especially as a booting controller. There are specific steps that must be completed to ensure that NetWare will recognize the DPT controller and any attached devices. The DPT diskette for NetWare contains the device drivers you need to install a DPT controller for NetWare 4.2 and 5.0. The diskette also contains additional modules that allow you to monitor and configure a NetWare server using Storage Manager on a remote client workstation. If you are using NetWare 4.11, you must download the installation files from the DPT Technical Support web site. NOTE The I2O drivers in the following Novell Support Packs or driver kits will result in unexpected behavior of the SmartRAID VI controller or disk arrays: I2ODRV3 NetWare 5 Support Pack 2 NetWare 5 Support Pack 2A If any of these Support Packs or updates are applied, use the Novell install procedure to update the drivers with the files from your DPT NetWare diskette. After you have installed the I2O drivers you can now use the normal NetWare procedures for modifying disk partitions, hot fixes, or volume maintenance. You can use SMOR to create or modify disk arrays or add Hot Spare drives. If you install remote communication support for Storage Manager, you can use Storage Manager from a client workstation to manage the storage subsystem. Software Installation 5-18 NetWare 4.11 – Boot Controller This section describes how to install a SmartRAID VI controller as a boot device for NetWare 4.11 servers. NOTE Part of this procedure requires that you have enough free space on your C: drive to hold the contents of the NetWare CD-ROM. 1. Download the NW411.ZIP file from the DPT Technical Support web site. Extract the files to a floppy disk. 2. Install the DPT controller as the primary controller and attach the disk drives. If other I/O controllers are present, ensure that the SmartRAID VI boot controller is in a lower number PCI slot than the other controllers. 3. Install and configure a secondary controller (SCSI or IDE) for the CD-ROM drive and any other devices such as a tape drive. 4. Boot the system and use SMOR to create any required disk arrays. Press Ctrl+D during boot to start SMOR. 5. Create a DOS partition on the logical storage unit (drive or array group) with the lowest SCSI ID. 6. Boot the system to DOS from the partition created in step 5. Ensure that you load the required CD-ROM drivers. 7. Insert the NetWare 4.11 release CD-ROM into the CD-ROM drive. Insert the diskette you created and run DPT411.BAT. This will copy the necessary files to the C: drive. 8. When asked to choose a disk driver select I2OPCI.NLM. Enter the slot number where the controller is installed and press F10. 9. Select Save parameters and load driver. 10. Choose Yes to select another driver. 11. Select BKSTROSM.HAM. Enter the slot number where the controller is installed and press F10. 12. Select Save parameters and load driver. 13. Install any additional drivers and continue the installation. 14. Ensure that BKSTROSM.HAM is listed after I2OPCI.NLM in your STARTUP.NCF file. Complete the NetWare installation according to the Novell documentation. Software Installation 5-19 NetWare 4.11 – Secondary Controller This section describes how to integrate a DPT SmartRAID VI controller into a new or existing Novell NetWare 4.11 system as a secondary controller. Ensure that your NetWare version is at the minimum patch level specified by Novell. NOTE The server must have patch kit IWSP4 or later installed to use the drivers supplied by DPT. NetWare 4 Support Pack 8 contains the latest Novell I2O drivers. These drivers are newer than the ones from DPT but have not been tested for compatiblity with DPT controllers. To integrate a DPT controller into a existing Novell NetWare 4.11 system, do the following: 1. Download the NW411.ZIP file from the DPT Technical Support web site. Extract the files to a floppy disk. 2. Shutdown the server and switch off the power. Install the DPT controller and any attached storage devices as a secondary disk subsystem. Note the slot used by the controller, you will need this information later in the install process. 3. Power on the server and use SMOR to configure the storage subsystem. Press Ctrl+D during boot to start SMOR. 4. Start NetWare. When the console prompt appears type, LOAD INSTALL and press Enter. 5. Select PRODUCT OPTIONS and press Enter. 6. Select INSTALL A PRODUCT NOT LISTED and press Enter. 7. Insert the diskette you created in drive A: and install I2O and BLOCK STORAGE support only. 8. Accept the defaults for the remaining install options. 9. Return to the main install screen and select NCF OPTIONS. 10. Select EDIT STARTUP.NCF. Ensure that BKSTROSM.HAM is listed after I2OPCI.NLM. 11. Shutdown and restart the server. Software Installation 5-20 NetWare 4.2 – Boot Controller This procedure is for installing a SmartRAID VI controller as the boot device in a NetWare 4.2 server. 1. Install the SmartRAID VI controller as the primary controller and attach the disk drives or storage subsystem. Ensure that you are using a CD-ROM that is not attached to the DPT controller. 2. Create a directory on the C: drive named NWUPDATE. 3. Insert the DPT NetWare diskette into the floppy disk drive. 4. Copy A:\NW42 to C:\NWUPDATE. 5. Start the NetWare installation program from the CD-ROM. Use the Custom Installation option. 6. On the Server Drivers - Summary menu, highlight Disk and CDROM Drivers and press Enter. 7. Highlight Select an Additional Driver and press Enter. Select I2OPCI.NLM and press Enter. Enter the slot number. Highlight Save Parameters and Continue. Press Enter. 8. Answer Yes when prompted to select an additional driver. 9. Select BKSTROSM.HAM and press Enter. Enter the slot number. Highlight Save Parameters and Continue. Press Enter. 10. Answer No when prompted to select an additional driver. 11. Highlight Continue Installation and press Enter. 12. Verify that BKSTROSM.HAM is listed after I2OPCI.NLM in your STARTUP.NCF file. Continue with the NetWare 4.2 installation according to the Novell documentation. Software Installation 5-21 NetWare 4.2 – Secondary Controller This section describes how to integrate a DPT SmartRAID VI controller into a new or existing Novell NetWare 4.2 system as a secondary controller. Ensure that your NetWare version is at the minimum patch level specified by Novell. NOTE NetWare 4 Support Pack 8 contains the latest Novell I2O drivers. These drivers are newer than the ones from DPT but have not been tested for compatiblity with DPT controllers. To integrate a DPT controller into a existing Novell NetWare 4.2 system, do the following: 1. Download the NW411.ZIP file from the DPT Technical Support web site. Extract the files to a floppy disk. 2. Shutdown the server and switch off the power. Install the DPT controller and any attached storage devices as a secondary disk subsystem. Note the slot used by the controller, you will need this information later in the install process. 3. Power on the server and use SMOR to configure the storage subsystem. Press Ctrl+D during boot to start SMOR. 4. Start NetWare. When the console prompt appears type, LOAD INSTALL and press Enter. 5. Select INSTALL A PRODUCT and press Enter. 6. Select INSTALL A PRODUCT NOT LISTED and press Enter. 7. Insert the diskette you created from the download file in drive A: and install I2O and BLOCK STORAGE support only. 8. Accept the defaults for the remaining options. 9. Return to the main install screen and select NCF OPTIONS. 10. Select EDIT STARTUP.NCF. Ensure that I2OPCI.NLM is listed after BKSTROSM.HAM. 11. Shutdown and restart the server. Software Installation 5-22 NetWare 5.0 – Boot Controller Use the following procedure to install support for a SmartRAID VI controller during installation of NetWare 5. The controller should be installed at the beginning of the procedure so that it can be detected by the install routine. 1. Install the DPT controller as the primary controller and attach the disk drives. You can use SMOR to create disk arrays or Hot Spare drives when you boot the system. 2. Install and configure a secondary controller (non-I2O SCSI or IDE) for the CD-ROM drive and any other storage devices such as a tape drive. 3. Create a directory on the C: drive named NWUPDATE. 4. Insert the DPT NetWare diskette into the floppy disk drive. 5. Copy A:\NW5 to C:\NWUPDATE. 6. Start the NetWare installation program from the CD-ROM. Use the Custom Installation option. 7. On the Server Drivers - Summary menu, highlight Disk and CDROM Drivers and press Enter. When prompted choose I2OPCI.NLM and BKSTROSM.HAM as disk drivers. 8. Complete the NetWare installation according to the Novell documentation. Verify that I2OPCI.NLM is listed after BKSTROSM.HAM in your STARTUP.NCF file. 9. NOTE Install the latest support pack for NetWare 5.0. Installing a NetWare Support Pack will overwrite the I2O drivers supplied by DPT. If you encounter problems after installing the Support Pack, you can restore the DPT files by copying them from the DPT NetWare diskette. Software Installation 5-23 NetWare 5.0 – Secondary Controller This section describes how to integrate a DPT SmartRAID VI controller into a new or existing Novell NetWare 5.0 system as a secondary controller. Ensure that your NetWare version is at the minimum patch level specified by Novell. NOTE NetWare 5 Support Pack 4 contains the latest Novell I2O drivers. These drivers are newer than the ones from DPT but have not been tested for compatiblity with DPT controllers. To integrate a DPT controller into an existing Novell NetWare 5.0 system, do the following: 1. Shutdown the server and switch off the power. Install the DPT controller and any attached storage devices as a secondary disk subsystem. Note the slot used by the controller, you will need this information later in the install process. 2. Power on the server and use SMOR to configure the storage subsystem. Press Ctrl+D during boot to start SMOR. 3. Start NetWare and insert the DPT NetWare diskette in the floppy disk drive. 4. When the console prompt appears type, LOAD NWCONFIG and press Enter. 5. Select DRIVER. 6. Select DISK DRIVER. 7. Install I2OPCI.NLM and BKSTROSM.HAM. You will need tospecify A:\NW5 as the location for the files. 8. Ensure that I2OPCI.NLM is listed after BKSTROSM.HAM in your STARTUP.NCF file. Software Installation 5-24 Installing Remote Communication Support 1. Insert the DPT NetWare diskette in the server’s floppy disk drive. 2. Enter the following command at the prompt: LOAD A:\DPTINST.NLM 3. You will be prompted to choose whether to load the remote communication support immediately or delay loading until the server is restarted. If you choose to wait until the server restarts, you will not be able to monitor the DPT subsystem from a remote client until the server is shut down and restarted. Otherwise, the remote communication support is loaded and available as soon as you exit the install program. Red Hat Linux To install a DPT controller under Red Hat Linux 5.2 or 6.x, you must have the DPT Linux diskettes. The diskette images can be downloaded from the DPT web site (www.dpt.com). NOTE The DPT drivers are for Linux kernel versions 2.0.36 and 2.2.5 or higher. If your kernel has been updated by a patch, the drivers might not function. In this case, contact DPT Technical Support for assistance. Refer to the READ.ME file for the latest information Linux support for DPT SmartRAID V controllers. The REDHAT.TXT file is a HOWTO document that describes the installation of a SmartRAID V controller in a system using Linux. DPT controller and RAID management is available through the DPT SMOR utility or Storage Manager for Linux. Storage Manager for Linux requires Linux 6.x (kernel version 2.2.5 or higher). See Chapter 4, “Storage Manager on ROM” or Chapter 6, “Storage Manager” for additional information about using these programs. Software Installation 5-25 Red Hat Linux 5.2 and 6.0 These instructions are for installation of the DPT device driver for Linux on a system using Red Hat Linux 5.2 or 6.0. 1. Install and configure your DPT controller according to the instructions in Chapter 3, “Configuration and Installation”. 2. If you want to install Linux on a disk array, use SMOR to configure any disk arrays before beginning the operating system installation. NOTE Any partitions created on disks that are not part of an array will be unavailable if you subsequently use the disk in a RAID configuration. 3. Boot the system from the DPT Red Hat Linux boot diskette and continue with the Linux installation according to the instructions in the REDHAT.TXT file. Red Hat Linux 6.1 These instructions are for installation of the DPT device driver for Linux on a system using Red Hat Linux 6.1. 1. Install and configure your DPT controller according to the instructions in Chapter 3, “Configuration and Installation”. 2. If you want to install Linux on a disk array, use SMOR to configure any disk arrays before beginning the operating system installation. NOTE Any partitions created on disks that are not part of an array will be unavailable if you subsequently use the disk in a RAID configuration. If your hard drives do not have partition tables or do not contain a recognizable partition), you will be prompted to initialize these disks. The operating system can automatically remove the data or you can manually partition the drives. For more information, refer to the Red Hat documentation. 3. Boot the system with the Red Hat Linux 6.1 boot diskette in the floppy drive and CD Disk 1 in your CD-ROM drive. 4. When the Red Hat 6.1 Welcome screen appears, type: expert at the boot: prompt. Software Installation 5-26 5. When prompted, insert the DPT driver diskette and press OK. 6. You will be prompted for the language and keyboard type. 7. You will be asked to specify the location of the media packages to be installed. If you are installing from CD-ROM, select Local CD-ROM. If you selected CD-ROM, you will be asked what type of CD-ROM you have. 8. The system will ask you to specify a driver. Scroll down and select the DPT I2O driver. 9. The system will inform you that it has found DPT I2O SmartRAID. 10. Unless there are other third party devices to install in your system, select Done. Continue with the Red Hat Linux 6.1 installation according to the Red Hat documentation. Installing Storage Manager for Linux The installation program detects which version you are using and installs the appropriate Storage Manager files for your operating system. If you will use remote communication, be sure to select the Communication Server install option. Storage Manager for Linux requires X Window System support. The DPT distribution includes the LessTif components. DPT has tested Storage Manager operation with both the K Desktop Environment (KDE) and GNU Network Object Environment (GNOME) graphical user interface. NOTE Use of more than 256 colors in your GUI may result in Storage Manager displaying incorrect colors. If this occurs, reset your color setting to use only 256 colors. 1. Create a temporary directory. To create a directory in Linux, type: mkdir <directory name> 2. Change the working directory to the one you just created: cd <...> Download the Storage Manager for Linux archive from the DPT web site to this directory. Software Installation 4. 5-27 When the download is complete, run the following command from the prompt: tar -xvf linsm218.tar 5. After the file extraction is finished, run the following command from the prompt: ./install You will be asked if you want the DPT Communication Server to load on boot. The default is No. If you will access this host from a remote Storage Manager client, enable the DPT Communication Server. 6. Reboot the system, when the installation is complete. 7. Open a command prompt window and change the working directory to /usr/dpt. 8. To launch Storage Manager, type: ./dptmgr This will open a Storage Manager window on your desktop. 5-28 Software Installation CHAPTER 6: Storage Manager DPT’s Storage Manager gives you complete control over your storage subsystem. You can manage your storage locally, remotely across a network or by using a modem. Physical View Storage Manager brings out the best in your DPT hardware, from checking your equipment configuration – to managing your disk arrays – to providing online event logging and performance statistics. Logical View SmartRAID V controllers also include Storage Manager on ROM, which lets you build disk arrays prior to installing your operating system and Storage Manager. See Chapter 4 for additional information about Storage Manager on ROM. Each physical or logical storage device is shown as an icon. To display information or configure the device, click on its icon. Storage Manager’s Physical View presents the storage subsystem as it is physically connected. Storage Manager’s Logical View presents the storage subsystem as it appears to the operating system. Icon Based Event Notification DPT controllers store events – fault conditions as well as status changes – in controller RAM. Events can thus be viewed even if the storage subsystem is not operating. Remote Communication Storage Manager can be used to configure controllers and disk arrays on remote systems across a TCP/IP network. 6-1 Storage Manager 6-2 Introduction DPT Storage Manager is included with your SmartRAID V controller. This utility performs several functions: • Checks hardware configuration. • Allows you to create, expand or delete disk arrays. • Provides online functions for the DPT storage subsystem such as event logging and notification, array status and I/O statistics. • Provides remote access to DPT hardware and attached storage devices across a TCP/IP network. Storage Manager versions for supported operating systems are on the DPT diskettes that were included in your controller kit. System Requirements Storage Manager can be installed on a computer with one of the following operating systems: • Windows 95/98 • Windows NT 4.0 • SCO UNIX 3.2V4.2 • SCO OpenServer 5 • SCO UnixWare 7.0 • Linux 6.x NOTE The versions of Storage Manager for SCO platforms uses the Motif graphical user interface. Storage Manager will not display correctly if your display is set to use more than 256 colors. Before running Storage Manager, be sure that your mouse driver is installed. Storage Manager 6-3 Running Storage Manager You can run Storage Manager: • On the same computer that contains the DPT hardware and peripheral devices (local operation). • Remotely, across a TCP/IP network. This lets you view and configure servers from remote locations. • In demo mode, where Storage Manager simulates a storage subsystem that contains various types of DPT controllers and peripheral devices. This lets you experiment with various storage configurations. Using Storage Manager Locally Storage Manager initially scans for DPT hardware installed on the computer on which it is run. If one or more DPT controllers are found, the storage subsystem hardware configuration is displayed. Using Storage Manager Remotely Windows NT, NetWare, SCO UNIX servers and Windows 95/98 systems can be viewed and configured across a TCP/IP network from Windows NT, Windows 95/98, or SCO UNIX workstations running Storage Manager. To install the DPT communication server software, ensure that Communications Server is selected in the DPT Storage Manager Setup dialog. Refer to the Remote Communication section in this chapter for detailed information about using the remote communication feature. 6-4 Storage Manager Storage Manager on ROM Storage Manager on ROM (SMOR) is a ROM-based version of Storage Manager which is provided on your SmartRAID V controller. If you are installing a new system, use SMOR to configure your RAID subsystem prior to installing your operating system. You can access SMOR during the system boot by pressing Ctrl+D after the DPT I2OBIOS is loaded. Refer to “Chapter 4, Storage Manager on ROM” for more information. Physical Configuration View The first window displayed by Storage Manager is the Physical Configuration View. This window displays each DPT controller in the system along with the peripheral buses and attached devices. Icons representing disk drives, CD-ROMs, tapes, printers, bridge controllers, scanners and jukeboxes are displayed. Devices are sorted by controller number and device ID from lowest to highest. To see a list of all icons and their meaning, select Help – Legend of Icons in Storage Manager. Disk drives that are part of an array have the word RAID on the drive icon. Disk drives that are assigned as Hot Spares have a red circle with a white cross on the drive icon. Select Legend of Icons from the Storage Manager Help menu to see a list of the various icons and their meaning. Storage Manager 6-5 The Switch View button toggles between the Physical Configuration View and the Logical Configuration View window. Create Array Group starts the process of creating a RAID logical disk. Print will print a text report of the subsystem configuration. 6-6 Storage Manager Logical Configuration View On the right side of the Logical Configuration View window are all physical devices that are attached to DPT controllers. On the left side of the window are the associated logical devices as seen by the host computer. Non-disk devices use the same icon for both logical and physical views. Disks drives can be seen either as individual drives or as members of arrays. In either case, the drive or array is represented on the left side of the window as a Logical Storage Unit (LSU). Arrays that make up a Parity Group are displayed as RAID 1 or RAID 5 icons that appear between the LSU icon on the left and the drives on the right. Devices are displayed in order of device type, with all non-disk devices displayed first, followed by all disk drives not assigned to an array, Hot Spares, and finally, all arrays by RAID level. Storage Manager 6-7 Logical Device Address Every device and array is assigned a logical device address by Storage Manager. This is the address used by the host operating system to access the device or array. Logical device addresses appear in parentheses under the logical device and LSU icons on the Logical Configuration View window. The logical device address is composed of four fields (HBA, Bus, Device, LUN) and are assigned to devices as follows: HBA (Host Bus Adapter) The controller to which the device is attached. PCI bus slots are scanned from lowest to highest looking for DPT controllers. As DPT controllers are found they are assigned numbers incrementally, starting with 0. Bus The controller bus to which the device is attached. SmartRAID V controllers can have up to three buses. Storage Manager 6-8 Device The unique ID for that device. For an array, this is the lowest ID among the drives that make up the array. LUN Logical Unit Number for that device (normally 0). NOTE Array groups are automatically assigned an address that corresponds to the lowest logical device address used by a device in that array group. For example, if the lowest member device address for an array is HBA:0 Bus:1 ID:12 LUN:0, the LSU address will be HBA:0 Bus:1 ID:12 LUN:0. When an Array Group has been created, its logical device address will not change if the drive with the lowest ID is replaced by a Hot Spare. When a Hot Spare replacement occurs, the failed drive automatically becomes the new Hot Spare. If you choose not to use that drive as a Hot Spare, Storage Manager will prompt you to select an unused logical device address for that drive. Status Status is reported by SmartRAID V controllers for arrays and drives. Some status conditions are indicated by Storage Manager through status flags on the drive or array icons. View the information window for the drive or array to see specific status information. Changes in status conditions are logged and can also be broadcast to selected recipients. The following table lists the general status conditions that can be indicated for drives or arrays. The Status field in the device or array information window displays additional information for any reported status condition other than Optimal. Storage Manager Building Status flag: blue - This flag appears on an array icon when an array that was created is being built. Status flag: white - This flag appears on the drive icon that data will be copied to in a RAID 1 array build. Failed Status flag: red - This flag appears on a drive icon when the drive has failed. On an array icon, this flag indicates that one drive has failed in a RAID 0 array or two or more drives have failed in a redundant array. Impacted Status Flag: white - The array is in a degraded mode but no host I/O request has occurred since the degraded status was reported. Missing Status flag: black - This flag appears on a drive icon when the drive is physically missing or will not respond to commands on the peripheral bus. On an array icon, this flag indicates that the array has been created or modified within Storage Manager but the array has not yet been built. On a Hot Spare icon this flag indicates that the Hot Spare has not yet been created by the controller. Optimal Status flag: none - The drive or array is fully functional and is not running any operations that impact performance. Pending Status flag: blue - This flag appears on an array icon when the array has been created and the build is queued on the controller, but is not yet started. Rebuilding Status flag: blue - This flag appears on an array icon when the array is being rebuilt after a drive failure. Status flag: white - This flag appears on a drive icon when data is being rebuilt onto that drive. Verifying Status flag: white - This flag appears on drive or array icons to indicate that redundancy is being verified on the array. Performance may be affected. Warning Status flag: yellow - This flag appears on a drive icon (with S.M.A.R.T. failure prediction) to indicate that failure may be imminent. This flag appears on a RAID 1 or RAID 5 array that has a failed or missing drive. 6-9 6-10 Storage Manager Information Windows Double click on a controller or device icon to display an Information window for that controller or device. Host Bus Adapter Information Window The Host Bus Adapter Info window displays configuration information reported by that controller. The Controller section displays the Model, Serial #, Firmware revision and amount of installed Cache. ECC is checked only if DPT ECC SIMMs or DIMMs are installed. The current temperature reported by the onboard sensor is also displayed. The Attached Modules section shows the expansion modules and type and capacity of memory modules installed. The SCSI Bus and Host Bus sections display the current configuration of the respective bus. Buttons available include Configure, Event Log, I/O Stats and Print. Battery displays the Battery Backup Configuration dialog if a BB4050 module is installed. Storage Manager 6-11 Battery Backup Configuration NOTE During the initial calibration cycle for a BB4050 module, the controller disables automatic, low-battery write-through mode. After the calibration, use the Battery Backup Configuration dialog to set a threshold for entering write-through mode when the battery charge drops below a predetermined level. This option lets you view the status of the BB4050 Battery Backup Module and set operating parameters when the battery capacity reaches a predetermined level. The battery Status and available Backup capacity (in hours) is displayed. The Backup value is monitored periodically by software and changes whenever the battery pack is charging or discharging. The Backup Capacity Warnings parameters let you activate the following options when the BB4050 module reaches a predetermined level of remaining backup capacity (in hours). The capacity warning thresholds can change depending on the capacity and number of memory modules. Generally, more cache will result in lower battery backup capacity. Low: Auto Write-Through When checked this option automatically sets the cache to write-through mode when the specified number of hours (Hrs.) of battery capacity remain. The number of hours must be greater than or equal to the number of hours for a Predictive Failure Warning. Predictive Failure Warning When this option is checked a warning message will be issued when the battery backup capacity is almost depleted. Enter the number of hours (Hrs.) of remaining backup capacity when this message should be issued. Storage Manager 6-12 Click the Defaults button to set the Battery Capacity Warnings to their default values. Actual default values are calculated by the controller based on the size of the cache memory. BB4050 Battery Status Messages Battery Module status is reported as one of the following: Full The battery is fully charged. Charging The battery is charging after being partially or fully discharged. Initial calibration charge The battery is in the first phase (charging) of the initial calibration cycle. Initial calibration discharge The battery is in the discharge phase of the initial calibration cycle. Initial calibration recharge The battery is in the final phase (recharge after discharge) of the initial calibration cycle. Maintenance calibration discharge The battery is being discharged as part of the maintenance cycle. Maintenance calibration charge The battery is charging as part of the maintenance cycle. Initial Calibration (BB4050) The Initial Calibration operation is started when a BB4050 Battery Backup Module is first installed on a controller. This function ensures the battery is fully charged for subsequent backup operation. The calibration cycle requires approximately 24 hours to complete. The BB4050 module will not be able to provide backup capability during this operation. When the process is completed, the BB4050 module is ready for normal operation. This function has three phases: 1. Initial charge: The battery is charged to its full capacity. 2. Discharge: The battery is discharged until no backup capacity remains. 3. Recharge: The battery is recharged to full capacity. Storage Manager 6-13 Battery Maintenance (BB4050) IMPORTANT The BB4050 module will not be able to provide backup capability during this operation. The Maintenance operation can be used to ensure the battery remains capable of accepting a full charge. The Maintenance cycle completely discharges and then recharges the battery pack. This helps to eliminate any voltage-depression effects resulting from the battery pack being partially discharged and then recharged repeatedly during normal operation. When this option is selected, the date of the most recent Maintenance cycle is displayed. HBA Configuration To modify hardware parameters for the SmartRAID V controller, click the Configure button in the Host Bus Adapter Info window. The Configure Host Bus Adapter window appears. Storage Manager 6-14 SCSI ID DPT controllers are set at ID 7 by default. The ID for a SmartRAID V Fibre Channel controller can change dynamically as the Fibre Channel loop self-configures. Refer to Chapter 3, Configuration and Installation for information about selecting an alternate SCSI ID. SCSI TERMPWR By default SmartRAID V controllers supply termination power through the TERMPWR line on the SCSI cable. Refer to the information on TERMPWR in Chapter 7, Theory of Operation before you change this parameter. Ext. Cable Detect This option causes the SmartRAID V controller to check for the presence of an external SCSI cable and automatically lower the maximum SCSI bus rate to 5MHz when an external cable is found. Some external SCSI cables are not capable of handling higher transfer rates without producing data errors. Enable this feature to prevent data integrity problems if you have external SCSI devices with long cables. Transfer The maximum possible SCSI transfer rate. SmartRAID V controllers automatically negotiate with each SCSI device at power-up, or reset, to determine the maximum SCSI transfer rate. This parameter should not be changed except when troubleshooting SCSI bus errors. If data errors are eliminated by setting the value to a lower rate, there might be problems with the length of the bus or the bus termination. Termination This parameter sets SCSI termination for the controller. The default (Auto) should not be changed unless both internal and external Wide SCSI cables or 8-bit (Narrow) cables are connected to the controller. Refer to Chapter 3, Configuration and Installation for information about configuring SCSI bus termination. Address This field displays the controller memory address assigned by the host BIOS. This value cannot be changed. Storage Manager 6-15 Buttons available are: Test Alarm – lets you test the audible alarm on the controller. Flash – displays the Flash Configuration dialog to update the controller firmware and BIOS. Caching – allows you to select the controller cache parameters. Defaults – resets the controller configuration to factory default settings. Cancel – cancels any changes you have made and returns to the Host Bus Adapter Info window. NOTE The specific buttons you see depend on the controller model and configuration. Flash Configuration This dialog is displayed when you click on the Flash button in the Configure Host Bus Adapter window. NOTE It is easier to perform an update if the image files are placed in the root directory of a diskette. Each component must be upgraded as a separate operation. Storage Manager 6-16 The current controller Model, Firmware Version and Type are displayed. To specify an image file for the flash operation, you can type a path and filename in the Filename field or click on Browse to use the standard file selection dialog. Firmware images are contained in a xxxxxxxx.FWI file, where the 8-character file name consists of the 4-digit controller model and a 4-digit release number. A DPT I2O BIOS image is contained in a file named I2OBIOS.xxx (where, xxx is the version number). SMOR updates are contained in a file named SMORyyyy.xxx. Where, yyyy is the version number and the file extension (xxx) is the build number. You can obtain the latest files by contacting DPT Technical Support or download the files from our FTP site at ftp.dpt.com. When you select an image file, Storage Manager reads the file to determine the type of image selected, firmware, I2O BIOS, or SMOR. The Version, Date and Type are displayed in the corresponding section of the dialog. Click OK to begin the flash operation. Click Cancel to return to the Configure Host Bus Adapter window. Controller Caching for Windows NT The SmartRAID V controller manages its data cache according to built-in algorithms (see Caching Configuration in this chapter and Chapter 7, “Theory of Operation” for additional information). If you are using Windows NT 4.0, do the following to ensure optimum performance: NOTE 1. Click Caching in the Configure Host Bus Adapter window to display the HBA Caching Configuration dialog. 2. When the HBA Caching Configuration dialog appears, change both of the settings to Advisory. 3. Click OK to exit the dialog and save the changes. 4. Reboot the Windows NT system to enable the new settings. If you reset the NVRAM on the controller, the changes to your cache settings return to the factory default of Mandatory. In that case, repeat this procedure to ensure optimum performance under Windows NT. Storage Manager 6-17 Device Information Window This window displays the following information: Description The manufacturer and model. Revision The drive firmware version. Address The logical address of the device. Capacity Storage capacity of the device in megabytes. For removable media disk devices, Capacity is reported for the currently inserted media. Disk devices also display the number of Sectors on the media along with the Physical and Logical sector size. Other information such as the Transfer rate or whether the device supports Removable media are also reported depending on the system configuration. The current device Status is displayed. General status conditions (other than Optimal) are also indicated by colored flags on the device icon. SCSI Capabilities shows which supported features are enabled [x] for the device. Members of an array display the name and RAID level of the array to which they belong and the Stripe Size for the array. 6-18 Storage Manager Various buttons are available depending upon the type of device. Disk drive devices will have an Event Log and I/O Stats button. Disk drives that are not members of arrays have Make HotSpare, Configure and Format buttons. Print is always available. Disk drives that are members of arrays display a Fail Drive button. If the drive is a Hot Spare, the Remove Hotspare button replaces the Make Hotspare button. Caching Configuration Clicking the Configure button in the SCSI Device Information or the Array Group Information window displays the Device Configuration dialog. This dialog lets you change the Write caching parameters. Click Defaults to set the cache operation to the default setting. Click Cancel to exit this dialog without saving changes. Click OK to exit with changes. Write back mode defers writes to disk until after command completion and generally provides better performance. Write through mode writes all data to disk for each write command before command complete status is returned to the host. The data can also be cached for subsequent read commands. The Predictive Cache checkbox enables and disables the predictive caching feature on SmartRAID V controllers. By default the box is not checked and the feature is disabled. Storage Manager 6-19 Predictive caching is a feature of SmartRAID V controllers that attempts to reduce average disk access time by determining when the host is requesting data that it read previously and reading in additional sequential data before it is actually requested. This feature can provide enhanced performance when you have a host with 20 or more users who are frequently accessing large, individual sequential files. Unless your configuration is similar to this, you will not see any benefit from using Predictive Cache and using it will adversely affect overall controller performance. For additional information about predictive caching, see Predictive Caching Algorithms in Chapter 7. Array Groups The tool bar at the top of the Logical Configuration View window contains Create Array Group, Expand Array Group (Windows NT only) and Delete Array Group buttons. The Expand Array Group button allows you to add drives to an existing array and dynamically resize the logical drive. SmartRAID V controllers can implement any combination of RAID level 0, 1 or 5 disk arrays. RAID 0 arrays can be any combination of individual drives. RAID 1 arrays are composed of two drives. RAID 5 arrays must contain at least three drives. One or more arrays of the same RAID level can be combined into a Parity Group. (This is also referred to as RAID 0+1 for multiple RAID 1 arrays or RAID 0+5 for multiple RAID 5 arrays.) The drives in a Parity Group appear as a single Logical Storage Unit (LSU) to the host computer. NOTE On SmartRAID V controllers, all drives in an array must be attached to the same controller. For controllers with drives on multiple SCSI bus channels, arrays are built using the drives in the order in which they were selected regardless of the bus to which the drive is attached. This behavior can be used to create fault-tolerant SCSI bus configurations using pairs of drives on alternate channels in a RAID 1 or RAID 0+1 array or with drives distributed across all three channels for a RAID 5 or RAID 0+5 array. 6-20 Storage Manager From the Logical Configuration View, you can double-click on an Array Group icon to display the Array Group Information window. Information windows for arrays that are part of a Parity Group can be viewed by clicking on the icons for those arrays. Storage Manager 6-21 The Array Group Information window displays the following information: NOTE Name The descriptive name assigned to the array. An icon in the upper right corner of the window indicates the RAID level. Address This is the logical device address used by the host operating system to access the logical drive. The address is the same one as the lowest device address disk drive in the array. Capacity The total usable storage capacity of the array in megabytes (MB). Status The current status of the array as reported by the controller. Hotspares Displays a list of any Hot Spare drives that are available to protect the array in the event of a drive failure. Components Displays the logical address, model and stripe size for each member of the array. If this a Parity Group information window, the list displays the address or name and stripe size for each disk array that is a member of the parity group. The availability of the various buttons depends on the current configuration and state of the array. Buttons include Configure, Print, Event Log, I/O Stats, Verify/Fix and Name. A Rebuild button will appear for redundant arrays that have a failed drive. For arrays that are building or rebuilding, a Stop Bld button is displayed. For arrays that have a build pending, a Build button is displayed. Arrays running Verification will have Stop Vfy button. Storage Manager 6-22 Creating an Array Group To create an Array Group, do the following: 1. Click the Create Array Group button. 2. The Select Array Type dialog appears. Specify whether or not you want Drive fault tolerance (RAID 1 or 5) or No fault tolerance (RAID 0) Select whether the array is to be Optimized for Capacity (RAID 5) or Optimized for Performance (RAID 1). As you make your selections, the Chosen Array Parameters change to indicate which RAID level and stripe size best suit your selection. You can customize the RAID level and stripe size defaults by selecting the Override button. 3. Click Continue to select the drives you want to use. The Logical Configuration View window will appear with the caption Choosing drives for Array (RAID n), where n is the RAID level chosen. Select the drives you want to use in the Array Group as follows: • To add drives: Mark each drive to be added by clicking on it. A green check mark indicates that a drive is selected. Click Include Drive to add the marked drives to the new Array Group. You may need to scroll the window to view the Array Group. • To remove drives: Click on the drive icons you want to remove and then click Remove Drive. Storage Manager 6-23 During the drive selection process some drives might be displayed in a blue color. This indicates that these drives cannot be included in the array unless you change the configuration. You must either select more drives for the array or remove one or more drives from the array. See the introduction to the Array Groups section for rules regarding the number of drives that can be included in arrays. 4. When you finish selecting the drives to be included in the new Array Group, click Done. The icon for the Array Group will appear with a black flag until you start the build process by saving your changes. 5. When you are finished creating arrays, exit Storage Manager. You will be prompted to save the configuration changes. If you save the configuration, the build operation will start automatically. If you have created multiple arrays, they are built one at a time in the order they were created. You can also start the build without exiting Storage Manager by selecting File–Set System Configuration. NOTE: For large redundant arrays, this process can take several hours to complete. You can exit Storage Manager and perform other activities on the system while the build continues. The arrays being built can be accessed during the build as nonredundant arrays. The arrays will be redundant when the build is complete. 6. RAID 1 arrays are created by copying the data on one drive of the mirrored pair to the other. If you have specified a RAID 1 array, you are prompted to select the direction of the copy. Storage Manager 6-24 If you want to monitor the progress of the build operation, display the Array Group Information window for the new array group. The build progress is displayed as a percentage of completion in the Status field. You can also view the Information window for an array that is a member of a Parity Group to monitor the progress for that component of the Parity Group. Naming an Array Group Click the Name button in the Array Group Information window to assign a unique name to an Array Group or Parity Group. This name will be displayed under the array icon and other locations that the display the array identifier. The name can be 1 – 13 characters in length. NOTE You must restart the host computer before the new array name will take effect. Dynamic Array Expansion NOTE Dynamic Array Expansion is available only for arrays created with SmartRAID V controllers running in a Windows NT host system. Dynamic Array Expansion allows you to increase your storage capacity by adding one or more drives to your RAID 0 and RAID 5 arrays while your system remains online. As additional drives are added, the controller redistributes the data on the array, placing the new space at the end of the LSU and increasing the size of the logical drive as seen by Windows NT. Before this feature was available, to increase the size of an array you had to backup the data on the array, shutdown the host system, delete the old array, and then build a larger array that included the new drives. After the larger array was built, you would reinstall the operating system (if necessary) and restore the data from the backup. This entire process could keep your system off-line for at least one day and possibly longer. Dynamic Array Expansion lets you add the new drives to the array while the system is active and users are logged in and accessing data. After the array is expanded, use Windows NT Disk Administrator to add the additional space to the volume set of the array, then shutdown the system and restart. When the system restarts, Windows NT recognizes the additional space as part of the existing logical drive. Storage Manager NOTE 6-25 There is a significant impact on system performance during array expansion. The relative priorities given to system performance and the array expansion process can be adjusted by use of the Background Task Priority setting in Storage Manager. Dynamic Array Expansion maintains the performance gains of RAID 0 and RAID 5, spreading accesses randomly across the drives in the array. The DPT controller presents the same number of LSUs to the operating system after the expansion. There is no need for manual load balancing, which would be required if the new space were presented as an additional LSU. Requirements and Restrictions Expand refers to the process of adding additional space to an existing array group using the Dynamic Array Expansion feature. Extend refers to the process of adding the new space created by the array expansion to the existing Windows NT volume (LSU). Dynamic Array Expansion has the following system requirements: • Windows NT Server or Windows NT Workstation (Version 4.0 and later with the most recent Service Pack). • Dynamic Array Expansion requires the I2O OSM supplied by DPT. The Microsoft-supplied OSM does not support Dynamic Array Expansion. • Dynamic Array Expansion and volume extension is supported only for RAID 0 or RAID 5 array groups using the NTFS file system. You cannot extend a volume that has a FAT partition. The expanded space must be added as a separate LSU. You cannot extend the Windows NT boot partition. • The array must have Optimal status before beginning the expansion. If the array status is not Optimal, correct the problem and complete a rebuild of the existing array before continuing with expansion. Storage Manager 6-26 NOTE If a drive fails during expansion, the expansion will complete successfully. However, the new, larger array will be in a degraded state until the problem is fixed. If there is a Hot Spare associated with the array, the degraded array is rebuilt using the Hot Spare. If there is no Hot Spare, replace the defective drive, and start a rebuild of the array. • Each new drive added to an array must be at least equal to the capacity of the smallest capacity drive already in the array. In any RAID configuration, the drive with the least capacity in the array determines the usable capacity of all the drives in the array. Therefore, there is no advantage in adding a drive with a capacity larger than the smallest capacity drive already in the array. Expanding an Array Group IMPORTANT DPT recommends that you backup your data before performing an operation that affects the configuration of a disk array. Do not power off the host system while the expansion operation is running. To expand an existing Array Group, do the following: 1. NOTE Connect the additional drives to the peripheral bus and power-on the drives. Refer to the Chapter 3, “Configuration and Installation” if necessary. If the drives are not in hot-pluggable carriers, power down the system before adding drives to the peripheral bus. 2. Start Storage Manager and click Switch View to change to the Logical Configuration View. 3. Select the Array Group to which you want to add drives by clicking the corresponding RAID 0 or RAID 5 icon. 4. Click Expand Array Group. 5. Mark the drives to be added to the array by clicking on them. A green check mark indicates that a drive is selected. 6. Click Include Drive. This will cause the marked drives to join the existing Array Group. The drives to be added are now marked New. Storage Manager 6-27 7. When you are finished choosing drives, click Done. The icon for the Array Group appears with a black flag until the expansion process is started. 8. Select File–Set System Configuration to start the array expansion. The status flag on the Array Group turns blue and the flags on the components turn white during the expansion process. You can perform other activity on the system while the expansion continues, because the array is fully functional during the expansion process. NOTE For large arrays, the expansion can take several hours to complete. Host I/O activity can prolong the expansion process. If you want to monitor the progress of the expansion operation, you can use Storage Manager to view the Array Group Information window. Status is Expanding during the expansion process, Optimal when it has completed. Reconfiguring Windows NT After Array Expansion When the array expansion is complete, do the following to allow Windows NT to recognize the additional space: 1. NOTE Shut down and restart Windows NT. When restarting, Windows NT will run CHKDSK to verify the new space. This might take an extended period of time for large volumes. 2. Start Disk Administrator. The new space appears as Free Space at the end of the existing logical drive. 3. Select both the original logical drive and the free space by highlighting both segments. 4. Select Partition–Extend Volume Set... Click Yes when prompted to the save your changes and to restart Windows NT. Use the RDISK.EXE utility to update your emergency repair diskette with the new disk configuration information. Storage Manager 6-28 Deleting an Array Group To delete an Array Group, do the following: 1. From the Logical Configuration View window, select the LSU or Array Group icon of the array you want to delete. Then click Delete Array Group. 2. Click OK when the confirmation message appears to complete the delete operation. Click Cancel to exit without deleting the Array Group. An array is not physically deleted until you exit Storage Manager and choose to save changes or select File–Set System Configuration. NOTE In a Microsoft Cluster Server configuration, a logical array that is deleted can continue to appear as available in a remote session from the other server in the cluster or from a remote client. The cluster servers must be restarted to ensure that the deleted array does not continue to be reported as available. Saving the Subsystem Configuration The Storage Manager File menu has four options: Read System Configuration Causes Storage Manager to read the current hardware configuration. Any changes that have been made and not saved are lost. This operation also occurs automatically when Storage Manager is started. Set System Configuration Causes Storage Manager to save any changes that you made to the storage subsystem configuration. If any arrays have been created or modified, this action causes the controller to start build operations for the new arrays. Load Configuration File Lets you load a previously saved configuration into Storage Manager and apply it to the current hardware. Save Configuration File Lets you save the current configuration, or any changes to that configuration, to a file for later use. This feature allows storage subsystems to be configured for other machines with the same size and type drives, then later loaded from the configuration file. NOTE If you reset the NVRAM on the controller, any changes to your controller parameters return to the factory defaults. Storage Manager 6-29 Events Events are generated for detected fault conditions as well as subsystem status changes. The events are grouped into four categories as follows: 1 – Soft Error An operation on a disk drive that caused an error but was successful after a retry. 2 – Recoverable Hard Error An error on a disk drive, controller or peripheral bus, where the data was recovered using ECC or from redundant array information. 3 – Nonrecoverable Hard Error An error on a disk drive, controller or peripheral bus where the data could not be recovered using ECC or from redundant array information. 4 – Status Change The status of an array or drive changed. Examples of this would be a drive or array failure or an array build or rebuild operation that was initiated or completed. Storage Manager 6-30 Event Logging When events occur, they are automatically logged in the cache on the SmartRAID V controller where they occurred. In addition, you can specify that Storage Manager maintain an event log on disk (see Event Notification). The contents of the event log can be displayed by clicking Event Log in any controller, drive or array information window. Only the events pertaining to that controller, drive or array are displayed. When the Event Log button is selected, the Event Log window appears. The Event Log window lets you specify that the display be limited only to events of a specific level or higher (the default is level 4). NOTE Some important events may not be displayed by the default level. You should select one of the higher event levels to ensure that you are aware of significant errors that might have occurred. Click on the arrow buttons to adjust the Display Threshold to the desired level. Click View Log to see the event messages whose levels match the selected levels. Storage Manager 6-31 Event Notification If your operating system supports a Broadcaster, Storage Manager lets you specify that event messages be sent to users, groups, devices, through e-mail, to the system error log and the DPT Log File. Select Options– Event Broadcast Control to display the Event Broadcasting dialog. The options in the Event Broadcasting dialog may vary depending upon your operating system. Click Stop Broadcasting to stop Storage Manager from sending event messages to the locations or addresses specified. Click Unload Broadcaster to remove the Broadcaster service from the current set of active services. 6-32 Storage Manager You can select or modify the following parameters: Time Interval Specified time interval at which point the Broadcaster will read the event logs of all DPT controllers with cache. Any new event messages are broadcast to each specified destination (based on the Display Threshold setting). Broadcast to Computer(s) Enable this option to send event messages to each system in the Computer Names list. Local Desktop Message Enable this option to have event messages displayed on the local system desktop. E-Mail to Users Enable this option to mail event messages to each e-mail address in the Email Users list. Log to Event Viewer Enable this option to also log and display event messages in the Windows NT Event Viewer. Computer Names / Email Users Use these fields to specify a list of computer systems or e-mail addresses that are to receive broadcast event messages. Display Threshold Click on the arrow buttons to adjust the indicator to the threshold you want to use for reporting events. Messages will be broadcast for all events whose levels match those selected. Storage Manager 6-33 Pager Event Messaging DPT Storage Manager for Windows NT can also send event messages to alphanumeric paging devices. The messages are sent as e-mail to pagers that support e-mail text message delivery. NOTE: This feature should work with any alphanumeric paging system that supports message delivery via e-mail. Contact your service provider for specific information. The following procedure applies to the system that is running the Storage Manager Event Logger to monitor DPT controllers and attached disk arrays. To configure alphanumeric pager support, do the following: 1. Ensure your pager is working and activated through a service provider. 2. Establish a permanent connection to an Internet service provider (ISP) or create Dial-up Networking connection to your ISP. 3. Configure your e-mail client software to access your Internet mail server. 4. Determine the e-mail addresses for the people you want to receive event messages. 5. In Storage Manager: a. Set the Display Threshold to the level where you want to start broadcast messages. b. Enable E-Mail to Users in the Event Broadcasting dialog (Options–Event Broadcast Control). c. Enter the e-mail addresses for the pagers in the E-Mail Users list. d. Click on OK to exit the dialog and save the changes. When the Event Broadcaster is active, the Event Logger will send text messages for selected events to the pager using the e-mail address you specified. Storage Manager 6-34 Broadcasters Broadcasters are provided on the DPT diskettes for Windows NT, SCO UNIX and SCO UnixWare. The Broadcaster collects events logged by DPT controllers in the host computer on which that broadcaster is running. The Broadcaster records these events to disk files for each controller for use by Storage Manager. Additionally, events whose levels are greater than or equal to the current Broadcast Threshold are sent to destinations as specified in the Storage Manager Event Broadcasting dialog (see Event Notification). Broadcaster for NetWare A Broadcaster is provided for NetWare. The Broadcaster collects events from DPT controllers and records them to files in the SYS:\SYSTEM\DPT directory for use by Storage Manager. Additionally, events are broadcast to the User/Group list, the system console and the system error log file as specified in the Storage Manager Event Broadcast Control window. Installing the Broadcaster The DPT diskette for NetWare contains the Broadcaster for NetWare. When this diskette is installed, the Broadcaster is placed, by default, in the SYS:\SYSTEM\DPT directory on the server. During Broadcaster installation, you will be prompted to specify if the Broadcaster is to be loaded automatically when the server is booted. Doing so will allow events to be gathered and recorded without user intervention. Stopping/Restarting the Broadcaster The Broadcaster is a NetWare Loadable Module (NLM) that can be loaded or unloaded from the server’s command prompt: unload DPTELOG load SYS:\SYSTEM\DPT\DPTELOG unloads the Broadcaster loads the Broadcaster Viewing Events Events can be viewed on a network workstation through the Event Log Display window in Storage Manager (see the Event Logging section). Events can also be viewed by examining the System Error Log file SYS$LOG.ERR on the server if the Broadcaster has been configured to send events to that file. Storage Manager 6-35 Broadcaster for SCO UNIX Systems DPT provides a Broadcaster for SCO UNIX 3.2V4.2, SCO OpenServer 5 and SCO UnixWare 7. The Broadcaster collects events from DPT controllers and saves them to files in the /usr/dpt directory for use by Storage Manager. Events can also be sent to an ASCII file, specified devices, the User/Group list or e-mailed to users as specified in the Event Broadcasting dialog. Installing the Broadcaster The DPT diskette for SCO contains the Broadcaster for SCO. When you install the software on this diskette, the Broadcaster is copied to /usr/dpt. During Broadcaster installation, you are prompted to specify if the Broadcaster will be loaded automatically when the system is started in multi-user mode. If you specify automatic loading, events are gathered and recorded without user intervention. This also copies a script file, S33dpt, to the /etc/ rc2.d directory. This script automatically loads the Broadcaster as a background process when the system goes into multi-user mode. NOTE Do not use the S33dpt script file for UnixWare 7 Broadcaster operation. Stopping/Restarting the Broadcaster A script file (dptlog) is provided that lets you stop and restart the Broadcaster from the UNIX prompt. Use the following commands to stop or start the Broadcaster: dptlog stop dptlog start stops the Broadcaster restarts the Broadcaster Viewing Events Events can be viewed from the system console or a terminal by using the Event Logs window in Storage Manager (see Event Logging). Storage Manager 6-36 Broadcaster for Windows NT The Windows NT Broadcaster collects events from DPT controllers and records them to files in the \DPTMGR directory for use by Storage Manager. Additionally, events are sent to the Windows NT Event Viewer. Installing the Broadcaster When the DPT installation program runs, the Broadcaster is copied to the C:\DPTMGR subdirectory by default. The Broadcaster is installed as a Windows NT service and runs automatically whenever the system is started. This allows events to be gathered and recorded without user intervention. Stopping/Restarting the Broadcaster Because the DPT Broadcaster is a Windows NT Service it must be managed from one of the Windows NT service management applications: • The Broadcaster can be controlled using the Services Control Panel. Services is accessed by selecting the Services icon in the Control Panel folder. Highlight the DPTSERV entry in the Services list. Then click on Start or Stop to start or stop the Broadcaster service. • The Broadcaster can also be started or stopped from a command line prompt by using the NET command as follows: NET START DPTSERV NET STOP DPTSERV starts the Broadcaster stops the Broadcaster Viewing Events Events can be viewed either through the Event Log Display window in Storage Manager (see Event Logging) or the Windows NT Event Viewer. The Event Viewer is part of the Windows NT operating system. To run the Event Viewer, select Event Viewer from the Administrative Tools group on the Start menu. The Event Viewer lets you view events that have been placed in the System, Security, and Application logs. To view DPT events, select Log–Application. Storage Manager 6-37 This window displays a list of the events submitted to the Application Log by the DPT Broadcaster, as well as other applications. Events are singleline entries that contain the following information: Icon An icon that indicates the Windows NT severity level for the event. DPT events can be assigned severity levels of Error, Warning, Information, Operation, or Unknown. Date The date the event was logged by the controller. Time The time the event was logged by the controller. Source The software component that triggered the event. This can be an application, a component of Windows NT or a device driver. DPT events can have DPTELOG, DPTENG32 or DPTSCOM in their Source field. Category DPT events can display None, Operation, Warning or a hexadecimal event code. Event ID A number assigned by the Broadcaster to identify the event for Windows NT. User DPT events always display N/A. Computer The name of the computer where the event occurred. Additional information about an event can be obtained by selecting View– Detail. The Description and Data fields display additional information about the event. The Description field contains a detailed text description of the event. The Data field contains the original DPT Event Log data, generated by the controller. This data might be requested by DPT Technical Support when troubleshooting problems. Event information can be saved by the Event Viewer to a file. If the file is saved in text format then only the event description is saved. Archiving in Event Log (.EVT) file format saves all event information which can then be sent to another person for troubleshooting purposes. Storage Manager 6-38 Formatting Drives SmartRAID V controllers can perform a low-level format on attached fixed disk drives. This function is available from the SCSI Device Information window in Storage Manager. SmartRAID V controllers format drives in standard 512-byte format. A low-level format is not normally required before using a disk drive. However, if a drive has been previously formatted with a different sector size, it must be reformatted with 512 byte sectors before it can be recognized by the SmartRAID V controller. ! IMPORTANT ! Do not power-down the drive or reboot the computer until after the format operation is complete. Doing so can cause drives to be left in an unusable state and require them to be returned to the manufacturer for repair. To perform a low-level format on a disk drive: 1. Click Format in the drive’s SCSI Device Information window. The Format Options dialog appears. 2. Click Format in the Format Options dialog to start the operation. 3. You can now exit Storage Manager. The format operation will continue even though Storage Manager is not running. To determine if the format has finished, run Storage Manager and look at the drive’s icon. A blue flag indicates that the format is still in progress. If the drive icon has no flag, the format is complete. Storage Manager 6-39 Drive Failures Drive failures are indicated by flags on the icons associated with the Array Group, array and individual drives. Failure conditions are indicated as follows: A drive belonging to an Array Group fails The drive icon displays a red flag in both the Physical and Logical Configuration Views. The failed drive belongs to a RAID 0 Array Group The icon for the failed drive displays black flag. Loss of any drive in a RAID 0 array means the array has failed and data on that array has been lost. The failed drive belongs to a RAID 1, 0+1, 5, or 0+5 Array Group The array icon displays a yellow flag, indicating that the array is currently running in degraded mode. If two or more drives belonging to the same array show a red flag, the yellow flag on the array changes to red, indicating that the array has failed and that data has been lost. Audible Alarm DPT controllers with caching capability (Millennium models or Decade/ Century models using an RA4050 module) have an audible alarm. The failure of a drive which is a member of an array attached to the controller causes the audible alarm to sound. The alarm stops automatically (after the initial system scan) when you start Storage Manager or SMOR. Alarms that occur while Storage Manager is running can be stopped by selecting Options–Turn Off Audible Alarms. Storage Manager 6-40 Rebuilding a Degraded Array NOTE You can select Rebuild even if the failed drive has not been replaced and try using the drive again. If the rebuild attempt is not successful, replace the drive before starting another rebuild. When a drive in a RAID 1 or RAID 5 array fails, and that drive is not protected by a Hot Spare, do the following to restore the array to Optimal status: 1. Replace the failed drive according to the procedure in your hardware documentation. 2. After the failed drive has been replaced, choose the Logical Configuration View in Storage Manager. 3. Double click the array group icon to open the Array Group Information window. 4. Click Rebuild in the Array Group Information window to start the rebuild process. The drive will display a white flag to indicate that a rebuild operation is in process. The array and LSU icons will display yellow flags. The percentage completion of the rebuild operation is displayed in the Array Group Information window. When the rebuild is complete, the flags will disappear and the array status should be Optimal. NOTE If you are using a DPT RAIDstation storage cabinet with a SmartRAID V controller, failed drives can be replaced and rebuilt without using Storage Manager. RAIDstation storage cabinets and drives have hot swap (SCA-2) connectors so that failed drives can be removed or replaced without first quieting the bus. The RAIDstation subsystem will detect that a failed drive has been physically replaced and the controller will automatically start a rebuild operation. Storage Manager 6-41 Hot Spares To assign a drive as a Hot Spare, click Make Hotspare in the drive’s SCSI Device Information window. Click Remove Hotspare to reassign an existing Hot Spare drive as a normal drive. Any drive that is not assigned to an array can be assigned as a Hot Spare. Hot Spares are reserved to automatically replace failed drives in RAID 1 or 0+1 and RAID 5 or 0+5 arrays and cannot be accessed by the operating system for data storage. Hot Spares can only protect drives of equal or less capacity that are attached to the same controller as the Hot Spare. When a drive failure occurs in an array protected by a Hot Spare, the controller automatically starts rebuilding data onto the Hot Spare. During this process, Storage Manager swaps the positions of the failed drive and the Hot Spare in the Logical Configuration View. The failed drive will appear with a red failed flag in the former position of the Hot Spare, and the Hot Spare will appear as a member of the Array Group with a white flag indicating that a rebuild operation is in process. The array and LSU icons appear with yellow (degraded) flags. When the rebuild is complete, the Hot Spare icon and flags will disappear and the drive will be displayed as a normal member of the array. The red flag will remain on the failed drive until that drive is replaced or returned to Optimal status. Do the following to replace the failed drive: 1. Follow the steps in your hardware documentation to remove and replace the failed drive. 2. Click Make Optimal in the new drive’s information window. The new drive will become the a Hot Spare, replacing the previous Hot Spare that is now a member of the rebuilt Array Group. NOTE You can select Make Optimal without replacing the drive if you want to try using the drive again. If the operation fails, you should replace the drive. Storage Manager 6-42 Verify NOTE Data inconsistencies should not occur under normal conditions. However, a power failure that interrupts an array write operation can cause inconsistencies. Using the Verify function to make the data consistent does not ensure that the new consistent data is the correct data. Running a Verify operation for RAID 1 and RAID 5 arrays ensures that the redundant information contained in the array is consistent. This operation is performed by the SmartRAID V controller concurrent with normal system operation and requires no user or host computer intervention. To start data verification on an array, select Verify in the Array Group Information window. If any inconsistencies in the data redundancy are found, they are made consistent. For RAID 1 arrays, the mirrored drive pairs are compared sector by sector to ensure that both drives contain identical data. For RAID 5 arrays, parity is recalculated and checked against the stored parity information. For RAID 0, only a disk media ECC check is performed. Running Verify on an array that is in a degraded state can result in significantly reduced I/O performance. Although there is no impact on the host CPU, system I/O performance can be affected due to increased demand on controller resources. If this is a concern, use the Background Task Priority feature to assign a lower level priority to background processes. Storage Manager 6-43 Background Task Priority You can run rebuild and verification operations without taking an array offline. These functions are performed as background tasks on the SmartRAID V controller and are transparent to the host operating system. However, the controller interleaves I/O from the operating system with I/O from the background task and this can affect system performance. The relative priority given to I/O from the operating system and the background task can be controlled by selecting Options–Background Task Priority. The Task Priority section of the dialog assigns the background task priority for all DPT controllers in the host computer. Set the Priority by using the arrow buttons to move the indicator . The indicator moves between Background and Foreground in ten increments. If the indicator is closer to Background, background tasks are processed only when there is no disk I/O from the host for a period of at least 250 milliseconds. As the indicator is moved toward Foreground, more of the controller resources are allocated to background tasks. All of the resources are allocated to background tasks during periods when there is no disk I/O from the host system. Storage Manager 6-44 I/O Statistics SmartRAID V controllers keep a cumulative record of I/O operations in cache RAM for use in analyzing the efficiency of the storage subsystem. You can view this data by selecting I/O Stats in the Information window for any, controller, drive or array. By analyzing these statistics, the array configuration, cache and stripe size can be optimized for your particular system configuration. Controller I/O Statistics Click the I/O Stats button in the Host Bus Adapter Information window to see cache statistics for that controller. These statistics include: Cache Statistics Total Pages The total number of pages contained in the controller cache. Used Pages The number of pages that currently contain disk data. Dirty Pages The number of pages that contain dirty data. Read-Ahead Pages The number of cache pages that contain data that has been loaded from disk as a result of read-ahead functions. ECC Fault Pages The number of pages that have been mapped for non-use after a RAM fault was discovered by the controller ECC feature Storage Manager 6-45 Command Statistics Total Comm ands The total number of commands received from the host computer. This includes read and write commands and other commands that may not involve device I/O. M isaligned Transfer The number of commands that required data to be transferred starting at a RAM address location that was not an even byte value. SCSI Bus Resets The total number of SCSI bus resets that have been issued by the controller. A large number of resets can indicate a problem with the SCSI bus or an attached device. Device I/O Statistics Write-Backs + Write-Throughs = the total number of sectors written to disk by the controller. Storage Manager 6-46 I/O Commands The number of read and write commands issued by the computer to the controller. If you use RAID and caching, the number of commands issued to the drives can differ significantly from this value. Total Sectors The total number of sectors read and written from the host computer. The total number of sectors (read or written from the host computer) that were found in the controller cache and did not require a disk access. Cache Hits Read-Ahead Hits Write-Backs Write-Throughs The number of the cache hits for data read requests satisfied by data held in the cache from previous disk read-ahead operations. The number of sectors written to disk that were held in the controller cache and written some time after the host write command reported as completed. The number of sectors written directly to disk before the write command ended. In RAID 1 arrays, (Write-Backs + Write-Throughs) can be up to twice the value of Total Sectors because each sector written from the host results in a write to each mirrored disk. In RAID 5 arrays, each write from the host can generate up to two disk reads and two disk writes. If the controller has cache memory, this can result in the actual number of sectors read from or written to disk being reported as less than this value. Environments with a large number of sequential reads should generate a high number of Read-Ahead Hits relative to Total Sectors. These hits reduce the number of seek operations and increase performance. The read-ahead hits count can be increased by adding more cache memory to the controller. A high percentage of 4KB or smaller I/O operations also indicates that increasing the controller cache would be beneficial. Storage Manager 6-47 If cache hits are low, adding more cache RAM can also increase the hit count. Systems with a large number of disk writes also derive significant performance benefits from the controller cache. For RAID 0 and RAID 5 arrays, the default stripe size is set for optimal performance in most environments. However, some specific environments can benefit from smaller or larger stripes. For example, when a RAID 5 write operation accesses all drives there will be a large number of stripe crossings. By using a larger stripe size, the RAID 5 parity data can be generated more efficiently. This results in better write performance. However, if the write crosses one or more stripes but does not involve all of the drives, the performance will be less efficient with the larger stripe size. You should choose the stripe size relative to both the I/O segment size and the number of drives in the array, so that most I/O operations either: • Do not cross stripes and involve only a single drive OR • Cross many stripes and involve all the drives in the array. 6-48 Storage Manager Remote Communication The Storage Manager Remote Communication feature lets you use Storage Manager running on your local workstation to manage remote server systems that contain DPT controllers. The Available Connections window shows the types of connections you can use and any predefined connections you have created. 6-49 Storage Manager Communicating Across a Network Storage Manager can run as a client/server application across a network using a TCP/IP connection. The Storage Manager client runs on a supported workstation operating system and connects to one of the supported networked servers running the DPT communication engine. The following illustration shows the supported workstation and server connections for a TCP/IP network. Client Workstations Windows 95/98 Windows NT SCO TCP/IP Windows 95/98 Windows NT NetWare SCO Servers Installation and Configuration Remote Communication uses both workstation-based and server-based software components. The workstation (client) remote communication software is automatically installed during Storage Manager setup. You are given the option whether to install the Communication Server software when you run the Storage Manager setup program on an operating system that supports a DPT communication server (Windows 95/98, Windows NT, NetWare or SCO platforms). Storage Manager 6-50 You must configure Remote Communication before it can be used. For both workstations and servers, this is done by editing the DPT configuration file (DPTMGR.INI). There may be additional server configuration steps, depending on your operating system. You must have physical connections between the servers and client workstations. NOTE Under Windows 95/98, the server must be started manually by selecting the DPT Communication Server icon. This version of the communication server runs in a DOS window. Editing the Configuration File Both the workstation and server communication engines use the DPT configuration file DPTMGR.INI. This file is contained in the directory in which you installed Storage Manager. The [OPTIONS] section of the file controls the behavior of the communication server. To control the display of messages from the server, change the Verbose parameter: [OPTIONS] Verbose=x where x is: 0 No messages 1 Basic messages (such as errors, connects and disconnects) 2 More messages (option 1 messages + socket numbers and TCP/IP addresses) 3 All messages (option 2 messages + message tracing) The default is 1. The [MODULES] section of the file tells the communication server the protocol you want to use for communication. [MODULES] TCP (Specify as many as needed) (Comm server will use TCP protocol) Each protocol can have its own section, in which you can set additional parameters specific to the protocol. The following list shows all supported options. The value listed is the default; optional values are in parentheses. [TCP] (Available options for TCP protocol) SOCKET=2091 (TCP socket on which to listen Can be any valid socket number) Storage Manager 6-51 Setting up the Server If you are using an operating system that supports the DPT communication server and selected the Communication Server option during Storage Manager setup, the server was automatically installed at that time. Additional steps may be required to complete the installation, depending on your operating system. Some operating systems (such as Windows NT) require setting up a user name and/or password before the server can be accessed. The default password is password. Windows NT Server Under Windows NT, the server is installed as a service named DPT Communication Service and starts automatically when Windows NT starts. Windows NT server access requires both a user name and password. The user name must be defined through the Windows NT User Manager. Additionally, the user name must have Administrator level privileges. Setup the user account for use by performing the following steps: 1. Log in with Administrator privileges. 2. From the Start menu select Programs–Administrative Tools–User Manager. 3. Select Policies-User Rights and check the Show Advanced User Rights box when the User Rights Policy dialog appears. 4. Grant the Act as part of the operating system and Log on as batch job rights to the Administrators group. 5. Reboot Windows NT before you attempt to use Remote Communication. Windows 95/98 Under Windows 95/98, the communication server is installed as a DOS command line application. You can start the communication server by clicking on DPT Communication Server in the DPT folder on the Start menu. The Windows 95/98 server is accessed by a password only; a user name is not required. The initial default password is password. To change the password, run Change Communication Password from the DPT folder in the Start menu. Storage Manager 6-52 SCO UNIX Under SCO UNIX, a communication server entry is placed into the rc.d files, which causes it to be started when the system is booted into multiuser mode. During installation, the file dptcom.chk is created in the directory into which Storage Manager is installed. The ownership of this file is set to root/dtadmain, and permissions are -rw-rw---(6608). Access to SCO servers requires both a user name and password. After determining that the user name and password are valid on the system on which it is running, the communication server will attempt to open dptcom.chk using the user name. Connecting Servers and Workstations The Storage Manager client must have a valid network connection to connect to a remote server. Use the following guidelines to ensure that the workstation and server can communicate. Servers and workstations communicating by TCP/IP must be connected by a local area network or the Internet. Some operating systems may require additional TCP/IP protocol configuration before use. Refer to your operating system documentation for more information. The client workstation specifies the TCP/IP address of the server, along with a user name and password as required by the server. Storage Manager 6-53 Connecting to Remote Systems Select Communication–Make Connection to use Storage Manager to manage DPT hardware in a remote server system using the remote communication feature. This menu item displays the Available Connections window. NOTE: You can also use the IP=address command line parameter when you start Storage Manager. This parameter causes Storage Manager to connect to the remote system at the specified IP address instead of the default Local connection. From this window, you can make a connection either by selecting an available protocol under Manual Connections and entering the name, address and password of the server; or by selecting an entry under Custom Connections. Custom connections are those for which you previously stored address information in the Phonebook (see Using the Phonebook for more information). 6-54 Storage Manager Making a Manual Connection Under the Manual Connections section of the Available Connections window, there is an icon the TCP/IP protocol that you configured in the DPTMGR.INI file, and an icon for the system you are using (Local). To make a connection to a remote system, click the icon that represents the protocol for that system. (To select the system from which you are running Storage Manager, select the Local icon). For icons except Local, the Connection Information dialog is displayed. Enter the address, user name (if required) and password for the server selected. Refer to Connecting Servers and Workstations for more information. When you click OK, Storage Manager attempts to connect to the remote system. If the connection is successful, Storage Manager scans the DPT hardware on the remote system. When the hardware scan is complete, the Physical Configuration View window for the remote system appears. Storage Manager 6-55 Using the Phonebook You can save the server name, address, user name and protocol of systems you frequently access in the Phonebook. After you have entered data for a system, you can place an icon under Custom Connections to make future connections to that system without having to reenter the connection information each time. To make an entry in the Phonebook, fill in the appropriate fields. Select Display icon for this entry if you want an icon for this connection displayed in the Available Connections window. You can customize the icon to be used by clicking Choose Icon. Click Add to add the new entry. Click Delete to remove unwanted entries. When you are finished, click Save to save your changes. To make a connection from within the Phonebook, highlight the desired system and click Connect. Storage Manager 6-56 Using a Custom Connection Under the Custom Connections section of the Available Connections window, there is one icon for each system that you marked for display in the Phonebook. To make a connection to a remote system, double-click the icon. The Connection Information dialog appears. Enter the password of the server selected. Refer to Connecting Servers and Workstations for details. When you click OK, Storage Manager will attempt to connect to the remote system. If the connection is successful, Storage Manager scans the DPT hardware on the remote system. After the scan is complete the Physical Configuration View window for the remote system appears. NOTE: You can also use the IP=address command line parameter when you start Storage Manager. This parameter causes Storage Manager to connect to the remote system at the specified IP address instead of the default local connection. CHAPTER 7: Theory of Operation This chapter provides background and reference information about: Chapter Topics: • Intelligent RAID Controllers • Operation of SmartRAID V controllers • Pipelined Parallel Processing • Disk array configuration • Caching Algorithms • SCSI device interfaces and cabling • RAID Levels • Controller Architecture • I2O Messaging • PCI Data Transfer • On-board Microprocessor • SCSI Interface • Cabling and Termination • Fibre Channel Arbitrated Loop • I2O BIOS 7-1 7-2 Theory of Operation Intelligent RAID Controllers File servers achieve maximum throughput when the performance of their component subsystems is optimized for the CPU bandwidth. If any component is not capable of supplying data at an optimum rate, that component will restrict the data path performance and slow down the entire system. Conversely, a component with significantly greater performance than the rest of the system can have much of its performance potential unused. Any attempt to speed up a server by increasing the performance of only some system components usually results in a negligible overall increase. The speed of CPUs used in currently available file servers has increased greatly over those available a few years ago. However, the performance of data storage subsystems has not kept up. As a result, many servers have data storage subsystems that are not capable of supplying data to the CPU fast enough. Consequently the CPU can be idle for significant periods waiting for data and these servers cannot perform at their full potential. In a traditional server, the host CPU handles the processing of I/O interrupts from peripherals, disk storage and network devices. This design was developed for the single-user and non-multitasking operating systems which were in use when microcomputers first became widely available. However, this design becomes a performance restriction when incorporated into graphics workstations or multi-user servers that have pipelined-architecture processors. On a busy server, the large amount of I/ O interrupts sent to the host CPU reduces the number CPU clock cycles available to process application software instructions. Additionally, each interrupt causes the CPU internal pipelines and caches to flush their data, which results in additional CPU performance degradation. Theory of Operation 7-3 Intelligent I/O To maximize the performance of a busy server requires a data storage subsystem that incorporates intelligent I/O. Such a subsystem would have a microprocessor embedded in the I/O and storage subsystem that is dedicated to handling interrupt requests and I/O processing functions in place of the host CPU. Intelligent I/O frees the CPU to process user application software and requests, which significantly increases data throughput and overall system response. DPT SmartRAID V controllers implement intelligent I/O using an onboard RISC microprocessor. Benefits Controllers that depend on the host CPU for processing low-level I/O functions can require a significant portion of the total processing power of the system: from 25% to nearly 100%, depending on the task. Nonintelligent RAID controllers (that is, controllers without embedded I/O processors) also use the host CPU for RAID functions such as, striping and parity calculations, RAID-generated disk interrupts, and read and write data transfers. Intelligent controllers incorporating hardware-based RAID relieve the CPU from handling of these additional processes. Intelligent host adapters and RAID controllers can provide the following benefits: Optimum server performance – An I/O subsystem with performance matching the current powerful host CPUs allows servers to reach their maximum application processing potential. I/O subsystem scalability – Server scalability through symmetric multiprocessing (SMP) can be matched with the installation of multiple intelligent controllers or by having multiple data channels per intelligent controller. A greater number of users per server – With servers free to process more applications with greater bandwidth, more users can be assigned to each server. Increased end-user productivity – With more CPU cycles devoted to servicing applications and user requests, system performance is improved yielding faster response time. Reduced total cost of ownership – With improved performance, servers can support more users and fewer servers may be required to meet the overall needs of the organization. In addition, fewer servers and their support structure may be needed in the future. Theory of Operation 7-4 I2O and Intelligent RAID Controllers Several information technology industry leaders have formed a Special Interest Group (SIG) to promote intelligent I/O standards for the entire industry. These standards, referred to as the Intelligent I/O (I2O) specification, address the performance issues caused by I/O interrupts sent to the host CPU and the need for unique drivers for every combination of I/O device and operating system. I2O-compliant products include both intelligent host adapters and RAID controllers (those incorporating a microprocessor) and non-intelligent host adapters and RAID controllers (those without a microprocessor). Maximizing a server’s potential requires more than just I2O. It requires an intelligent adapter or controller with a dedicated microprocessor. Intelligent I/O (both intelligent adapters and RAID controllers) has been available from DPT for two decades. The I2O-compliant SmartRAID V controllers are the latest intelligent adapter technology, with fast RISCbased embedded I/O processors and our new Pipelined Parallel Processing (P 3) technology. The following illustration depicts the two-part device driver architecture used by I2O compliant products. This design allows for much faster device driver development for specific operating system platforms. For additional information, see the SmartRAID V Architecture section in this chapter. I 2O Split Driver Architecture HOST OSM OS Specific OS Revision Independent I/O Processor Communication Layer HDM OS Independent I/O Software Hardware 7-5 Theory of Operation Pipelined Parallel Processing (P3) Traditional RAID controller designs execute host commands sequentially. Each command initiates a sequence of hardware activities that are processed one after the other until the command is complete. If any of these activities are delayed, hardware components must wait. These delays compromise performance. DPT’s P3 technology addresses this problem in five important areas: • Real-Time Control System – P 3 technology can process a virtually unlimited number of host commands in parallel. The SmartRAID V Real-Time Control System (RTCS) breaks each command down into sub-tasks that are then routed to one of the following hardware processors on the controller: – DMA processor – XOR processor – SCSI or Fibre Channel interface. XOR Engine DMA Engine SCSI / Fibre Channel Interface Controller CPU Host Commands • Hardware Request Schedulers – Each hardware processor has an associated hardware request scheduler that coordinates its queued requests and manages the queue so that all subtasks are processed efficiently. The disk hardware request scheduler manages one request queue for each disk drive attached to the controller. To achieve maximum throughput from each drive, sorted disk queues are maintained by grouping requests when possible. This results in an increased number of read and write operations per drive. Theory of Operation 7-6 • Hardware RAID Processor – DPT’s P 3 architecture is based on a new DPT-exclusive ASIC. This specially designed integrated circuit provides memory-to-memory and disk-to-memory data transfers that are fully concurrent with controller CPU execution. Depending on whether the PCI bus is 32-bit or 64-bit, data transfers occur at 132 or 264 MB/sec data rates, respectively. Independent DMA and XOR processors execute Scripts-based programs, enabling DMA and XOR tasks to be chained and executed without the intervention of the controller CPU. The hardware RAID processor also generates 128-bit parallel errorcorrecting code (ECC) for the controller cache memory. This powerful ECC is capable of correcting an error of up to 32 bits for each 512-byte block of data. • Intelligent Caching – Because most popular operating systems are heavily cached, a SmartRAID V controller does not cache data read by the host. Instead, the controller cache is used for predictive and writeback caching and provides groups write data for efficient RAID 5 operation. For those environments where read caching on the controller will improve performance (particularly those without software disk caching), read caching can be enabled using Storage Manager. SmartRAID V controllers also incorporate predictive caching algorithms. These algorithms are described in the Software and Hardware Caching section. • Virtual Cache – In addition to normal caching functions, SmartRAID V controllers also maintain a large virtual cache used for pattern recognition and prediction. The total amount of cache space supported by a SmartRAID V controller is fixed. Some of this total cache space is used when physical memory modules are installed on the controller to be used for standard cache. The space not used for standard cache is available for virtual caching. SmartRAID V Century controllers support a total cache space of 128MB with up to 64MB of physical cache (depending on the number of memory modules installed). SmartRAID V Millennium controllers support a total cache space of 512MB with up to 256MB of physical cache. As an example, if 128MB of cache memory were installed on a SmartRAID V Millennium controller then (512 – 128)MB = 384MB of virtual cache would be available. Disk Caching SmartRAID V Millennium controllers can be configured with up to 256MB of cache RAM. SmartRAID V Century controllers (equipped with an RA4050 RAID Accelerator) can be configured with up to 64MB of cache RAM. Adding more cache to a SmartRAID V controller can result in better RAID performance – especially for RAID 5. 7-7 Theory of Operation Software and Hardware Caching The SmartRAID V cache is designed to enhance performance in environments that are already software cached, such as UNIX, Novell and Windows NT. Although software caches are beneficial, hardware caching offers a significant advantage in larger, heavily loaded systems when combined with the software cache for the operating system. The purpose of the operating system cache is to minimize disk reads. If data requested by an application is found in the operating system cache, a disk read is eliminated. A software cache can also improve application response time by immediately accepting data to be written to disk from application programs and postponing the actual writes until the disk is idle. LIGHTLY LOADED SYSTEM Without Hardware Cache Application programs write to OS cache: Bus activity: Idle time Idle time OS cache flushes to disk (~11ms per write) Although write caching through the operating system can benefit a lightly loaded system, it can result in performance degradation in large multiuser environments. The greater I/O demands in such systems reduce the periods of system idle time required to flush the operating system cache to disk. As disk activity becomes more intense, the periods of system idle time become shorter and less frequent. The operating system cache fills up with dirty sectors waiting to be written to disk, which take up space that could be used for more recently requested data. When cache RAM is added to a SmartRAID V controller, the operating system cache buffers must still be flushed. However, the controller receives and caches the flushed data in a fraction of the time required to actually write to a disk. The controller can also write the data back to disk in an elevator-sorted order without interrupting other system activity. Theory of Operation 7-8 HEAVILY LOADED SYSTEM HEAVILY LOADED SYSTEM With Hardware Cache Without Hardware Cache Application programs write to OS cache: Bus activity: Idle time Idle time Application programs write to OS cache System Bus activity Idle time Idle time OS cache flushes to SmartRAID (1ms per write) SmartRAID Bus OS cache flushes to disk (~11ms per write) SmartRAID elevator-sorted writes to disk (1-5ms per write) As an example, consider an operating system with 4MB of dirty data in its cache buffers. With a 4KB record size and an average disk I/O time of 11ms per record, this flush operation would take 11 seconds. However, with controller cache installed the entire flush operation from the software cache would take approximately 1 second instead of 11 seconds. The SmartRAID V controller can then flush its cache to disk in elevator-sorted order using its separate I/O bus, concurrently with other system activity. Elevator Sorting SmartRAID V cache flush operations occur much faster than from the operating system cache, because all data in the controller cache is kept in elevator sorted order. Data is written to disk in order of increasing block address, minimizing both physical disk seeks and rotational latency. This feature, called Elevator Sorted Write-back, eliminates much of the head thrashing commonly associated with disk-intensive operating systems like Novell NetWare, Windows NT and UNIX. By elevator sorting the sectors in cache, the average write access time to the drive may be reduced from the normal 11ms (seek + rotation) time, to between 1 and 5ms. A good analogy is an elevator in a multistory building. Consider how much slower the elevator would be if it went to the requested floors in the same sequence that the buttons were pressed, instead of in floor number sequence! An additional benefit of elevator sorting is that multiple short disk write operations can often be coalesced within the controller cache into one large write operation, significantly reducing peripheral bus overhead. 7-9 Theory of Operation DISK WRITES DISK WRITES Without Elevator Sorting: 11ms average disk write With Elevator Sorting: 1-5ms average disk write 4 65 4 65 93 11 93 17 31 11 17 31 27 27 Caching SmartRAID V controllers can operate in write-back or write-through mode and also use a predictive caching algorithm to optimize disk I/O for the host system. This section describes the methods and rules used by SmartRAID V controllers to cache data for host I/O operations. Write-back and Write-through Algorithm Write-back is a method of postponing data to be written to a peripheral device, such as a disk drive, by temporarily saving the data in a cache. The data can then be written at a later time when the device would otherwise be idle. In Write-back mode, writes to disk are deferred until after command completion. This type of caching generally provides better I/O performance. In addition, the data can be processed by techniques such as elevator sorting, to increase write operation performance. In Write-through mode, all data is written immediately to disk for each write command before command complete status is returned to the host. The data may also be held in cache for subsequent read requests. NOTE When you first install a PM3755U2B controller with a BB4050 module, automatic low-battery write-through mode is disabled. Use the Battery Backup Configuration dialog in Storage Manager to set a threshold for when write-through mode should be used if the battery backup capability drops below a predetermined level. Theory of Operation 7-10 Flush Strategy DPT SmartRAID V controllers continually flush all dirty cache pages to disk, with bursts occurring every second and increasing to 4 times per second as the number of dirty pages increases. The data is written to disk in elevator sorted order. The cache flushing routine establishes a flush rate that writes all the dirty pages to disk within three minutes. If there is no host activity, the cache flush will occur in less than three minutes. Predictive Caching Algorithms SmartRAID V predictive caching dramatically increases disk read performance in computer systems with highly fragmented file structures. The SmartRAID V pattern recognition algorithms are capable of predicting disk read requests from the host computer by recognizing patterns within seemingly random disk accesses. The SmartRAID V pattern recognition algorithms not only look for hidden sequential strings, but also analyze historical read/write patterns to determine when the host is accessing files that were previously paged out of host cache. Virtual Cache SmartRAID V controllers use virtual cache to track the patterns of data access for the most recently accessed disk data without actually caching that data. The collected information can then be used for more intelligent predictive algorithms. Additionally, the use of virtual cache enables the controller to track how many hits would have resulted from installing more controller or host cache. Virtual cache does not actually use RAM. Read Ahead Because disk data is often grouped as contiguous sectors on the disk, it is sometimes beneficial to continue to read sequential sectors into cache following a sector that has been requested by the computer. The SmartRAID V controller uses algorithms that analyze the pattern of disk access, looking for cases where sequential I/O may be occurring. If it is determined that a read command from the computer is part of a pattern of sequential reads, the controller reads additional sequential sectors into cache so that future read commands will result in cache hits. 7-11 Theory of Operation Pre-Fetch The SmartRAID V pre-fetch algorithm analyses disk access patterns to detect whether the host is reading data that it previously read. By using records stored in virtual cache, the caching algorithm determines the boundaries of the contiguous block of previously read data surrounding the current host read request, then reads that data block into cache. Predictive Caching in Multi-user Systems Disk read-ahead is effective in a multi-user environment when a large number of read-ahead sectors from many different areas of the disk are cached. This is because multi-user and networking operating systems contain highly fragmented files and time-slice I/O requests from many different users or tasks. Data that has been cached by a read-ahead operation may not be accessed until after other queued commands are processed and the same user or task has another chance to access the disk. In addition, patterns of sequential I/O are harder to detect in large multiuser systems because they are typically interleaved with I/O from many users. This is why the read-ahead FIFO buffer on a drive (which can store only a limited number of data segments) provides acceptable performance in a single-user system, but must be augmented by the larger cache on the SmartRAID V controller in a system with multiple users. AUTOMATIC READ-AHEAD IS PERFORMED BY DRIVE Read data Command terminates here Read-Ahead data Read-Ahead data is stored in FIFO buffer on SCSI drive. READ-AHEAD SEGMENTS ARE CACHED IN BACKGROUND HARDWARE DISK CACHE 40MB/s Peripheral Bus Stores thousands of Read-Ahead segments DRIVE DRIVE DRIVE DRIVE Read Ahead FIFOs Theory of Operation 7-12 Caching Host Reads Because there is no advantage in using controller cache to duplicate the operating system cache, SmartRAID V controllers with cache only cache predictive and dirty data. Read cache misses are transferred directly from disk to host, bypassing the controller cache. Optimizing Operating System Cache Size When configuring a server, you should always consider the effect of the operating system cache on the disk subsystem. Although many disk read operations can be eliminated by the operating system cache, all writes must get through to the disk. In effect, the operating system cache is acting as a read filter for the disk subsystem. As the operating system cache size is increased, more read hits are serviced from the operating system cache resulting in fewer reads issued to the disk subsystem. However, the number of disk writes stays relatively constant. At some point, adding more cache to the operating system will not result in significantly reduced disk I/O. At this point it is better to add more cache to the controller to improve write throughput. NOTE Most operating systems that have caching capability can automatically manage the size of their disk cache. Optimizing Controller Cache Size The SmartRAID V cache is used for predictive reads, elevator sorted write-backs and as temporary storage during RAID 5 parity calculations. Increasing the size of the cache makes these features more efficient. More cache RAM allows the controller to hold and elevator-sort more records, resulting in closer spacing between consecutive write-back segments. This results in lower average access time for disk write operations and higher disk throughput. The SmartRAID V cache can be expanded incrementally as needed to maintain optimum system performance. More cache is typically required for systems with many active users than for single-user systems. Systems with large data files also benefit from a larger cache. However, a system that has a large number of users who all access the same data, will require less cache than the previous examples. NOTE DPT recommends a minimum of 16MB of cache for SmartRAID V controllers. Theory of Operation 7-13 RAID The basic idea of RAID (Redundant Array of Independent Disks) is to combine multiple inexpensive disk drives into an array of disk drives to obtain performance, capacity and reliability that exceeds that of a single large drive. The array of drives appears to the host computer as a single logical drive. The Mean Time Between Failure (MTBF) of the array is equal to the MTBF of an individual drive, divided by the number of drives in the array. Because of this, the MTBF of a non-redundant array (RAID 0) is too low for mission-critical systems. However, disk arrays can be made faulttolerant by redundantly storing information in various ways. Five types of array architectures, RAID 1 through RAID 5, were originally defined, each provides disk fault-tolerance with different compromises in features and performance. In addition to these five redundant array architectures, it has become popular to refer to a non-redundant array of disk drives as a RAID 0 array. Disk Striping Fundamental to RAID technology is striping. This is a method of combining multiple drives into one logical storage unit. Striping partitions the storage space of each drive into stripes, which can be as small as one sector (512 bytes) or as large as several megabytes. These stripes are then interleaved in a rotating sequence, so that the combined space is composed alternately of stripes from each drive. The specific type of operating environment determines whether large or small stripes should be used. Most operating systems today support concurrent disk I/O operations across multiple drives. However, in order to maximize throughput for the disk subsystem, the I/O load must be balanced across all the drives so that each drive can be kept busy as much as possible. In a multiple drive system without striping, the disk I/O load is never perfectly balanced. Some drives will contain data files that are frequently accessed and some drives will rarely be accessed. Theory of Operation 7-14 STRIPING DISK DRIVES Disk 1 1 5 9 13 Disk 2 2 6 10 14 Disk 3 3 7 11 15 Disk 4 4 8 12 16 Data stripes from each drive are interleaved to create one logical drive. By striping the drives in the array with stripes large enough so that each record falls entirely within one stripe, most records can be evenly distributed across all drives. This keeps all drives in the array busy during heavy load situations. This situation allows all drives to work concurrently on different I/O operations, and thus maximize the number of simultaneous I/O operations that can be performed by the array. Definition of RAID Levels RAID 0 is typically defined as a group of striped disk drives without parity or data redundancy. RAID 0 arrays can be configured with large stripes for multi-user environments or small stripes for single-user systems that access long sequential records. RAID 0 arrays deliver the best data storage efficiency and performance of any array type. The disadvantage is that if one drive in a RAID 0 array fails, the entire array fails. RAID 0 Non-Redundant Striped Array Writes can occur simultaneously on every drive. DATA DATA DATA DATA DATA DATA Reads can occur simultaneously on every drive. 7-15 Theory of Operation RAID 1, also known as disk mirroring, is simply a pair of disk drives that store duplicate data but appear to the computer as a single drive. Although striping is not used within a single mirrored drive pair, multiple RAID 1 arrays can be striped together to create a single large array consisting of pairs of mirrored drives. All writes must go to both drives of a mirrored pair so that the information on the drives is kept identical. However, each individual drive can perform simultaneous, independent read operations. Mirroring thus doubles the read performance of a single non-mirrored drive and while the write performance is unchanged. RAID 1 delivers the best performance of any redundant array type. In addition, there is less performance degradation during drive failure than in RAID 5 arrays. RAID 1 Mirrored Arrays Duplicate data is written to pairs of drives. DATA DATA DATA DATA DATA DATA Reads can occur simultaneously on every drive. RAID 2 arrays sector-stripe data across groups of drives, with some drives assigned to store ECC information. Because all disk drives today embed ECC information within each sector, RAID 2 offers no significant advantages over other RAID architectures and is not supported by SmartRAID V. RAID 2 Parallel Array with ECC Each write operation spans all drives. DATA DATA DATA DATA ECC ECC Each read operation spans all drives. ECC 7-16 Theory of Operation RAID 3, as with RAID 2, sector-stripes data across groups of drives, but one drive in the group is dedicated to storing parity information. RAID 3 relies on the embedded ECC in each sector for error detection. In the case of drive failure, data recovery is accomplished by calculating the exclusive OR (XOR) of the information recorded on the remaining drives. Records typically span all drives, which optimizes the disk transfer rate. Because each I/O request accesses every drive in the array, RAID 3 arrays can satisfy only one I/O request at a time. RAID 3 delivers the best performance for single-user, single-tasking environments with long records. Synchronized-spindle drives are required for RAID 3 arrays in order to avoid performance degradation with short records. Because RAID 5 arrays with small stripes can yield similar performance to RAID 3 arrays, RAID 3 is not supported by SmartRAID V. RAID 3 Parallel Array with Parity Read and write operations span all drives. DATA DATA DATA DATA DATA PARITY Parallel access decreases data transfer time for long sequential records. RAID 4 is identical to RAID 3 except that large stripes are used, so that records can be read from any individual drive in the array (except the parity drive). This allows read operations to be overlapped. However, since all write operations must update the parity drive, they cannot be overlapped. This architecture offers no significant advantages over other RAID levels and is not supported by SmartRAID V. RAID 4 Parallel Array with Parity Every write must update dedicated parity drive. DATA DATA DATA DATA PARITY Reads can occur simultaneously on every data drive. 7-17 Theory of Operation RAID 5, sometimes called a Rotating Parity Array, avoids the write bottleneck caused by the single dedicated parity drive of RAID 4. Under RAID 5 parity information is distributed across all the drives. Since there is no dedicated parity drive, all drives contain data and read operations can be overlapped on every drive in the array. Write operations will typically access one data drive and one parity drive. However, because different records store their parity on different drives, write operations can usually be overlapped. RAID 5 Striped Array with Rotating Parity Writes require parity to be updated. DATA/ PARITY DATA/ PARITY DATA/ PARITY DATA/ PARITY DATA/ PARITY DATA/ PARITY Reads can occur simultaneously on every drive. Theory of Operation 7-18 In summary: • RAID 0 is the fastest and most efficient array type but offers no faulttolerance. RAID 0 requires a minimum of two drives. • RAID 1 is the best choice for performance-critical, fault-tolerant environments. RAID 1 is the only choice for fault-tolerance if no more than two drives are used. • RAID 2 is seldom used today since ECC is embedded in all hard drives. RAID 2 is not supported by SmartRAID V. • RAID 3 can be used to speed up data transfer and provide faulttolerance in single-user environments that access long sequential records. However, RAID 3 does not allow overlapping of multiple I/O operations and requires synchronized-spindle drives to avoid performance degradation with short records. Because RAID 5 with a small stripe size offers similar performance, RAID 3 is not supported by SmartRAID V. • RAID 4 offers no advantages over RAID 5 and does not support multiple simultaneous write operations. RAID 4 is not supported by SmartRAID V. • RAID 5 combines efficient, fault-tolerant data storage with good performance characteristics. However, write performance and performance during drive failure is slower than with RAID 1. Rebuild operations also require more time than with RAID 1 because parity information is also reconstructed. At least three drives are required for RAID 5 arrays. Dual-Level RAID In addition to the standard RAID levels, SmartRAID V controllers can combine multiple hardware RAID arrays into a single array group or parity group. In a dual-level RAID configuration, the controller firmware stripes two or more hardware arrays into a single array. NOTE The arrays being combined must both use the same RAID level. Dual-level RAID achieves a balance between the increased data availability inherent in RAID 1 and RAID 5 and the increased read performance inherent in disk striping (RAID 0). These arrays are sometimes referred to as RAID 0+1 or RAID 10 and RAID 0+5 or RAID 50. Theory of Operation 7-19 Creating Data Redundancy RAID 5 offers improved storage efficiency over RAID 1 because only the parity information is stored, rather than a complete redundant copy of all data. The result is that three or more drives can be combined into a RAID 5 array, with the storage capacity of only one drive dedicated to store the parity information. Therefore, RAID 5 arrays provide greater storage efficiency than RAID 1 arrays. However, this efficiency must be balanced against a corresponding loss in performance. The parity data for each stripe of a RAID 5 array is the XOR of all the data in that stripe, across all the drives in the array. When the data in a stripe is changed, the parity information is also updated. There are two ways to accomplish this: The first method is based on accessing all of the data in the modified stripe and regenerating parity from that data. For a write that changes all the data in a stripe, parity can be generated without having to read from the disk, because the data for the entire stripe will be in the cache. This is known as full-stripe write. If only some of the data in a stripe is to change, the missing data (the data the host does not write) must be read from the disks to create the new parity. This is known as partial-stripe write. The efficiency of this method for a particular write operation depends on the number of drives in the RAID 5 array and what portion of the complete stripe is written. The second method of updating parity is to determine which data bits were changed by the write operation and then change only the corresponding parity bits. This is done by first reading the old data which is to be overwritten. This data is then XORed with the new data that is to be written. The result is a bit mask which has a 1 in the position of every bit which has changed. This bit mask is then XORed with the old parity information from the array. This results in the corresponding bits being changed in the parity information. The new updated parity is then written back to the array. This results in two reads, two writes and two XOR operations. This is known as readmodify-write. Theory of Operation 7-20 RAID 5 Updating Parity During Writes XOR WRITE READ DATA XOR READ WRITE PARITY The cost of storing parity, rather than redundant data as in RAID 1, is the extra time required for the write operations to regenerate the parity information. This additional time results in slower write performance for RAID 5 arrays over RAID 1. Because SmartRAID V controllers generate XOR in hardware, the negative effect of parity generation is primarily from the additional disk I/O required to read the missing information and write the new parity. SmartRAID V controllers can generate parity using either the full- or partial-stripe write algorithm or the read-modify-write algorithm. The parity updated method chosen for any given write operation is determined by calculating the number of I/O operations needed for each type and choosing the one with the smallest result. To increase the number of full stripe writes, the cache is used to combine small write operations into larger blocks of data. Handling I/O Errors SmartRAID V controllers maintain two lists for each RAID 5 array: a Bad Parity List, and a Bad Data List. These lists contain the physical block number of any parity or data block that could not be successfully written during normal write, rebuild or dynamic array expansion operations. These lists alert the controller that the data or parity in these blocks is not valid. If the controller subsequently needs data from a listed block and cannot recreate the data from existing redundant data, it returns an error condition to the host. Blocks are removed from the Bad Parity List or the Bad Data List if the controller successfully writes to them on a subsequent attempt. Theory of Operation 7-21 Degraded Mode When a drive fails in a RAID 0 array, the entire array fails. In a RAID 1 array, a failed drive reduces read performance by 50%, as data can only be read from the remaining drive. Write performance is increased slightly because only one drive is accessed. A RAID array operating with a failed drive is said to be in degraded mode. RAID 5 arrays synthesize the requested data by reading and XORing the corresponding data stripes from the remaining drives in the array. For RAID 5, the magnitude of the performance impact in degraded mode depends on the number of drives in the array. An array with a large number of drives will experience more performance degradation than an array with small number of drives. Rebuilding a Failed Hard Drive A failed drive can be replaced in a RAID 1 or RAID 5 array by physically removing the drive and replacing it or by a designated Hot Spare. SmartRAID V controllers will rebuild the data for the failed drive onto the new drive or Hot Spare. This rebuild operation occurs online while normal host reads and writes are being processed by the array. RAID 1 arrays are rebuilt relatively quickly, because the data is simply copied from the duplicate (mirrored) drive to the replacement drive. For RAID 5 arrays, the data for the replacement drive must be synthesized by reading and XORing the corresponding stripes from the remaining drives in the array. RAID 5 arrays that contain a large number of drives will require more time for a rebuild than a small array. Theory of Operation 7-22 SmartRAID V Architecture SmartRAID V controllers can process commands from the operating system using two different protocols: • ASPI (Advanced SCSI Programming Interface), which is compatible with tape and CD-ROM application software. • I2O Messaging, which uses the full performance capability and function of the PCI bus. ASPI Protocol SmartRAID V controllers can communicate with any ASPI protocol device under Windows NT and Windows 95/98. ASPI support under MS-DOS is limited to CD-ROM drives only. MS-DOS support is provided by the I2ODDL.SYS and DPTCDROM.SYS driver files. I2O Messaging Protocol Intelligent I/O architecture (I2O) is a device driver architecture that provides a standardized interface between I/O devices and operating systems. I 2O supports PCI bus mastering, overlapped I/O processing, command queuing, scatter/gather memory access and auto-request sense. The I2O architecture uses a split-driver model, where an I/O driver consists of two parts: An Operating system Services Module (OSM) that translates operating system specific I/O calls into a neutral message-based format. A Hardware Device Module (HDM) that accepts the OSM messages and processes them on a specific controller and devices. (The SmartRAID V controller functions as an HDM.) This messaging system enables the modules to communicate without specific knowledge of the underlying operating system or I/O bus. Theory of Operation 7-23 Command Processing The I 2O messaging protocol is based on the existence of a messaging FIFO (first-in, first-out) queue and a reply FIFO queue. Each queue consists of a list of message frames. The messaging queue contains requests for I/O processing that are read by the HDM. The reply queue is where completion statuses are posted by the controller and read by the OSM. DPT SmartRAID V controllers use I2O messaging to process a command from the host computer as follows: 1. The OSM acquires a frame in controller RAM from the messaging queue on the controller, fills it out and returns it to the messaging queue to initiate the I/O command. 2. The controller HDM firmware processes the frame. 3. The controller completes the I/O command; transferring data if necessary. 4. The controller acquires a frame from the reply queue, fills it out and returns it to the queue and issues an interrupt. 5. On interrupt, the OSM retrieves the completed reply frame from the reply queue and uses the information in the frame to complete the I/O operation. It then returns the frame to the reply queue. Command Overlapping Command overlapping is a technique that lets a controller receive and respond to multiple host requests before any particular request is completed. SmartRAID V controllers can receive additional commands before the previous command has finished executing. By allowing multiple outstanding commands, SmartRAID V controllers can optimize performance by overlapping commands for multiple devices, thereby keeping all devices busy as much as possible. The Decade and Century family of controllers can queue up to 2000 commands. The Millennium family of controllers can queue up to 8000 commands. Theory of Operation 7-24 Command Queuing I2O messaging allows the controller to queue multiple commands from the host and execute them out of order for greater efficiency. When a command is complete, the controller transfers status information to host memory. This status message contains information indicating which command was just completed and enables commands to be executed in a different order than they were issued by the host. This allows commands to be queued and rearranged so that they are executed in a more efficient order for the particular peripheral configuration. SmartRAID V controllers also support Tagged Command Queuing on the peripheral bus. This feature allows the controller to transfer multiple commands to a single device if that device can accept queued commands. Auto Request Sense When a SCSI error occurs, the controller automatically issues a Request Sense command and returns the data to the host in the message reply frame. Data returned by this command is stored in the controller’s Event Log. You can use Storage Manager to view the Event Log. Byte/Word Alignment Data to be read or written by the SmartRAID V controllers need not be aligned to word or long-word boundaries in system memory. If the data starts on an odd memory address, the necessary bus control signals will be generated by the SmartRAID V to access 8-bit, 16-bit, 24-bit and 32-bit data as required. Data blocks of any byte length are correctly handled by SmartRAID V. Scatter/Gather SmartRAID V controllers support Scatter/Gather. This is a method of providing multiple memory addresses for data transfer in one host command. This ability greatly increases performance in environments such as UNIX, Novell NetWare and Windows NT. Scatter/Gather is necessary because when using virtual memory addressing schemes, system memory that may appear contiguous to the user can actually be fragmented into many widely scattered physical address locations. Because of this, when accessing a large amount of contiguous data from a peripheral device, it is often necessary to split the transfer into many different locations in system memory. Theory of Operation 7-25 PCI Data Transfer and Bus Mastering The Peripheral Component Interconnect (PCI) bus provides a means to interconnect peripheral chips and expansion cards to the computer backplane. PCI is optimized for peripheral device controllers that transfer data in blocks. PCI allows for data transfer rates of 132MB/sec (32-bit PCI) and 264MB/sec (64-bit PCI). If a Plug-and-Play BIOS is available, automatic expansion card configuration is also available. All SmartRAID V controllers use a PCI bus for internal communication as well as their interface to the host computer. SmartRAID V Century controllers are configured by the host BIOS as multifunction PCI devices. SmartRAID V Millennium controllers are seen by the host computer as standard PCI-to-PCI bridge devices. Millennium controllers are available in both 32-bit and 64-bit PCI versions. The PCI bus uses a 33MHz clock rate as opposed to the 8.33MHz clock used by ISA and EISA buses. To maintain data integrity at the higher clock rate, the PCI bus is limited to four card slots and six devices integral to the motherboard. However, motherboard designs can include multiple PCI buses that are interconnected through bridge devices. PCI supports two modes of data transfer: Bus mastering and PIO. Third party DMA is not supported by the PCI architecture. Each PCI device contains configuration registers that allow the system to be configured for maximized throughput. Parameters such as Latency Timer, Cache Line Size, Minimum Bus Grant, Maximum Latency, as well as configurable address and IRQs, can be read or written by the PCI system BIOS. SmartRAID V controllers support the full range of required and optional features described by revision 2.1 of the PCI specification. SmartRAID V controllers are also fully compliant with revision 2.1 of the PCI specification for bus drivers and receivers. These transceivers are unique in their ability to vary the drive current in order to minimize signal reflections. All mandatory and optional memory read/write commands are supported by SmartRAID V controllers. Mandatory commands include Memory Read and Memory Write, which are used by all PCI bus-mastering devices. Optional commands include Memory Read Line, Memory Read Multiple and Memory Write and Invalidate. These commands maximize performance in PCI systems with intelligent bridges that perform CPU cache line optimization. Theory of Operation 7-26 On-Board Microprocessor SmartRAID V controllers use embedded processors to maximize their performance when installed in fully loaded servers. The onboard microprocessor performs high-level processing of commands from the host and controls the sequencing of command execution on the controller. A fast microprocessor enables the controller to process more I/O commands per second which is especially important when caching and RAID are used. SmartRAID V Millennium controllers use a high-performance RISC processor. SmartRAID V Decade and Century controllers use an Intel i960® embedded I/O processor. SCSI Interface The Small Computer Systems Interface (SCSI) is a standard parallel interface designed to communicate with intelligent peripheral devices. SmartRAID V controllers conform to the ANSI SCSI specification defined in ANSI document number X3.131-1986 and subsequent standards defined in ANSI X3.131-1994 (SCSI-2) and various SCSI-3 specification documents. SCSI Device IDs The original SCSI specification allowed up to eight SCSI devices, including the controller, to be connected to a single 8-bit SCSI bus. Wide (16-bit) SCSI busses support up to fifteen devices and one controller per bus. All SCSI devices, including the controller, must be assigned a unique numeric identifier. These SCSI IDs can be any number from 0 – 7 or, for Wide SCSI devices, 0 – 15. The SmartRAID V controller ID is set by default to ID 7. In 8-bit SCSI systems, the device with ID 7 has the highest priority and ID 0 has the lowest priority when arbitrating for use of the SCSI bus. In a Wide SCSI system, IDs have the following priority (highest to lowest): 7, 6, 5, 4, 3, 2, 1, 0, 15, 14, 13, 12, 11, 10, 9, 8 The IDs 8 – 15 always have a lower priority during arbitration than 8-bit devices, this allows 8-bit devices which do not recognize IDs 8 – 15 to coexist on a SCSI bus with Wide SCSI devices which may be assigned those IDs. However, when controlling 8-bit devices, a Wide SCSI controller cannot be assigned an ID greater than 7 because 8-bit devices would not be able to recognize the controller. Theory of Operation 7-27 Logical Unit Numbers (LUN) A SCSI device may contain up to eight sub-devices or Logical Units, assigned Logical Unit Numbers (LUN) 0 – 7. SmartRAID V controllers support multiple LUNs. However, most devices other than bridge controllers consist of only one LUN and are accessed as LUN 0 by SmartRAID V controllers. Bridge Controllers Bridge controllers are single devices that can, in turn, control multiple peripheral devices. These devices may be disk drives configured as a remote RAID subsystem. Each of the peripheral devices attached to the bridge controller is assigned a Logical Unit Number. A SmartRAID V controller supports 250 physical devices. These devices can be individual SCSI IDs for actual physical devices or LUNs within an ID (such as on a bridge controller). Commands and Messages All SCSI commands are supported by SmartRAID V. SmartRAID V controllers pass through any SCSI command from the host computer to the SCSI peripheral device. SmartRAID V also supports one byte, two byte, and extended messages, such as Initiator Detected Error, Parity Error, Simple Queue, Wide Negotiation and Synchronous Negotiation. The SCSI message protocol is normally handled automatically by SmartRAID V controllers without requiring intervention by the host computer. This allows much faster SCSI protocol handling and reduces the load on the host CPU, freeing it for other tasks. Disconnect/Reconnect SmartRAID V provides full support for Disconnect and Reconnect commands by SCSI peripheral devices. All Disconnect/Reconnect commands are handled automatically by SmartRAID V controllers, without host intervention. Disconnection allows a SCSI device or controller to temporarily release control of the SCSI bus, during periods of non-activity while a SCSI command is in process, so that another SCSI device can share the bus. Theory of Operation 7-28 Transfer Padding and Residue Reporting In unusual cases, a SCSI peripheral device might read or write more data than was requested by the host. If this occurs during a write operation, SmartRAID V controllers automatically transfer pad data by adding additional bytes to the end of the data. If this occurs during a read operation, the controller automatically strips off additional bytes of data read from the device. This prevents the data from overwriting valid data in host memory. It is also possible for a SCSI peripheral device to read or write less data than was requested by the host. If this occurs, SmartRAID V controllers will report the actual number of bytes transferred as less than the requested number of bytes. Single-Ended and Differential SCSI The SCSI electrical specification has two transceiver specifications: 1. Single-Ended TTL transceivers which allow: Asynchronous data transfer at a maximum cable length of 6 meters (19.6 feet). No maximum transfer rate is specified but typical rates range from 1.5MHz to 3MHz. Synchronous data transfer up to 5MHz at a maximum cable length of 6 meters. 10MHz (Fast) synchronous data transfer at a maximum cable length of 3 meters (9.8 feet). 20MHz (Ultra) synchronous data transfer at a maximum cable length of 3 meters with up to 4 devices and 1.5 meters (4.9 feet) with up to eight devices. 2. Differential SCSI: Differential electrical signal protocol transmits information through a current loop rather than by changes in voltage, thereby reducing susceptibility to electrical interference. Differential SCSI has two variants: High Voltage Differential (HVD) SCSI uses RS-485 transceivers that allow up to 20MHz data transfer with a maximum cable length of 25 meters (82 feet). Ultra2 SCSI Low Voltage Differential (LVD) transmission. This transmission method has the benefits of differential SCSI without the need for external, high-voltage bus transceivers. Ultra2 SCSI allows synchronous transfers up to 40MHz with a maximum cable length of 12 meters. SmartRAID V products support multimode Ultra2 SCSI, which includes LVD operation. Theory of Operation 7-29 Multi-Mode SCSI To ensure backward compatibility with existing SCSI devices, all SmartRAID V Ultra2 controllers support both LVD and single-ended devices. This is referred to as multimode SCSI. Both types of devices can be attached to the same SCSI bus with the following restrictions: • If all devices on the bus are Ultra2, the bus operates in LVD mode and runs at the maximum Ultra2 speed (40 MHz). • If the devices are a mix of 40 MHz Ultra2 and 20 MHz Ultra singleended, the bus operates in single-ended mode and runs at 20MHz. ! CAUTION ! Do not use both LVD and High Voltage Differential devices on the same SCSI bus. Do not attach High Voltage Differential devices to an Ultra2 bus. Wide SCSI The SCSI-2 specification defines 8-bit, 16-bit and 32-bit bus widths. All SmartRAID V controllers use a 16-bit bus and support both 8-bit and 16-bit SCSI devices. SCSI Transfer Rate SmartRAID V controllers are capable of handling a combination of SCSI devices with different transfer speeds, and both synchronous and asynchronous protocols on the same SCSI bus. Using the SCSI message protocol, SmartRAID V controllers automatically negotiate with each device during the power-on sequence to determine the fastest transfer speed and protocol for that device. SmartRAID V controllers can also detect the presence of an external SCSI cable and automatically lower the maximum SCSI bus transfer rate when an external cable is present. (Both the external and internal cable transfer rates are lowered.) Because some external SCSI cabling methods are not capable of handling the maximum possible transfer rates without causing data errors, this feature protects you from data integrity problems. Theory of Operation 7-30 The original SCSI specification synchronous transfer rates of up to 5MHz. The SCSI-2 specification increased the maximum synchronous rate to 10MHz. Devices that support the faster 10MHz rate are called Fast SCSI devices. The SCSI-3 specification defines transfer rates up to 20MHz (Fast20/Ultra SCSI). The SCSI-3 SPI-2 specification defines synchronous data transmission speeds of up to 40MHz. The 40MHz transfer speed provides data transfer rates up to 40MB/sec on an 8-bit bus and 80MB/sec on a 16-bit SCSI bus. Devices that support these rates are called Ultra2 SCSI devices. Ultra2 SCSI is also known as Fast-40 SCSI. A device must use Low Voltage Differential signaling to achieve the maximum Ultra2 speed. Fibre Channel Arbitrated Loop (FC-AL) controllers transfer data at a maximum speed of 1GHz per loop (100 MB/sec). Cabling Single-Ended SCSI The SCSI cable is an electrical transmission line that has a characteristic impedance. The value of the impedance depends on the type and configuration of the cable. Differences in this impedance can cause signal reflections. These impedance variations can be the result of extra capacitance internal to SCSI devices, connectors, incorrect termination, mixing of different cable types, cable stubs, and so on. A properly configured Single-Ended SCSI bus can reliably transfer data at up to 20MHz. However, the following guidelines should be used to ensure success: Use as short a cable length as possible. For 10MHz data transfers the total SCSI bus length should not exceed 3 meters (9.8 feet). For 20MHz data transfers, total SCSI bus length should not exceed 3 meters with up to 4 devices on the bus, or 1.5 meters (4.9 feet) with between 5 and 8 devices on the bus. NOTE When an external SCSI storage cabinet is used, the cabinet’s internal SCSI backplane will add additional length to the bus. Avoid stub clustering. Avoid spacing SCSI devices on the cable closer than 0.3 meters (11.8 in). When devices are clustered closely together on the SCSI cable, their capacitance adds together to create an impedance discontinuity and thus reflections. SCSI devices should be spaced as evenly as possible. Cable stub length should not exceed 10 cm (3.9 in). Some SCSI devices may create stubs internal to the device which exceed this value. This can result in excessive capacitive loading and signal reflections. This factor is controlled by the SCSI device manufacturer. The SCSI cabling itself should not include stubs. Theory of Operation 7-31 Beware of capacitance changes. As devices are added to a SCSI bus, capacitance is introduced to each signal from the connectors, receivers, and circuit board traces. The SCSI-3 working specification limits this capacitance to 25pF because added capacitance lowers the impedance of the cable near the device and adds delay. Look for input filters that may be attached to the SCSI front-end of the device’s printed circuit board. These filters add capacitance. Avoid unnecessary connector converters. They cause impedance discontinuity and signal reflections. Route the cable with care. Avoid rolling the cable up on itself, running the cable alongside of metal for long lengths or routing the cable past noise generators (such as power supplies). Placing the cable near ground planes created by grounded metal components also reduces its impedance. The SCSI-3 draft specification suggests that to minimize discontinuity due to local impedance variation, a flat cable should be spaced at least 1.27 mm (0.050 in.) from other cables, any other conductor, or the cable itself when the cable is folded. Follow the SCSI specification for cable impedance. Cable impedance for 10MHz SCSI systems should be limited to 84+/-12 Ohms (Ω). Cable impedance for 20MHz SCSI systems should be limited to 90+/-12Ω for REQ and ACK signals and 90+/-10Ω for all other signals. Avoid mixing cable types. Select either flat or round, shielded or unshielded. Typically mixing cables mixes impedance. Cable impedance mismatch is a common problem that results in signal reflections. Internal cables are normally unshielded flat ribbon cables, while external cables should be shielded. Where they offer easier routing, size advantages, and better air flow, round cables can also be used internally. This may be beneficial if it allows for better impedance matching to the external cable. When round cable is used, select a cable that uses an optimal placement of signals within the cable. Ribbon cable has good crosstalk rejection due to the GND-Signal-GND layout. With standard 25-pair round cable, pairs are arranged in three layers. The closer a pair is to the cable center, the higher the impedance. Using centrally located high impedance pairs for speed-critical signals such as REQ and ACK is a good choice. Locating the data pairs in the outermost layer of the cable minimizes crosstalk between REQ, ACK and the data lines. The middle layer might contain status lines such as C/D, I/O, MSG, ATN, and so on. Make sure that the lowest impedance wire in the cable is used for TERMPWR to minimize transmission line effects on this voltage supply line. Some SCSI cables have a lowimpedance conductor specifically for this purpose. 7-32 Theory of Operation Cabling Ultra2 (LVD) SCSI When the total length of a SCSI cable must exceed the maximum length for single-ended buses, DPT recommends the use of an Ultra2 Low Voltage Differential SCSI interface. The following guidelines will help ensure reliability when configuring Ultra2 SCSI systems: • Use twisted-pair cable. Twisted-pair cable (either twisted-flat or discrete wire twisted-pairs) provides greater signal integrity over longer distances because noise coupled into a twisted-pair generally appears equally on both wires. Because the differential receivers respond to differences between the conductors of the twisted-pair, the coupled common-mode noise is rejected. Flat non-twisted ribbon cable can cause two problems. First, noise introduced into parallel conductors tends not to be common mode. Second, while the single-ended conductor arrangement interleaves ground wires between signal wires, there are not enough conductors to interleave grounds between each differential signal pair. These factors lead to increased crosstalk between adjacent conductors on a flat non-twisted ribbon cable. • The maximum cable length for an LVD bus is 12 meters (39.3 feet). • Because Ultra2 cables are sensitive to cable capacitance, the following table of minimum spacing between devices should be followed: Cable Capacitance Minimum Spacing 40 pF/m 36 cm 65 pF/m 22 cm 90 pF/m 16 cm 115 pF/m 13 cm 140 pF/m 10 cm • Stub lengths should not exceed 0.1 meters (3.9 in.). The difference in stub length should be less than 1.27 cm (0.05 in.) for the REQ, ACK, DATA and PARITY signals. • Terminators should be installed only at each physical end of the bus, either on the last device attached or the unused connector at the end of the cable. Ultra2 buses must be terminated with LVD terminators. DPT cables are supplied with an LVD terminator installed at the end of the cable. Theory of Operation 7-33 SCSI Termination SCSI termination for SmartRAID V controllers is controlled through Storage Manager or SMOR. Refer to Chapter 3, “Configuration and Installation” for information about setting SCSI termination for SmartRAID V controllers. SmartRAID V controllers contain onboard active SCSI terminators for maximum reliability with Fast and Ultra SCSI devices. Active termination for a single-ended bus uses one 110Ω resistor per signal, pulled up to a locally supplied voltage that is regulated at 2.85V. Active termination for Ultra2 SCSI uses a differential impedance of 100Ω with a 1.25V bias. Features of active termination include: • Better immunity to fluctuations in TERMPWR. • Closer match to the characteristic impedance of the cable minimizes reflections. • Increased signal-to-noise ratio. Passive termination employs one 220Ω pull-up and one 330Ω pull-down resistor per signal. Active terminators should be used whenever possible. However, active and passive termination can be mixed on a SCSI bus and will result in better reliability than using only passive termination. IMPORTANT Do not use passive termination for Fast-20 or Ultra SCSI in a single-ended bus configuration. Theory of Operation 7-34 TERMPWR SCSI terminators need power to operate. SmartRAID V controllers always supply power for their own onboard SCSI terminators and, by default, supply termination power for other devices using the TERMPWR line on the SCSI cable. Most SCSI devices allow the way in which TERMPWR is supplied to their onboard SCSI terminators to be selected using jumpers on the device. Devices that supply SCSI bus termination should be configured to supply their own isolated TERMPWR. This prevents loss of receiver noise margin due to a DC voltage drop across the cable. TERMPWR should remain enabled if there is a possibility of power-loss on an external SCSI device that supplies its own TERMPWR. If all devices supplying termination for the SCSI cable are also capable of supplying their own termination power, then TERMPWR supplied to the SCSI cable from SmartRAID V controllers can be disabled using SMOR or Storage Manager. SmartRAID V controllers supply termination power onto the SCSI cable through a circuit breaker which protects the controller from a short-toground on the TERMPWR line. Some SCSI devices use a fuse for protection; this can require the replacement of the part if a short occurs or if the SCSI cable is inserted incorrectly. The ANSI XT3T9.3 SCSI-3 Parallel Interface working group recommends that all TERMPWR lines be decoupled at each terminator to minimize TERMPWR glitch coupling. The minimum recommended values are a 2.2µF solid tantalum capacitor along with .01µF ceramic capacitor in parallel to suppress high frequency, low voltage noise. These capacitors supply the high frequency, low impedance path to ground necessary to provide a clean supply voltage. Theory of Operation 7-35 Fibre Channel Arbitrated Loop (FC-AL) Fibre Channel is an industry standard set of protocols for information transfer using a serial bus. Fibre Channel provides for reliable high-speed transfer of large amounts of information over long cable lengths. SmartRAID V Fibre Channel controllers support transfer rates of 1GHz among up to 126 devices over a maximum of 30 meters (98 feet) of copper or 10 km (6.2 miles) of optical cable. DPT Fibre Channel controllers use Arbitrated Loop (FC-AL) topology, where all devices and the controller are connected in a serial (loop) fashion. FC-AL provides a cost-effective method of implementing a Fibre Channel storage subsystem, while maintaining high bandwidth and reliability characteristics. Redundancy can be added to a Fibre Channel storage subsystem by using a dual loop configuration. By forming two arbitrated loops on a dual channel controller and connecting dual-port devices to both loops, fault tolerance is provided for cable failure. In normal operation, the controller will use both loops to communicate with the devices, thus providing an effective controller bandwidth of 200MB/sec. DPT SmartRAID V Fibre Channel controllers can have a one or two HSSDC (copper) connectors. If you want to use a cable length greater than 30 meters, a Media Interface Adapter (MIA) can be used to convert electrical signals to optical signals for use with fiber optic cable. Optical cable has complete immunity to electrical noise and the ability to use significantly longer cable lengths without signal loss. Theory of Operation 7-36 DPT I2O BIOS SmartRAID V controllers are shipped with the DPT I 2O BIOS loaded on an EEPROM. This BIOS intercepts and processes Int13 requests with an embedded DOS driver. The host system Plug-and-Play BIOS can automatically disable or change the address of the I 2O BIOS ROM. In systems with multiple DPT controllers, the first DPT I2O controller found during boot loads its BIOS and installs all of the DPT I2O hardware on the system. DPT I2O controllers found subsequently automatically detect the presence of the first controller and disable their BIOS code. If another manufacturer’s BIOS occupies address C8000H, then an alternate BIOS ROM address will be selected for either the DPT controller or the other card. The disk controller that has the lowest BIOS ROM address (typically, the lowest PCI slot) will become the booting controller. Therefore, in a system with multiple controllers, ensure that the DPT ROM occupies the lowest address if you want the DPT controller to be the booting controller. If the DPT I2O BIOS is correctly configured, the following message appears during boot-up, followed by a list of attached devices: DPT I2O SCSI BIOS V001.xx (yyyy/mm/dd) Distributed Processing Technology ©Copyright 1996-99 All Rights Reserved Hit <CTRL+D> for DPT setup APPENDIX A: Assembly Drawings This chapter contains outline drawings of DPT’s SmartRAID V products with jumpers and connectors labeled for easy reference. Millennium Controllers PM3755F PM3755U2B PM3754U2 See the SmartRAID V Controller LEDs section in Chapter 2 for specific information about the LED indicators on your controller or module. Decade/Century Controllers PM1554U2 PM2554U2 PM2654U2 Bus Expansion Modules SX4054U2-1 SX4054U2-2 SX4055U2-1 SX4055U2-2 SX4055F RAID Accelerator RA4050 Battery Module BB4050 A-1 A-2 Assembly Drawings PM3755F ECC EN pin-1 P9 P6 P4 ECC ERR pin-1 87654321 IRQ Audible Alarm J9 SIMM 1 SIMM 2 SIMM 3 J8 J7 SIMM 4 P4 Pins 1-2 NVRAM Clear Pins 3-4 Misc (Reserved, do not use) P6 Disk Activity LED Connector P9 Pins 1-2 Load Pins 3-4 Run J7 32-bit Bus Expansion Module Connector J8 64-bit Bus Expansion Module Connector J9 External Fibre Channel HSSDC Connector (Bus 0) 1…8, IRQ Adapter Activity LEDs ECC EN ECC Enabled LED (Green) ECC ERR ECC Error LED (Red) Assembly Drawings A-3 PM3755U2B J10 pin-1 ECC EN 87654321 P6 IRQ ECC ERR pin-1 P4 DIMM 3 & 4 J12 pin-1 J7 J11 J8 P9 pin-1 Audible Alarm RUN LOAD P4 Pins 1-2 NVRAM Clear Pins 3-4 Misc (Reserved, do not use) P6 Disk Activity LED Connector P9 Pins 1-2 Load Pins 3-4 Run J7 32-bit Bus Expansion Module Connector J8 64-bit Bus Expansion Module Connector J10 Internal Wide Ultra2 SCSI Connector (Bus 0) J11 External Wide Ultra2 SCSI Connector (Bus 0) 1…8, IRQ Adapter Activity LEDs ECC EN ECC Enabled LED (Green) ECC ERR ECC Error LED (Red) DIMM 1 & 2 A-4 Assembly Drawings PM3754U2 P4 J10 pin-1 ECC EN P6 87654321 IRQ ECC ERR pin-1 Audible Alarm pin-1 J11 pin-1 SIMM 1 P9 J4 SIMM 2 SIMM 3 SIMM 4 P4 Pins 1-2 NVRAM Clear Pins 3-4 Misc (Reserved, do not use) P6 Disk Activity LED Connector P9 Pins 1-2 Load Pins 3-4 Run J4 Bus Expansion Module Connector J10 Internal Wide Ultra2 SCSI Connector (Bus 0) J11 External Wide Ultra2 SCSI Connector (Bus 0) 1…8+IRQ Adapter Activity LEDs ECC EN ECC Enabled LED (Green) ECC ERR ECC Error LED (Red) Assembly Drawings A-5 PM1554U2, PM2554U2 and PM2654U2 pin-1 87654321 IRQ P6 P9 pin-1 pin-1 J11 J7 P4 Pins 1-2 NVRAM Clear Pins 3-4 Misc (Reserved, do not use) P6 Disk Activity LED Connector P9 Pins 1-2 Retry (Reserved, do not use) Pins 3-4 Reset (Reserved, do not use) J7 Bus Expansion Module Connector J10 Internal Ultra2 Wide SCSI Connector (Bus 0) J11 External Ultra2 Wide SCSI Connector (Bus 0) 1…8, IRQ Adapter Activity LEDs P4 RA4050 Module Connector J10 A-6 Assembly Drawings SX4054U2-1 Bus Expansion Module pin-1 J2 pin-1 J3 P5 J2 Internal Ultra2 Wide SCSI Connector (Bus 1) J3 External Ultra2 Wide SCSI Connector (Bus 1) P5 Mating Connector for SmartRAID V Controller Assembly Drawings A-7 SX4054U2-2 Bus Expansion Module pin-1 J4 pin-1 J2 pin-1 J3 P5 pin-1 J1 J1 External Ultra2 Wide SCSI Connector (Bus 2) J2 Internal Ultra2 Wide SCSI Connector (Bus 1) J3 External Ultra2 Wide SCSI Connector (Bus 1) J4 Internal Ultra2 Wide SCSI Connector (Bus 2) P5 Mating Connector for SmartRAID V Controller A-8 Assembly Drawings SX4055U2-1 Bus Expansion Module pin-1 J2 pin-1 J3 P5 P3 J2 Internal Wide Ultra2 SCSI Connector (Bus 1) J3 External Wide Ultra2 SCSI Connector (Bus 1) P3 64-bit SmartRAID V Adapter Connector P5 Mating Connector for SmartRAID V Controller Assembly Drawings A-9 SX4055U2-2 Bus Expansion Module pin-1 J4 pin-1 J2 pin-1 J3 P5 P3 pin-1 J1 J1 External Wide Ultra2 SCSI Connector (Bus 2) J2 Internal Wide Ultra2 SCSI Connector (Bus 1) J3 External Wide Ultra2 SCSI Connector (Bus 1) J4 Internal Wide Ultra2 SCSI Connector (Bus 2) P3 64-bit SmartRAID V Adapter Connector P5 Mating Connector for SmartRAID V Controller A-10 Assembly Drawings SX4055F FC-AL Bus Expansion Module P5 P3 P2 P2 Fibre Channel (FC-AL) Connector (Bus 1) P3 64-bit SmartRAID V Adapter Connector P5 Mating Connector for SmartRAID V Controller Assembly Drawings A-11 ECC ERR ECC EN RA4050 RAID Accelerator Docking Guide J1 SIMM 1 Docking Connector SIMM 2 SIMM 3 SIMM 4 Docking Guide J1 Docking Connector ECC EN ECC Enabled LED (Green) ECC ERR ECC Error LED (Red) Audible Alarm A-12 Assembly Drawings BB4050 Battery Module TRICKLE Stability Bracket mounting location J1 CHARGE Mounting Hole P12 Mounting Holes Board shown without Stability Bracket J1 Battery Cable Connector P12 Connector for SmartRAID V PM3755U2B TRICKLE LED indicator for trickle charge activity CHARGE LED indicator for charging/recharging cycle ! CAUTION ! Danger of explosion if battery is incorrectly replaced. Replace only with the same or equivalent type recommended by the manufacturer. Dispose of used batteries according to the manufacturer’s instructions. APPENDIX B: Troubleshooting This chapter provides answers to many commonly asked questions. If a situation occurs that is not covered in this chapter, or if the recommendations here do not correct the problem, contact DPT Technical Support. We are always ready to assist you. DPT Technical Support Phone: 407-830-5522 (Press 6 and follow the prompts.) Fax: 407-830-4793 Internet: http://www.dpt.com Product information and the latest versions of DPT drivers and utilities can be obtained at no charge from the DPT FTP site (ftp.dpt.com) or from the Technical Support section of our World Wide Web site 24 hours a day. DPT also offers priority Technical Support as a fee-based option. If you choose one of these options, your call is given priority over all other support calls: 900-555-4378 at the rate of $1.35 per minute 407-830-5522 Press 6 and select the Priority Technical Support option. The rate is $30 for the first hour and $1.00 per minute after the first hour. B-1 B-2 Troubleshooting Problem: When the DPT I2O BIOS displays the peripheral devices at system boot, a device does not appear. Solution: The following conditions can cause this to occur: The device ID might be set to the same ID as the DPT controller (ID 7). Ensure that all devices have a unique ID. Fibre Channel devices automatically configure a unique ID for each device on the bus. The device might not be powered on. The device is not connected to the SCSI cable or the connection is loose. Problem: In addition to the SmartRAID V controller, the system contains another manufacturer’s SCSI controller and hangs during boot. Solution: The other controller does not correctly implement EBDA usage rules. Use SMOR to try a different setting for the EBDA Relocation parameter or rearrange the controller slot assignments. If your system BIOS supports configuring the boot order, you can also try changing those settings. Problem: The system contains another manufacturer’s SCSI controller in addition to the SmartRAID V controller. During boot, messages from each controller’s BIOS appear, but one controller cannot communicate with its attached drives. Solution: The other controller does not properly implement EBDA usage rules. Use SMOR to try a different setting for the EBDA Relocation parameter or rearrange the controller slot assignments. If your system BIOS supports configuring the boot order, you can also try changing those settings. Problem: Windows NT displays a blue screen error message that references the system video controller. Solution: The video controller does not properly implement extended BIOS data area (EBDA) usage rules. Use SMOR to enable the EBDA Relocation option. Problem: The controller does not respond and the IRQ LED (and possibly other LEDs) remains lit. See Appendix A for the location of the LEDs on your controller. Solution: The IRQ LED indicates that the controller IRQ assignment is pending. This usually indicates an IRQ conflict with another card. Ensure that each card is set to a unique IRQ. Troubleshooting Problem: B-3 The controller does not respond and one of the following LED patterns occurs at power-up: LEDs 6 and 7 alternating with LEDs 5 and 8 LEDs 5 and 6 alternating with LEDs 7 and 8 LEDs 5 and 7 alternating with LEDs 6 and 8 Solution: These patterns indicate that the DPT controller is not being configured by the motherboard BIOS. SmartRAID V Century controllers require a motherboard BIOS that supports multifunction devices, where one of the devices is a PCI-PCI bridge. All SmartRAID V controllers require a BIOS that supports large memory-mapped address ranges. Refer to the SmartRAID V READ.ME file on the DPT diskette for information about motherboard compatibility and a list of motherboards that DPT has tested with SmartRAID V products. Problem: The controller does not respond and one of the following patterns of LEDs flash once per second at power-up: PATTERN Solution: MEANING 7, 6, 5, 2, 1 None 7, 6, 5, 3, 1 High 7, 6, 5, 3, 2 Mismatch 7, 6, 5, 3, 2, 1 Invalid These patterns indicate that there is a problem with the memory modules on the controller. None: Either no memory modules were detected on the controller, or there is no module in socket 1. Socket 1 must always have a 16MB or 64MB 60ns EDO memory module installed. High: Too much memory has been detected on a Decade or Century controller. Remove memory so that the total is less than or equal to 64MB. Mismatch: Memory modules of mixed sizes have been detected or a SIMM slot was skipped. All installed modules must be the same size and must be filled sequentially from socket 1 to socket 4. Invalid: A memory module of a size other than 16MB or 64MB has been detected. Use only 16MB or 64MB memory modules. NOTE: Do not install non-EDO SIMMs or DIMMs. This will cause data corruption. Troubleshooting B-4 Problem: The controller does not respond and various LEDs in the 1–4 range flash once per second. Solution: This pattern indicates an internal microprocessor trap occurred in the controller. Remove all attached devices, cables and option modules and retry. If the trap error disappears, reconnect the cables and devices, one device at a time, until the faulty device, cable or module is isolated. If the error persists, contact DPT Technical Support. Problem: Pressing Ctrl+D to access SMOR does not work or the information displayed is garbled. Solution: If this happens, use the following procedure to restore the parameters in the NVRAM to their default settings: 1. Turn off power to the system. 2. Place a shorting jumper across pins 1 and 2 of P4 on the controller. 3. Power on the system and wait until the LEDs 3, 5, 7 and 8 on the controller begin flashing. 4. Turn off power to the system and remove the jumper. The controller can now be reconfigured using SMOR or Storage Manager. Problem: During the installation of SCO UNIX with a DPT PCI controller the following message appears: Warning: SCSI controller cannot install interrupts vecno=xx, type = 2, IPL=5 Vector xx is private. Solution: SCO UNIX reserves certain interrupts for its internal use. This error indicates that the DPT controller has been assigned one of these reserved interrupts. Assign a different interrupt to the controller and start the installation again. Problem: You want the system to boot from a drive that is not attached to a DPT controller. However, during boot, the DPT I2O BIOS message appears first which indicates that a drive attached to a DPT controller will be the boot drive. Solution: Use SMOR to modify the Bootable Devices parameter by selecting Disabled. This will prevent the DPT controller from being used as the booting controller for system. Troubleshooting B-5 Problem: The SmartRAID V controller I2O BIOS reports the drive as a disk instead of a drive. Solution: This typically happens when a drive that is attached to a SmartRAID V controller has been formatted with a sector size other than 512 bytes . Use Storage Manager or SMOR to reformat the drive with 512 byte sectors. This can also occur if the drive is the 9th or higher logical drive attached to the controller. NOTE Using SMOR to set Bootable Devices to Disabled as in the previous problem will result in the same symptoms. If you require access to disk drives connected to the SmartRAID V controller during the boot process, change Bootable Devices to Normal. Problem: Although the SCSI devices can be accessed by the SmartRAID V controller, the fault LEDs on the devices in a RAIDstation storage cabinet do not flash during boot-up and the SmartRAID V controller does not detect drive swaps or cabinet failures. Solution: These symptoms indicate that the RAIDstation storage cabinet status signals are not being properly received by the SmartRAID V controller. For DEC Fault Bus subsystems: this can be caused by another SCSI device or non-DPT cabinet connected to the external SCSI cable along with the RAIDstation cabinet. Other devices will typically ground these signals. For SAF-TE or SES: this can result from a failed enclosure monitoring module in the subsystem cabinet. Problem: After updating the SmartRAID V controller firmware or BIOS and rebooting, the adapter does not respond. Solution: The update may have been unsuccessful. The controller is now in a state in which it hangs the system during boot. If this happens, the parameters in the NVRAM can be restored to their default settings using the following procedure: 1. Turn off power to the system. 2. Place a shorting jumper across pins 1 and 2 of P4 on the controller. 3. Power on the system and wait until the LEDs 3, 5, 7 and 8 on the controller begin flashing. 4. Turn off power to the system and remove the jumper. You can now reconfigure the controller using SMOR or Storage Manager. Troubleshooting B-6 Problem: After updating the SmartRAID V controller firmware or BIOS and rebooting, LEDs 1 and 5 or 2 and 5 flash once per second. Solution: These patterns indicate that the adapter startup code detected a firmware checksum error or a flash error. Attempt the firmware update procedure again by using the procedure in the following Problem description to recover from this condition. Problem: A flash ROM upgrade is unsuccessful, causing the controller to hang. Solution: The new firmware can be temporarily disabled and the upgrade attempted again by following the steps below: 1. Power-off the system. 2. PM1554, PM2554 and PM2654 controllers – remove any RA4050 or SX405x expansion modules from the controller. 3. PM1554, PM2554 and PM2654 controllers – place shorting jumpers across pins 1 and 2 and pins 3 and 4 of P9 on the controller. PM375x controllers – move the shorting jumper from pins 3 and 4 of P9 to pins 1 and 2 (from RUN to LOAD) as shown in Appendix A, “Assembly Drawings”. NOTE You do not need to remove an SX405x expansion module from PM375x controllers to access the jumper pins at P9. 4. NOTE Insert the DPT SMOR Boot diskette and power-up the system. This will start SMOR. The SMOR Boot diskette image is available from the DPT Technical Support ftp site. The download file contains the diskette image and instructions for use. 5. Use SMOR to update the firmware. You must restore all three components of the flash ROM, firmware, I2O BIOS, and SMOR. 6. Power-off the system and return the jumpers to their original positions. 7. Reattach the expansion module to the controller card and insert the card in a host system PCI slot. 8. Remove the SMOR Boot diskette from your floppy disk drive and power-up the system. Troubleshooting B-7 Problem: After a flash ROM upgrade of the I 2O BIOS only, pressing Ctrl+D at the system prompt displays the message Card not configurable. Solution: Perform a flash ROM upgrade for SMOR to correct this condition. Problem: The floppy disk drive cannot be accessed after installing a DPT controller. Solution: Use SMOR to enable the EBDA Relocation option. Problem: The controller’s audible alarm is sounding during normal operation. Solution: This indicates a drive has failed. Start Storage Manager or restart the host system and run SMOR to identify the failed drive. The alarm will stop when Storage Manager or SMOR finish the system scan. Replace the failed drive and start a rebuild operation for the array. For additional information about procedures for failed drives, refer to Chapter 4, “Storage Manager on ROM” or Chapter 6, “Storage Manager”. B-8 Troubleshooting APPENDIX C: Specifications This chapter lists the electrical and environmental specifications for the SmartRAID V product line. Specifications: • DC Power Requirements • Environmental Specifications • Memory Requirements • Battery C-1 C-2 Specifications DC Power Requirements Voltage: 5 V ± 5% Ripple and Noise: 50mv peak-to-peak max Component Current (typical) PM3754U2B 1.82A PM3755U2B 1.90A PM3755F 1.82A PM2654U2 1.63A (with SX4054U2) 1.60A (with SX4055F) 1.35A (with RA4050; no cache) PM2554U2 1.15A PM1554U2 1.15A RA4050 0.20A SX4054U2 0.48A SX4055U2 0.98A SX4055F 0.45A BB4050 0.27A (not charging) 1.16A (charging) SM4050-16 0.16A SM4050-64 0.16A Voltage: 3.3 V ± 5% Ripple and Noise: 50mv peak-to-peak max Component Current DM4050-16 DM4060-16 0.16A typical DM4050-64 DM4060-64 0.16A typical C-3 Specifications Environmental Specifications Ambient Temp (operating): 10° C to 50° C 10° C to 40° C (PM3755U2B with BB4050) Relative Humidity (operating): 10% to 90% non-condensing Altitude (operating): 3,000 meters (10,000 feet) NOTE Maximum ambient temperature is 40°C when using a BB4050 module. Memory SmartRAID V controllers accept up to four memory modules. The total memory installed must not exceed the maximum cache capacity of the controller. Capacities Product PM1554U2 w/RA4050 PM2554U2 w/RA4050 PM2654U2 w/RA4050 PM3754U2 PM3755F PM3755U2B Max Cache 64MB 64MB 64MB 256MB 256MB 256MB Module Type SIMM SIMM SIMM SIMM SIMM DIMM SIMMs Non-DPT SIMMs to be installed in SmartRAID V controllers must conform to the following specifications: Speed: Size: Width: Configuration: Voltage: 60ns EDO 16MB or 64MB 32-bit or 36-bit Single-sided, low-profile 5.0V C-4 Specifications DIMMs DIMMs to be installed in SmartRAID V controllers must be DPT DM4050 or DM4060 memory modules only. Use of non-DPT DIMMs can result in data corruption. Battery The following applies to the BB4050 module only: Type: Capacity: Backup time: Charge time: Operating Temp: Nickel Metal Hydride 3800mAH (minimum) 72 hours (with one 16MB memory module installed) 3 hours 10° C to 40° C Exceeding the temperature limits can shorten the battery life and reduce the battery capacity. Storage Manager displays the ambient temperature for the controller which is reported by the onboard temperature sensor. APPENDIX D: SNMP Simple Network Management Protocol (SNMP) is an industry-wide standard protocol designed to allow you to remotely manage your computer network. By using the DPT SNMP subagent and an SNMP-based management console, you can get the DPT hardware configuration and information for your servers from a remote workstation. Introduction What’s Included System Requirements Hardware Support Management Consoles Operating Systems and Platforms Installation DPT SNMP Support Microsoft Windows SNMP Operation Software Overview DPT SNMP Subagent DPT SNMP Trap Broadcaster D-1 D-2 Simple Network Management Protocol Introduction Simple Network Management Protocol (SNMP) lets you obtain basic DPT hardware configuration and status information from an SNMP-based management console. You can also receive SNMP Traps, which are messages about changes in the hardware status. These messages alert you to important events that affect the DPT hardware and attached devices. Simple Network Management Protocol Simple Network Management Protocol (SNMP) is a group of network management specifications, which includes the protocol itself, the definition of the database and associated concepts. SNMP is widely used and supported on a variety of servers, workstations, bridges, routers and hubs. SNMP support also includes other computer system resources, such as SCSI, Fibre Channel and RAID controllers. SNMP implementations vary from simple device information display and collection of statistics, to complex configuration management systems. SNMP is implemented by creating a Management Information Base (MIB) that describes the objects to be managed. SNMP establishes standards to access and manage various types of data regarding attached resources within a computer network. Management Information Base As with any network management system, the core component of SNMP is the database containing the information about the objects to be managed. For SNMP this is referred to as the Management Information Base or MIB. A MIB is written using the ASN.1 (Abstract Syntax Notation One) format as described in ISO 8825-2. This format allows the exchange of structured data, especially between application programs over networks, by describing data structures in a form that is independent of machine architecture and application software. Simple Network Management Protocol D-3 Every system resource to be managed is represented as an object and the MIB is a collection of these objects. In a network environment each system (workstation or server) maintains a copy of the MIB containing the current status of the objects which it defines. The MIB information is kept up-to-date by a software agent. At the operating system level, there is a Master Agent that controls the system MIB. Each vendor for a managed resource (such as DPT) also supplies a subagent that contributes its own MIB to the system MIB. This sub-agent also responds to requests from the Master Agent for information as needed. NOTE For additional security all of the DPT MIB data is read-only. The DPT SNMP feature is intended only for gathering inventory information and for processing status and alert information. Management Console The SNMP management console is usually a client workstation running SNMP-based management software. The console software can be from any vendor who provides SNMP management console software. DPT MIB Information The specific hardware and configuration information in the DPT MIB includes groups for the following: • DPT SCSI System Modules • DPT SCSI Controllers • DPT SCSI Busses • DPT SCSI Devices • DPT SCSI Arrays • DPT SCSI Statistics • DPT SCSI Events D-4 Simple Network Management Protocol Refer to the MIB itself for the exact contents of each of these groups. The following lists are the groups’ contents: DPT SCSI System Modules group identifies the versions, creation date and various capabilities of the software modules. The following specific modules are included: DPT SNMP Subagent DPT SNMP Engine DPT SCSI Driver DPT SCSI Logger MIB revision information DPT SCSI Controller group is a list of all DPT controllers in the system. This group contains the following information for each Controller: Controller Number Controller Vendor Firmware Version Address IRQ IRQ Type Host Bus Type Max Transfer Rate Controller Modules (RAID, Caching, SIMMs/DIMMs) DPT SCSI Bus group is a list of the SCSI Buses with a set of parameters that describe and control a SCSI Bus. These parameters include: SCSI bus number SCSI bus width SCSI bus type SCSI bus transfer rate DPT controller SCSI ID (on this bus) Simple Network Management Protocol D-5 DPT SCSI Device group is a list of SCSI Devices managed by the DPT SCSI subsystem and represents the physical configuration. For each device in the system there is: Device SCSI Address information: Controller Bus ID LUN Device SCSI Inquiry data Device Capacity and Block Size Device RAID level and status (Optimal, Failed, etc.) DPT SCSI Array group contains all the RAID-specific information within the DPT SCSI subsystem. For each Array there are: Configuration parameters SCSI address information Background task information DPT SCSI Statistics group contains statistical information regarding the DPT SCSI controllers, SCSI devices and arrays. For each SCSI controller, there are statistics on: Cache Pages Commands Transfers For Devices and Arrays there are statistics on: Cache hits/misses Stripe boundary crossings Physical I/O commands (read/write) DPT SCSI Events group is used to send traps on Controller event log entries. These event log entries are converted to SNMP traps and are identical to those used by the DPT Logger/Broadcaster. The specific traps are listed in the MIB. D-6 Simple Network Management Protocol What’s Included The DPT SNMP software components are included on the diskettes in the DPT controller package. Specific components vary by operating system. The Windows 95/98 and Windows NT components are on the DPT Windows diskette. The components are as follows: • DPT Event Logger • SNMP Event Logger Extensions • DPT SNMP sub-agent • DPT MIB System Requirements The DPT SNMP feature has the following system requirements: • The TCP/IP network protocol must be enabled on your system. Refer to your operating system documentation for information about installing the TCP/IP protocol. • The SNMP Service for your operating system must be installed. Hardware Support The DPT SNMP agent is designed to work with all DPT SmartRAID V controllers. The specific controller information available will vary depending on whether or not that device has RAID or cache capability. Management Consoles The DPT SNMP agent conforms to the SNMP Version 1 specification. DPT has developed and tested this feature to work with various operating systems that provide built-in SNMP capability. Simple Network Management Protocol D-7 Operating System Support The following table lists the environments in which DPT hardware is manageable from an SNMP management console: Operating System Comments Novell NetWare Versions 4.11, 4.2 and 5.0 Windows 95/98 Windows NT 4.0 Workstation and Server versions Installation of DPT SNMP Software The following topics describe how to install DPT SNMP subagent software components and how to install SNMP support for Microsoft Windows 95/98 and Windows NT 4.0. NOTE Ensure that your operating system has SNMP support enabled before installing the DPT subagent software. Installing DPT SNMP Support The DPT SNMP agent can be installed during the DPT Storage Manager installation process. The setup utility displays a Select Components dialog that includes a check box for the DPT SNMP software. To install this feature, check the box labeled SNMP System Agent. By default this check box is not checked. Continue with the installation according to the installation procedure for your operating system in Chapter 5, “Software Installation”. If your operating system is Windows NT, refer to the Microsoft Windows NT documentation for information about installing the SNMP Service. Simple Network Management Protocol D-8 Installing SNMP for Microsoft Windows 95 If your operating system is Windows 95, the SNMP Service must be installed by following these steps: 1. Insert the Windows 95 Installation CD-ROM into your CD-ROM drive. If the Autostart window appears, close the window. 2. Launch the Network icon in Control Panel. Click Add and select Service as the type of network component to install. 3. Click Add, then click the Have Disk button. Browse to the ADMIN\NETTOOLS\SNMP directory on the CDROM. The file SNMP.INF will be selected. Click OK. 4. Click OK in the Install From Disk window. The Microsoft SNMP agent will be selected. Click OK to complete the installation. Installing SNMP for Microsoft Windows 98 If your operating system is Windows 98, the SNMP Service must be installed by following these steps: 1. Insert the Windows 98 Installation CD-ROM into your CD-ROM drive. If the Autostart window appears, close the window. 2. Launch the Network icon in Control Panel. Click Add and select Service as the type of network component to install. 3. Click Add, then click the Have Disk button. Browse to the \TOOLS\RESKIT\NETADMIN directory on the CDROM. The file SNMP.INF will be selected. Click OK. 4. Click OK in the Install From Disk window. The Microsoft SNMP agent will be selected. Click OK to complete the installation. Simple Network Management Protocol D-9 Operation Before you can view information about your DPT hardware, you must install the DPT Management Information Base (MIB) into the Management Console database. During the installation of the SNMP feature, the DPT MIB is installed by default as DPTMGR\DPTSCSI.MIB. Refer to your SNMP Management Console documentation for more information about adding this MIB to your existing database. The DPT SNMP sub-agent can be accessed from any SNMP Management Console. SNMP Software Overview This section describes the architecture of the DPT SNMP functions in a platform independent manner. The DPT SNMP software architecture is an addition to the current DPT software components. The components used in the SNMP implementation are the DPT Engine, Event Logger/Broadcaster and operating system device driver. The DPT Engine is used to gather all information on the system configuration and to perform the defined management functions. An SNMP Trap broadcast module has been added to the Event Logger to handle messages that are intended specifically for the SNMP console. D-10 Simple Network Management Protocol TC P/IP SNM P M anagem ent Console SNM P M aster Agent DPT SCS I Sub-Agent SN MP Trap Broadcast M odule DPT Engine DPT Event Logger DPT Driver D P T C ontroller DPT SNMP Sub-Agent The DPT SNMP sub-agent attaches to the operating systemspecific Master Agent to handle SNMP requests for objects defined in the DPT MIB. It also broadcasts the DPT-specific Traps to the designated management consoles. The design and implementation of the DPT SNMP sub-agent complies with the operating system-specific implementations of the SNMP specification. This assures compatibility and functionality within each operating system environment. On the client side, all SNMP management consoles are supported. Simple Network Management Protocol D-11 DPT SNMP Trap Broadcaster Module The SNMP Trap implementation uses the Broadcaster feature of the DPT Event Logger. The Event Logger has individual broadcast modules that have complete control over how events are received from the Event Logger. The modules define what events are to be sent and how they want to receive the event information. Each broadcast module has control over which events are to be broadcast, how they are broadcast and where they are sent. An SNMP Trap Broadcast module controls all DPT SNMP Traps. The SNMP Trap Broadcast module registers with the DPT Event Logger to receive all events generated for the DPT subsystem. This module then forwards all events to the DPT SNMP sub-agent for processing and delivery to the SNMP Master Agent. D-12 Simple Network Management Protocol Glossary This glossary provides brief definitions of selected terms and acronyms used throughout this manual. G-1 G-2 Glossary Adapter SCSI Host Bus Adapter or HBA ANSI American National Standards Institute. Arbitrated Loop See FC-AL. Bridge Controller A device which appears as a single device on the bus, but which bridges to multiple devices. Bridge controllers are typically used to overcome limitations on the number of devices that can be on a single bus or to control remote subsystems. Array Group A group of disk drives that appear to the computer as a single logical drive. RAID 0, RAID 1 and RAID 5 array groups can be composed of any combination of individual disk drives. Build The operation of initializing a redundant array by creating consistent redundant information. In the case of a RAID 1 array, data from one drive is copied to a second drive. In the case of RAID 5 arrays, parity information is generated by XORing the disk data. ASIC Application Specific Integrated Circuit. An integrated circuit chip designed for a specific task rather than a general purpose design such as a microprocessor. Burst A term used to describe data words which are transmitted as a single group across a bus without interruption by another device. ASPI Advanced SCSI Programming Interface. A protocol used by many SCSI drivers to communicate with SCSI controllers under MS-DOS, OS/2 and NetWare. Asynchronous Data transfer protocol that is not synchronized to a set timing interval. Asynchronous SCSI data transmitting devices must wait after each byte for acknowledgment from the receiving device. Either device can take as long as it needs to send or acknowledge data. Asynchronous SCSI has no defined maximum transfer rate but is typically limited to between 1.5 and 3MHz. BIOS Basic Input Output System. A ROM-based collection of device drivers and system start-up routines which is provided as an integral part of a computer. The BIOS provides enough intelligence to enable the computer to understand some simple keyboard commands and load the operating system from disk on power-up. Bus Mastering A method of data transfer that allows data to be moved between a peripheral controller and system memory without interaction with the host CPU or a DMA controller. This technique allows the peripheral controller to take control of the system bus and move data at the maximum speed supported by the bus. Cache A temporary storage area (usually RAM) for data that would normally be accessed from a slower storage device. A cache management algorithm monitors the data access patterns and selects which data from the slower device is to be kept in the cache for quick access. Caches are normally transparent to or hidden from the accessing device. CD-ROM Compact Disk Read-Only Memory. A read-only storage device that can retrieve data from a removable optical storage disk similar to an audio compact disk. Command Queuing A feature that allows multiple I/O commands to be executed by a peripheral controller in a more efficient order. Glossary Controller A device that controls the transfer of data between a computer and a peripheral device. For example, disk drives, video displays, keyboards, and printers all require controllers. The DPT SmartRAID V is a controller for disk drives and disk arrays. See also, HBA. DAE Dynamic Array Expansion. A feature that enables you to increase your storage capacity under Windows NT by adding one or more drives to your RAID 0 and RAID 5 arrays while your system remains online. Degraded Mode The mode of operation of a redundant array in which it can continue to be accessed after a member drive has failed. For read accesses, data is synthesized from the other drives in the array. For write accesses, data is stored on the remaining drives in such a way that it can be restored when the failed drive is replaced. Device SCSI devices include peripherals such as disk and tape drives, optical devices, scanners, and printers. SCSI controllers are also considered SCSI devices. Differential An electrical signal protocol which transmits information through a current loop rather than by changes in voltage, thereby reducing the susceptibility to electrical interference. High Voltage Differential SCSI uses RS485 transceivers to transfer data at distances up to 25 meters (82 feet). Low Voltage Differential SCSI (Ultra2) achieves a 25 meter cable length without the need for external transceivers. Digital High Availability Fault Bus A proprietary Compaq Corporation (formerly Digital Equipment Corp.) bus standard that provides signals to host adapters for remote system management and device fault notification. G-3 DIMM Dual In-line Memory Module. A standard packaging for RAM on a small circuit board with a defined edge connector. See also SIMM. Dirty Refers to a cache page in which data has been written or modified but which has not yet been copied to the storage device. When the data has been copied to disk, the page is said to be clean. DMA Direct Memory Access. A method of data transfer that allows data to be moved between a peripheral controller and system memory without interaction with the host CPU. The data may be moved by the peripheral controller itself or by a separate DMA controller. Driver A system level software module that receives I/ O requests from higher levels within the operating system and converts those requests to the protocol required by a specific hardware device such as a peripheral adapter. Dual Loop A method of providing Fibre Channel controller redundancy. By forming two arbitrated loops on a dual channel controller and connecting the devices to both loops, fault tolerance is provided for cable failure. In normal operation, the controller will use both loops to communicate with the devices, which maximizes controller bandwidth and performance. EBDA Extended BIOS Data Area. An area of system RAM that may be used by controller devices to store and execute their BIOS code. Standard rules define the way in which devices must share this space. ECC Error Correcting Code. A method of generating redundant information (checksums), which can be used to detect and correct bit errors in stored or transmitted data. G-4 Glossary EDO DRAM Extended Data Output DRAM. A type of RAM that improves memory read performance on systems that are designed to use EDO memory. Flash ROM A nonvolatile memory device on the controller that can be reprogrammed using special software without removing it from the board. Elevator Sorting A method of sorting records or cache pages by physical location on disk so that the information can be written to disk with less seek and rotational latency. Flush The action of writing all dirty data in the cache to disk. Events Messages generated by DPT controllers for detected fault conditions or subsystem status changes. Failed The mode of operation of a drive or array in which the drive or array, because of a malfunction, can no longer be accessed. Fast SCSI The SCSI-2 standard for synchronous transfers at up to 10MHz. This provides a transfer speed of 10MB/sec for an 8-bit bus and 20MB/sec for a 16-bit bus. Devices that utilize these faster timings are called Fast SCSI devices. The original SCSI standard defined a 5MHz transfer rate. Fast-20 SCSI See Ultra SCSI. Fast-40 SCSI See Ultra2 SCSI. FC-AL Fibre Channel Arbitrated Loop – A Fibre Channel topology where up 126 devices are connected in a serial (loop) fashion. The devices negotiate individually for use of the bus. See also, Fibre Channel. Fibre Channel A standard set of protocols for information transfer. Fibre Channel provides for high speed transfer of information over long cable lengths. Fibre Channel controllers can transfer data at up to 100MB/sec. among up to 126 devices over 30 meters of copper or 10 km of optical cable. Hardware Array A group of disk drives that are all members of the same RAID level 1 or 5 array managed by a DPT controller and which appears to the computer as one storage device. HBA Host Bus Adapter – Refers to a DPT or other controller card that provides host computer access to the peripheral bus. HDM Hardware Device Module. The part of the I2O split device driver that resides within the firmware of the device. Hit A data access in which the requested data is found in the cache. Hit Ratio The ratio of cache hits to total disk accesses. A hit ratio of 100% means that all disk accesses were serviced from the cache. Hot Plug The operation of adding or removing a device from a bus while transactions involving other devices are occurring over the bus. Hot Spare A disk drive that is assigned to automatically replace a failed disk drive. Hot Swap The operation of removing a failed disk drive that is a member of a redundant array and replacing it with a good drive while transactions involving other devices are occurring over the bus. Synonymous with Hot Plug. Glossary HSSDC High Speed Serial Data Connector. The industry standard modular connector used on Fibre Channel controllers. I 2O Intelligent I/O Architecture. A proprietary specification that provides a standardized software interface between peripheral devices with built-in intelligence and a host operating system. ID A numeric value used by SCSI devices to address one another. (IDs can be from 0 to 7 or 0 to 15 for Wide SCSI.) Fibre Channel devices can have ID numbers from 0 to 126. Information View The view in SMOR that provides a display of device specific information when that device is highlighted in the Tree View. The information on this view may be further grouped into Tab Pages. Initiator A SCSI device, such as a SmartRAID V controller, that sends commands to SCSI Target devices such as disk drives. IRQ Interrupt ReQuest. A hardware interrupt on a computer. Systems that use the IBM/Intel architecture have 16 IRQ lines used to signal the CPU when a peripheral event has started or terminated. Except for PCI devices, two devices cannot use the same line. The PCI bus allows IRQs to be shared between devices. Latency The time required by a device to access stored data, excluding the data transfer time. Reducing disk latency results in more I/O operations per second being performed on a disk drive. LBA Logical Block Address. A method of addressing storage blocks on a disk drive in a linear fashion, rather than by Cylinder, Track and Sector. This technique also overcomes storage addressing limitations on some systems. G-5 LED Light Emitting Diode. An electronic device that gives off light when power is applied. LRU Least Recently Used. A cache management algorithm employed by SmartRAID V to determine the next cache page to delete and reuse when all pages have been filled with data. By deleting the page in cache that has gone the longest without an access, the algorithm ensures that the most frequently accessed data is resident in the cache. LSU Logical Storage Unit. A device on which the computer can store and retrieve information. This can be an individual disk drive or an array group. LUN Logical Unit Number. Each SCSI device can contain up to eight sub-devices or logical units. The logical units are assigned from 0 to 7. Typically, SCSI devices such as a disk or tape drive contain only one subunit (LUN 0). LVD SCSI Low Voltage Differential SCSI. A SCSI-3 transmission protocol that provides long cable lengths without the need for external high voltage bus transceivers. The maximum synchronous transfer rate is 40MHz. Also known as Ultra2 SCSI. MIA Media Interface Adapter. A device that converts electrical signals to optical fiber signals for Fibre Channel connections. Mirroring A popular term for RAID 1. It refers to the method of creating disk-fault tolerance by storing duplicate information on pairs of drives. Miss A data access in which the requested data is not found in cache. G-6 Glossary MTBF Mean Time Between Failure. The average time between expected failures of a device in a large sample group of devices. Multilevel RAID A method of combining multiple RAID 1 or RAID 5 arrays into a single array, providing increased storage and performance in multiuser environments. Non-Redundant Array An Array Group with no fault tolerance (RAID 0). If only one drive in a non-redundant array fails, the entire array will fail. NVRAM Nonvolatile Random Access Memory. Hardware memory that stores data even when system power is turned off. SmartRAID controllers store their setup information in NVRAM. Operating System Software that manages the resources of a computer and provides the operating environment for application programs. Optimal The mode of operation of a disk array in which no drive failures have occurred. OSM Operating System Module. A system-level software module that provides communication between the host operating system and the intelligent hardware controller. See also HDM. Page The smallest region of cache which can be allocated to store data. Each page stores one 512-byte sector from disk. Parity A method of generating redundant information which can be used to detect errors in stored or transmitted data. Parity is used in standard memory modules and over the peripheral bus to detect data errors. Parity is used in RAID 5 disk arrays to reconstruct flawed or missing data sectors. PCI Peripheral Component Interconnect. An intelligent computer bus specification that provides automatic configuration of peripheral cards. The bus supports 32-bit data paths at a 132 MB/sec data transfer rate or 64-bit data paths at a 264 MB/sec data transfer rate. PIO Programmed Input/Output. A method of data transfer where data is moved between a peripheral controller and system memory by the CPU. Plug-and-Play The ability to install peripheral cards or devices without requiring a user to configure interrupts or addressing for the device. Plug-and-Play BIOS A part of the system BIOS in PCI computers that has the ability to automatically configure PCI peripheral cards so that there are no conflicts with other installed devices. Predictive Caching A method of analyzing disk I/O requests to improve system performance by predicting which data is likely to be needed in the near future. The data is then read into the physical cache. RAID Redundant Array of Independent Disks. A method of combining disk drives into one logical storage unit that provides disk-fault tolerance and can operate at higher throughput levels than a single disk drive. Rebuild The operation of restoring data belonging to a failed member of a redundant disk array by reconstructing the data from the other disks and writing that data to a replacement disk drive. Redundant Array A fault-tolerant disk array (for example, RAID 1 or RAID 5). Glossary SAF-TE SCSI Accessed Fault-Tolerant Enclosure. A specification (co-developed by nStor Corporation, Inc. and Intel Corp.) which provides a standardized method for monitoring and reporting on the condition of disk drives, power supplies and cooling systems used in high availability LAN servers and storage subsystems. The specification is independent of hardware I/O cabling, operating systems, server platforms, and RAID implementation because the enclosure itself is treated as a device on the SCSI bus. Scatter/Gather A feature that allows data to be transferred to or from multiple noncontiguous areas of host computer memory with a single I/O command. SCSI Small Computer Systems Interface. An ANSI standard parallel interface for communication with intelligent peripheral devices. The original SCSI definition is defined in ANSI document number X3.131-1986. The standard is now in its third major revision. SES SCSI Enclosure Services. A SCSI-3 command set that provides a method to manage and sense the state of the power supplies, cooling devices, displays, indicators, individual drives, and other non-SCSI components installed in an enclosure. See also SAF-TE. SIMM Single In-line Memory Module. A standard packaging for RAM on a small circuit board with a defined edge connector. See also DIMM. Single-ended An electrical signal protocol which transmits information through changes in voltage. Singleended SCSI uses standard TTL signal-andground pairs to transmit information over the SCSI bus. Single-ended SCSI cables can be up to 3 meters in length. G-7 S.M.A.R.T. Self-Monitoring, Analysis and Reporting Technology. A standard for disk drives that monitor their own condition and report potential problems. It is part of the ATA-3 specification for IDE drives and is also used on some SCSI drives. SPX Sequenced Packet Exchange. The transport layer protocol used by Novell NetWare networks. Stripe A contiguous region of disk space. Stripes can be as small as one sector or can be composed of many contiguous sectors. Striping A method of distributing data evenly across all drives in an array by concatenating interleaved stripes from each drive. Synchronous A data transmission protocol which is synchronized to a defined time interval. Synchronous SCSI can transmit data faster than asynchronous SCSI because the transmitting device does not wait for acknowledgment of each byte from the receiving device. Tagged Command Queuing A feature of SCSI-2 and SCSI-3 protocols that allows SCSI commands to be executed out of order. Target A SCSI device, such as a disk drive, that receives and executes commands from a SCSI Initiator device such as a DPT SmartRAID V controller. TCP/IP Transmission Control Protocol/Internet Protocol. A widely used network communication protocol that is the standard for transmitting data through the Internet. G-8 Glossary Termination A method of matching the transmission impedance of an electrical bus so that signal reflections are minimized or eliminated. TERMPWR A signal line on the SCSI bus that supplies electric power for SCSI bus terminators. Throughput A term used to describe the amount of data that can be processed or transmitted by a system in a given amount of time. Tree View The view in SMOR that provides a graphic display of all controllers and devices on the system in a hierarchical format. When a device is highlighted in the Tree View, a corresponding Information View is displayed that provides specific information about that device. Ultra SCSI The SCSI-3 specification that defines synchronous data transmission rates of up to 20MHz. This transfer rate provides data transfer of up to 20MB/sec on an 8-bit bus and 40MB/sec on a 16-bit bus. Ultra SCSI is also called Fast-20 SCSI. Ultra2 SCSI The SPI-2 specification that defines synchronous data transmission rates of up to 40MHz. This transfer rate provides data transfers of up to 40MB/sec on an 8-bit bus and 80MB/sec on a 16-bit SCSI bus. Ultra2 SCSI is also called Fast-40 SCSI. VHDCI Very High Density Cable Interconnect. The small industry standard 68-pin external connector used on DPT SmartRAID V SCSI controllers. Wide SCSI A SCSI protocol and signal definition that provides a data path more than 8-bits wide. Wide SCSI buses can support both 8- and 16-bit data transfers. All SmartRAID V controllers use a 16-bit SCSI interface. WORM Write Once Read Multiple – An optical storage device similar to a CD-ROM that can write data one time only to any location on a removable optical disk. WORM drives are primarily used as data archive devices because once written, the data can never be erased. Write-Back A method postponing an actual data write operation to a slower device, such as a disk drive, by saving the data in a cache. The data can then be written at a time when the device would otherwise be idle. Write-Through Data is written to directly to the final destination before a write operation is reported as complete. XOR Exclusive OR. A logical operation performed on two binary operands which yields a 0 for every bit position where the operands are both 1 or both 0, and a 1 in every bit position when the operands are dissimilar. Index Index address controller 3-16, 4-13 I2O BIOS 7-36 logical device 6-7 alarm audible 2-13, 6-39 disable 2-13, 6-39 testing 6-15 architecture, SmartRAID V 7-22 array group building with SMOR 4-21 building with Storage Manager 6-23 caching configuration 6-18 copying data 6-23 creating 4-20, 6-22 deleting 4-23, 6-28 expanding 6-26 hot spare rebuild 6-41 information (SMOR) 4-17 modifying 6-24 naming 6-24 number of drives 6-19 rebuilding 6-21, 6-40 starting a build 6-28 task priority 6-43 ASPI protocol 7-22 asynchronous SCSI 7-29 AUTOEXEC.BAT Windows 95/98 5-8, 5-10 Windows NT 5-7 battery module features 2-10 installing 3-14 warning 2-10 battery specifications C-4 BB4050 configuration 6-11 features 2-10 installing 3-14 status 6-12 bootable devices 4-10 booting controller 3-16 bridge controller 7-27 Broadcaster 6-31, 6-34 NetWare 6-34 pager event messages 6-33 SCO Unix 6-35 SCO UnixWare 6-35 Windows NT 6-36 BSD/OS 5-1 building arrays SMOR 4-2, 4-20 Storage Manager 6-23, 6-28 bus expansion module compatability 3-9 features 2-8 installation 3-9 types 2-8, 3-9 bus mastering byte/word alignment 7-24 PCI 7-25 B C background task priority 6-43 battery backup auto write-through 6-11 initial calibration 6-12 maintenance 6-13 predictive failure warning 6-11 status messages 6-12 status window 6-11 cable adapters 1-5 disk activity 3-15 external cable detect 7-29 Fibre Channel 3-3 guidelines 7-30, 7-32 included with product 1-5 LVD 7-32 SCSI cable installation 3-3 single-ended 7-30 Ultra2 7-32 A I-1 I-2 cache caching host reads 7-12 configuring 6-18, 7-6 DIMM, installing 3-13 DOS/Windows 3.1 setting 4-10 flushing 7-7, 7-10 operating system 7-7 operating system, size of 7-12 optimizing size 7-12 predictive 2-4, 6-19, 7-10 requirements 3-11, 3-13 SIMM, installing 3-11 virtual 7-6, 7-10 write-back vs. write-through 7-9 Century expansion modules 2-8 features 2-7 SIMM installation 3-11 system requirements 1-5 types 2-7 cluster server cables 3-20 enable/disable, support for 4-14 overview 3-18 requirements 3-19 SmartRAID V 3-20 command overlapping 7-23 queuing 7-24 configuration, setting 4-19 controller booting 3-16 ID 3-6 installling 3-15 intelligent 7-3 IRQ 3-16 NVRAM reset 3-17 SCSI ID, changing 4-14, 6-15 creating data redundancy 7-19 D DAE. See Dynamic Array Expansion data verification 6-42 Decade cache 2-7 features 2-2, 2-7 SIMM installation 3-11 system requirements 1-5 Index degraded mode 7-21 deleting arrays 6-28 device caching configuration 6-18 capabilities 4-16 configuring IDs 3-6 formatting 4-24 SCSI capabilities 6-17 status info 4-16 differential SCSI 7-28 Digital Fault Bus G-3 DIMM installing 3-13 restrictions 3-13 types 2-6 DM4050, installing 3-13 documentation chapter summaries 1-2 overview 1-2 DOS/Windows 3.1 cache setting 4-10 drivers BSD/OS 4.1 5-1 FreeBSD 5-1 Linux 5-24, 5-25 Novell NetWare 5-17 SCO Unix 5-14 Windows NT 5-2, 5-7 Dynamic Array Expansion. See See DAE overview 6-24 performance 6-25 system requirements 6-25 using 6-26 E EBDA. See extended BIOS data area ECC enabled LED 2-12 error LED 2-12 enable extended int13 4-10 environmental specifications C-3 event levels 6-29 logging 6-30 send message to pager 6-33 SNMP D-11 viewing 6-34, 6-36 Index event notification broadcasters 6-34 configuring 6-31 NetWare 6-34 pager messages 6-33 SCO Unix 6-35 SCO UnixWare 6-35 SNMP D-11 Windows NT 6-36 expanding arrays 6-26 extended BIOS data area definition of G-3 relocation, enabling 4-10 SMOR parameter 4-10 troubleshooting B-2, B-7 extended Int 13 4-10 F Fibre Channel cable 3-3 configuration 3-3, 3-6 connector 3-3, 7-35 controller 2-5, A-2 description of 7-35 device ID 3-6 expansion module 2-6, 2-8 firmware file name 4-27 restoring from disk 4-28 saving to disk 4-27 upgrading 4-25, 6-15 flash SMOR 4-25 Storage Manager 6-15 unsuccessful, recovering from B-6 flushing, cache operating system 7-7 strategy 7-10 formatting disks SMOR 4-24 Storage Manager 6-38 FreeBSD 5-1 full stripe write 7-19 H hardware device module (HDM) 7-22, 7-23 Hot Spare 2-4, 6-41 assigning 4-23 icon 6-4 removing 4-23 I I/O statistics 6-44 I2O command processing 7-23 features 7-22 intelligent controllers 7-4 split driver model 7-22 I2O BIOS configuration 7-36 flash upgrading 4-25 powerup message 7-36 icons SMOR 4-4 Storage Manager 6-4 installation battery module 3-14 bus expansion module 3-7, 3-10 configuring 3-3 controller 3-15 drivers BSD/OS 4.1 5-1 FreeBSD 5-1 Linux 5-25 NetWare 5-17 SCO Unix 5-14 Windows 95/98 5-7 Windows NT 5-2, 5-7 memory modules 3-11, 3-13 overview 3-2 procedure 3-2 RA4050 3-8 RAID Accelerator 3-8 roadmap 1-3 SIMMs 3-11 SNMP D-7 Storage Manager Linux 5-26 SCO UNIX 5-14 Windows 5-13 I-3 I-4 Int 13, extended 4-10 IRQ 3-16 K keys, SMOR navigation 4-3 L LED battery module 2-13, A-12 cache status 2-12 Century/Decade, location of A-5 controller active 2-12 controller idle 2-11 disk activity 3-15 ECC enabled 3-11, 3-13 PM375x, location of A-3 power up sequence 2-11 RA4050, location of A-11 Linux driver installation 5-25 Storage Manager 5-26 locality of reference 7-10 logical block addressing 4-10 logical device address 6-7 logical storage unit (LSU) 6-19 logical unit number (LUN) 7-27 LVD SCSI 7-28 Index Millennium connectors 2-6 DIMM installation 3-13 expansion modules 2-6 features 2-5 memory modules 2-6 SIMM installation 3-11 mirroring 7-15 module installation 3-7 MSCS. See Microsoft Cluster Server (MSCS) multi-mode SCSI 7-29 N naming arrays 6-24 Novell NetWare boot controller, 4.11 5-18 boot controller, 4.2 5-20 boot controller, 5.0 5-22 driver installation 5-17 remote communication 5-24 secondary controller, 4.11 5-19 secondary controller, 4.2 5-21 secondary controller, 5.0 5-23 NT. See Windows NT NVRAM clearing 3-17 resetting 6-28 restoring defaults 3-17 M O management console, SNMP D-3 management information base D-2 memory capacities C-3 memory modules Century/Decade 2-9 Millennium 2-6 memory specifications C-3 microprocessor 7-26 Microsoft Cluster Server cables 3-20 enable/disable, support for 4-14 overview 3-18 SmartRAID V 3-20 system requirements 3-19 operating system NetWare remote communication 5-24 operating system drivers BSD/OS 4.1 5-1 FreeBSD 5-1 Linux 5-24, 5-25 NetWare 4.11 - booting 5-18 NetWare 4.11 - secondary 5-19 NetWare 4.2 - booting 5-20 NetWare 4.2 - secondary 5-21 NetWare 5 - booting 5-22 NetWare 5 - secondary 5-23 SCO OpenServer 5 5-14 UNIX 3.2v4.2 5-14 UnixWare 7 5-15 Index Windows 95/98 5-7 Windows NT 5-2 operating system services module (OSM) description of 7-22 dynamic array expansion 6-25 Microsoft Windows 5-2, 5-6 P pager event notification 6-33 parity group 7-18 partial stripe write 7-19 password, remote communication changing 6-51 default 6-51 SCO servers 6-52 Windows 95/98 6-51 Windows NT 6-51 PCI bus 2-5, 7-25 performance caching 7-6 intelligent I/O 7-3 pipelined parallel processing 7-5 physical configuration view 6-4 pipelined parallel processing 7-5 powerup booting controller 3-16 I2O BIOS message 7-36 predictive caching 2-4, 6-19, 7-10 prefetch algorithm 7-11 R RA4050 features 2-9 installation 3-8 SIMM installation 3-11 SIMMs 2-9 RAID array groups 4-17 bad data list 7-20 bad parity list 7-20 degraded mode 7-21 dual-level 7-18 I/O errors 7-20 intelligent controller 7-3 parity 7-19 RAID 0 7-14 RAID 1 7-15 RAID 2 7-15 RAID 3 7-16 RAID 4 7-16 RAID 5 7-17 RAID Accelerator features 2-9 installation 3-8 SIMM installation 3-11 read-ahead algorithm 7-10 read-modify-write 7-19 rebuilding arrays button 6-21 hot spare 6-41 task priority 6-43 using SMOR 4-24 using Storage Manager 6-40 remote communication command line parameter 6-53 configuration file, editing 6-50 configuring 6-49 default password 6-51 NetWare support 5-24 network attached 6-49 phonebook 6-55 servers 6-51 TCP/IP 6-50, 6-52 reset NVRAM 3-17 S SAF-TE G-7 scan delay 4-10 SCSI ANSI specification 7-26 asynchronous 7-29 cable installation 3-3 commands and messages 7-27 Common Command Set (CCS) 7-26 configurable parameters controller termination 4-14 SCSI ID 6-15 termination 3-4 TERMPWR 4-13, 4-14 controller ID 3-6, 6-14 device capabilities 6-17 device IDs 3-6 I-5 I-6 devices, number of 3-6 differential 7-28 LUNs 7-27 LVD 7-28 LVD cabling 7-32 mixing LVD and non-LVD devices 7-29 multi-mode 7-29 residue reporting 7-28 single-ended cabling 7-30 singled-ended 7-28 synchronous 7-29 termination 3-4, 7-33 TERMPWR 4-13, 4-14, 7-34 transfer padding 7-28 transfer rate 7-30 Ultra2 cabling 7-32 wide 3-3, 3-6, 7-29 SES (SCSI Enclosure Services) G-7 SIMM installing 3-11 restrictions 3-11 single-ended SCSI 7-28 SM4050, installing 3-11 SmartRAID V architecture 7-22 configuration 6-13 controller ID 3-6 features 2-4 installation 3-15 modules, installing 3-7 product overview 2-2 products 2-3 SMOR array information 4-18 controller configuration 4-13 controller information 4-11 device capabilities 4-16 device information 4-15 device status 4-16 icons 4-4 information view 4-6, 4-11 keyboard reference 4-3 menu reference 4-4 navigation 4-5, 4-6 overview 4-2 Index parameters bootable devices 4-10 DOS/Windows 3.1 cache 4-10 EBDA relocation 4-10 enable extended int13 4-10 scan delay 4-10 termination 3-4, 4-14 TERMPWR 4-14 running 4-8 screen layout 4-5 tree view 4-6 upgrading 4-25 SNMP components D-6, D-10 description of D-2 installing D-7 management console D-3 MIB D-2 MIB, DPT specific D-3 operating system support D-7 operation D-9 software overview D-9 sub-agent D-10 system requirements D-6 trap broadcaster D-11 status array 6-8 device 4-16 drive 6-8, 6-17 failed drive 6-39, 6-41 Storage Manager array group creating 6-22 deleting 6-28 modifying 6-24 naming 6-24 background task priority 6-43 Broadcaster 6-31, 6-34 NetWare 6-34 SCO Unix 6-35 SCO UnixWare 6-35 Windows NT 6-36 configuration files 6-28 controller information 6-10 device information 6-17 event logging 6-30 Index event notification 6-31, 6-34 NetWare 6-34 SCO Unix 6-35 SCO UnixWare 6-35 Windows NT 6-36 I/O statistics 6-44 Linux installation 5-26 modem operation 6-48 network operation 6-3, 6-48 overview 6-2 physical configuration view 6-4 platforms supported 5-1 remote operation 6-3, 6-48 running 6-3 SCO UNIX installation 5-14 system requirements 6-2 Windows installation 5-13 striping 7-13 sub-agent, SNMP D-10 SX405x connectors 2-9 features 2-8 installation 3-9 types 2-8 synchronous SCSI 7-29 system requirements 1-5 T temperature 6-10, C-3 termination 7-33 configuration 3-4 enabling 4-14 power 4-14, 7-34 TERMPWR 4-13, 4-14, 7-34 transfer padding and residue reporting 7-28 U Ultra2 SCSI 7-28, 7-32 upgrading firmware 4-25, 6-15 V Verify 6-42 virtual cache 7-10 W wide SCSI IDs 3-6 termination 3-4 with Narrow (8-bit) devices 3-3 Windows 95/98 5-7 Windows NT 5-2 X XOR 7-19 I-7