1
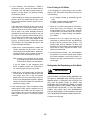
Thermostat Removal & Replacement
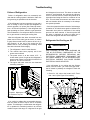
1. Turn off the gas supply at the main tank.
2. Remove the flare fitting from the inlet tube of the
Gas Control Valve.
WARNING
3. Remove the outlet tube flare fitting from the Gas
Control Valve.
USE TWO WRENCHES WHEN TIGHTENING OR
UNTIGHTENING GAS FITTINGS. LEAK TEST AFTER WORKING ON ALL GAS FITTINGS. FAILURE
TO DO SO COULD RESULT IN A GAS LEAK
WHICH COULD RESULT IN A FIRE OR EXPLOSION, WHICH COULD CAUSE PERSONAL INJURY OR DEATH.
4. Remove the screws that secures the Control Assembly to the cabinet.
5. Lift the Control Assembly away from the cabinet.
6. Remove the selector switch knob.
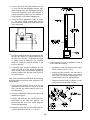
1. Turn off the gas supply at the main tank.
7. Remove the two screws that secure the selector
switch to the Control Assembly.
2. Remove the inlet flare fitting to the Gas Control
Valve.
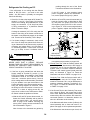
8. Lift the selector switch away from the control
bracket.
3. Remove the outlet flare fitting from the Gas Control Valve.
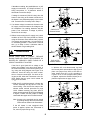
9. Remove the wires from the selector switch one
at a time and connect to the new switch exactly
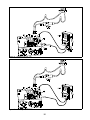
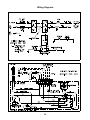
as removed. Double check the wiring connections with the wiring diagrams as follows:
4. Remove the screw that secures the Control Assembly to the cabinet.
5. Lift the Control Assembly away from the cabinet.
Orange wires to G3 & W3
Red wires from Thermostat to W2 & W3
Red wires from fuse & terminal block to AC1
& AC2
Blue wires to DC1 & DC2
6. Remove the two screws that secure the
Thermostat to the Control Assembly.
7. Remove the two red wires from the Thermostat.
8. Remove the clips that secure the capillary tube
to the fins, noting that the capillary tube is located on the fifth fin from the right.
10. To reinstall, reverse Steps 7-1.
11. Leak test all gas fittings removed.
9. Pull the capillary tube through the back of the
cabinet.
10. To reinstall reverse the above procedure.
Orifice Removal & Replacement
11. Leak test all gas fittings removed.
WARNING
USE TWO WRENCHES WHEN TIGHTENING OR
UNTIGHTENING GAS FITTINGS. LEAK TEST AFTER WORKING ON ALL GAS FITTINGS. FAILURE
TO DO SO COULD RESULT IN A GAS LEAK
WHICH COULD RESULT IN A FIRE OR EXPLOSION, WHICH COULD CAUSE PERSONAL INJURY OR DEATH.
Selector Switch Removal & Replacement
WARNING
USE TWO WRENCHES WHEN TIGHTENING OR
UNTIGHTENING GAS FITTINGS. LEAK TEST AFTER WORKING ON ALL GAS FITTINGS. FAILURE
TO DO SO COULD RESULT IN A GAS LEAK
WHICH COULD RESULT IN A FIRE OR EXPLOSION, WHICH COULD CAUSE PERSONAL INJURY OR DEATH.
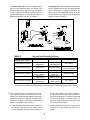
1. Turn off the gas supply at the main tank.
2. Remove the flare nut from the orifice assembly.
3. Remove the orifice assembly from the burner.
20