1
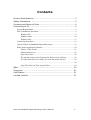
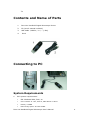
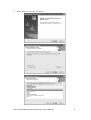
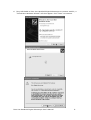
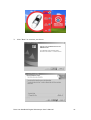
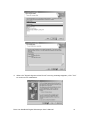
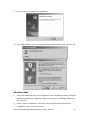
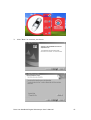
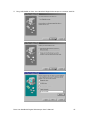
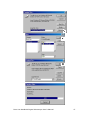
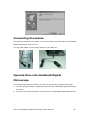
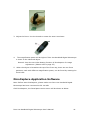
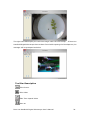
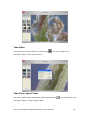
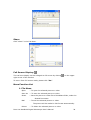
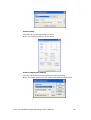
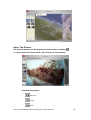
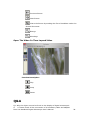
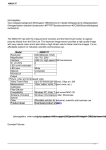
Dino-Lite Handheld Digital Microscope
AM-311
User’s Manual
Thank you for choosing Dino-Lite Handheld Digital Microscope!
Dino-Lite Handheld Digital Microscope has a wide scope of applications, such as,
1. Skin Check
2. Scalp Check
3. Industrial Inspection e.g. Printing Circuit Board(PCB)inspection, electronics
device inspection
4. Visual Assistance
5. Printing Inspection
6. Textile Inspection
7. Jewelry Inspection
8. Science Learning
9. ….. etc.
Please read this manual carefully before using Dino-Lite Handheld Digital
Microscope.
Dino-Lite Handheld Digital Microscope User’s Manual
1
Contents
Product Specifications.............................................................. 3
Safety Precautions ................................................................. 3
Contents and Name of Parts ..................................................... 4
Connecting to PC .................................................................... 4
System Requirements............................................................................................. 5
Driver Installation Procedure................................................................................. 5
Windows XP ................................................................................................ 6
Windows 2000 ........................................................................................... 10
Windows 98se ............................................................................................ 13
Connecting Procedure.......................................................................................... 19
Operate Dino-Lite Handheld Digital Microscope .............................................. 19
DinoCapture Application Software...................................................................... 20
Picture / Video Folder .................................................................................. 21
Menu Function List...................................................................................... 25
Open The Picture ......................................................................................... 28
The opened picture can be displayed in full screen by clicking ................ 28
To return from full screen mode, just click the mouse left key.
............. 28
.................................................................................................. 28
Open The Video Or Time Lapsed Video...................................................... 29
Q&A ....................................................................................
Copyright.............................................................................
Certification .........................................................................
Limited Liability ....................................................................
30
31
31
31
Dino-Lite Handheld Digital Microscope User’s Manual
2
Product Specifications
1.
Resolution:640*480 VGA.
2.
Built-in 1 optical lens.
3.
Magnification power:10x~200x.
4.
Built-in LED light.
5.
Frame rate: up to 30 FPS
6.
Interface:USB (PC)
Remarks: The magnification power is the ratio of the real size of the an observe
object vs. the image show on a 15” monitor
Safety Precautions
1.
Avoid touching the lens with finger to protect the product from
electrostatic damage.
2.
Do not attempt to service this product yourself. Opening the covers may
expose you to dangerous voltage points or other risks.
3.
When hands are wet, do not plug in or remove the adaptor or other
connectors.
4.
Using or storing Dino-Lite Handheld Digital Microscope, do not plug in any
other cables, not belong to Dino Digital Microscope.
5.
Do not use any detergent or volatile solution, which will damage the
camera case, painted surfaces & lens. Only use a soft cleaning cloth.
6.
If the lens is dirty, please use a kens brush on soft cloth to wipe clean.
Avoid touching them with your fingers. Exercise care to avoid scratching
the lens.
7.
Without protection, do not put Dino Digital Microscope outdoor to avoid
the lens damaged by high temperature or humidity.
8.
Using and storing Dino Digital Microscope at Temp: 0oC~ 40oC, Humidity:
45%~85%.
9.
If water has entered Dino Digital Microscope device and the inspection
stage, immediately turn the power off and remove the USB cable. Do not
use dryer neither.
10. Using or storing Dino-Lite Handheld Digital Microscope, need to watch all
cables to avoid trip over or Dino-Lite Handheld Microscope fall down.
11. To avoid electric shock, remove all electricity source before moving PC or
Dino-Lite Handheld Digital Microscope User’s Manual
3
TV.
Contents and Name of Parts
1.
Dino-Lite Handheld Digital Microscope Device
2.
CD (user’s manual included)
3.
USB Cable《USB2.0 / 1.1》 (1.8m)
4.
Dock
Connecting to PC
System Requirements
●
PC’s system requirements:
9
OS: Windows 98se, 2000, XP
9
CPU: Pentium IV 1.5G, Celeron, AMD Athlon or above
9
Memory: 128MB
9
HDD storage space: at least 150MB
Dino-Lite Handheld Digital Microscope User’s Manual
4
( for driver and application software installation)
9
Graphic card: 16-bit or above
9
CD-ROM driver
9
USB2.0 / 1.1 port
Driver Installation Procedure
■
Power on PC and place installation CD into CD-ROM driver, do not connect
USB Cable from Dino-Lite Handheld Digital Microscope to PC before driver
installation.
■
Select driver installation, and follow the instructions to complete installation.
■
As driver installation completed, and if system asking for re-start, please
re-start the Windows OS.
Note: The driver needs to be installed only once for each computer.
Windows XP
1.
Place the installation CD into CD-ROM driver, the installation program should be
started automatically. Otherwise, please execute the AUTORUN.EXE directly
from the CD.
2.
Select “Driver Installation” from Dino-Lite Handheld digital Microscope
Installation menu screen as shown.
Dino-Lite Handheld Digital Microscope User’s Manual
5
3.
Click “Next” to continue, as shown.
Dino-Lite Handheld Digital Microscope User’s Manual
6
4.
When the “Software Installation” warning message appears, click “Continue
Anyway”.
5.
Click “Finish” to complete the installation.
Dino-Lite Handheld Digital Microscope User’s Manual
7
6.
Plug USB Cable to Dino-Lite Handheld Digital Microscope to connect with PC, a
“Found New Hardware Wizard” will then appear. Click “Next” to continue.
Dino-Lite Handheld Digital Microscope User’s Manual
8
Windows 2000
1.
Place the installation CD into CD-ROM driver, the installation program should be
started automatically. Otherwise, please execute the AUTORUN.EXE directly
from the CD.
2.
Select “Driver Installation” from Dino-Lite Handheld digital Microscope
Installation menu screen as shown.
Dino-Lite Handheld Digital Microscope User’s Manual
9
3.
Click “Next” to continue, as shown.
Dino-Lite Handheld Digital Microscope User’s Manual
10
4. When the “Digital Signature Not Found” warning message appears, click “Yes”
to continue the installation.
Dino-Lite Handheld Digital Microscope User’s Manual
11
5.
Click “Finish” to complete the installation.
6. Plug USB Cable to Dino-Lite Handheld Digital Microscope to connect with PC
Windows 98se
1.
Place the installation CD into CD-ROM driver, the installation program should be
started automatically. Otherwise, please execute the AUTORUN.EXE directly
from the CD.
2.
Select “Driver Installation” from Dino-Lite Handheld digital Microscope
Installation menu screen as shown.
Dino-Lite Handheld Digital Microscope User’s Manual
12
3.
Click “Next” to continue, as shown.
Dino-Lite Handheld Digital Microscope User’s Manual
13
4.
Click “Finish” to complete the installation.
Dino-Lite Handheld Digital Microscope User’s Manual
14
5.
Plug USB Cable to Dino-Lite Handheld Digital Microscope to connect with PC
Dino-Lite Handheld Digital Microscope User’s Manual
15
6. When the following message appears, please insert the Windows 98 Second
Edition CD-ROM.
Dino-Lite Handheld Digital Microscope User’s Manual
16
Dino-Lite Handheld Digital Microscope User’s Manual
17
Connecting Procedure
The following procedure will show you how to properly connect Dino-Lite Handheld
Digital Microscope with your PC.
Connect USB Cable on Microscope Device to PC USB port.
Operate Dino-Lite Handheld Digital
Microscope
The following procedure will show you how to operate Dino Digital Microscope.
1. To have up-right image, suggest placing Dino-Lite Handheld Digital Microscope
as shown.
2. Put the to-be-observed object near the Dino-Lite Handheld Digital Microscope.
Dino-Lite Handheld Digital Microscope User’s Manual
18
3. Adjust the focus: Use the thumb to rotate the area A as shown.
4.
The magnification power will be higher if Dino-Lite Handheld Digital Microscope
is closer to the observed object.
Remark: Can also use Video Setting function of DinoCapture for image
adjustment. (Please refer to page 25)
5. When the object is located at the top of the front cap, there are two focus
positions, each with different magnification power, can be found by rotating the
focus knob.
DinoCapture Application Software
Note: Before start DinoCapture, please make sure Dino-Lite Handheld Digital
Microscope has been connected to PC via USB.
Click DinoCapture, the DinoCapture main screen will be shown as below.
Dino-Lite Handheld Digital Microscope User’s Manual
19
The right hand side display the real-time image under the microscope. If Dino-Lite
Handheld Digital Microscope has not been found while opening the DinoCapture, the
message will be prompted as below.
Tool Bar Description
Take Picture
Take Video
Take Time Lapsed Video
Save as
Dino-Lite Handheld Digital Microscope User’s Manual
20
Mail
Picture / Video Folder
Picture / Video folder is on the left side of the program, which contains the
thumbnails of picture or video captured by the program.
The file in the folder will not be automatically deleted when leaving the program.
But it is still suggested to save the picture or video and keep the folder clean for file
security and program’s performance concern.
Thumbnail Notation
Grey shadow -- The picture or video has not yet been saved.
Orange shadow -- The picture or video has been saved.
Blue frame –- The picture or video is selected.
The selected picture or video can thus be opened, be saved, be copied ,
be shared, be mailed or be deleted.
Take Picture
The picture can be taken either by clicking the
icon on Tool Bar or by
selecting “Picture” under Capture Menu.
Dino-Lite Handheld Digital Microscope User’s Manual
21
Take Video
The Video can be taken either by clicking the
icon on Tool Bar or by
selecting “Video” under Capture Menu.
Take Time Lapsed Video
The Time Lapsed Video can be taken either by clicking the
icon on Tool Bar or by
selecting “Frames” under Capture Menu.
Dino-Lite Handheld Digital Microscope User’s Manual
22
Save Picture or Video
The file can be saved as “jpg” or “bmp”, by either clicking
in the Tool Bar or by
selecting “Save as” under the File Menu . The selected file in the folder will then be
saved as prompted below.
Mail
Click “Mail” : The file name is same as system’s.
The selected file can be mailed by clicking
in the Tool Bar, or by selecting “Mail”
under the File Menu.
Dino-Lite Handheld Digital Microscope User’s Manual
23
Share
Click “share” in the File Menu.
Full Screen Display:
The real time display can be enlarged to full screen by clicking
on the upper
right corner of the window.
To return from full screen mode, please click “Esc”.
Menu Function List
1. File Menu
Open
-- To open the selected picture or video.
Save As -– To save the selected picture or video.
Share
–- Save the picture or video file to DinoShare folder, under the
Shared Document.
Mail
-- To mail the selected picture or video.
The picture will be mailed in JPG format automatically.
Delete
-- To delete the selected picture or video.
Dino-Lite Handheld Digital Microscope User’s Manual
24
Delete All – To delete all the files in selected folder, picture or video.
On display thumbnail picture, click mouse right key, the functions
showed are same as file’s.
2. Setting
Audio Setting
The user can select the quality of audio file to be recorded.
Dino-Lite Handheld Digital Microscope User’s Manual
25
Video Setting
The user can set the parameter of video.
Note: The resolution setting is not useful.
Video Compression Setting
The user can select the compressor for video recording.
Note: The video quality may be varied with different compressor.
Dino-Lite Handheld Digital Microscope User’s Manual
26
Video Thumbnail Auto-play
The thumbnail auto play can be switched on or Off.
If thumbnail auto
play is enabled, the video will play when cursor move over.
3. Capture
The picture, video and frame functions in Capture have the same
functions as the buttons of
in the Tool Bar.
4. Help
User can use “Program Updates” in Help to download the most updated
DinoCapture from AnMo web site www.anmo.com.tw
Dino-Lite Handheld Digital Microscope User’s Manual
27
Open The Picture
The opened picture can be displayed in full screen by clicking
To return from full screen mode, just click the mouse left key.
Function Description
Save as
Copy
Mail
Dino-Lite Handheld Digital Microscope User’s Manual
28
Previous Picture
Next Picture
Share the Picture by sending the file to DinoShare under the
Shared Document
Enlarge
Shrinkage
Open The Video Or Time Lapsed Video
Function Description
Play
Stop
Pause
Q&A
Q1. Why the object cannot be found on the display of digital microscope?
A:
a. Please check all the connection of all necessary cable and adapter.
Dino-Lite Handheld Digital Microscope User’s Manual
29
Q2. Why cannot work, when connect to PC?
A:
a. Check driver installation is completed.
b. The USB cable is connected to Dino-Lite Handheld Microscope and PC USB
port.
Q3. How to install driver?
A:
a. Do not connect USB cable to Dino-Lite Handheld Microscope before driver
installation.
b. Place installation CD into CD-Rom driver, select “driver installation”.
Q4. If USB cable connected to Dino-Lite Handheld Digital Microscope before driver
installation?
A:
Remove USB cable from Dino-Lite Handheld Digital Microscope for 5 sec., and
then plug it back to Dino-Lite Handheld Digital Microscope.
Q5. How to connect “DinoCapture” ?
A:
Complete driver installation, connect USB cable to Dino-Lite Handheld Digital
Microscope, and then Execute “DinoCapture” application procedure.
Q6. How to uninstall driver ?
A:
Remove USB cable from Dino-Lite Handheld Digital Microscope, execute
“uninstall” in application procedure “Dino Digital Microscope”.
Q7.
When connecting to PC, why the picture is slow or unsmooth?
A:
a. Probably your PC’s configuration is not sufficient enough. Please check the
system requirements as mentioned in this User’s Manual.
b. Probably your PC’s CPU or memory is overloaded by executing too many
application software. Try to shut down other application and restart your
system to release the memory.
c. Probably your system has being attacked by virus, which may
dramatically degrade your system’s performance.
Q8.
What should we do, if Dino-Lite Handheld Digital Microscope is not working
normally?
A:
Please reset the system by disconnecting all the cables from Dino-Lite
Handheld Digital Microscope. Wait for about 5 sec., re-connecting the cables to
restart.
Copyright
AnMo Electronics Corp. reserves all patents, trademarks, copyrights, and other
Dino-Lite Handheld Digital Microscope User’s Manual
30
intellectual rights regarding the user manual. Copying the manual in part or in full
without the written permission of AnMo Electronics Corp. is prohibited.
Illegal
usage of part or all of the document may result in criminal penalty.
Windows 98se, Windows 2000 and Windows XP are Microsoft company’s trademark.
Certification
CE, FCC
Limited Liability
The manufacturer, importer, and the dealer cannot be held responsible for
accidental damage, including personal injury or any other damage, due to
inappropriate usage of the product.
Information in the user manual is written for the current specification of the product.
The manufacturer of Dino Digital Microscope continues to provide additional
functions and apply new technology to it. All specifications may be changed
without notice to individual users.
Dino-Lite Handheld Digital Microscope User’s Manual
31