1
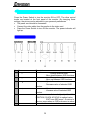
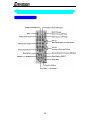
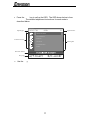
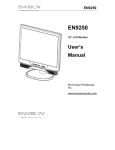
EN-8500 EN-8500 18” LCD Monitor With TV Tuner User’s Manual By Envision Peripherals, Inc. www.envisionmonitor.com Before operating your monitor, please read this manual thoroughly. EN-8500 TABLE OF CONTENTS COVER ……………………………………………………………………… TABLE OF CONTENTS …………………………………………………... FOR YOUR SAFETY ……………………………………………………… SPECIAL NOTES ON LCD MONITOR …………………………………. GENERAL NOTES ………………………………………………………… FEATURES ………………………………………………………………… PACKAGE CONTENTS ………………………………………………….. INSTALLATION INSTRUCTIONS ………………………………………. POWER CORD ……………………………………………………….. BASIC CONNECTIONS ……………………………………………… PREPARING TO INSTALL THE OPTIONAL WALL MOUNT ARM. ATTACHING THE OPTIONAL WALL MOUNT ARM ……………... CONNECTING OTHER VIDEO & AUDIO SOURCES ………….... ADJUSTING THE VIEWING ANGLE …………………………………… OPERATING INSTRUCTIONS ………………………………………….. USER CONTROLS ……………………………………………………. REMOTE CONTROL …………………………………………………. OSD FUNCTIONS …………………………………………………….. PLUG AND PLAY …………………………………………………………. TECHNICAL SUPPORT (FAQ) …………………………………………. ERROR MESSAGES …………………………………………………….. RESOLUTION TABLE ……………………………………………………. HOW TO INSTALL INF & ICM FILE ……………………………………. SPECIFICATIONS ……………………………………………………….. FACTORY PRESET TIMING TABLE …………………………………… D-SUB CONNECTOR PIN ASSIGNMENT …………………………….. V-CHIP ……………………………………………………………………… WARRANTY STATEMENT ………………………………………………. 1 1 2-3 4 5 6 7 8 9 10 11 12 13 14-15 16 17-21 22 23-24 25 25 26 27-28 29 29 30-31 32-33 EN-8500 FOR YOUR SAFETY Before operating the monitor please read this manual thoroughly. This manual should be retained for future reference. FCC Class B Radio Frequency Interference Statement WARNING: (FOR FCC CERTIFIED MODELS) NOTE: This equipment has been tested and found to comply with the limits for a Class B digital device, pursuant to Part 15 of the FCC Rules. These limits are designed to provide reasonable protection against harmful interference in a residential installation. This equipment generates, uses and can radiate radio frequency energy, and if not installed and used in accordance with the instructions, may cause harmful interference to radio communications. However, there is no guarantee that interference will not occur in a particular installation. If this equipment does cause harmful interference to radio or television reception, which can be determined by turning the equipment off and on, the user is encouraged to try to correct the interference by one or more of the following measures: 1. Reorient or relocate the receiving antenna. 2. Increase the separation between the equipment and receiver. 3. Connect the equipment into an outlet on a circuit different from that to which the receiver is connected. 4. Consult the dealer or an experienced radio/TV technician for help. NOTICE 1. The changes or modifications not expressly approved by the party responsible for compliance could void the user's authority to operate the equipment. 2. Shielded interface cables and AC power cord, if any, must be used in order to comply with the emission limits. 1. The manufacturer is not responsible for any radio or TV interference caused by unauthorized modification to this equipment. It is the responsibilities of the user to correct such interference. As an ENERGY STAR Partner Envision Peripherals, Inc. has determined that this product meets the ENERGY STAR guidelines for energy efficiency. WARNING: To prevent fire or shock hazard, do not expose the monitor to rain or moisture. Dangerously high voltages are present inside the monitor. Do not open the cabinet. Refer servicing to qualified personnel only. 2 EN-8500 SAFETY PRECAUTIONS z Do not use the monitor near water, e.g. near a bathtub, washbowl, kitchen sink, laundry tub, swimming pool or in a wet basement. z Do not place the monitor on an unstable cart, stand, or table. If the monitor falls, it can injure a person and cause serious damage to the appliance. Use only a cart or stand recommended by the manufacturer or sold with the monitor. If you mount the monitor on a wall or shelf, use a mounting kit approved by the manufacturer and follow the kit instructions. z Slots and openings in the back and bottom of the cabinet are provided for ventilation. To ensure reliable operation of the monitor and to protect it from overheating, be sure these openings are not blocked or covered. Do not place the monitor on a bed, sofa, rug, or similar surface. Do not place the monitor near or over a radiator or heat register. Do not place the monitor in a bookcase or cabinet unless proper ventilation is provided. z The monitor should be operated only from the type of power source indicated on the label. If you are not sure of the type of power supplied to your home, consult your dealer or local power company. z The monitor is equipped with a three-pronged grounded plug, a plug with a third (grounding) pin. This plug will fit only into a grounded power outlet as a safety feature. If your outlet does not accommodate the three-wire plug, have an electrician install the correct outlet, or use an adapter to ground the appliance safely. Do not defeat the safety purpose of the grounded plug. z Unplug the unit during a lightning storm or when it will not be used for long periods of time. This will protect the monitor from damage due to power surges. z Do not overload power strips and extension cords. Overloading can result in fire or electric shock. z Never push any object into the slot on the monitor cabinet. It could short circuit parts causing a fire or electric shock. Never spill liquids on the monitor. z Do not attempt to service the monitor yourself; opening or removing covers can expose you to dangerous voltages and other hazards. Please refer all servicing to qualified service personnel. z To ensure satisfactory operation, use the monitor only with UL listed computers which have appropriate configured receptacles marked between 100 - 240V AC, Min.6A. z The wall socket shall be installed near the equipment and shall be easily accessible. 3 EN-8500 SPECIAL NOTES ON LCD MONITORS NOTES The following symptoms are normal with LCD monitor and do not indicate a problem. • Due to the nature of thefluorescent light, the screen may flicker during • • • • initial use. Turn off the Power Switch and then turn it on again to make sure the flicker disappears. You may find slightly uneven brightness on the screen depending on the desktop pattern you use. The LCD panel used in this monitor is a very high technology product with 2,359,296 thin film transistors giving you fine picture details. Occasionally, a few non-active pixels may appear on the screen as a fixed point of red, green, blue, white or black. Please note that this does not indicate a defective panel. Due to the nature of the LCD screen, an afterimage of the previous screen may remain after switching the image when the same image has been displayed for a long time. The monitor will slowly recover from this. The life of the fluorescent light used in the LCD monitor is approximately 30,000 hours. Contact your dealer or EPI service center for replacement when the screen is dark, flickering or not lighting up. Never attempt to replace it by yourself. 4 EN-8500 S GENERAL NOTES • Set your resolution to 1024 x 768 @ 60Hz refresh rate for optimum • • • • • • • display quality. The screen surface is very soft. Do not rub, touch or tap the screen surface with sharp object such as pen or pencil. This contact may scratch or damage the screen. These damages are not covered under the warranty. Turn your computer OFF before installing your new monitor. Refer to your computer manual for the proper shut down procedure. This is a Plug & Play monitor. Microsoft Windows will automatically install a Plug & Play driver for it when you first install this monitor. It is not necessary to install the INF driver file included in the floppy diskette if Microsoft Windows successfully installed a Plug & Play driver. Do not install the monitor in a location near heat sources such as radiators or air ducts, or in a place subject to direct sunlight, or excessive dust or mechanical vibration or shock. Save the original shipping carton and packing materials, as they will come in handy if you ever have to ship your monitor. For maximum protection, repackage your monitor as it was originally packed at the factory. To keep the monitor looking new, periodically clean the case & surface of the TFT-LCD panel with a soft fabric lightly dampened with a glass cleaner. Never spay the glass cleaner directly on the monitor. Never use strong solvents such as thinner, benzene, or abrasive cleaners, since these will damage the case & panel. As a safety precaution, always unplug the monitor before cleaning it. 5 EN-8500 BEFORE YOU OPERATE THE MONITOR FEATURES FEATURES • • • • • • • • 18” TFT Color LCD Monitor with TV Tuner Composite & S-Video Inputs PIP (Picture-in-Picture) Crisp, Clear Display for Windows Recommended Resolutions: 1024 X 768 @60Hz ® EPA ENERGY STAR Ergonomic Design Space Saving, Compact Case Design 6 EN-8500 CHECKING THE CONTENTS OF THE EN-8500 PACKAGE The product package should include the following items: 1. 2. 3. 3. 4. 5. 6. EN-8500 LCD Monitor with TV Tuner Quick Start Guide Remote Control with Batteries Power adaptor & Power Cord Driver Disk Containing Windows 95/98/ME/2000/XP INF & ICM Files PC Stereo Cable D-Sub Cable Monitor Quick Start Guide (QSG) Remote Control w/batteries Power Adapter Power Cord Driver Disk PC Stereo Cable D-Sub Cable 7 EN-8500 INSTALLATION INSTRUCTIONS INSTALLATION INSTRUCTIONS POWER CORD Power Source: 1. Make sure the power cord is the correct type that required in your area. 2. This LCD monitor has a universal power supply that allows operation from100 - 240V AC voltage area (No user adjustment is required.) 3. Connect the Power Adapter’s DC cord into your LCD monitor’s power input socket. Then connect the male side of the power cord into a 3-pin AC power outlet. Connect the other end of the power cord to the Power Adapter. The power cord may be connected to either a wall power outlet or the power outlet socket on your PC, depending on the type of power cord supplied with your LCD monitor. A certified power supply cord has to be used with this equipment. The relevant national installation and/or equipment regulations shall be considered. A certified power supply cord not lighter than ordinary polyvinyl chloride flexible cord according to IEC 60227 (designation H05VV-F 3G 0.75mm or H05VVH2-F2 3G 0.75mm ) shall be used. Alternative a flexible cord be of synthetic rubber according to IEC 60245 (designation H05RR-F 3G 0.75mm ) shall be used. 8 EN-8500 INSTALLATION INSTRUCTIONS (cont) BASIC CONNECTIONS NOTE: 1. 2. 3. 4. 5. 6. Connect the Power Adapter DC Cord to the monitor’s 12VDC Input. Connect one end of the D-Sub cable to the monitor’s D-Sub Input. Connect the other end of the D-Sub cable to the computer’s VGA video output port. Connect the antenna or Cable TV to the monitor’s TV input port. Connect the power cord to the AC power outlet. Connect the other end to the monitor’s power adapter. Caution: If the AC outlet is not grounded (with three holes), install the proper grounding adapter (not supplied). 9 EN-8500 INSTALLATION INSTRUCTIONS (cont) Preparing To Install The Optional Wall Mount Arm (not supplied): This monitor can be attached to a wall mounting arm you can purchase separately. Turn the power OFF then dis-connect the cables from the monitor before performing the procedure below. Lay the monitor face down on a soft surface. 1. 2. Press the “FOLD” button on the base of the monitor. Fold the base so it is flush against the back of the monitor. 10 EN-8500 3. INSTALLATION INSTRUCTIONS (cont) Attaching The Optional Wall Mount Arm (not supplied): Follow these steps to finish installing the wall mounting arm: 1. Place the wall mounting arm onto the back of the monitor. Line up the holes of the arm with the holes in the back of the monitor. 2. Insert the 4 screws into the holes and tighten. 3. Insert the cables into the slot on the back of the monitor. NOTE: The Envision EN-8500 is in compliance with the most current revision of the VESA 100mm Flat Panel Monitor Physical Mounting Interface Standard, “FPMPMI Standard”. It is also compatible with the Ergotron line of mounting and arm solutions. Visit their website at www.ergotron.com for more information on the many ways on which you can mount this monitor. 11 EN-8500 Connecting Other Video & Audio Sources: Connecting the Video & Audio Cable: In addition to VGA & TV inputs, this monitor also provides VIDEO & S-Video video inputs as well as L/R RCA & PC stereo audio inputs. 12 EN-8500 ADJUSTING THE VIEWING ANGLE INSTALLATION INSTRUCTIONS • For optimal viewing it is recommended to look at the full face of the • • monitor, then adjust the monitor’s angle to your own preference. Hold the stand so you do not topple the monitor when you change the monitor’s tilt angle. You are able to adjust the monitor’s tilt angle from -5° to 25°. NOTES • Do not touch the LCD screen when you change the angle. It may cause • • damage or break the LCD screen. Careful attention is required not to catch your fingers or hands when you change the angle. The “FOLD” button on the base is for shipping or wall mount use, pls don’t press the button when adjusting the tilt angle. 13 EN-8500 OPERATING INSTRUCTIONS Press the Power Switch to turn the monitor ON or OFF. The other control knobs are located at the front panel of the monitor. By changing these settings, the picture can be adjusted to your personal preferences. • The power cord should be connected. • Connect the video cable from the monitor to the video card. • Press the Power Switch to turn ON the monitor. The power indicator will light up. USER CONTROLS No. Name 1. CH 2. CH 3. VOL 4. VOL 5. AUTO/EXIT 6. REMOTE SENSOR Description TV or PIP Mode: Change channel down. OSD Mode: Move down between OSD functions. TV or PIP Mode: Change channel up. OSD Mode: Move up between OSD functions. All Modes: Adjust volume down. OSD Mode: Decrease value of selected OSD function. All Modes: Adjust volume up. OSD Mode: Increase value of selected OSD function. PC & PIP Modes: Automatically adjust the H/V POSITION, CLOCK & FOCUS to optimal value. OSD Mode: EXIT from OSD menu. Or return to previous menu when an OSD sub-menu is active. Sensor for the remote control. 14 EN-8500 OPERATING INSTRUCTIONS (cont) USER CONTROLS (cont) 7. MENU 8. A-SEL 9. V-SEL 10. Power Indicator 11. Power Switch ALL Modes: Open OSD menu or select the highlighted FUNCTION when OSD menu is already active. PIP Mode: Audio source select (PIP audio or PC audio) ALL Modes: Video source select Green: Power ON AMBER: OFF Mode All Modes: Switch monitor ON/OFF. 15 EN-8500 OPERATING INSTRUCTIONS (cont) REMOTE CONTROL 16 EN-8500 • Press the Menu key to call up the OSD. The OSD shown below is from PC Mode. The detailed adjustment instructions for each mode is described below. Input Type Main X 1024 Menu 768 (1) 60Hz PC Input Source BRIGHTNESS CONTRAST/BRIGHTNESS CONTRAST Function Icons FOLUS CLOCK TRAPEZOID/PARALLELOGRAM H-POSITION PINCUSHION/PIN BALANCE EXIT TILT Function Name SELECT: Key Tip • Use the CH 17 Setting bar EN-8500 SELECT THE DIFFERENT INPUT SOURCE There are seven display modes that you can choose by V-SEL key. PC Mode : Display the video signal from the PC. PC+TV Mode (PIP mode): Display the TV signal in PIP and the background is PC video signal. PC+S-VIDEO Mode (PIP mode): Display the S-VIDEO signal in PIP and the background is PC video signal. PC+VIDEO Mode (PIP mode): Display the VIDEO signal in PIP and the background is PC video signal. TV Mode : Display the signal from the TV to full screen. S-VIDEO Mode : Display the signal from the S-VIDEO to full screen. VIDEO Mode : Display the signal from the VIDEO to full screen. 18 EN-8500 SCREEN CONTROLS PC SCREEN ADJUST Menus – Available in PC & PIP mode. Icon Menus and Sub-menus Function Descriptions BRIGHTNESS Adjust the picture brightness. CONTRAST FOCUS Adjust the picture contrast. TRACK Fine tune the horizontal noise CLOCK Adjust the vetical noise H.POSITION V.POSITION Adjust the horizontal position of the picture. Adjust the horizontal noise Adjust the vertical position of the picture. Adjust the color from redish white to bluish white. COLOR 7-1. (7800°K) Bluish white color. 7-2. (6500°K) Redish white.color 7-3. RED Adjusts Red intensity. 7-4. GREEN Adjusts Green intensity. 7-5. BLUE Adjusts Blue intensity. 7-6. Return EXIT Replace all the item in OSD menu with the Factory default value. And re-do auto-configuration. EXIT RECALL RETURN 19 EN-8500 OSD ADJUST menu – Available in ALL modes Icon Menus and Sub-menus Function Descriptions H.POSITION Adjust the OSD H.POSITION V.POSITION Adjust the OSD V.POSITION OFF TIME RECALL Setting the duaration time of OSD menu. Replace the OSD H./V.POSITION ,OFF TIME with the factory default value. EXIT RETURN VIDEO ADJUST menu – Available in TV, Video & S-Video modes Icon Menus and Sub-menus Function Descriptions BRIGHTNESS Adjust the VIDEO brightness. CONTRAST Adjust the VIDEO contrast. TINT COLOR Adjust VIDEO color from green to purple SHARPNESS Adjust the richness of color Adjust VIDEO sharpness. RECALL Replace all the item in VIDEO adjust menu with the Factory default value. Activating this in TV Mode will also set the V-Chip pin number to the default value of “0000”. RETURN EXIT 20 EN-8500 TV SETUP menu – Available in TV mode Icon Menus and Sub-menus Function Descriptions CHANNEL ADD/DEL To add/delete the selected TV Channel . CHANNEL SCAN TV Channel Auto Search . Select a TV system , cable / antenna Cable : STD IRC(For USA) HRC(For USA) Antenna : air Select STEREO/SAP/MONO MTS: Multi.channel TV sound SAP: Second audio program Setting the rating limitation of TV or movie Initial pin setting is “0000”. If you block a level,then all the higher evel will also be blocked. (ref. to appendix) Enable or disable closed caption feature FREQUENCY TYPE MTS SETUP V-CHIP SETUP and set the appearance of closed caption text. .on/off C.C SETUP .caption/text .channel 1/2 .field 1/2 .box/shadow RETURN EXIT PIP ADJUST menu – Available in PIP mode Icon Menus and Sub-menus Function Descriptions H.POSITION Adjust the PIP H.POSITION V.POSITION Adjust the PIP V.POSITION PIP SIZE BORDER COLOR AUDIO SELECT Adjust PIP Size SMALL/STANDARD/LARGE Adjust the PIP Border COLOR PIP Audio Source Select – PC, TV, S-VIDEO or VIDEO EXIT RETURN 21 EN-8500 PLUG AND PLAY Plug & Play DDC1/2B Feature This monitor is equipped with VESA DDC1/2B(Display Data Channel) capabilities according to the VESA DDC STANDARD. It allows the monitor to inform the host system of its identity and, depending on the level of DDC used, communicate additional information about its display capabilities. The communication channel is defined in two levels, DDC1 and DDC2B. The DDC1 is a unidirectional data channel from the display to the host that continuously transmits EDID(Extended Display Identification Data) information. The DDC2B is a bidirectional data channel based on the I²C protocol. The host can request EDID information over the DDC2B channel. THIS MONITOR WILL APPEAR TO BE NON-FUNCTIONAL IF THERE IS NO VIDEO INPUT SIGNAL. IN ORDER FOR THIS MONITOR TO OPERATE PROPERLY, THERE MUST BE A VIDEO INPUT SIGNAL. This monitor meets the Green monitor standards as set by the Video Electronics Standards Association (VESA) and/or the United States Environmental Protection Agency (EPA) and The Swedish Confederation Employees (NUTEK). This feature is designed to conserve electrical energy by reducing power consumption when there is no video-input signal present. When there is no video input signal this monitor, following a time-out period, will automatically switch to an OFF mode. This reduces the monitor's internal power supply consumption. After the video input signal is restored, full power is restored and the display is automatically redrawn. The appearance is similar to a "Screen Saver" feature except the display is completely off. The display is restored by pressing a key on the keyboard, or clicking the mouse. USING THE RIGHT POWER CORD : The accessory power cord for the Northern American region is the wallet plug with NEMA 5-15 style and is UL listed and CSA labeled. The voltage rating for the power cord shall be 125 volts AC. Supplied with units intended for connection to power outlet of personal computer: Please use a cord set consisting of a minimum No. 18 AWG, type SJT or SVT three conductors flexible cord. One end terminates with a grounding type attachment plug, rated 10A, 250V, CEE-22 male configuration. The other end terminates with a molded-on type connector body, rated 10A, 250V, having standard CEE-22 female configuration. Please note that power supply cord needs to use VDE 0602, 0625, 0821 approval power cord in European counties. 22 EN-8500 TECHNICAL SUPPORT (FAQ) Problem & Question Power LED is not on No Plug & Play Picture is fuzzy Picture bounces or a wave pattern is present in the picture The power LED is ON (orange) but there’s no video or no picture. Missing one of the primary colors (RED, GREEN, or BLUE) Possible Solution *Check if the Power Switch is in the ON position *Power Cord should be connected *Check if the PC system is Plug & Play compatible *Check if the Video Card is Plug & Play compatible *Check if the D_sub 15 plug pin of Video Cable is bent *Make sure the LCD Monitor Drivers are installed (The Monitor Drivers are available at: www.envisionmonitor.com) *Adjust the Contrast and Brightness Controls. *Move electrical devices that may cause electrical interference. *Computer Power Switch should be in the ON position. *Computer Video Card should be snugly seated in its slot *Make sure monitor’s video cable is properly connected to the computer. *Inspect monitor’s video cable and make sure none of the pins are bent. *Make sure computer is operational by hitting the CAPS LOCK key on the keyboard while observing the CAPS LOCK LED. The LED should either turn ON or OFF after hitting the CAPS LOCK key. *Inspect the monitor’s video cable and make sure that none of the pins are bent. 23 EN-8500 Screen image is not centered or sized *Adjust pixel frequency (CLOCK) and FOCUS or press hot-key (AUTO) properly. Picture has color defects *Adjust RGB color or select color (white does not look white) temperature Poor brightness or contrast *The life time of the back-light is limited.In 30000 Hours the luminance of the light has been reduced to half of its original value. Please send the monitor to an authorized service Agent for service. Horizontal or vertical disturbancies on *Use win 95/98/2000 shut-down mode the screen Adjust CLOCK and FOCUS or perform Auto config. (AUTO-key). Screen is wavy or jittery and pressing *Adjust TRACK. Press the MENU key the AUTO button cannot correct it. twice, then press CH-down to select TRACK. Press VOL-down or VOLup to adjust it until the screen is clear. CLOCK (pixel frequency) controls the number of pixels scanned by one horizontal sweep. If the frequency is not correct, the screen shows vertical stripes and the picture has not correct width. FOCUS adjust the phase of the pixel clock signal. With a wrong phase adjustment the picture has horizontal disturbances in light picture. For FOCUS and CLOCK adjustment use “dot-pattern” or win 95/98/2000 shut-down mode pattern . 24 EN-8500 ERROR MESSAGE & POSSIBLE SOLUTION CABLE NOT CONNECTED : 1. 2. Check that the signal-cable is properly connected , If the connector is loose, tighten the connector’s screws. Check the signal-cable’s connection pins for damage. INPUT NOT SUPPORT : Your computer has been set to unsuitable display mode ,Set the computer to display mode given in the following table. VIDEO/TV NO SIGNAL : You set the monitor to the VIDEO /TV mode but there is no video/TV signal input. Check to make sure that the video/TV signal cable is properly connected and make sure the video player is working. If the monitor is stuck in “Power Saving” mode: 1. 2. 3. 4. Make sure monitor’s signal-cable is properly connected to the computer. The computer has switched the monitor into power save mode. Press any key on the computer keyboard to wake up the monitor. Check that the computer is switched on. Check the computer resolution, rate may be too high and out of the LCDMONITOR’s display mode range. RESOLUTION : RESOLUTION VERTICAL FREQUENCY RESOLUTION VERTICAL FREQUENCY 640 × 480 60Hz 800 × 600 60.3Hz 640 × 350 70Hz 800 × 600 72.2Hz 720 × 400 70Hz 800 × 600 75Hz 640 × 480 72.8Hz 832 × 624 74.5Hz 640 × 480 75Hz 1024 × 768 60Hz 640 × 480 66.67Hz 1024 × 768 70Hz 800 × 600 56.3Hz 1024 × 768 75Hz 1024 × 768 74.92Hz 25 EN-8500 HOW TO INSTALL INF & ICM FILE FOR FIRST TIME INSTALLATION : This is a Plug & Play LCD monitor. Turn off the PC then connect the cables. Power on the PC and it will automatically detect your new monitor. The Windows Operating system will automatically install a plug & play driver for it. If you would still like to install the driver included in the diskette that came with the monitor, log-on to our website at www.envisionmonitor.com/support/faq.asp. Then look for “Installing the Driver” section. 26 EN-8500 APPENDIX SPECIFICATIONS LCD Panel Driving system Size Pixel pitch Viewable angle Response time Contrast ratio TFT Color LCD (18”) 0.3585mm( H )x 0.3585mm( V ) -80~80° (H) –60~70° (V) 35 ms(tr+tf) 350(typ.) Brightness Video Separate Sync. H-Frequency V-Frequency 340(typ.) R,G,B Analog Interface Input H/V TTL 30kHz – 63kHz 55-75Hz Display Colors 16.7 million Colors Dot Clock 80MHz Max. Resolution 1024 x 768 TM Plug & Play VESA DDC1/2B <55W( For 4 CCFL) EPA ENERGY STAR® ON Mode OFF Mode <3W Input Connector D_sub 15pin Input Video Signal Analog:0.7Vp-p(standard), 75 OHM, Positive Maximum Screen Size Horizontal : 367.2mm Vertical : 275.4mm (18-inch diagonal) Power Source 100~240VAC,50~60Hz Environmental Operating Temp: 0° to 40°C Storage Temp.: -20° to 60°C Considerations Operating Humidity : 10% to 90% Power DC2.2V~DC3.2V Remote Controller Battery CD2025 Distance 6M(Typ.) Angle +/-25 ° NTSC Color system M/N Sound system TV,Video Video format 27 CVBS,S-VHS EN-8500 • Standby Power button • Input Video Source selected Switch • • • • • Power Management Power Consumption Regulatory Compliance button Input Audio Source selected button Menu button Auto Adjust/exit button Volume up / down button up/down button VESA DPMS 55 Watts UL, CSA, FCC, TÜV/GS, CE ( Maximum ) Monitor Dimension 28 EN-8500 FACTORY PRESET TIMING TABLE STANDARD VGA SVGA XGA HORIZONTAL FREQUENCY RESOLUTION VERTICAL FREQUENCY 720 × 400 31.47kHz 70Hz 640 × 480 31.47kHz 60Hz 640 × 480 35.00kHz 66.6Hz 640 × 480 37.50kHz 75Hz 800 × 600 37.879kHz 60Hz 800 × 600 46.875kHz 75Hz 832 × 624 49.725kHz 75Hz 1024 × 768 48.363kHz 60Hz 1024 × 768 56.476kHz 70Hz 1024 × 768 60.02kHz 75Hz 1024 × 768 60.241kHz 74.9Hz CONNECTOR PIN ASSIGNMENT 1 5 6 10 11 15 15 - Pin Color Display Signal Cable PIN NO. 1. 2. 3. 4. 5. 6. 7. 8. DESCRIPTION PI N NO. DESCRIPTION 9. 10. 11. 12. 13. 14. 15. +5V Detect Cable Ground DDC-Serial Data H-Sync V-Sync DDC-Serial Clock Red Green Blue Ground Ground R-Ground G-Ground B-Ground 29 EN-8500 V-Chip(USA only) This Telecommunications Act of 1996 in USA requires that every television made, starting in 1998, must be equipped with the technological device named V-Chip. The V-Chip can block certain rated television shows off television (if chosen) so children cannot watch programs that their parents do not approve. With this device, program-rating information will be transmitted along with the television signal, and be decoded by the chip in each television. The chip will then compare the rating codes to values preset by the viewer, which is meant to be the parents. If the rating codes are higher than the preset values, the television signal will be blocked, and a blank screen will be displayed. EN-8500 have this feature and you can adjust the V-Chip setting via OSD. Use arrow keys on the remote controller or control buttons on the front cabinet of the monitor to change the setting. 1. Select V-Chip on OSD, Then enter the 4-digit pin number. - Initial pin number is “0000”. You can change this later. See section 5 below. - If you enter an incorrect pin number “Incorrect” message will be displayed and you have to re-enter the correct pin number. 2. Use arrow keys to change or to activate the highlighted function. 3. Setting up TV Guidelines – Select TV GUIDELINES from V-Chip Setup menu. - Use Up/Down/Left/Right arrow buttons to move around the matrix and press Menu button to change the value from “U” to “B” or ”B” to ”U” - U : Unblock B : Block All FV B TV-Y B B TV-Y7 U TV-G U TV-PG U TV-14 U TV-MA TV-Y : Young Children TV-Y7 : Children 7 and over TV-G : General Audience TV-PG : Parent Guidance TV-14 :Viewers 14 and over TV-MA :Mature audience V U U U 30 S L U U U U U U FV : fantasy Violence V : Violence S : Sexual Situation L : Coarse language D: Suggestive Dialog D U EN-8500 4. Setting up MPAA rating Mode – Select MOVIE GUIDELINES from the V-Chip menu. - Use Up/Down/Left/Right arrow buttons to move around the matrix and press Menu button to change the value from “U” to ‘B” or “B” to “U” - MPAA : Motion Picture Association of America [movie rating organization] G PG PG-13 R NC-17 X NR U U U U U U U General Guidance Parental Guidance Suggested Parents Strongly Cautioned Restricted Under 17 Requires No Children Under 17 Admitted Adult Not Rated 5. Entering a new pin number - Select CHANGE PIN NUMBER from the V-Chip menu. - Use numeric keys enter a new pin number. Pin number confirm menu appears. - Again, use numeric keys to enter the pin number you entered at the previous step. If the two pin numbers do not match, “ Incorrect “ message will be displayed. - If you forget your pin number, you can reset it to the default “0000” by following the procedure below. Press Menu (VIDEO ADJUST will be selected by default). Press Menu. Then press CH-down to highlight RECALL. Press Menu to execute RECALL. 6. Blocking Screen - If the incoming signal’s rating is higher than the one specified, the screen will be blanked and the excessive rating message will be appeared. NOTE: When the screen is blocked by V-Chip, and if you want to change VChip setting, press Exit button on the remote control or auto/exit key on the front cabinet of the monitor to bring up OSD Menu. 31