1
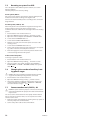
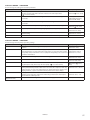
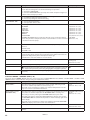
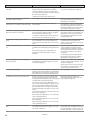
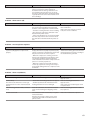
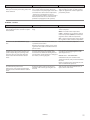
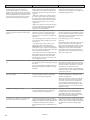
Problem – Operating pressure switch open alternatively high hot gas temperature
(indicated by med in the display’s lower left corner)
Cause
Troubleshooting
Remedy
1. The operating pressure switch does not
close again.
1. Switch off the main switch for the heat
pump, wait until the compressor has been
stationary for at least 15 minutes.
If the pressure switch is closed, bridge the
pressure switch cables temporarily and
switch on the current to the heat pump
again. If there is an indication in the display
this means that the pressure switch is faultfree and the problem is in the wiring or in
the circuit board.
2. Disconnect the two cables on the pressure switch, using a buzzer check if the
pressure switch is closed.
If the pressure switch is open, try carefully
tapping the head of the pressure switch
with a screwdriver and use a buzzer test to
see if it has closed again.
Replace the pressure switch if it appears to
jam repeatedly.
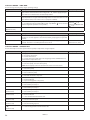
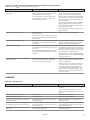
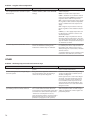
2. Sensor fault, shows >120°C
Check what the sensor shows, is it a plausible/actual value?
If the sensor is defective, replace it.
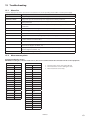
Measure the resistance of the sensor, check
against the ohm table in the Measurement
points section.
3. Hot gas temperature too high.
Check the set value on DELIVERY PIPE in the
heat pump’s control computer (factory setting 120°C)
The square symbol appears when the delivery pipe temperature is as high or greater
than the set value for DELIVERY PIPE.
4. Overheating too high.
Using manometer apparatus and thermometer check what the overheating reading of
the unit is.
If the overheating reading does not correspond with the instructions for the specific
refrigerant, adjust the expansion valve until
the correct value is obtained. See separate
instructions for cooling techniques.
Also check that bulb and capillary tube are
undamaged and that the bulb is correctly
installed.
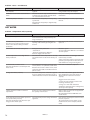
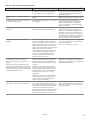
5. Lack of refrigerant, not enough refrigerant in the system.
Using manometer apparatus and thermometer, check that the unit’s overheating is
correct for the specific refrigerant.
If overheating cannot be adjusted with the
expansion valve or if the capillary tube/bulb
is damaged, replace it.
Follow the correct procedure (depending
on type of refrigerant) to add the correct
amount of refrigerant.
If there appears to be a leak in the refrigerant circuit, carry out leak tracing and any
necessary corrective action. If leak tracer
is not available, brush soap water on the
suspected leak and look for bubbles. Also
check for oil as this can come out from the
refrigerant circuit.
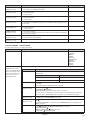
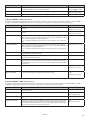
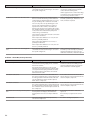
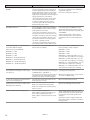
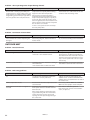
LEAKAGE
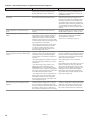
Problem – Leak fluid side
Cause
Troubleshooting
Remedy
1. Insufficiently tightened connections.
Locate the leak.
• Tighten the connection and check that it
is sealed
• If it is still not sealed, replace the entire
connection and support sleeve (only at soft
pipes)
2. Cracked nut or connection.
Locate the leak.
Replace nut or connection.
3. Defective gasket or O-ring.
Locate the leak.
Replace the gasket or O-ring.
4. There is no overflow pipe connected to
the safety valve(s).
Establish which safety valve does not have
an overflow pipe.
Install an overflow pipe according to the
applicable norms.
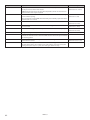
5. Filler valve between incoming cold water
and heating system not closed or leaking.
Check whether water continuously leaks
from the safety valve on the expansion vessel on the hot side.
Try closing the filler valve and see if water
stops dripping from the safety valve, if not,
replace the filler valve.
6. No condensation drain to heat pump’s
drip tray.
Check that condensation drain is installed
and correctly connected.
Install the condensation drain that runs out
into the floor drain.
VMBMA602
71