1
Installation and Operating Guide | Warranty
Model Number LMG340 High-Performance, Mini Component CD System
Compact Disc Player System with Speakers
© Copyright 2003, Zenith Electronics Corporation.
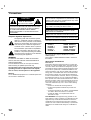
Precautions
CAUTION
RISK OF ELECTRIC
SHOCK DO NOT OPEN
CAUTION:TO REDUCE THE RISK OF ELECTRIC
SHOCK DO NOT REMOVE COVER (OR BACK)
NO USER SERVICEABLE PARTS INSIDE.
REFER SERVICING TO QUALIFIED SERVICE
PERSONNEL.
Graphical Symbols Explanation:
The lightning flash with arrowhead symbol,
within an equilateral triangle is intended to
alert the user to the presence of uninsulated
dangerous voltage within the product’s enclosure that may be of sufficient magnitude to
constitute a risk of electric shock to persons.
The exclamation point within an equilateral
triangle is intended to alert the user to the
presence of important operating and maintenance(servicing) instructions in the literature
accompanying the appliance.
WARNING
TO REDUCE THE RISK OF FIRE OF ELECTRIC
SHOCK, DO NOT EXPOSE THIS APPLIANCE TO
RAIN OR MOISTURE.
To avoid electrical shock, do not open the cabinet,
Refer servicing to qualified personnel only.
The apparatus shall not be exposed to dripping or
splashing and that no objects filled with liquids,
such as vases, shall be placed on the apparatus.
Warning:
Do not install this equipment in a confined space such
a book case or similar unit.
CAUTION
Use of controls or adjustments or performance of procedures other than those specified herein may result
in hazardous radiation exposure.
Laser component in this product is capable of emitting radiation exceeding the limit for Class 1.
CAUTION:INVISIBLE LASER RADIATION WHEN
OPEN AND INTERLOCKS DEFEATED. AVOID
EXPOSURE TO THE BEAM.
VARNING:OSYNLIG LASERSTRÅLNING NÄR
DENNA DEL ÄR ÖPPNAD STRÅLEN ÄR FARLIG.
Attention:Quand l'appareil est ouvert, ne pas
s'exposer aux radiations invisibles du faisceau laser.
This label is located on the interior.
CLASS 1
KLASSE 1
LUOKAN 1
KLASS 1
CLASSE 1
LASER PRODUCT
LASER PRODUKT
LASER LAITE
LASER APPARAT
PRODUIT LASER
This Compact Disc player is classified as a CLASS 1
LASER product.
The CLASS 1 LASER PRODUCT label is located on
the exterior.
REGULATORY INFORMATION:
FCC Part 15
This product has been tested and found to comply with
the limits for a Class B digital device, pursuant to Part 15
of the FCC Rules. These limits are designed to provide
reasonable protection against harmful interference when
the product is operated in a residential installation. This
product generates, uses and can radiate radio frequency
energy and, if not installed and used in accordance with
the instruction manual, may cause harmful interference
to radio communications. However, there is no guarantee
that interference will not occur in a particular installation.
If this product does cause harmful interference to radio or
television reception, which can be determined by turning
the product off and on, the user is encouraged to try to
correct the interference by one or more of the following
measures:
• Reorient or relocate the receiving antenna.
• Increase the separation between the product and
receiver.
• Connect the product into an outlet on a circuit different
from that to which the receiver is connected.
• Consult the dealer or an experienced radio/TV
technician for help.
FCC WARNING: This equipment may generate or use
radio frequency energy. Changes or modifications to this
equipment may cause harmful interference unless the
modifications are expressly approved in the instruction
manual. The user could lose the authority to operate this
equipment if an unauthorized change or modification is
made.
2
CAUTION: PLEASE READ AND OBSERVE ALL WARNINGS AND INSTRUCTIONS IN THIS OWNER’S MANUAL AND THOSE MARKED ON THE UNIT. RETAIN THIS BOOKLET FOR FUTURE REFERENCE.
This set has been designed and manufactured to assure personal safety. Improper use can result in electric shock
or fire hazard. The safeguards incorporated in this unit will protect you if you observe the following procedures for
installation, use, and servicing.
This unit does not contain any parts that can be repaired by the user.
DO NOT REMOVE THE CABINET COVER, OR YOU MAY BE EXPOSED TO DANGEROUS VOLTAGE. REFER
SERVICING TO QUALIFIED SERVICE PERSONNEL ONLY.
1.
Read these instructions. - All these safety and
operating instructions should be read before the
product is operated.
2.
Keep these instructions. - The safety, operating
and use instructions should be retained for future
reference.
3.
Heed all warnings. - All warnings on the product
and in the operating instructions should be adhered
to.
4.
Follow all instructions. - All operating and use
instructions should be followed.
5.
Do not use this apparatus near water. – For
example: near a bath tub, wash bowl, kitchen sink,
laundry tub, in a wet basement; or near a swimming
pool; and like.
6.
Clean only with dry cloth. – Unplug this product
from the wall outlet before cleaning. Do not use
liquid cleaners.
7.
Do not block any ventilation openings. Install in
accordance with the manufacturer’s instructions. Slots and openings in the cabinet are provided for
ventilation and to ensure reliable operation of the
product and to protect it from over- heating.
The openings should never be blocked by placing
the product on a bed, sofa, rug or other similar
surface. This product should not be placed in a
built-in installation such as a bookcase or rack
unless proper ventilation is provided or the
manufacturer’s instructions have been adhered to.
8.
Do not install near any heat sources such as
radiators, heat registers, stoves, or other
apparatus (including amplifiers) that produce
heat.
9.
Do not defeat the safety purpose of the polarized
or grounding-type plug. A polarized plug has two
blades with one wider than the other. A grounding type plug has two blades and a third grounding prong. The wide blade or the third prong are
provided for your safety. If the provided plug
does not fit into your outlet, consult an electrician for replacement of the obsolete outlet.
10. Protect the power cord from being walked on or
pinched particularly at plugs, convenience
receptacles, and the point where they exit from
the apparatus.
11. Only use attachments/accessories specified by
the manufacturer.
12. Use only with the cart, stand, tripod, bracket, or
table specified by the manufacturer, or sold with
apparatus. When a cart is used, use caution
when moving the cart/apparatus combination to
avoid injury from tip-over.
13. Unplug this apparatus during lightning storms
or when unused for long periods of time.
14. Refer all servicing to qualified service personnel.
Servicing is required when the apparatus has
been damaged in any way, such as powersupply cord or plug is damaged, liquid has
been spilled or objects have fallen into the
apparatus, the apparatus has been exposed to
rain or moisture, does not operate normally, or
has been dropped.
3
INTRODUCTION
IMPORTANT SAFETY INSTRUCTIONS
Table of Contents
INTRODUCTION
OPERATION
Precautions . . . . . . . . . . . . . . . . . . . . . . . . . . . . . . . 2
Presetting the Radio Stations (Channel Search) . 12
IMPORTANT SAFETY INSTRUCTIONS . . . . . . . . . . 3
Listening to the Radio. . . . . . . . . . . . . . . . . . . . . . 13
Table of Contents . . . . . . . . . . . . . . . . . . . . . . . . . . 4
Tape Playback . . . . . . . . . . . . . . . . . . . . . . . . . . . . 14
Basic Playback . . . . . . . . . . . . . . . . . . . . . . . . . 14
To Stop Play . . . . . . . . . . . . . . . . . . . . . . . . . . . 14
Tape Counter Reset . . . . . . . . . . . . . . . . . . . . . . 14
To Play Fast Rewind or Fast Forward. . . . . . . . . 14
Dubbing . . . . . . . . . . . . . . . . . . . . . . . . . . . . . . . 14
Before Use. . . . . . . . . . . . . .
Safety Precautions. . . . . .
Notes on Discs . . . . . . . .
Notes on Remote Control.
Notes on Tapes . . . . . . . .
.
.
.
.
.
.
.
.
.
.
.
.
.
.
.
.
.
.
.
.
.
.
.
.
.
.
.
.
.
.
.
.
.
.
.
...........5
...........5
...........5
...........5
...........5
Front Panel/ Rear Panel . . . . . . . . . . . . . . . . . . . . . 6
Remote Control . . . . . . . . . . . . . . . . . . . . . . . . . . . . 7
Display Window. . . . . . . . . . . . . . . . . . . . . . . . . . . . 7
Connections . . . . . . . . . . . . . . . . . . . . . . . . . . . . . . 8
Speaker System Connection . . . . . . . . . . . . . . . . 8
Antenna (Aerial) Connections. . . . . . . . . . . . . . . . 8
BEFORE OPERATION
Setting the CLOCK . . . . . . . . . . . . . . . . . . . . . . . . . 9
Sleep Function . . . . . . . . . . . . . . . . . . . . . . . . . . . . 9
Using Microphone . . . . . . . . . . . . . . . . . . . . . . . . . . 9
Timer Function . . . . . . . . . . . . . . . . . . . . . . . . . . . 10
Audio Adjustment . . . . . . . . . . . . . . . . . . . . . . . . . 11
Volume Adjustment. . . . . . . . . . . . . . . . . . . . . . . 11
Sound Quality Adjustment . . . . . . . . . . . . . . . . . 11
MUTE . . . . . . . . . . . . . . . . . . . . . . . . . . . . . . . . 11
SURROUND . . . . . . . . . . . . . . . . . . . . . . . . . . . 11
DISPLAY MODE . . . . . . . . . . . . . . . . . . . . . . . . . 11
XDSS (Extreme Dynamic Sound System). . . . . . 11
DEMO . . . . . . . . . . . . . . . . . . . . . . . . . . . . . . . . 11
DIMMER . . . . . . . . . . . . . . . . . . . . . . . . . . . . . . 11
Auxiliary (External Equipment) Input . . . . . . . . . . 11
Recording Setup . . . . . . . . . . . . . . . . . . . . . . . . . . 15
Basic Recording Setups . . . . . . . . . . . . . . . . . . . 15
Recording from Radio, CD or Auxiliary source . . 15
CD to Tape Synchronized Recording . . . . . . . . . 15
CD Playback . . . . . . . . . . . . . . . . . . . . . . . . . . . . . 16
Basic Playback Setup . . . . . . . . . . . . . . . . . . . . 16
To Pause Play . . . . . . . . . . . . . . . . . . . . . . . . . . 16
To Stop Play . . . . . . . . . . . . . . . . . . . . . . . . . . . 16
To Skip a Track . . . . . . . . . . . . . . . . . . . . . . . . . 16
To Fast Rewind or Fast Forward . . . . . . . . . . . . 16
To Go to the Next Disc . . . . . . . . . . . . . . . . . . . . 16
To Select a Disc Directly . . . . . . . . . . . . . . . . . . 16
To Exchange Discs During Playback . . . . . . . . . 17
To Repeat Play . . . . . . . . . . . . . . . . . . . . . . . . . 17
Program Play Setup . . . . . . . . . . . . . . . . . . . . . . 18
Reference
Troubleshooting . . . . . . . . . . . . . . . . . . . . . . . . . . 19
Specifications . . . . . . . . . . . . . . . . . . . . . . . . . . . . 20
Notes. . . . . . . . . . . . . . . . . . . . . . . . . . . . . . . . . 21-23
Warranty . . . . . . . . . . . . . . . . . . . . . . . . . Back Cover
About the symbols for instructions
Indicates hazards likely to cause harm to the unit
itself or other material damage.
Indicates special operating features of this unit.
Indicates tips and hints for making a task easier.
4
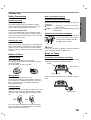
Safety Precautions
Notes on Remote Control
Handling the unit
Remote control operating range
When shipping the unit
Point the remote control at the remote sensor and press
the buttons.
" Distance:
About 23 ft (7 m) from the front of the
remote sensor.
" Angle:
About 30° in each direction of the front of the
remote sensor.
The original shipping carton and packing materials
come in handy. For maximum protection, re-pack the
unit as it was originally packed at the factory.
To keep the surface clean
Do not use volatile liquids, such as insecticide spray,
near the unit. Do not leave rubber or plastic products in
contact with the unit for a long period of time. They will
leave marks on the surface.
Remote control battery installation
Detach the battery cover on the rear
of the remote control, and insert two
R03 (size AAA) batteries with
and
aligned correctly.
Cleaning the unit
To clean the cabinet
Use a soft, dry cloth. If the surfaces are extremely dirty,
use a soft cloth lightly moistened with a mild detergent
solution. Do not use strong solvents, such as alcohol,
benzine, or thinner, as these might damage the surface
of the unit.
Caution
Do not mix old and new batteries. Never mix different
types of batteries (standard, alkaline, etc.).
Notes on Discs
Notes on Tapes
Handling discs
Preventing overwriting a recording
Do not touch the playback side of the disc.
Hold the disc by the edges so that fingerprints will not
get on the surface.
Do not stick paper or tape on the disc.
Removing the safety tab(s) of the cassette (with a small
screwdriver) will prevent accidental erasure.
Side A
Tab for side A
Tab for side B
Storing discs
After playing, store the disc in its case.
Do not expose the disc to direct sunlight or sources of
heat, or leave it in a parked car exposed to direct sunlight, as there may be a considerable temperature
increase inside the car.
To record again, cover the hole of the tab with adhesive
tape.
Cleaning discs
Fingerprints and dust on the disc can cause poor sound
quality and sound distortion. Before playing, clean the
disc with a clean cloth. Wipe the disc from the center
out.
YES
Adhesive tape.
NO
Do not use strong solvents such as alcohol, benzine,
thinner, commercially available cleaners, or anti-static
spray intended for analog records.
5
INTRODUCTION
Before Use
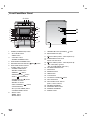
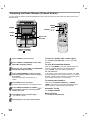
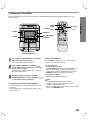
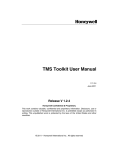
Front Panel/Rear Panel
23 22 21
AM
20
18 19
17
16
1
2
3
4
5
6
7
8
9
10
11
12
24
FM
L
25
R
15
L
14
13
R
+
+
26
27
1.
2.
POWER (STANDBY/ON) button
• PLAY MODE button
• DEMO button
• CD SYNC. button
• NORMAL DUBBING button
HIGH SPEED DUBBING button
3.
4.
5.
6.
RECORD/ RECORD PAUSE (
FUNCTION SELECT buttons
(TUNER, TAPE, CD, AUX)
• TUNING DOWN button
• PRESET DOWN button
7.
• REWIND (
) button
• REVERSE PLAY (
• STOP (
) button
)/CLEAR button
• FORWARD PLAY ( ) button
• TUNING UP button
• PRESET UP button
•
•
•
•
•
•
•
8.
6
FAST FORWARD (
) button
CD PAUSE button
SET (CLOCK/ TIMER) button
COUNTER RESET button
PROG. button
MEMO. button
ENTER button
9. HEADPHONE JACK (PHONES):
10. EQUALIZER knob (EQ)
6.3mm
11.
PUSH OPEN position - TAPE A (DECK A)
12. SURROUND ADJUST knob
13. MULTI JOG SHUTTLE
REC
) button
14.
PUSH OPEN position - TAPE B (DECK B)
15. • MIC JACK (MIC): 6.3mm
• MIC VOLUME KNOB (MIC VOL.)
16. VOLUME DOWN/UP knob
17. XDSS button
18. MODE/RIF button
19. TIMER button
20. CLOCK button
21. CD OPEN/ CLOSE(CD ) button
22. DISC SKIP button
23. DISC DIRECT PLAY buttons
(DISC1, DISC2, DISC3)
24. ANTENNA TERMINAL
25. AUXILIARY INPUT JACK
26. SPEAKER TERMINAL
27. POWER CORD
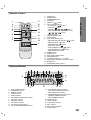
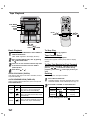
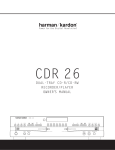
Remote Control
1.
2.
3.
4.
5.
6.
2
3
4
5
16
15
14
X
AUTO
13
6
12
11
10
7
8
TAPE-A
7.
8.
9.
9
TAPE-B
INTRODUCTION
17
1
XDSS button
POWER button
TUNER/BAND button
AUX button
PRESET (
) button
CD FUNCTION buttons
• PLAY/ PAUSE (
) button
• CD STOP( ) button
• CD SKIP (
) button
/
• FAST REWIND/ FAST FORWARD PLAY
(
) button
/
• REPEAT button
DISPLAY MODE button
CLOCK button
TAPE FUNCTION buttons
• RECORD/ RECORD PAUSE (
) button
• REVERSE PLAY ( ) button
• FORWARD PLAY ( ) button
• TAPE STOP button ( )
• FAST FORWARD PLAY (
) button
• FAST REWIND PLAY (
) button
• TAPE-A/B SELECT button
DIMMER button
SLEEP button
DISC SKIP (D.SKIP) button
PROGRAM button
VOLUME CONTROL (
) button
EQUALIZER PATTERN (EQ PATT.) button
MUTE button
SURROUND (SURR.) button
AUTO
10.
11.
12.
13.
14.
15.
16.
17.
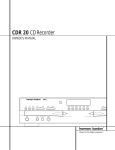
Display Window
12 3
4
5
6
19
7 8
9
AUTO
10
11
12
18 17 16
1.
2.
3.
4.
5.
6.
7.
8.
9.
10.
11.
PLAY/ PAUSE indicator
PROGRAM indicator
REPEAT indicator
SLEEP indicator
TIMER indicator
FM STEREO RECEIVING indicator
CD SYNC. indicator
MEMORY indicator
CD TRACK indicator
CD TRACK OVER indicator
AUTO TUNE RECEIVING indicator
15
14 13
12. • PLAY MODE SELECT indicator
• TAPE PLAY DIRECTION indicator
• TAPE A/B SELECT indicator
13. • RECORD/RECORD PAUSE indicator
• NORMAL DUBBING indicator
• HIGH DUBBING indicator
14. MUTE indicator
15. LEVEL indicator
16. SURROUND indicator
17. MIC indicator
18. DISC Number indicator
19. XDSS indicator
7
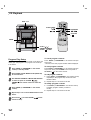
Connections
Speaker System Connection
Connect the speakers using the supplied speaker cords by matching the colors of the terminals and those of the
cords. To obtain the best possible surround sound, adjust the speaker parameters (distance, level, etc.).
FM
L
R
red
L
R
Right speaker
+
+
black
Left speaker
red
otes
• Be sure to match the speaker cord to the appropriate terminal on the components: + to + and – to –. If the cords
are reversed, the sound will be distorted and will lack base.
• If you use front speakers with a low maximum input rating, adjust the volume carefully to avoid excessive sound
output to the speakers.
• Do not disassemble the front cover of supplied speaker.
Antenna (Aerial) Connections
Connect the supplied FM/AM antennas for listening to the radio.
• Connect the AM loop antenna to the AM antenna connector.
• Connect the FM wire antenna (or FM “T” antenna) to the FM 300Ω connector.
FM external
antenna(aerial)
(not supplied)
300
cable
FM indoor
antenna(aerial)
Position
it for the
best
reception
AM loop antenna (aerial)
(Supplied)
AM
FM
otes
• To prevent noise pickup, keep the AM loop antenna away from the unit and other components.
• Be sure to fully extend the FM antenna wire.
• After connecting the FM antenna wire, keep it as horizontal as possible.
8
Setting the CLOCK
2.
Press CLOCK.
(If the clock requires setting, press and hold
CLOCK for more than 2 seconds.)
- The hours display begins to blink.
Select either the 24 hour cycle or the 12 hour
cycle with the MULTI JOG SHUTTLE.
(12HR)
3
or
(24HR)
Press SET to confirm the selected hour cycle.
4
5
6.
7
8
Use MULTI JOG SHUTTLE to set the current
hour.
BEFORE OPERATION
1
Press SET.
Use MULTI JOG SHUTTLE to set current
minutes.
Press SET and the correct time is shown on
the display.
Press CLOCK at any time to show the time on
the display, for about 5 seconds.
Sleep Timer Function
When the sleep timer is set, the unit automatically turns off after the specified time has elapsed.
1
To specify the time delay before the power is
turned off, press SLEEP.
In the display window you can see
for
about 5 seconds. This means that the system
turns off automatically after 90 minutes.
Each time the button is pressed the time interval
before it turns off is reduced by 10 minutes. i.e.
80...70... etc.
Select the desired time to turn off.
2
To check the remaining time until the power is
turned off.
While the sleep function is active press SLEEP
briefly. The time remaining until the unit turns off
is displayed for about 5 seconds.
ote
If you press SLEEP while the sleep time is displayed,
the SLEEP time is reset.
To cancel Sleep Timer setting
If you wish to stop the function, press the SLEEP button
repeatedly until 10 appears, and then press SLEEP
once again after 10 shows on the display.
Using Microphone
You can sing along with a music source by connecting a
microphone to the unit.
1
2
3
Connect your microphone (not supplied) to the
MIC jack.
Play the song you want to sing along with.
Sing along with the accompaniment.
Adjust the microphone volume by turning MIC
VOLUME KNOB.
For your reference
You can record using a microphone.
Refer to the “Recording” explanation section.
otes
• When not using the microphone, set the MIC volume
knob to minimum or turn off the MIC and remove the
microphone from the MIC jack.
• If the microphone is set too near the speaker, a
howling sound may be produced. In this case, move
the microphone away from the speaker or decrease
the sound level with the MIC volume control.
• If the sound through the microphone is extremely loud,
it may be distorted. In this case, turn the MIC volume
control toward minimum.
9
Timer Functions
Using the TIMER function you can have the radio reception and recording, CD play, tape play or auxiliary source
play and recording turned on and off at the time desired.
1
2
3
4
5
6
7
8
10
Press CLOCK to check the current time.
Press “TIMER” to enter the timer setting
mode. (If you want to correct the previous
memorized TIMER setting, press and hold the
“TIMER” button more than 2 seconds.)
The previous memorized timer setting for On
Time and “TIMER” appear in the display. Each
function: TUNER-CD-TAPE flash in the display
window in turn.
Press SET when the desired function
flashes.
If you select TUNER:
PLAY and REC flash in the display window
alternately for about 3 seconds. Press SET to
confirm the desired operating mode.
REC: TUNER recording and play
PLAY: TUNER play only
• If you have selected CD or TAPE,
ignore step 4.
If you have selected TUNER:
To correct a previously memorized preset
number, use the MULTI JOG SHUTTLE and
press SET.
The hour “ON TIME” display flashes.
• If you have selected CD or TAPE, ignore
step 5.
Set the turn on hour using the MULTI JOG
SHUTTLE.
Press SET to confirm the turn on hour time.
The minute display flashes.
Set the turn on minutes time using the
MULTI JOG SHUTTLE.
9
Press SET to confirm the turn on minutes
time.
The hour ‘OFF TIME’ now flashes in the display.
10
11
12
13
14
15
16
Set the turn off hour time using the MULTI
JOG SHUTTLE.
Press SET.
Set the turn off minutes using the MULTI
JOG SHUTTLE.
Press SET.
Adjust the volume level using the MULTI
JOG SHUTTLE.
Press SET.
“TIMER” appears in the display window and
the timer setting has been completed.
Turn the system off.
The selected function is automatically
switched on and off at the preset times.
To cancel or check the timer
Each time the “TIMER” button is pressed, you can
select the timer set or cancel. You can also check the
timer setting status.
To activate or check the timer, press the “TIMER”
button repeatedly so that “TIMER” appears in the
display window.
To cancel the TIMER, press the “TIMER” button
repeatedly so that “TIMER” disappears from the
display window.
Volume Adjustment
DISPLAY MODE
• On unit, turn VOLUME DOWN/UP knob clockwise to
increase the sound level, or counterclockwise to
decrease it.
• On remote, use VOLUME CONTROL ( ) to increase
the sound level, or use the VOLUME CONTROL ( )
to decrease sound.
Whenever you press DISPLAY MODE, you can enjoy
the spectrum change with 6 types in the display.
Sound Quality Adjustment
• To activate stereo sound
- You can choose between 8 fixed sound impressions
and 1 USER MODE.
Select a desired sound mode using the EQ PATT.
button ( or turning EQ knob on the front panel).
- When you select USER MODE, press the ENTER
button repeatedly.
You can select three sound modes (BASS,
MIDDLE, TREBLE).
- Each time you press the button the indicator in the
display window changes as follows.
FLAT → ROCK → POP → VOCAL → CLASSIC
↑
USER MODE ← SAMBA ←
SALSA ←
JAZZ
• Headphone Jack
Connect a stereo headphone plug ( 6.3mm) into the
headphone jack.
The speakers are automatically disconnected when
you plug in the headphones (not supplied).
XDSS (Extreme Dynamic Sound System)
- Use the XDSS feature to reinforce treble, bass and
surround effect.
- Each time you press XDSS the indicator changes as
follows.
XDSS OFF → XDSS1 ON → XDSS2 ON
DEMO
Press DEMO with the power off to review the available
functions in the display window.
To cancel DEMO, press POWER or DEMO again.
During demonstration with the power on, you can cancel
DEMO by pressing any other button.
DIMMER
Dimmer darkens the display window by half with the
power on. Press DIMMER once, and the display darkens. If you press Dimmer a second time, the display will
darken by half again. To cancel, press Dimmer a third
time.
MUTE
Press MUTE to turn off the sound, press again to
restore.
You can mute your unit in order, for example, to answer
a telephone, “MUTE” indicator flashes in the display
window.
SURROUND
To activate surround mode
• You can choose between 6 fixed sound impressions.
• Select a desired surround mode using the
SURROUND button.
• Each time you press SURROUND, the indicator
changes as follows.
SURROUND OFF → SIMULATED LOW → SIMULATED HIGH
↑
MOVIE HIGH ← MOVIE LOW ← MUSIC HIGH ← MUSIC LOW
Auxiliary (External Equipment) Input
1
2
Connect an auxiliary device i.e. TV or VCR, via the rear mounted AUX input jacks.
Press AUX.
ote
You can also record from the auxiliary input source,
see Recording Section.
11
BEFORE OPERATION
Audio Adjustment
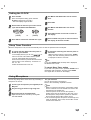
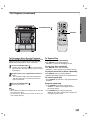
Presetting the Radio Stations (Channel Search)
You can preset 30 stations for FM and AM. Before tuning, make sure that you have turned the volume down to the
minimum level.
X
TUNER/
BAND
POWER
PRESET (
)
TUNER
MEMO
MULTI JOG
SHUTTLE
TAPE-A
TAPE-B
TAPE-A
TAPE-B
• TUNING DOWN/UP
• PRESET DOWN/UP
• STOP ( )/ CLEAR
1
2
3
4
7
8
12
Use the MULTI JOG SHUTTLE to tune in the station
manually.
Press TUNER or TUNER/BAND to show either
FM or AM in the display window.
To clear all memorized stations
Every time you press TUNER or TUNER/BAND,
FM and AM change alternately.
To recall preset numbers
TAPE-B
Press MEMO on the front panel.
A preset number will flash in the display window.
Press PRESET DOWN/UP (or PRESET (
on the remote control) to select the preset
number you want.
Press MEMO on the front panel again.
- The station is stored.
Repeat steps 3 to 6 to store other stations.
Press and hold MEMO on the front panel for about two
seconds, “CLEAR” appears in the display window.
Press CLEAR again, the stations are cleared.
For your reference
If all stations have already been entered, the FULL
message will appear in the display window for a moment
and then a preset number will flash. To change the preset
number, follow the steps 6-7 on the left side.
Press TUNING DOWN/UP on the front panel
until the frequency indicator starts to change,
then release.
Scanning stops when the unit tunes in a
station.
TAPE-A
5
6
To tune in a station with a weak signal
Press POWER to turn the unit on.
)
Press and hold PRESET DOWN/UP ( or PRESET
(
) on the remote control) until the desired preset
number appears or press the button repeatedly.
Automatic Tuning
Use TUNING DOWN/UP.
Manual Tuning
Usw the MULTI JOG SHUTTLE.
Listening to the Radio
Preset radio stations in the units memory first (see “Presetting the Radio Stations (Channel Search)” on the
previous page).
TUNER/
BAND
PRESET (
POWER
VOLUME
(
)
)
MODE/RIF
VOLUME DOWN/
UP KNOB
TUNER
TAPE-A
TAPE-B
TAPE-A
TAPE-B
•TUNING DOWN/UP
•PRESET DOWN/UP
1
2
3
To turn the radio off
Use TUNER or TUNER/BAND to select either
AM or FM in the display window.
The last received station is tuned in.
Press POWER to turn the unit off or select another
function mode (CD, TAPE or AUX).
For your reference
• If a FM program is noisy
Press MODE/RIF repeatedly so that “STEREO” disappears in the display window. There will be no
stereo effect, but the reception will improve. Press
MODE/RIF again to restore the stereo effect.
Press PRESET DOWN/UP (or PRESET
on the remote control) repeatedly to select the
preset station you want.
Each time you press the button, the unit tunes in
the next preset station.
Adjust the volume by rotating VOLUME
DOWN/UP KNOB (or pressing VOLUME (
on the remote control) repeatedly.
TAPE-A
TAPE-B
To listen to non-preset radio stations
• For manual tuning, see “Manual Tuning” on the previous page.
• For automatic tuning, see “Automatic Tuning” on the
previous page.
)
• To improve reception
Reposition the supplied antennas.
otes
• Use MODE/RIF (Radio Interference Filter)
function to switch to Mono reception if stereo
reception is distorted by noise.
• When recording weak AM broadcasts, if beat noises
occur, press MODE/RIF once.
13
OPERATION
X
Tape Playback
X
PLAY MODE
NOR./Hi
DUBB
TAPE
TAPE-A
PLAY ( / )
TAPE-A/B
TAPE-B
/
•
• PLAY (
• STOP (
2
3
Open cassette TAPE A (or B) door by pushing
the PUSH OPEN button.
Insert one or two cassettes with the tape side
to the bottom and then close the TAPE A
(and/or B) door.
4
AUTO STOP DECK (TAPE A)
or
).
Select cassette playback direction (front or back) with
PLAY MODE button.
Function
One
After the cassette in deck TAPE B
plays front or reverse (backward
play) side, stops automatically.
Two
After the cassette in deck TAPE B
plays front and reverse side, stops
automatically.
Three
14
) during playback.
Tape Counter Reset
Press COUNTER during playback.
Playing time appears “TAP A (or B) 0000” in display
window.
To Play Fast Rewind or Fast Forward
After pressing and holding
/
on the front
panel or
/
on the remote control during
playback, press PLAY ( ) at the tape position you
want.
TAPE-B
AUTO REVERSE DECK (TAPE A/B)
Display
Press STOP (
Dubbing
TAPE-A
After Tape A deck plays front side of cassette, the unit
stops automatically.
Presses
)
To Stop Play
Use TAPE or TAPE-A/B button to select TAPE A or
TAPE B cassette deck.
(“NO TAPE” appears in the display window.)
Press PLAY (
/
STOP (
TAPE-B
/ )
)/ CLEAR
Basic Playback
1
TAPE-A
After the cassette in deck TAPE B
plays six times repeatedly front and
reverse side, stops automatically.
How to copy from one tape to another.
1
2
Press TAPE or TAPE-A/ B.
•Cassette TAPE A- Insert the playback tape to dub.
•Cassette TAPE B- Insert a blank tape to copy on.
Press NOR./ Hi DUBB. as indicated below.
Press
Display
Function
NOR.DUBBING
Normal speed
copying.
HiDUBBING
Double speed
copying.
To stop dubbing, press STOP(
).
Recording Setup
Wind the tape to the recording start point.
Only use normal tapes to make recordings.
You can only use deck B for recording.
OPERATION
X
TUNER/
BAND
PLAY MODE
CD SYNC.
REC
CD, TUNER
PLAY (
TAPE-A
/
)
TAPE-B
TAPE-A
TAPE-B
TAPE
STOP (
)
•
/
•PRESET DOWN
•PLAY ( / )
•STOP ( )/ CLEAR
Basic Recording Setups
To Pause Recording
1
2
To pause the recording, press RECORD/ RECORD
PAUSE ( REC
or
) button again.
“ REC” flashes in display window.
Press CD or TUNER/BAND to select source.
To Stop Recording
Open the cassette deck TAPE B and insert a
blank cassette into the cassette compartment.
Press TAPE STOP (
Set the recording direction
Press PLAY MODE repeatedly to set the recording
direction.
CD to Tape Synchronized Recording
Presses
One
Function
Display
Recording front side.
TAPE-A
Two
Three
Recording from Radio, CD or Auxiliary
source
1
2
The CD synchro recording function dubs a complete CD
and programmed titles automatically onto a cassette.
1
TAPE-B
Recording front and
reverse side.
Press RECORD/ RECORD PAUSE ( REC
or
) button .
“ REC” flashes and holds the cassette in pause
mode.
).
2
In Stop mode, press CD SYNC..
“ REC” flashes and “
” appears in the
display window.
The synchronized recording is started automatically after about 7 seconds.
otes
• If you wish to record from the desired track, select
the desired track with
/
before
commencing CD synchro recording.
• A function change is not possible during
recording.
Press PLAY( ) on the front panel.
The recording begins.
15
CD Playback (Continued)
DISC SKIP
X
DISC 1,2,3
PLAY/ PAUSE
(
)
CD OPEN/
CLOSE( )
POWER
STOP (
TAPE-A
)
TAPE-B
D.SKIP
TAPE-A
TAPE-B
•
/
•PLAY ( / )
•STOP ( )/ CLEAR
•CD PAUSE (CD )
Basic Playback Setup
To Pause Play
1
2
Press CD PAUSE (CD ) or PLAY/ PAUSE (
the remote control during playback.
Press the button again to resume play.
3
Press POWER to turn on the unit.
) on
Press the CD button to enter the CD mode.
If no disc is in the disc drawer, the “NO DISC” indicator appears.
To Stop Play
Press CD OPEN/CLOSE ( ) and place the
disc into the disc tray.
The disc on the left (DISC 1) is played first.
• Press
on the front panel or CD SKIP
on the remote control to go to the next track.
• When
button on the front panel or CD SKIP
button on the remote control is pressed
once midway through a track, the player returns
to the start of that track. When it is pressed again,
a track is skipped each time the button is pressed.
DISC 1
With the label side up
TAPE-A
Press STOP (
) during playback.
To Skip a Track
TAPE-B
To Fast Rewind or Fast Forward
ote
To load an 8cm(3 inch) disc, put it onto the inner circle
of the tray.
4
5
16
Press CD OPEN/CLOSE ( ) to close the disc
compartment.
Press PLAY (
) or PLAY/ PAUSE (
remote control.
) on the
After pressing and holding
/
on the front
panel or
/
on the remote control
during playback, press PLAY ( ) at the point you
want.
To Go to the Next Disc
Press DISC SKIP or D.SKIP during playback or
in Stop mode.
To Select a Disc Directly
Press DISC 1, DISC 2 or DISC 3 during playback or
in Stop mode.
When you press DISC 1-3 before playing a disc, the unit
will automatically start playing the selected disc.
CD Playback (Continued)
CD OPEN/CLOSE(
OPERATION
X
)
REPEAT
TAPE-A
TAPE-B
TAPE-A
TAPE-B
To Exchange Discs During Playback
To Repeat Play
You can open the disc tray while playing a disc to check
what discs are to be played next and exchange discs,
without interrupting playback of the current disc.
To play one track repeatedly.
1
2
Press CD OPEN/CLOSE ( ).
The disc tray is opened. Two disc compartments
appear. Even if the unit is playing a disc, it doesn’t
stop playing.
To play one disc repeatedly.
Press REPEAT again during playback.
- “REPEAT 1 DISC” appears in the display window.
To play all tracks on all discs repeatedly
Replace discs in the compartments with other
ones.
The unit plays the disc in the left compartment
after the current disc, and then the one in the
right compartment.
Press REPEAT once more during playback.
- “REPEAT ALL DISC”appears in the display window.
Press CD OPEN/CLOSE ( ).
The CD door closes.
Program repeat play
TAPE-A
3
Press REPEAT once during playback.
- “REPEAT 1” appears in the display window.
TAPE-B
otes
• Do not place more than one compact disc on one disc
tray at the same time.
• Do not push on the disc tray to close CD door, you
may damage the unit.
To cancel repeat play
- Press REPEAT several times until repeat indicators
disappear.
• Press REPEAT once during program play.
- “REPEAT 1” appears in the display window.
(One track repeat)
• Press REPEAT again during program play.
- “REPEAT ALL DISC” appears in the display window. (All program repeat)
17
CD Playback
DISC 1,2,3
X
PLAY/ PAUSE
(
)
PROGRAM
CD STOP
( )
PROG.
TAPE-A
TAPE-B
TAPE-A
TAPE-B
• PLAY ( / )
• PRESET DOWN/UP
• STOP ( )CLEAR
Program Play Setup
To check program contents
You can arrange the order of the tracks on the discs and
create your own program. The program can contain up
to 20 tracks.
Press PROG. (or PROGRAM on the remote control) in
Stop mode.
- The disc, track and program number will be displayed.
1
2
3
To clear program contents
4
5
6
18
Press PROG. (or PROGRAM on the remote
control) in the Stop mode.
Press D.SKIP or DISC DIRECT PLAY (DISC1/2/3)
to select the disc.
Use PRESET DOWN/UP or MULTI JOG SHUTTLE
on the front panel or CD SKIP
/
on the remote control to select the
track.
TAPE-A
Press PROG. (or PROGRAM on the remote control) in
Stop mode. Then press CLEAR on the front panel or
CD STOP ( ) on the remote control.
To add program contents
1. Press PROG. (or PROGRAM on the remote control)
repeatedly in the program Stop mode until “Disc
Number” blinks.
TAPE-B
Press PROG. (or PROGRAM on the remote
control).
Repeat steps 1~4 to select additional discs and
tracks.
Press PLAY( ) (or PLAY/ PAUSE (
remote control).
) on the
2. Repeat steps 2~5 as shown to the left.
To modify program contents
1. Use PROG. (or PROGRAM on the remote control)
to display program number you want to
modify.
2. Repeat steps 2~4 as shown to the left .
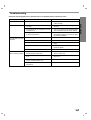
Troubleshooting
Check the following guide for the possible cause of a problem before contacting service.
Cause
Possible Solution
• The power cord is disconnected.
• Plug the power cord into a wall power
outlet securely.
No sound.
• The audio cables are not connected
securely.
• Insert the audio cables into the jacks
securely.
• The external source equipment’s power
is switched off.
• Turn on the power of the external equipment connected with the audio cables.
• The Digital Audio Output is set
to the wrong position.
• Set the Digital Audio Output to the correct position, then turn on the unit again
by pressing POWER.
• No disc is inserted.
• Insert a disc.
• An unplayable disc is inserted.
• Insert a playable disc.
• The disc is placed upside down.
• Place the disc with the playback side
down.
• The disc is not placed within the guide.
• Place the disc on the disc tray correctly
inside the guide.
• The disc is dirty.
• Clean the disc.
• The remote control is not pointed at the
remote sensor on the unit.
• Point the remote control at the remote
sensor on the unit.
• The remote control is too far from the
unit.
• Operate the remote control within about
23 ft (7 m).
• There is an obstacle in the path of the
remote control and the unit.
• Remove the obstacle.
• The batteries in the remote control are
exhausted.
• Replace the batteries with new ones.
The unit does not start
playback.
The remote control
does not work properly.
19
REFERENCE
Symptom
No power.
Speakers
TAPE
Amp
AM
(MW)
Tuner
FM
CD
General
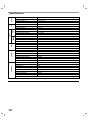
Specifications
Power Supply
Power Consumption
Weight (Approx.)
External Dimensions (Approx.)
Frequency response
Signal-to-Noise Ratio
Dynamic range
Tuning Range
Intermediate Frequency
Signal-to-Noise Ratio
Frequency Response
Tuning Range
Intermediate Frequency
Signal-to-Noise Ratio
Frequency Response
Output Power
T.H.D
Frequency Response
Signal-to-Noise Ratio
Tape Speed
Wow Flutter
F.F/REW Time
Frequency Response
Signal-to-Noise Ratio
Channel Separation
Erase Ratio
AC 120V, 60Hz
190W
23 pounds
11 x 14.5 x 15.7 inches (W x H x D)
40 - 18000 Hz
70 dB
70 dB
87.5 - 108.0 MHz
10.7 MHz
61/58 dB
60 - 10000 Hz
530 - 1720 kHz
450 kHz
35 dB
100 - 1900 Hz
200W + 200W
0.15%
25 - 25000 Hz
80 dB
4.75cm/sec
0.25% (MTT -111, JIS-WTD)
120sec (C-60)
125 - 8000Hz
43dB
50dB(P/B)/45dB(R/P)
55dB (MTT-5511)
Model Number
FE-986E
Type
Impedance
Frequency Response
Sound Pressure Level
Rated Input Power
Max. Input Power
Net Dimensions (Approx.)
Net Weight (Approx.)
3Way 3Speaker
6Ω
45-20000Hz
85 dB/W (1m)
200W
400W
11 x 16.3 x 12.5 inches (W x H x D)
17 pounds
❋ Note: Design and specifications are subject to change without notice.
20
Notes
21
Notes
22
Notes
23
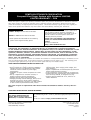
ZENITH ELECTRONICS CORPORATION
Compact Disc Player System with Speakers LMG340
LIMITED WARRANTY – USA
Zenith will repair or replace your product, at Zenith’s option, if it proves to be defective in material or workmanship under normal use, during the warranty period ("Warranty Period") listed below, effective from the date
("Date of Purchase") of original purchase of the product. This limited warranty is good only to the original purchaser of the product and effective only when used in the United States, excluding U.S. Territories.
WARRANTY PERIOD:
LABOR: 90 days from the Date of Purchase.
PARTS: 1 Year from the Date of Purchase.
* Parts replaced are warranted for the remaining
portion of the original warranty period.
HOW SERVICE IS HANDLED:
Carry-In Service: Please retain dealer’s dated bill of
sale or delivery ticket as evidence of the Date of
Purchase for proof of warranty, and submit a copy of
the bill of sale to the service person at the time
warranty service is provided.
Please call 1-877-9Zenith (1-877-993-6484) to
locate your nearest Zenith Authorized Service
Center.
Or visit our website at
http://www.zenithservice.com
THIS WARRANTY IS IN LIEU OF ANY OTHER WARRANTY, EXPRESS OR IMPLIED, INCLUDING WITHOUT
LIMITATION, ANY WARRANTY OF MERCHANTABILITY OR FITNESS FOR A PARTICULAR PURPOSE.
TO THE EXTENT ANY IMPLIED WARRANTY IS REQUIRED BY LAW, IT IS LIMITED IN DURATION TO THE
EXPRESS WARRANTY PERIOD ABOVE. ZENITH WILL NOT BE LIABLE FOR ANY INCIDENTAL, CONSEQUENTIAL, INDIRECT, SPECIAL, OR PUNATIVE DAMAGES OF ANY NATURE, EVEN IF ADVISED OF THE
POSSIBILITY OF SUCH DAMAGES, INCLUDING WITHOUT LIMITATION, LOST REVENUES OR PROFITS,
LOST OR CORRUPTED PROGRAMMING OR DATA, OR ANY OTHER DAMAGE WHETHER BASED IN CONTRACT, TORT, OR OTHERWISE.
Some states do not allow the exclusion or limitation of incidental or consequential damages or limitations on how
long an implied warranty lasts, so the above exclusion or limitation may not apply to you. This warranty gives
you specific legal rights and you may also have other rights that vary from state to state.
THIS LIMITED WARRANTY DOES NOT APPLY TO:
• Damage caused in shipping or transit
• Service required as a result of improper installation,
including incorrect or insufficient AC supply (Please
consult the owner’s manual for power supply
requirements)
• Installation or repair of other components in a video
system
• Set-up or adjustment on consumer controls, or
damage caused by improper adjustments
• Damage cause by other system components
• Damage (including cosmetic damage), failure, loss or
personal injury due to misuse, abuse, negligence,
improper maintenance or storage, or to acts of nature
or other causes beyond Zenith’s control (Causes
beyond Zenith’s control include but are not limited to
lightning strike, power surges, power outages, and
water damage)
• Repair or replacement of warranted parts by other than
Zenith Authorized Service Centers
• Units purchased or serviced outside the coverage area
• Product where the original factory serial numbers have
been removed, defaced, or changed in any way
• Product sold and labeled as "as is, where is" or
similar disclaimer
The costs of repair or replacement under these excluded circumstances shall be borne by the consumer.
CUSTOMER INTER-ACTIVE CENTER NUMBERS:
For nearest Authorized Service
Center, Where to buy, Product
Assistance, or Customer Assistance
Call 1-877-9Zenith (1-877-993-6484) (Monday ~ Friday, 7 AM ~ 8 PM
CT; and Saturday, 8 AM ~ 5 PM CT) and select appropriate option from the
menu.
Or visit our website at http://www.zenithservice.com
ZENITH ELECTRONICS CORPORATION
2000 MILLBROOK DRIVE
LINCOLNSHIRE, IL 60069
Zenith Part No. 206-3875
GS# 3828R-A074D
Printed in China
Issue O