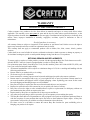
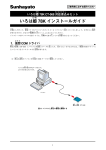
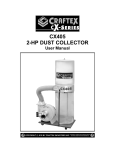
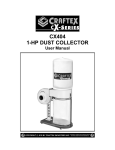
1
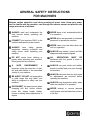
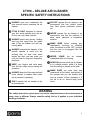
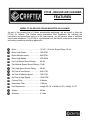
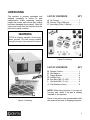
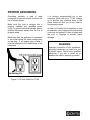
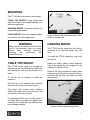
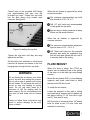
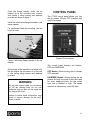
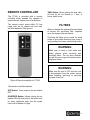
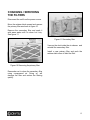
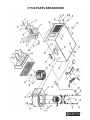
CT168 DELUXE CEILING MOUNTED AIR CLEANER User Manual TABLE OF CONTENTS General Safety Instructions for Machines ............................................................... 3 Specific Safety Instructions..................................................................................... 4 CT168 Features ...................................................................................................... 5 Un-Packing & Inventory .......................................................................................... 6 Proper Grounding ................................................................................................... 7 Mounting ................................................................................................................. 8 Table Top Mount..................................................................................................... 8 Hanging Mounting................................................................................................... 8 Flush Mount ............................................................................................................ 9 Control Panel ..........................................................................................................10 Remote Controller................................................................................................... 11 Filters ...................................................................................................................... 11 Changing / Servicing the Filters .............................................................................. 12 Parts Breakdown.....................................................................................................13 Parts List................................................................................................................. 14 Warranty ................................................................................................................. 15 2 GENERAL SAFETY INSTRUCTIONS FOR MACHINES Extreme caution should be used when operating all power tools. Know your power tool, be familiar with its operation, read through the owner’s manual and practice safe usage procedures at all times. ALWAYS read and understand the user manual before operating the machine. CONNECT your machine ONLY to the matched and specific power source. ALWAYS wear safety glasses respirators, hearing protection and safety shoes, when operating your machine. NEVER leave a tool unattended while it is in operation. NEVER allow unsupervised or untrained personnel to operate the machine NEVER reach over the table when the tool is in operation. ALWAYS keep blades, knives and bits sharpened and properly aligned. DO NOT wears loose clothing or jewelry when operating your machine. Wear protective hair covering. ALL OPERATIONS MUST BE performed with the guards in place to ensure safety. A SAFE ENVIRONMENT is important. Keep the area free of dust, dirt and other debris in the immediate vicinity of your machine. ALWAYS use push sticks and feather boards to safely feed your work through the machine. BE ALERT! DO NOT use prescription or other drugs that may affect your ability or judgment to safely use your machine. DISCONNECT the power source when changing drill bits, hollow chisels, router bits, shaper heads, blades, knives or making other adjustments or repairs. ALWAYS make sure that any tools used for adjustments are removed before operating the machine. ALWAYS keep bystanders safely away while the machine is in operation. NEVER attempt to remove jammed cutoff pieces until the blade has come to a full stop. 3 CT168 – DELUXE AIR CLEANER SPECIFIC SAFETY INSTRUCTIONS ALWAYS read and understand the user manual before operating the air cleaner. CT168 IS ONLY designed to remove very fine wood particles from the air. Do not use it as a dust collector. ALWAYS secure any aprons, clothing and long hair away from the intake side of the air cleaner unit and any moving parts. ALWAYS research the dangers of the specific species of wood you are working with, as dust from some woods are toxic and can make you sick and lead to long term respiratory problems. KEEP your fingers and tools away from the fan output screen during fan operation. ALWAYS keep the filters serviced and never attempt to replace filters while the air cleaner is operating. ONLY operate this air cleaner in dry an environment. DO NOT operate this air cleaner in an environment that has volatile fumes from fuels, paints, pesticides, smoke, etc. NEVER operate the air cleaner in an environment that has the particles of silica, metal, asbestos, or hazardous bacteria. MAKE SURE before making any adjustments, servicing or installing parts, the switch is in the “OFF” position and the cord is un-plugged from the power source. NEVER LEAVE the air unattended while it is running. cleaner ALWAYS make sure that the air cleaner is in a stable position, either it is hung from the ceiling or placed on the table. MAKE SURE you have read and understood all the safety instructions in the manual and you are familiar with your air cleaner, before operating it. If you fail to do so, serious injury could occur. WARNING The safety instructions given above can not be complete because the environment in every shop is different. Always consider safety first as it applies to your individual working conditions. 4 CT168 - DELUXE AIR CLEANER FEATURES MODEL CT168 DELUXE CEILING MOUNTED AIR CLEANER As part of the growing line of Craftex woodworking equipment, we are proud to offer the CT168, Air Cleaner. The Craftex name guarantees Craft Excellence. By following the instructions and procedures laid out in this user manual, you will receive years of excellent service and satisfaction. The CT168 is a professional tool and like all power tools, proper care and safety procedures should be adhered to. Motor ................................... .......... 1/5-HP, 115-Volts, Single Phase, 60-Hz Motor Low Speed ................ .......... 750 RPM Motor Medium speed........... .......... 960 RPM Motor High Speed................ .......... 1200 RPM Fan Low Speed Sound Rating........ 62 dB Fan Medium Speed Sound Rating.. 67 dB Fan High Speed Sound Rating ....... 69 dB Air Flow at Low Speed......... .......... 556 CFM Air Flow at Medium Speed... .......... 702 CFM Air Flow at High Speed ........ .......... 1044 CFM Primary Filter ....................... .......... 5-Micron Secondary Filter .................. .......... 1-Micron Unit Dimensions .................. .......... Length 30-1/4” x Width 24-1/8” x Height 12-1/8” Weight ................................. .......... 56 lbs Warranty .............................. .......... 2 Years 5 UNPACKING The machine is properly packaged and shipped completely in crates for safe transportation. When unpacking, carefully inspect the crates and ensure that nothing has been damaged during transit. Open the crates and check that the machine and the parts are in good condition. LIST OF CONTENTS QTY A. Air Cleaner ....................................... 1 B. Primary Filter (5-Micron) .................. 1 C. Secondary Filter (1-Micron) ............. 1 WARNING CT168 is a heavy machine, do not overexert yourself. For safe moving method use get the help of an assistant or friend. Figure-2 Inventory LIST OF CONTENTS D. E. F. G. H. I. J. QTY Remote Control................................ AAA Battery ..................................... Flange Bracket................................. Rubber Feet ..................................... Eye Bolts (M6-1.0 x 20) ................... Hex Bolts (M6-1.0 x 8) ..................... Flat Washers (6 mm) ....................... 1 2 4 4 4 8 8 NOTE: While doing inventory, if you can not find any part, check if the part is already installed on the machine. Figure-1 Inventory Some of the parts come preassembled with the machine because of shipping purposes. 6 PROPER GROUNDING Grounding provides a path of least resistance for electric current to reduce the risk of electric shock. Make sure the cord is plugged into a properly installed and grounded power outlet. To prevent electrical hazards, have a qualified electrician ensure that the line is properly wired. Make sure that the appliance is connected to an outlet having the same configuration as the plug. If an adaptor plug is used, it must be attached to the metal screw of the receptacle. It is strongly recommended not to use extension cords with your CT168. Always try to position your machine close to the power source so that you do not need to use extension cords. In case if you really find it necessary to use an extension cord, make sure the extension cord does not exceed 50-feet in length and the cord is 14-gauge to prevent motor damage. WARNING Improper connection of the equipmentgrounding conductor can result in a risk of electric shock. Check with a qualified electrician if you are in doubt as to whether the outlet is properly grounded. Figure-3 115-Volts Outlet for CT168 7 MOUNTING The CT168 can be mounted in three ways: TABLE TOP MOUNT: Using rubber feet and/or the flush mount flange brackets for a table-top application. HANGING MOUNT: Using the eye bolts for a high ceiling application. FLUSH MOUNT: Using the flange brackets for a wall or low ceiling application. WARNING Make sure the air cleaner is OFF and the cord is disconnected from the power source while installing, removing, servicing and performing any maintenance job. Figure-4 Rubber feet attached to the bottom of the air cleaner unit HANGING MOUNT The CT168 can be hung from the ceiling, operating at an optimum height from the floor. To install the CT168 operating, hung from the ceiling: TABLE TOP MOUNT The CT168 can be used as a portable air filtration system by installing the rubber feet and placing the unit on a work-bench or a table. To set up the air cleaner for table top operation: Install four chains, cable or steel strapping lines to the ceiling from the support or joist capable of holding 105 lbs. Remove the plug screws and retain these screws as you will need to reinstall them to seal back the air filter unit when eye bolts are removed. Get the help of an assistant and carefully place the air cleaner unit upside down. The rubber feet feature sticky backing. Attach the rubber feet to the bottom of the air cleaner as shown in figure-4. For permanent table top mounting, refer to the Flush Mount procedure on page-9 and install the unit on the table top with the flush mount flange brackets. Figure-5 Removing the plug screws 8 Thread each of the provided M10 flange nuts approximately half way onto the provided eye bolts. Thread the eye bolts into the hole where plug screws were removed. See figure-6. When the air cleaner is supported by wood structural member: The minimum recommended eye bold size should be 5/16” -18” x 2”. Drill 1/4" pilot holes are recommended to help guide the eye bolts. Ensure the eye bolts penetrate at lease 40mm into the wood structure. When the air cleaner is supported by concrete structure: The minimum recommended expansion eye bolt size is 5/16” – 18” x 2”. Figure-6 Installing the eye bolt Tighten the eye bolts until they are snug against the air filter. Get the help of an assistant or a friend and raise the air cleaner and secure to the four hanging lines through the four eye bolts. WARNING Do not fasten the air cleaner onto sheet rock or dry wall, drop ceiling tile or frame. Do not use a rope or power cord to hang the air cleaner. Do not locate the unit in a corner or near any heating or cooling vents. Do not use chain rated for a minimum of 150 lbs working load for each support. Do not use fasteners that can tear out and make the air cleaner fall. Failure to follow these instructions may result in serious damage (to the unit), injury or death. Drill 12mm pilot holes into the concrete structure and press the expansion eye bolt into hole and tighten the bolt until it is securely held to the ceiling. FLUSH MOUNT When the shop is small, the CT168 air cleaner can be installed flush to the ceiling of the shop or to the table top using flange mounts. Mount the air cleaner ONLY to load bearing supports, wall studs, steel chain or table that can hold 150 lbs of load. To install the air cleaner: Locate the supports on the wall or ceiling and mark the air cleaner unit bolt pattern on the wall or ceiling (17-1/4” from left to right and 31” from front to rear) Drill the holes to accept at least 1/4" shank bolts for studs or use 1/4” nuts, bolts and washers for mounting. 9 Place the flange bracket under the air cleaner lip at the mounting hole location and secure it using screws and washers provided as shown in figure-7. CONTROL PANEL The CT168 control panel allows you turn the air cleaner ON and OFF manually and set the fan speed. Install the other three flange brackets in the same manner. For permanent table top mounting, use the lower lip holes. Figure-8 Control panel Figure-7 Mounting flange bracket to the air cleaner The control panel features two buttons: OFF and ON/SPEED. Get the help of an assistant or a friend to lift the air cleaner up and secure it on the wall or the ceiling using screws and washers provided. OFF Button: Allows turning the air cleaner OFF manually. WARNING ON/SPEED Button: Allows turning the air cleaner ON with one push of the button and for every additional push, the fan cycles from Low to Medium to High. The speed selection is indicated by a red LED light. Do not use support rated for a minimum of 150 lbs working load. Do not use fasteners that can tear out and make the air cleaner fall down. Failure to follow these instructions may result in serious damage (to the unit), injury or death. 10 REMOTE CONTROLLER The CT168 is provided with a remote controller which enables the operator to operate the air cleaner from a far distance. The remote control works within 75 feet range from the air cleaner unit and uses two AAA batteries. See figure-9. TIME Button: Allows setting the auto shutoff time for the air cleaner in 1 hour, 2 hours, and 4 hours. FILTERS When to change the primary filter and when to service the secondary filter, depends upon the usage of the air cleaner. Checking the filters once a week for small shops is good while checking once a day is very important for heavy use and big shops. WARNING Make sure to wear a dust mask and safety glasses when servicing and changing filters. The tiny dust particles can go into your lungs and cause serious long term illness. WARNING Make sure the unit is OFF and the cord is disconnected from the power source when installing, removing, or servicing any part of the unit. Figure-9 Remote controller for CT168 The remote controlller features: OFF Button: Turns power to the air cleaner OFF. ON/SPEED Button: Allows turning the air cleaner ON with one push of the button and for every additional push, the fan cycles from Low to Medium to High. 11 CHANGING / SERVICING THE FILTERS Disconnect the unit from the power source. Move the retainer latch upward and remove the primary filter as shown in figure-10. Remove the secondary filter and wash it with warm water until it is clean. Let it dry. See figure-11. Figure-11 Secondary filter Vaccum the dust inside the air cleaner and reinstall the secondary filter. Install a new primary filter and push the retainer latch down to hold the filter. Figure-10 Removing the primary filter Remember not to clean the secondary filter using compressed air. Doing so, will damage the filter and reduce the filtering qaulity. 12 CT168 PARTS BREAKDOWN 13 CT168 PARTS LIST 14 WARRANTY CRAFTEX 2 YEARS LIMITED WARRANTY Craftex warrants every product to be free from defects in materials and agrees to correct such defects where applicable. This warranty covers two years for parts and 90 days for labor (unless specified otherwise), to the original purchaser from the date of purchase but does not apply to malfunctions arising directly or indirectly from misuse, abuse, improper installation or assembly, negligence, accidents, repairs or alterations or lack of maintenance. Proof of purchase is necessary. All warranty claims are subject to inspection of such products or part thereof and Craftex reserves the right to inspect any returned item before a refund or replacement may be issued. This warranty shall not apply to consumable products such as blades, bits, belts, cutters, chisels, punches etceteras. Craftex shall in no event be liable for injuries, accidental or otherwise, death to persons or damage to property or for incidental contingent, special or consequential damages arising from the use of our products. RETURNS, REPAIRS AND REPLACEMENTS To return, repair, or replace a Craftex product, you must visit the appropriate Busy Bee Tools showroom or call 1800-461-BUSY. Craftex is a brand of equipment that is exclusive to Busy Bee Tools. For replacement parts directly from Busy Bee Tools, for this machine, please call 1-800-461-BUSY (2879), and have your credit card and part number handy. All returned merchandise will be subject to a minimum charge of 15% for re-stocking and handling with the following qualifications. Returns must be pre-authorized by us in writing. We do not accept collect shipments. Items returned for warranty purposes must be insured and shipped pre-paid to the nearest warehouse Returns must be accompanied with a copy of your original invoice as proof of purchase. Returns must be in an un-used condition and shipped in their original packaging a letter explaining your reason for the return. Incurred shipping and handling charges are not refundable. Busy Bee will repair or replace the item at our discretion and subject to our inspection. Repaired or replaced items will be returned to you pre-paid by our choice of carriers. Busy Bee reserves the right to refuse reimbursement or repairs or replacement if a third party without our prior authorization has carried out repairs to the item. Repairs made by Busy Bee are warranted for 30 days on parts and labour. Any unforeseen repair charges will be reported to you for acceptance prior to making the repairs. The Busy Bee Parts & Service Departments are fully equipped to do repairs on all products purchased from us with the exception of some products that require the return to their authorized repair depots. A Busy Bee representative will provide you with the necessary information to have this done. For faster service it is advisable to contact the nearest Busy Bee location for parts availability prior to bringing your product in for repairs. 15