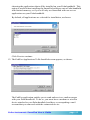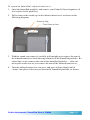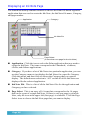
1
Seiko Instruments USA Inc.
2990 W. Lomita Blvd.
Torrance, CA 90505-5196
www.seikosmart.com
February, 2001
Seiko Instruments SmartPad User’s Guide
page 1
Contents
Chapter 1:
Introduction ......................................................5
Welcome! ........................................................................ 5
How SmartPad Works ..................................................... 5
SmartPad Features ......................................................... 6
Ways to Use SmartPad ................................................... 7
SmartPad Overview ......................................................... 8
SmartPad Product Box Contents .................................. 10
System Requirements ................................................... 10
Chapter 2:
SmartPad Setup .............................................. 11
Battery Installation .......................................................... 11
SmartPad Software Installation ..................................... 12
Reassigning Front Panel Buttons .................................. 18
Attaching your Palm OS-based Organizer ..................... 20
Repositioning the Infrared Transceiver .......................... 22
Chapter 3:
Using SmartPad .............................................. 25
eMemo .......................................................................... 25
eAddress ....................................................................... 33
eToDo ........................................................................... 41
eDatebook ..................................................................... 48
Attaching Ink Notes to a Different Record ..................... 54
Attaching Ink Notes to an E-mail Message .................... 57
Using the Smart KeyPad ............................................... 60
Page 2
Chapter 4:
SmartPad Desktop Software.......................... 64
Starting the SmartPad Desktop Application ................... 64
Displaying an Ink Note Page ......................................... 66
Choosing Ink Width ....................................................... 67
Changing an Ink Note Category .................................... 67
Printing Your Ink Notes ................................................. 68
Exporting Ink Notes (Save As) ...................................... 70
Opening Other Ink Notes .............................................. 71
Finding Ink Note Files ................................................... 72
Zooming the Ink Note View ........................................... 74
Attaching an Ink Note to an E-Mail Message ................. 75
Additional File Menu Commands ................................... 76
Preferences Menu ......................................................... 76
Toolbar Buttons ............................................................. 77
Chapter 5:
Reference ........................................................ 78
Replacing Ink Cartridges ............................................... 78
Replacing the SmartPad Pen Battery ............................ 79
Troubleshooting ............................................................. 81
Index ...................................................................... 86
Seiko Instruments SmartPad User’s Guide
page 3
Trademarks and Copyright
SmartPad and the SmartPad logo are trademarks of Seiko Instruments USA Inc.
Copyright © 2001, Seiko Instruments USA Inc.
All Rights Reserved. Seiko Instruments’ products contain certain trade secrets
and confidential and proprietary information. Use, reproduction, disclosure and
distribution by any means are prohibited, except pursuant to a written license
from Seiko Instruments USA Inc. Use of Copyright Notice is precautionary and
does not imply publication or disclosure. Other products and brand names may
be trademarks or registered trademarks of their respective owners.
Disclaimer and Limitation of Liability
Seiko Instruments USA Inc. assumes no responsibility for any damage or loss
resulting from the use of this product.
Seiko Instruments USA Inc. assumes no responsibility for any loss or claims by
third parties that may arise through the use of this software.
Seiko Instruments USA Inc. assumes no responsibility for any damage or loss
caused by deletion of data resulting from malfunction, dead batteries, or repair.
Be sure to make backup copies of all-important data on other media to protect
against data loss.
Important: Please read the Seiko Instruments USA Inc. End User Software
License Agreement before using the accompanying software program(s). Using
any of the software indicates that you accept the terms of the End User Software
License Agreement.
Restricted Rights Legend:
Use, duplication, or disclosure by the Government is subject as set forth in
subparagraph (c) (1) (ii) of the Rights in Technical Data and Computer Software
clause at DFARS 52.227-7013.
Page 4
Chapter 1:
Introduction
Welcome!
Welcome to SmartPad™, the Connected
Notepad! Using the supplied software, and an
ordinary paper writing pad, SmartPad automatically links to your Palm™ OS-based organizer
and stores anything that you write directly into
the memory of the Palm unit. Whether you
scribble quick notes, draw diagrams or maps, or take extensive notes at meetings,
SmartPad enables you to instantly transfer and store the handwritten information
on your Palm OS-based organizer.
SmartPad consists of an electronic notepad, integrated into an elegant portfolio
that also stores and protects your Palm OS-based organizer. The paper notepad is
a standard paper pad; refills are available at any stationery store. A special pen is
provided, and it automatically transmits whatever you write through SmartPad
and into your Palm OS-based organizer. For convenience, the opposite end of the
pen contains a stylus point for use with the Palm OS-based organizer.
How SmartPad Works
SmartPad Portfolio
Located beneath SmartPad’s paper pad is a special digitizer tablet that is sensitive
to the position of the SmartPad pen. As you write with the SmartPad pen on the
paper pad, the SmartPad reads the location of the pen tip and communicates its
exact location to your Palm OS-based organizer.
SmartPad Software in your Palm Connected organizer
The SmartPad software installed on your Palm OS-based organizer automatically
recognizes the infrared data transmitted by SmartPad, and instantly creates a new
Ink Note file in any of the four SmartPad applications; To Do List, Memo, Date
Book, and Address. With appropriate e-mail software and a modem, you can email your Ink Notes directly from your Palm OS-based organizer.
Seiko Instruments SmartPad User’s Guide
page 5
SmartPad Desktop software installed on your Windows PC
When you HotSync your Palm OS-based organizer with your Windows PC, all of
your SmartPad notes are automatically copied to the PC and saved for use by
your SmartPad desktop software. This software allows you to view, print, and
even e-mail your Ink Note file images from your PC.
SmartPad Features
Once you have installed the SmartPad software, SmartPad works instantly and
automatically to transfer your handwritten notes into your Palm OS-based
organizer. SmartPad features include:
n An easy user interface. Just touch the pen to the pad, and you’re automatically storing your handwritten data!
n Each Ink Note can have up to 16 pages of handwritten data. With the Palm
OS-based organizer you can easily view the contents of each page, and make
additions as necessary.
n You can zoom to enlarge the view of the written notes on the Palm OS-based
organizer, and pan to move the position of the image on the screen. You can
easily zoom up to 4x magnification to view the smallest details of your
handwritten notes on the Palm OS-based organizer.
n Smart KeyPad makes it quick and easy to enter text into your SmartPad
applications. Simply use the SmartPad pen to tap on the printed keypad.
Many users find this easier than Graffiti characters, or miniature screen-size
keyboards.
n SmartPad’s sleep mode integrates with the Palm OS-based organizer’s “autooff” feature. If your Palm OS-based organizer is set for “auto-off after: 2
minutes” (and you’re using the SmartPad), the Palm OS-based organizer will
go into “sleep mode” to conserve power after two minutes. However, the
infrared communication between SmartPad and your Palm OS-based organizer will remain active. Even though the screen is blank, the Palm OS-based
organizer will instantly awaken when you touch the SmartPad pen to the pad,
and you can continue taking notes. If you don’t use your SmartPad for 30
minutes, the “sleep mode” will finally turn off the infrared communications
with the SmartPad and then completely turn off your Palm OS-based organizer.
n SmartPad will automatically name an Ink Note file based upon the application you’re currently using. You can also associate an Ink Note file with any
record in the selected application, or change the name of the Ink Note file.
Page 6
n Ability to send a written Ink Note as an e-mail message. If you have a Palm
Modem™ connected to your Palm OS-based organizer, you can use an e-mail
application to transmit your written notes as an e-mail message.
n Uses standard paper notepads, available in any stationery store. No special
paper supplies are required for the SmartPad.
n Easily confirm the status of the batteries that power the SmartPad.
n The SmartPad software includes eMemo, eToDo, eAddress, and eDatebook.
These applications function the same as the standard applications on your
Palm OS-based organizer — they simply extend the function of these
applications to automatically work with SmartPad. You can attach an Ink
Note to any file in these four Palm OS-based organizer applications.
Ways to Use SmartPad
SmartPad can change the way you work with your Palm OS-based organizer,
vastly expanding its capabilities with the effortless association of handwritten
notes, diagrams, maps — anything that you can draw with the SmartPad pen. The
following are some ideas for using SmartPad :
n If you attach an Ink Note to an event in the eDatebook application, the Ink
Note is associated with the date and time of the event — such as a meeting.
This means that you can use the SmartPad to take handwritten notes or
“meeting minutes,” and then easily find them, attached to the date and time of
the event.
n In the applications that support Categories (eAddress, eToDo, and eMemo),
you can create Categories for the records that contain the Ink Notes you
create with SmartPad. This makes it easy to organize the data on your Palm
OS-based organizer, and makes it fast to find the Ink Notes that you want to
review or modify.
n The Ink Notes generated by SmartPad are separate from the regular Notes that
can be attached to records in your Palm OS-based organizer. This means that
you can attach text notes using Graffiti on your Palm OS-based organizer,
and also attach Ink Notes (for handwritten notes or drawings) with the
SmartPad.
n SmartPad can automatically assign default names to new records. With the
eToDo and eMemo applications, just start writing on the Notepad to create a
new record, with the date and time as the name for the record. With the
eAddress and eDatebook applications, you can start writing to create a new
Ink Note that can be attached to a record at a later time.
Seiko Instruments SmartPad User’s Guide
page 7
SmartPad Overview
The following diagram points out the SmartPad features:
Phone Pocket
Infrared Transceiver
SmartPad Pen
Storage
Pocket
Notepad and
Smart KeyPad
Battery Compartment
Phone Pocket
This pocket is designed to hold a cell phone. Slip the phone under the band of
this pocket.
Storage Pocket
The storage pocket can be used for anything that you want to carry along with
your SmartPad. This pocket contains spare ink cartridges for the SmartPad pen.
Refer to the section entitled Replacing Ink Cartridges for complete information
about how to replace the SmartPad pen’s ink cartridge.
The outside of this pocket also provides a convenient place to store your business
cards.
Page 8
Infrared Transceiver
The infrared transceiver communicates information between SmartPad and the
Palm OS-based organizer. There must be a clear path between this infrared
transceiver and your Palm OS-based organizer. Do not store items in the area
between the infrared transceiver and the Palm OS-based organizer. This infrared
transceiver can also be repositioned to accommodate different types of Palm OSbased organizers. Refer to the section entitled Repositioning the Infrared
Transceiver for more information.
SmartPad pen
This special SmartPad pen is used for writing on the Notepad. The SmartPad pen
contains a special transmitter that communicates with the SmartPad. The
SmartPad pen uses a AAAA battery that can be easily replaced. Refer to the
section entitled Replacing the SmartPad pen Battery for complete information
about how to replace this battery. The SmartPad pen also uses replaceable ink
cartridges. Refer to the section entitled Replacing Ink Cartridges for complete
information about how to replace the SmartPad pen’s ink cartridge.
Notepad and Smart KeyPad
The Notepad is a standard paper pad. Replacements for this pad are available at
stationery stores. No special paper is required for use with the SmartPad. Any
standard paper pad of the correct dimensions will work just fine with SmartPad.
The Smart KeyPad is located beneath the Notepad. The Smart Keypad enables
you to quickly and easily enter text with the SmartPad pen. For more information, refer to the section entitled Smart KeyPad.
Battery Compartment
The battery compartment stores the batteries that are used to power the SmartPad.
A pair of standard AAA batteries are provided for the SmartPad portfolio. Before
you use SmartPad for the first time, you must install these batteries. Refer to the
section entitled Battery Installation for complete information about how to
install the batteries.
Seiko Instruments SmartPad User’s Guide
page 9
SmartPad Product Box Contents
The shipping box for the SmartPad should contain the following items:
n SmartPad portfolio
n SmartPad pen (with one AAAA battery installed)
n SmartPad pen refill cartridges
n Two (2) AAA batteries for the SmartPad portfolio
n Quick Start Guide
n Software CD-ROM.
If any of these items are missing, contact the reseller where you purchased the
SmartPad.
System Requirements
The following are minimum system requirements for SmartPad:
n Windows 95, Windows 98, Windows 2000, or Windows NT 4
n IBM PC (or compatible), equipped with a Pentium 166 MHz (or faster)
n 16 Mbytes of RAM
n 16 Mbytes of available hard disk storage
n VGA (or better) video card, and color monitor with at least 800x600
resolution (or better)
n CD-ROM drive
n Mouse
n Palm III series organizer or higher (not compatible with Palm or Palm Pro
that has been upgraded to Palm III)
n Palm OS 3.1 or higher.
Optional Equipment
n Modem for the Palm OS-based organizer (such as the Palm Modem)
n Windows compatible printer.
Page 10
Chapter 2:
SmartPad Setup
This chapter explains how to set up your SmartPad, and how to install the
software on both your desktop PC and your Palm OS-based organizer.
Battery Installation
Your SmartPad is supplied with 2 (two) AAA batteries. These batteries must be
installed before you can use SmartPad.
To install the batteries:
1. Remove the 2 (two) AAA batteries from the SmartPad package.
2. Remove the batteries from their protective wrapper.
3. The battery compartment has a cover, and is located to the left of the notepad
area of the SmartPad portfolio. Gently press down on the cover, and then
slide the cover off, as shown:
Press Down
Here
Remove Cover
Seiko Instruments SmartPad User’s Guide
page 11
4. Insert the batteries into the battery compartment. Note the polarity of the
batteries: the positive end (+) of both batteries should point down toward the
lower edge of the SmartPad portfolio, as shown:
Install Batteries
Battery Compartment
5. Replace the battery cover, and slide it into place. When you have replaced it
correctly, the battery cover “clicks” into position.
Battery installation is complete, and you are ready to install the SmartPad desktop
software on your desktop PC.
SmartPad Software Installation
The next step is to install the SmartPad software on your Windows PC and your
Palm OS-based organizer. The Windows PC must be the same Windows computer that you use to HotSync your Palm OS-based organizer.
To install the SmartPad software:
1. Begin by closing any applications you have running on your Windows PC.
You will restart your computer at the end of this procedure; so be sure to
close all important files or applications before you begin the installation.
Page 12
2. Load the SmartPad Software CD-ROM into your Windows PC. The Setup
program should start automatically.
If it does not, refer to the Quick Start Guide (supplied with SmartPad).
3. The Choose Setup Language screen appears, as shown:
Click the pull-down menu to choose the language that you want for your
SmartPad software. Then, click OK to continue.
4. The Welcome screen appears, as shown:
Click Next to continue.
5. A screen detailing the SmartPad software license agreement appears. Review
the contents of the agreement. If you agree, click Yes to continue.
6. The Choose Application Location screen appears. The default location for
the SmartPad desktop software is c:\Program Files\SmartPad, and is recommended. If you want to choose a different location, click on the Browse
button and choose a different location. Otherwise, click Next to continue.
Seiko Instruments SmartPad User’s Guide
page 13
7. If you have chosen the default location (which is recommended), an alert
appears, showing that the folder does not exist, as shown:
In this case, the SmartPad installation software will automatically make the
necessary folder. Click Yes to continue.
8. The Choose Ink Location screen appears. This defines the directory where the
“Ink Note” files will be stored (when transferred from your Palm handheld).
The default location for the Ink Note data is c:\SmartData, and is recommended. If you want to choose a different location, click Browse and choose
a different location. Otherwise, click Next to continue.
9. Again, the installation software detects that the folder does not yet exist. An
alert appears, prompting you to create the necessary folder. Click Yes to
continue.
10. You are prompted to install the SmartPad Desktop software on your PC.
This screen displays the space required for the installation, and the space
available on your hard disk drive, as shown:
Click Next to continue.
11. The Select Palm Applications screen appears. This gives you the option of
Page 14
choosing the applications that will be installed on your Palm handheld. This
option is useful when installing the SmartPad software onto a Palm handheld
with limited memory, or if you will only use SmartPad with one or two
applications on your Palm handheld.
By default, all applications are selected for installation, as shown:
Click Next to continue.
12. The PadFire Applications To Be Installed screen appears, as shown:
The PadFire application enables you to send and receive e-mail messages
with your Palm handheld. To do so, you must have a modem or wireless
device attached to your Palm handheld, and have a correspoding e-mail
account that you can reach with the connected device.
Seiko Instruments SmartPad User’s Guide
page 15
The PadFire application is included on a 30-day evaluation basis. If you want
to use PadFire after this 30-day period, you must register the software with
Seiko Instruments. Complete information about how to register the PadFire
software appears at http://www.seikosmart.com.
13. A prompt appears, showing the memory space required for the software
installation on your Palm handheld, as shown:
If you do not have this much space available on your Palm handheld, click No
to return to step #11. Otherwise, click Yes to continue.
14. The SmartPad Palm Setup screen appears. If you have more than one Palm
handheld User associated with your Windows PC (and its related Palm
Desktop software), this screen enables you to choose the User for the
SmartPad software. Click to select the user, as shown:
Click OK to continue.
15. A prompt appears, asking if you want a SmartPad shortcut icon placed on the
Windows desktop, as shown:
Page 16
Based upon your own preference, click Yes or No to continue.
16. A dialog appears, as shown:
This shows that the SmartPad software will be installed on your Palm
handheld the next time you perform a HotSync operation. Click OK to
continue.
17. The Product Registration screen appears, as shown:
Click Register Now to step through the brief online registration procedure.
Or, click Register Later to register your SmartPad at a later time.
18. At this point, the SmartPad desktop software is installed on your Windows
PC. The SmartPad Setup software displays a Restart prompt, as shown:
Seiko Instruments SmartPad User’s Guide
page 17
Click to select “Yes, I want to restart my computer now,” and then click the
OK button.
19. When your computer restarts, place your Palm handheld in its cradle and
perform a HotSync operation. This will install the SmartPad software on
your Palm handheld.
Software installation is complete, for both your desktop PC and your Palm OSbased organizer. You may want to reassign the front panel buttons of your Palm
OS-based organizer so they automatically activate the SmartPad software, as
described in the following section.
Reassigning Front Panel Buttons
Your Palm OS-based organizer has four application buttons on its front panel.
These buttons are used to start, and switch among the four standard Palm OSbased organizer applications: DateBook, Address Book, To Do List, and Memo
Pad. Note that these application buttons are the black push-buttons located along
the lower edge of your Palm OS-based organizer (don’t look for these buttons
anywhere on the screen display of your Palm OS-based organizer).
Once you have installed the special SmartPad versions of these applications, you
may want to reassign these application buttons so they activate the SmartPad
applications. By reassigning the application buttons, your Palm OS-based
organizer will use the extended SmartPad versions, which automatically recognize the SmartPad.
Important: The only limitation for reassigning these buttons is for “beaming”
data between two Palm OS-based organizers. When sending or receiving data
that is “beamed” from another Palm OS-based organizer, the sender (and/or
receiver) must have different Palm applications activated.
Page 18
For example, if you are using the SmartPad version of the Memo application
(eMemo), and someone attempts to “beam” their business card when running the
Memo application, the transfer may not complete successfully. In this case,
switch to a different SmartPad application, such as eAddress. Once you have
reassigned the front panel buttons (as described in the following procedure),
simply press a different front panel button to switch to a different application.
To reassign the application buttons on your Palm OS-based organizer:
1. Before you begin, be sure that you have taken the steps to install the
SmartPad software on your Palm OS-based organizer, and have performed a
HotSync operation. Refer to the section entitled SmartPad Software Installation for the complete procedure.
2. Turn on your Palm OS-based organizer by pressing the Power button or any
of the front panel buttons.
3. Tap on the Applications (or Home) icon. The Applications screen appears.
4. Tap on the Prefs icon. (You may have to scroll down through the installed
applications to find the Prefs icon.)
5. Tap the upper-right of the Palm screen. When a pop-up menu appears, tap to
choose Buttons from this menu. The Buttons settings appear, as shown:
6. Tap the menu next to the Date Book icon. From the list of applications that
appears, tap to choose eDatebook.
7. Tap the menu next to the Address icon. From the list of applications that
appears, tap to choose eAddress.
8
Tap the menu next to the To Do List icon. From the list of applications that
appears, tap to choose eToDo.
Seiko Instruments SmartPad User’s Guide
page 19
9. Tap the menu next to the Memo Pad icon. From the list of applications that
appears, tap to choose eMemo.
10. Press any Application button on your Palm OS-based organizer to save your
button assignments, and move directly to that application.
This procedure is complete. At this point, you can use any of the Application
buttons on your Palm OS-based organizer to directly activate the special
SmartPad versions of the applications.
Attaching your Palm OS-based Organizer
Your SmartPad portfolio has a special area designed to hold and store your Palm
OS-based organizer. In fact, your Palm OS-based organizer must be placed in this
area, so its infrared link can communicate with the SmartPad portfolio.
Special self-adhesive strips are provided. When placed on the back of your Palm
OS-based organizer, they firmly attach the organizer to the SmartPad portfolio.
The adhesive strips are of the hook-and-loop design, so you can easily remove
your Palm OS-based organizer and use it separately from the SmartPad portfolio.
Attaching the Adhesive Strips
To attach the adhesive strips to your Palm OS-based organizer:
1. Locate the adhesive fastener strips on the left side of the SmartPad portfolio.
There are two white strips that cover hook-and-loop fasteners. Remove these
two fastener strips completely from the hook-and-loop fasteners.
2. Place your Palm OS-based organizer face-down on a suitable work surface.
3. Carefully peel the adhesive strip away from the fastener. Be careful not to
peel the white adhesive backing off from the adhesive strip. Set the strip
aside for step #4.
4. Remove the white backing from the adhesive strips, and place them on the
back of your Palm OS-based organizer, as shown:
Page 20
Attach Strip
Attach Strip
You may need to position the strips so they do not cover the battery compartment (or other features) on the back panel of your Palm OS-based organizer.
5. When you have positioned the strips, place your Palm OS-based organizer
into the SmartPad portfolio so the hook-and-loop strips are firmly connected.
6. When your Palm OS-based organizer is correctly placed in the SmartPad
portfolio, it will appear similar to the following diagram:
Seiko Instruments SmartPad User’s Guide
page 21
Palm OS-based organizer
placed in SmartPad portfolio
Note: For best operation, your Palm OS-based organizer should be centered in
the area provided for the organizer, and should be vertically-aligned with the
edges of your SmartPad portfolio.
This procedure is complete. The hook-and-loop fastener on the back of your
Palm OS-based organizer enables you to remove it at any time, and use it
separately from the SmartPad portfolio.
Repositioning the Infrared Transceiver
As shipped, the SmartPad is set to work with Palm OS-based organizers that have
the infrared port located on the top edge of the organizer. On some Palm OSbased organizers, such as the Handspring™ Visor™, the infrared port is located
on the left side of the organizer. To use SmartPad with Palm OS-based organizers where the infrared port is on the left side, you must reposition SmartPad’s
infrared transceiver.
Page 22
To reposition SmartPad’s infrared transceiver:
1. Open the SmartPad portfolio, and remove your Palm OS-based organizer (if
it is in place in the portfolio).
2. Pull to remove the round cap on the infrared transceiver, as shown in the
following diagram:
Remove Cap...
...Then Remove Arm
3. With the round cap removed, carefully pull straight up to remove the arm of
the infrared transceiver from the snap retainers of the SmartPad portfolio. Be
aware that a wire connects this arm to the SmartPad portfolio — take care
not to pull on the wire as you remove the arm of the infrared transceiver..
4. Turn the infrared transceiver arm over, and press it down firmly until it
“snaps” into place in the new position in the SmartPad portfolio, as shown:
Seiko Instruments SmartPad User’s Guide
page 23
Reposition Arm...
...Then Replace Cap
Note: You may need to gently feed the wire of the infrared transceiver arm
into the cover of the SmartPad portfolio. Be careful! You want the infrared
arm to be seated firmly and securely into the SmartPad portfolio.
5. Replace the round cap to secure the arm of the infrared transceiver.
6. Replace your Palm OS-based organizer. The infrared port of your Palm OSbased organizer should be approximately inline with the infrared transceiver.
This procedure is complete.
Page 24
Chapter 3:
Using SmartPad
This chapter explains how to use the SmartPad with your Palm OS-based
organizer. For each of the special SmartPad applications you’ve loaded onto
your Palm OS-based organizer, this chapter explains how to:
n Create a new Ink Note
n Add pages to an Ink Note
n Zoom to view the contents of an Ink Note
n Associate an Ink Note with a different record on your Palm OS-based
organizer
n Change the name of an Ink Note
n Send an Ink Note as an e-mail attachment.
You can also use your desktop PC to view, print and e-mail Ink Notes that you
create with your SmartPad. Information about how to use the SmartPad desktop
software appears in Chapter 4: SmartPad Desktop Software.
eMemo
The eMemo application functions the same way as the standard Memo Pad on
your Palm OS-based organizer. It contains extensions so that anything you create
as a handwritten note in your SmartPad is automatically saved as an Ink Note in
your Palm OS-based organizer.
As you work with eMemo, you’ll find that creating Ink Notes and attaching them
to Memo records is probably easier than creating regular text memos on your
Palm OS-based organizer. Any record that you create with the eMemo application can contain both an Ink Note and regular text (as when using Graffiti on
your Palm OS-based organizer).
The following procedure steps through the creation of a new Ink Note and the
ways you can work with an Ink Note in the eMemo application.
Seiko Instruments SmartPad User’s Guide
page 25
To create an Ink Note in the eMemo application:
1. Press the Memo button on the front of your Palm OS-based organizer. If you
have programmed this button of your Palm OS-based organizer to start the
eMemo application, eMemo appears on the screen, as shown:
eMemo Running
SmartPad Battery Okay
Linked to SmartPad
Note that the name “eMemo” appears at the top of the screen of your Palm
OS-based organizer. This shows that you are running the eMemo application,
rather than the standard Memo Pad supplied with your Palm OS-based
organizer. If the name “eMemo” does not appear at the top of the screen, you
need to set the front panel buttons to automatically launch the SmartPad
software for the Palm OS-based organizer. Refer to the section entitled
Reassigning Front Panel Buttons that appears in the previous chapter.
Note also that a small check-box named “Elink” appears at the bottom of the
screen. A check-mark in this box indicates that your Palm OS-based organizer is communicating with SmartPad. The current condition of the
batteries in your SmartPad also appears on this line.
2. Create a new Ink Note. To do this, use the SmartPad pen, and write the word
“Hello” on the paper pad of your SmartPad. Note that as soon as you touch
the Pen to the paper, the screen of your Palm OS-based organizer changes to
record your Ink Note, as shown:
Page 26
Default Name
The name for your new Ink Note appears at the top of the screen. The default
name is the current date and time. If you’re taking notes in a hurry, you don’t
have to worry about assigning a specific name; you can easily review your
notes based upon the date and time they were created.
3. Next, change the default name of your new Ink Note. Use the stylus, and drag
to select the default name of the Ink Note, as shown:
Drag stylus over Default name
Tip: The opposite end of the SmartPad pen contains a stylus tip that you can
use with your Palm OS-based organizer. You don’t have to switch between
the SmartPad pen and the Palm stylus to work with SmartPad!
Use the Graffiti writing area on your Palm OS-based organizer to write a new
name for the Ink Note. For this example procedure, name this Ink Note “my
memo.”
Seiko Instruments SmartPad User’s Guide
page 27
4. Tap Done. You are returned to the list view of the eMemo screen. Note that
a new Memo record has been created. And, as with all Ink Notes that you
create with the SmartPad, a special “Ink Note” icon appears in the line with
the file name. This shows that there is an Ink Note associated with the Memo
record, as shown:
Ink Note icon
New record with Ink Note
Adding to an Ink Note
Once you have created an Ink Note attached to a Memo record, you can go back
and review the Ink Note, or continue writing to add to the Ink Note.
To add more to an Ink Note:
1. In the list view of the eMemo application, find a Memo record with an
associated Ink Note. Tap the Ink Note icon for that record. The SmartPad Ink
screen appears.
2. Continue writing with the SmartPad pen on the paper pad. Any new information that you write will automatically be recorded in the Ink Note.
3. Tap Done when you are finished adding to your Ink Note.
Note: If you switch to another Palm application (such as the Date Book)
before you tap Done, all of your handwritten information is still stored with
the Ink Note.
Page 28
Zooming and Panning in an Ink Note
While your Ink Note is on the screen of your Palm OS-based organizer, you can
easily zoom (magnify the view) to see the details of the Ink Note. You can
magnify the view to 2x (double size), and then magnify the view again to 4x (four
times the size) to see the smallest details of your handwritten Ink Note.
When working with a magnified view, you cannot see the entire contents of the
Ink Note on the screen of your Palm OS-based organizer. For this circumstance,
the Panning feature is incorporated into the Ink Note view. The panning feature
enables you to reposition the view of the Ink Note so you can see any area: top,
bottom, or either side.
SmartPad’s zooming and panning features are easily controlled with the stylus on
your Palm OS-based organizer.
To work with SmartPad’s zooming and panning features in an Ink Note:
1. In the list view of the eMemo application, find a Memo record with an
associated Ink Note. Tap the Ink Note icon for that record. The SmartPad Ink
screen appears, as shown:
Tap screen to
zoom from 1x view...
...or tap here to zoom to 2x view
2. Tap anywhere in the image of the Ink Note to zoom to a 2x view. Or, you can
tap the 1x button to zoom to a 2x view.
Seiko Instruments SmartPad User’s Guide
page 29
3. Once you have zoomed to a 2x view, you can tap and drag anywhere in the
zoomed image for panning (repositioning) the zoomed view of the Ink Note.
Or, you can tap the 2x button to zoom to a 4x view of the Ink Note image, as
shown:
Tap screen and drag
for panning the zoomed image...
...or tap here to zoom to 4x view
4. With the zoomed 4x view of the Ink Note image on the screen, you can tap
and drag the image to reposition the view. Or, you can tap the 4x button to
return to the normal (1x) view of the Ink Note image.
Each time you tap the zoom button (1x, 2x, 4x), you toggle among the
zoomed views of your Ink Note image. When the 2x or 4x views of the
image are displayed, you can tap and drag anywhere in the image area to
activate the panning feature.
Adding Pages to an Ink Note
Once you have created an Ink Note, you may find that you want to add more
handwritten data than will fit on a single paper notepad page. With SmartPad,
you can store up to 16 handwritten pages as a part of a single Ink Note.
Once you have added pages to an Ink Note, you can easily use your Palm OSbased organizer to switch among the pages. You can even add more handwritten
information to any individual page that is stored as a part of the total Ink Note
data.
The SmartPad desktop software on your Windows PC makes it easy to review
any of the 16 pages that can be part of an Ink Note. For complete information,
refer to Chapter 4: SmartPad Desktop Software.
Page 30
To add pages to an Ink Note:
1. In the list view of the eMemo application, find a Memo record with an
associated Ink Note. Tap the Ink Note icon for that record. The SmartPad Ink
screen appears, as shown:
Tap here to add a page
to the Ink Note
2. Tap the ÷ button to add a page to the Ink Note. The Ink Note view changes
to show a new, blank page on your Palm OS-based organizer.
3. Turn the paper page on the notepad of your SmartPad before you begin
writing your handwritten data. You may want to number the paper page, so
you can keep track of the paper pages that correspond to your Ink Note data.
4. Tap Done when you have finished adding pages and handwritten data to your
Ink Note. Any pages that you created will be stored on your Palm OS-based
organizer as a part of your Ink Note.
Note: If you have created multiple pages for an Ink Note, you can use the
With any page
that appears on the Ink Note screen, you can use the zooming and panning
features to view the details of the page.
ÿ and ÷ buttons to move among the pages that you have created.
Deleting an Ink Note
On occasion, you may create an Ink Note that you no longer want to store on
your Palm OS-based organizer. In this case, you can use the Details dialog to
delete the Ink Note.
Seiko Instruments SmartPad User’s Guide
page 31
To delete an Ink Note from your Palm OS-based organizer:
1. In the list view of the eMemo application, find the Memo record with the Ink
Note that you want to delete. Tap the Ink Note icon for that record. The
SmartPad Ink screen appears, as shown:
Tap Details
2. Tap Details. The Details dialog appears, as shown:
Tap Delete
3. Tap Delete. The Delete Ink dialog appears, as shown:
Page 32
Select Current Page or
All Pages
4. At this point, tap to select the range of Ink Note pages that you want to delete.
You can choose to delete just the current (displayed) Ink Note page, or you
can choose to delete all of the pages of the Ink Note.
Tap OK to delete the Ink Note page(s) you have selected.
eAddress
The eAddress application functions the same way as the standard Address Book
on your Palm OS-based organizer. It contains extensions so that anything you
create as a handwritten note in your SmartPad portfolio is automatically saved as
an Ink Note in your Palm OS-based organizer.
The ability to attach Ink Notes makes it easy to include information such as
directions, or attach a small map to your Address Book records. As you work
with eAddress, you’ll find that creating Ink Notes and attaching them to Address
Book records is remarkably easy to do.
The following procedure steps through the creation of a new Ink Note, and the
ways you can work with an Ink Note in the eAddress application.
Seiko Instruments SmartPad User’s Guide
page 33
To create an Ink Note in the eAddress application:
1. Press the Address Book button on the front of your Palm OS-based organizer.
Because you have programmed this button of your Palm OS-based organizer
to start the eAddress application, eAddress appears on the screen, as shown:
eAddress Running
SmartPad Battery Okay
Linked to SmartPad
Note that the name “eAddress” appears at the top of the screen of your Palm
OS-based organizer. This shows that you are running the eAddress application, rather than the standard Address Book supplied with your Palm OSbased organizer. If the name “eAddress” does not appear at the top of the
screen, you need to set the front panel buttons to automatically launch the
SmartPad software for the Palm OS-based organizer. Refer to the section
entitled Reassigning Front Panel Buttons that appears in the previous chapter.
Note also that a small check-box named “Elink” appears at the bottom of the
screen. A check-mark in this box indicates that your Palm OS-based organizer is communicating with SmartPad. The current condition of the
batteries in your SmartPad also appears on this line.
2. Tap to select any existing Address Book record. The screen of your Palm OSbased organizer changes to show the Address Book record, as shown:
Page 34
3. Create a new Ink Note for the Address Book record. To do this, use the
SmartPad pen, and begin writing on the paper pad of your SmartPad. Note
that as soon as you touch the Pen to the paper, the screen of your Palm OSbased organizer changes to record your Ink Note, as shown:
Tap Done when finished
The name for your new Ink Note appears at the top of the screen. The default
name is the name of the record in your eAddress book. If you’re taking notes
in a hurry, you don’t have to worry about assigning a specific name; you can
easily review your notes based upon the entry in your Address Book.
As with the eMemo application, you can use the stylus, tap and drag to select
the name, and change the name to anything you want. If you want to change
this name, use the Graffiti writing area on your Palm OS-based organizer to
write a new name for the Ink Note.
Tip: The opposite end of the SmartPad pen contains a stylus tip that you can
use with your Palm OS-based organizer. You don’t have to switch between
the SmartPad pen and the Palm stylus to work with SmartPad!
Seiko Instruments SmartPad User’s Guide
page 35
4. Tap Done. You are returned to the list view of the eAddress screen. Note
that the Ink Note icon appears in the line with the record name. This shows
that there is an Ink Note associated with the Address Book record, as shown:
Ink Note icon
Record with Ink note
Adding to an Ink Note
Once you have created an Ink Note attached to a Address Book record, you can
go back and review the Ink Note, or continue writing to add to the Ink Note.
To add more to an Ink Note:
1. In the list view of the eAddress application, find an Address Book record with
an associated Ink Note. Tap the Ink Note icon for that record. The SmartPad
Ink screen appears.
2. Continue writing with the SmartPad pen on the paper pad. Any new information that you write will automatically be recorded in the Ink Note.
3. Tap Done when you are finished adding to your Ink Note.
Note: If you switch to another Palm application (such as the Date Book)
before you tap Done, all of your handwritten information is still stored with
the Ink Note.
Zooming and Panning in an Ink Note
While your Ink Note is on the screen of your Palm OS-based organizer, you can
easily zoom (magnify the view) to see the details of the Ink Note. You can
magnify the view to 2x (double size), and then magnify the view again to 4x (four
times the size) to see the smallest details of your handwritten Ink Note.
Page 36
When working with a magnified view, you cannot see the entire contents of the
Ink Note on the screen of your Palm OS-based organizer. For this circumstance,
the Panning feature is incorporated into the Ink Note view. The Panning feature
enables you to reposition the view of the Ink Note so you can see any area: top,
bottom, or either side.
SmartPad’s zooming and panning features are easily controlled with the stylus on
your Palm OS-based organizer.
To work with SmartPad’s zooming and panning features in an Ink Note:
1. In the list view of the eAddress application, find an Address Book record with
an associated Ink Note. Tap the Ink Note icon for that record. The SmartPad
Ink screen appears, as shown:
Tap screen to
Zoom from 2x view...
...or tap here to Zoom to 4x view
2. Tap anywhere in the image of the Ink Note to Zoom to a 2x view. Or, you can
tap the 1x button to Zoom to a 2x view.
3. Once you have zoomed to a 2x view, you can tap and drag anywhere in the
zoomed image for panning (repositioning) the zoomed view of the Ink Note.
Or, you can tap the 2x button to Zoom to a 4x view of the Ink Note image, as
shown:
Seiko Instruments SmartPad User’s Guide
page 37
Tap screen and Drag
for panning the zoomed image...
...or tap here to zoom to 1x view
4. With the zoomed 4x view of the Ink Note image on the screen, you can tap
and drag the image to reposition the view. Or, you can tap the 4x button to
return to the normal (1x) view of the Ink Note image.
Each time you tap the Zoom button (1x, 2x, 4x), you toggle among the
zoomed views of your Ink Note image. When the 2x or 4x views of the
image are displayed, you can tap and drag anywhere in the image area to
activate the Panning feature.
Adding Pages to an Ink Note
Once you have created an Ink Note, you may find that you want to add more
handwritten data than will fit on a single paper notepad page. With SmartPad you
can store up to 16 handwritten pages as a part of a single Ink Note.
Once you have added pages to an Ink Note, you can easily use your Palm OSbased organizer to switch among the pages. You can even add more handwritten
information to any individual page that is stored as a part of the total Ink Note
data.
The SmartPad desktop software on your Windows PC makes it easy to review
any of the 16 pages that can be part of an Ink Note. For complete information,
refer to Chapter 4: SmartPad Desktop Software.
To add pages to an Ink Note:
1. In the list view of the eAddress application, find an Address Book record with
an associated Ink Note. Tap the Ink Note icon for that record. The SmartPad
Ink screen appears, as shown:
Page 38
Tap here to add a page
to the Ink Note
2. Tap the ÷ button to add a page to the Ink Note. The Ink Note view changes
to show a new, blank page on your Palm OS-based organizer.
3. Turn the paper page on the notepad of your SmartPad before you begin
writing your handwritten data. You may want to number the paper page, so
you can keep track of the paper pages that correspond to your Ink Note data.
4. Tap Done when you have finished adding pages and handwritten data to your
Ink Note. Any pages that you created will be stored on your Palm OS-based
organizer as a part of your Ink Note.
Note: If you have created multiple pages for an Ink Note, you can use the
With any page
that appears on the Ink Note screen, you can use the zooming and panning
features to view the details of the page.
ÿ and ÷ buttons to move among the pages that you have created.
Deleting an Ink Note
On occasion, you may create an Ink Note that you no longer want to store on
your Palm OS-based organizer. In this case, you can use the Details dialog to
delete the Ink Note.
To delete an Ink Note from your Palm OS-based organizer:
1. In the list view of the eAddress application, find the Address Book record
with the Ink Note that you want to delete. Tap the Ink Note icon for that
record. The SmartPad Ink screen appears, as shown:
Seiko Instruments SmartPad User’s Guide
page 39
Tap Details
2. Tap Details. The Details dialog appears, as shown:
Tap Delete
3. Tap Delete. The Delete Ink dialog appears, as shown:
Select Current Page or
All Pages
4. At this point, tap to select the range of Ink Note pages that you want to delete.
You can choose to delete just the current (displayed) Ink Note page, or you
can choose to delete all of the pages of the Ink Note.
5. Tap OK to delete the Ink Note page(s) you have selected.
Page 40
eToDo
The eToDo application functions the same way as the standard To Do List on
your Palm OS-based organizer. It contains extensions so that anything you create
as a handwritten note in your SmartPad is automatically saved as an Ink Note in
your Palm OS-based organizer.
The ability to attach Ink Notes makes it easy to include information such as
directions, or attach a small map to your To Do List records. As you work with
the eToDo application, you’ll find that creating Ink Notes and attaching them to
the eToDo records is remarkably easy to do.
The following procedure steps through the creation of a new Ink Note, and the
ways you can work with an Ink Note in the eToDo application.
To create an Ink Note in the eToDo application:
1. Press the To Do List button on the front of your Palm OS-based organizer. If
you have programmed this button of your Palm OS-based organizer to start
the eToDo application, eToDo appears on the screen, as shown:
eToDo List Running
SmartPad Battery Okay
Linked to SmartPad
Note that the name “eToDo List” appears at the top of the screen of your
Palm OS-based organizer. This shows that you are running the eToDo
application, rather than the standard To Do List supplied with your Palm OSbased organizer. If the name “eToDo List” does not appear at the top of the
screen, you need to set the front panel buttons to automatically launch the
SmartPad software for the Palm OS-based organizer. Refer to the section
entitled Reassigning Front Panel Buttons that appears in the previous chapter.
Seiko Instruments SmartPad User’s Guide
page 41
Note also that a small check-box named “Elink” appears at the bottom of the
screen. A check-mark in this box indicates that your Palm OS-based organizer is communicating with the SmartPad. The current condition of the
batteries in your SmartPad also appears on this line.
2. Tap to select the text of any existing To Do List item. If you want to create a
new To Do List item, tap the New button, and enter a name for the new item.
3. Create a new Ink Note for the To Do List item. To do this, use the SmartPad
pen, and begin writing on the paper pad of your SmartPad. Note that as soon
as you touch the Pen to the paper, the screen of your Palm OS-based organizer changes to record your Ink Note, as shown:
Tap Done when finished
The name for your new Ink Note appears at the top of the screen. The default
name is the date and time that you began the Ink Note. If you’re taking notes
in a hurry, you don’t have to worry about assigning a specific name; you can
easily review your notes based upon the entry in your To Do List.
As with the eMemo application, you can use the stylus, tap and drag to select
the name, and change the name to anything you want. If you want to change
this name, use the Graffiti writing area on your Palm OS-based organizer to
write a new name for the Ink Note.
Tip: The opposite end of the SmartPad pen contains a stylus tip that you can
use with your Palm OS-based organizer. You don’t have to switch between
the SmartPad pen and the Palm stylus to work with SmartPad!
4. Tap Done. You are returned to the list view of the eToDo screen. Note that
the Ink Note icon appears in the line with the record name. This shows that
there is an Ink Note associated with the To Do List item, as shown:
Page 42
Ink Note icon
To Do List Item with Ink Note
Adding to an Ink Note
Once you have created an Ink Note attached to a To Do List item, you can go
back and review the Ink Note, or continue writing to add to the Ink Note.
To add more to an Ink Note:
1. In the list view of the eToDo List application, find a To Do List item with an
associated Ink Note. Tap the Ink Note icon for that record. The SmartPad Ink
screen appears.
2. Continue writing with the SmartPad pen on the paper pad. Any new information that you write will automatically be recorded in the Ink Note.
3. Tap Done when you are finished adding to your Ink Note.
Note: If you switch to another Palm application (such as the Date Book)
before you tap Done, all of your handwritten information is still stored with
the Ink Note.
Zooming and Panning in an Ink Note
While your Ink Note is on the screen of your Palm OS-based organizer, you can
easily zoom (magnify the view) to see the details of the Ink Note. You can
magnify the view to 2x (double size), and then magnify the view again to 4x (four
times the size) to see the smallest details of your handwritten Ink Note.
When working with a magnified view, you cannot see the entire contents of the
Ink Note on the screen of your Palm OS-based organizer. For this circumstance,
the panning feature is incorporated into the Ink Note view. The panning feature
enables you to reposition the view of the Ink Note so you can see any area: top,
bottom, or either side.
Seiko Instruments SmartPad User’s Guide
page 43
SmartPad’s zooming and panning features are easily controlled with the stylus on
your Palm OS-based organizer.
To work with SmartPad’s zooming and panning features in an Ink Note:
1. In the list view of the eToDo List application, find To Do List item with an
associated Ink Note. Tap the Ink Note icon for that item. The SmartPad Ink
screen appears, as shown:
Tap screen to
zoom from 1x view...
...or tap here to zoom to 2x view
2. Tap anywhere in the image of the Ink Note to zoom to a 2x view. Or, you can
tap the 1x button to zoom to a 2x view.
3. Once you have zoomed to a 2x view, you can tap and drag anywhere in the
zoomed image for panning (repositioning) the zoomed view of the Ink Note.
Or, you can tap the 2x button to zoom to a 4x view of the Ink Note image, as
shown:
Tap screen and drag
for panning the zoomed image...
...or tap here to zoom to 4x view
Page 44
4. With the zoomed 4x view of the Ink Note image on the screen, you can tap
and drag the image to reposition the view. Or you can tap the 4x button to
return to the normal (1x) view of the Ink Note image.
Each time you zoom button (1x, 2x, 4x), you toggle among the zoomed
views of your Ink Note image. When the 2x or 4x views of the image are
displayed, you can tap and drag anywhere in the image area to activate the
panning feature.
Adding Pages to an Ink Note
Once you have created an Ink Note, you may find that you want to add more
handwritten data than will fit on a single paper notepad page. With SmartPad you
can store up to 16 handwritten pages as a part of a single Ink Note.
Once you have added pages to an Ink Note, you can easily use your Palm OSbased organizer to switch among the pages. You can even add more handwritten
information to any individual page that is stored as a part of the total Ink Note
data.
The SmartPad desktop software on your Windows PC makes it easy to review
any of the 16 pages that can be part of an Ink Note. For complete information,
refer to Chapter 4: SmartPad Desktop Software.
To add pages to an Ink Note:
1. In the list view of the eToDo List application, find a To Do item with an
associated Ink Note. Tap the Ink Note icon for that item. The SmartPad Ink
screen appears, as shown:
Tap here to add a page
to the Ink Note
Seiko Instruments SmartPad User’s Guide
page 45
2. Tap the ÷ button to add a page to the Ink Note. The Ink Note view changes
to show a new, blank page on your Palm OS-based organizer.
3. Turn the paper page on the notepad of your SmartPad before you begin
writing your handwritten data. You may want to number the paper page, so
you can keep track of the paper pages that correspond to your Ink Note data.
4. Tap Done when you have finished adding pages and handwritten data to your
Ink Note. Any pages that you created will be stored on your Palm OS-based
organizer as a part of your Ink Note.
Note: If you have created multiple pages for an Ink Note, you can use the
With any page
that appears on the Ink Note screen, you can use the zooming and panning
features to view the details of the page.
ÿ and ÷ buttons to move among the pages that you have created.
Deleting an Ink Note
On occasion, you may create an Ink Note that you no longer want to store on
your Palm OS-based organizer. In this case, you can use the Details dialog to
delete the Ink Note.
To delete an Ink Note from your Palm OS-based organizer:
1. In the list view of the eToDo List application, find the To Do List item with
the Ink Note that you want to delete. Tap the Ink Note icon for that record.
The SmartPad Ink screen appears, as shown:
Tap Details
Page 46
2. Tap Details. The Details dialog appears, as shown:
Tap Delete
3. Tap Delete. The Delete Ink dialog appears, as shown:
Select Current Page or
All Pages
4. At this point, tap to select the range of Ink Note pages that you want to delete.
You can choose to delete just the current (displayed) Ink Note page, or you
can choose to delete all of the pages of the Ink Note.
5. Tap OK to delete the Ink Note page(s) you have selected.
Seiko Instruments SmartPad User’s Guide
page 47
eDatebook
The eDatebook application functions the same way as the standard Date Book on
your Palm OS-based organizer. It contains extensions so that anything you create
as a handwritten note in your SmartPad is automatically saved as an Ink Note in
your Palm OS-based organizer.
The ability to attach Ink Notes makes it easy to include information such as notes,
maps, or directions to your Date Book records. As you work with eDatebook
you’ll find that creating Ink Notes and attaching them to your scheduling and
appointment records is remarkably easy to do.
The following procedure steps through the creation of a new Ink Note, and the
ways you can work with an Ink Note in the eDatebook application.
To create an Ink Note in the eDatebook application:
1. Press the Date Book button on the front of your Palm OS-based organizer.
Because you have programmed this button of your Palm OS-based organizer
to start the eDatebook application, eDatebook appears on the screen, as
shown:
SmartPad Battery Okay
Ink indicates eDateBook is running
Linked to SmartPad
Note that the special “Ink” button appears at the bottom of the screen of your
Palm OS-based organizer. This indicates that you are running the eDatebook
application, rather than the standard Date Book supplied with your Palm OSbased organizer. If the Ink button does not appear at the bottom of the screen,
you need to set the front panel buttons to automatically launch the SmartPad
software for the Palm OS-based organizer. Refer to the section entitled
Reassigning Front Panel Buttons that appears in the previous chapter.
Page 48
Note also that a small check-box named “Elink” appears near the bottom of
the screen. A check-mark in this box indicates that your Palm OS-based
organizer is communicating with the SmartPad. The current condition of the
batteries in your SmartPad also appears on this line.
2. Tap to select the line for any time on the eDatebook screen. If you want to
create a new eDatebook record (appointment time), tap to select the blank
line for the appropriate time.
3. Create a new Ink Note for the appointment you’ve selected. To do this, use
the SmartPad pen, and begin writing on the paper pad of your SmartPad.
Note that as soon as you touch the SmartPad pen to the paper, the screen of
your Palm OS-based organizer changes to record your Ink Note, as shown:
Tap Done when finished
The name for your new Ink Note appears at the top of the screen. The default
name is the date and time that correspond to the appointment. If you’re
taking notes in a hurry, you don’t have to worry about assigning a specific
name; you can easily review your notes based upon the entry in your Date
Book.
As with any SmartPad application, you can use the stylus, tap and drag to
select the name, and change the name to anything you want. If you want to
change this name, use the Graffiti writing area on your Palm OS-based
organizer to write a new name for the Ink Note.
Tip: The opposite end of the SmartPad pen contains a stylus tip that you can
use with your Palm OS-based organizer. You don’t have to switch between
the SmartPad pen and the Palm stylus to work with SmartPad!
4. Tap Done. You are returned to the list view of the eDatebook screen. Note
that the Ink Note icon appears in the line with the record name. This shows
that there is an Ink Note associated with the Date Book item, as shown:
Seiko Instruments SmartPad User’s Guide
page 49
Ink Note icon
Date Book Event with
Ink Note attached
Adding to an Ink Note
Once you have created an Ink Note attached to a Date Book item, you can go
back and review the Ink Note or continue writing to add to the Ink Note.
To add more to an Ink Note:
1. In the list view of the eDatebook application, find a Date Book appointment
with an associated Ink Note. Tap the Ink Note icon for that record. The
SmartPad Ink screen appears.
2. Continue writing with the SmartPad pen on the paper pad. Any new information that you write will automatically be recorded in the Ink Note.
3. Tap Done when you are finished adding to your Ink Note.
Note: If you switch to another Palm application (such as the Memo Pad)
before you tap Done, all of your handwritten information is still stored with
the Ink Note.
Zooming and Panning in an Ink Note
While your Ink Note is on the screen of your Palm OS-based organizer, you can
easily zoom (magnify the view) to see the details of the Ink Note. You can
magnify the view to 2x (double size), and then magnify the view again to 4x (four
times the size) to see the smallest details of your handwritten Ink Note.
When working with a magnified view, you cannot see the entire contents of the
Ink Note on the screen of your Palm OS-based organizer. For this circumstance,
the panning feature is incorporated into the Ink Note view. The panning feature
enables you to reposition the view of the Ink Note so you can see any area: top,
bottom, or either side.
Page 50
SmartPad’s zooming and panning features are easily controlled with the stylus on
your Palm OS-based organizer.
To work with SmartPad’s zooming and panning features in an Ink Note:
1. In the list view of the eDatebook application, find a Date Book appointment
with an associated Ink Note. Tap the Ink Note icon for that item. The
SmartPad Ink screen appears, as shown:
Tap screen to
zoom from 1x view...
...or tap here to zoom to 2x view
2. Tap anywhere in the image of the Ink Note to zoom to a 2x view. Or you can
tap the 1x button to zoom to a 2x view.
3. Once you have zoomed to a 2x view, you can tap and drag anywhere in the
zoomed image for panning (repositioning) the zoomed view of the Ink Note.
Or you can tap the 2x button to zoom to a 4x view of the Ink Note image, as
shown:
Tap screen and drag
for panning the zoomed image...
...or tap here to zoom to 4x view
Seiko Instruments SmartPad User’s Guide
page 51
4. With the zoomed 4x view of the Ink Note image on the screen, you can tap
and drag the image to reposition the view. Or, you can tap the 4x button to
return to the normal (1x) view of the Ink Note image.
Each time you tap Zoom (1x, 2x, 4x), you toggle among the zoomed views
of your Ink Note image. When the 2x or 4x views of the image are displayed,
you can tap and drag anywhere in the image area to activate the panning
feature.
Adding Pages to an Ink Note
Once you have created an Ink Note, you may find that you want to add more
handwritten data than will fit on a single paper notepad page. With SmartPad you
can store up to 16 handwritten pages as a part of a single Ink Note.
Once you have added pages to an Ink Note, you can easily use your Palm OSbased organizer to switch among the pages. You can even add more handwritten
information to any individual page that is stored as a part of the total Ink Note
data.
The SmartPad desktop software on your Windows PC makes it easy to review
any of the 16 pages that can be part of an Ink Note. For complete information,
refer to Chapter 4: SmartPad Desktop Software.
To add pages to an Ink Note:
1. In the list view of the eDatebook application, find a Date Book appointment
with an associated Ink Note. Tap the Ink Note icon for that item. The
SmartPad Ink screen appears, as shown:
Tap here to add a page
to the Ink Note
2. Tap the ÷ button to add a page to the Ink Note. The Ink Note view changes
to show a new, blank page on your Palm OS-based organizer.
Page 52
3. Turn the paper page on the notepad of your SmartPad before you begin
writing your handwritten data. You may want to number the paper page, so
you can keep track of the paper pages that correspond to your Ink Note data.
4. Tap Done when you have finished adding pages and handwritten data to your
Ink Note. Any pages that you created will be stored on your Palm OS-based
organizer as a part of your Ink Note.
Note: If you have created multiple pages for an Ink Note, you can use the
ÿ and ÷ buttons to move among the pages that you have created. With any page
that appears on the Ink Note screen, you can use the zooming and panning
features to view the details of the page.
Deleting an Ink Note
On occasion, you may create an Ink Note that you no longer want to store on
your Palm OS-based organizer. In this case, you can use the Details dialog to
delete the Ink Note.
To delete an Ink Note from your Palm OS-based organizer:
1. In the list view of the eDatebook application, find the Date Book appointment with the Ink Note that you want to delete. Tap the Ink Note icon for that
record. The SmartPad Ink screen appears, as shown:
Tap Details
2. Tap Details. The Details dialog appears, as shown:
Seiko Instruments SmartPad User’s Guide
page 53
Tap Delete
3. Tap Delete. The Delete Ink dialog appears, as shown:
Select Current Page or
All Pages
4. At this point, tap to select the range of Ink Note pages that you want to delete.
You can choose to delete just the current (displayed) Ink Note page, or you
can choose to delete all of the pages of the Ink Note.
5. Tap OK to delete the Ink Note page(s) you have selected.
Attaching Ink Notes to a Different Record
As you work with SmartPad, you may find that you want to associate an Ink Note
with a different record on your Palm OS-based organizer. For example, you may
create an Ink Note for an eDatebook appointment, and then later decide that this
Ink Note should be really be attached to a different eDatebook appointment.
Making changes like this is quick and easy with the SmartPad. At any time, you
can unattach an Ink Note from either an eDatebook or eAddress record, and then
attach that Ink Note to any record in the same application of your Palm OSbased organizer.
Page 54
To attach an Ink Note to a different record on your Palm OS-based organizer:
1. For this example, we’ll use an eDatebook appointment. Begin with a tap to
select the text line of an eDatebook appointment. The flashing cursor appears
in the line of the text you have selected, as shown:
Date Book appointment
selected (flashing cursor)
2. Tap the Menu icon (lower-left corner of your Palm OS-based
organizer screen). The Record menu appears, as shown :
Tap on the Unattach Ink
Note menu choice
3. Tap to select the Unattach Ink Note menu item. The Ink Note is removed
from the eDatebook record. Note that the Ink Note icon disappears in the list
view of the eDatebook application.
4. Tap to select the new eDatebook appointment where you want to attach the
Ink Note. This can be a different time on the same day or a different day. The
flashing cursor appears in the eDatebook appointment you have selected.
Seiko Instruments SmartPad User’s Guide
page 55
5. Tap Ink. The screen of your Palm OS-based organizer changes to show the
available (unattached) Ink Notes, as shown:
List of unattached
Ink Notes
6. From the list at the top of the screen, tap to select the Ink Note that you want
to attach. If you have more than one unattached Ink Note, the screen changes
to show the contents of each Ink Note, as you tap to select the name of the
Ink Note.
7. Tap Attach. The Title Format dialog appears, as shown:
Tap to select a
Title Format
8. In the Title Format dialog, tap to choose the Title that you want associated
with your Ink Note. Three choices are available:
Default Title. This is the Title that has already been assigned to your Ink
Note. Use this selection if you want to use the same Title when you move
the Ink Note.
Change Title to the Event Time. This selection changes the Title so that it
corresponds to the Event Time (appointment) where you are moving the Ink
Note.
New Title. This choice enables you to enter any new title that you want for
the Ink Note. If you select this choice, tap on the black line to place the
cursor, and then use the Graffiti writing area to enter the new title.
Page 56
9. Tap OK. The Ink Note that you selected is attached to the new appointment,
and you are returned to the list view of the eDatebook. Note that the list
view changes to show that an Ink Note is attached, as shown:
Ink Note icon
New Date Book appointment
with new time name assigned
You can use this same procedure to change how an Ink Note is attached for any
SmartPad application on your Palm OS-based organizer.
Note: Ink Notes cannot be shared among applications on your Palm OS-based
organizer. You can only move an Ink Note to another record in the same application.
Attaching Ink Notes to an E-mail Message
All of the SmartPad applications have the ability to attach Ink Notes to an e-mail
message. If you have a Palm Modem connected to your Palm OS-based organizer, and have installed e-mail software on your Palm OS-based organizer, you
can compose your e-mail message, and then transmit the completed message —
with the Ink Note attached — to any e-mail recipient.
The Ink Note file that you attach to the e-mail message can be in one of two file
formats: EDF (.edf, the SmartPad Data Format), or GIF (.gif, or Graphic
Interchange Format):
n If your e-mail recipient has a SmartPad, you can attach the note as an .edf
file.
n If your e-mail recipient does not have a SmartPad, the SmartPad software can
convert the Ink Note image to a GIF image file. The GIF file format is
standard for any recent Windows PC, and your recipient will most likely be
able to view the Ink Note file that you have attached to an e-mail message.
Seiko Instruments SmartPad User’s Guide
page 57
Note: The following procedure assumes that you have an appropriate e-mail
application installed on your Palm OS-based organizer, that you have configured
this application so you can send and receive e-mail with your Palm OS-based
organizer, and that you have a Palm Modem (or compatible modem) connected to
your Palm OS-based organizer.
The following procedure shows how to attach an Ink Note to an e-mail message
using typical e-mail software. Other e-mail software for the Palm OS-based
organizer works in a similar fashion.
To attach an Ink Note to an e-mail message:
1. From any of the SmartPad applications, use your SmartPad to create an Ink
Note. The Ink Note screen appears on your Palm OS-based organizer.
2. Tap the Email as arrow. The Email as pop-up menu appears, as shown:
Tap to select file format:
EDF or GIF
3. Tap to choose the file format that you want for the e-mail attachment. You
can choose either EDF or GIF.
4. Tap Done. A confirmation dialog appears. This confirmation dialog asks
whether you want to attach the Ink Note file(s) in the GIF file format, as
shown:
Page 58
5. Tap OK to continue.
6. If you selected the GIF file format, a status window appears. A progress bar
appears, showing that your Ink Note file(s) are being converted into the GIF
file format for your e-mail attachment.
7. The screen on your Palm OS-based organizer changes to show a new e-mail
message, as shown:
8. Fill in the e-mail address for the recipient in the To: field. Fill in the subject
for the e-mail message in the Subject field. Enter any text that you want in
the main message area of your e-mail message.
Seiko Instruments SmartPad User’s Guide
page 59
9. Tap either Send or Send Later, as appropriate for your e-mail message.
If you tapped Send, your e-mail message will be transmitted along with the Ink
Note images that you specified during this procedure. If you tapped Send Later,
your e-mail message will be transmitted the next time you transmit your e-mail
message with your Palm Modem.
Using the Smart KeyPad
The Smart KeyPad makes it quick and easy to enter text in any of your SmartPad
applications. With the Smart KeyPad, you can simply tap with the SmartPad pen
to enter any text, number, character or punctuation mark directly as text into your
SmartPad application — there’s no need to memorize and draw special shapes
that correspond to text characters.
The Smart KeyPad is located below the paper Notepad of your Seiko SmartPad
portfolio. Lift the paper in the Notepad to reveal the Smart KeyPad, as shown:
In each of the SmartPad applications (eAddress, eDateBook, eMemo, and eToDo)
a Smart KeyPad menu item appears in the Options menu. The following procedure explains how to access and use this menu item to activate the Smart KeyPad
feature.
To use the Smart KeyPad feature:
1. Start the eMemo application. The Smart KeyPad works the same in all of the
SmartPad applications, so this example procedure will illustrate its use with
the eMemo application.
2. Tap on the New button. A new Memo appears on the screen.
Page 60
Note: You could also tap any existing Memo to display and edit its contents.
3. Tap the Menu icon (lower-left corner of your Palm OS-based organizer
screen). The application menus appear at the top of the screen.
4. On the top of the screen, tap the Options menu.
5. In the Options menu, tap to choose Smart KeyPad. The Smart KeyPad screen
appears, as shown:
6. Use the SmartPad pen to tap on the Smart KeyPad. Tap directly on the center
of each letter that you want to “type.” Also, hold the SmartPad pen as close
to straight up-and-down (perpendicular) as you can, with respect to the
surface of the Smart KeyPad.
7. When you are finished, tap the Done button on the Smart KeyPad screen (on
your Palm OS-based organizer).
8. You are returned to the new Memo that you just created. All of the text that
you created with the Smart KeyPad will appear in this Memo.
9. Tap the Done button to close the Memo, and return to the Memo List in the
eMemo application.
Seiko Instruments SmartPad User’s Guide
page 61
Smart KeyPad Keys
The Smart KeyPad includes all of the keys you would find on a standard keyboard. The following keys appear in addition to the standard keys:
n Alpha. The Alpha key activates the alphanumeric characters on the Smart
KeyPad. These characters appear in black.
n Int’l. The Int’l (international) key activates the international, accented
characters, and currency characters on the Smart KeyPad. These characters
appear in blue.
n Tab. The Tab key acts as a standard Tab key on a keyboard.
n Caps. The Caps key activates the Caps Lock feature. Tap this key, and all
text will be entered in capital letters. Tap the Caps key a second time to turn
off the Caps Lock feature.
n Shift. The Shift key is used to create a capital letter. Tap the Shift key, and
the next letter that you tap will be capitalized. Subsequent letters appear as
normal, lower case letters. If you want to type in all capital letters, use the
Caps key.
n Left Arrow. The left arrow key deletes the previous text character after the
flashing cursor on your Palm OS-based organizer.
n Enter. The Enter key acts as a “return” key to continue text on the next line.
n Delete. The Delete key deletes the next text character after the flashing
cursor on your Palm OS-based organizer.
Page 62
Smart KeyPad Tips
n The surface of the Smart KeyPad is made of a special plastic that is resistant
to ink. Should ink “dots” accumulate as you use the Smart Keypad, you can
clean its surface with a damp tissue.
n For accuracy, hold the SmartPad pen perpendicular to the surface of the
Smart KeyPad. That is, as close to straight up-and-down as possible.
n When the Smart KeyPad is activated, you cannot use the screen of the Palm
OS-based organizer for text entry. For example, you cannot write Graffiti
characters on the Palm OS-based organizer screen to create text. You also
cannot use any of the Graffiti shortcuts, or special strokes (such as space,
back-space, or return).
n If you’re going to be inserting text into a message, be sure to tap the insertion
point in the text before you activate the Smart KeyPad. In other words, tap in
the text at the point where you want to start writing. This saves time in
navigating through text in a long message.
Seiko Instruments SmartPad User’s Guide
page 63
Chapter 4:
SmartPad Desktop Software
This chapter explains how to use the SmartPad desktop software that is included
with SmartPad.
The SmartPad desktop software is designed to work with the handwritten
information that you create with SmartPad. With the SmartPad desktop software,
you can:
n Select and view any of the Ink Notes that you have created with SmartPad and
your Palm OS-based organizer.
n Easily move among the 16 pages that can be a part of a single Ink Note.
n Change the line width of your handwritten data. With the different widths
available, you can easily view your Ink Notes on any kind of computer
monitor.
n Save the individual page images as separate files. You can save the images in
either bitmap (.bmp) or GIF (.gif) file formats. This makes it easy to work
with your handwritten notes in other software applications.
n Seamlessly e-mail Ink Notes (in GIF or EDF format) over the Internet.
Starting the SmartPad Desktop Application
When you installed the SmartPad desktop software, a Program Menu shortcut
was automatically installed in your Windows system. You can easily use this
shortcut, regardless of other software running on your Windows PC.
To start the SmartPad desktop application:
1. With Windows running on your desktop PC, click the Start button and choose
Programs. A pop-out menu of the available programs appears.
2. Drag the mouse to the right, and then click to choose the SmartPad menu
selection. A pop-out menu of the items in the SmartPad program group
appears.
Page 64
3. Drag the mouse to the right, and then click to choose SmartPad. The
SmartPad desktop software starts. In a moment, the main SmartPad desktop
window appears, as shown:
At this point, the SmartPad desktop software is running and ready for use. The
following sections of this chapter explains how to use the features of the
SmartPad desktop software.
Seiko Instruments SmartPad User’s Guide
page 65
Displaying an Ink Note Page
The SmartPad desktop contains controls to choose the Palm OS-based organizer
application that was used to create the Ink Note, the Ink Note file name, Category,
and page number.
Application
Category
Ink Note file
Page Select
(if more than one page for the Ink Note)
n Application. Click the icon to select the Palm application that was used to
create the Ink Note. The icons correspond to the eDatebook, eAddress,
eToDo, and eMemo applications.
n Category. If you have a lot of Ink Notes in a particular application, you can
use the Category menu to just display the Ink Notes for a specific Category.
Click this menu, and then click to choose the Category that you want to
display. The default menu selection is “All” so that all of the Ink Notes are
displayed for the selected application.
n Ink Note File. This is a list of all the Ink Note files for the application and
Category you have selected.
n Page Select. This is an array of 16 icons that correspond to the 16 pages
that can be a part of a single Ink Note. If there is only one page in your Ink
Note, only the icon at the upper-left (first page) is available. Click the Page
Select icons to choose the Ink Note page that you want to display.
Page 66
Choosing Ink Width
Once you have selected an Ink Note page for display, the SmartPad desktop
enables you to choose the Ink Width that is used for the display.
By default, the SmartPad desktop shows the Ink Note lines as one-pixel wide
(very thin). This is the most accurate display of your handwritten data. However,
if you are going to print your Ink Note, or use it with another application, you
may want to change the Ink Width.
The Ink Width control appears near the bottom of the window, as shown:
Click to Choose Ink Width
To change the Ink Width:
1. Click to choose the Ink Width that you want. Three settings are available:
Fine, Medium, and Thick.
Note: The Ink Width control is also available as a menu command in the
Preferences menu.
Changing an Ink Note Category
You can use the SmartPad desktop to change the Category of an Ink Note. If you
have a lot of Ink Notes associated with a particular Application, this feature is
useful for filing the Ink Notes so they’re easier to find.
To change an Ink Note Category:
1. Click the Change Category pull-down menu, as shown:
Seiko Instruments SmartPad User’s Guide
page 67
Click here
Click to choose Category
2. In the pull-down menu, click to choose the new Category that you want for
the Ink Note.
Note: Only Categories that currently have Ink Notes are available in this
menu. You may have many more Categories available in the application on
your Palm OS-based organizer.
3. Click Apply. The Category you selected is applied to the Ink Note.
Printing Your Ink Notes
You can use the SmartPad desktop application to print any of your Ink Notes.
You can print your Ink Notes to any printer that you ordinarily use with your
Windows PC. The SmartPad desktop software has controls for Page Setup, Print
Preview, and for the actual printing of your Ink Notes.
To print your Ink Notes:
1. Choose Print Setup from the File menu. The Print Setup dialog appears, as
shown:
Note: The exact appearance of the Print Setup dialog varies, according to the
type of printer that you use with your Windows PC.
Page 68
2. In the Print Setup dialog, choose the settings that you want for printing your
Ink Note pages. When you have finished, click the OK button to continue.
3. Choose Print Preview from the File menu. The Print Preview window
appears, as shown:
4. In the Print Preview window, you have a variety of controls to preview how
your printed Ink Note pages will appear:
Next Page / Previous Page. If your Ink Note has more than one page, these
buttons enable you to navigate among the pages that will be printed. These
buttons are not activated if your Ink Note only has one page.
One Page / Two Page. This button changes the view between a single page,
and two pages in the Print Preview dialog. This button is not activated if
your Ink Note only has one page.
Zoom In / Zoom Out. These buttons change the magnification of the Print
Preview image. You can use these buttons to Zoom In up to a 4x magnification of the Print Preview image.
Print. Activates the Print dialog for the printer that you selected in steps #1
and #2.
Close. Closes the Print Preview window and returns to the SmartPad
desktop window.
Seiko Instruments SmartPad User’s Guide
page 69
5. Click Close. The Print Preview window closes, and you are returned to the
SmartPad desktop window.
6. Choose Print from the File menu. The Print dialog appears, as shown:
7. In the Print dialog, click to select the pages that you want to print. The
default setting is to print all the pages of the Ink Note. If you want to print a
specific range of pages, click the Pages button in the Page Range area and
specify the pages that you want to print.
8. Click OK. The pages of the Ink Note that you selected in the previous step
are printed, with the settings and the printer that you have selected in this
procedure.
Note: Once you have completed the settings that you want in the Print Setup, and
Print Preview windows, you can simply use the Print command from the File
menu to print pages from any of your Ink Note files.
Exporting Ink Notes (Save As)
The SmartPad desktop software has features so you can export your Ink Note
pages as separate computer files. This makes it easy to use your handwritten Ink
Notes with other graphics applications on your Windows PC or to send the files
as attachments to e-mail messages.
You can save your Ink Note images in two standard file formats: Bitmap (.bmp)
files or GIF (.gif) files. Both of these file formats are common for applications
on Windows computers.
Page 70
To export Ink Notes in a different file format:
1. In the SmartPad desktop, click to display the Ink Note page that you want to
export.
Note: If the Ink Note contains more than one page, only the page that is
currently displayed will be exported as a separate file.
2. Choose Save As from the File menu. The Save As dialog appears, as shown:
3. Click the Save In pull-down menu, and navigate to the directory where you
want to export the file.
4. In the File Name area, enter the name that you want for the exported file.
Note: You do not have to enter the file extension (.bmp or .gif). The
extension will be added automatically, depending on the file format that you
select in the next step.
5. Click the Save As Type pull-down menu, and click to select the file format
you want for the exported file. You can choose either Bitmap (.bmp) or GIF
(.gif) as the file format.
6. Click Save. The exported file is saved in the directory you selected, in the file
format you selected, and with the name that you specified.
Opening Other Ink Notes
By default, the SmartPad desktop opens the Ink Note files that are stored in the
c:\SmartData directory. This is the directory that automatically receives the Ink
Note files when you perform a HotSync operation with your Palm OS-based
organizer.
If you have received Ink Note files on disk, or from another source (such as the
Internet), you can use the SmartPad desktop to work with these files.
Note: SmartPad Ink Note files have the file name extension .edf.
Seiko Instruments SmartPad User’s Guide
page 71
To open other Ink Note files with the SmartPad desktop:
1. Choose Open from the File menu. The Open dialog appears, as shown:
2. Click the Look in pull-down menu and navigate to the directory that contains
the new Ink Note file(s).
3. Click to select the file that you want to open.
4. Click Open. The file that you selected appears in the SmartPad desktop.
Finding Ink Note Files
The SmartPad desktop automatically displays the Ink Note files stored in the
SmartData directory of your hard drive. If you have stored Ink Note files in other
directories, the SmartPad desktop has a powerful Find command that enables you
to quickly locate and use these files. You can use the Find command to search
your Windows PC for Ink Note files by name and location, or by date.
Find by Name and Location
To Find by name and location:
1. Choose Find from the File menu. The Find dialog appears, as shown:
Page 72
2. If you know the file name you’re looking for, enter it in the Filename box.
Otherwise the Find feature will find all files in the Ink Note format.
3. In the Path box, enter the directory path to search. You can type the exact
path in this box, or use the Browse button to choose the directory path that
you want to search.
4. Click Find Now. All of the files that match your search criteria appear in the
bottom part of the Find dialog.
Find by Date
To Find by File Date:
1. Choose Find from the File menu. The Find dialog box appears.
2. Click Date. The Find dialog box changes to show the Date Search selections,
as shown:
3. Click the Find All EDF Files button to activate the advanced Date Search
selections.
4. Use the buttons and settings to define the dates that you want to search.
You can search for files that were created, accessed or modified during a
certain range of dates, during a certain number of days previous to the search,
or, during a certain period of months previous to the search.
Seiko Instruments SmartPad User’s Guide
page 73
5. Click Find Now. All of the files that match your search criteria appear in the
bottom part of the Find dialog.
Zooming the Ink Note View
The SmartPad desktop includes a zoom button in the toolbar that is used to zoom
in on the Ink Note for a closer view.
To zoom the Ink Note view:
1. Click to select an Ink Note in the SmartPad desktop.
2. Click the zoom button.
3. Move the mouse cursor over the Ink Note view, and click to magnify the area
that you want to view. The Ink Note view is magnified, as shown:
Zoom button
Scroll bars activated
Scroll bars are activated when the magnified view is displayed. You can use
the scroll bars to move the view of the magnified image.
4. Use the zoom button again to zoom to a normal view of the Ink Note.
Page 74
Attaching an Ink Note to an E-Mail Message
If you want to include an Ink Note as a part of an e-mail message, you can do so
directly from the SmartPad desktop. SmartPad desktop also gives you the choice
of attaching the Ink Note file as either an .edf file (the normal SmartPad file
format), or as a GIF file (Graphics Interchange Format).
The Ink Note file that you attach to the e-mail message can be in one of two file
formats: EDF (.edf, the SmartPad Data Format), or GIF (.gif, or Graphic
Interchange Format):
n If your e-mail recipient has a SmartPad, you can attach the note as an .edf
file.
n If your e-mail recipient does not have a SmartPad, the SmartPad desktop can
convert the Ink Note image to a GIF image file. The GIF file format is
standard for any recent Windows PC, and your recipient will most likely be
able to view the Ink Note file that you have attached to an e-mail message.
Note: The following procedure assumes that you are using Microsoft Outlook
and that you have already configured the software so you can send and receive
e-mail.
To attach an Ink Note to an e-mail message:
1. Click to select an Ink Note in the SmartPad desktop.
2. Click the mail button. A dialog box appears, prompting you to
choose a file format for the attachment, as shown:
3. Click to choose EDF attachment or GIF attachment, and then click OK to
continue.
Seiko Instruments SmartPad User’s Guide
page 75
4. Microsoft Outlook opens a new message window. The Ink Note image is
attached automatically, in the file format that you selected in step #3.
Address and send the message in the normal manner.
Note: If your e-mail application is not Microsoft Outlook, you will have to
attach the image manually.
Additional File Menu Commands
In the SmartPad desktop, the File menu contains additional commands that you
can use when working with your Ink Notes. This section describes each of these
commands:
n Rename. Enables you to change the name of an Ink Note file. Click to
select the file that you want to change, and then choose Rename from the File
menu.
n Delete. Will delete the Ink Note file from your Windows PC. If you choose
the Delete command from the File menu, a confirmation alert appears before
the file is actually deleted.
n Mail. Enables you to send the current Ink Note page as an e-mail attachment.
n Refresh. Updates the current file list in the SmartPad desktop. Use this
command after you perform a HotSync operation with your Palm OS-based
organizer.
n Restore. Restores your Ink Note files from the most recent backup copy.
n Exit. Exits the SmartPad desktop application.
Preferences Menu
The Preferences menu contains commands that control the display of the Ink
Note file.
Ink Display Width
The Ink Display Width command contains a sub-menu that allows you to choose
the width of the lines used to display the Ink Note image. You can choose Fine,
Medium, or Thick. This menu command has the same function as the control
buttons that appear near the bottom of the SmartPad desktop window.
Page 76
With Lines
The With Lines command activates the ruled line display that appears with the Ink
Note image. You can choose to have the ruled lines turned off, so you only see
the lines of your Ink Note image. This command acts as a toggle, to turn the
ruled line display off and on. The default setting is With Lines, to show the ruled
lines with the Ink Note image.
Toolbar Buttons
The SmartPad desktop includes a toolbar that contains buttons for commonly
used features, as shown:
Open
Print
Find
Zoom
Mail
Save As
n Open. This button is the same as the Open command in the File menu. It is
used to open Ink Note files that are located in a different directory.
n Save As. This command is the same as the Save As command in the File
menu. It is used to save the Ink Note images in a different file format.
n Print. This button is the same as the Print command in the File menu. It
activates the Print dialog box.
n Mail. This button is the same as the Mail command in the File menu. It
activates the feature for attaching an Ink Note image to an e-mail message.
n Find. This button is the same as the Find command in the File menu. It is
used to search for Ink Note files in a different directory.
n Zoom. This button activates the zoom feature, for a magnified view of your
Ink Note file.
Seiko Instruments SmartPad User’s Guide
page 77
Chapter 5:
Reference
This chapter contains information about how to replace the ink cartridge in the
SmartPad pen, how to replace the battery in the SmartPad pen, and Troubleshooting information for your SmartPad.
Replacing Ink Cartridges
Spare ink cartridges are included with SmartPad. As shipped, these spare ink
cartridges are located in the storage pocket of the SmartPad portfolio.
The spare ink cartridges are stored in a cartridge holder. This cartridge holder
also incorporates a special tool that is used to remove expended ink cartridges.
The following procedure explains how to replace the SmartPad pen’s ink cartridge.
To replace the ink cartridge of the SmartPad pen:
1. Find the ink cartridge holder for the SmartPad portfolio. The cartridge holder
is stored in a pocket of the SmartPad portfolio.
2. The cartridge holder has a special tool that is used to remove the ink cartridge. Fit the tip of the SmartPad pen into the notch of this tool, as shown:
Fit ridge into tool
SmartPad
Pen
Cartridge holder
Page 78
3. Pull the SmartPad pen away from the cartridge holder to extract the ink
cartridge, as shown:
Pull SmartPad Pen
to remove ink cartridge
4. Remove a fresh ink cartridge from the cartridge holder.
5. Place the fresh ink cartridge into the end of the SmartPad pen, and press the
tip of the SmartPad pen firmly down onto a writing surface. You should be
able to feel the cartridge stop when it is firmly seated into the SmartPad pen.
Should you require additional ink cartridges, check with your Seiko Instruments
reseller, contact Seiko Instruments at 800-688-0817, or refer to the web site at
www.seikosmart.com.
Replacing the SmartPad Pen Battery
The SmartPad pen is powered by a standard AAAA battery. With regular use of
your SmartPad, this battery should power the SmartPad pen for several months.
If you find that your handwritten data no longer appears on the Ink Note screen of
your Palm OS-based organizer, it’s probably time to replace the battery in the
SmartPad pen. You can find a replacement AAAA battery at most camera stores,
and at Radio Shack retail outlets.
Seiko Instruments SmartPad User’s Guide
page 79
To replace the battery in the SmartPad pen:
1. The body of the SmartPad pen has two sections that are threaded together. To
separate the two sections, begin by firmly grasping the SmartPad pen at the
two locations shown:
Grasp Here
Grasp Here
2. Twist the pen to unscrew the two sections.
3. Separate the two sections, and the AAAA battery will slide out, as shown:
Replace Battery
4. Replace the battery with a fresh AAAA alkaline battery. Be sure to note the
polarity of the battery, as shown in the previous diagram.
5. Carefully fit the two sections of the SmartPad pen back together, and twist to
join the two havlves.
When the connection is tight, the SmartPad pen is ready for use.
Page 80
Troubleshooting
This Troubleshooting section describes problems you may encounter when
working with your SmartPad, and the solutions to those problems.
If you are having a problem with your SmartPad, review each of the Troubleshooting questions in this section. If you cannot find an appropriate question or
solution, information about how to contact Seiko Instruments, and SmartPad
Support appears at the end of this section.
SmartPad Troubleshooting
I write on the notepad in SmartPad, but nothing appears on the screen of my
Palm OS-based organizer.
n Make sure that your Palm OS-based organizer is turned on. Press the Power
button on the Palm OS-based organizer and choose the SmartPad application
that you want to use (e.g. eMemo, eAddress, etc.)
n Make sure that you are running one of the SmartPad applications, rather than
the standard version installed on your Palm OS-based organizer. For
example, make sure that you are running eMemo rather than the standard
Memo Pad application. Refer to the section entitled Reassigning Front Panel
Buttons, and make sure that you have assigned the SmartPad applications to
the front panel buttons of your Palm OS-based organizer.
n Make sure that the Elink check-box (lower-left corner of the screen) has a
check-mark. A check-mark in the Elink box indicates that your Palm OSbased organizer is communicating with your SmartPad.
Certain models of Palm OS-based organizers may need to be repositioned
slightly in the hook-and-loop fasteners. For example, the Palm M-100
organizer should be repositioned a bit to the left of center. Experiment with
the placement of your Palm OS-based organizer, to make sure that the Elink
check-box has a check-mark. This ensures porper operation.
n Make sure that the batteries in your SmartPad portfolio are in good condition. The battery condition is reported on the bottom of the screen.
Seiko Instruments SmartPad User’s Guide
page 81
n Try replacing the battery in the SmartPad pen. The SmartPad pen contains
one AAAA battery.
SmartPad works fine, but battery consumption is an issue. The batteries don’t
seem to last very long in my Palm OS-based organizer.
n SmartPad is designed for taking notes. After a period of inactivity, the screen
of your Palm OS-based organizer will go blank to conserve energy, but your
Palm OS-based organizer is still running, and ready to take notes with the
SmartPad. This stage of power conservation lasts about 30 minutes; if you
don’t resume taking notes after 30 minutes, the Palm OS-based organizer
shuts down completely.
If you use SmartPad to take notes in a situation where there are long periods
of inactivity, use the Power button on your Palm OS-based organizer to turn
off its power when you’re not actually taking notes.
I tapped the 1x button of the SmartPad screen for a zoomed-in view of my
handwritten notes. With the zoomed-in view, I can’t see any of my handwritten
notes.
n The zoomed-in view represents a small “window” to the total writing area of
the notepad. You can easily reposition this window. Use the stylus, touch the
zoomed-in view and drag the stylus tip to reposition the view of the notepad.
I had to perform a Hard Reset of my Palm OS-based organizer and now it
doesn’t communicate with the SmartPad portfolio.
n When you perform a Hard Reset of the Palm OS-based organizer, all of the
applications that you have installed are removed from the memory of the
Palm OS-based organizer. In this case, you must reinstall the SmartPad
software on your Palm OS-based organizer. Refer to the section entitled
SmartPad Software Installation for the complete procedure.
SmartPad Desktop Software Troubleshooting
I start the SmartPad desktop software, but can’t see any of the Ink Notes from
my Palm OS-based organizer.
n For your Ink Notes to appear in the SmartPad desktop software, you must
perform a HotSync operation with your Palm OS-based organizer. With your
Windows PC running, return the Palm OS-based organizer to its cradle, and
press the HotSync button. Then choose Refresh from the File menu of the
SmartPad desktop.
Page 82
n Make sure that the SmartPad desktop software is looking in the correct
directory for the Ink Note files. The default directory is c:\SmartData. In the
SmartPad desktop software, choose Open from the File menu, and then
navigate to the c:\smartdata directory.
I’m having trouble printing my Ink Note files.
n The SmartPad desktop software is designed to work with any printer that is
compatible with your PC. Make sure that your printer is connected to your
computer, and that it is turned on. Try to print something with another
application on your PC. If you still have trouble printing your Ink Notes,
refer to the section entitled Printing Your Ink Notes. If all else fails, click the
Start button, and choose Help to display the Help topics for your computer.
I want to use my Ink Note files with other applications on my PC.
n Ink Note files are saved in the special .edf file format. To use these files with
other applications on your PC, you can save the files in either Bitmap (.bmp)
or GIF (.gif) file formats. Refer to the section entitled Exporting Ink Notes
(Save As).
Contacting Seiko Instruments
If you have a problem that you cannot resolve, make sure that you have reviewed
this User’s Guide, and this Troubleshooting section in particular. If you are still
having problems using your SmartPad Connected Notepad, you can contact Seiko
Instruments Inc. via telephone or the World Wide Web.
Telephone Support:
800-757-1011
World Wide Web:
http://www.seikosmart.com
Written correspondence should be addressed to:
Seiko Instruments USA Inc.
Attn: Business and Home Office Products Division
2990 W. Lomita Blvd.
Torrance, CA 90505-5196
Seiko Instruments SmartPad User’s Guide
page 83
North America
United States
Seiko Instruments
25108 Milton Thompson
Lees Summit, MO 64086
Canada
GEAC Canada Ltd.
45 McIntosh Dr.
Markham, Ontario, Canada L3R 8C7
European product repair centers
Germany
Papyrus Software-Entwicklung GmbH
Hainbuchenweg 14-18
21224 Rosengarten b. Hamburg/Germany
Germany
+49-4105-5567-0
France
Logistix/Seiko Repair
c/o TAT Express
9 rue Pierre et Marie Curie
Z.I. Ingre
45140 Saint Jean De La Ruelle
France
tel: +353-1-8484995
fax: +353-1-8484995
Sweden
Memstore AB
TruckvŠgen 16
Box 2027
S-194 02 Upplands VŠsby
Sweden
tel: +46 8 5909 2000
fax: +46 8 5909 1733
Switzerland
Lab Plus AG
Kirchacherstr. 9
CH-8608 Bubikon
Switzerland
tel: +41-55 243 38 77
fax: +41-55 243 38 75
Finland
Paricad OY
Olarinluoma 16
FIN-02200 ESPOO
Finland
tel: +358-59 452 3577
fax: +358-59 425 475
Page 84
Netherlands
Compac b.v.
Franciscusweg 291
Hilversum
Netherlands
tel: +31 35-626 06 33
fax: +31 35-624 15 78
United Kingdom
Seiko U.K. Ltd.
Hattori House Vanwall Road
Madinhead, Berkshire SL6 4UW
United Kingdom
tel: +44-1628-770988
fax: +44-1628-770655
Ireland
Seiko Instruments Repair Centre
c/o Logistix Ireland Ltd.
Swords Business Park
Seaton Road, Swords
Dublin, Ireland
tel: +353-1-8484995
fax: +353-1-8484995
North America Technical Support:
United States & Canada
1-800-757-1011 between the hours of 6:00am to 8:00pm (Pacific Time)
Email support http://www.seikosmart.com/support/techsupp.html
European technical Support:
United Kingdom - 9:00am to 4:00pm
Toll Free: +800 72797870
France - 10:00am to 4:00pm
Toll Free: +800 72797870
Germany - 10:00am to 4:00pm
Toll Free: +800 72797870
Central Europe - 10:00am to 4:00pm
Tel: +49-40 2380 8916
Seiko Instruments SmartPad User’s Guide
page 85
Index
A
Applications
eMemo 25
front panel buttons 18
Attaching
ink note to e-mail 57
ink note to record 54
B
Batteries
in SmartPad 11
in SmartPen 79
C
Category
changing ink note 67
E
E-Mail
attaching from desktop 75
attaching ink notes 57
eAddress 33
adding ink note pages 38
adding to ink note 36
creating ink note 34
deleting ink note 39
zooming and panning 36
eDatebook 48
adding ink note pages 52
adding to ink note 50
creating ink note 48
deleting ink note 53
zooming and panning 50
eMemo 25
adding ink note pages 30
adding to ink note 28
creating ink note 26
deleting ink note 31
zooming and panning 29
Entering Text
with Smart KeyPad 60
eToDo 41
adding ink note pages 45
adding to ink note 43
creating ink note 41
deleting ink note 46
zooming and panning 43
Exporting
ink notes 70
F
File Menu
additional commands 76
Find 72
Find by Date 73
Find by Name 72
Page 86
I
O
Ink Note
adding pages in eAddress 38
adding pages in eDatebook 52
adding pages in eMemo 30
adding pages in eToDo 45
adding to in eAddress 36
adding to in eDatebook 50
adding to in eMemo 28
adding to in eToDo 43
attaching to different record 54
changing category 67
creating in eAddress 34
creating in eDatebook 48
creating in eMemo 26
creating in eToDo 41
deleting in eAddress 39
deleting in eDatebook 53
deleting in eMemo 31
deleting in eToDo 46
exporting 70
finding 72
in Smartpad desktop 66
opening 71
printing 68
save as 70
width in SmartPad desktop 67
zooming in eAddress 36
zooming in eDatebook 50
zooming in ememo 29
zooming in eToDo 43
Open
ink notes 71
Ink Width 67
preferences menu 76
P
Palm OS-based Organizer
attaching 20
reassign front panel buttons 18
Panning
in eAddress 36
in eDatebook 50
in eMemo 29
in eToDo 43
Preferences Menu
commands 76
Printing
ink notes 68
R
Reassign Front Panel Buttons 18
S
Save As 70
Seiko Instruments
contacting 83
Smart KeyPad
keys 62
tips 63
using 60
Installing
batteries 11
SmartPad software 12
Seiko Instruments SmartPad User’s Guide
page 87
SmartPad
attaching organizer 20
battery installation 11
eMemo 25
features 6
how it works 5
ink notes in e-mail 57
package box contents 10
software installation 12
system requirements 10
troubleshooting 81
ways to use 7
SmartPad Desktop
attaching ink note to e-mail 75
changing ink note category 67
choosing ink width 67
displaying ink note 66
exporting ink notes 70
file menu 76
finding ink note files 72
opening ink note files 71
preferences menu 76
printing ink note 68
save as 70
starting 64
toolbar buttons 77
troubleshooting 82
zooming ink note view 74
SmartPad Pen
battery replacement 79
ink replacement 78
Page 88
T
Text
with Smart KeyPad 60
Toolbar Buttons 77
Troubleshooting 81
Z
Zooming
in eAddress 36
in eDatebook 50
in eMemo 29
in eToDo 43
in SmartPad desktop 74
Seiko Instruments SmartPad User’s Guide
page 89