1
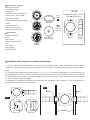
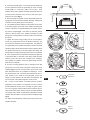
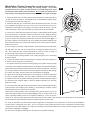
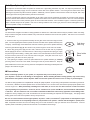
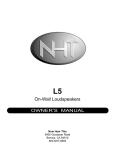
iC1, iC2, iC3 and iC4 In-Ceiling Loudspeakers OWNER’S MANUAL Now Hear This 527 Stone Road Benicia, CA 94510 800-NHT-9993 Thank you for your purchase of the NHT in-ceiling loudspeaker. Please take a few minutes to read through this owner's manual prior to installing your new speakers. The information provided will help you to obtain maximum performance from your audio system. If you have questions or need assistance at any time during the installation or operation of your new speakers, please call your NHT Dealer or our Toll-Free Customer Hotline at: 1-800-NHT-9993 Specifications iC1 iC2 System Type: 2-way in-ceiling design 2-way in-ceiling design Driver Complement: 6.5” long-throw polypropylene cone woofer and 6.5” long-throw polypropylene cone woofer and 1” fluid cooled soft dome tweeter coaxially mounted 1” soft dome three-tweeter array 2.2KHz, 18dB/octave high-pass 2.2KHz, 18dB/octave high-pass and 12dB/octave low-pass and 6dB/octave low-pass Response: 60Hz - 20KHz, +/-3dB 60Hz - 20KHz, +/-3dB Sensitivity: 86dB (2.83V at 1M) 86dB (2.83V at 1M) Impedance: 8 ohms nominal 8 ohms nominal Recommended Power: 10W/ch minimum, 100W/ch maximum 10W/ch minimum, 100W/ch maximum Inputs: Spring clips Professional grade spring posts Weight: 4.6 lbs. each 5 lbs. each Cutout Diameter: 8 13/16” Dia. (without iCB6: 8 1/2”) 8 13/16” Dia. (without iCB6: 8 1/2”) Bezel Diameter: 9 11/16” Dia. 9 11/16” Dia. Depth behind ceiling: 4 13/16” 4 13/16” Finish: Matte white (paintable) Matte white (paintable) System Type: 2-way in-ceiling design 2-way in-ceiling design Driver Complement: 6.5” long-throw aluminum cone woofer and 8” long-throw aluminum cone woofer and 1” fluid cooled aluminum dome three-tweeter array 1” fluid cooled aluminum dome three-tweeter array 1.9KHz, 18dB/octave high-pass 1.6kHz, 18dB/octave high-pass and 12dB/octave low-pass and 12dB/octave low-pass Response: 50Hz - 20KHz, +/-3dB 40Hz - 20KHz, +/-3dB Sensitivity: 85dB (2.83V at 1M) 87dB (2.83V at 1M) Impedance: 8 ohms nominal 8 ohms nominal Recommended Power: 10W/ch minimum, 125W/ch maximum 10W/ch minimum, 150W/ch maximum Inputs: Professional grade spring posts Professional grade spring posts Weight: 5 lbs. each 7 lbs. each Cutout Diameter: 8 13/16” Dia. (without iCB8: 8 1/2”) 10 1/4” Dia. (without iCB8: 10”) Bezel Diameter: 9 11/16” 11 1/4” Depth behind ceiling: 4 13/16” Dia. 4 3/4” Dia. Finish: Matte white (paintable) Matte white (paintable) Crossover: iC3 Crossover: iC4 Design NHT loudspeakers are designed to deliver refined, musical sound from attractive and affordable packages. Our efforts are guided by the study of human hearing and are optimized for real world use. Every NHT speaker undergoes rigorous testing and quality control at the factory to ensure you years of listening pleasure. NHT in-ceiling loudspeakers are designed to deliver the sonics and value of NHT’s acclaimed freestanding speakers, while offering the invisibility of in-ceiling installation. The drive units are custom designed to achieve a level of performance not normally associated with in-ceiling speakers, while the intuitive mounting system makes them ideal for new or existing construction. The iC2, iC3 and iC4 employ NHT’s innovative three tweeter array for more even sound dispersion to a wider range of listening areas. Caution: The NHT in-ceiling speakers should be installed by an experienced and licensed custom installation professional. Be sure that the installer possesses sufficient skill, the proper tools, knowledge of local fire and building codes, and a familiarity with the structure of the building (especially wall and/or ceiling materials, layouts, electrical and plumbing lines, etc.). Placement NHT in-ceiling speakers are designed for installation between standard wood joists. Their moisture resistant drive units allow them to be installed in moisture prone interior environments such as bathrooms, indoor swimming pool and sauna rooms. Outdoor use is not recommended. Spend some time considering placement prior to installing the speakers. Once they are installed, they are permanent, so their location should be selected carefully. When possible, locate the speakers at least 3 feet from adjacent side walls and at least 2 feet from front or rear walls. The speakers should be mounted on a flat surface to ensure a good seal between the baffle and the mounting surface. When possible, position the speakers so that they are equidistant from the most likely listening area. If the NHT in-ceiling speakers are going to serve as rear (surround) channels in a home theater system, make sure to install them toward the “rear” of the room (the opposite side from where the television will likely be). For best results, position the NHT in-ceiling speakers 40 to 60 degrees off-axis from the listening position. The polar plots, located on the NHT website, indicate smoother frequency response at these angles. If you wish to get an idea how they will look, try taping the supplied cutout templates to the ceiling. Tech Tips: Pre-Wiring for New Construction 1. For best results, avoid running speaker wire near AC wire, as it may induce a 60Hz hum in the audio signal. It’s a good idea to run the speaker wire after the AC wiring has already been completed, so that you can route the speaker wire at least three feet away from the AC wiring. If speaker wire and AC wiring must run parallel, install the speaker wire within a steel conduit. Note that low voltage wiring (doorbell, intercom, telephone, security, etc.) is unlikely to induce hum and can typically be run parallel to speaker wire with no detrimental effects. 2. When drilling holes through wall studs or ceiling joists, use a drill bit that is at least as wide as the speaker cable that will be routed through them. Always drill through the center of the stud or joist. If the hole must be drilled within one inch of the edge of a wall stud, add a nail plate to the drywall side to protect the wire from possible nails and screws put in the wall later. Line up the holes in the studs or joists as you go, so that pulling the wire through them will be easier. Parts List (each speaker): “Speaker” pack includes: (1) Speaker assembly iC1 iCB6 / iCB8 (optional) (1) Metal grille (2) Absorptive foam pad (except iC1) (1) Paint shield - cutout template Butyl Rubber 2 iC2 iC3 3 #2 Philips screwdriver Pencil Tape measure Aluminum Mounting wing Mounting bracket Paint shield cutout template 14 41 13 31 iC4 Tools Needed: 12 21 11 11 10 01 9 9 Absorptive Foam Pad (4) 5 x 50mm flathead screws 8 8 (2) Metal mounting wings 7 7 6 6 (1) Mounting bracket 5 5 4 4 3 Metal grille includes: 2 iCB6 and iCB8 Mounting Bracket pack 1 1 (1) Roll of butyl rubber Use iCB6 for models iC1, iC2, iC3 Use iCB8 for model iC4 Utility knife or keyhole saw Speaker Assembly Level Wire strippers Safety goggles Protective gloves Installation: New Construction (unfinished ceilings) 1. Once you’ve selected the desired location for the speaker, begin by installing the iCB6 or iCB8 mounting bracket between adjacent ceiling joists. First attach the mounting wings to the bracket by inserting them into the locking plastic tabs in the side of the bracket (fig.1). 2. The wings feature progressively elongated sections (1”, 1”, 2”, 2”, 2”, 3”, 3”) with screw holes spaced in one inch increments. The iCB6 and iCB8 have NHT logos on one side, this side should be oriented away from the drywall. Attach the wings to the joists with the 5 x 50mm flathead screws or staples. For maximum stability, use two screws for each wing. Bend back the extra portion of the wing at one of the pre stamped “break” lines (fig.2). 3. Complete the pre wiring before the drywall goes up (see “Tech Tips: Pre-Wiring for New Construction”). Leave an extra few feet of speaker wire, and tie it to the the mounting bracket. fig.2 14 1 2 3 4 5 6 7 8 9 10 11 12 13 14 Bend fig.1 14 14 1 2 1 2 3 1 2 1 2 3 13 13 13 12 12 12 11 11 11 10 10 10 9 9 9 8 8 8 Bend 7 7 7 6 6 6 5 5 5 4 4 4 3 3 3 2 2 2 1 1 2 3 4 5 6 7 8 9 10 11 12 13 14 1 1 1 2 3 4 5 6 7 8 9 10 11 12 13 14 Joists 4. During the drywall phase, cut a hole around the bracket so fig.3 that the drywall surrounds the protruding lip of the mounting bracket (iCB6 = 8 13/16” Dia., iCB8 = 10 1/4” Dia.). Once installed, the lip of the speaker assembly will extend about 1/2 inch beyond the perimeter of the cutout to hide minor imper- Drywall fections in the cutout (fig.3). 5. After the drywall is complete, connect the speaker wire to the spring posts on the back of the speaker assembly, making sure to observe correct polarity (see “Connections”). 6. The speaker assembly attaches to the bracket via four plastic mounting clamps on the back of the speaker assembly that swivel to “sandwich” the drywall between the speaker assembly and the clamps (fig.4). First rotate the mounting clamps fig.4 inward so that the body of the speaker assembly can slide through the mounting bracket. Exercise caution not to damage the drivers. 7. Tighten the screws snugly, making sure to not over tighten, as this may compromise the fit of the speaker assembly. The use of power screwdrivers is not recommended. The gasket on the drywall side of the speaker assembly lip reduces unwanted vibrations against the drywall and will compress slightly to allow the speaker assembly lip to rest flush against the ceiling. The spring loaded mounting clamps provide tension once installed. 8. If the exposed area of the speaker assembly and grille are to be painted after it’s mounted to the ceiling, install the paint shield to protect the driver from overspray (see “Painting”). Once painting is complete, remove the paint shield and set it aside for use in Step #9. 9. The NHT in-ceiling speakers use an absorptive foam pad (except the iC1) on the inside of the grille to shape the sound radiation (fig.5). There is a circular section in the center of the paint shield that serves as a template for attaching it. Punch out the perforated circle. Place the paint shield (minus the cir- Cut around perforations cular section) on the inside of the metal grille, remove the backer from the adhesive dot and attach the absorptive pad onto the inside of the grille through the circular cutout. 10. fig.5 A strip of butyl rubber is provided with this product. Application of butyl rubber is not required, but can be used to provide additional security when mounting the grill in place. Cut a 1/4” long piece of butyl rubber from the end of the roll provided. Peel off the paper covering and roll the rubber between your fingers until it makes a small cylinder. Make three of these cylinders and place them in the groove before installing the grill (fig.6). 11. Attach the metal grille by inserting it into the grooves in the speaker assembly. Remove template 5 Installation: Existing Construction (retrofitting finished ceilings) Warning: Exercise caution when drilling into existing ceilings. Do not drill through electrical wires, pipes, conduits, heating or air conditioning ducts. If you feel resistance while drilling, stop immediately. Do not install the speaker into a drop ceiling or soft ceiling, as this type of construction will not support its weight. fig.6 1. Using a studfinder or the “knocking” method, locate the joists in the ceiling area where you wish to mount the speaker. The speaker will be mounted between adjacent joists, no closer than two inches from either joist. 2. Determine that there are no obstructions above the desired cutout area. This may be accomplished by drilling a hole in the center of the cutout area and using an “L” shaped piece of metal (like a coat hanger) to “feel around” above the ceiling. If you discover an obstruction, fill the hole with patching compound and try another location. 3. If there are no obstructions found above the ceiling, use the supplied cutout template and a pencil to draw a 10” diameter outline of the area to be cut out. Begin by drilling a hole on the inside of the circle with a 1/4” bit. Then cut out the ceiling section with a utility knife or keyhole saw, following the line traced around the cutout template (fig.7). If the ceiling is painted, use the keyhole saw. Once installed, the speaker assembly outer frame will extend about 1/2 inch beyond the perimeter of the cutout to hide minor imperfections in the cutout. 4. If the ceiling is constructed of lath and plaster, outline the penciled circle with masking tape, drill a 1/4” hole, and use a utility knife to cut through the plaster down to the Apply Here lath. Use a saber saw with a metal cutting blade or a pair of tin snips to gently cut through the lath, being careful not to vibrate plaster off the ceiling. 5. To mount the NHT in-ceiling speaker into an existing ceiling, the use of a mounting bracket is optional. 6. Connect the speaker wire to the spring posts on the back of the bezel, making sure to observe correct polarity (see “Connections”). 7. The speaker assembly mounts to the existing ceiling via four plastic mounting clamps on the back of the speaker assembly that swivel to “sandwich” the speaker assembly in place between its protruding outer frame and the rear surface of the drywall. First rotate fig.7 Cutout Diameter 1/4“ Diameter the mounting clamps inward so that the body of the speaker assembly can slide through the cutout in the ceiling. Exercise caution not to damage the driver (fig 4). 8. Tighten the screws snugly, making sure not to over tighten, as this may compromise the fit of the speaker assembly. The use of power screwdrivers is not recommended. The gasket on the back the speaker assembly lip reduces unwanted vibrations against the drywall and will compress slightly to allow the speaker assembly lip to rest flush against the ceiling. 9. If the bezel frame and grille are to be painted in the ceiling, install the paint shield to protect the driver from overspray (see “Painting”). Once painting is complete, remove the paint shield and set it aside for use in Step #10. 10 The NHT in-ceiling speakers use an absorptive foam pad (except the iC1) on the Joists inside of the grille to shape the sound radiation (fig.5). There is a circular section in the center of the paint shield that serves as a template for attaching it. Punch out the perforated circle. Place the paint shield (minus the circular section) on the inside of the metal grille, remove the backer from the adhesive dot and attach the larger absorptive pad onto the grille through the circular cutout. 11. A strip of butyl rubber is provided with this product. Application of butyl rubber is not required, but can be used to provide additional security when mounting the grill in place. Cut a 1/4” long piece of butyl rubber from the end of the roll provided. Peel off the paper covering and roll the rubber between your fingers until it makes a small cylinder. Make three of these cylinders and place them in the groove before installing the grill (fig.6). 12. Attach the metal grille by inserting it into the grooves in the speaker assembly. Tech Tips: Optimizing Sonic Performance Bass response is smoothest when the speaker is mounted into a rigid ceiling that flexes very little. For improved performance, add cross-braces horizontally roughly one and a half feet to either side of the speaker location. Use wood glue and extra screws when attaching the drywall to the joists around the speaker. Additionally, once the speaker cutout has been made in the drywall, add a strip of wood glue where the drywall meets the joists and cross-braces. For more controlled bass response, add insulation to the ceiling cavity around and behind the speaker to provide acoustic damping. Be sure to add the same amount of insulation to speakers in the same room to ensure consistent sound. Use R-12 or R-19 fiberglass insulation, and be sure to wear protective gloves to avoid contact with the fibers. If the insulation is paper- or foil-faced, position the paper or foil side away from the speaker. If the new or existing insulation is the “loose” type, place a thin sheet of fiberglass over the top of the speaker to keep out small debris. Painting The bezel frame and grille of the NHT in-ceiling speakers are finished in a matte white finish that may be painted to match the ceiling. Keep in mind that the grille contains hundreds of tiny holes that are essential to the sound of the speaker. Take care not to cover these holes with paint. 1. Paint the outer ring of the speaker assembly and the grille at the same time using the same paint. Use the supplied paint shield to protect the driver and inside of the speaker assembly from overspray. Fold the edge of the shield down and insert it into the groove in the speaker assembly Fold down outer ring where the grille attaches (fig. 8). Be careful not to punch through the round hole in the middle. 2. When using spray paint, apply two thin coats, make sure to let the first coat dry completely before applying the second. This will avoid runs. When using a compressor and spray gun, apply the paint using its finest setting. Painting with a brush is not recommended, but when necessary be sure to thin the paint so as not to cover the holes in the grille. If the paint does cover any of Place Inside Bezel the grille holes, poke them out with a paper clip. 3. Once painting is complete, remove the paint shield from the speaker assembly by carefully punching out the round hole in the middle, and using this hole to pull the shield free. Keep the paint shield and the round cutout, as they will serve as templates for attaching the absorptive foam fig.8 pad(s) to the inside of the grille. Connections Before connecting speakers to your system, it is important that you turn off the power to your amplifier / receiver to avoid damage to the equipment. Before installing the NHT in-ceiling speaker, map out the wiring paths between the speakers and the amplifier. Make sure that the speaker wire does not rest on sharp or pointed objects. The NHT in-ceiling speakers are compatible with virtually all quality amplifiers. Proper wiring of the speakers is essential to good sound. At a minimum, 16AWG 2-conductor speaker wire is recommended for runs of 10 feet or less, with heavier special purpose speaker wire used for longer runs. When permanently installing wire inside walls, be sure to use wire that is rated for in-wall use and has special jacketing for fire prevention. In the U.S., the U.L. standard is CL-2, CL-3 and CM wire, and in Canada the CSA standard is FT4 wire. The wire should be run in accordance with National Electrical Code and any applicable local building codes. Prepare the wire by stripping 1/4” to 3/8” of insulation from the ends and twisting the exposed wire strands tightly. The spring loaded binding posts on the back of the speakers will only accept raw wire. Be sure to connect both the left and right speakers "in-phase." That is, the Positive + (red) terminal on the amplifier output must be connected to the corresponding Positive + (red) terminal on the speaker. Likewise with the Negative - (black) terminals. All speaker wire have some sort of marking along one or both conductors to help you make the correct connections. Incorrect speaker phase is indicated by weak bass and the lack of a well-defined stereo image. Operation The NHT in-ceiling speakers are designed to handle a wide range of listening levels, but every speaker has limits. It is important to use common sense and listen for signs of possible distress from the speakers. Underpowered amplifiers are most often the cause of speaker damage. For example, a 60-watt amplifier runs out of power when called upon to produce more than 60 watts, and the resulting distortion can damage the speaker. If you tend to listen at high volume levels, more powerful amplifiers are preferable because they are less likely to run out of power. Noticeable distortion or harsh breakup is an indication that either your amplifier or your speakers are running beyond their capacity, and the volume should be decreased. Speaker damage most often occurs from sustained high volume levels, not from transient sounds or brief musical peaks. Excessive boosting of bass, treble or equalizer controls can worsen the problem, and is not recommended. Maintenance The NHT in-ceiling speakers require minimal maintenance under normal use. The grille and speaker assembly may be cleaned using a damp cloth or a mild, non-abrasive cleaner. Do not expose the speakers to direct sunlight or high temperatures. Do not attempt to clean the actual drivers. Limited Warranty Valid Only in the U.S.A. Warranty Period For the period of 5 years for parts and 5 years for labor from date of original purchase (the warranty period) from an authorized NHT dealer, Now Hear This (NHT) warrants that if our product fails to function properly under normal use due to a manufacturing defect when installed and operated according to the owner’s manual instructions enclosed with the unit, it will be repaired or replaced with a unit of comparable value at the option of NHT without charge to you for parts or actual repair work. Parts supplied under this warranty may be new or rebuilt at the option of NHT. What’s Not Covered This warranty does not cover any product which is used in any trade or business, or in an industrial or commercial application. This warranty does not cover the cabinet or any appearance item, or any damage caused to the product resulting from: alterations, modifications not authorized in writing by NHT, accident, misuse or abuse, damage due to lightning or power surges, or being subjected to power in excess of the speaker’s published power rating. This warranty does not cover the cost of parts which would otherwise be provided without charge under this warranty, obtained from any source other than an authorized NHT service location. This warranty does not cover defects or damage caused by the use of unauthorized parts or labor or from improper maintenance. Altered, defaced or removed serial numbers void this warranty. Your Rights The liability of NHT will be limited to the purchase price of the product, and NHT will not be liable for incidental or consequential damages. NHT limits its obligations under any implied warranties under state laws to a period not exceeding the warranty period. Some states do not allow limitations on how long an implied warranty lasts, and some states do not allow the exclusion or limitation of incidental or consequential damages. The above limitations or exclusions may not apply to you. This warranty gives you specific legal rights, and you may have other rights which vary from state to state. To Obtain Service NHT has appointed a number of authorized service companies throughout the USA should your product ever require service. To receive warranty service, you will need to present your sales receipt showing place and date of original owner’s transaction. To find the name and address of the nearest authorized NHT service location, call or write: Customer Service Department, NHT, 527 Stone Rd., Benicia, CA 94510, 1-800-NHT-9993 (648-9993), www.nhthifi.com Keep this warranty with your sales receipt. Record date and place of purchase for future reference. CONSUMER INFORMATION CARD THANKS FOR USING NHT REGISTER YOUR PURCHASE NOW FOR • Warranty Confirmation. By returning this card we will have your purc~se information on file in the event we need to contact you or you have questions regarding your purchase • Promoting Better Products Our research.& development team is interested in you and creating products that meet your needs. visit our website at: -.NHTHifi.com Please send other correspondence to: NHT Customer Service 527 Stone Road Benicia, CA 9451 0 or call1-800-648-9993 JNH01-01 P 0 BOX 17468 DENVER CO 80217-0468 11 .. 1.11 ..... 1.1 ... 111 ... 111 .... 1.. 1.11 .. 1.. 1•• 1.. 11 Please fold here. Thank you for your purchase of NHT speakers. Completing and returning this Consumer Registration card will ensure that you receive prompt service should it ever be required. In addition. this information will help us to continue to develop products that meet the needs of our customers. Thank you for your cooperation and assistance. CONSUMER INFORMATION CARD IMPORTANT! PLEASE FILL OUT AND RfTURN WITHIN THE NEXT 10 DAYS. Register Online at: www.prodregister.tom/recoton 2. O Mrs. 1. 1. O Mr. First Name 3. 0 Ms. 4. 0 Miss Last Name JNH01·01 Initial IIIIIIIIII [IIIII IIIIIIII IIIII II IIIIIII DJ/1 I I I I 0 E-mail Address 2. YoordaleofbirUI: Month 3. -status: 1. 0 Married Year 2. 0 Single 4. Date of pwdlase: DJ!DJ/1 I I I I Month Day 16. WhaltypeofllllSic: doyoulistentomosloflen? (check only one) 1. Jazz 4. 0 Classical 2. 0 Rock 5. 0 Country Western 3. 0 Easy Listening 6. 0 Other 17. Whic:h magazines do you smseribe to or read regularly? 1. 0 Sound & Vision 5. 0 Stereophile 2. 0 Audio Video Interiors 6. 0 Wide Screen Review 3. 0 Stereophile Guide to 7. 0 The Sensible Sound Horne Theatre Horne Theater 8. 0 The Absolute Sound 5. 4. 0 9. 0 Other _ _ __ 18. NPI inclydi!!$1 JO!Oelf. what is the GENDER and AGE (in years) of children and other adults living in your household? 1. 0 No one else in household 2. · 0 Child under 1 yr. Male Female Age Male Female Age 8. Did you purchase a c:omplete sound system with these speakers? 1. 0 Yes 2. 0 No 9. Whidt of the following best destribes this purchase? (check only one) 1. 0 The flf'SI set of speakers ever purchased 2. 0 Addttional speakers 3. 0 Replacement for existing NHT speakers 4. 0 Replacement for existing speakers of a different brand 10. -will yoor new NHT speakers PRIMARILY be used? 1. 0 In an audio only system 2. 0 In a home theater only system 3. 0 In a combination audio/home theater system 11 . In whidt room of yoor home will these speakers be used? 1. 0 front room 4. 0 Kitchen 2. 0 family room 5. 0 Entertainment room 3. 0 Bedroom 6. 0 Other - - - - - 12. -did you FIRST become aware of NHT speakers? 1. 0 Newspaper ad 6. 0 Salesperson 2. 0 Magazine ad 7. 0 In·store display/ 3. 0 Magazine review/ Demonstration Article 8. 0 Online service 4. 0 Product brochure (AOL, Compuserve.etc.) 5. 0 friend/Relative 13. Select 3 fac:tors that MOST influenced yoor decision to purthase these NHT speakers: 01. 0 Received as a gilt 09. 0 Salesperson 02. 0 NHT reputation recommendation 03. 0 Product features 10. 0 friend/Relative 04. 0 Qualtty of sound recommendation 05. 0 Previous experience 11 . 0 Magazine article/Review wtth NHT 12. 0 Demonstration/Display 06. 0 Price/Promotion 13. 0 Information 07. 0 Appearance through the mail 08. 0 Warranty 14. 0 Advertisement 14. Who in JOII' household made the decision to pll'dtase these NHT speakers? (check only one) 1. 0 Male adult in household 2. 3. 4. 5. 0 0 0 0 female aduk in household Both male and female adults of household Child in household Person outside of household 15. What other llr- did you SERIOUSLY consider before pll'dtasing NHT speakers? (check all that apply) 01 . 0 Did not consider 11 . 0 JBL any other brands 12. 0 JENSEN 02. 0 Advent 13. 0 Mirage 03. 0 AR 14. 0 M&K 04. 0 B&W 15. 0 Paradigm 05. 0 Bose 16. 0 Polk Audio 06. 0 Boston Acoustics 17. 0 PSB 07. 0 Gerwin Vega 18. 0 Velodyne 08. 0 Defin~ive Technology 19. 0 Yamaha 09. 0 Energy 20. 0 Other _ _ __ 10. 0 lnf01ity 1. 0 2. 0 1. 0 2. 0 OJ yrs. 1. 0 2. 0 yrs. 1. 0 2. 0 19. Otcupation: (check all that apply) You Professional/Technical ......... .. Upper Management/Executive Middle Management ........ ...... ................ Sales/Marketing Clerical/Service Worker Tradesman/Machine Operator/Laborer .. 20. Are you or your spouse: You A Homemaker? ... Retired? ........ .. ............................ A Student? Self Employed/Business Owner? .. Working from a Home Office? .. In the Military? .. A federal Employee? .. D J yrs. Spouse 0 0 0 0 0 0 1. 0 2. 3. 4. 0 0 0 5. 0 6. 0 Spoose 0 0 0 0 0 0 0 1. 2. 3. 0 0 0 4. 0 5. 6. 0 0 7. 0 21 . Whidt group desc:ribes JOII' annual family income? 01 . 0 Under $15,000 08. 0 $75,000·$99,999 02. 0 $15,000·$19,999 09. 0 $100.000·$1 24.999 03. 0 $20,000-$29,999 10. 0 $125,000·$149,999 04. 0 $30,000-$39,999 11 . 0 $150,000-$174,999 05. 0 $40,000·$49.999 12. 0 $175,000-$199,999 06. 0 $50,000-$59.999 13. 0 $200.000-$249.999 07. 0 S60.000·S74,999 14. 0 $250.000 & over 22. Level of education: (check highest level completed) 1. 0 Completed H~ School 3. 0 Completed 2. 0 Completed College Graduate Sdtool 23. Whidt aed~ cards do you use regularly? 1. 0 American Express. Diners Club 2. 0 MasterCard, Visa, Discover 3. 0 Department Store. Oil Company. etc. 4. 0 Do not use cred~ cards 24. For your primary residenc:e, do you: 1. 0 Own? 2. 0 Rent? 25. Whidt of the following do you plan to do within the next 6 or 12 months? 1-11 7-12 Months 0 0 0 0 0 0 0 0 Get Married Have a Baby ........... ...................... .. Buy a House ................................... . Remodel a Home ............................. ....... Move to a New Residence ...................... . Buy a Personal Computer .......... . Buy/Lease a New Vehicle ....... . Buy/Lease a Used Vehicle ........... Months 1. 2. 3. 4. 5. 6. 7. 8. 0 0 0 0 0 0 0 0 (PLEASE CONTINUE ON BACK) ,.. ,.. ,.. Please seal with tape. Do not staple. 26. Please check all that apply to yow household. 01. 0 Shop by Catalog/Mail 02. 0 Member of Frequent Flyer Program 03. 0 Donate to Charitable Causes 04. 0 Own a Compact Disc Player 05. 0 Have a Dog 06. 0 Have a Cat 07. 0 Own a Cellular Phone 08. 09. 10. 11. 0 0 0 0 Subscribe to an Online/Internet Service Own an IBM or Compatible Computer Own an Apple/Macintosh Computer Own a CD-ROM 27. To help us understand cu customers' lifestyles, please indicate the interests and activities in which you or your spouse enjoy participating on a regu/111 basis. 01. 0 Bicycling 16. 0 Vegetable Gardening 29. 0 Attending Cultural/ 42. 0 02. 0 Golf 17. 0 Crafts ·Arts Events 43. 0 03. 0 Physical Fitness/ 18. 0 Buy Pre-recorded 30. 0 Fashion Clothing 44. 0 Exercise Videos 31. 0 Fine Artl Antiques 45. 0 04.0 Running/Jogging 19. 0 Automotive Work 32. 0 Foreign Travel 05.0 Snow Skiing 20. 0 Electronics 33. 0 Cruise ~hip Vacations 46. 0 06. 0 Tennis 21. 0 Home Workshop/ 34. 0 Travel in USA 07. 0 Camping/Hiking Do-lt-Yourself 35. 0 Gourmet Cooking/ 47. 0 08.0 Fishing Fine Foods · 22. 0 Recreation Vehicles 09.0 Hunting/Shooting 23. 0 Listen to Records/ 36. 0 Wines 48. 0 10. 0 Horseback Riding Tapes/COs 37. 0 Coin/Stamp Collecting 49. 0 11. 0 Powerboating 24. 0 Surf the Internet 38. 0 Collectibles/Collections 50. 0 12. 0 Sailing 25. 0 Avid Book Reading 39. 0 Our Nation's Heritage 13. 0 Grandchildren 26. 0 Bible/Devotional 40. D Real Estate 51. 0 14. 0 Needlework/ Reading Investments Knitting/Sewing 27. 0 Health/Natural Foods 41. 0 Stocks/Bonds/ 52. ·o 15. 0 Flower Gardening 28. 0 Photography Mutual Funds 28. Using ... runbers in ... above list. please indicate your 3 most impoltanlactivlties: Entering Sweepstakes Casino Gambling Science Fiction Wildlife/Environmental Issues Dieting/Weight Control Science/New Technology Self-Improvement Walking for Health Watching Sports on Tv · Home Video Recording Moneymaking Opportunities OJ OJ .rn Thanks for \aking the time to fill out this questionnai'e. Yoor answers will be used for market research studies and reports. They win also allow you to receive important mailings and special offers from a number of fme C0fll>811ies whose produc:ts and services relate di'ectly to the specifc interests, hobbies, and other ilformation indicated above. Thrwgh this selective pr<9'am. you will be able to obtail more informatioo about activities in which yau are ilvolved and less about those i1 which you are not. Please check here if, for some reason, you would prefer not to participate in this opportm~. 0 Please check here if you do not want to receive mailings and offers using ycu E-mail address. 0 Copyright C 2001 All Rights Reserved