1
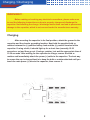
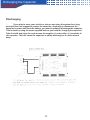
DIGITAL FLAME-AMP STYLE 6
FARAD CAPACITOR BANK
ACAP601Q
The Audiobahn Way
To bring the product to market that excites the consumer through
sound and vision from an orientation of integrity and customer service. We
make you look as good as you sound. We strive to take car audio to an
extreme the world has never seen, and a world that never stops evolving.
Audiobahn was established in 1997 with one long-term goal in mind,
"Build it Bigger, Badder, & Better, and the people will take notice!" We
back this statement with an engineering team that has brought home several
Innovations, Design & Engineering Showcase Awards, and a marketing team
from around the world that spends countless hours developing our no
compromise products to satisfy the most discriminating enthusiasts.
Our global manufacturing facilities feature ISO9002 ratings (the highest
level of quality control awarded in the electronics manufacturing industry), fully
robotic assembly lines and a state of the art, California based R & D
laboratory.
Due to overwhelming response from our competitors, and our goal to
participate in even more events this year, we created *"TEAM AUDIOBAHN."
This organization is designed to create a support network along with shirts and
perks for team members. "TEAM AUDIOBAHN" is not only for the diehard
competitor, but also for anyone that loves car audio as much as we do. With
four levels of play, one is right for you to get started in the Audiobahn family.
Our Technical Department and entire staff look to strive above and
beyond the rest of the pack by going that extra mile to help you out. Whether
you happen to be a veteran competitor, or a beginner car audio enthusiast that
does not know a voice coil from a spider. We are all here to help you get the
best system you can with what you have.
Judge for yourself, and remember what it's all about, "If it's not
Bigger, Badder & Better, it's not Audiobahn." If audio is your life,
Audiobahn is the brand for you! We make you look as good as you sound.
People never stop trying to get the best product, so we will never stop making
it.
*To learn more about "TEAM AUDIOBAHN" please give us a call, see our website at
www.audiobahninc.com, or email us at [email protected] to learn about all the details.
Table of Contents
Table of Contents
INTRODUCTION
3
CAPACITOR INTRODUCTION
4
SPECIFICATIONS
5-6
INSTALLATION AND MOUNTING
7
ADJUSTMENTS AND TROUBLESHOOTING
8
WARNING / DISCLAIMER
9
WARRANTY
10-11
2
Introduction
Dear Customer,
Congratulations on your purchase of the worlds finest brand of car audio products. Here at
Audiobahn Inc. we are devoted to making our musical reproduction the very best, and we are
pleased you have chosen our product. Through years of engineering expertise, hand
craftsmanship, and critical testing procedures, we have created a wide range of products that
reproduce music with all the clarity and richness you deserve.
For maximum performance we recommend you have your Audiobahn product installed by an
Authorized Audiobahn Dealer, as we provide specialized training through our Audiobahn
Installer Training Programs. Please read your warranty, keep your receipt, and original carton
for possible future use.
Great products and proper installation are only a small piece of the puzzle when it comes to
your system. Make sure that your installer is using only 100% authentic installation accessories
from the Audiobahn Connections. The Audiobahn Connections line has everything ranging
from the smallest terminal, to power wires up to 0 gauge, and 4 channel RCA cables.
To get a free brochure on Audiobahn products and Audiobahn Connections in the U.S. call
(714) 988-0400 or e-mail us at [email protected].
WARNING
Continuous exposure to sound pressure levels over 100 dB may cause
permanent hearing loss. High powered autosound systems may produce sound
pressure levels well over 135dB. Need we say more! Use common sense.
If after reading this manual, you still have questions regarding your product, we
recommend that you see your nearest Audiobahn Dealer. A list of Authorized
Audiobahn Dealers can be found on our web page. If you need further assistance, feel
free to call us at (800)488-8595 and ask for the Technical Department. Be sure to have
the model number, date of purchase, and invoice number available when you call.
The model number can be located on the outside of the carton. Record this in the space
provided below along with the date of purchase. It is a good idea to keep your receipt
with this, as you will need it in the case of a warranty repair or exchange.
Model Number:___________________ Date of Purchase: _____________________
3
Specifications
MODEL: ACAP601Q
�
6 FARAD DIGITAL CAPACITOR WITH BLUE DISPLAY, POSITIVE POLE MAXI FUSE �
�
BLOCK AND NEGATIVE POLE DISTRIBUTION CONNECTING BLOCK
Capacitance--------------------------------------------------------------------6,000,000 micro farad (6 Farad)
Working Voltage---------------------------------------------------------------24V DC
Surge Voltage------------------------------------------------------------------30V DC
E.S.R. (Equivalent Series Resistance)----------------------------------0.0012 ohm @ 120Hz / 25 C
Capacitance Tolerance------------------------------------------------------+/- 5%
Features
New Flame Amp Style Design
Two 1/0 Gauge Input
Eight 4 Gauge Outputs
Remote Turn-on Distribution
Auto on/off Blue L.E.D. Four Digit Readout
Electronic Polarity Protection Circuit
Overvoltage Protection Circuit
Soft on/off Circuit
Aluminum Heat Sink with Chrome Plated Cover
Wooden Gift Box
Dimensions
ACAP601Q: 12 3/4" (W) x 3 1/2" (H) x 13" (D)
4
Capacitor Introduction
�
When installed properly, your new stiffening capacitor will provide years of dependable
service. There are many benefits of adding a stiffening capacitor. The most significant benefit is the
capacitors ability to improve bass performance in your sound system. This is possible due to the
voltage stabilizing effects of the capacitor.
�
When an audio system needs to deliver an instantaneous bass peak, the vehicle's
electrical system often cannot provide enough power. This means that the system voltage drops
substantially to a point that the amplifiers are unable to produce their rated power. This is referred to
as clipping. When an amplifier clips, it will cause distortion and can cause amplifier and / or speaker
damage.
�
Stiffening capacitors are able to store large amounts of energy in preparation of these
bass peaks. When a bass peak occurs, the stiffening capacitor delivers power to supplement the
system voltage and prevent amplifier clipping. This retains amplifier output power, thus improving
bass response and increases amplifier and speaker life span.
�
Another beneficial effect of capacitors is their ability to filter the current produced by the
vehicle's alternator. This alternator current, can cause noise (alternator whine) in the audio system.
A capacitor will help reduce or eliminate this "alternator whine" and popping.
�
We recommend using 1 farad of capacitance for every 1000 watts of amplifier output. This
is a general rule of thumb and may be adjusted up or down depending on the efficiency, current
draw, and design of the amplifiers being used.
5
Installation and Mounting
You can find the mounting screw sin the attached hardware bag.. Then use the lock screws to hold
the tab in the car's wall. Make sure the whole unit does not move after you install all four tabs.
6
Features
A) Blue lite digital voltage meter with 4 digit readout that can measure 0.01 DCV.
B) Positive pole distribution block with 4 maxi fuses. Negative pole distribution block. These �
connections can offer a simple alternative to using various power and ground distribution blocks �
when connecting multiple amplifiers and accessories.
C) Reverse pole connecting PCB buzz warning function. If the capacitor is connected incorrectly by �
reversing the positive and negative wires during the installation process, the PCB will issue a 45
second noise to warn you.
D) High-end platinum plated 100% solid brass parts and chrome plated metal cover.
E) Over voltage limit and low battery voltage limit warning. When the system voltage peeks over �
16V (DC) or LESS than 10V (DC), the buzzer on the PCB will issue an audible noise warning.
F) Multiple small capacitance capacitors linked together to provide the lowest inner E.S.R. and the �
largest momentary discharge.
5
Charging / Discharging
WARNING!!!�
�
Before making or breaking any electrical connections, please make sure
to read the following instructions on how to properly charge and discharge the
capacitor. Not following the charge / discharge instructions can lead to permanent
damage to the capacitor, which is not covered under the manufacturer warranty.
Charging
�
After mounting the capacitor in its final position, attach the ground to the
capacitor and the chassis grounding location. Next hold the supplied bulb or
resistor between the (+) positive battery lead and the (+) positive terminal of the
capacitor. If using a bulb, it should light up for a short time (normally 15-30
seconds or so) and then go out. If using a resistor, just wait the appropriate time of
15-30 seconds. After waiting for the capacitor to charge, remove the bulb or
resistor and immediately attach the power (+) cable to the capacitor. The best way
to ensure the cap is charged best is to keep the bulb or resistor attached until you
touch the main power (+) wire to the capacitor, then remove it.
8
Wiring
Follow the attached wiring diagram to connect all wiring and parts. Below is an illustration showing
correct wiring for the capacitor.
BEFORE MAKING ANY POWER CONNECTIONS, DISCONNECT THE BATTERY POWER FROM
YOU SOUND SYSTEM.
9
Dicharging the Capacitor
Discharging
�
If you plan to store your vehicle or plan on not using the system for a long
period of time, we suggest to remove the capacitor. Anytime you disconnect the
capacitor's power wire from the battery, you need to properly discharge the capacitor.
This is done by using the same supplied bulb as you used for charging the capacitor.
Take the bulb and place the ends across the negative (-) and positive (+) terminals of
the capacitor. This will cause the capacitor to safely discharge so it can be stored
away.
10
Troubleshooting
�
Should you encounter a problem with your capacitor, you can follow the steps below to
make sure that it is working properly.
�
1. Follow all power (+) and ground (-) connections to and from the capacitor. Make sure
there are no kinks in the wire and no cuts either. If there is a problem in the wiring, make sure to use
new wire and place the wire in a good location where it will not be roughed up and abused.
�
2. If using a capacitor with a digital display, you can visually check the capacitor to see if it
is functioning correctly. After charging the capacitor with the provided bulb, remove the bulb and
attach the power wire. If the volt-meter changes slowly, then the capacitor is properly holding the
charge. If the display rapidly decreases and shuts off, then the cap is not properly holding a charge.
�
3. In the case that you find that step 2 shows your capacitor is not holding a charge, you
may want to take the capacitor to an authorized dealer to have them run a capacitance test on the
capacitor.
11
Technical Assistance(800)488-8595 /[email protected]
Warning / Disclaimer
WARNING
Investigate the layout of your automobile thoroughly before drilling or cutting any holes.
Take care when you work near the gas tanks, gas lines, hydraulic lines, and electrical
wiring. Attach the system securely to the automobile to prevent damage, particularly in
the event of an accident. Do not mount the system so that the wire connections are
unprotected or are subject to pinching or damage from nearby objects.
The +12V DC power wire must be fused at the battery positive terminal connection.
Before making or breaking power connections at the system power terminals,
disconnect the +12V wire at the battery end. Confirm your radio/head unit and/or other
equiptment is turned off while connecting the input jacks and speaker terminals.
If you need to replace the power fuse, replace it only with a fuse identical to that
supplied with the system. Using a fuse of different type or rating may result in damage to
this system which is not covered by the warranty.
Disclaimer
Specifications are subject to change with out notice.
For the most updated Specifications call Audiobahn,
or your local Authorized Audiobahn Dealer,
or check the Audiobahn website.
www.audiobahninc.com
12
13
14