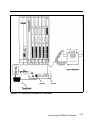
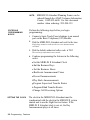
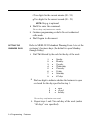
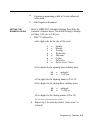
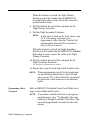
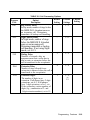
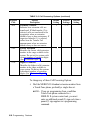
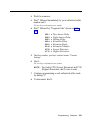
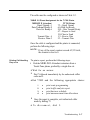
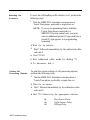
1
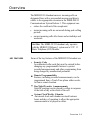
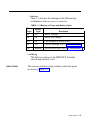
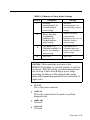
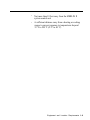
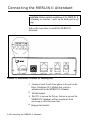
AT&T
®
MERLIN II
COMMUNICATIONS SYSTEM
MERLIN II Attendant
Installer’s Guide
©1989 AT&T
All Rights Reserved
Printed in USA
Issue 2
January, 1990
NOTICE
The information in this document is subject to change without notice. AT&T
assumes no responsibility for any errors that may appear in this document.
MERLIN is a registered trademark of AT&T.
To order copies of this document, call the AT&T Customer Information Center,
1-800-432-6600 and include the document number 518-600-017 with your order.
Contents
Section 1: Installation Requirements
Overview
1-1
Equipment and Location Requirements
1-7
Administration Procedures
1-10
Connecting the MERLIN II Attendant
1-14
Section 2: Initial Programming
Programming Features
2-1
Section 3: Testing and Troubleshooting
Testing
3-1
Troubleshooting
3-3
Index
FCC Notification Information
INTERFERENCE
INFORMATION
Federal Communications Commission (FCC) Rules
require that you be notified of the following:
This equipment generates, uses, and can radiate radio
frequency energy and, if not installed and used in
accordance with the instructions in this manual, may
cause interference to radio communications.
This equipment has been tested and found to comply
with the limits for a Class A computing device
pursuant to Subpart J of Part 15 of FCC rules, which
are designed to provide reasonable protection against
such interference when operated in a commercial
environment.
Operating this equipment in a residential area is likely
to cause interference with radio communications, in
which case the user, at his or her own expense, will be
required to do whatever is necessary to correct the
interference.
The MERLIN II Attendant is designed to be connected
to a Basic (012) Telephone Module of the MERLIN II
system control unit. It is not intended to be connected
directly to the network.
The MERLIN II Attendant is a separately registered
device.
> FCC registration number : GRM3U8-19187-CIE
●
●
●
●
●
FCC Notification Information 1
Overview
The MERLIN II Attendant answers incoming calls on
designated lines with a prerecorded message and directs
callers to the appropriate extension in the MERLIN® II
Communications System Release 3. This equipment can:
reduce the workload of the receptionist
insure incoming calls are answered during peak calling
periods
●
●
●
answer incoming calls after-hours and on holidays and
weekends
The MERLIN II Attendant only operates
with the MERLIN II Release 3 system and a 517C 13
Basic Telephone (012) Module.
CAUTION:
KEY FEATURES
Some of the key features of the MERLIN II Attendant are:
●
Security Code
An authorized caller code that must be entered before
changing any programmable features to protect
recorded announcements and other programming from
being changed by unauthorized personnel.
Remote Programmability
Features, including recorded announcements, can be
programmed from a Touch-Tone phone either on-site
or from a remote location.
Day/Night/Transfer Announcements
Specific greetings can be played to callers in response
to the time of day or the status of the call.
System Clock/Weekly Calendar
An internal clock and calendar can track business
hours and days of operation to allow the appropriate
announcement to be played to callers.
Overview 1 - 1
•
Call Supervision
The MERLIN II Attendant can supervise calls and
monitor the progress of calls.
•
Alternate Routing
When the first requested extension is unavailable,
callers can be transferred automatically to an
secondary extension.
•
Battery Backup
Routing plans and programming changes can be saved
up to eight weeks following a power outage, provided
the battery is fully charged. Recorded announcements
can be saved up to three hours under the same
conditions.
FRONT PANEL
There are three lights on the front panel as shown in
Figure 1-1. The lights indicate the following:
FIGURE 1-1 Front view of the MERLIN II Attendant.
•
1-2 Overview
power
MERLIN II Attendant is connected to a power source
when this light is on.
•
battery
Table 1-1 describes the meaning of the different light
combinations when ac power is connected:
TABLE 1-1 Meaning of Power and Battery Lights
I
Power
Light
Battery
Light
On
Off
Battery charging
On
On
Battery fully charged
Off
On
Unit operating on battery power
Off
Off
Unit not operating; refer to “Troubleshooting”
On
Blinking
Out of Service code; refer to “Troubleshooting.”
●
Description
talking
This light is on whenever the MERLIN II Attendant
answers and monitors a call.
BACK PANEL
The connectors and four setup switches on the back panel
are shown in Figure 1-2.
Overview 1 - 3
FIGURE 1-2 Back view of the MERLIN II Attendant.
•
reset
This recessed button resets the MERLIN II Attendant.
See “Troubleshooting” for details.
•
setup switches
There are four setup switches. Switches 1,2, and 3
control the MERLIN II Attendant response to a power
outage as shown in Table 1-2; switch 4 is not used.
1-4 Overview
TABLE 1-2 Meaning of Setup Switch Settings
On (Down)
Switch
Off (up)
1
Recorded
announcements are
retained during a
power outage
Recorded
announcements are
erased during a power
outage
2
Routes and other
programming
parameters are
retained during a
power outage
Routes and other
programming
parameters are reset to
defaults during a
power outage
The MERLIN II
Attendant continues to
answer calls during a
power outage
The MERLIN II
Attendant does not
answer calls during a
power outage
Not Used
Not Used
3
4
After connecting ac power to the
MERLIN II Attendant, be sure that switches 1 and 2 are
on (down). With this setting, recorded announcements
are saved up to three hours during a power outage
(assuming the battery is fully charged) and routing
plans and programming parameters are retained up to
eight weeks.
CAUTION:
10 VAC
This is the power connector.
serial i/o
This is the connection for the printer to perform
diagnostic tests.
audio out
Not used
reserved
Not used
Overview 1 - 5
•
to line
This connects the MERLIN II Attendant with the
Basic Telephone (012) Module on the MERLIN II
system control unit.
1-6 Overview
Equipment and Location Requirements
The following equipment is supplied with the MERLIN II
Attendant:
• Power cord with transformer
•
8-foot, 6-wire modular phone cord
• Mounting plate
• User’s Guide
Also required, but not supplied, is a 517C13 Basic
Telephone (012) Module housed in a MERLIN II Release
3 system control unit. Up to four MERLIN II Attendants
can be connected to the module.
When the maximum of four MERLIN II Attendants are
connected to the module, no basic telephones intended for
call handling should be connected to any of the remaining
eight ports. However, when programming MERLIN 11
Attendant features, you can connect a basic Touch-Tone
telephone to one of the remaining eight ports to perform
the programming procedures.
NOTE: If a 400 w/TTR module is present in the system,
there is no limit to the number of basic
telephones that can be connected to the Basic
Telephone module with Merlin II Attendant
units.
NUMBER OF
MERLIN II
ATTENDANTS
REWIRED
If a customer is using the MERLIN II Attendant only for
backup call handling or night service, only one
MERLIN 11 Attendant is required unless call volume is
heavy, as shown in Table 1-3. When call traffic is heavy,
the number of MERLIN II Attendants required at a site
depends on the number of calls the customer receives
during peak hours. Refer to Table 1-3 to determine how
many MERLIN II Attendants are required.
Equipment and Location Requirements 1-7
TABLE 1-3 Calls Per Hour Table
Calls
Per Hour
25
25-50
Number of
Units Needed
2
3
50-100
4
If the customer does not know the number of calls the
business gets during peak hours, you can estimate how
many MERLIN II Attendants are required by asking the
customer how many incoming lines the business has. Then
refer to Table 1-4 to determine the number of MERLIN II
Attendants required.
TABLE 1-4 Incoming Lines Table
Number
of Lines
6 or fewer
Number of
Units Needed
2
3
10-12
LOCATION
4
The location for the MERLIN II Attendant must meet the
following criteria:
•
Within 5 feet of a properly grounded ac power source
that is not controlled by a switch
NOTE: If possible, the MERLIN II Attendant should
share the same power source with the
MERLIN II system control unit. This is
recommended when the MERLIN II system
control unit is connected to an Uninterruptible
Power Supply (UPS).
1-8 Equipment and Location Requirements
•
Not more than 10 feet away from the MERLIN II
system control unit
•
A sufficient distance away from a heating or cooling
source to prevent exposure to temperatures beyond
32 °F to 104 °F (O °C to 40 °C)
Equipment and Location Requirements 1-9
Administration Procedures
Before installing the MERLIN II Attendant you must
administer a port on the Basic Telephone (012) module for
each unit you are connecting.
CAUTION: Do
not administer the port for outward call
restriction.
While you are performing administration procedures, you
should also administer the lines that will be assigned to the
MERLIN II Attendant(s). Ask the customer which lines
are being answered by the MERLIN II Attendant,
including backup call handling and Night Service.
If you are installing more than one MERLIN II Attendant
to answer the same lines or line pools, you need to assign
these ports on the Basic Telephone (012) Module to the
same Call Distribution Group to prevent call contention
between the units.
Perform all the appropriate administration procedures
from the MERLIN II System Display Console:
ADMINISTERING A
PORT ON THE BASIC
TELEPHONE (012)
1
MODULE
2
Use the following procedure to administer a port for the
MERLIN II Attendant:
Enter administration mode by sliding the T/P switch to
P .
Press Conference twice.
The administration menu appears.
3
4
Press Stations , More , More , More , AA/VMS .
Press the Auto Intercom button for each port you want
assigned to the MERLIN II Attendant.
Green light on = station is assigned to a MERLIN II Attendant
Green light off = station is assigned to a basic telephone
1-10 Administration Procedures
5
ADMINISTERING
LINES/LINE POOLS
Press Conference to return to the main administration
menu or slide the T/P switch to the center position to
leave administration mode.
Use the following procedure to administer the lines or line
pools to be answered by the MERLIN II Attendant:
1
Enter administration mode by sliding the T/P switch to
P.
2
Press Conference twice.
The administration menu appears.
3
Press
4
Press the Auto Intercom button for the MERLIN II
Attendant port.
Press Enter .
5
Stations
,
Line/Pool
.
A steady green light goes on next to the Auto Intercom button and
the two-beep confirmation tone sounds.
6
Press the line buttons for the lines that will be
answered by the MERLIN II Attendant.
Green light on = line can be answered by MERLIN II Attendant
Green light off = line cannot be answered by MERLIN II Attendant
7
8
Repeat steps 3 through 6 for each MERLIN II
Attendant.
Press Conference to return to the main administration
menu or exit administration mode by sliding the T/P
switch to the center position.
Administration Procedures
1-11
ADMINISTERING
CALL DISTRIBUTlON
GROUPS
Use this procedure when you are installing more than one
MERLIN II Attendant to answer the same lines or line
pools:
1
Enter administration mode by sliding the T/P switch to
P.
2
Press Conference twice.
The administration menu appears.
3
4
5
6
Press Stations , More , GrpCall .
Dial the number of the Call Distribution Group
(default numbers 870 through 875).
Press
Enter .
Press the Auto Intercom button for each MERLIN II
Attendant port.
Green light on = port is assigned to CDG
Green light off = port is not assigned to CDG
7
8
Press the line buttons of the lines that will be answered
by the MERLIN II Attendant in this Call Distribution
Group.
Press Conference to return to the main administration
menu or leave administration mode by sliding the T/P
switch to the center position.
1-12 Administration Procedures
ADMINISTERING
NIGHT SERVICE
If the customer wants the Night announcement to play
whenever the business is closed, assign the MERLIN II
Attendant to the appropriate Night Service group.
1 Enter administration mode by sliding the T/l? switch to
P.
2
Press Conference twice.
The administration menu appears.
3
Press
4
Press Group .
Dial the intercom number for the receptionist of the
Night Service group that you are assigning the
MERLIN II Attendant to.
Press Enter .
5
6
7
More ,
Night
.
Press the Auto Intercom button of the MERLIN II
Attendant port(s).
Green light on = port is assigned to Night Service group
Green light off = port is not assigned to Night Service group
8
Press Conference to continue administration or leave
administration mode by sliding the T/P switch to the
center position.
Administration Procedures
1-13
Connecting the MERLIN II Attendant
I
Before initial installation of the MERLIN II
Attendant, set switches 1 and 2 on the back panel to off
(up) .
CAUTION:
Follow the steps below to install the MERLIN II
Attendant:
FIGURE 1-3 Setup Switch Positions for Installing Unit.
1
2
Connect a basic Touch-Tone phone to the port on the
Basic Telephone (012) Module that you have
administered for the MERLIN II Attendant.
Lift the handset.
3
Dial #31 to turn on the Privacy feature to prevent the
MERLIN II Attendant and the receptionist from
answering a call at the same time.
4
Hangup the handset.
1-14 Connecting the MERLIN II Attendant
5
Repeat steps 1 through 4 for each MERLIN II
Attendant port.
6
Place the MERLIN II Attendant on a table or desktop
or mount it using the mounting bracket:
CAUTION: To
avoid internal damage and feature
malfunction, do not stack multiple MERLIN II
Attendants.
Using a #10 or smaller screw (wood, sheet metal,
concrete), attach the wall mounting bracket to a
vertical wall surface so that the hook end of the
bracket is down.
b Locate the keyhole opening on the underside of the
MERLIN II Attendant with the hook on the
bracket. Slide the unit over the hook and down to
secure.
Make sure setup switches 1 and 2 are off, then plug one
end of the modular phone cord into the jack on the
back of the MERLIN 11 Attendant labeled “to line.”
(See Figure 1-3.)
a
7
8
Plug the other end of the modular phone cord into an
administered MERLIN II Attendant port on the Basic
Telephone (012) Module. (See Figure 1-4.)
9
Plug one end of the power cord into the 10 VAC power
connector on the MERLIN II Attendant.
Plug the other end into a 120 VAC outlet.
10
The power light goes on. If the battery light flashes, routes have
not been programmed.
11
Reset the setup switches as described in Table 1-5.
Connecting the MERLIN II Attendant
1-15
TABLE 1-5 Switch Settings When Operating Unit
Switch
NOTE:
Setting
Result
1
On
Saves recorded
announcements during
power outage
2
On
Saves routes and
programmable
features during power
outage
3
Off
Does not use battery
backup to answer calls
during power outage
(See NOTE)
4
Off
Not used
During a power outage there is no need to use battery
backup to answer calls if the MERLIN II Attendant
shares an Uninteruptible Power Supply (UPS) with the
MERLIN II system control unit. If a UPS is not being
used with the control unit during a power failure
incoming calls cannot be answered by the system and
therefore cannot be directed to the MERLIN II
Attendant.
1-16 Connecting the MERLIN II Attendant
FIGURE 1-4 Connecting the MERLIN II Attendant.
Connecting the MERLIN II Attendant
1-17
Programming Features
The MERLIN II Attendant is programmed from a TouchTone phone using special command strings that are
discussed in this section. For each command string:
* tells the MERLIN II Attendant that the following
digits are a part of a command string. It can also be
used to start a command over when a mistake is made
#denotes the end of an entry or executes the
command string
All programming for the MERLIN II
Attendant should be done from a single-line TouchTone phone. If you are programming from a multiline
phone, such as a MERLIN 11 system voice terminal,
that is connected to the MERLIN 11 system control unit,
you must enter an additional pound (#) sign each time a
pound (#) sign appears in a programming command.
CAUTION:
COMPLETING THE
PLANNING FORMS
•
•
•
•
•
•
•
•
•
Ask the customer for the completed MERLIN II Attendant
Planning Forms. If the forms have not been completed,
have the customer fill them in before proceeding any
further. The planning forms are as follows:
planning Form A—Business Days
Planning Form B—Business Hours
Planning Form C—Amouncement Time Reallocation
Planning Form D—Announcement Recordings
Planning Form E—Routing Plan
Planning Form F—Supervised Transfers
Planning Form G—Blind Transfers
Planning Form H—Call Processing Options
Planning Form I—Individual Changes
Programming Features 2-1
NOTE:
ENTERING
PROGRAMMING
MODE
MERLIN II Attendant Planning Forms can be
ordered through the AT&T Customer Information
Center, 1-800-432-6600. Use this document
number when ordering: 999-504-139
Perform the following steps before you begin
programming:
1
2
Connect a basic Touch-Tone telephone to an unused
port on the Basic Telephone (012) Module.
Dial the MERLIN II Attendant and wait for the tone.
Single beep sounds to indicate there are no announcements
recorded.
3
Dial the default authorized caller code:
❉ 789#
The two-beep confirmation tone sounds.
4
Continue programming the features in the following
—
order:
a Set
the MERLIN II Attendant Clock
b Set the Business Days
c Set the Business Hours
d Reallocate Announcement Times
e Record
Announcements
f Play Back Announcements
g Program
Supervised Transfer Routes
h Program Blind Transfer Routes
i Change Call Processing Options
SETTING THE CLOCK
The clock in the MERLIN II Attendant must be
synchronized with the clock in the MERLIN II system
control unit to use the Night Service feature. If the
MERLIN II Attendant clock is not set, the Day
Announcement plays at all times.
2-2 Programming Features
To set the MERLIN II Attendant clock, use the following
procedure:
1 Dial *71 followed by:
a One
digit for the current day of the week
1
2
3
4
5
6
7
b Two
Sunday
Monday
Tuesday
Wednesday
Thursday
Friday
Saturday
=
=
=
=
=
=
=
digits for the current month
01
02
03
04
05
06
07
08
09
10
11
12
January
February
March
April
May
June
July
August
September
October
November
December
=
=
=
=
=
=
=
=
=
=
=
=
Two digits for the current date (01 - 31)
d Two digits for the current year (00 - 99)
e Two digits for the current hour (in military time)
c
00
23
=
=
midnight
11:00 p.m.
Programming Features 2-3
f Two
digits for the current minute (00 - 59)
g Two
digits for the current second (00 - 59)
NOTE: Step
g is optional.
Dial # to enter the command.
2
The two-beep confirmation tone sounds.
Continue programming or dial ❉ #to exit authorized
caller mode.
Dial # again to disconnect.
3
4
SETTING THE
BUSINESS DAYS
Refer to MERLIN II Attendant Planning Form A to set the
customer’s business days (the default is open Monday
through Friday).
Dial *74 followed by the code for the day of the week:
1
1
2
3
4
5
6
7
9
2
Sunday
Monday
Tuesday
Wednesday
Thursday
Friday
Saturday
All days
=
=
=
=
=
=
=
=
Dial one digit to indicate whether the business is open
or closed for the day specified in step 1.
1
2
3
=
=
=
open
closed
holiday
The two-beep confirmation tone sound.
3
2-4 Programming Features
Repeat steps 1 and 2 for each day of the week (unless
“all days” was specified).
4
Continue programming or dial ❉ # to exit authorized
caller mode.
Dial # again to disconnect.
5
SETTING THE
BUSINESS HOURS
Refer to MERLIN II Attendant Planning Form B for the
customer’s business hours. The default setting is Monday
to Friday, 8:30 a.m. to 5:00 p.m.
1
Dial *73 followed by:
a One digit code for the day of the week:
1
2
3
4
5
6
7
9
b Two
=
=
=
=
=
=
=
=
Sunday
Monday
Tuesday
Wednesday
Thursday
Friday
Saturday
Entire week (7 days)
digits for the opening hour (military time)
00
23
=
=
midnight
11:00 p.m.
c Two
digits for the opening minute (00 to 59)
d Two digits for the closing hour (military time)
00
23
e Two
=
=
midnight
11:00 p.m.
digits for the closing minute (00 to 59)
The two-beep confirmation tone sounds.
2
Repeat step 1 for each day (unless “entire week” is
selected).
Programming Features 2-5
3
Continue programming or dial *# to exit authorized
caller mode.
4 To disconnect, dial #.
REALLOCATING
ANNOUNCEMENT
TIMES
Five announcements are available. Each has a default
duration in seconds, totaling 64 seconds. Refer to
MERLIN II Attendant Planning Form D to see if the
customer has elected to lengthen or shorten any of the
time allocations. If a customer is not using an
announcement, set the allocated time to 00. The default
allocations are as follows:
TABLE 2-1 Default Announcement Time Allocations
Seconds
20
NOTE:
2-6 Programming Features
Announcement
Day announcement
20
Night announcement
14
Transfer Fail announcement
5
Hold announcement
5
Connect announcement
If the time allocated to one announcement is
increased, decrease another time accordingly so
that the total time does not exceed 64 seconds.
Announcements are recorded only up to the time
allocated. If while recording an announcement
you run over the time allowed, the recording
stops at the time allocated. Therefore, always
play back the announcements to be sure they
were completely recorded. See “Playing Back
Announcements” in this section.
Follow the procedure below to reallocate announcement
times:
CAUTION: This
procedure causes all announcements to
be erased.
1
Dial *49 followed by the announcement time lengths
for each announcement:
.
NOTE: Set the time allocation to 00 for any
announcement that is not being used.
a
Two digits for the maximum time (in seconds)
allocated for the Day announcement
b
Two digits for the maximum time (in seconds)
allocated for the Night announcement
c
Two digits for the maximum time (in seconds)
allocated for the Transfer Fail announcement
d
Two digits for the maximum time (in seconds)
allocated for the Hold announcement
Two digits for the maximum time (in seconds)
allocated for the Connect announcement
2 Dial # to enter the command.
e
The two-beep confirmation tone sounds.
Continue programming or dial *# to exit authorized
caller mode.
4 Dial # to disconnect.
3
Programming Features 2-7
RECORDING
ANNOUNCEMENTS
Refer to MERLIN II Attendant Planning Form D for the
standard announcements. The customer may elect to
record these announcements in his or her own voice or the
voice of another employee.
When recording the announcement, the speaker should
speak clearly, use a normal tone of voice, and pause after
each route number so that when the message is played the
caller has an opportunity to hear the number he or she
needs to enter. If announcements are being transferred
from a tape recorder, make sure the volume is not set too
high.
Here is an example of how a Day announcement is
recorded:
“You have reached AT&T. (Pause) If you know the
extension of the person you are calling, please dial it now.
(Pause) For Sales, dial 1. (Pause) For Parts, dial 2.
(Pause) For Customer Service, dial 3. (Pause) Or stay on
the line for operator assistance.
Follow the steps below to record announcements:
Dial *4 followed by the one digit code for the
1
announcement being recorded:
1
2
3
4
5
2
=
=
=
=
=
Day announcement
Night announcement
Transfer Fail announcement
Hold announcement
Connect announcement
Record the appropriate announcement. When you are
finished, dial #to enter the announcement.
The two-beep confirmation tone sounds.
NOTE:
2-8 Programming Features
The delay between the time you dial # to
enter the command and the time you hear the
confirmation tone represents the additional
recording time available for the message.
Continue programming or dial *#to exit authorized
caller mode.
4 Dial # to disconnect.
3
PLAYING BACK
ANNOUNCEMENTS
To confirm the recording of announcements, use the
following procedure:
1
Dial ❉ 5 followed by the appropriate announcement
code:
1
2
3
4
5
=
=
=
=
=
Day announcement
Night announcement
Transfer Fail announcement
Hold announcement
Connect announcement
You hear the renouncement as it was recorded.
DETERMINING THE
ROUTING PLAN
2
Continue programming or dial *# to exit authorized
caller mode.
3
Dial # to disconnect.
The MERLIN
II Attendant is administered to transfer calls
one of two ways:
•
Blind Transfer
The MERLIN II system control unit handles the call
after the MERLIN II Attendant transfers the caller to
the route or extension number dialed. If the number
entered is invalid, the call is transferred to the
receptionist. If there is no answer, the call continues to
ring there and at the receptionist position until either
person answers or the caller hangs up.
The blind transfer method should be used unless there
is another mute or extension a caller could logically
choose as an alternative. For example, a caller to a car
dealership who needs to make an appointment to have
Programming Features 2-9
a car serviced would not want to talk to the sales
department if the service department was unavailable.
FIGURE 2-1 Blind Transfer process.
2-10 Programming Features
•
Supervised Transfer
During a supervised transfer, calls are monitored by
the MERLIN II Attendant. If the route or extension
number is busy or doesn’t answer, the MERLIN II
Attendant retrieves the call and handles it one of two
ways:
> If a secondary extension is provided, the
MERLIN II Attendant transfers the call to the
secondary extension when the first (primary)
extension is unavailable.
NOTE: The number of rings allowed before the
call is transferred to the secondary
extension is programmable, see “Call
Processing Options” later in this section.
>
If a secondary extension is not provided, the caller
hears the Transfer Fail announcement. After the
announcement, the caller can dial another route or
extension number or hang up and try again later.
Programming Features
2-11
FIGURE 2-2 Supervised Transfer process.
2-12 Programming Features
Refer to MERLIN II Attendant Planning Form E to see
how the customer would like to handle incoming calls.
Programming Call
Handling Options
The MERLIN II Attendant can be configured to handle
calls in two ways:
•
Immediate Call Handling
The MERLIN II Attendant answers all the calls
coming in on the specified lines. The receptionist
handles callers who have rotary sets or who require
additional assistance.
•
Backup Call Handling
Incoming calls ring first at the receptionist position.
Calls are answered by the MERLIN II Attendant only
when the receptionist fails to answer in a specified
number of rings. The number of rings can be
programmed, see “Call Processing Options” later in
this section.
Programming Features
2-13
FIGURE 2-3 Immediate and Backup Call Handling.
2-14 Programming Features
Programming
Supervised Transfer
Routes
Refer to MERLIN II Attendant Planning Form F to see if
the customer has planned any supervised transfer routes.
To program these routes:
NOTE: If you make a mistake and want to reprogram a
particular route, enter *3 followed by the route
number (0 through 9) and dial # four times. This
erases all programmed extension numbers for the
route entered.
1 Dial ❉ 3 to enter a route.
2
3
Dial the route number (0 through 9). This is the
number callers enter when they want to be connected
to a particular department.
Dial the Day Primary Extension. When the business is
open, this is the first extension number the MERLIN II
Attendant dials when a caller selects this route.
4
Dial #to indicate the end of the command for the Day
Primary Extension.
5
Dial the Day Secondary Extension.
N O T E : If this space is blank on the form, skip to step
6. If a secondary extension is not
programmed, callers hear the Transfer Fail
announcement when the first extension is
busy or does not answer.
When the business is open, the Day Secondary
Extension is the number the MERLIN II Attendant
dials when it cannot connect the caller to the Day
Primary Extension.
6
7
Dial #to indicate the end of the command for the Day
Secondary Extension.
Dial the Night Primary Extension.
N O T E : If this space is blank on the form, skip to
step 8.
Programming Features
2-15
8
9
When the business is closed, the Night Primary
Extension is the first number that the MERLIN II
Attendant dials when a caller selects this route after
normal business hours.
Dial #to indicate the end of the command for the
Night Primary Extension.
Dial the Night Secondary Extension.
If this space is blank on the form, skip to step
10. If a secondary extension is not
programmed, callers hear the Transfer Fail
announcement when the first extension is
busy or does not answer.
When the business is closed, the Night Secondary
Extension is the number that the MERLIN II Attendant
dials when it cannot connect the caller to the Night
Primary Extension.
NOTE:
10
Dial #to indicate the end of the command for the
Night Secondary Extension.
The two-beep confirmation tone sounds.
11
Repeat these steps for each Supervised Transfer route.
NOTE:
Programming Blind
Transfers
When programming route 0 for the receptionist,
use an extension number that is not in the dial
plan, such as 720, so that calls to the receptionist
are directed to a line button not to an intercom
button.
Refer to MERLIN II Attendant Form G and follow these
steps to enter blind transfer routes:
N O T E : If you make a mistake and want to reprogram a
particular route, enter *3 followed by the route
number (O through 9) and dial # four times. This
erases all programmed extensions for the route
entered.
2-16 Programming Features
1
Dial ❉ 8.
2
Dial the mute number (0 through 9). This is the
number callers enter when they want to be connected
to a particular department.
N O T E : When programming route 0 for the
receptionist, use an extension number that is
not in the dial plan, such as 720, so that calls
to the receptionist are directed to a line button
not to an intercom button.
3
Dial the appropriate extension code:
11
21
4
5
6
7
8
CHANGING CALL
PROCESSING
OPTIONS
=
=
Day Primary Extension
Night Primary Extension
Dial 2 for a blind transfer.
Dial the extension number where the caller will be
connected.
Dial ###.
Continue programming or dial *# to exit authorized
caller mode.
Dial #to disconnect.
This section contains a list of ringing options and time
delays that can be adjusted depending on the customer’s
needs. It also lists several options to improve call
processing if the customer allows callers to dial individual
extension numbers.
Table 2-2 gives a description of the options, the default
setting for each one, and the possible settings that can be
used. The last column can be used to record the value
selected by the customer.
Programming Features 2-17
If the customer wants callers to have the option to enter
individual extension numbers so that they can be
connected to employees’ telephones directly, these
commands can improve the processing of those calls. Call
transfers to extensions can be expedited when the
MERLIN II Attendant knows which extensions are valid
in the MERLIN II system and what the maximum number
of digits are in an extension (two to four). For example, if
the customer has only 2-digit extension numbers ranging
from 10 to 55, once a caller enters two numbers, the
MERLIN II Attendant quickly determines if the extension
number is valid and transfers the call without waiting for
further input from the caller.
NOTE:
Occasionally, a MERLIN II system has extension
numbers with various numbers of digits. For
example, a system may include two-digit
extension numbers, such as 29, and four-digit
extension numbers, such as 2489. In systems
with mixed numbers of extension digits, the
“Extension Digits” Call Processing option must
be set to 19. The “Lowest Extension” and
“Highest Extension” option cannot be used when
“Extension Digits” is set to 19.
Refer to Planning Form H and the programming
instructions following the table to change any of the
values listed.
2-18 Programming Features
TABLE 2-2 Call Processing Options
Program
Code
Option/
Description
Default
Setting
Possible
Settings
2901
Day Answer Delay
In Day mode, number of rings before
the MERLIN II Attendant answers
an incoming call. Determines
immediate or backup call handling.
1
1–5
2902
Night Answer Delay
1
1–15
2903
Dialing Delay
Number of seconds after an
announcement that a caller has to
dial a route or extension before the
call is transferred to the receptionist.
2
2-5
2904
Extension Delay
Number of rings allowed for an
extension to answer before the call is
transferred to the receptionist.
4
2–6
2916
Extension Digits
The number of digits in an
extension. If all phones have 2-digit
extensions, set to 2. If all phones
have 3-digit extensions, set to 3, etc.
If the system has various numbers of
digits (e.g., combination of 2- and
3-digit extension numbers), set to 19.
2
2–4
or
19
Current
Setting
In Night mode, number of rings
before the MERLIN II Attendant
answers an incoming call.
Determines immediate or backup
call handling. If not using Night
mode, set to 15.
Programming Features
2-19
TABLE 2-2 Call Processing Options (continued)
Program
Code
Option/
Description
Default
Setting
Possible
Settings
2918
Extension Transfer
Indicates how extension calls are
transferred. If blind transfer (2) is
selected, calls are transferred to the
receptionist when an extension
dialed is busy or does not answer. If
supervised transfer (1) is selected,
callers hear the Transfer Fail
announcement when an extension
dialed is busy or does not answer.
1
1–2
9709
Lowest Extension
Identifies the lowest valid extension
number in the range available in the
system. Do not set for systems with
various numbers of extension digits.
(See “Extension Digits.”)
—
9710
Highest Extension
Identifies the highest valid extension
number in the range available in
your system. Do not set for systems
with mixed numbers of extension
digits. (See “Extension Digits.”)
—
Current
Setting
To change any of these Call Processing Options:
1
Dial the MERLIN II Attendant extension number from
a Touch-Tone phone, preferably a single-line set.
NOTE:
2-20 Programming Features
If you are programming from a multiline
Touch-Tone phone connected to a
MERLIN II system control unit, you must
enter an additional pound (#) sign each time a
pound (#) sign appears in a programming
command.
2
Wait for an answer.
3
Dial * followed immediately by your authorized caller
number and #.
The two-beep confirmation tone sounds.
4
Dial * followed by “Program Code” shown on Table
2-2.
2901
2902
2903
2904
2916
2918
9709
9710
=
=
=
=
=
=
=
=
Day Answer Delay
Night Answer Delay
Dialing Delay
Extension Delay
Extension Digits
Extension Transfer
Lowest Extension
Highest Extension
5
Dial the number you have entered under "Current
Setting”.
6
Dial #.
The two-beep confirmation tone sounds.
NOTE:
7
8
For Codes 9709 (Lowest Extension) and 9710
(Highest Extension), dial # twice to enter.
Continue programming or exit authorized caller mode
by dialing *#.
To disconnect, dial #.
Programming Features
2-21
Testing
Once you have installed and programmed the MERLIN II
Attendant, you should dial the MERLIN II Attendant
extension and perform the following tests:
TESTING
SUPERVISED
TRANSFER ROUTES
Use this procedure if the customer has programmed any
supervised transfer routes:
1
Dial the first supervised transfer route number.
2
Verify that the primary extension from the Route Plan
(Planning Form E) rings. Do not pickup the call.
Make sure the call is forwarded to the secondary
extension, if programmed. If not, make sure the call is
forwarded to the receptionist.
3
4
Repeat this procedure except this time take the phone
at the secondary extension off-hook.
5
Make sure the Transfer Fail announcement plays.
Repeat this procedure for each supervised transfer
6
route.
TESTING BLIND
TRANSFER ROUTES
Use this procedure if the customer has programmed any
blind transfer routes:
1 Dial the first blind transfer route number.
2
3
4
Verify that the extension from the Route Plan
(Planning Form F) rings. Do not pickup the call.
Make sure the unanswered call is routed to the
receptionist.
Repeat this procedure for each of the blind transfer
routes.
Testing 3 - 1
TESTING EXTENSION
NUMBERS
Use this procedure if the customer allows callers to enter
individual extension numbers:
1 Dial a valid extension number.
NOTE:
If the system includes various numbers of
extension digits (e.g., 2- and 3-digit
extensions), dial a valid extension number for
each extension length. If supervised transfer
is selected, there will be a delay of up to two
seconds (or the current “Dialing Delay”
setting) before you are connected to the
extension numbers of the shorter length.
2 Make
3 Dial
sure the call is directed to the proper extension.
an invalid extension number.
4 Make sure the call is directed to the receptionist.
3-2 Testing
Troubleshooting
OUT-OF-SERVICE
CODES
If the MERLIN II Attendant detects a problem, the unit
enters an out-of-service state. The LED labeled “battery”
on the front panel blinks a specific number of times,
pauses, then repeats the pattern. Refer to Table 3-1 for a
list of the Out-of-Service codes.
NOTE:
The MERLIN II Attendant will not answer calls
while it is out of service. The line will continue to
ring until the caller hangs up.
If the “battery” light blinks once slowly then repeats the
pattern, make sure aIl appropriate announcements are
recorded. See “Playing Back Announcements” in Section
2, “Initial Programming.”
If the problem persists or the “battery” light blinks more
frequently, use a straightened paper clip to press the
recessed reset button on the back panel of the MERLIN II
Attendant.
Pressing reset does not affect the programming
or recorded announcements.
If pressing reset does not correct the problem, the
MERLIN II Attendant should be replaced.
NOTE:
CAUTION:
If you must disconnect ac power to the
MERLIN II Attendant, make sure setup switches 1 and
2 on the back panel are on (down). This saves
programming and recorded announcements.
Troubleshooting 3-3
TABLE 3-I Out-of-Service Codes
Number
of Blinks
POWER FAILURES
Problem
1
Announcements were not recorded or were erased
(slow blink) or cannot compute battery level (fast
blink).
2
Unable to turn Voice Recorder off.
3
Unable to turn Voice Recorder on.
4
Unable to turn Voice Playback off.
5
Unable to turn Voice Playback on.
6
Announcement detected with no time allocation.
7
Attempt made to play an unrecorded announcement.
8
RAM constants pool corruption detected.
9
ROM check-sum error detected.
10
Invalid value read from Real-Time Clock.
During a power failure, the MERLIN II Attendant can
maintain all of its programming information (i.e., routes,
business schedule, authorization code) up to eight weeks
and all recorded announcements up to three hours if the
MERLIN II Attendant battery was fully charged and
switches 1 and 2 were in the ON position at the time of the
power failure.
It takes 18 hours of continuous power to charge the
battery.
3-4 Troubleshooting
PRINTING REPORTS
You can connect a TI 700 or equivalent 1200-baud serial
printer to the serial i/o port of the MERLIN II Attendant to
produce reports to analyze call traffic patterns or to see
how routes, announcement times, or business schedules
are programmed.
NOTE:
A special adapter is required to connect a “silent
700” printer.
Setting the Baud Rate
The default baud rate for the serial i/o port is 9600. To
connect a TI 700 or equivalent 1200-baud serial printer,
set the baud rate to 1200 using the following procedure:
1
Dial the MERLIN II Attendant extension from a
Touch-Tone phone, preferably a single-line set.
NOTE:
If you are programming from a multiline
Touch-Tone phone connected to a
MERLIN II system control unit, you must
enter an additional pound (#) sign each time a
pound (#) sign appears in a programming
command.
2
Wait for an answer.
3
Dial * followed immediately by the authorized caller
code and #
The two-beep confirmation tone sounds.
4
Dial *291712# to change the baud rate to 1200 baud.
The two-beep confirmation tone sounds.
5
6
Continue programming or exit authorized caller mode
by dialing *#.
To disconnect, dial #.
Troubleshooting 3-5
Contents of a Traffic
Analysis Report
The traffic analysis report provides the following
information:
•
Route
The report is detailed by route number (O through 9)
•
Messages
This field is not relevant to the MERLIN II Attendant.
•
Attempted
This field contains the number of times outside callers
have selected a particular route since the last time the
counter was reset to 0. See “Resetting the Counters’”
for details.
•
Completed
This field records the number of times a call was
completed to a particular route.
•
Abandoned before answer
This field indicates the number of calls abandoned
before the MERLIN II Attendant answered. It also
includes calls answered by other MERLIN II
Attendants assigned to the same Call Distribution
Group.
•
Abandoned after answer
The number of calls abandoned after the MERLIN II
Attendant answers a call but before the call is
processed.
•
Authorized callers
The number of times authorized caller mode was
accessed for programming.
Connecting the
Printer
3-6 Troubleshooting
To connect the printer, you need the following equipment:
•
14-foot, 8-conductor modular cable (straight)
•
Modular/RS-232 DB-25 adaptor, male connector
•
Modular/RS-232 DB-25 adaptor, female connector
The cable must be configured as shown in Table 3-2.
TABLE 3-2 Pinout Assignment for the TI 700 Printer
MERLIN II Attendant
Signal Ground—3
Data Terminal Ready-8
Data Set Ready-6
Transmit Data—4
Receive Data-2
TI 700 Printer
7/5—Signal Ground
6/6-Data Set Ready
20/4—Data Terminal Ready
4/7—Request to Send
5/8-Clear to Send
3/2—Receive Data
2/3—Transmit Data
Once the cable is configured and the printer is connected,
perform the following steps:
NOTE:
Printing Call Handling
Reports
If any of the report counters exceed 65,535 total,
the counter is reset to 0.
To print a report, perform the following steps:
1
Dial the MERLIN II Attendant extension from a
Touch-Tone phone, preferably a single-line set.
2
3
Wait for an answer.
Dial * followed immediately by the authorized caller
code and #.
4
Dial *2909 and the following appropriate choice:
I
2
3
4
5
6
=
=
=
=
print route programming
print traffic analysis report
print business schedule
print announcement time allocations
Once the report is complete, exit authorized caller
mode by dialing *#.
To disconnect, dial #.
Troubleshooting 3-7
Resetting the
Counters
To reset the call handling traffic statistics to O, perform the
following steps:
1
Dial the MERLIN II Attendant extension from a
Touch-Tone phone, preferably a single-line set.
NOTE:
2
Printing Call
Processing Reports
If you are programming from a multiline
Touch-Tone phone connected to a
MERLIN II system control unit, you must
enter an additional pound (#) sign each time a
pound (#) sign appears in a programming
command.
Wait for an answer.
3
Dial * followed immediately by the authorized caller
code and #.
4
Dial *29101.
5
Exit authorized caller mode by dialing *#.
6
To disconnect, dial #.
To print the current settings of call processing options,
perform the following steps:
1
Dial the MERLIN II Attendant extension from a
Touch-Tone phone, preferably a single-line set.
2
3
4
Wait for an answer.
Dial * followed immediately by the authorized caller
code and #.
Dial *29 followed by the appropriate selection:
01
02
03
3-8 Troubleshooting
=
=
=
Day Answer Delay
Night Answer Delay
Dialing Delay
5
6
Dial #.
Once the report is completed, exit authorized caller
mode by dialing *#.
7 To
LOST AUTHORIZED
CALLER CODE
disconnect, dial #.
If the default authorized caller code (789) is changed and
the new code is lost or forgotten, the default code can be
restored. However this procedure also restores all the
MERLIN II default settings so that any changed
programmed setting must be reentered and all
announcements must be rerecorded.
To restore the default authorized caller code:
1
On the back of the MERLIN II Attendant, set switches
1 and 2 to off (up).
2
Unplug the MERLIN II Attendant from its power
source.
3
With switches 1 and 2 still off (up), plug the
MERLIN II Attendant back into its power source.
4
Reset switches 1 and 2 to on (down).
5
Use the appropriate MERLIN IX Attendant Planning
Forms to reprogram your settings and rerecord your
announcements.
Troubleshooting 3-9
Index
A
Administration mode
entering, 1-10
leaving, 1-11
Alternate routing, 1-2
Announcements, 1-1
duration, 2-6 —2-7
maintained during power outage, 3-4
playing back, 2-9
reallocating time, 2-6
recording, 2-8 –2-9
Audio out 1-5
Authorized Caller Code, lost, 3-9
B
Back panel, 1-3
Backup call handling, 2-13
Basic Telephone Module, 1-1
administering port 1-10
connecting to, 1-7
connector, 1-6
Battery, 1-2, 1-16
charging, 3-4
light, 1-3, 1-15, 3-3
in out-of-service state, 3-3
recommended switch settings (table), 1-15
Baud rate, setting, 3-5
Blind transfer, 2-9
programming routes+ 2-16 –2-17
testing, 3-1
Business days, setting, 2-4 —2-5
Business hours, setting, 2-5 —2-6
Button, reset, 1-4,3-3
C
Calendar, weekly, 1-1
Call Distribution Group, 1-10
administering, 1-12
Call handling, 2-13
Call processing options, changing, 2-17 —2-21
Call supervision, 1-2
Call transfer methods, 2-9 —2-12
blind transfer, 2-9
supervised transfer, 2-11
Call volume, 1-7
Caller code (security code), 1-1,2-2
Changing call processing options, 2-17 –2-21
clocks, 1-1
setting, 2-2 —2-4
synchronizing, 2-2
Command strings, 2-1
Connectors, 1-3 —–1-6
Cords
power, 1-7, 1-15
6-wire modular phone, 1-7
counter, reset, 3-8
counters, report, 3-7
D
Day Announcement, 2-2
Day answer delay, 2-19
Day/night/transfer announcements, 1-1
Dialing delay, 2-19
Disconnecting ac power, 1-5
E
Extension numbers, testing, 3-2
F
FCC rules, 1
Front panel, 1-2
I
Immediate call handling, 2-13
Incoming calls, handling, 2-12 —2-13
L
Lights, 1-2 –l -3
battery, 1-3, 1-15
power, 1-2, 1-15
talking, 1-3
Lines, administering, 1-10
Lines/Line Pools, administering + 1-11 —1-12
M
MERLIN II System Display Console, 1-10
Mounting plate, 1-7
N
Night answer delay, 2-19
Index I - 1
O
R
Out-of-service codes, 3-3
table, 3-4
Outward Restriction, administering, 1-11
Recording announcements, 2-8 —2-9
Remote programmability, 1-1
Reports
announcement time allocations, 3-7
business schedule, 3-7
call processing, 3-8
routes, 3-7
traffic analysis, 3-7
Reserved, 1-5
Reset button, 1-4,3-3
Ringing options, changing, 2-17 —2-21
Routing, 1-2
Routing plan, 2-9—2-17
P
Panel, bacl, 1-3
Panel, front 1-2
Planning forms, 2-1
Planning Form A, 2-4
Planning Form B, 2-5
Planning Form D, 2-6, 2-8
Planning Form E, 2-12
Planning Form F, 2-15
Playing back announcements, 2-9
Port administering Basic Telephone
Module, 1-10
Power
connector, 1-15
cord, 1-7, 1-15
disconnecting ac, 1-5
light 1-2, 1-15
power outage, 1-2, 1-16
maintaining programming information 3-4
maintaining recorded announcements, 3-4
setup switches control of, 1-4 —1-5
Power source, MERLIN II Attendant, 1-8
Primary daytime extension, 2-15
Primary night extension, 2-15
Printer
announcement time allocations report, 3-7
business schedule report 3-7
call processing report 3-8
connecting, 3-6
pinout assignment 3-7
routes report, 3-7
T1 700, 1-5
traffic analysis report 3-7
Privacy feature, 1-14
Programming
blind transfer routes, 2-16 —2-17
maintained during power outage, 3-4
from remote location, 1-1
supervised transfer routes, 2-15 —2-16
Programming mode, entering, 2-2
Programming mode, leaving, 2-4
I-2 Index
S
Secondary daytime extension, 2-15
Secondary night extension 2- 1 6
Security code, 1-1
Serial i/o, 1-5,3-5
Setting business days, 2-4 —2-5
Setting business hours, 2-5 —2-6
Setting the clock, 2-2 —2-4
Setup switches, 1-4,3-3
Supervised transfer + 2-11
programming routes, 2-15 —2-16
testing, 3-1
System clock/weekly calendar, 1-1
T
Talking light 1-3
Tests, performing, 3-1
TI 700 printer, 1-5,3-5
To line, 1-6
Touch-Tone phone, 1-7,2-1
Traffic analysis report, 3-6 —3-7
Transfer Fail announcement, 2-11
testing, 3-1
Transferring calls, methods, 2-9 —2-12